


先看几种不同权限下的用户所显示的tabbar
admin: 看全部的tabbar

其他用户:看部分的tabbar


1, pages.json页面
和pages并列, 在tabbar对象中.将其他的全部删掉或者注释点掉,只留pagePath这项.
	"tabBar": {
		// "custom": true,
		// "color": "#666", // 表示tabBar item项中文字默认的颜色
		// "selectedColor": "#3c9cff",
		"list": [{
				"pagePath": "pages/radiation/radiation"
				// "text": "辐射",
				// "iconPath": "./static/icon/radiation.png",
				// "selectedIconPath": "./static/icon/radiation_active.png"
			},
			{
				"pagePath": "pages/drink/drink"
				// "text": "饮用水",
				// "iconPath": "static/icon/drink.png",
				// "selectedIconPath": "static/icon/drink_active.png"
			},
			{
				"pagePath": "pages/swim/swim"
				// "text": "泳池水",
				// "iconPath": "static/icon/swim.png",
				// "selectedIconPath": "static/icon/swim_active.png"
			},
			{
				"pagePath": "pages/my/my"
				// "text": "我的",
				// "iconPath": "static/icon/my.png",
				// "selectedIconPath": "static/icon/my_active.png"
			}
		]
	}
2, 新建tabbar组件
在components中新建tabbar组件
tabbar.vue, 直接ctrl+c ctrl+v可用
<template>
<view class="tab-bar">
   		<view class="tab-bar-border"></view>
   		<view v-for="(item,index) in tabBarList" :key="index" class="tab-bar-item" :data-id="index"
   			@click="jump(item)">
   			<image :src="current == item.index ? item.selectedIconPath : item.iconPath"></image>
   			<view :style="{'color':current == item.index ? '#409eff' : '#909399'}" style="margin-top: 10rpx;">
   				{{item.text}}</view>
   		</view>
   	</view>

</template>

<script>
	export default {
		props: {
			tabBarList: {
				type: Array,
				default: uni.getStorageSync('tabBarList')
			},
			current: Number
		},
		data() {
			return {
				value1: 0, // 默认页面
				inactiveColor: '#909399' // 高亮颜色
			}
		},
		methods: {
			// 点击跳转对应tabbar页面
			jump(e) {
				uni.switchTab({
					url: e.pagePath
				})
			}
		}
	}

</script>

<style lang="less" scoped>
		.tab-bar {
			position: fixed;
			bottom: 0;
			left: 0;
			right: 0;
			height: 48px;
			border-top: 1px solid #ccc;
			background: white;
			display: flex;
		}
		.tab-bar-border {
			// background-color: rgba(0, 0, 0, 0.33);
			background-color: white;
			position: absolute;
			left: 0;
			top: 0;
			width: 100%;
			height: 1px;
			border-top: 2rpx solid rgba(187, 187, 187, 0.3);
			transform: scaleY(0.5);
		}

		.tab-bar-item {
			flex: 1;
			text-align: center;
			display: flex;
			justify-content: center;
			align-items: center;
			flex-direction: column;
		}

		.tab-bar-item image {
			width: 24px;
			height: 24px;
		}

		.tab-bar-item view {
			font-size: 10px;
		}

</style>
到这里自己定义的tabbar组件就建好了,接下来就是添加权限了
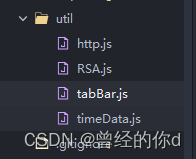
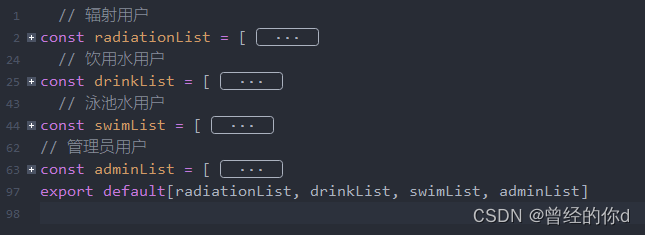
3, 新建tabBar.js页面
随便在哪里创建都可以,只要可以引入,我这里就在根目录新建一个文件夹专门存放各种js的了
页面结构
	// 泳池水用户
const swimList = [
	{
		iconPath: "/static/icon/swim.png", // 未点击的图标
		selectedIconPath: "/static/icon/swim_active.png", // 已点击的图标
		text: '泳池水', // 标题
		pagePath: "/pages/swim/swim", // 页面路径
		name: "swim", // 名字
		index: '2' // 下标
	},
	{
		iconPath: "/static/icon/my.png",
		selectedIconPath: "/static/icon/my_active.png",
		text: '我的',
		pagePath: "/pages/my/my",
		name: "my",
		index: '3'
	},
]
// 管理员用户
const adminList = [
	{
		iconPath: "/static/icon/radiation.png",
		selectedIconPath: "/static/icon/radiation_active.png",
		text: '辐射',
		pagePath: "/pages/radiation/radiation",
		name: "radiation",
		index: '0'
	},
	{
		iconPath: "/static/icon/drink.png",
		selectedIconPath: "/static/icon/drink_active.png",
		text: '饮用水',
		pagePath: "/pages/drink/drink",
		name: "drink",
		index: '1'
	},
	{
		iconPath: "/static/icon/swim.png",
		selectedIconPath: "/static/icon/swim_active.png",
		text: '饮用水',
		pagePath: "/pages/swim/swim",
		name: "swim",
		index: '2'
	},
	{
		iconPath: "/static/icon/my.png",
		selectedIconPath: "/static/icon/my_active.png",
		text: '我的',
		pagePath: "/pages/my/my",
		name: "my",
		index: '3'
	},
]
有几个权限就写几个页面路径放里面就可以了
4, store中的index.js页面
import Vue from 'vue'
import Vuex from 'vuex'
Vue.use(Vuex)
import tabBar from '@/util/tabBar.js' // 引入刚刚创建的tabBar.js
const store = new Vuex.Store({
	state: {
		tabBarList: [],
	},
	mutations:{
		// 底部tabbar
		setRoleId(state,data){
			state.tabBarList = tabBar[data]
			uni.setStorageSync('tabBarList', tabBar[data]) // 根据登录时传过来的值,存储对应的tabbarlist
		},
	}
})
export default store
5, 在需要tabbar的页面引入组件
<tabbar :current="0" :tabBarList="tabBerLists" />
import tabBar from '@/components/tabbar/tabbar.vue'
export default {
	components: {
		tabBar
	},
	data() {
		return {
			tabBerLists: []
		}
	},
	onLoad() {
		// 影藏原生的tabbar,有自定义tabbar的页面都要写一遍
		uni.hideTabBar()
	},
	onShow() {
		this.tabBerLists = uni.getStorageSync('tabBarList') // 自定义的tabbar赋值
	},
}
current表示当前组件从左往右的位置,
这是第一个页面,其他页面引入的方式都一样,只不过改一下那个current的值就好了
6, 登录页面判断是哪种用户
login(){
	// 登录
	this.$http('sysuser/login', params, 'POST').then(res => {
		if(res.id == 0){ // admin用户
			this.$store.commit('setRoleId', 3)
		}else if(res.id == 1){ // 另一种用户
			this.$store.commit('setRoleId', 2)
		}
	})
}
这里传的值是根据 第三点 你export的数组的下标相对应的,比如我这里的admin用户传了一个3,在第三点那个暴露的数组中的下标为3的值是adminlist的数组,以此类推,
到这里基本上就完成了自定义的tabbar了
7, 部分问题
1, 自定义tabbar点击没反应
这个就是第一点那块,pages.json页面中的tabBar里面的都注释掉只留一个pagePath
2, 原生的tabbar没有影藏
在引入自定义页面中都加一个这个就可以影藏原生的了
onLoad() {
// 影藏原生的tabbar,有自定义tabbar的页面都要写一遍
	uni.hideTabBar()
},
ok,没了,有问题还请留言或者添加博主微信进行咨询,下期再见!!!


 4620
4620


 被折叠的 条评论
为什么被折叠?
被折叠的 条评论
为什么被折叠?
 到【灌水乐园】发言


