


之前写了个输入是1x2向量的模型的调用文章,后来有了个需要用到图像识别的项目,因此写下此文记录一下在java中如何借助DJL调用自己写的pytorch模型进行图像识别。
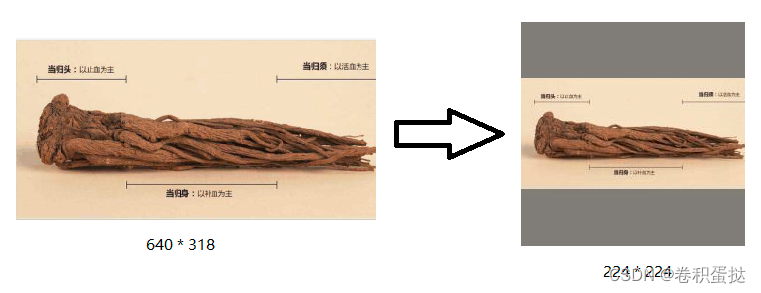
我具体模型用的什么模型就不介绍了,输入图片是3*224*224,放入图片前需要看一下横纵比是否合理,不合理的话会进行下面这样的操作:
1. 依赖
<dependency>
    <groupId>ai.djl.pytorch</groupId>
    <artifactId>pytorch-engine</artifactId>
    <version>0.16.0</version>
</dependency>
<dependency>
    <groupId>ai.djl.pytorch</groupId>
    <artifactId>pytorch-native-auto</artifactId>
    <version>1.9.1</version>
    <scope>runtime</scope>
</dependency>
<dependency>
    <groupId>ai.djl.pytorch</groupId>
    <artifactId>pytorch-jni</artifactId>
    <version>1.9.1-0.16.0</version>
    <scope>runtime</scope>
</dependency>
2. 准备模型
- 首先将模型按下面方法保存,放到项目resources中
import torch

# An instance of your model.
model = MyModel(num_classes = 80)

# Switch the model to eval model
model.eval()

# An example input you would normally provide to your model's forward() method.
example = torch.rand(1, 3, 224, 224)

# Use torch.jit.trace to generate a torch.jit.ScriptModule via tracing.
traced_script_module = torch.jit.trace(model, example)

# Save the TorchScript model
traced_script_module.save("model.pt")- 编写工具类,用于完成识别功能
public class HerbUtil {

    //规定输入尺寸
    private static final int INPUT_SIZE = 224;

    //标签文件 一种类别名字占一行
    private List<String> herbNames;

    //用于识别
    Predictor<Image, Classifications> predictor;

    //模型
    private Model model;

    public HerbUtil() {
        //加载标签到herbNames中
        this.loadHerbNames();
        //初始化模型工作
        this.init();
    }
}- 将标签文件放到resources中,载入标签
   private void loadHerbNames() {
        BufferedReader reader = null;
        herbNames = new ArrayList<>();
        try {
            InputStream in = HerbUtil.class.getClassLoader().getResourceAsStream("names.txt");
            reader = new BufferedReader(new InputStreamReader(in));
            String name = null;
            while ((name = reader.readLine()) != null) {
                herbNames.add(name);
            }
            System.out.println(herbNames);
        } catch (Exception e) {
            e.printStackTrace();
        } finally {
            if (reader != null) {
                try {
                    reader.close();
                } catch (IOException e) {
                    e.printStackTrace();
                }
            }
        }
}- 初始化模型
   private void init() {
        Translator<Image, Classifications> translator = ImageClassificationTranslator.builder()
                //下面的transform根据自己的改
                .addTransform(new RandomResizedCrop(INPUT_SIZE, INPUT_SIZE, 0.6, 1,
                        3. / 4, 4. / 3))
                .addTransform(new ToTensor())
                .addTransform(new Normalize(
                        new float[] {0.5f, 0.5f, 0.5f},
                        new float[] {0.5f, 0.5f, 0.5f}))
                //如果你的模型最后一层没有经过softmax就启用它
                .optApplySoftmax(true)
                //载入所有标签进去
                .optSynset(herbNames)
                //最终显示概率最高的5个
                .optTopK(5)
                .build();
        //随便起名
        Model model = Model.newInstance("model", Device.cpu());
        try {
            InputStream inputStream = HerbUtil.class.getClassLoader().getResourceAsStream("model.pt");
            if (inputStream == null) {
                throw new RuntimeException("找不到模型文件");
            }
            model.load(inputStream);

            predictor = model.newPredictor(translator);
        } catch (Exception e) {
            e.printStackTrace();
        }
}- 我开头提到的图片预处理 的代码
   private Image resizeImage(InputStream inputStream) {
        BufferedImage input = null;
        try {
            input = ImageIO.read(inputStream);
        } catch (IOException e) {
            e.printStackTrace();
        }
        int iw = input.getWidth(), ih = input.getHeight();
        int w = 224, h = 224;
        double scale = Math.min(1. *  w / iw, 1. * h / ih);
        int nw = (int) (iw * scale), nh = (int) (ih * scale);
        java.awt.Image img;
        //只有太长或太宽才会保留横纵比,填充颜色
        boolean needResize = 1. * iw / ih > 1.4 || 1. * ih / iw > 1.4;
        if (needResize) {
            img = input.getScaledInstance(nw, nh, BufferedImage.SCALE_SMOOTH);
        } else {
            img = input.getScaledInstance(INPUT_SIZE, INPUT_SIZE, BufferedImage.SCALE_SMOOTH);
        }
        BufferedImage out = new BufferedImage(INPUT_SIZE, INPUT_SIZE, BufferedImage.TYPE_INT_RGB);
        Graphics g = out.getGraphics();
        //先将整个224*224区域填充128 128 128颜色
        g.setColor(new Color(128, 128, 128));
        g.fillRect(0, 0, INPUT_SIZE, INPUT_SIZE);
        out.getGraphics().drawImage(img, 0, needResize ? (INPUT_SIZE - nh) / 2 : 0, null);
        ByteArrayOutputStream outputStream = new ByteArrayOutputStream();
        try {
            ImageOutputStream imageOutputStream = ImageIO.createImageOutputStream(outputStream);
            ImageIO.write(out, "jpg", imageOutputStream);
            //去D盘看效果
            //ImageIO.write(out, "jpg", new File("D:\\out.jpg"));
            InputStream is = new ByteArrayInputStream(outputStream.toByteArray());
            return ImageFactory.getInstance().fromInputStream(is);
        } catch (IOException e) {
            e.printStackTrace();
            throw new RuntimeException("图片转换失败");
        }
}- 识别功能
    public List<Classifications.Classification> predict(InputStream inputStream) {
        List<Classifications.Classification> result = new ArrayList<>();
        Image input = this.resizeImage(inputStream);
        try {
            Classifications output = predictor.predict(input);
            System.out.println("推测为:" + output.best().getClassName()
                    + ", 概率:" + output.best().getProbability());
            System.out.println(output);
            result = output.topK();
        } catch (Exception e) {
            e.printStackTrace();
        }
        return result;
    }
3. 测试
    @Test
    public void test7() {
        HerbUtil herbUtil = new HerbUtil();
        String path = "E:\\深度学习专用\\data\\train\\当归\\24.jpeg";
        try {
            File file = new File(path);
            InputStream inputStream = new FileInputStream(file);
            herbUtil.predict(inputStream);
        } catch (Exception e) {
            e.printStackTrace();
        }
    }
输出:

加入到项目中后,工具类直接Autowire注入或者方法都写static的,Controller接收前端MultipartFile,将其inputstream用于推测
如果你想加载网络图片,那就去网上搜索怎么把它转成inputstream吧
测试多线程一起predict时报错了
更新
当我打包成jar到centos7的linux中运行时,报错UnsatisfiedLinkError,经过大神的指导,问题出来我引的依赖。
修改后的依赖:
    <properties>
        <java.version>8</java.version>
        <jna.version>5.3.0</jna.version>
    </properties>


    <dependencies>
        <dependency>
            <groupId>ai.djl.pytorch</groupId>
            <artifactId>pytorch-engine</artifactId>
            <version>0.16.0</version>
        </dependency>
        <dependency>
            <groupId>ai.djl.pytorch</groupId>
            <artifactId>pytorch-native-cpu-precxx11</artifactId>
            <classifier>linux-x86_64</classifier>
            <version>1.9.1</version>
            <scope>runtime</scope>
        </dependency>
        <dependency>
            <groupId>ai.djl.pytorch</groupId>
            <artifactId>pytorch-jni</artifactId>
            <version>1.9.1-0.16.0</version>
            <scope>runtime</scope>
        </dependency>
        <dependency>
            <groupId>org.springframework.boot</groupId>
            <artifactId>spring-boot-starter-web</artifactId>
        </dependency>
    </dependencies>


 335
335


 被折叠的 条评论
为什么被折叠?
被折叠的 条评论
为什么被折叠?
 到【灌水乐园】发言


