Java-web实现用户登录、注册功能

源码在资源里

环境搭建

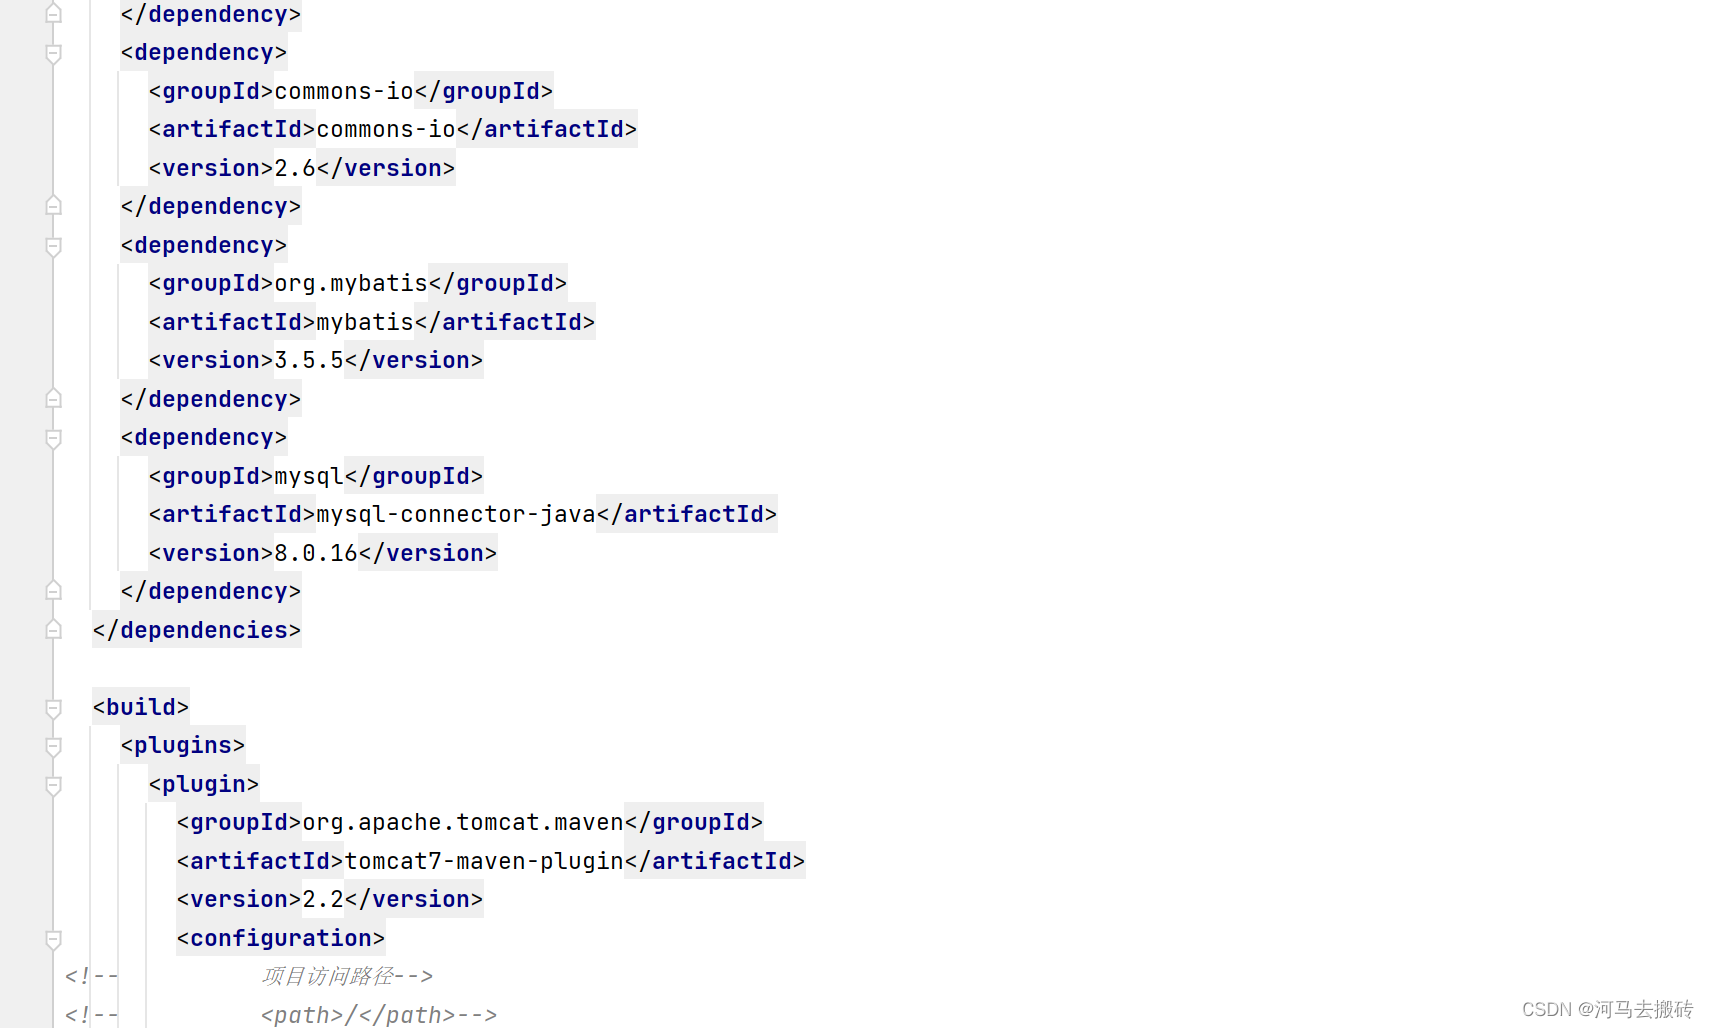
在编写代码之前,在pom.xml导入servlet、mybatis的依赖,导入tomcat插件。
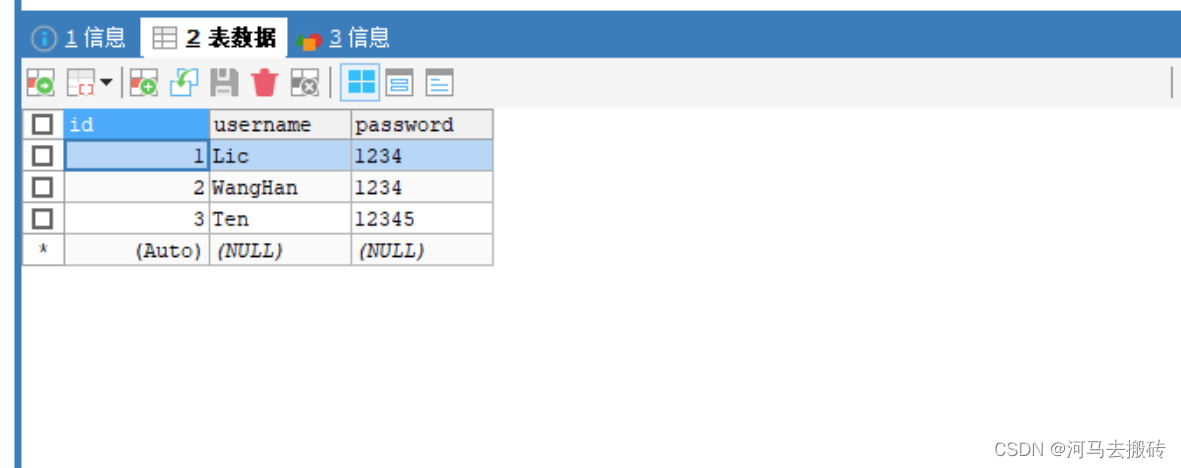
在这里插入图片描述

数据库

在这里插入图片描述

用户登录

需求分析

  1. 在前端页面输入用户名和密码,点击登录,将数据提交给servlet。
  2. 在servlet中编写程序,实现接收前端提交的用户名和密码。
  3. 在servlet中通过Mybatis框架调用Mapper查询,返回结果封装成一个User对象并返回
  4. 判断User对象是否为null,是null登录失败、不是null登录成功。

代码实现

编写UserMapper类

编写UserMapper提供根据用户名、密码查询用户数据方法方法

public interface UserMapper {

    /**
     *根据用户名 密码 查询用户
     * @param username
     * @param password
     * @return
     */
    @Select("select* from tb_user where username =#{username} and password = #{password}")
    User select(@Param("username") String username, @Param("password") String password);


}

编写User类

编写User类

public class User {
    private Integer id;
    private String username;
    private String password;

    public void setId(Integer id) {
        this.id = id;
    }
    public String getUsername() {
        return username;
    }

    public void setUsername(String username) {
        this.username = username;
    }

    public String getPassword() {
        return password;
    }

    public void setPassword(String password) {
        this.password = password;
    }
    @Override
    public String toString() {
        return "User{" +
                "id=" + id +
                ", username='" + username + '\'' +
                ", password='" + password + '\'' +
                '}';
    }

}

编写loginServlet类

编写loginServlet类

@WebServlet("/loginServlet")
public class loginServlet extends HttpServlet {

    @Override
    protected void doGet(HttpServletRequest req, HttpServletResponse resp) throws ServletException, IOException {
        //第一步:接收用户名、密码

        String username;
        username= req.getParameter("username");
        String password;
        password= req.getParameter("password");
        byte[] bytes = username.getBytes(StandardCharsets.ISO_8859_1);
        username = new String(bytes, StandardCharsets.UTF_8);
        byte[] bytes1 = password.getBytes(StandardCharsets.ISO_8859_1);
        password = new String(bytes1, StandardCharsets.UTF_8);
        //第二步:调用Mybatis查询用户
        //工具类SqlSessionFactoryUtil调用方法返回sqlSessionFactory
        SqlSessionFactory sqlSessionFactory = SqlSessionFactoryUtil.getSqlSessionFactory();
        //  获取sqlSession对象,执行sql
        SqlSession sqlSession = sqlSessionFactory.openSession();
        //获取UserMapper接口的代理对象
        UserMapper mapper = sqlSession.getMapper(UserMapper.class);
        //获取方法
        User user = mapper.select(username, password);
        sqlSession.close();
        //获取字符的输出流 设置content-type
        resp.setContentType("text/html;charset=utf-8");
        PrintWriter writer = resp.getWriter();
        //第三步:判断
        if(user!=null){
            //登陆成功
            writer.write("登录成功");
        }else {
            //登录失败
            writer.write("登录失败");
        }
    }
    @Override
    protected void doPost(HttpServletRequest req, HttpServletResponse resp) throws ServletException, IOException {

        this.doGet(req, resp);
    }
}

编写login.html

编写login.html

<!DOCTYPE html>
<html lang="en">

<head>
    <meta charset="UTF-8">
    <title>login</title>
    <link href="css/login.css" rel="stylesheet">
</head>

<body>
<div id="loginDiv">
    <form action="/Web-Demo/loginServlet" method="post" id="form">
        <h1 id="loginMsg">LOGIN IN</h1>
        <p>UserName:<input id="username" name="username" type="text"></p>

        <p>PassWord:<input id="password" name="password" type="password"></p>

        <div id="subDiv">
            <input type="submit" class="button" value="login up">
            <input type="reset" class="button" value="reset">&nbsp;&nbsp;&nbsp;
            <a href="register.html">没有账号?点击注册</a>
        </div>
    </form>
</div>
</body>
</html>

编写login.css

编写login.css

* {
    margin: 0;
    padding: 0;
}

html {
    height: 100%;
    width: 100%;
    overflow: hidden;
    margin: 0;
    padding: 0;
    background: url(../imgs/BackGround.JPG) no-repeat 0px 0px;
    background-repeat: no-repeat;
    background-size: 100% 100%;
    -moz-background-size: 100% 100%;
}

body {
    display: flex;
    align-items: center;
    justify-content: center;
    height: 100%;
}

#loginDiv {
    width: 37%;
    display: flex;
    justify-content: center;
    align-items: center;
    height: 300px;
    background-color: rgba(75, 81, 95, 0.3);
    box-shadow: 7px 7px 17px rgba(52, 56, 66, 0.5);
    border-radius: 5px;
}

#name_trip {
    margin-left: 50px;
    color: red;
}

p {
    margin-top: 30px;
    margin-left: 20px;
    color: azure;
}

input {
    margin-left: 15px;
    border-radius: 5px;
    border-style: hidden;
    height: 30px;
    width: 140px;
    background-color: rgba(216, 191, 216, 0.5);
    outline: none;
    color: #f0edf3;
    padding-left: 10px;
}
#username{
    width: 200px;
}
#password{
    width: 202px;
}
.button {
    border-color: cornsilk;
    background-color: rgba(100, 149, 237, .7);
    color: aliceblue;
    border-style: hidden;
    border-radius: 5px;
    width: 100px;
    height: 31px;
    font-size: 16px;
}

#subDiv {
    text-align: center;
    margin-top: 30px;
}
#loginMsg{
    text-align: center;color: aliceblue;
}

用户注册

需求分析

  1. 在前端页面输入用户名和密码,点击注册,将数据提交给servlet。
  2. 在servlet中编写程序,实现接收前端提交的用户名和密码。
  3. 在servlet中通过Mybatis框架调用Mapper查询,返回结果封装成一个User对象并返回
  4. 判断User对象是否为null,是null调用mapper添加用户、不是null代表用户已存在。

代码编写

编写UserMapper类

编写UserMapper提供根据用户名查询用户数据方法和添加用户方法

public interface UserMapper {
    /**
     * 根据用户名查询用户对象
     * @param username
     * @return
     */
    @Select("select* from tb_user where username =#{username}")
    User selectByUsername(String username);

    /**
     * 添加用户
     */
    @Select("insert into tb_user values(null,#{username},#{password})")
    void add(User user);
}

编写registerServlet类

@WebServlet("/registerServlet")
public class registerServlet extends HttpServlet {
    @Override
    protected void doGet(HttpServletRequest req, HttpServletResponse resp) throws ServletException, IOException {
        //第一步:接收用户名、密码

        String username;
        String password;
        username= req.getParameter("username");
        password= req.getParameter("password");


        byte[] bytes = username.getBytes(StandardCharsets.ISO_8859_1);
        username = new String(bytes, StandardCharsets.UTF_8);
        byte[] bytes1 = password.getBytes(StandardCharsets.ISO_8859_1);
        password = new String(bytes1, StandardCharsets.UTF_8);
        //封装用户对象
        User user1 = new User();
        user1.setUsername(username);
        user1.setPassword(password);


        //第二步:调用Mybatis查询用户
        //加载Mybatis的核心配置文件
        SqlSessionFactory sqlSessionFactory = SqlSessionFactoryUtil.getSqlSessionFactory();
        //  获取sqlSession对象,执行sql
        SqlSession sqlSession = sqlSessionFactory.openSession();
        //获取UserMapper接口的代理对象
        UserMapper mapper = sqlSession.getMapper(UserMapper.class);
        //获取方法
        User user = mapper.selectByUsername(username);


        //获取字符的输出流 设置content-type
        resp.setContentType("text/html;charset=utf-8");
        PrintWriter writer = resp.getWriter();
        //第三步:判断
        if(user==null){
            //用户名不存在,添加用户
            mapper.add(user1);
            //提交事务
            sqlSession.commit();
            sqlSession.close();
        }else {
            //用户存在,给出提示信息
            writer.write("用户已存在");
        }
    }

    @Override
    protected void doPost(HttpServletRequest req, HttpServletResponse resp) throws ServletException, IOException {

        this.doGet(req, resp);
    }
}

编写register.html

采用正则表达式实现用户名不超过15个字符、密码在4~10个字符。采用上个案例的注册界面。

<!DOCTYPE html>
<html>
<head>
    <meta charset="utf-8">
    <title>欢迎注册</title>
    <link rel = "stylesheet" href="css/register.css">
</head>
<body>
<div class = "form-div">
    <div class="reg-content">
        <h1>欢迎注册</h1>
        <span>已有账号?</span>
        <a href="login.html">登录</a>
    </div>
    <form id = "reg-form" action="/Web-Demo/registerServlet" method="post">
        <table>
            <tr>
                <td>用户名:</td>
                <td class="inputs">
                    <input type="text" name = "username" id="username"/>
                    <br>
                    <span id = "username_err" class="err_msg" style="display:none">用户名不符合规则</span>
                </td>
            </tr>
            <tr>
                <td>密码:</td>
                <td class="inputs">
                    <input type="password" name = "password" id = "password"/>
                    <br>
                    <span id="password_err" class="err_msg" style="display: none">密码格式有误</span>
                </td>
            </tr>

        </table>
        <div class="buttons">
            <input type = "submit" value="注册" id ="reg_btn" />
        </div>
        <br class="clear">
    </form>
</div>
<script>

    //验证用户名
    var usernameInput = document.getElementById("username");
    usernameInput.onblur = checkUser;
    function checkUser(){
        var username = usernameInput.value.trim();
        //判断用户名是否符合规则:长度0~15 单词字符组成
        var reg = /^\w{0,15}$/;
        var flag= reg.test(username);
        if(flag){
            document.getElementById("username_err").style.display = "none";
        }else{
            document.getElementById("username_err").style.display = "";
        }
        return flag;
    }
    //验证密码
    var passwordInput = document.getElementById("password");
    passwordInput.onblur = checkPassword;
    function checkPassword(){
        var password = passwordInput.value.trim();
        var reg = /^\w{4,10}$/;
        var flag= reg.test(password);
        if(flag){
            document.getElementById("password_err").style.display = "none";
        }else{
            document.getElementById("password_err").style.display = "";
        }
        return flag;
    }
</script>
</body>
</html>

编写register.css

* {
    margin: 0;
    padding: 0;
    list-style-type: none;
}
.reg-content{
    padding: 30px;
    margin: 3px;
}
a, img {
    border: 0;
}

body {
    background-image: url("../imgs/BackGround.JPG") ;
    no-repeat:center center fixed;
    /*兼容浏览器版本*/
    -webkit-background-size: cover;
    -o-background-size: cover;
    background-size: cover;

    display: flex;
    align-items: center;
    justify-content: center;
    height: 100%;
}

table {
    border-collapse: collapse;
    border-spacing: 0;
}

td, th {
    padding: 0;
    height: 90px;

}
.inputs{
    vertical-align: top;
}

.clear {
    clear: both;
}

.clear:before, .clear:after {
    content: "";
    display: table;
}

.clear:after {
    clear: both;
}

.form-div {
    background-color: rgba(255, 255, 255, 0.27);
    border-radius: 10px;
    border: 1px solid #aaa;
    width: 424px;
    margin-top: 150px;
    margin-left:1050px;
    padding: 30px 0 20px 0px;
    font-size: 16px;
    box-shadow: inset 0px 0px 10px rgba(255, 255, 255, 0.5), 0px 0px 15px rgba(75, 75, 75, 0.3);
    text-align: left;
}

.form-div input[type="text"], .form-div input[type="password"], .form-div input[type="email"] {
    width: 268px;
    margin: 10px;
    line-height: 20px;
    font-size: 16px;
}

.form-div input[type="checkbox"] {
    margin: 20px 0 20px 10px;
}

.form-div input[type="button"], .form-div input[type="submit"] {
    margin: 10px 20px 0 0;
}

.form-div table {
    margin: 0 auto;
    text-align: right;
    color: rgba(64, 64, 64, 1.00);
}

.form-div table img {
    vertical-align: middle;
    margin: 0 0 5px 0;
}

.footer {
    color: rgba(64, 64, 64, 1.00);
    font-size: 12px;
    margin-top: 30px;
}

.form-div .buttons {
    float: right;
}

input[type="text"], input[type="password"], input[type="email"] {
    border-radius: 8px;
    box-shadow: inset 0 2px 5px #eee;
    padding: 10px;
    border: 1px solid #D4D4D4;
    color: #333333;
    margin-top: 5px;
}

input[type="text"]:focus, input[type="password"]:focus, input[type="email"]:focus {
    border: 1px solid #50afeb;
    outline: none;
}

input[type="button"], input[type="submit"] {
    padding: 7px 15px;
    background-color: #3c6db0;
    text-align: center;
    border-radius: 5px;
    overflow: hidden;
    min-width: 80px;
    border: none;
    color: #FFF;
    box-shadow: 1px 1px 1px rgba(75, 75, 75, 0.3);
}

input[type="button"]:hover, input[type="submit"]:hover {
    background-color: #5a88c8;
}

input[type="button"]:active, input[type="submit"]:active {
    background-color: #5a88c8;
}
.err_msg{
    color: red;
    padding-right: 170px;
}
#password_err,#tel_err{
    padding-right: 195px;
}

#reg_btn{
    margin-right:50px; width: 285px; height: 45px; margin-top:20px;
}

编写SqlSessionFactory工具类

在写Servlet的时候,因为需要使用Mybatis来完成数据库的操作,所
以对于Mybatis的基础操作就出现了些重复代码:

String resource = "mybatis-config.xml";

InputStream inputStream = Resources.getResourceAsStream(resource);

SqlSessionFactory sqlSessionFactory = new 
 SqlSessionFactoryBuilder().build(inputStream);

有了这些重复代码就会造成一些问题:

  1. 重复代码不利于后期的维护

  2. SqlSessionFactory工厂类进行重复创建,资源消耗非常大但性能却非常低。

  3. 代码重复可以抽取工具类

  4. 对指定代码只需要执行一次可以使用静态代码块

对于静态代码块会随着类的加载而自动执行同时加载,只执行一次,就很好解决这一问题。

public class SqlSessionFactoryUtil {
//SqlSessionFactory工具类抽取
    private static SqlSessionFactory sqlSessionFactory;
    static {
        //静态代码块会随着类的加载而加载 只执行一次

        //加载Mybatis的核心配置文件
        String resource = "mybatis-config.xml";
        InputStream resourceAsStream = null;
        try {
            resourceAsStream = Resources.getResourceAsStream(resource);
        } catch (IOException e) {
            e.printStackTrace();
        }
        //  获取sqlSessionFactory对象
        sqlSessionFactory = new SqlSessionFactoryBuilder().build(resourceAsStream);
   }
    public static SqlSessionFactory getSqlSessionFactory (){

        return sqlSessionFactory;
    }
}

工具类抽取以后,以后在对Mybatis的SqlSession进行操作的时候,就可以直接使用。

项目总体架构

在这里插入图片描述

运行展示

用户登录:
在这里插入图片描述

登录成功:
在这里插入图片描述
来一个登录失败的案例:admin用户不存在
在这里插入图片描述

登录失败:

在这里插入图片描述

注册admin用户:
在这里插入图片描述

注册成功,后端数据库已写入admin用户数据

在这里插入图片描述

案例图片

漂亮~~
在这里插入图片描述

  • 36
    点赞
  • 329
    收藏
    觉得还不错? 一键收藏
  • 20
    评论
首先,需要设计数据库表来存储用户信息,例如: ```sql CREATE TABLE `user` ( `id` int(11) NOT NULL AUTO_INCREMENT, `username` varchar(50) NOT NULL, `password` varchar(50) NOT NULL, `email` varchar(50) DEFAULT NULL, PRIMARY KEY (`id`), UNIQUE KEY `username_UNIQUE` (`username`) ) ENGINE=InnoDB DEFAULT CHARSET=utf8mb4; ``` 然后,需要编写 Java 类来处理用户的注册和登录请求。以下是一个简单的示例: ```java import java.sql.*; public class UserDAO { private Connection connection; public UserDAO(String url, String username, String password) throws SQLException { connection = DriverManager.getConnection(url, username, password); } public boolean register(User user) throws SQLException { PreparedStatement statement = connection.prepareStatement("INSERT INTO user (username, password, email) VALUES (?, ?, ?)"); statement.setString(1, user.getUsername()); statement.setString(2, user.getPassword()); statement.setString(3, user.getEmail()); return statement.executeUpdate() == 1; } public boolean login(String username, String password) throws SQLException { PreparedStatement statement = connection.prepareStatement("SELECT * FROM user WHERE username = ?"); statement.setString(1, username); ResultSet resultSet = statement.executeQuery(); if (resultSet.next()) { String actualPassword = resultSet.getString("password"); return actualPassword.equals(password); } return false; } } ``` 在上面的代码中,`User` 是一个简单的 Java Bean,用于存储用户信息。`UserDAO` 类用于与数据库交互,实现用户注册和登录功能。`register` 方法将用户信息插入到数据库中,`login` 方法从数据库中查询用户信息并验证密码是否匹配。 最后,需要编写一个 Servlet 来处理用户的注册和登录请求。以下是一个简单的示例: ```java import javax.servlet.*; import javax.servlet.http.*; import java.io.*; import java.sql.*; public class UserServlet extends HttpServlet { private UserDAO userDAO; public void init() throws ServletException { String url = getServletContext().getInitParameter("db.url"); String username = getServletContext().getInitParameter("db.username"); String password = getServletContext().getInitParameter("db.password"); try { userDAO = new UserDAO(url, username, password); } catch (SQLException e) { throw new ServletException("Unable to connect to database", e); } } public void doPost(HttpServletRequest request, HttpServletResponse response) throws ServletException, IOException { String action = request.getParameter("action"); if (action.equals("register")) { String username = request.getParameter("username"); String password = request.getParameter("password"); String email = request.getParameter("email"); User user = new User(username, password, email); try { if (userDAO.register(user)) { response.sendRedirect("login.jsp"); } else { response.sendRedirect("register.jsp?error=Username already exists"); } } catch (SQLException e) { throw new ServletException("Unable to register user", e); } } else if (action.equals("login")) { String username = request.getParameter("username"); String password = request.getParameter("password"); try { if (userDAO.login(username, password)) { HttpSession session = request.getSession(); session.setAttribute("username", username); response.sendRedirect("welcome.jsp"); } else { response.sendRedirect("login.jsp?error=Invalid username or password"); } } catch (SQLException e) { throw new ServletException("Unable to login", e); } } } } ``` 在上面的代码中,`UserServlet` 类处理用户的注册和登录请求。`init` 方法初始化 `UserDAO` 对象,`doPost` 方法根据请求参数调用相应的方法进行处理,并将结果重定向到相应的页面。在登录成功后,将用户名保存在 `HttpSession` 中,以便在后续的页面中使用。需要注意的是,为了安全起见,密码应该使用哈希函数进行处理,而不是明文存储在数据库中。

“相关推荐”对你有帮助么?

  • 非常没帮助
  • 没帮助
  • 一般
  • 有帮助
  • 非常有帮助
提交
评论 20
添加红包

请填写红包祝福语或标题

红包个数最小为10个

红包金额最低5元

当前余额3.43前往充值 >
需支付:10.00
成就一亿技术人!
领取后你会自动成为博主和红包主的粉丝 规则
hope_wisdom
发出的红包
实付
使用余额支付
点击重新获取
扫码支付
钱包余额 0

抵扣说明:

1.余额是钱包充值的虚拟货币,按照1:1的比例进行支付金额的抵扣。
2.余额无法直接购买下载,可以购买VIP、付费专栏及课程。

余额充值