


Spring注解驱动开发
一、IOC容器
根据雷丰阳老师这门教程中的脑图来安排这个专栏的,这里给出这张脑图,如下图所示。
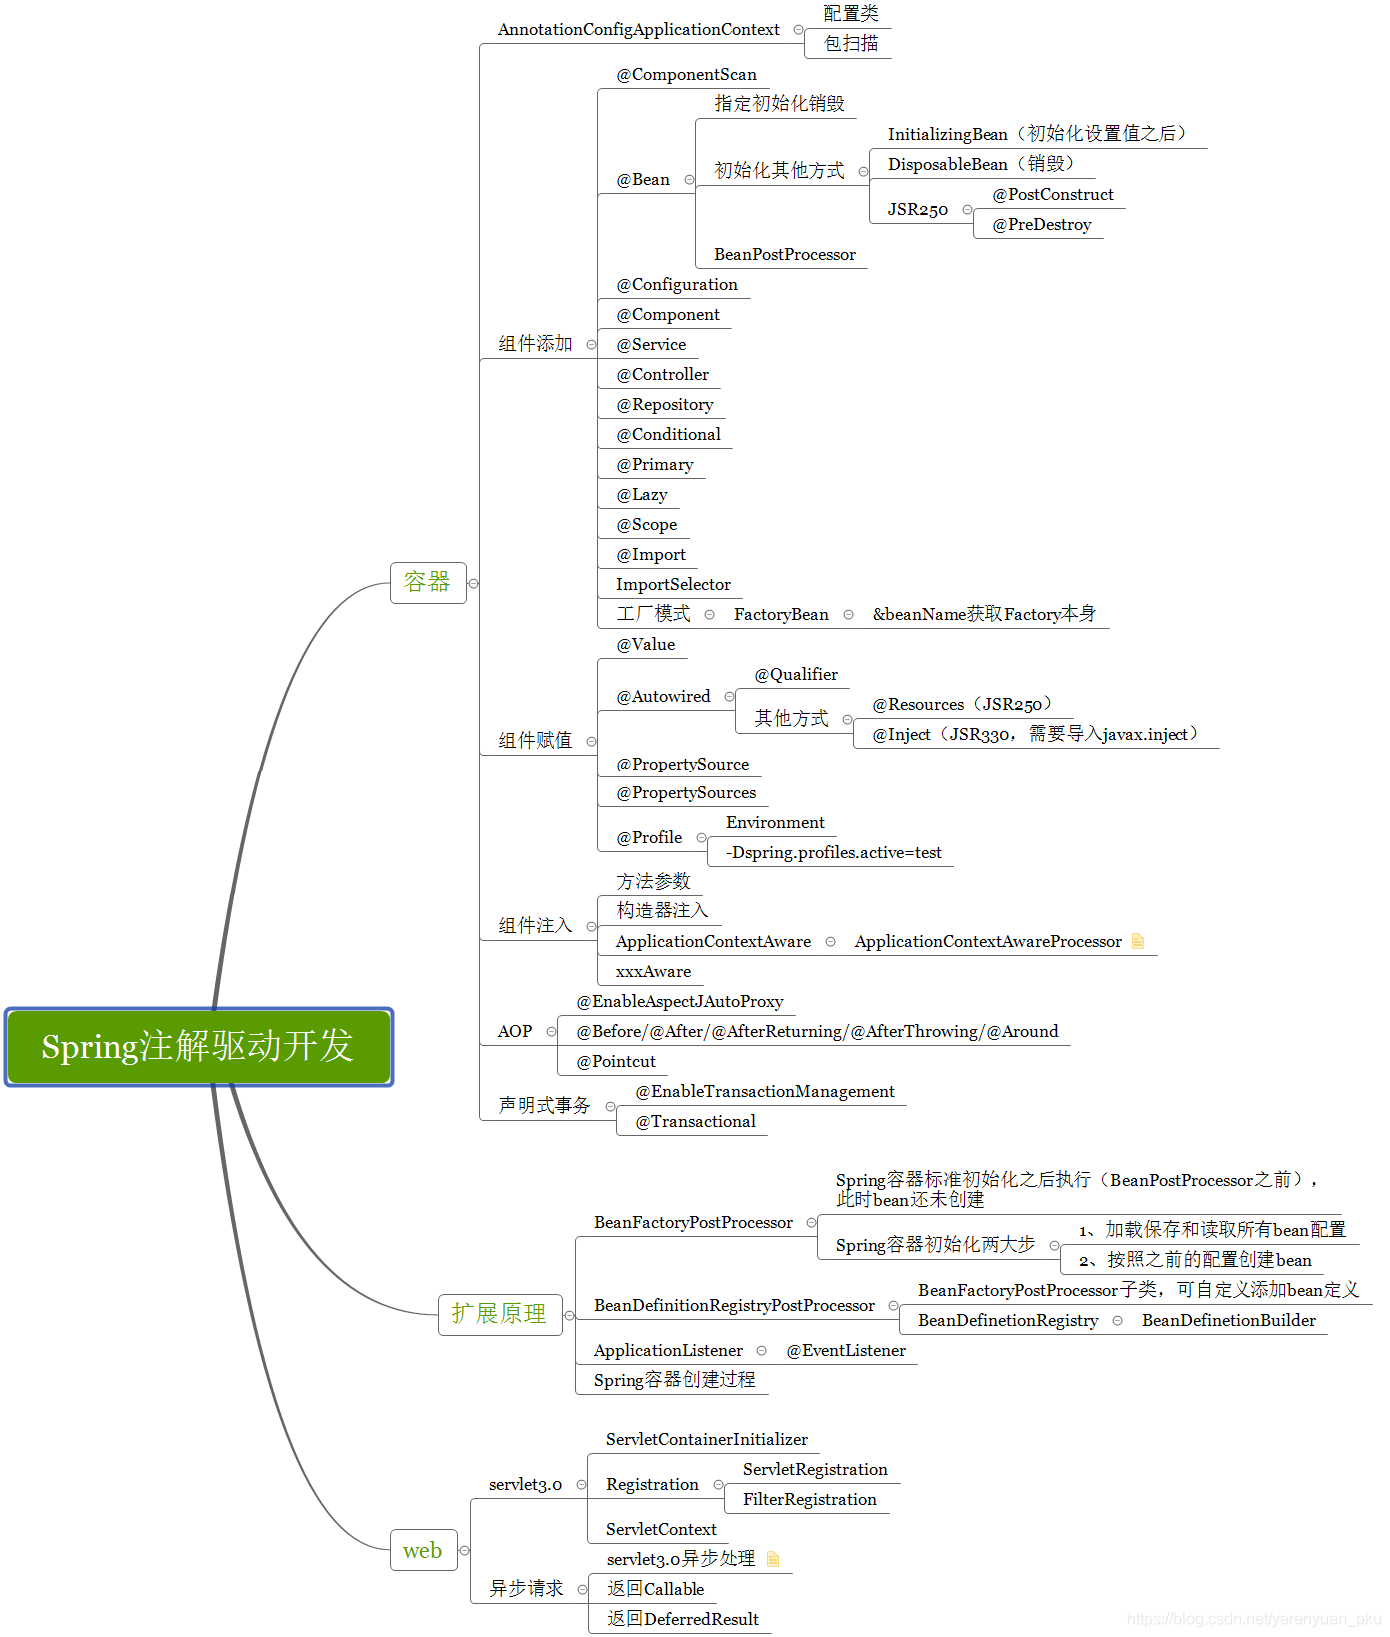
根据上面这张脑图,我把整个专栏分成了三个大的部分,分别是:容器、扩展原理以及Web。
一、IOC容器
- AnnotationConfigApplicationContext
- 组件添加
- 组件赋值
- 组件注入
- AOP
- 声明式事务
既然开始学习spring注解驱动力,先来配个spring xml文件吧
-
打开Idea—>settings–>Editor–>File and Code Templates
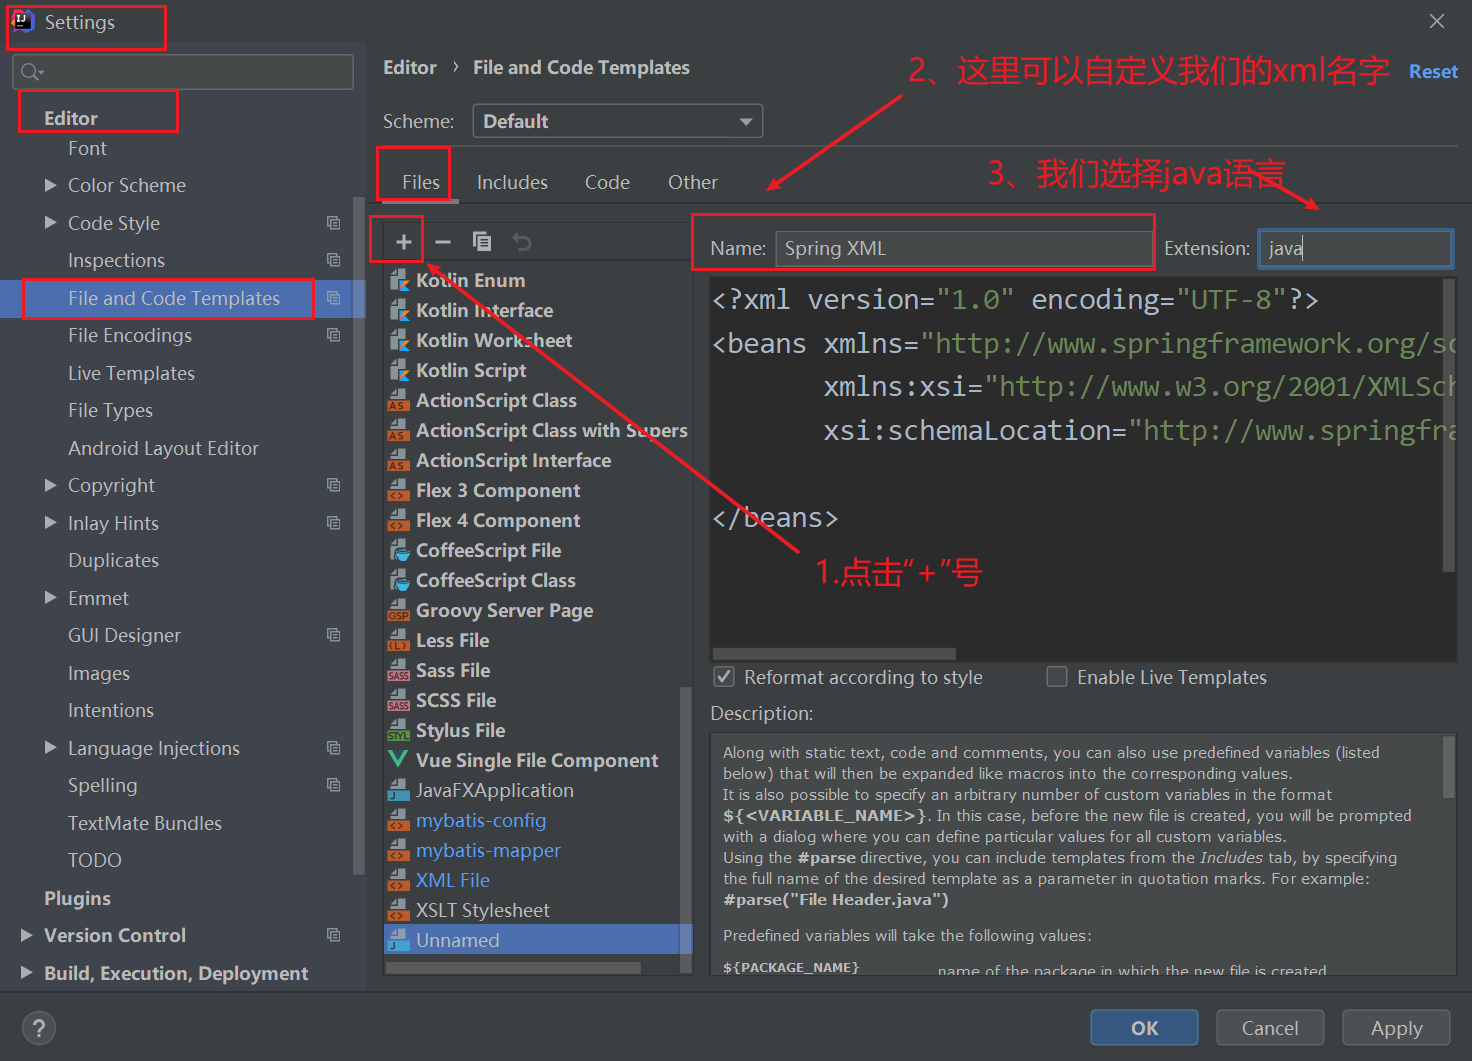
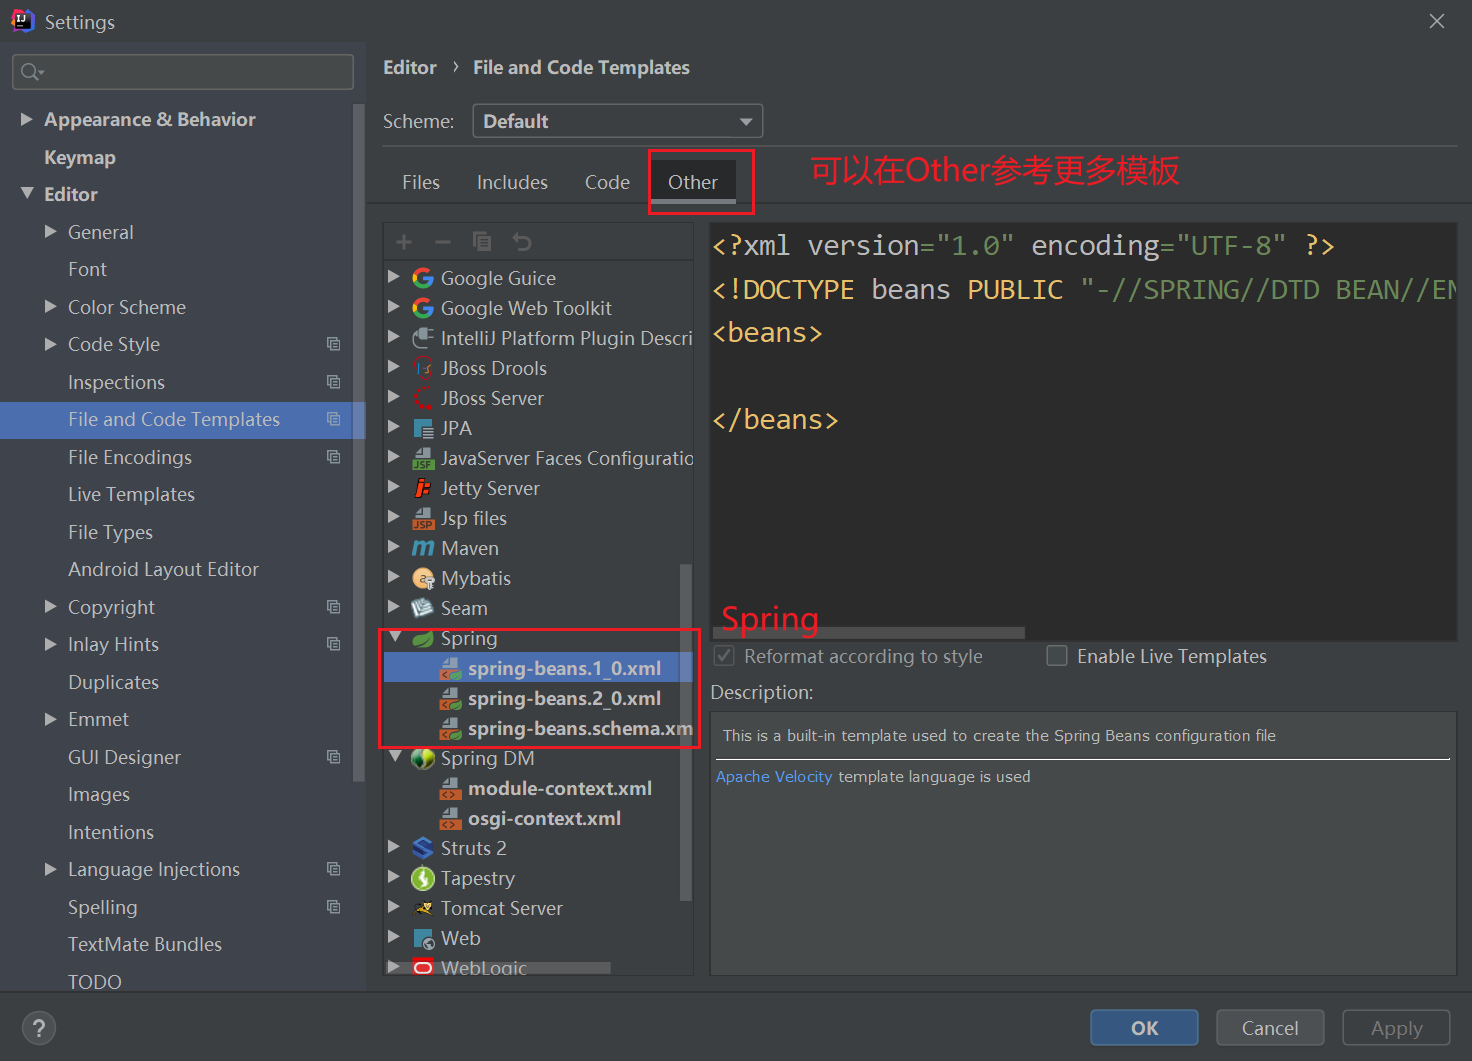
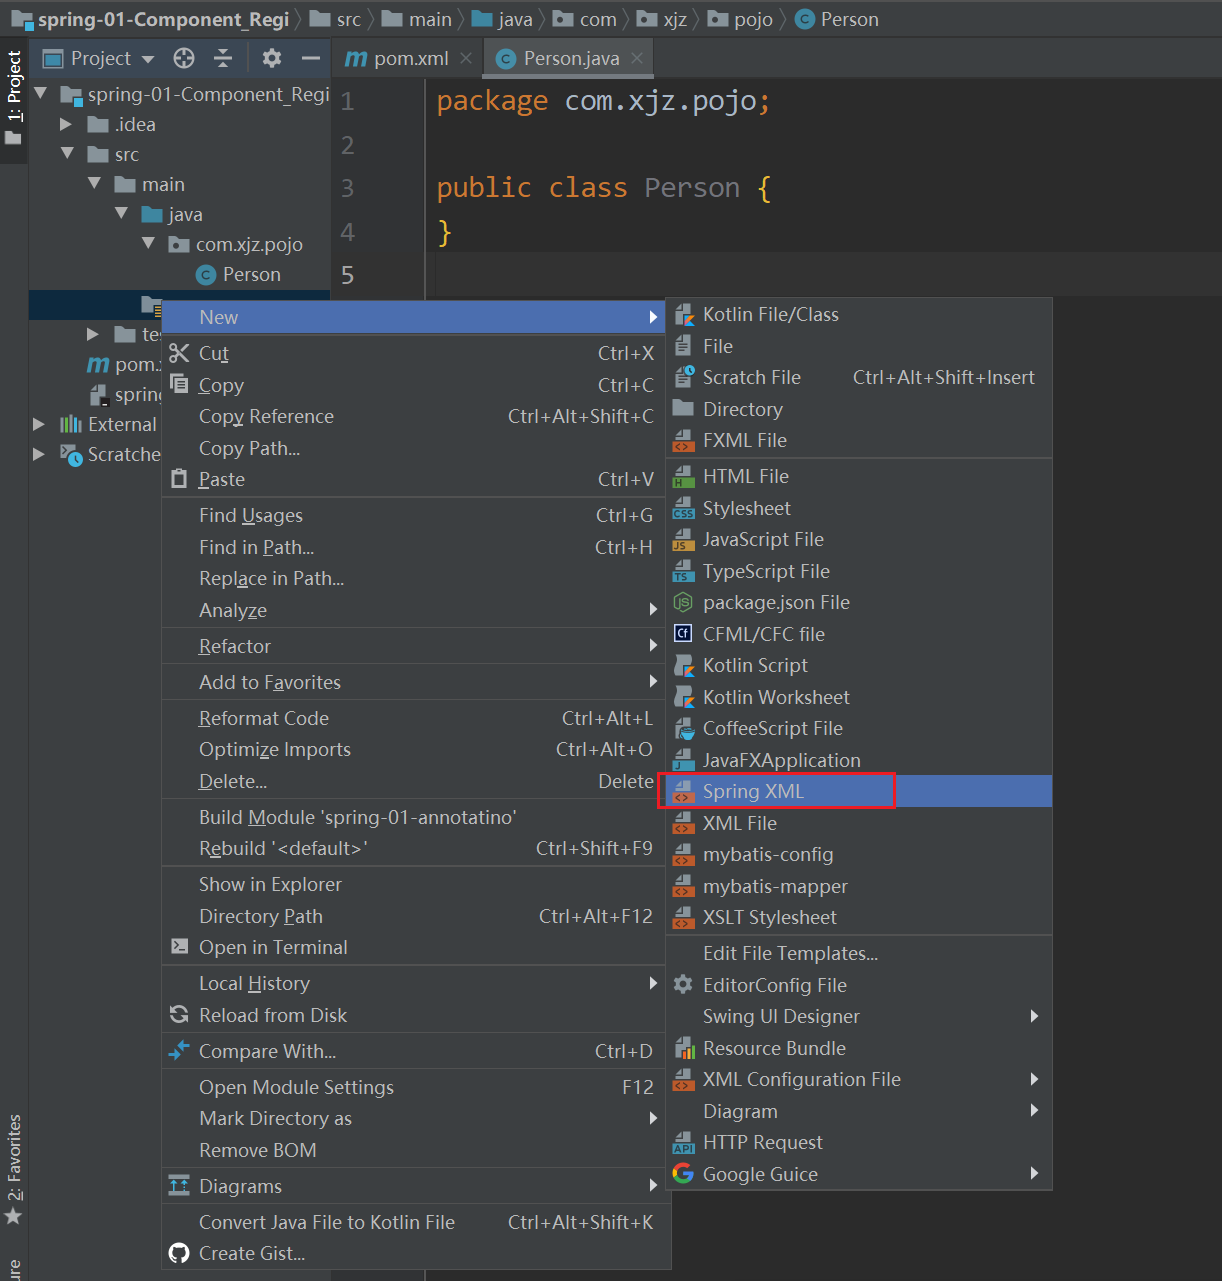
- 附上Spring xml模板
<?xml version="1.0" encoding="UTF-8"?>
<beans xmlns="http://www.springframework.org/schema/beans"
       xmlns:xsi="http://www.w3.org/2001/XMLSchema-instance"
       xsi:schemaLocation="http://www.springframework.org/schema/beans http://www.springframework.org/schema/beans/spring-beans.xsd">

</beans>
1. 组件注册—@Configuration&Bean容器中
这里主要是使用org.springframework:spring-context:4.3.12RELEASE进行分析
- 首先第一步导入Maven依赖
<!-- https://mvnrepository.com/artifact/org.springframework/spring-context -->
        <dependency>
            <groupId>org.springframework</groupId>
            <artifactId>spring-context</artifactId>
            <version>4.3.12.RELEASE</version>
        </dependency>
- Bean是Spring中最重要的部分之一,我们定义一个Pojo让它成为Bean
package com.xjz.pojo;

public class Person {

    private String name;
    private Integer age;

    public Person() {
    }

    public Person(String name, Integer age) {
        this.name = name;
        this.age = age;
    }

    public String getName() {
        return name;
    }

    public void setName(String name) {
        this.name = name;
    }

    public Integer getAge() {
        return age;
    }

    public void setAge(Integer age) {
        this.age = age;
    }

    @Override
    public String toString() {
        return "Person{" +
                "name='" + name + '\'' +
                ", age=" + age +
                '}';
    }
}
- 先用配置bean的方式来试一下
beans.xml
<?xml version="1.0" encoding="UTF-8"?>
<beans xmlns="http://www.springframework.org/schema/beans"
       xmlns:xsi="http://www.w3.org/2001/XMLSchema-instance"
       xsi:schemaLocation="http://www.springframework.org/schema/beans http://www.springframework.org/schema/beans/spring-beans.xsd">

    <bean id="person" class="com.xjz.pojo.Person">
        <property name="age" value="20"></property>
        <property name="name" value="zhangsan"></property>
    </bean>

</beans>
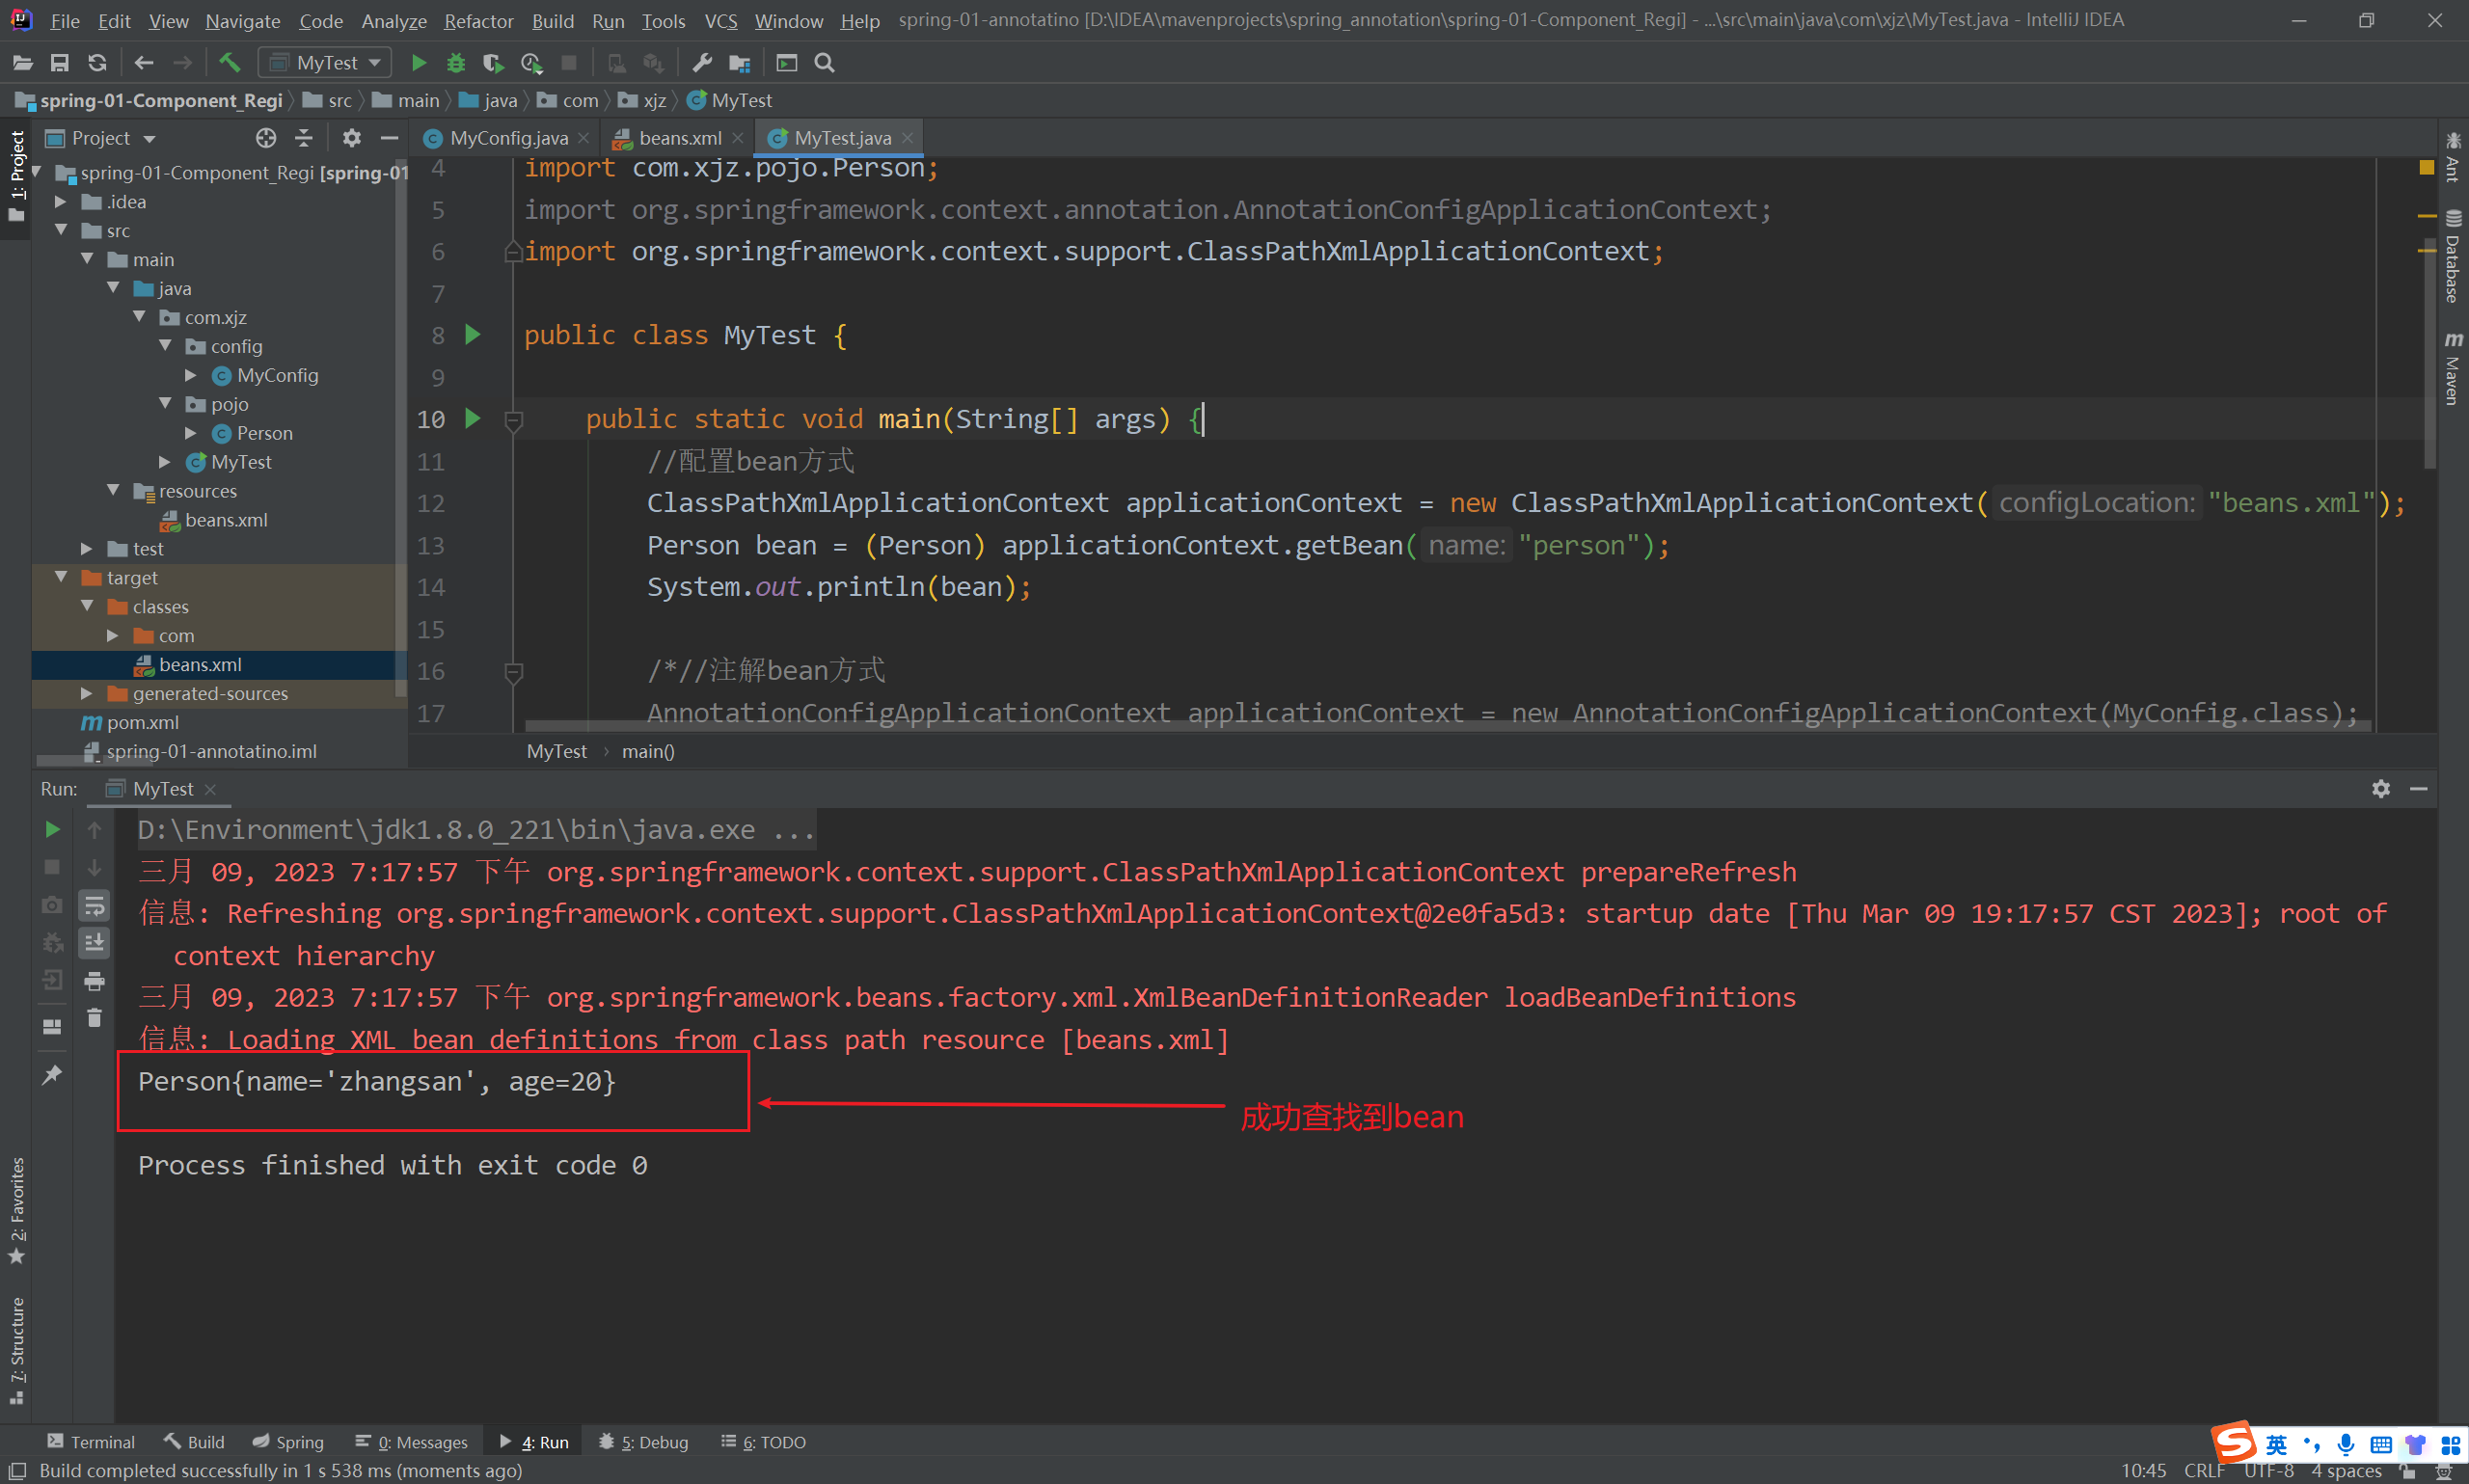
MyTest.java 测试一下
public class MyTest {

    public static void main(String[] args) {
        //配置bean方式
        ClassPathXmlApplicationContext applicationContext = new ClassPathXmlApplicationContext("beans.xml");
        Person bean = (Person) applicationContext.getBean("Person");
        System.out.println(bean);

    }
}
- 接下来用注解bean的方式来测试一下
注解bean的配置类
//配置类==配置文件
@Configuration  //告诉Spring这是一个配置类
public class MyConfig {

    //给容器中注册一个Bean;类型为返回值的类型,id默认是用方法名作为id
    @Bean("person")
    public Person person01(){
        return new Person("list",20);
    }

}
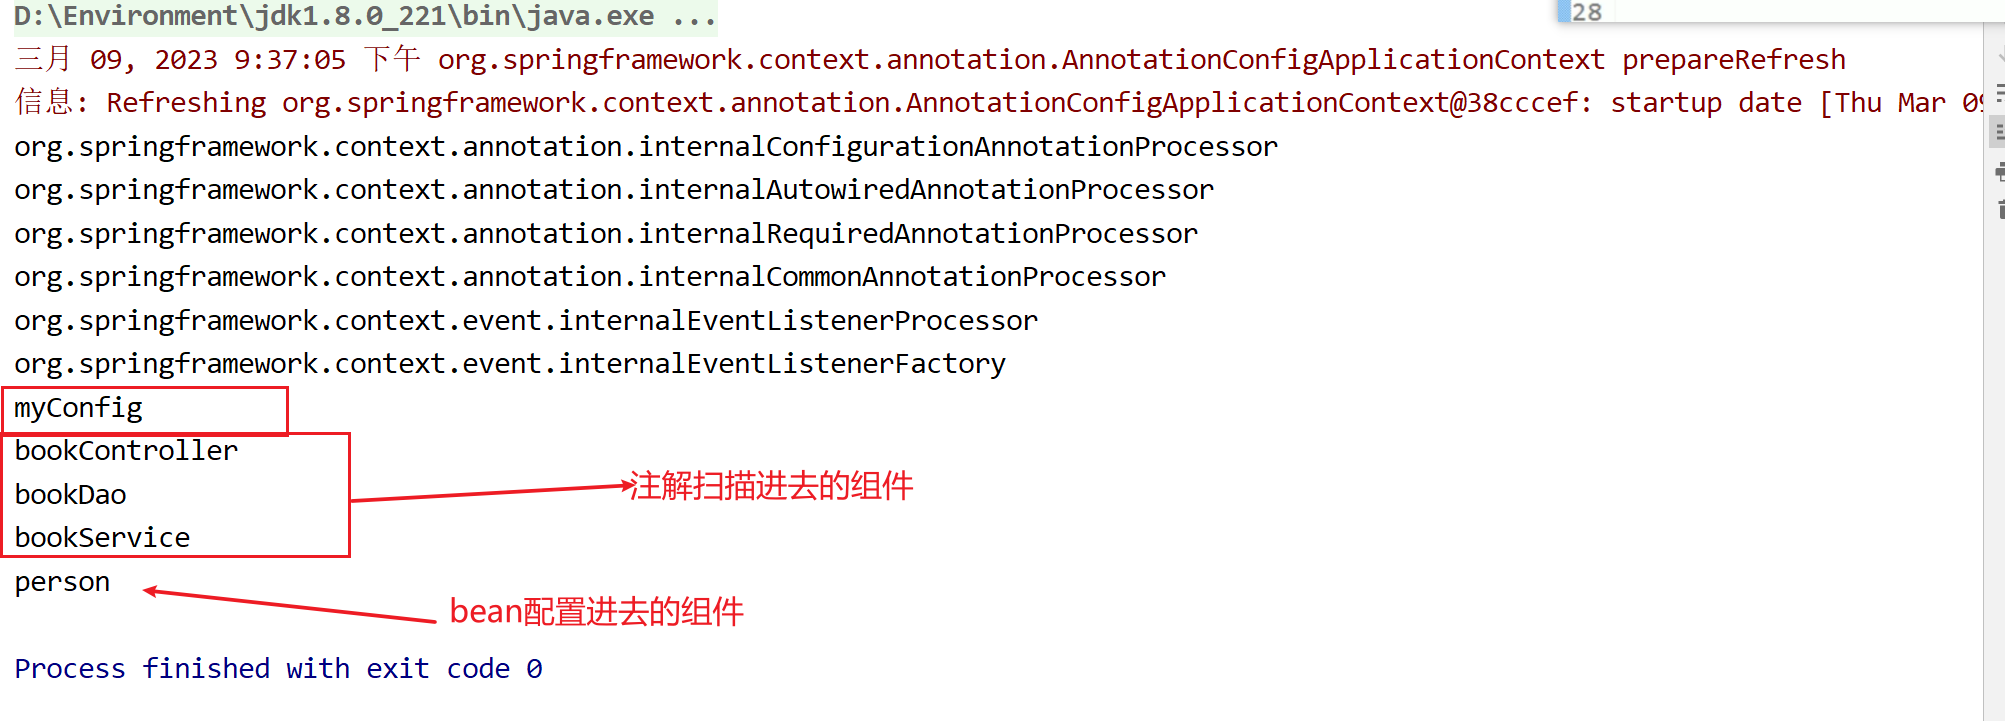
测试一下
public class MyTest {

    public static void main(String[] args) {
        //配置bean方式
//        ClassPathXmlApplicationContext applicationContext = new ClassPathXmlApplicationContext("beans.xml");
//        Person bean = (Person) applicationContext.getBean("person");
//        System.out.println(bean);

        //注解bean方式
        AnnotationConfigApplicationContext applicationContext = new AnnotationConfigApplicationContext(MyConfig.class);
        Person bean = applicationContext.getBean(Person.class);
        System.out.println(bean);

        String[] namesForType = applicationContext.getBeanNamesForType(Person.class);
        for (String name : namesForType) {
            System.out.println(name);
        }
    }
}
结果如下:

2. 组件注册—@Configuration&Bean容器中
- 包扫描、只要标注了@Controller、@Service、@Repository、@Component、任意一个就可以组件就可以自动扫描加进容器中
- excludeFilters = Filter[],指定扫描的时候按照什么规则排除那些组件
//配置类==配置文件
@Configuration  //告诉Spring这是一个配置类
@ComponentScans(
        value = {
                @ComponentScan(value = "com.xjz",includeFilters = {
                        @ComponentScan.Filter(type = FilterType.ANNOTATION, classes = {Controller.class})
                },useDefaultFilters = false)
        }
)
//ComponentScan  value:指定要扫描的包
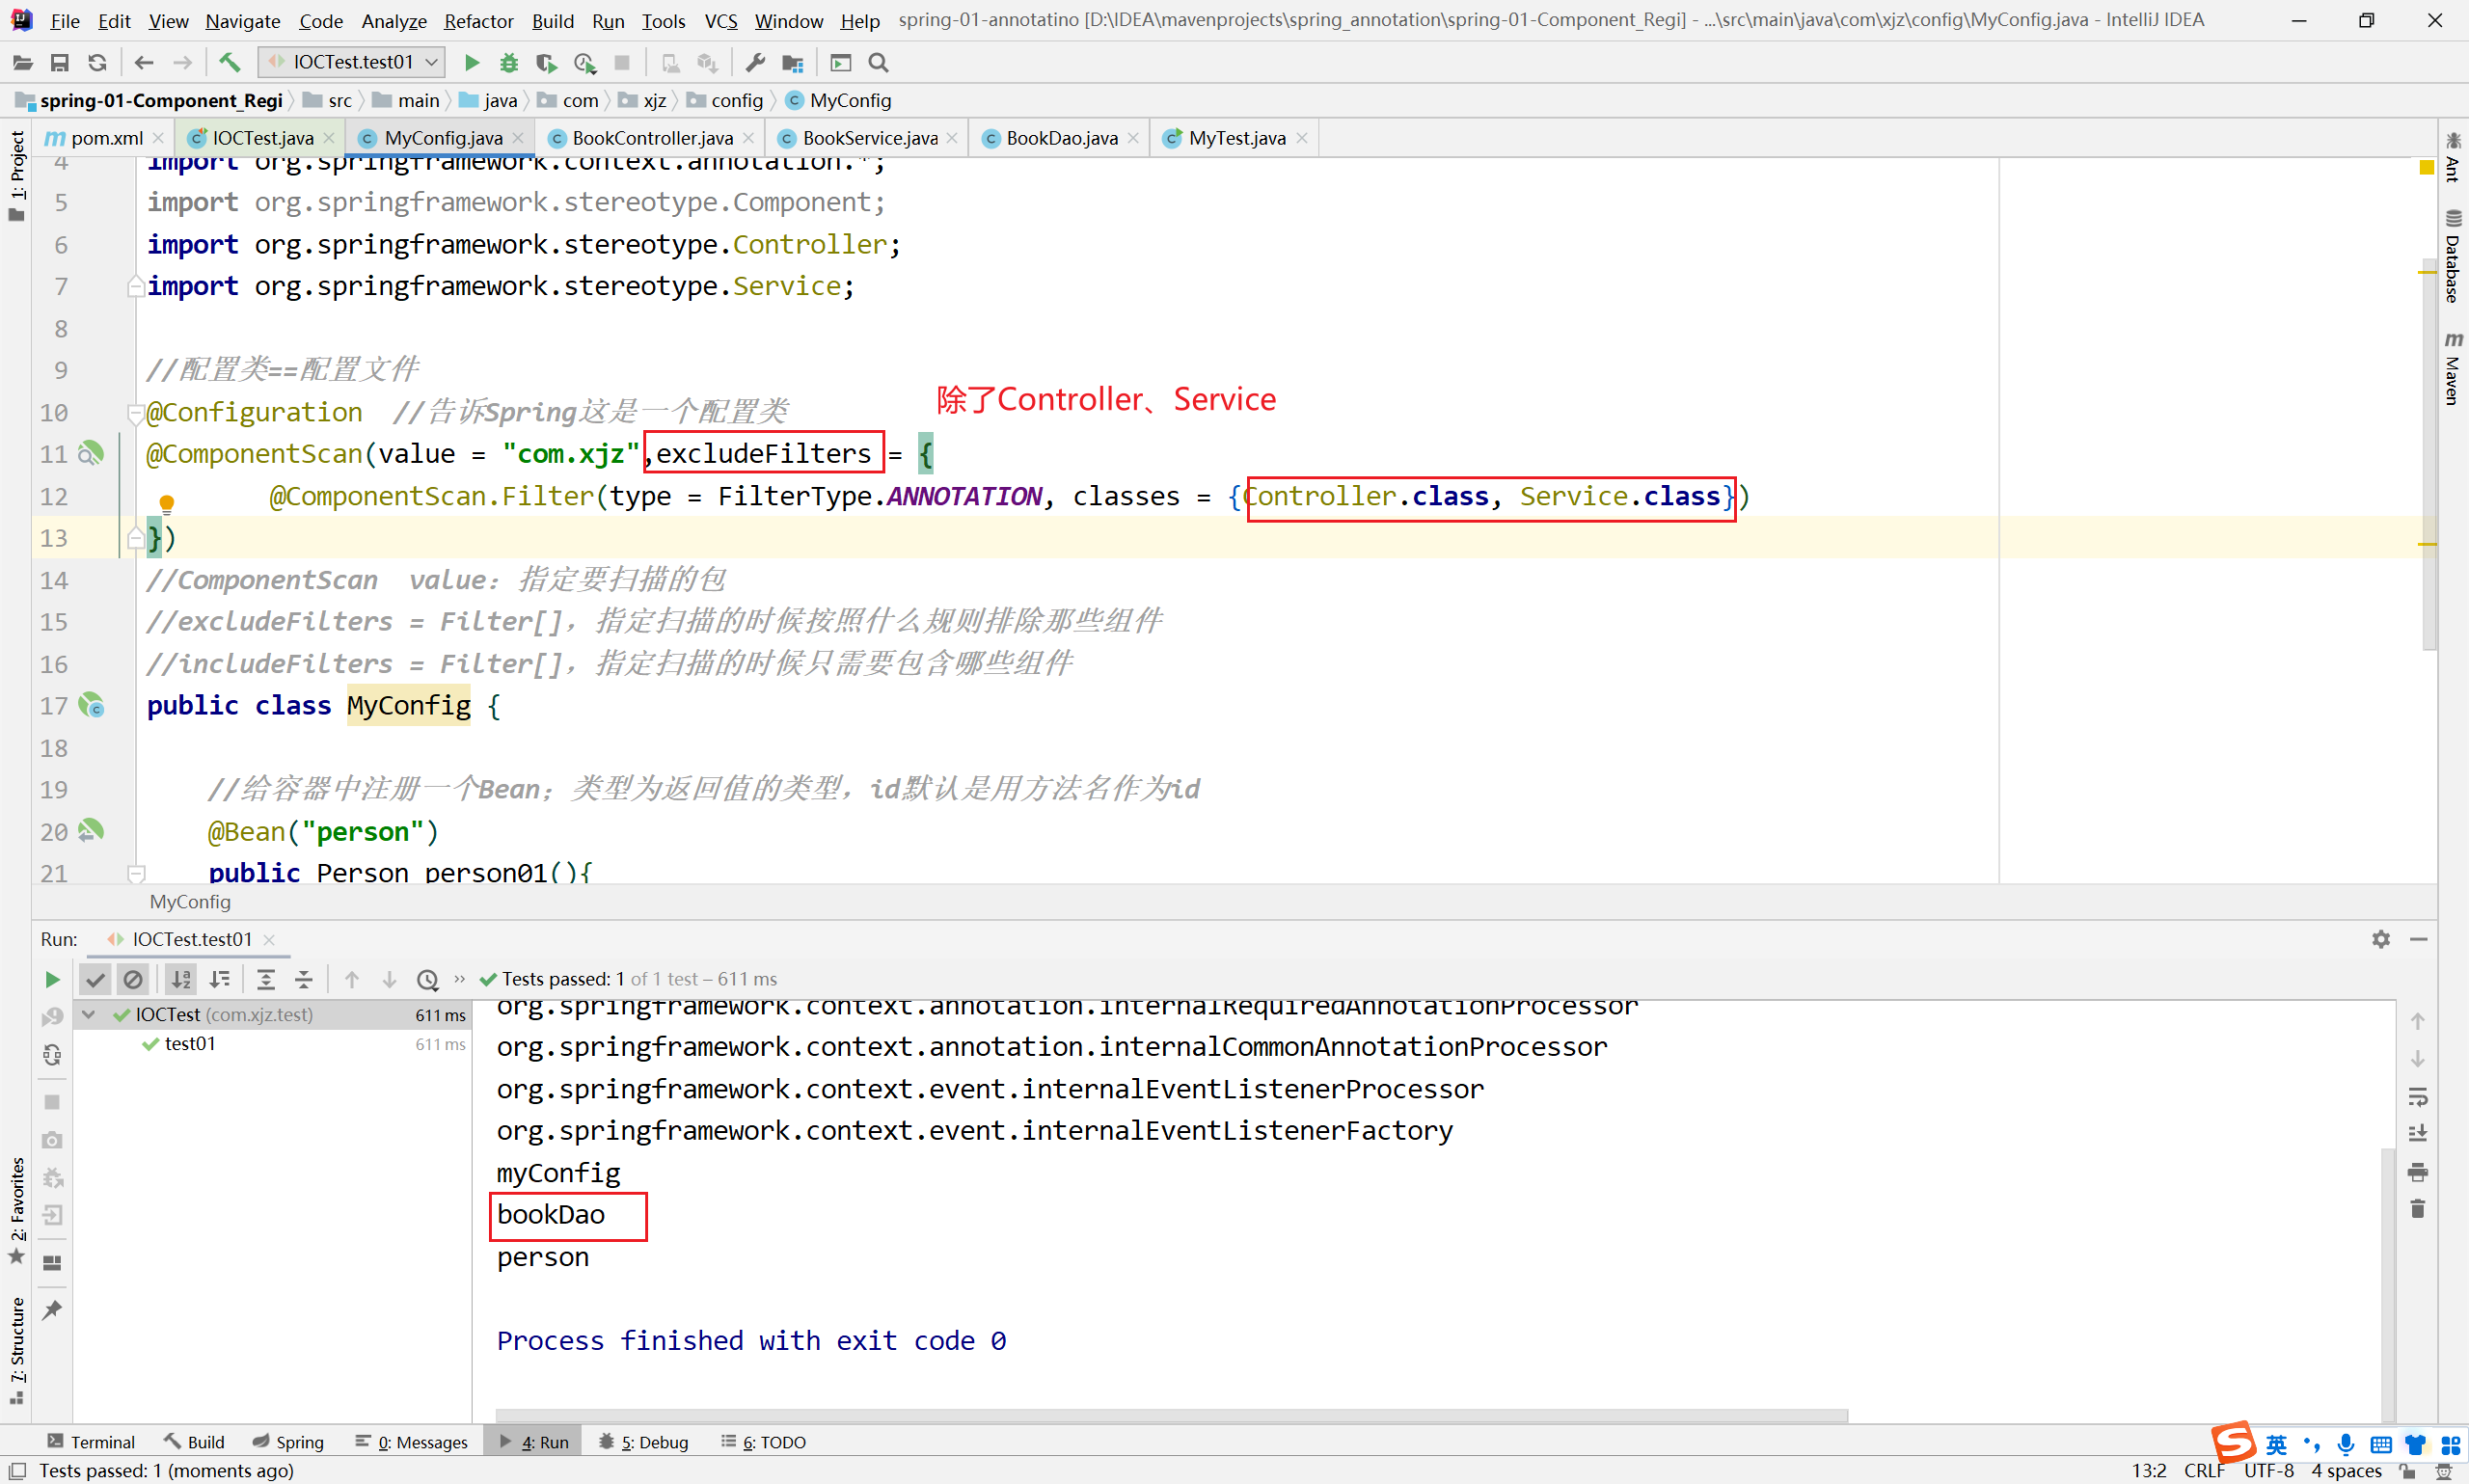
-
includeFilters = Filter[],指定扫描的时候只需要包含哪些组件
**注意:**当使用仅包含的注解是,必须先禁用默认扫描所有规则use-default-filters=“false”
配置文件beans.xml
<context:component-scan base-package="com.xjz" use-default-filters="false"></context:component-scan>注解@ComponentScan({…},userDefaultFilters = false)

3. 自定义TypeFilter指定@ComponentScan注解的过滤规则
- FilterType.ANNOTATION:按照注解进行包含或者排除
- FilterType.ASSIGNABLE_TYPE:按照给定的类型进行包含或者排除
- FilterType.ASPECTJ:按照ASPECTJ表达式进行包含或者排除
- FilterType.REGEX:按照正则表达式进行包含或者排除
- FilterType.CUSTOM:按照自定义规则进行包含或者排除
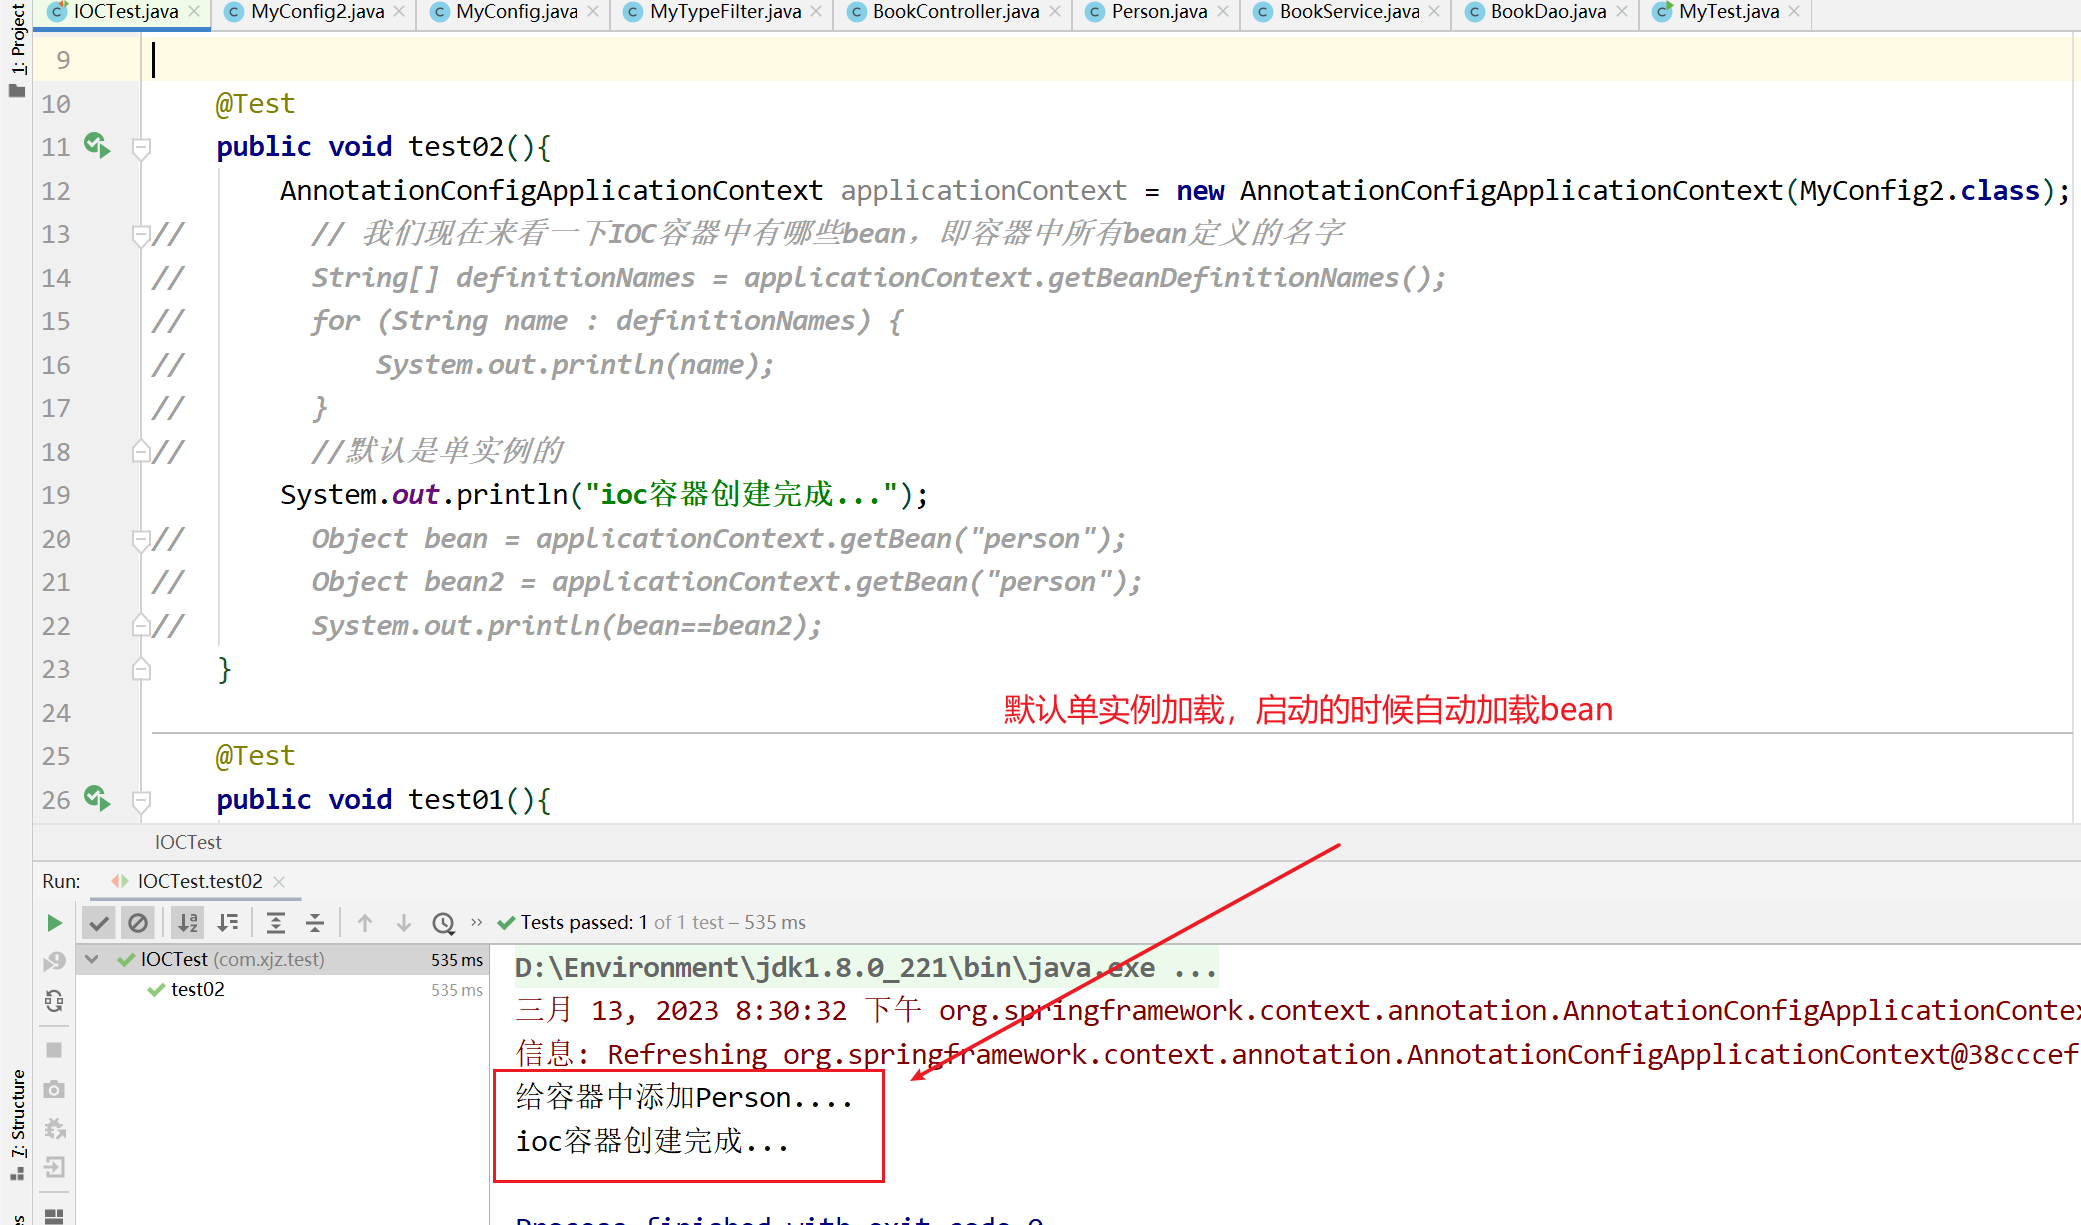
4. 组件注册-@Scope-设置组件作用域
@Scope() 单例调用

@Scope(“prototype”)多例调用
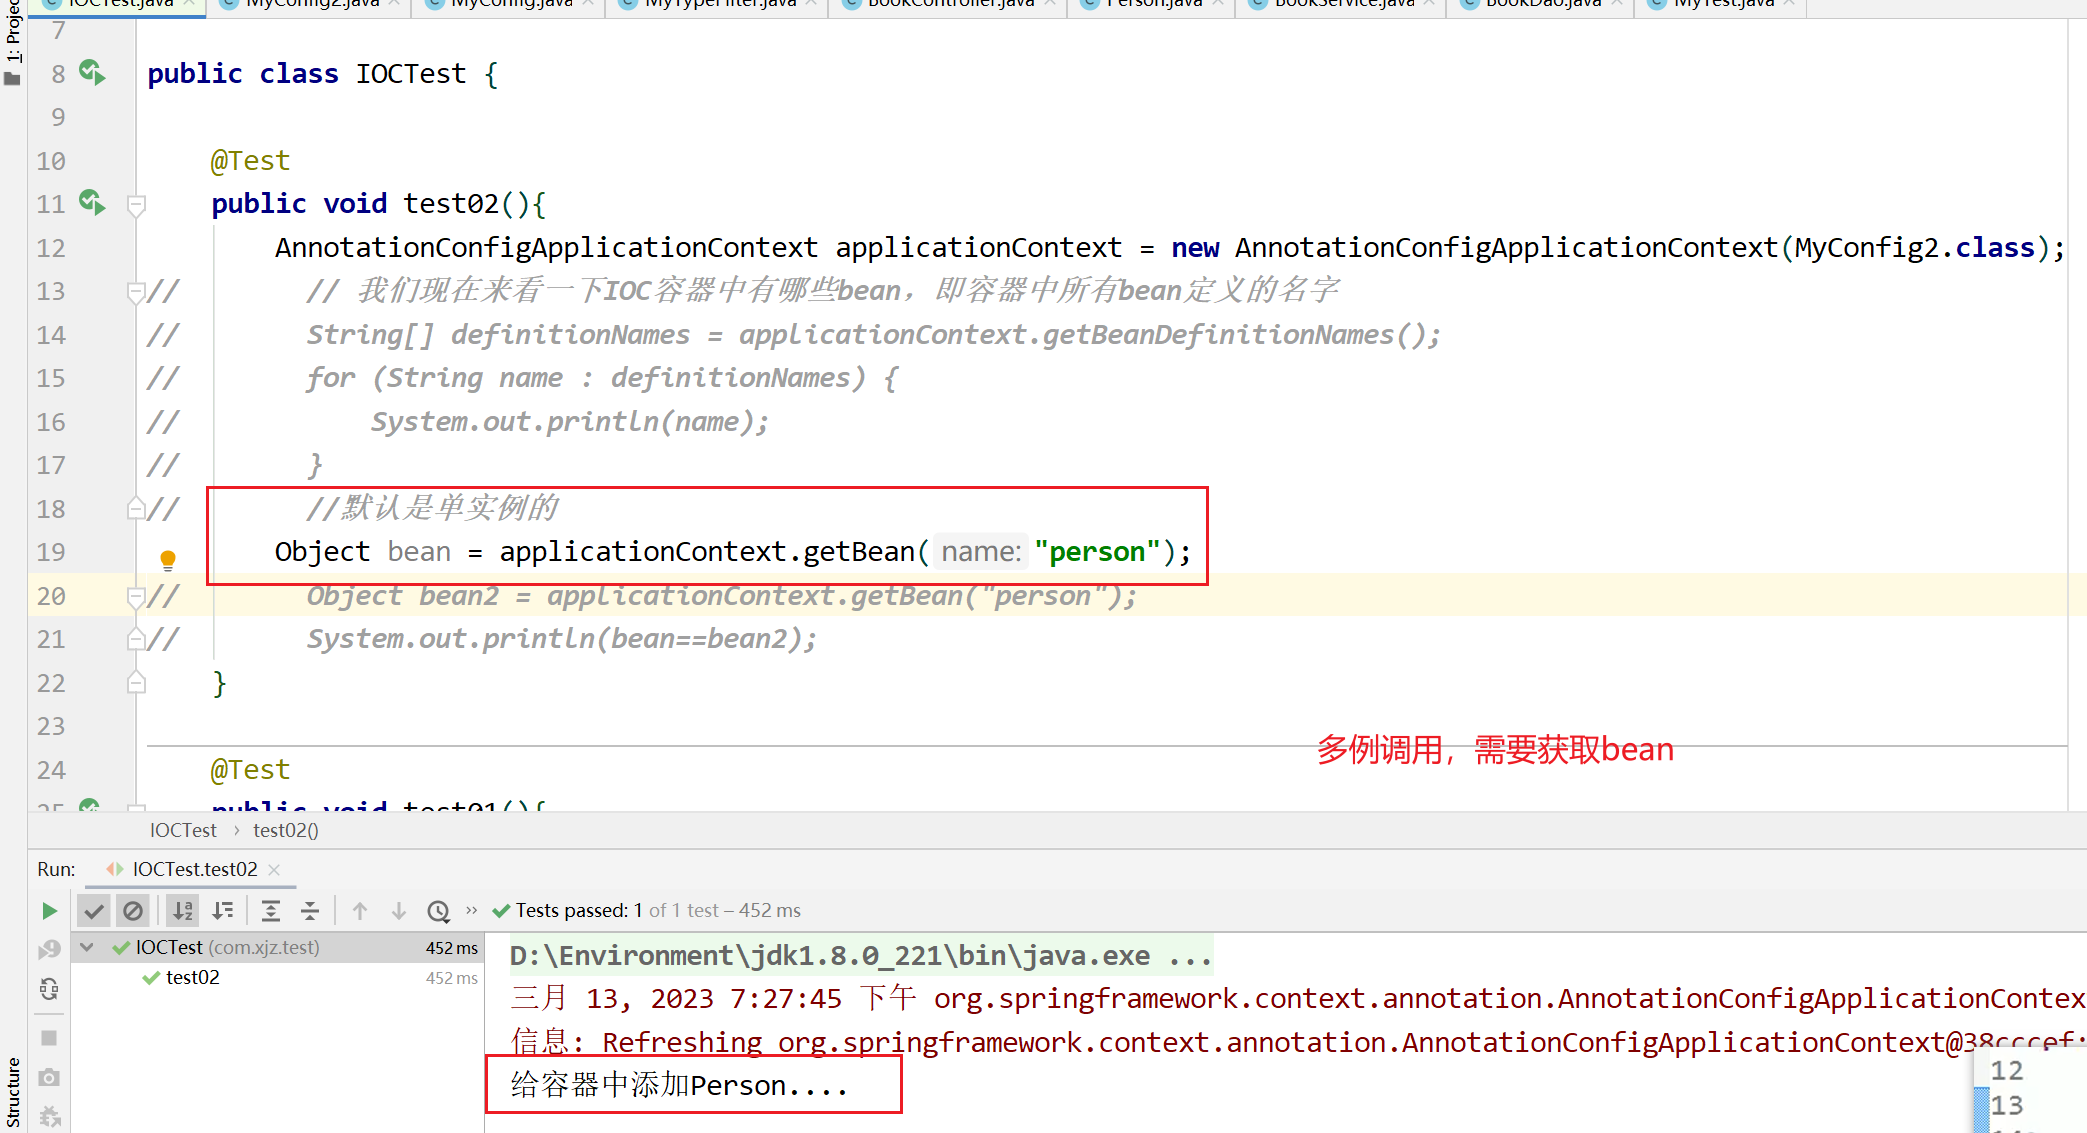
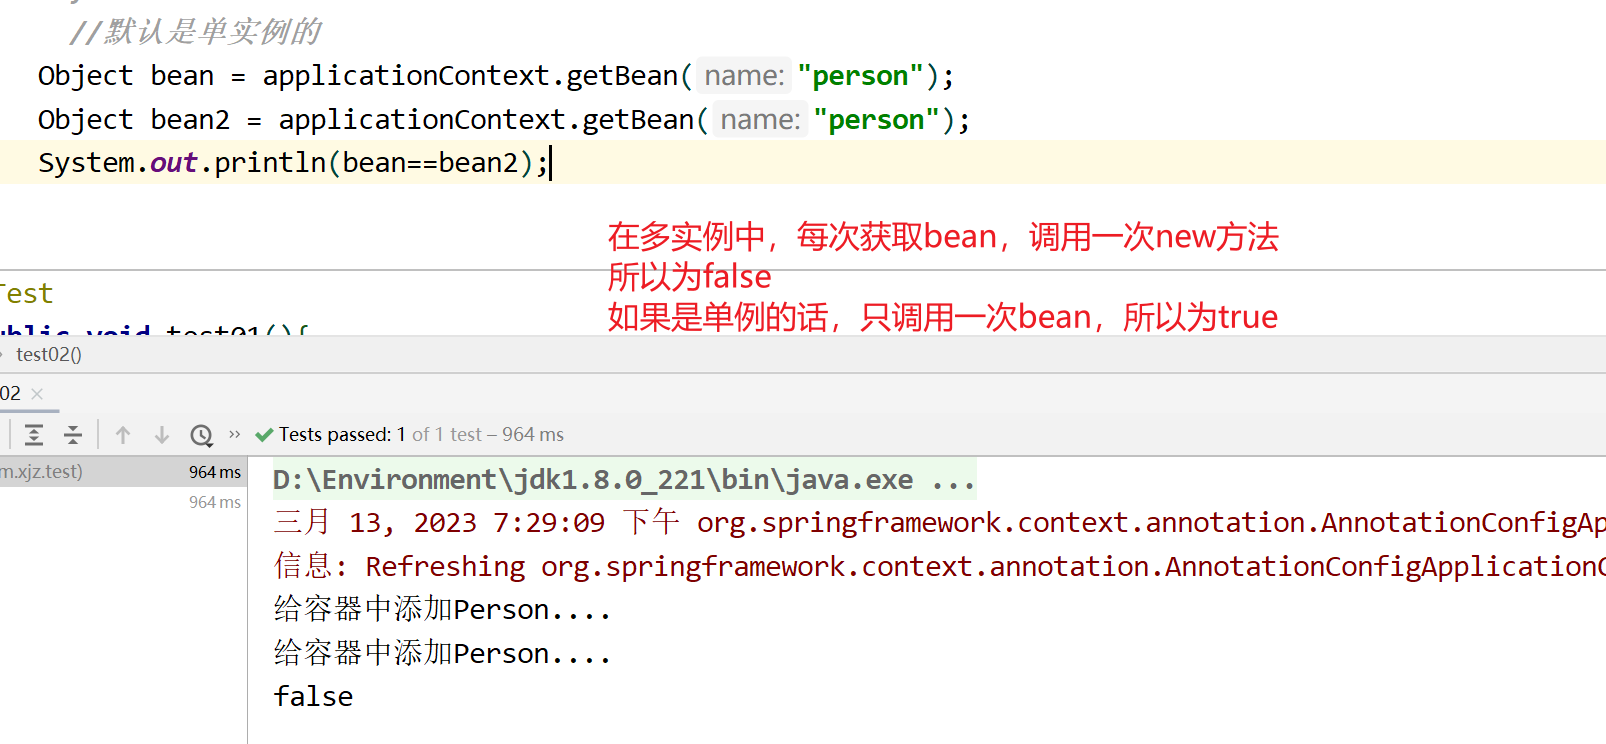
为什么单实例两个bean为true,多实例两个bean不一样(false)
我们来看一下 MyConfig2.java 代码
@Configuration
public class MyConfig2 {

    //默认是单例的

    /**
     * @see ConfigurableBeanFactory#SCOPE_PROTOTYPE
     * @see ConfigurableBeanFactory#SCOPE_SINGLETON
     * @see org.springframework.web.context.WebApplicationContext#SCOPE_REQUEST
     * @see org.springframework.web.context.WebApplicationContext#SCOPE_SESSION
     * @return\
     * @Scope:调整作用域
     * prototype:多实例的:ioc容器启动并不会去调用方法创建对象放在容器中。
     *                     每次获取的时候才会去调用方法创建对象;
     * singleton:单实例的(默认值):ioc容器启动会调用方法创建对象放到ioc容器中。
     *                              以后每次获取就是直接从容器(map.get())中拿;
     * request:同一次请求创建一个实例
     * session:同一个session创建一个实例
     */
    @Scope("prototype")
    @Bean("person")
    public Person person(){
        System.out.println("给容器中添加Person....");
        return new Person("张三",21);
    }
}
测试代码
public class IOCTest {

    @Test
    public void test02(){
        AnnotationConfigApplicationContext applicationContext = new AnnotationConfigApplicationContext(MyConfig2.class);
//        // 我们现在来看一下IOC容器中有哪些bean,即容器中所有bean定义的名字
//        String[] definitionNames = applicationContext.getBeanDefinitionNames();
//        for (String name : definitionNames) {
//            System.out.println(name);
//        }
//        //默认是单实例的
        Object bean = applicationContext.getBean("person");
        Object bean2 = applicationContext.getBean("person");
        System.out.println(bean==bean2);
    }
4.2 懒加载 @Lazy
懒加载;
单实例bean:默认在容器启动的时候创建对象;(默认是单实例)
懒加载:容器启动不创建对象,第一次使用(获取)Bean创建对象,并初始化;
单实例加载如下所示:
@Configuration
public class MyConfig2 {
    //@Scope("prototype")
    @Bean("person")
    public Person person(){
        System.out.println("给容器中添加Person....");
        return new Person("张三",21);
    }
}
懒加载
@Configuration
public class MyConfig2 {
    //@Scope("prototype")
    @Lazy
    @Bean("person")
    public Person person(){
        System.out.println("给容器中添加Person....");
        return new Person("张三",21);
    }
}


5. 组件注册-Conditional-按照条件注册bean
@Conditional注解可以按照一定的条件进行判断,满足条件向容器中注册bean,不满足条件就不向容器中注册bean。

- ConditionContext:判断条件能使用的上下文(环境)
- AnnotatedTypeMetadata:注释信息
public interface Condition {

	/**
	 * Determine if the condition matches.
	 * @param context the condition context
	 * @param metadata metadata of the {@link org.springframework.core.type.AnnotationMetadata class}
	 * or {@link org.springframework.core.type.MethodMetadata method} being checked.
	 * @return {@code true} if the condition matches and the component can be registered
	 * or {@code false} to veto registration.
	 */
	boolean matches(ConditionContext context, AnnotatedTypeMetadata metadata);

}
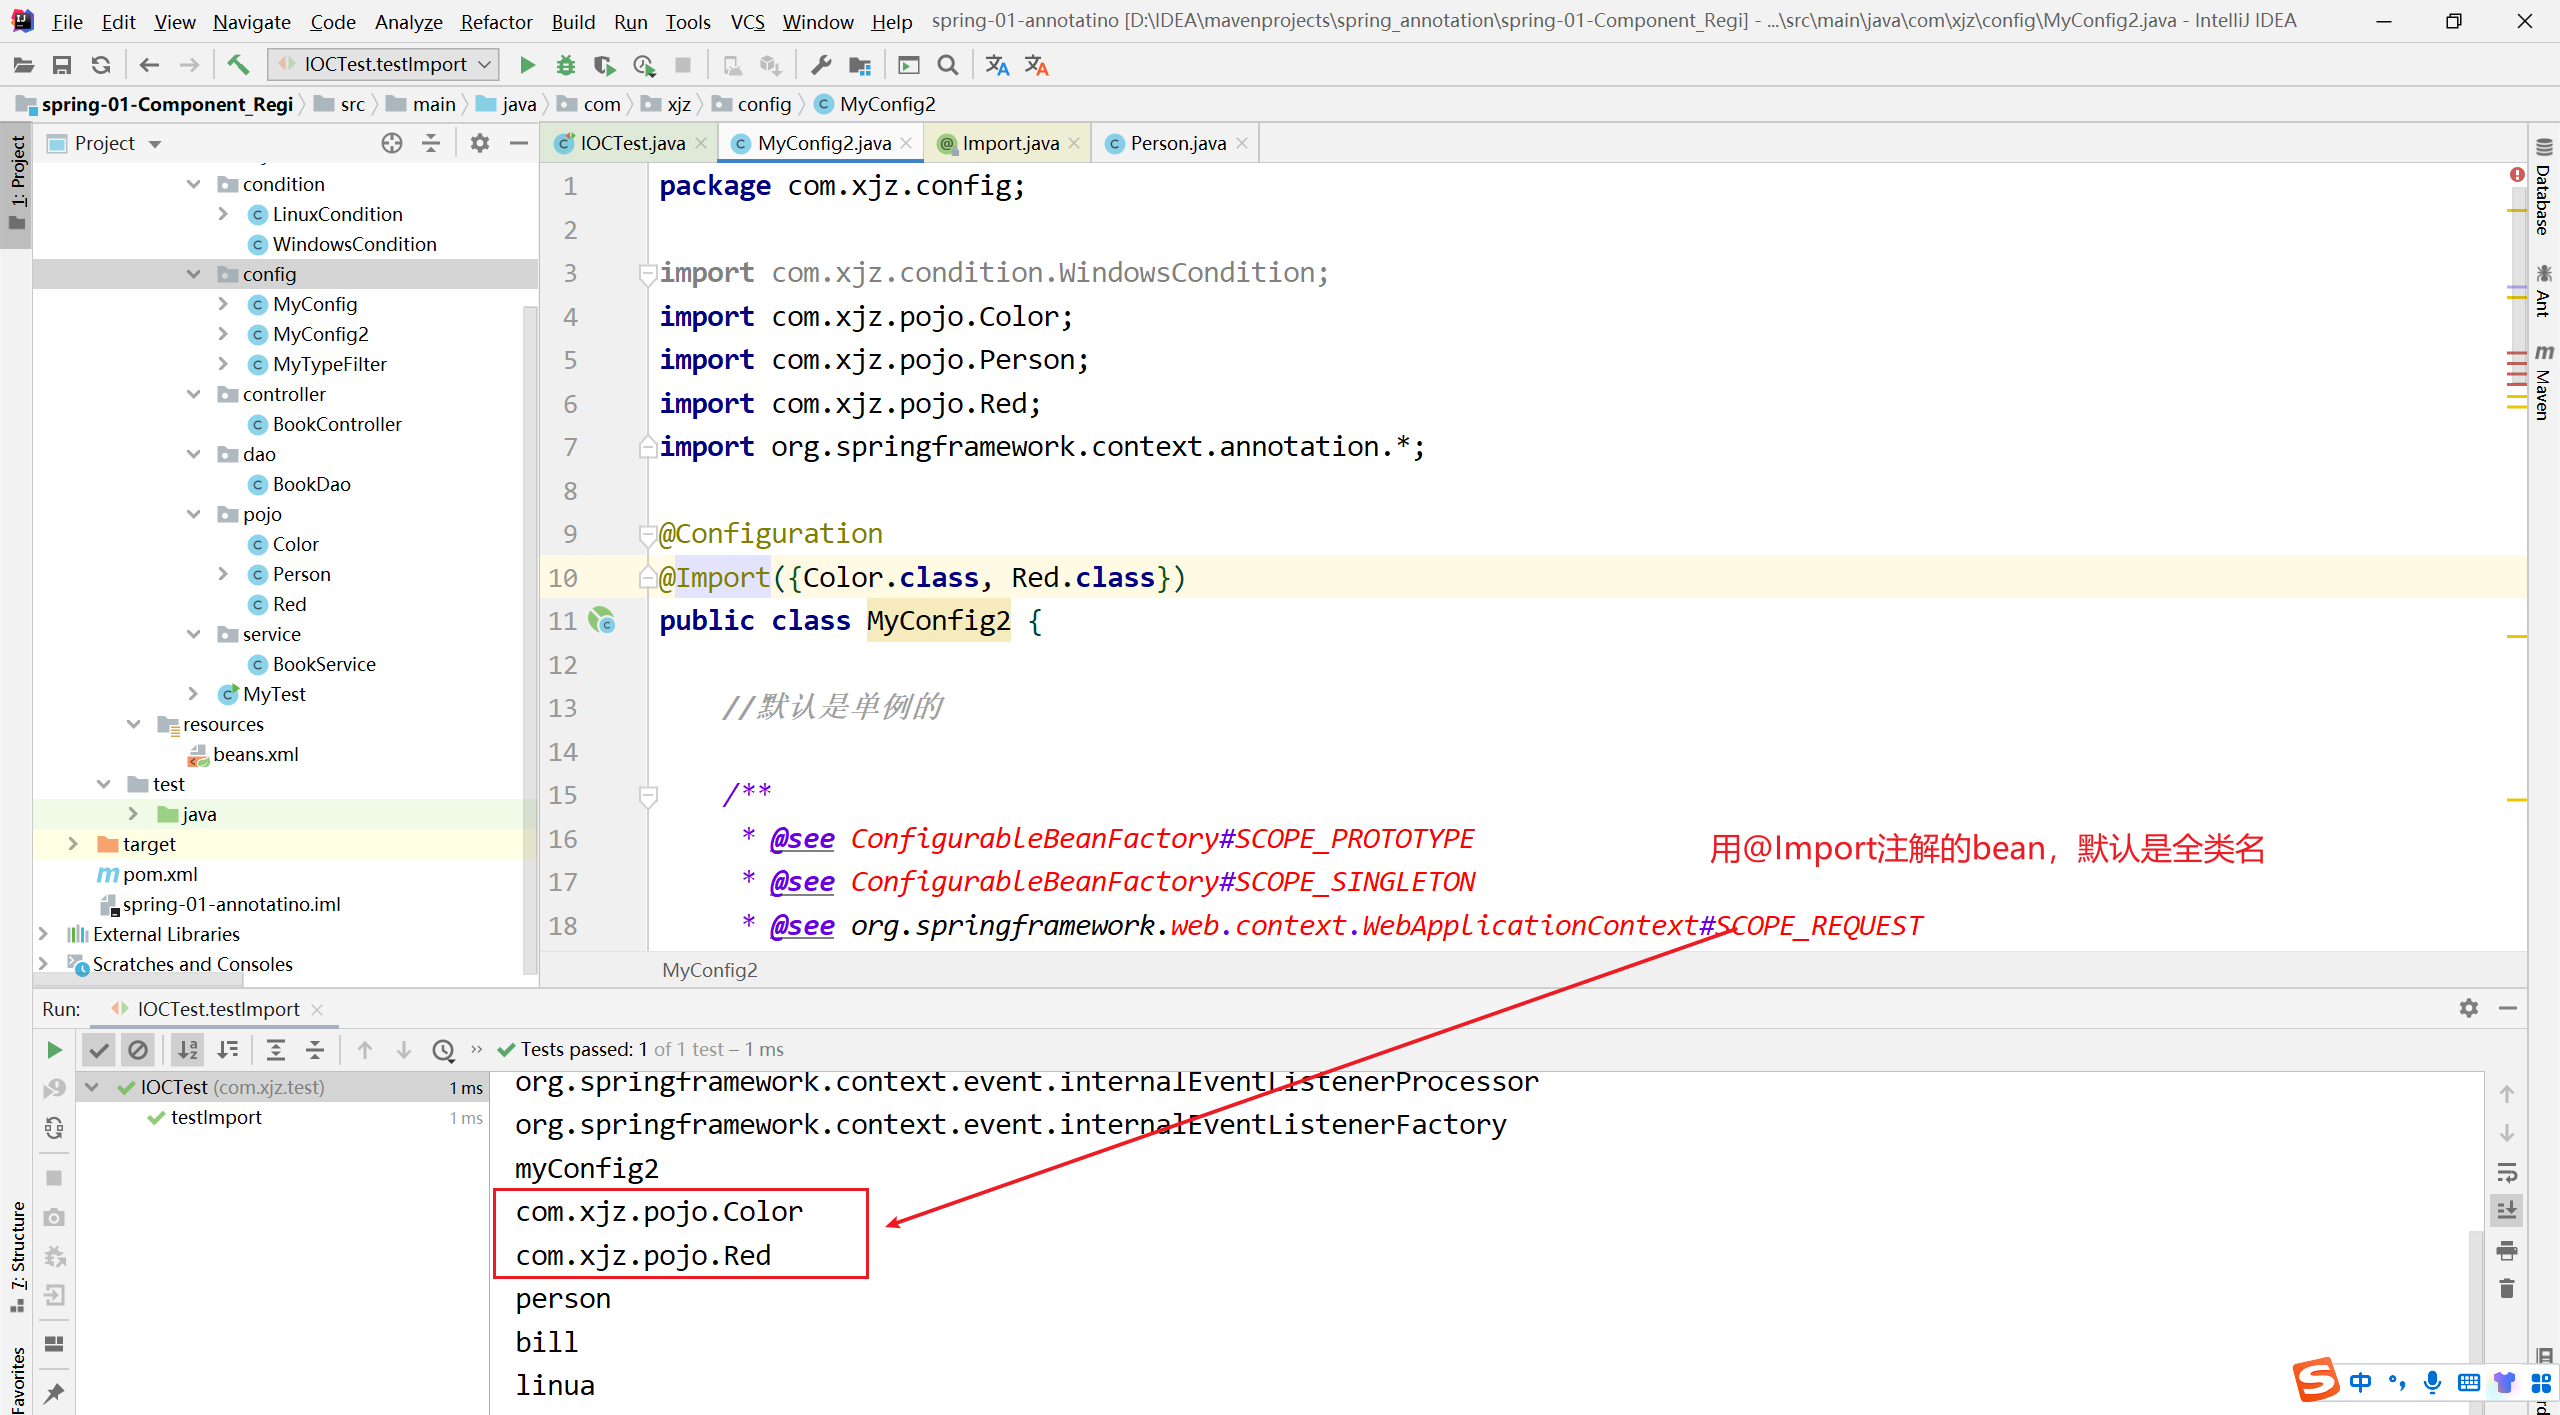
6. 组件注册-@Import-给容器中快速导入一个组件
注册bean的方式
向Spring容器中注册bean通常有以下几种方式:
- 包扫描+给组件标注注解(@Controller、@Servcie、@Repository、@Component),但这种方式比较有局限性,局限于我们自己写的类
- @Bean注解,通常用于导入第三方包中的组件
- @Import注解,快速向Spring容器中导入一个组件
我们先来看一下@Import注解的源码,如下图所示:
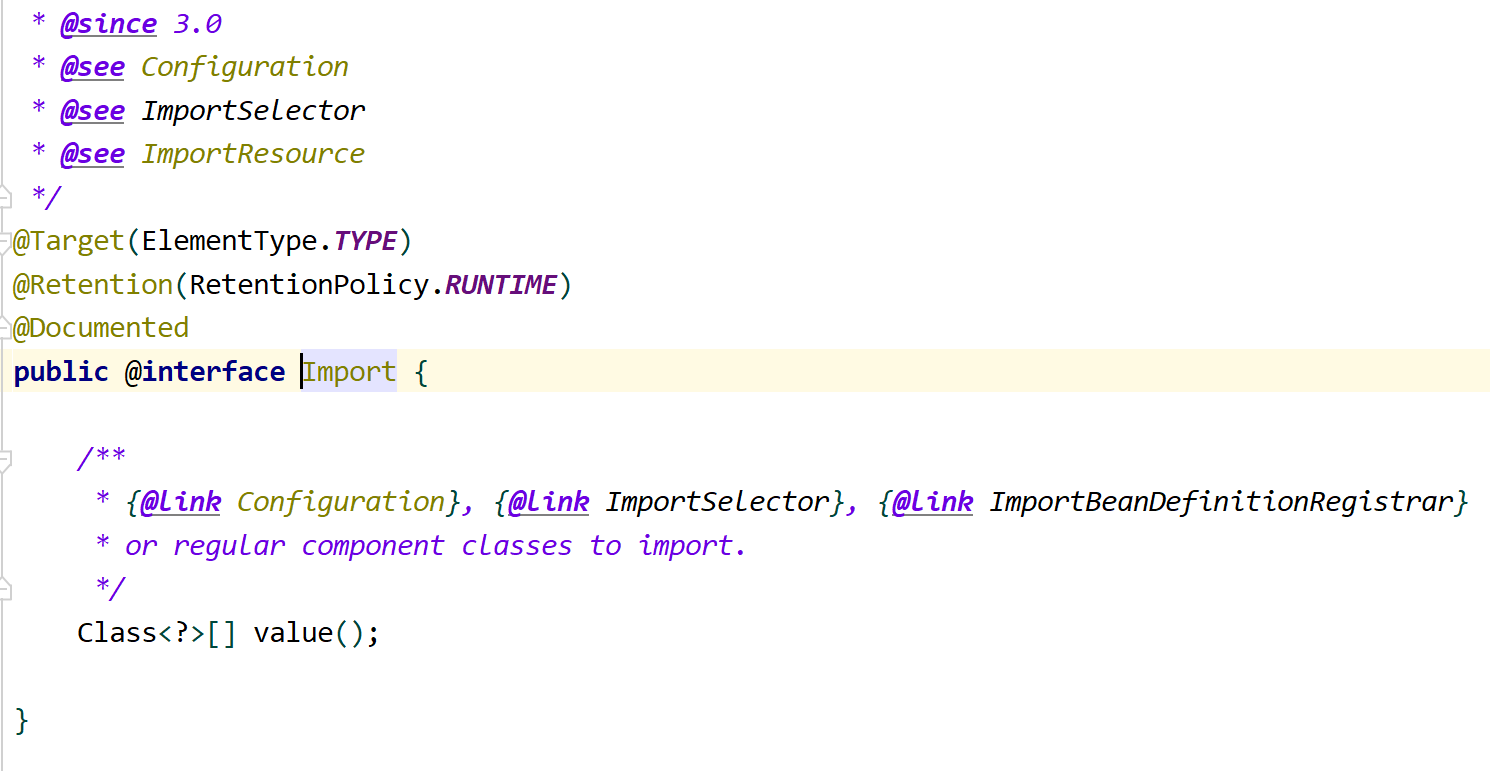
注意:@Import注解只允许放到类上面,不允许放到方法上。
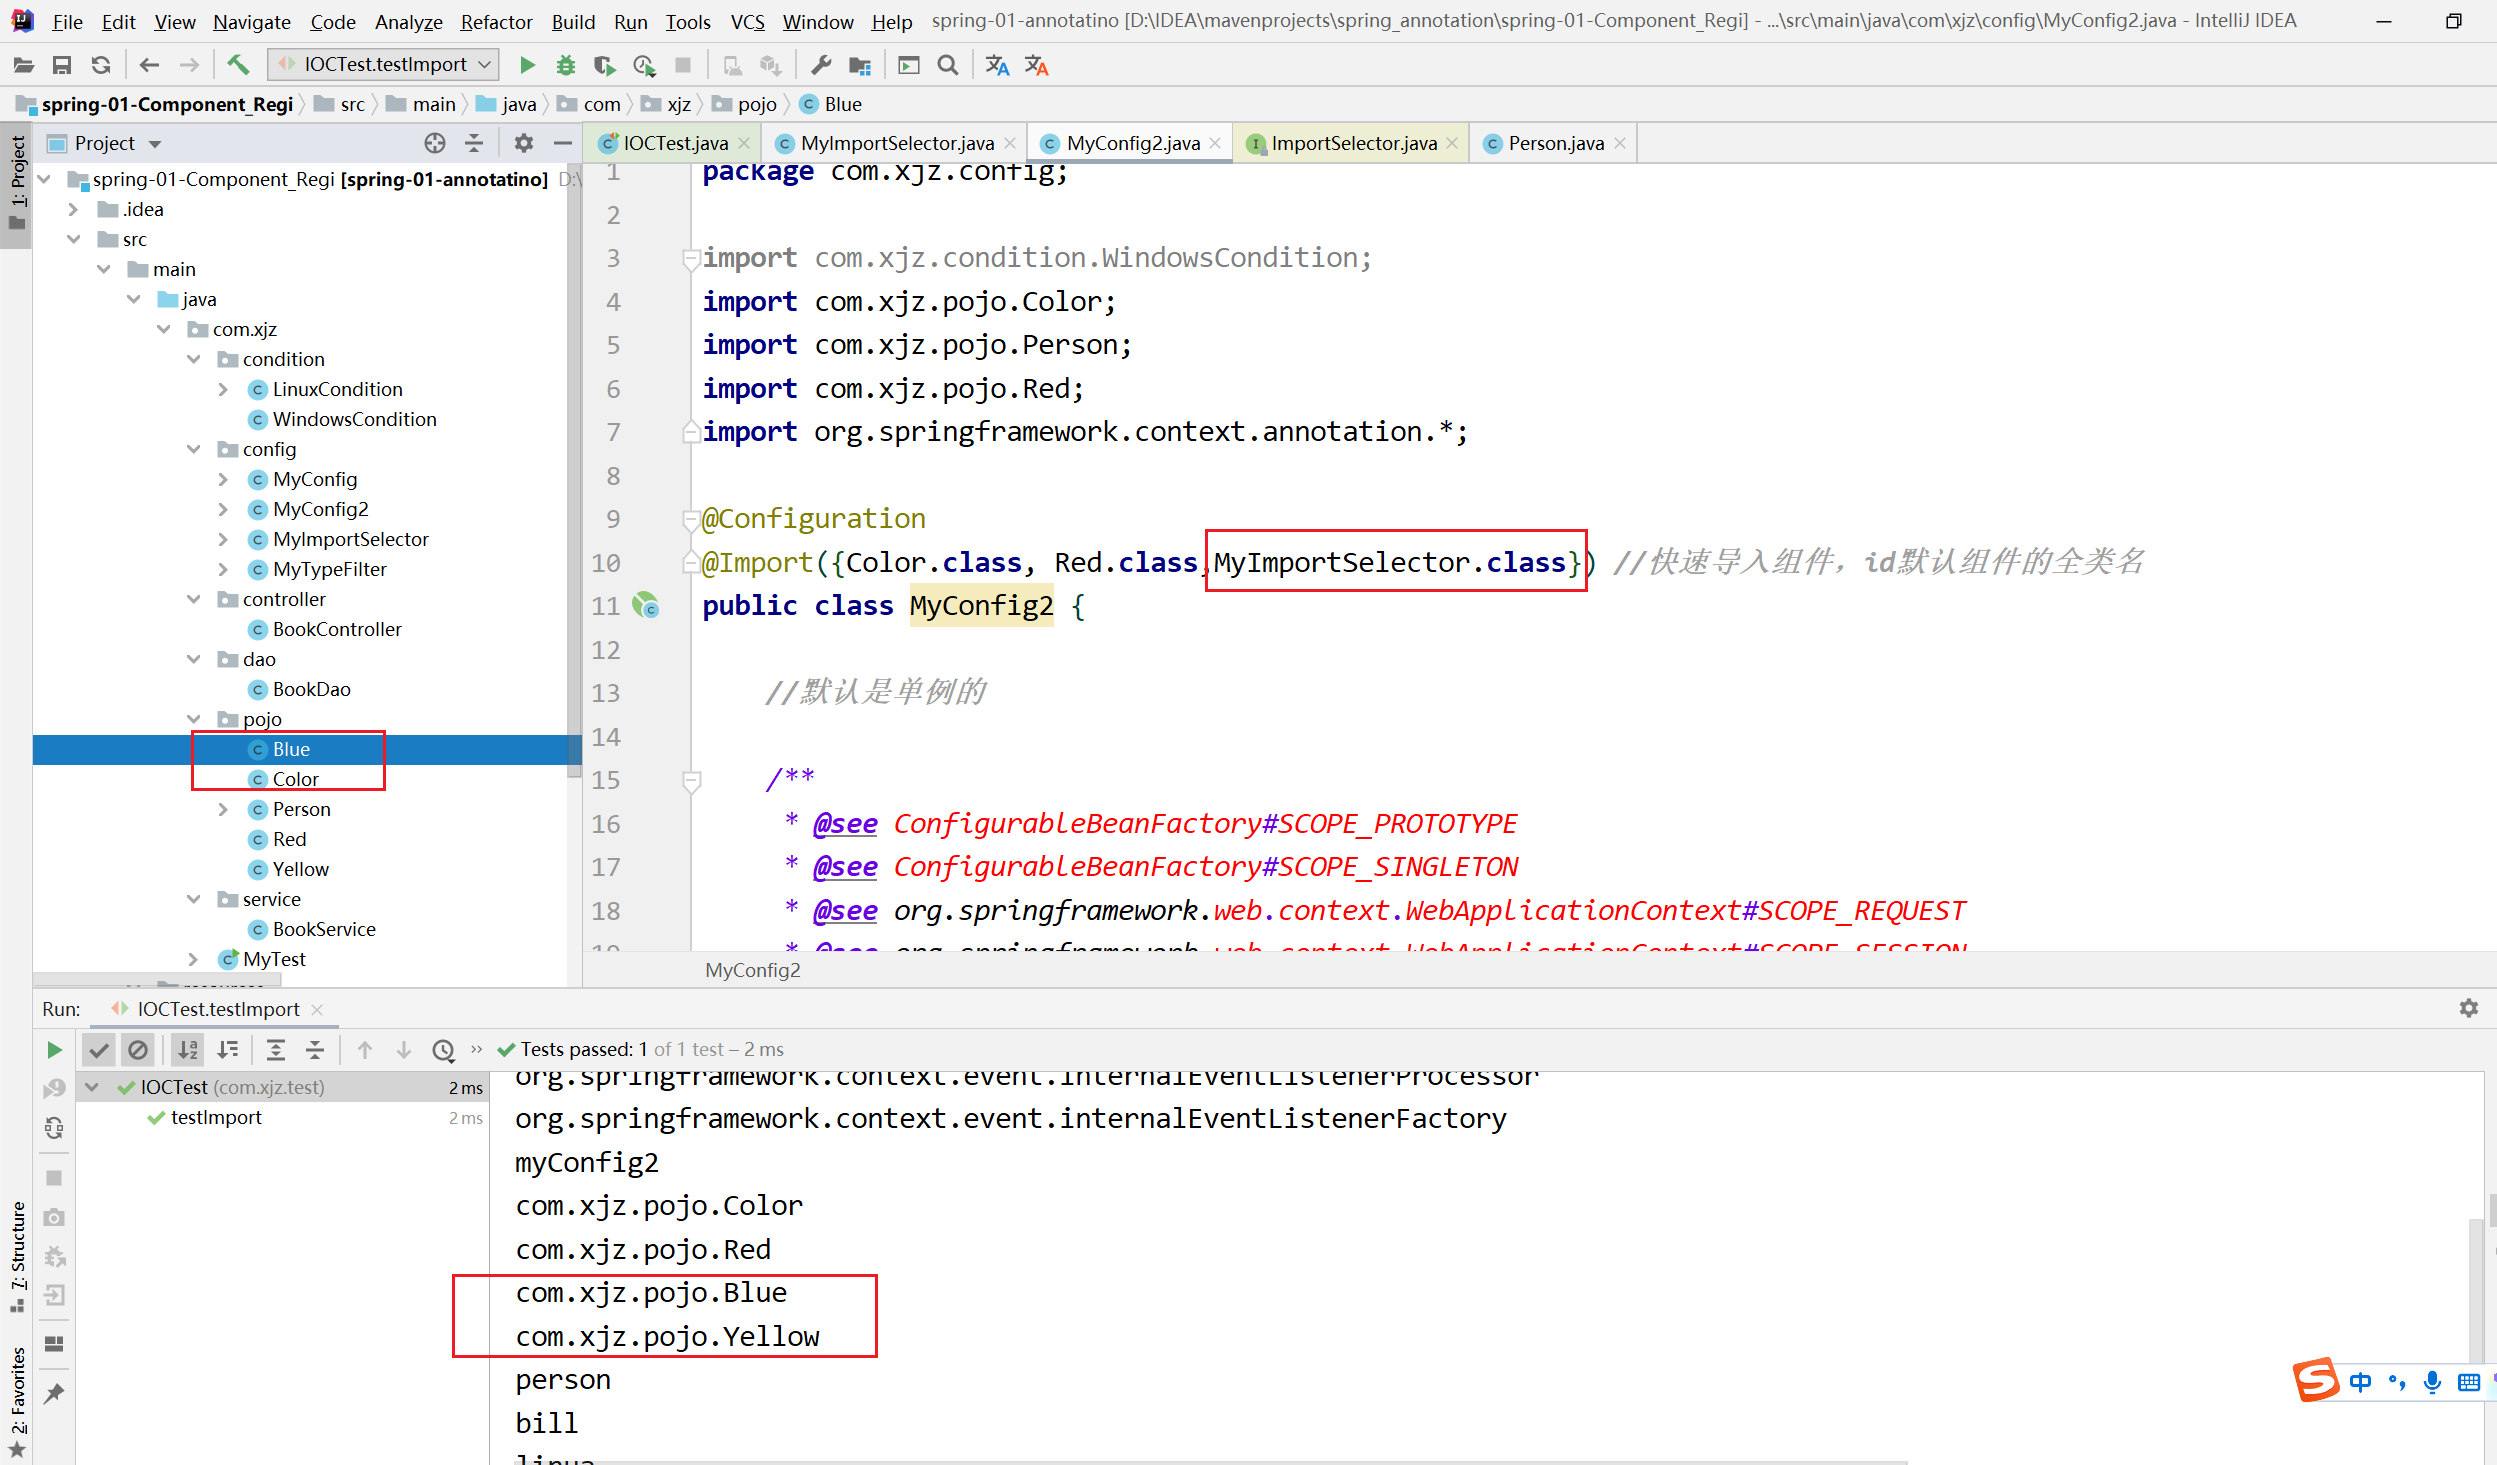
1)、@Import(要导入到容器中的组件):容器中就会自动注册这个组件,id默认是全类名
2)、@ImportSelector:返回需要导入的组件的全类名数组;–>Springboot用 的多
ImportSelector接口是Spring中导入外部配置的核心接口,在Spring Boot的自动化配置和@EnableXXX(功能性注解)都有它的存在。我们先来看一下ImportSelector接口的源码,如下所示。
public interface ImportSelector {

	/**
	 * Select and return the names of which class(es) should be imported based on
	 * the {@link AnnotationMetadata} of the importing @{@link Configuration} class.
	 */
	String[] selectImports(AnnotationMetadata importingClassMetadata);

}
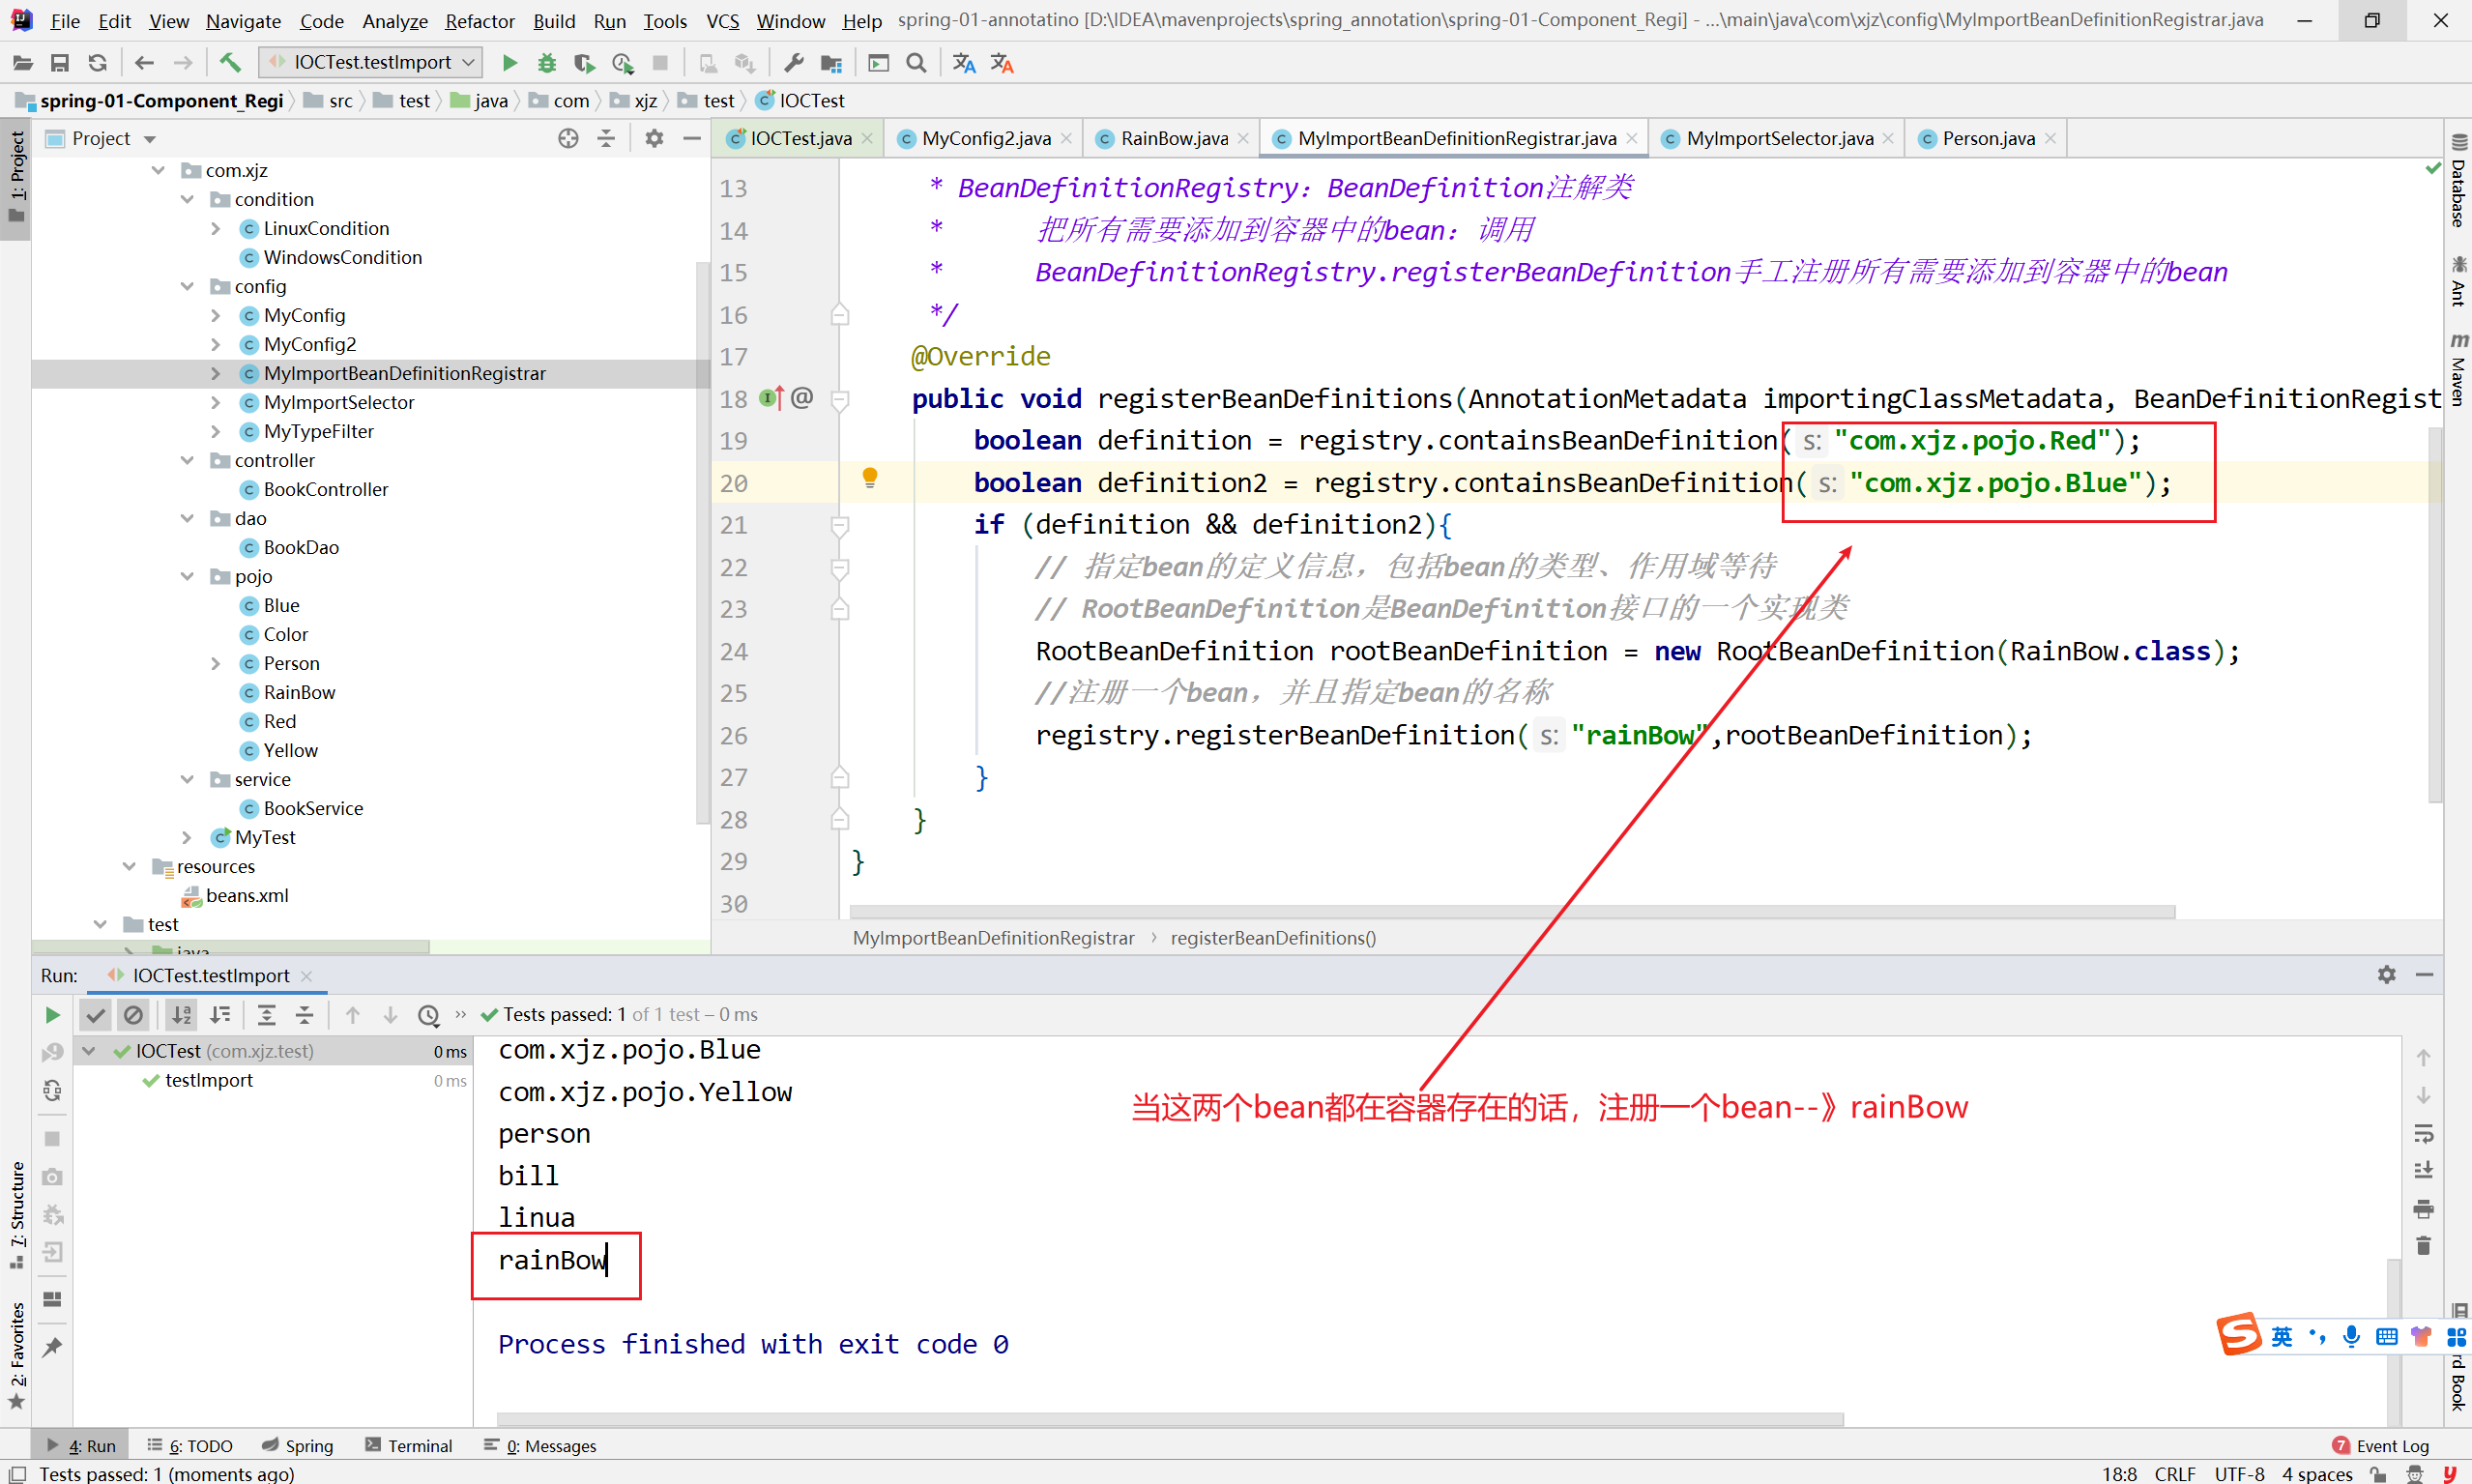
3)、@ImportBeanDefinitionRegistrar:手动注册bean到容器中
ImportBeanDefinitionRegistrar需要配合@Configuration和@Import这俩注解,其中,@Configuration注解定义Java格式的Spring配置文件,@Import注解导入实现了ImportBeanDefinitionRegistrar接口的类。
public interface ImportBeanDefinitionRegistrar {

	/**
	 * Register bean definitions as necessary based on the given annotation metadata of
	 * the importing {@code @Configuration} class.
	 * <p>Note that {@link BeanDefinitionRegistryPostProcessor} types may <em>not</em> be
	 * registered here, due to lifecycle constraints related to {@code @Configuration}
	 * class processing.
	 * @param importingClassMetadata annotation metadata of the importing class
	 * @param registry current bean definition registry
	 */
	public void registerBeanDefinitions(
			AnnotationMetadata importingClassMetadata, BeanDefinitionRegistry registry);

}
4)、使用Spring提供的 FactoryBean(工厂Bean)
- 1)、默认获取到的是工程bean调用getObject创建的对象
- 2)、要获取工程Bean本身,我们需要给id前面加一个&
&colorFactoryBean
首先,创建一个ColorFactoryBean类,它得实现FactoryBean接口,如下所示。
//创建一个Spring定义的FactoryBean
public class ColorFactoryBean implements FactoryBean<Color> {

    //返回一个Color对象,这个对象会添加到容器中
    @Override
    public Color getObject() throws Exception {
        System.out.println("ColorFactoryBean....");
        return new Color();
    }

    @Override
    public Class<?> getObjectType() {
        return Color.class;
    }

    //是否单例?
    //true:这个bean是单实例,在容器中只保存一份
    //false:这个bean是多实例,每次获取都会创建一个新的bean
    @Override
    public boolean isSingleton() {
        return false;
    }
}
然后,我们在MainConfig2配置类中加入ColorFactoryBean的声明,如下所示。
 @Test
    public void testImport(){
        printBeans(applicationContext);
        Blue bean = applicationContext.getBean(Blue.class);
        System.out.println(bean);

        //工厂Bean获取的是调用getObject创建的对象
        Object bean2 = applicationContext.getBean("colorFactoryBean");
        Object bean3 = applicationContext.getBean("colorFactoryBean");
        System.out.println("bean的类型:"+bean2.getClass());
        System.out.println(bean2==bean3);

        Object bean4 = applicationContext.getBean("&colorFactoryBean");
        System.out.println(bean4.getClass());

    }
//ColorFactoryBean....
//ColorFactoryBean....
//bean的类型:class com.xjz.pojo.Color
//false
//class com.xjz.pojo.ColorFactoryBean


 230
230


 被折叠的 条评论
为什么被折叠?
被折叠的 条评论
为什么被折叠?
 到【灌水乐园】发言


