


从零开始手写Tomcat的教程
手写Tomcat
介绍
本项目主要是手写精简版的tomcat,力争做到不遗不漏
本项目gitee仓库链接如下:https://gitee.com/DaHuYuXiXi/easy-tomcat.git
本篇文章是梳理每一小节的基本脉络,具体每小节的代码实现,自行参考gitee仓库里面的提交记录
第一节 : 一个简单的Web服务器
本节主要重点在于建立基本的socket通信服务,完成最简单的Http通信
本节主要创建了HttpServer,Request和Response三个类,分别为程序入口点,解析请求的对象和负责响应的对象,IO选择的是最简单的BIO实现
注意点
在BIO中,accept()得到的客户端socket中,如果在使用过程中关闭了通道中的输入流或者输出流,会终止当前通道的连接,这点需要特点注意。 还需要注意,数据写完记得flush一下,否则数据会遗留在缓冲区中,导致浏览器接收不到数据
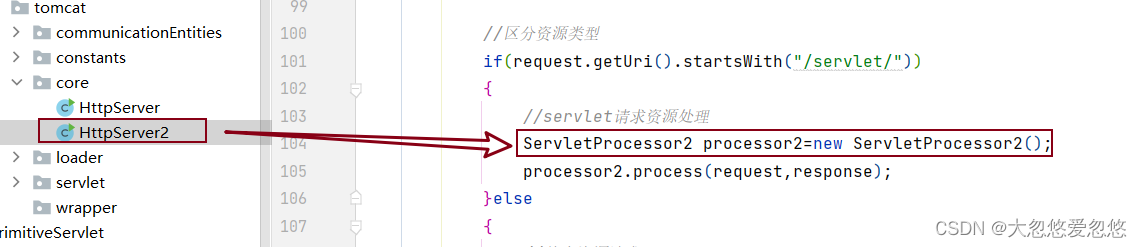
第二节: 一个简单的servlet容器
创建一个Primitvie类,然后将其生产的字节码文件移动到webroot目录下面,因为类加载器加载的class字节码文件

首先,我们指定一个规则,来负责区分静态资源请求和servlet请求,先简化为如下:
静态资源请求:
http://host:port/xx.html
servlet请求:
http://host:port/servlet/servletClass ---全类名
区分部分对应代码如下:
        //区分资源类型
            if(request.getUri().startsWith("/servlet/"))
            {
                //servlet请求资源处理
                ServletProcessor1 processor1=new ServletProcessor1();
                processor1.process(request,response);
            }else
            {
                //静态资源请求
                StaticResourceProcessor processor=new StaticResourceProcessor();
                processor.processor(request,response);
            }
下面需要做的是将Request和Response对象分别继承ServletRequest和ServletResponse对象
需要注意的是ServletResponse对象的getWriter方法重写:
    /**
     * <p>
     *     PrintWriter构造函数第二个参数为true,
     *     表示是否开启自动刷新,传入true表示对println的任何方法都刷新输出,但是print方法不会
     *     当然这个bug后续版本会修改
     * </p>
     * @return
     * @throws IOException
     */
    @Override
    public PrintWriter getWriter() throws IOException {
        writer = new PrintWriter(bufferedOutputStream, true);
        return writer;
    }
创建两个处理器对象,分别处理静态资源和sevlet请求资源
/**
 * <p>
 *     静态资源处理器
 * </p>
 * @author 大忽悠
 * @create 2022/3/5 23:09
 */
public class StaticResourceProcessor {
   public void processor(Request request, Response response)
   {
       response.sendStaticResource();
   }
}
/**
 * <p>
 *     servlet请求处理器
 * </p>
 * @author 大忽悠
 * @create 2022/3/5 23:11
 */
public class ServletProcessor1 {
 public void process(Request request, Response response) {
     try {
         //1.获取servlet的名字
         String uri = request.getUri();
         String serveltName = uri.substring(uri.lastIndexOf("/") + 1);
         System.out.println("servelt的名字为: "+serveltName);
         //2.创建类加载器
         URLClassLoader loader=null;
         URL[] urls = new URL[1];
         URLStreamHandler urlStreamHandler=null;
         //类路径
         File classPath=new File(Constants.WEB_ROOT);
         //资源仓库地址
         //file.getCanonicalPath: 返回标准的文件绝对路径
         //URL : 参数一: 资源协议--file,https,ftp等 参数二:主机名,http是需要 参数三:资源路径,这里填文件路径
         String respository=(new URL("file",null,classPath.getCanonicalPath()+File.separator)).toString();
         System.out.println("仓库地址为: "+respository);
         // urlStreamHandler通过资源不同的来源来决定处理的逻辑--->不同前缀来识别。比如:"file :"、"http :"、"jar :"
         urls[0] = new URL(null, respository, urlStreamHandler);
         //加载指定路径下的class
         loader=new URLClassLoader(urls);
         //负责加载当前访问的servlet
         Class myclass=null;
         //这里可以直接填类名,而非全类名的条件是,类文件放在java目录下
         myclass = loader.loadClass(serveltName);

         Servlet servlet=null;
         servlet = (Servlet) myclass.newInstance();
         //执行指定servlet的方法
         servlet.service((ServletRequest) request,(ServletResponse) response);
     } catch (IOException e) {
         e.printStackTrace();
     } catch (ClassNotFoundException e) {
         e.printStackTrace();
     } catch (InstantiationException e) {
         e.printStackTrace();
     } catch (IllegalAccessException e) {
         e.printStackTrace();
     } catch (ServletException e) {
         e.printStackTrace();
     }
 }
}
这里提两点:
- 如果一个URL以"/"结尾,则表明它指向的是一个目录,否则,URL默认指向一个JAR文件,根据需要载入器会下载并打开这个JAR文件
- 在servlet容器中,类加载器查询servlet类的目录称为仓库
这里对URLClassLoader不清楚的,自己去查资料
到此为止,大致思路和代码就完工了,但是完美了吗? 不不不,还有很大的问题
public void process(Request request, Response response){
.....
         //执行指定servlet的方法
         servlet.service((ServletRequest) request,(ServletResponse) response);
}
有没有看出来问题,直接将Request对象和Response传给用户,这意味着,用户可以调用Request的parse方法和Response的sendStaticResource方法。
显然,这样是非常不安全的,但是还不能将parse方法和sendStaticResource方法设置为私有的,因为其他类还需要调用。
下面有两种解决方法:
- Request和Response类都设置为默认的访问修饰符,这样就不能从他们所在包外访问了
- 外观模式
这里主要讲一下外观模式的使用,因为第一种方法存在局限性

外观模式在此处使用的作用不是屏蔽系统使用的复杂性,主要是为了向用户隐蔽一些内部方法

虽然此时程序员仍然可以将servletRequest对象向下转型RequestFacade对象,但是只能访问ServletRequest对象中提供的方法,保证了Request对象中的parse方法的安全性。

在将Request和Response对象传给用户的时候,将其转换为外观对象,传入。
第三节: 连接器
Catalina中主要有两个模块: 连接器(connector) 和 容器(container)。
本节重点在于建立一个连接器对象,来增强第二节中的应用程序功能
本节中的连接器主要负责解析HTTP请求头,使servlet实例能够获取到请求头,cookie和请求参数/值等信息。
并且我们还需要对之前遗留下来的Response的getWriter()问题进行解决
从本节开始,连接器和容器是分开的。
StringManager类
该类用来处理应用程序中不同模块之间和Catalina本身中错误信息的国际化操作。


    private static Hashtable managers = new Hashtable();

    public synchronized static StringManager getManager(String packageName)
    {
        StringManager mgr = (StringManager) managers.get(packageName);
        if(mgr==null)
        {
            mgr=new StringManager(packageName);
            managers.put(packageName,mgr);
        }
        return mgr;
    }


StringManager类源码会在下面给出
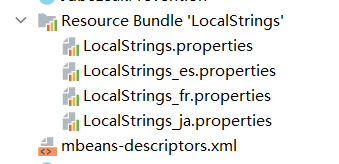
public class StringManager {

    private ResourceBundle bundle;

    //设为private,单例模式的特点,要获取对象,可以通过getManager(String)方法
    private StringManager() {
        bundle = ResourceBundle.getBundle("LocalStrings");
    }

    //StringManager类实例的包下properties文件中等号左边的值作为Key传递
    //返回的是等号右面的信息
    public String getString(String key) {
        if (key == null) {
            String msg = "key is null";

            throw new NullPointerException(msg);
        }
        String str = null;
        try {
            str = bundle.getString(key);
    } catch (MissingResourceException mre) {
            str = "Cannot find message associated with key '" + key + "'";
        }
        return str;
    }

    //保存不同包下的StringManager对象
    private static Hashtable managers = new Hashtable();

    //单例模式用这个方法获取不同包的StringManager对象,
    //因为可能同时被多个类使用产生错误,所以方法需要设置为同步
    public synchronized static StringManager getManager(String packageName) {
        StringManager mgr = (StringManager) managers.get(packageName);
        if (mgr == null) {
            mgr = new StringManager();
            managers.put(packageName, mgr);
        }
        return mgr;
    }
}
ResourceBundle是java提供用来解决国际化和本地化问题的类
简单介绍一下ResourceBundle国际化的使用:
package org.bundle;

import java.util.Locale;
import java.util.ResourceBundle;

public class TestResourceBundle {

    public static void main(String[] args) {

        Locale locale1 = new Locale("zh", "CN");
        ResourceBundle resb1 = ResourceBundle.getBundle("org.bundle.myres", locale1);
        System.out.println(resb1.getString("login"));

        Locale locale3 = new Locale("en", "US");
        ResourceBundle resb3 = ResourceBundle.getBundle("org.bundle.myres", locale3);
        System.out.println(resb3.getString("login"));

        ResourceBundle resb2 = ResourceBundle.getBundle("org.bundle.myres");//按
        System.out.println(resb2.getString("login"));
    }
}
myres_en_US.properties和myres.properties内容
login=login
myres_zh_CN.properties内容:后面表示“请登录"中文的UTF-8编码
login=\u8BF7\u767B\u5F55
读取的文件命名有规范: 自定义名_语言代码_国别代码.properties,
对于ResourceBundle而言,需要加上完整包名,getBundle第一个参数就是完整包名+自定义名 ,而语言代码和国别代码来自Locale中。
输出结果
请登录
login
请登录
可以看到,如果没有指定Locale,使用的是系统默认的区域和语言。
StringManager的具体使用可以参考Cookie:

其实就是去properties文件中,通过指定的key值查找到预先设置好的错误消息值,进行输出显示。

源码: 源码中使用了缓存,防止每次获取StringManager都要重新创建。并且还增加了可以往预定的错误消息中插入命令参数的机制。这些都值得我们借鉴和学习
/*
 *  Licensed to the Apache Software Foundation (ASF) under one or more
 *  contributor license agreements.  See the NOTICE file distributed with
 *  this work for additional information regarding copyright ownership.
 *  The ASF licenses this file to You under the Apache License, Version 2.0
 *  (the "License"); you may not use this file except in compliance with
 *  the License.  You may obtain a copy of the License at
 *
 *      http://www.apache.org/licenses/LICENSE-2.0
 *
 *  Unless required by applicable law or agreed to in writing, software
 *  distributed under the License is distributed on an "AS IS" BASIS,
 *  WITHOUT WARRANTIES OR CONDITIONS OF ANY KIND, either express or implied.
 *  See the License for the specific language governing permissions and
 *  limitations under the License.
 */

package org.apache.catalina.tribes.util;

import java.text.MessageFormat;
import java.util.Enumeration;
import java.util.Hashtable;
import java.util.LinkedHashMap;
import java.util.Locale;
import java.util.Map;
import java.util.MissingResourceException;
import java.util.ResourceBundle;


/**
 * An internationalization / localization helper class which reduces
 * the bother of handling ResourceBundles and takes care of the
 * common cases of message formating which otherwise require the
 * creation of Object arrays and such.
 *
 * <p>The StringManager operates on a package basis. One StringManager
 * per package can be created and accessed via the getManager method
 * call.
 *
 * <p>The StringManager will look for a ResourceBundle named by
 * the package name given plus the suffix of "LocalStrings". In
 * practice, this means that the localized information will be contained
 * in a LocalStrings.properties file located in the package
 * directory of the classpath.
 *
 * <p>Please see the documentation for java.util.ResourceBundle for
 * more information.
 *
 * @author James Duncan Davidson [duncan@eng.sun.com]
 * @author James Todd [gonzo@eng.sun.com]
 * @author Mel Martinez [mmartinez@g1440.com]
 * @see java.util.ResourceBundle
 */
public class StringManager {

    private static int LOCALE_CACHE_SIZE = 10;

    /**
     * The ResourceBundle for this StringManager.
     */
    private final ResourceBundle bundle;
    private final Locale locale;


    /**
     * Creates a new StringManager for a given package. This is a
     * private method and all access to it is arbitrated by the
     * static getManager method call so that only one StringManager
     * per package will be created.
     *
     * @param packageName Name of package to create StringManager for.
     */
    private StringManager(String packageName, Locale locale) {
        String bundleName = packageName + ".LocalStrings";
        ResourceBundle bnd = null;
        try {
            bnd = ResourceBundle.getBundle(bundleName, locale);
        } catch (MissingResourceException ex) {
            // Try from the current loader (that's the case for trusted apps)
            // Should only be required if using a TC5 style classloader structure
            // where common != shared != server
            ClassLoader cl = Thread.currentThread().getContextClassLoader();
            if (cl != null) {
                try {
                    bnd = ResourceBundle.getBundle(bundleName, locale, cl);
                } catch (MissingResourceException ex2) {
                    // Ignore
                }
            }
        }
        bundle = bnd;
        // Get the actual locale, which may be different from the requested one
        if (bundle != null) {
            Locale bundleLocale = bundle.getLocale();
            if (bundleLocale.equals(Locale.ROOT)) {
                this.locale = Locale.ENGLISH;
            } else {
                this.locale = bundleLocale;
            }
        } else {
            this.locale = null;
        }
    }


    /**
     * Get a string from the underlying resource bundle or return null if the
     * String is not found.
     *
     * @param key to desired resource String
     *
     * @return resource String matching <i>key</i> from underlying bundle or
     *         null if not found.
     *
     * @throws IllegalArgumentException if <i>key</i> is null
     */
    public String getString(String key) {
        if (key == null){
            String msg = "key may not have a null value";
            throw new IllegalArgumentException(msg);
        }

        String str = null;

        try {
            // Avoid NPE if bundle is null and treat it like an MRE
            if (bundle != null) {
                str = bundle.getString(key);
            }
        } catch (MissingResourceException mre) {
            //bad: shouldn't mask an exception the following way:
            //   str = "[cannot find message associated with key '" + key +
            //         "' due to " + mre + "]";
            //     because it hides the fact that the String was missing
            //     from the calling code.
            //good: could just throw the exception (or wrap it in another)
            //      but that would probably cause much havoc on existing
            //      code.
            //better: consistent with container pattern to
            //      simply return null.  Calling code can then do
            //      a null check.
            str = null;
        }

        return str;
    }


    /**
     * Get a string from the underlying resource bundle and format
     * it with the given set of arguments.
     *
     * @param key  The key for the required message
     * @param args The values to insert into the message
     *
     * @return The requested string formatted with the provided arguments
     */
    public String getString(final String key, final Object... args) {
        String value = getString(key);
        if (value == null) {
            value = key;
        }

        MessageFormat mf = new MessageFormat(value);
        mf.setLocale(locale);
        return mf.format(args, new StringBuffer(), null).toString();
    }


    /**
     * Identify the Locale this StringManager is associated with
     *
     * @return The Locale associated with this instance
     */
    public Locale getLocale() {
        return locale;
    }


    // --------------------------------------------------------------
    // STATIC SUPPORT METHODS
    // --------------------------------------------------------------

    private static final Map<String, Map<Locale,StringManager>> managers =
            new Hashtable<>();


    /**
     * The StringManager will be returned for the package in which the class is
     * located. If a manager for that package already exists, it will be reused,
     * else a new StringManager will be created and returned.
     *
     * @param clazz The class for which to retrieve the StringManager
     *
     * @return The StringManager for the given class.
     */
    public static final StringManager getManager(Class<?> clazz) {
        return getManager(clazz.getPackage().getName());
    }


    /**
     * If a manager for a package already exists, it will be reused, else a new
     * StringManager will be created and returned.
     *
     * @param packageName The package name
     *
     * @return The StringManager for the given package.
     */
    public static final StringManager getManager(String packageName) {
        return getManager(packageName, Locale.getDefault());
    }


    /**
     * If a manager for a package/Locale combination already exists, it will be
     * reused, else a new StringManager will be created and returned.
     *
     * @param packageName The package name
     * @param locale      The Locale
     *
     * @return The StringManager for a particular package and Locale
     */
    public static final synchronized StringManager getManager(
            String packageName, Locale locale) {

        Map<Locale,StringManager> map = managers.get(packageName);
        if (map == null) {
            /*
             * Don't want the HashMap to be expanded beyond LOCALE_CACHE_SIZE.
             * Expansion occurs when size() exceeds capacity. Therefore keep
             * size at or below capacity.
             * removeEldestEntry() executes after insertion therefore the test
             * for removal needs to use one less than the maximum desired size
             *
             */
            map = new LinkedHashMap<Locale,StringManager>(LOCALE_CACHE_SIZE, 1, true) {
                private static final long serialVersionUID = 1L;
                @Override
                protected boolean removeEldestEntry(
                        Map.Entry<Locale,StringManager> eldest) {
                    if (size() > (LOCALE_CACHE_SIZE - 1)) {
                        return true;
                    }
                    return false;
                }
            };
            managers.put(packageName, map);
        }

        StringManager mgr = map.get(locale);
        if (mgr == null) {
            mgr = new StringManager(packageName, locale);
            map.put(locale, mgr);
        }
        return mgr;
    }


    /**
     * Retrieve the StringManager for a list of Locales. The first StringManager
     * found will be returned.
     *
     * @param packageName The package for which the StringManager is required
     * @param requestedLocales the list of Locales
     *
     * @return the found StringManager or the default StringManager
     */
    public static StringManager getManager(String packageName,
            Enumeration<Locale> requestedLocales) {
        while (requestedLocales.hasMoreElements()) {
            Locale locale = requestedLocales.nextElement();
            StringManager result = getManager(packageName, locale);
            if (result.getLocale().equals(locale)) {
                return result;
            }
        }
        // Return the default
        return getManager(packageName);
    }
}
应用开发
本节的应用程序主要包含三个模块的开发: 连接器模块,启动模块和核心模块


这里体现了懒加载的思想

这里SocketInputStream是org.apache.catalina.connector.http.SocketInputStream
下面我们将按照:
- 启动应程序
- 连接器
- 创建HttpRequest对象
- 创建HttpResponse对象
的顺序进行讲解
BootStrap启动类
/**
 * <p>
 *     final防止别人继承破坏
 * </p>
 * @author zdh
 */
public final class BootStrap{
    public static void main(String[] args) {
        //创建连接器,启动连接器,负责接收客户端连接
        HttpConnector connector=new HttpConnector();
        connector.start();
    }
}
HttpConnector类
/**
 * @author 大忽悠
 * @create 2022/3/9 17:55
 */
public class HttpConnector implements Runnable{
    /**
     * tomcat是否停止
     */
    private boolean stopped;
    /**
     * 通信使用的协议
     */
    private String scheme="http";
    /**
     * 默认服务器端口号
     */
    private static final Integer DEFAULT_PORT=8080;

    /**
     * 创建一个新的线程,启动连接器
     */
    public void start() {
        new Thread(this).run();
    }


    public String getScheme() {
        return scheme;
    }


    @Override
    public void run() {
        ServerSocket serverSocket=null;
        try {
            //backlog设置连接队列大小,当队列中未处理的连接数超过backlog后,服务器会拒绝此次连接
            serverSocket=new ServerSocket(DEFAULT_PORT);
        } catch (IOException e) {
            e.printStackTrace();
            //通常: 0表示正常退出,1表示异常退出
            System.exit(1);
        }
        //循环等待客户端连接
        while(!stopped)
        {
            try {
                Socket socket = serverSocket.accept();
                //TODO:后期线程池优化处理
                new Thread(new Runnable() {
                    @Override
                    public void run() {
                        doHandleAccept(socket);
                    }
                },"大忽悠线程-"+ UUID.randomUUID().toString().substring(0,5)).start();
            } catch (Exception e) {
                e.printStackTrace();
            }
        }
        System.out.println("服务器已断开连接");
    }

    private void doHandleAccept(Socket socket) {
        try{
            System.out.println("当前线程: "+Thread.currentThread().getName());
            System.out.println("客户端已接入");
            //处理客户端连接请求
            //与上节的不同之处,不从连接器中直接判断请求类型,而是交给HttpProcessor处理
            HttpProcessor processor=new HttpProcessor(this);
            processor.process(socket);
        }catch (Exception e)
        {
            e.printStackTrace();
        }
    }
}
HttpProcessor类
该类目前主要负责解析请求行和请求头,并将相关属性注入请求和响应对象之中
/**
 * @author 大忽悠
 * @create 2022/3/9 18:03
 */
public class HttpProcessor {
    private HttpConnector connector = null;
    private HttpRequest request;
    private HttpRequestLine requestLine = new HttpRequestLine();
    private HttpResponse response;
    protected String method = null;
    protected String queryString = null;

    /**
     * 错误信息国际化管理
     */
//    protected StringManager sm = StringManager
//            .getManager("dhy.com.tomcat.core.connector.HttpProcessor");
    public HttpProcessor(HttpConnector httpConnector) {
        connector = httpConnector;
    }

    public void process(Socket socket) {
        /**
         * 因为无法找到tomcat4中该类的源码,这里我手动模拟了一下
         */
        SocketInputStream input = null;
        OutputStream output = null;
        try {
            input = new SocketInputStream(socket.getInputStream());
            output = socket.getOutputStream();
            //创建请求和响应对象
            request = new HttpRequest(input);
            response = new HttpResponse(response);
            //设置响应的浏览头
            response.setHeader("wish", "dhy-xpy");
            //解析请求行和响应头
            parseRequest(input, output);
            parseHeaders(input);
        } catch (Exception e) {
            e.printStackTrace();
        }
    }

    /**
     * 功能:解析请求头
     * 这个方法是org.apache.catalina.connector.http.HttpProcessor的简化版本
     * 这个方法解析了一些“简单”的头部,像"cookie", "content-length","content-type",忽略了其他头部
     */
    private void parseHeaders(SocketInputStream input) throws IOException, ServletException {
        //进入死循环,直到解析请求头结束跳出
        while (true) {
            HttpHeader header = new HttpHeader();
            //SocketInputStream流中获取header
            input.readHeader(header);
            //是否读取完毕
            if (header==null) {
                break;
            }
            String key = header.getKey();
            String value = header.getValue();
            //将获取到的请求头的名称和值放入HttpRquest对象中
           //如名称可以为content-length,值可以为10164(某个数字)
            request.addHeader(key,value);

            //判断是否是cookie(cookie包含在请求头中),格式如
            //Cookie: BD_UPN=1d314753; ispeed_lsm=4; sugstore=1; BAIDUID=3E664426E867095427DD59:FG=1; BIDUPSID=3E664426E827DD59; PSTM=1440774226; BDUSS=Ex4NkJ0bEF0WTgwMwAAAA; ATS_PSID=1
            if (key.equals("cookie")) {
                //如果是cookie,还要对cookie做特殊处理
                Cookie cookies[] = RequestUtil.parseCookieHeader(value);
                for (int i = 0; i < cookies.length; i++) {
                    if (cookies[i].getName().equals("jsessionid")) {
                        //不管url是否存在jsessionid,这里通通覆盖掉
                            request.setRequestedSessionId(cookies[i].getValue());
                            request.setRequestedSessionCookie(true);
                            request.setRequestedSessionURL(false);
                    }
                    request.addCookie(cookies[i]);
                }
                //判断请求中是否有content-length
            } else if (key.equals("content-length")) {
                int n = -1;
                try {
                    //有的话直接转为int类型保存到HttpRequest对象中
                    n = Integer.parseInt(value);
                } catch (Exception e) {
                    throw new ServletException("content-length parse error!");
                }
                request.setContentLength(n);
            } else if (key.equals("content-type")) {
                //如果是content-type直接保存
                request.setContentType(value);
            }
        }
    }


    /**
     * 解析请求行
     * 请求行如:GET /myApp/ModernServlet?userName=tarzan&password=pwd HTTP/1.1
     */
    private void parseRequest(SocketInputStream input, OutputStream output) throws ServletException {
        //从SocketInputStream对象中直接获取RequestLine对象
        input.readRequestLine(requestLine);
        //获取请求的方式:如GET
        String method = requestLine.method;
        //获取请求的URI---携带请求参数---/myApp/ModernServlet?userName=tarzan&password=pwd
        String uri = requestLine.uri;
        //获取请求的协议版本:如HTTP/1.1
        String protocol = requestLine.protocol;
        //请求行无效的情况:没有请求的方式或没有请求的URI
        if (method.length() < 1) {
            throw new ServletException("Missing HTTP request method");
        } else if (uri.length() < 1) {
            throw new ServletException("Missing HTTP request URI");
        }
        //判断和获取请求行中第二项中的请求参数,并获取到URI
        int question = uri.indexOf("?");
        if (question >= 0) {
            //有参数的
            //得到"?"后面的查询字符串:如userName=tarzan&password=pwd,并保存到HttpRequest对象中
            request.setQueryString(uri.substring(question + 1, uri.length()));
            //得到URI
            uri = uri.substring(0, question);
        } else {
            //没参数的
            request.setQueryString(null);
        }

        //这里的if语句用于请求的不是以/开头的相对资源,
        //即获取以绝对地址的请求方式的URI
        if (!uri.startsWith("/")) {
            int pos = uri.indexOf("://");
            // Parsing out protocol and host name
            if (pos != -1) {
                pos = uri.indexOf('/', pos + 3);
                if (pos == -1) {
                    uri = "";
                } else {
                    uri = uri.substring(pos);
                }
            }
        }

        //检查并解析第二项中的可能存在的 jsessionid
        String match = ";jsessionid=";
        //;的起始位置
        int start = uri.indexOf(match);
        if (start >= 0) {
            //=的结束位置,
            String jsessionid = uri.substring(start + match.length());
            //将获取到的值放到HttpRequest对象中
            request.setRequestedSessionId(jsessionid);
            //当 jsessionid 被找到,也意味着会话标识符是携带在查询字符串里边,而不是在 cookie里边。需要传递true
            request.setRequestedSessionURL(true);
            //将uri去除jessionId
            uri = uri.substring(0, start);
        } else {
            request.setRequestedSessionId(null);
            request.setRequestedSessionURL(false);
        }

        //用于纠正“异常”的 URI。
        String normalizedUri = normalize(uri);

        // Set the corresponding request properties
        ((HttpRequest) request).setMethod(method);
        request.setProtocol(protocol);
        if (normalizedUri != null) {
            ((HttpRequest) request).setRequestURI(normalizedUri);
        } else {
            ((HttpRequest) request).setRequestURI(uri);
        }

        if (normalizedUri == null) {
            throw new ServletException("Invalid URI: " + uri + "'");
        }
    }

    //纠正“异常”的 URI。例如,任何\的出现都会给/替代。
    //这里涉及到URL的编码解码:编码的格式为:%加字符的ASCII码的十六进制表示
    //如果URL不能纠正返回null,否则返回相同的或者被纠正后的 URI
    private String normalize(String path) {
        if (path == null)
            return null;
        // Create a place for the normalized path
        String normalized = path;

        //如果URI是/~开头的,除去URI前面前四个字符并加上/~
        //%7E->~
        if (normalized.startsWith("/%7E") || normalized.startsWith("/%7e"))
            normalized = "/~" + normalized.substring(4);

        //下面是解码后对应的结果,这些字符不能在URI中出现
        //%25->%   %2F->/  %2E->.  %5c->\
        //如果找到如下字符的其中一个,说明URI错误
        if ((normalized.indexOf("%25") >= 0)
                || (normalized.indexOf("%2F") >= 0)
                || (normalized.indexOf("%2E") >= 0)
                || (normalized.indexOf("%5C") >= 0)
                || (normalized.indexOf("%2f") >= 0)
                || (normalized.indexOf("%2e") >= 0)
                || (normalized.indexOf("%5c") >= 0)) {
            return null;
        }
        //如果URI仅仅只是/.则返回/
        //如www.cnblogs.com/.是可以纠正的
        if (normalized.equals("/."))
            return "/";

        //将\转为/,这里的\\是指\,第一个\是转义字符
        if (normalized.indexOf('\\') >= 0)
            normalized = normalized.replace('\\', '/');
        //URI字符串如果没有以/开头就加给它
        if (!normalized.startsWith("/"))
            normalized = "/" + normalized;
        //如果存在//,将剩下/
        //如http://www.cnblogs.com/lzb1096101803/p//4797948.html变为
        //http://www.cnblogs.com/lzb1096101803/p/4797948.html
        while (true) {
            int index = normalized.indexOf("//");
            if (index < 0)
                break;
            normalized = normalized.substring(0, index)
                    + normalized.substring(index + 1);
        }
        //如果存在/./,变成/
        while (true) {
            int index = normalized.indexOf("/./");
            if (index < 0)
                break;
            normalized = normalized.substring(0, index)
                    + normalized.substring(index + 2);
        }
        //如果存在/../
        while (true) {
            int index = normalized.indexOf("/../");
            if (index < 0)
                break;
            if (index == 0)
                return (null); // Trying to go outside our context
            int index2 = normalized.lastIndexOf('/', index - 1);
            normalized = normalized.substring(0, index2)
                    + normalized.substring(index + 3);
        }
        //URI中存在/...或者3个点以上,认为不能纠正
        if (normalized.indexOf("/...") >= 0)
            return (null);

        //返回修改后的URI
        return (normalized);
    }
}
HttpRequest类
该类主要作用就是保存当前请求相关的信息,例如:请求头,请求uri,请求头和请求参数
但注意: 请求参数只有在第一次被读取的时候,才会进行解析,相关方法,例如getParameter,getParameterMap, getParameterNames 或者 getParameterValues 四个读取参数的方法开头都调用了 parseParameter 方法
并且通过一个布尔变量parsed来标志请求参数是否被解析过,以此来避免进行重复解析
package dhy.com.tomcat.communicationEntities;

import dhy.com.tomcat.core.connector.stream.SocketInputStream;
import dhy.com.tomcat.core.connector.utils.RequestUtil;

import javax.servlet.*;
import javax.servlet.http.Cookie;
import java.io.BufferedReader;
import java.io.IOException;
import java.io.UnsupportedEncodingException;
import java.util.*;

/**
 * @author 大忽悠
 * @create 2022/3/9 18:12
 */
public class HttpRequest implements ServletRequest {
    private String queryString;
    private String protocol;
    private String sessionId;
    private String method;
    private String requestUri;
    private boolean sessionURL;
    private boolean cookieURL;
    private Map<String, String> headers = new HashMap<>();
    /**
     * 最大cookie数量
     */
    private final int DEFAULT_MAX_COOKIE_SIZE = 100;
    private List<Cookie> cookies = new ArrayList<>();
    private int contentLength;
    private Object contentType;
    private boolean parsed;
    private ParameterMap parameters;
     private SocketInputStream inputStream;

    public HttpRequest(SocketInputStream input) {
    inputStream=input;
    }

    public void addCookie(Cookie cookie) throws ServletException {
        if (cookies.size() + 1 > DEFAULT_MAX_COOKIE_SIZE) {
            throw new ServletException("over max cookies size!");
        }
        cookies.add(cookie);
    }

    public void setContentLength(int n) {
        this.contentLength = n;
    }

    public void setContentType(String value) {
        this.contentType = value;
    }

    protected void parseParameters() {
        if (parsed)
        {
            //如果已经解析过了,直接返回
            return;
        }
        ParameterMap results = parameters;
        if (results == null) {
            results = new ParameterMap();
        }
        //打开 parameterMap的锁以便写值。
        results.setLocked(false);
        //获得字符编码
        String encoding = getCharacterEncoding();
        //检查字符编码,并在字符编码为 null的时候赋予默认字符编码。
        if (encoding == null){
            encoding = "ISO-8859-1";
        }
        //getQueryString方法在上一节解析了请求头时,如果URL如果有查询参数有设置。
        //尝试解析查询字符串。解析参数是使用org.apache.Catalina.util.RequestUtil的 parseParameters方法来处理的。
        //如果queryString为空(URL中没有参数),下面parseParameters方法的的解析直接返回
        String queryString = getQueryString();
        //解析请求参数---Get方式拼接在URL后面的
        RequestUtil.parseParameters(results, queryString, encoding);

        //获取内容类型
        String contentType = getContentType();
        if (contentType == null){
            contentType = "";
        }
        int semicolon = contentType.indexOf(';');
        if (semicolon >= 0) {
            contentType = contentType.substring(0, semicolon).trim();
        } else {
            contentType = contentType.trim();
        }

        //请求参数在请求体中
        //请求方式是POST(内容长度大于零)且内容类型是 application/x-www-form-urlencoded
        //同样用parseParameters解析POST中的内容
        if ("POST".equals(getMethod()) && (getContentLength() > 0)
                && "application/x-www-form-urlencoded".equals(contentType)) {
            try {
                int max = getContentLength();
                int len = 0;
                byte buf[] = new byte[max];
                ServletInputStream is = getInputStream();
                while (len < max) {
                    int next = is.read(buf, len, max - len);
                    if (next < 0) {
                        break;
                    }
                    len += next;
                }
                is.close();
                if (len < max) {
                    throw new RuntimeException("Content length mismatch");
                }
                RequestUtil.parseParameters(results, String.valueOf(buf), encoding);
            } catch (UnsupportedEncodingException ue) {
                ;
            } catch (IOException e) {
                throw new RuntimeException("Content read fail");
            }
        }

        //锁定 ParameterMap表示不可修改参数
        //设置 parsed为 true表示已经解析过了,
        results.setLocked(true);
        parsed = true;
        parameters = results;
    }
//省略get和set方法,以及从父类继承下来的方法
....
}
ParameterMap类
Servlet 程序员可以以 Map 的形式获得参数(通过调用 HttpServletRequest 的 getParameterMap 方法)和参数名/值,但不允许修改参数值。因此将使用一个特殊的HashMap—org.apache.catalina.util.ParameterMap。
ParameterMap 继承了 java.util.HashMap,所以许多方法都是用super关键字直接调用HashMap中的方法
那又是如何保证参数不被修改呢?
Tomcat在ParameterMap中加入布尔变量 locked 当 locked 是false 的时候,名/值对仅仅可以添加,更新或者移除。否则,lock为true时,异常 IllegalStateException 会抛出,结合parseParameters方法可以更加清晰了解。所以在put时做了些许的修改(对错误处理的类StringManager上一节说过了。)
/**
 * <p>
 * 对HashMap做的增强在于多加了一把锁,用来控制用户是否可以修改请求参数的值
 * </P>
 *
 * @author 大忽悠
 * @create 2022/3/9 22:10
 */
public class ParameterMap extends HashMap {
    /**
     * 防止用户对请求参数的值进行修改
     */
    private boolean locked = false;

    public ParameterMap() {
        super();
    }

    public ParameterMap(int initialCapacity) {
        super(initialCapacity);
    }

    public ParameterMap(int initialCapacity, float loadFactor) {
        super(initialCapacity, loadFactor);
    }

    public ParameterMap(Map map) {
        super(map);
    }

    public boolean isLocked() {
        return locked;
    }

    public void setLocked(boolean locked) {
        this.locked = locked;
    }

    private static final StringManager sm =
            //传入包名
            StringManager.getManager("dhy.com.tomcat.communicationEntities");

    @Override
    public void clear() {
        checkLocked();
        super.clear();
    }

    @Override
    public Object put(Object key, Object value) {
        checkLocked();
        return super.put(key, value);
    }

    @Override
    public void putAll(Map m) {
        checkLocked();
        super.putAll(m);
    }


    @Override
    public Object remove(Object key) {
       checkLocked();
        return super.remove(key);
    }

    /**
     * 检查是否上锁了
     */
    private void checkLocked() {
        if (locked) {
            throw new IllegalStateException
                    (sm.getString("parameterMap.locked"));
        }
    }
}
HttpResponse类
上一节中,我们在Response的getWriter方法处遗留了一个小问题,就是autoflush只能:

因此为了解决这个问题,我们有以下几个思路:
- 使用子类重写PrintWriter的print和println方法,让其都可以自动刷新
/**
 * @author 大忽悠
 * @create 2022/3/10 17:10
 */
public class ResponseWriter extends PrintWriter {
    public ResponseWriter(Writer out) {
        super(out);
    }

    public ResponseWriter(BufferedOutputStream bufferedOutputStream, boolean autoFlush) {
        super(bufferedOutputStream,autoFlush);
    }

    @Override
    public void print(String x) {
        super.print(x);
        //手动刷新
        super.flush();
    }
}
HttpResponse类和上一节比基本没有变化可言:
 * @author 大忽悠
 * @create 2022/3/9 18:12
 */
public class HttpResponse implements ServletResponse {
    private Request request;
    private BufferedOutputStream bufferedOutputStream;
    private ResponseWriter writer;
    private final int BUFFER_SIZE=1024;

    public void sendStaticResource() {
        File file = new File(Constants.WEB_ROOT, request.getUri());
        if(!file.exists())
        {
            //文件没找到
            String errorMsg="HTTP/1.1 404 File Not Found\r\n"+
                    "Content-Type:text/html;charset=UTF-8\r\n"+
                    "Content-Length: 23\r\n"+
                    "\r\n"+
                    "<h1>File Not Found</h1>";
            try {
                bufferedOutputStream.write(errorMsg.getBytes(StandardCharsets.UTF_8));
                bufferedOutputStream.flush();
            } catch (IOException e) {
                e.printStackTrace();
            }
            return;
        }

        try (BufferedInputStream bufferedInputStream=new BufferedInputStream(new FileInputStream(file))){
            StringBuilder builder=new StringBuilder();
            String string = builder.append("HTTP/1.1 200 OK\r\n")
                    .append("Content-Type:text/html;charset=UTF-8\r\n")
                    .append("\r\n")
                    .toString();
            //写出响应头
            bufferedOutputStream.write(string.getBytes(StandardCharsets.UTF_8));
            //将文件内容读出来,放入输出流写出
            byte[] bytes = new byte[BUFFER_SIZE];
            int ch=-1;
            while((ch = bufferedInputStream.read(bytes)) != -1){
                bufferedOutputStream.write(bytes,0,ch);
            }
            bufferedOutputStream.flush();
        } catch (IOException e) {
            e.printStackTrace();
        }
    }

    /**
     * <p>
     *     PrintWriter构造函数第二个参数为true,
     * </p>
     * @return
     * @throws IOException
     */
    @Override
    public PrintWriter getWriter() throws IOException {
        writer = new ResponseWriter(bufferedOutputStream, true);
        return writer;
    }
    省略get和set方法
    ...
}
总结

首先我们先讲解了Tomcat如何动态获取参数且只解析一次,即parsed变量和HashMap维护
然后了解了如何防止修改参数值,即扩展HashMap并通过locked变量
最后我们了解了Tomcat获取错误信息的方法
如果我们以后在一个很大型的项目中有许多的类需要处理和管理大量信息时(不仅仅国际化和错误处理) ,你能联想到Tomcat是如何管理错误信息的?我们可以通过包内单例模式,包之间实例保存在Map中。 这样既实现了有效的管理,又节省了内存消耗。所以说学习Tomcat中最重要的是学习思想。
上面给出的代码有些许问题,一切以仓库代码为准
1-3节的toncat源码全部放置在了gitee仓库中,仓库链接: https://gitee.com/DaHuYuXiXi/easy-tomcat.git


 3092
3092


 被折叠的 条评论
为什么被折叠?
被折叠的 条评论
为什么被折叠?
 到【灌水乐园】发言


