


文章目录
Spring5
1.概念
Spring是轻量级的开源的JavaEE框架,可以解决企业应用开发的复杂性。
Spring核心部分:IOC 和 AOP
Spring特点:
- 方便结耦,简化开发
- Aop编程支持
- 方便程序的测试,对Junit5支持
- 可以方便和其他框架进行整合
- 方便进行事务操作
- 降低JavaEE API开发难度
简单案例
(暂时没有使用maven)
新建普通的Java项目就行,然后导入Spring5 的相关Jar包,基本的Jar包:Beans,Core,Context,Expression,还需要一个第三方的日志包,commons-logging-1.1.1.jar
案例使用Spring5创建对象,调用方法:
先有要创建的类(User类,里面有个方法add打印一句话),然后写个配置文件 (xml格式,bean01.xml),一般新建到src目录下
<?xml version="1.0" encoding="UTF-8"?>
<beans xmlns="http://www.springframework.org/schema/beans"
       xmlns:xsi="http://www.w3.org/2001/XMLSchema-instance"
       xsi:schemaLocation="http://www.springframework.org/schema/beans
                           http://www.springframework.org/schema/beans/spring-beans.xsd">

    <!-- User类对象的创建,上面是idea帮我们加的-->
    <bean id="user" class="com.sutong.bean.User"></bean>
</beans>
测试:
@Test
public void testAdd() {
    // 1.加载Spring5的配置文件 (后面的文件名是因为在src目录下可以这么写)
    BeanFactory context = new ClassPathXmlApplicationContext("bean01.xml"); // 这时不会创建对象
    ApplicationContext context = new ClassPathXmlApplicationContext("bean01.xml"); //这时就创建对象

    // 2.获取配置创建的对象,第一个参数是配置文件中的id属性,第二参数是字节码对象
    User user = context.getBean("user", User.class);

    System.out.println(user);
    user.add();
}
2.IOC容器
IOC:Inversion Of Control,即控制反转,把创建对象过程和对象之间的调用过程交给 Spring 进行管理,减低了耦合度
2.1 IOC底层原理
底层用到了:xml 解析,工厂模式,反射
普通模式:在UserService里面直接new UserDao,然后调用方法,这样耦合度太高了,牵一发而动全身!
工程模式:降低了一些耦合度
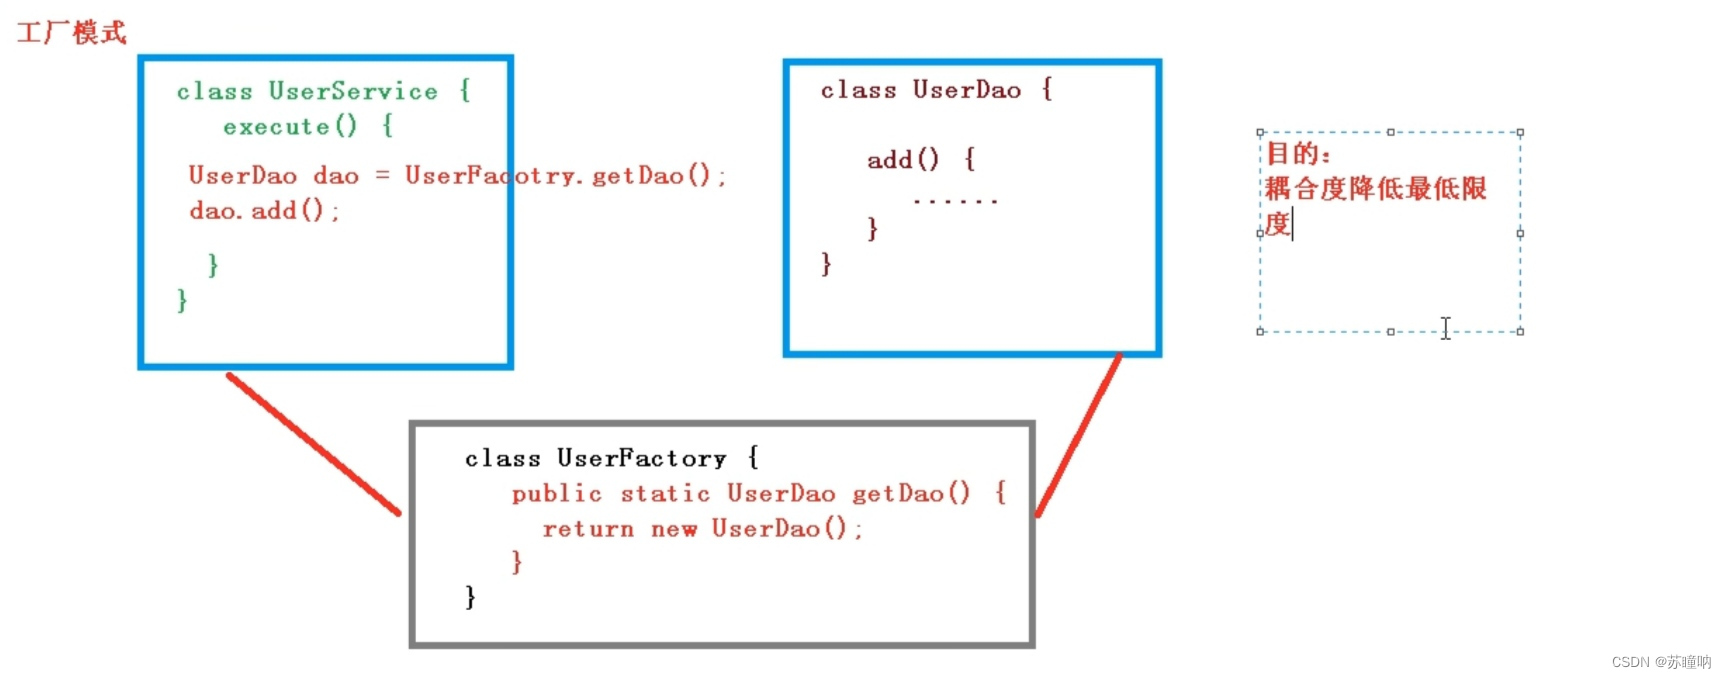
IOC模式:进一步降低了耦合度
![[外链图片转存失败,源站可能有防盗链机制,建议将图片保存下来直接上传(img-PTOey2it-1661088727957)(Spring5.assets/IOC模式.jpg)]](https://img-blog.csdnimg.cn/94a39155ebb64cfbb58240ffc0daf46f.jpeg)
2.2 IOC接口
IOC思想基于IOC容器完成,IOC容器底层就是对象工厂。
Spring中提供 IOC 容器实现的两种方式(两个接口):
-
BeanFactory:IOC容器基本实现,是Spring内部的使用接口,我们开发一般不使用特点:加载配置文件不会创建对象,在获取/使用对象的时候才去创建对象。
-
ApplicationContext:BeanFactory的子接口,提供了更多更强大的功能,一般开发人员用这个特点:加载配置文件的时候就会进行对象创建
(这样合理点,可以服务器启动的时候就创建好对象,而不是操作的时候创建,把这种耗时的耗资源的过程都交给服务器完成)
ApplicationContext接口的主要的实现类:
FileSystemXmlApplicationContext:要传入:xml文件在我们磁盘下的全路径ClassPathXmlApplicationContext:要传入:类路径,src开始
2.3 IOC操作Bean管理
Bean管理:即两个操作,Spring创建对象,Spring注入属性
Bean管理两种方式:基于xml文件实现,基于注解方式实现
① 基于xml文件实现
Ⅰ创建对象
<!-- 1.使用bean标签,添加对应的属性就行-->
<bean id="user01" class="com.sutong.bean.User"></bean>

<!--bean标签里面常用的属性:-->
id : 给对象起个唯一标识,并不完全等于对象名,
class : 类全路径
name : 跟id作用类似,id中不能用特殊符号,name可以,用的不多

<!-- 创建对象的时候,默认是执行无参构造方法-->
Ⅱ 注入属性
DI:依赖注入,就是注入属性。
面试经常问IOC和DI什么区别? DI是IOC中的一种具体实现,表示注入属性,需要在创建对象的基础之上完成。
使用setXxx方法注入:
<bean id="book01" class="com.sutong.bean.Book">
    <!-- 里面使用property完成属性注入,name是属性名,value是属性值-->
    <property name="name" value="活着"></property>
    <property name="author" value="余华"></property>
</bean>
使用有参构造注入:
<bean id="book02" class="com.sutong.bean.Book">
    <constructor-arg name="name" value="平凡的世界"></constructor-arg>
    <constructor-arg name="author" value="路遥"></constructor-arg>
</bean>
使用p名称空间注入: 简化xml配置方式(底层还是用的set方法注入,用的不太多)
添加一个p命名空间在配置文件是最上面,beans标签属性
<beans xmlns="http://www.springframework.org/schema/beans"
       xmlns:xsi="http://www.w3.org/2001/XMLSchema-instance"
       xmlns:p="http://www.springframework.org/schema/p"    <!-- 这里新加了p命名空间-->
       xsi:schemaLocation="http://www.springframework.org/schema/beans
                           http://www.springframework.org/schema/beans/spring-beans.xsd">

       <bean id="book03" class="com.sutong.bean.Book" p:name="哈哈" p:author="苏瞳"></bean>
</beans>
还要有个c命名空间,底层是根据有参构造器注入。写法就是和p命名空间一样
⭐特殊情况
- null值和特殊符号
<bean id="book01" class="com.sutong.bean.Book">
    <!-- 特殊情况1:向属性设置null值-->
    <property name="name">
        <null/>
    </property>

    <!-- 特殊情况2:属性值有特殊符号,可以转义 $lt之类的,可以使用CDATA-->
    <property name="author">
        <value> <![CDATA[ <><余华> ]]> </value>
    </property>
</bean>
- 外部Bean的注入
<!-- 外部Bean的注入-->
<!-- 特殊情况3:注入的是对象,例如Service层需要Dao对象,首先先创建两个对象-->
<bean id="userDao01" class="com.sutong.dao.UserDaoImpl"></bean>
<bean id="userService01" class="com.sutong.service.userServiceImpl">
    <!-- name是UserService中的属性名称,后面不是value了,而是ref属性值要和要注入对象的id一致-->
    <constructor-arg name="userDao" ref="userDao01"></constructor-arg>
</bean>
- 内部Bean的注入(即bean标签的嵌套)
<!-- 内部Bean的注入-->
<!-- 特殊情况4:一对多的关系,例如员工和部门,每个Emp对象里面的属性:名字ename,和Dept引用表示那个部门
	 Dept类属性:部门名dname-->
<bean id="emp01" class="com.sutong.bean.Emp">
    <property name="ename" value="Jack"></property>
    <property name="dept">  <!-- 这里可以使用外部Bean的注入的方法,也可以使用下面写的方法-内部Bean-->
        <bean id="dept01" class="com.sutong.bean.Dept">
            <property name="dname" value="销售"></property>
        </bean>
    </property>
</bean>
- 级联赋值
<!-- 级联赋值-->
<!-- 第一种写法:和外部Bean没大区别-->
<bean id="emp01" class="com.sutong.bean.Emp">
    <property name="ename" value="Jack"></property>
    <property name="dept" ref="dept01"></property>
</bean>
<bean id="dept01" class="com.sutong.bean.Dept">
    <property name="dname" value="技术"></property>
</bean>


<!-- 第二种写法-->
<bean id="emp01" class="com.sutong.bean.Emp">
    <property name="ename" value="Jack"></property>
    <property name="dept" ref="dept01"></property>
    <!-- 即给emp对象里面的dept属性的dname属性赋值,emp对象里面要有getDept()方法!!-->
    <property name="dept.dname" value="技术"></property>
</bean>
<bean id="dept01" class="com.sutong.bean.Dept"></bean>
- 注入数组和集合
public class Student {
    private String[] courses;
    private List<String> list;
    private Map<String, String> map;
    private Set<String> set;  // 下面还有get/set方法
}
<bean id="stu01" class="com.sutong.bean.Student">
    <property name="courses">
        <array>
            <value>Java课</value>
            <value>C++课</value>
            <value>SQL课</value>
        </array>
    </property>
    <property name="list">
        <list>
            <value>张三</value>
            <value>小三</value>
        </list>
    </property>
    <property name="map">
        <map>
            <entry key="key01" value="value01"></entry>
            <entry key="key02" value="value02"></entry>
        </map>
    </property>
    <property name="set">
        <set>
            <value>MySQL</value>
            <value>Redis</value>
        </set>
    </property>
</bean>
细节1:集合元素如果对象类型怎么办?
private List<Book> list;
<bean id="stu02" class="com.sutong.bean.Student">
    <property name="list">
        <list>
            <ref bean="book04"></ref>    <!-- 注意不是value标签了,而是ref!!!-->
            <ref bean="book05"></ref>
        </list>
    </property>
</bean>

<bean id="book04" class="com.sutong.bean.Book">
    <property name="name" value="书名01"></property>
</bean>
<bean id="book05" class="com.sutong.bean.Book">
    <property name="name" value="书名02"></property>
</bean>
细节2:可以把注入的部分提取出来,让其他地方也都能用到.
首先需要在配置文件最上面引入 命名空间util,新加个schemaLocation
<beans xmlns="http://www.springframework.org/schema/beans"
       xmlns:xsi="http://www.w3.org/2001/XMLSchema-instance"
       xmlns:util="http://www.springframework.org/schema/util"           <!-- 这里是新加的-->
       xsi:schemaLocation="http://www.springframework.org/schema/beans
                           http://www.springframework.org/schema/beans/spring-beans.xsd
                           http://www.springframework.org/schema/util         这里是新加的
                           http://www.springframework.org/schema/util/spring-util.xsd">

<bean id="stu03" class="com.sutong.bean.Student">
    <property name="list" ref="list01"></property> <!-- 里面不再写list标签了,直接用ref引用下面的list01就行-->

    <!-- map和set提取一样方法,下面省略了-->
</bean>

<!-- 提取List-->
<util:list id="list01">
    <value>张三</value>
    <value>小三</value>
</util:list>

</beans>
Spring两种类型的Bean
-
普通的Bean (我们自己创建的)
在Spring的配置文件中,bean标签中class属性的值就是创建对象对应的类型
-
工厂Bean (FactoryBean)
在配置文件中定义bean的类型可以和返回类型不一样
工厂Bean的创建流程:
1.创建一个类,作为工厂Bean,实现接口FactoryBean
2.实现接口里面的方法,在实现的方法中定义返回的bean类型
public class MyBean implements FactoryBean<Book> {
    // 返回Bean的实例,
    @Override
    public Book getObject() throws Exception {
        Book book = new Book();  // 这里用反射等
        book.setName("活着");
        book.setAuthor("余华");
        return book;
    }

    // Bean的类型(下面这两个方法具体实现)
    @Override
    public Class<?> getObjectType() {return null;}
    // 是否是个单例
    @Override
    public boolean isSingleton() {return false;}
}


@Test
public void test05() {
    ApplicationContext context = new ClassPathXmlApplicationContext("bean01.xml");
    Book book = context.getBean("myBean01", Book.class); // 虽然bean定义的MyBean类型,但返回的是Book类型
    // 默认获取的工厂Bean调用getObject创建的对象,要获取工厂Bean本身需要在获取的时候id前加上一个&
}
<bean id="myBean01" class="com.sutong.bean.MyBean"></bean>
Bean作用域
在Spring里面,可以设置创建Bean实例是单实例还是多实例。默认是单实例
单实例:只有一个对象,多次获得都是一个对象
多实例:每次都创建一个新对象
可以设置为多实例:
通过spring配置文件,bean标签里面的属性 scope用于设置,默认是 singleton 单实例,prototype 多实例
(在Web中值还可以是request,session,如果是request说明没创建对象都会放到request域中,session说明放到session域中)
<bean id="book01" class="com.sutong.bean.Book" scope="prototype">
    <property name="name" value="活着"></property>
    <property name="author" value="余华"></property>
</bean>
区别:
singleton,加载Spring配置文件的时候就会创建单实例对象
prototype,不是在加载配置文件时创建,而是调用getBean()方法的时候创建
Bean的生命周期
生命周期:创建到销毁的过程
- 执行无参构造方法(默认)
- 为bean的属性设置值和对其他Bean的引用(调用set方法)
- 调用bean的初始化的方法(需要进行配置)
- 使用bean对象
- 当容器关闭的时候,调用bean的销毁方法(需要进行配置)
初始化方法和销毁方法的设置:
public class Book {
    private String name;
    private String author;
    // 自己写初始化方法
    public void init() {
        System.out.println("初始化方法");
    }
    // 销毁的方法,只有真正销毁才会调用这个方法,测试的话我们要手动销毁
    public void destroy() {
        System.out.println("销毁方法");
    }
    // 下面有get/set方法,省略了
}


@Test
public void testBook01() {
    // close()方法是ClassPathXmlApplicationContext类才有的,ApplicationContext接口里面没有,子接口才有
    // 而ClassPathXmlApplicationContext实现类它的子接口,所以用它才能调用close
    ClassPathXmlApplicationContext context = new ClassPathXmlApplicationContext("bean01.xml");
    Book book = context.getBean("book01", Book.class);
    System.out.println(book);

    // (ClassPathXmlApplicationContext (context)).close()    使用ApplicationContext的要强转一下
    context.close();
}
<!-- init-method属性值的要配置的初始化方法名,destroy-method一样-->
<!-- 使用注解 -> @Bean(initMethod="init",destroyMethod="destory")-->
<bean id="book01" class="com.sutong.bean.Book" init-method="init" destroy-method="destroy">
    <property name="name" value="活着"></property>
    <property name="author" value="余华"></property>
</bean>
还可以让Bean实现
InitializingBean,DisposableBean接口,就不用指定方法了还可以使用
@PostConstruct,@PreDestory标注在初始化和销毁方法上(JSR250规范的注解javax下的)
其实细的话还有两步,即bean的后置处理器,这两步在初始化的前后
共七步: !!
- 执行构造方法
- 调用set方法
- 把bean实例传递给bean后置处理器的方法去处理,即
postProcessBeforeInitialization() - 调用bean的初始化
- 把bean实例传递给bean后置处理器的方法去处理,即
postProcessAfterInitialization() - 使用bean对象
- 调用bean的销毁方法
创建后置处理器(自己写个类实现 BeanPostProcessor 接口,还要配置一下):
后置处理器会给当前配置文件中的所有bean添加后置处理器的处理!!!
public class MyBeanPost implements BeanPostProcessor {
    @Override
    public Object postProcessBeforeInitialization(Object bean, String beanName) throws BeansException {
        System.out.println("postProcessBeforeInitialization 初始化之前");
        return bean;  // 注意要return bean;
    }

    @Override
    public Object postProcessAfterInitialization(Object bean, String beanName) throws BeansException {
        System.out.println("postProcessAfterInitialization 初始化之后");
        return bean;
    }
}
<!-- 配置后置处理器,当加载配置文件的时候就会创建这个后置处理器-->
<bean id="myBeanPost" class="com.sutong.bean.MyBeanPost"></bean>
后置处理器其他一些接口:⭐
BeanDefinitionRegistryPostProcessor在所有bean定义信息将要被加载,bean实例还未创建的时候 执行这个
BeanFactoryPostProcessor在所有bean定义信息已经保存加载到beanFactory,但是bean的实例还未创建 执行这个
BeanPostProcessor在bean创建完之后,调用初始化方法的前后 执行这个
xml自动装配
手动装配:通过name,value/ref 一个一个设置值
自动装配:根据指定装配规则(属性类型/属性名称),Spring会帮我们自动完成属性值的注入,不需要明确指定为那个属性名称赋值的过程(不需要写property那个标签)
使用:(实际用的不多,一般都是使用下面的基于注解)
<!-- base标签里面的autowire属性设置自动装配,常用值有:byName根据名称进行注入,byType根据类型进行注入-->

<!-- byName使用的前提:要注入值即Dept bean的id值要和即将自动装配的属性的set方法对应!!!即setDept()-->
<bean id="emp01" class="com.sutong.autowrite.Emp" autowire="byName"></bean>
<bean id="dept" class="com.sutong.autowrite.Dept"></bean>

<!-- id无所谓了不需要对应了,但有点问题,如果有两个相同的类型,如下面,就报错了-->
<bean id="emp01" class="com.sutong.autowrite.Emp" autowire="byType"></bean>
<bean id="dept01" class="com.sutong.autowrite.Dept"></bean>
<bean id="dept02" class="com.sutong.autowrite.Dept"></bean>
注解:
@AutoWired,优先按照类型去容器找对应的组件,如果找到多个相同类型的组件,再将属性名作为id去容器中查找(可指定是否必须注入)!可结合使用@Qualifier指定id名。
@Primy让Spring 进行自动装配的时候,默认使用首选的Bean(写在方法,类上都行),明确指定则用我们指定的。
@Rsource(JSR205规范),但不支持@Primy的功能,不能指定是否必须注入。
@Inject(JSR330规范) 自动装配,需要导包,而且也不能指定是否必须注入(几乎不用)。
引入外部属性文件
场景:一个对象中会很多属性,可能有些的固定的,例如数据库的,我们可以抽取出来放到*.properties文件中,让xml文件去读取。
配置druid连接池:
-
首先需要创建properties文件,一般放src目录,即类路径下
# 等号前面可以随便写,之所以加个前缀可避免命名冲突 (druid.properties) prop.driverClassName=com.mysql.jdbc.Driver prop.url=jdbc:mysql://localhost:3306/userDb prop.username=root prop.password=zgq20020820 -
把外部的properties文件引入搭配spring配置文件中。需引入context名称空间
<?xml version="1.0" encoding="UTF-8"?>
<beans xmlns="http://www.springframework.org/schema/beans"
       xmlns:xsi="http://www.w3.org/2001/XMLSchema-instance"
       xmlns:context="http://www.springframework.org/schema/context"   <!-- 这里是新加的-->
       xsi:schemaLocation="http://www.springframework.org/schema/beans
                           http://www.springframework.org/schema/beans/spring-beans.xsd
                           http://www.springframework.org/schema/context    这里是新加的
                           http://www.springframework.org/schema/context/spring-context.xsd">

    <!-- 使用标签引入外部属性文件,location是外部文件的路径,classpath对应src目录-->
    <context:property-placeholder location="classpath:druid.properties"/>

    <bean id="DataSource" class="com.alibaba.druid.pool.DruidDataSource">
        <property name="driverClassName" value="${prop.driverClassName}"></property> <!-- EL表达式-->
        <property name="url" value="${prop.url}"></property>
        <property name="username" value="${prop.username}"></property>
        <property name="password" value="${prop.password}"></property>
    </bean>
</beans>
② 基于注解管理Bean
注解:优雅,简化 xm 配置 ⭐
Spring为 创建对象提供的注解:
@Component@Service一般用在Service层@Controller一般用在web层@Repository一般用在Dao层(持久层)
以上四个注解功能是一样的,都可以创建对象,一般都遵守约定取使用。
使用步骤:
第一步:引入jar, 除了以前的还需要额外的jar:spring-aop-5.2.6.RELEASE.jar
第二步:开启组件扫描(为了让Spring知道哪里写了注解,去哪扫描),配置文件中加入context名称空间
<!-- bean03.xml文件-->
<!-- 开启组件扫描,扫描多个包中间用逗号隔开,或者写要扫描包的上层目录-->
<context:component-scan base-package="com.sutong.bean02,com.sutong.dao"></context:component-scan>
<context:component-scan base-package="com.sutong"></context:component-scan>

<!-- 细节1;-->
<!-- use-default-filters="false"表示不使用默认的filters了,需要我们自己写规则-->
<context:component-scan base-package="com.sutong" use-default-filters="false">
    <!-- context:include-filter表示扫描哪些内容,下面写的意思的去com.sutong扫描带有Component注解的类-->
    <context:include-filter type="annotation" expression="org.springframework.stereotype.Component"/>
</context:component-scan>

<!-- 细节2;-->
<context:component-scan base-package="com.sutong">
    <!-- 使用默认的filter,去扫描com.sutong下的所有类,除了带有Component-->
    <context:exclude-filter type="annotation" expression="org.springframework.stereotype.Component"/>
</context:component-scan>
第三步:创建类,类上面加上创建对象注解
// 注解的value值可以不写,默认是 类名称首字母小写
@Service(value = "userService")  // == <bean id="userService" class=".."/>
@Scope(value = "singleton")      // 或者prototype, 设置单例,还是多例
public class UserService {
    public void add() {
        System.out.println("UserService add...");
    }
}

@Test
public void test01() {
    ApplicationContext context = new ClassPathXmlApplicationContext("bean03.xml");
    UserService userService = context.getBean("userService", UserService.class);

    userService.add();
}
注解进行属性注入
属性注入的相关注解(这些都不依赖于set方法):
@AutoWired根据属性类型进行自动装配,可以用在属性,set方法,构造方法上@Qualifier根据属性名称进行自动装配,可用在属性,方法入参,构造方法入参@Resource可以根据类型注入,也可以根据名称注入@Value注入普通类型属性,上面三个都是注入对象类型
例如在UserService层注入UserDaoImpl:
第一步:创建两个对象,即在上面两个类上面加上 创建对象的注解
第二步:UserService创建属性,在属性上加注解(可以不用写set方法)
@Repository(value = "userDao01")
public class UserDaoImpl implements UserDao {
    @Override
    public void add() {
        System.out.println("UserDaoImpl add....");
    }
}

@Service(value = "userService")
public class UserService {
    @Autowired   // Autowired,根据类型 (如果UserDao有多个实现类,Spring就不知道创建哪个了,就出错了)
    private UserDao userDao;
}


@Autowired  // Qualifier根据名称注入(是和value里面的一致,并不是和属性名一致),这个要和Autowired一起使用!!
@Qualifier(value = "userDao01")
private UserDao userDao;


@Resource  // Resource这样是根据类型注入 (细节:Resource不是Spring包下的,而是Javax扩展包下面的注解)
private UserDao userDao;
@Resource(name = "userDao01") // Resource这样是根据名称注入,注意不是value了而是name
private UserDao userDao;


@Value(value = "abc")  // Value注入普通类型,Value可以注入配置文件里面的值,@Value(value = "${key}"),动态获取
private String name;
完全注解开发
开启扫描的配置也可以用 注解方法。
- 创建配置类,替代xml配置文件
@Configuration   // 作为配置类,替代xml配置文件
@ComponentScan(basePackages = {"com.sutong"})  // basePackages是个数组,可以写多个
public class SpringConfig {

}
- 测试类中和上面有点不同,需要new AnnotationConfigApplicationContext(),参数放入配置类的class对象
@Test
public void test02() {
    ApplicationContext context = new AnnotationConfigApplicationContext(SpringConfig.class); // 加载配置类
    UserService userService = context.getBean("userService", UserService.class);

    userService.add();
    System.out.println(userService.name);
}
相关注解还有:
@Bean,@Scope,@Lazy(只针对单实例懒加载),@Condition
3.Aop
3.1 概念
Aop:Aspect Oriented Programming,即面向切面编程,不修改源代码的情况下进行功能增强
利用Aop可以对业务逻辑的各个部分进行隔离,从而使得业务逻辑各部分之间的耦合度降低,提供程序的可复用性,同时提高了开发的效率。
通俗描述:不通过修改源代码的方式,在主干的功能里面添加新功能(两个模块独立,通过配置的方式加入,降低了耦合度)
![[外链图片转存失败,源站可能有防盗链机制,建议将图片保存下来直接上传(img-CwvRWeUn-1661088727958)(Spring5.assets/Aop简单图解.jpg)]](https://img-blog.csdnimg.cn/ea11e4e6415c40b792eee4a5cb5024d9.jpeg)
3.2 底层原理
Aop底层使用:动态代理
两种情况的动态代理:
- 有接口的情况,使用 JDK 动态代理
![[外链图片转存失败,源站可能有防盗链机制,建议将图片保存下来直接上传(img-Uv7TWpyv-1661088727959)(Spring5.assets/JDK代理.jpg)]](https://img-blog.csdnimg.cn/7ccd90b5ad8e4bb197331bab1295be0d.jpeg)
- 没接口的情况,使用 CGLIB 动态代理
![[外链图片转存失败,源站可能有防盗链机制,建议将图片保存下来直接上传(img-625NyCIB-1661088727959)(Spring5.assets/CGLIB代理.jpg)]](https://img-blog.csdnimg.cn/9ef225f5aff44de596c89ee4a6ee7ed5.jpeg)
术语:
连接点: 类里面的哪些方法可以被增强,那这些方法就成为连接点
切入点:实际被真正增强的方法,称为切入点
通知/增强:实际增强的逻辑部分称为通知,通知有五种类型:
前置通知(要增强方法前执行)
@Before。后置通知(要增强方法后执行)@AfterReturning。环绕通知(要增强的方法前后执行)
@Around。异常通知(发生异常时执行)@AfterThrowing。最终通知(类似finally,不管怎样都会执行)
@After切面:是动作,把通知应用到切入点的过程
3.2 Aop操作
Spring一般基于AspectJ 实现AOP操作,Spring会根据是否有接口去选择JDK动态代理还是CGLIB 动态代理!!!
AspectJ:不是Spring的组成部分,是独立AOP框架,一般把AspectJ 和Spring一起使用,来进行AOP相关操作。
- 首先需要引入Aop相关的依赖,即Jar包,spring-aspects-5.2.6.RELEASE.jar,和下图的AspectJ相关依赖
![[外链图片转存失败,源站可能有防盗链机制,建议将图片保存下来直接上传(img-NNa56noB-1661088727959)(Spring5.assets/image-20220111163202598.png)]](https://img-blog.csdnimg.cn/893db7245acf491cb90af4ac3f5c4289.png)
- 学习切入点表达式(来表示对那个个类的那个个方法进行增强)
语法:execution([权限修饰符][返回类型][类的全路径][方法名称]([参数列表]))

例子:对 com.sutong.dao.UserDaoImpl类里面的add方法进行增强
     execution(* com.sutong.dao.UserDaoImpl.add(..))
     // 权限修饰符可以省略,*代表所有返回类型,后面有个空格,..是通配符表示任何参数类型

     execution(* com.sutong.dao.UserDaoImpl.*(..))     // UserDaoImpl中所有方法
     execution(* com.sutong.dao.*.*(..))               // com.sutong.dao下所有类的所有方法
- 实现Aop ⭐
基于注解方法实现(用的多)
Ⅰ 在spring配置文件中开启注解扫描(或者使用完全注解开发)
Ⅱ 使用注解创建User和UserProxy对象
Ⅲ 在增强类上面添加注解 @Aspect
Ⅳ 在spring配置文件中开启生成代理对象 (配置文件要引入aop名称空间)
Ⅴ 配置不同类型的通知(在增强类中作为通知方法上添加通知类型的注解,使用切入点表达式)
// 被增强类
@Component
public class User {
    public void add() {
        System.out.println("add()...");
    }
}

// 增强类
@Component
@Aspect // 生成代理对象
public class UserProxy {

    // 前置通知
    @Before(value = "execution(* com.sutong.aop.User.add(..))")
    public void before() {
        System.out.println("before...");
    }

    // 后置通知 (和After区别:After是最终通知不管有没有异常都会执行,After方法之后执行,
    //          AfterReturning如果未增强方法有异常就执行不了,在未增强方法返回结果后执行!)
    @AfterReturning(value = "execution(* com.sutong.aop.User.add(..))", returning = "res")
    public void afterReturning(Object res) {
        System.out.println("afterReturning...正常返回值是:" + res);
    }

    // 环绕通知,这个有点不一样!!要写个参数
    @Around(value = "execution(* com.sutong.aop.User.add(..))")
    public void around(ProceedingJoinPoint point) throws Throwable {
        System.out.println("环绕前...");
        point.proceed();  // 执行为增强前的方法 (point还能拿到方法名,参数.)
        System.out.println("环绕后...");
    }


    // 细节1:相同切入点抽取-----------------------------------------------------------------------
    @Pointcut(value = "execution(* com.sutong.aop.User.add(..))")  // 抽取出来维护一份就行了
    public void pointDemo() { }

    @AfterThrowing(value = "pointDemo()", throwing="ex")  // 异常通知 - 这里只需要写方法名()就行了
    public void afterThrowing(Exception ex) {
        System.out.println("afterThrowing  ... 异常是:" + ex);
    }
    // 细节2:如果有多个增强类对同一个方法进行增强,可以设置增强类的优先级---------------------------------
    // 在增强类的上面添加@Order(数字值),值越小优先级越高,默认是一个很大的数
}

// 测试类
public class TestAop {
    @Test
    public void test01() {
        ApplicationContext context = new ClassPathXmlApplicationContext("bean03.xml");
        // ApplicationContext context = new AnnotationConfigApplicationContext(SpringConfig.class);
        User user = context.getBean("user", User.class);
        user.add();
    }
}
bean03.xml文件:
<?xml version="1.0" encoding="UTF-8"?>
<beans xmlns="http://www.springframework.org/schema/beans"
       xmlns:xsi="http://www.w3.org/2001/XMLSchema-instance"
       xmlns:context="http://www.springframework.org/schema/context"
       xmlns:aop="http://www.springframework.org/schema/aop"
       xsi:schemaLocation="http://www.springframework.org/schema/beans
                           http://www.springframework.org/schema/beans/spring-beans.xsd
                           http://www.springframework.org/schema/context
                           http://www.springframework.org/schema/context/spring-context.xsd
                           http://www.springframework.org/schema/aop
                           http://www.springframework.org/schema/aop/spring-aop.xsd">

    <!-- 开启注解扫描-->
    <context:component-scan base-package="com.sutong.aop"></context:component-scan>
    <!-- 开启Aspect生成代理对象-->
    <aop:aspectj-autoproxy></aop:aspectj-autoproxy>

    <!-- proxy-target-class默认是false,即代表默使用JDK的动态代理创建代理类,true代表使用CGLIB动态代理
		 可以不写,Spring会尝试JDK不行,就用CGLIB。注解里面也是这样
		<aop:aspectj-autoproxy proxy-target-class="true"></aop:aspectj-autoproxy>  -->
</beans>
完全注解开发,springConfig 类:
@Configuration   // 作为配置类,替代xml配置文件
@ComponentScan(basePackages = {"com.sutong"})  // 开启注解扫描
// == <context:component-scan base-package="com.sutong.aop"></context:component-scan>
@EnableAspectJAutoProxy     // 开启Aspect自动生成代理对象
// == <aop:aspectj-autoproxy></aop:aspectj-autoproxy>
public class SpringConfig {

}
基于XML配置文件实现(了解)
<bean id="user" class="com.sutong.aop.User"></bean>
<bean id="userProxy" class="com.sutong.aop.UserProxy"></bean>
<!-- 配置aop增强方法,前置做例子-->
<aop:config>
    <!-- 配置切入点-->
    <aop:pointcut id="p" expression="execution(* com.sutong.aop.User.add(..))"/>
    <!-- 配置切面-->
    <aop:aspect ref="userProxy">
        <!-- 配置 通知类型和增强作用在切入点的方法-->
        <aop:before method="before" pointcut-ref="p"/>
    </aop:aspect>
</aop:config>
4. JdbcTemplate
JdbcTemplate:Spring对JDBC进行了封装,使用JdbcTemplate方便实现对数据库的操作。
4.1 准备工作
jar包:spring-jdbc-5.2.6.RELEASE.jar(封装的jdbc),spring-tx-5.2.6.RELEASE.jar(事务相关的),spring-orm-5.2.6.RELEASE.jar(整合其他框架操作数据库用的), druid连接池,mysql驱动
配置连接池(可以放到properties文件中,去读取 <context:property-placeholder location=“classpath:druid.properties”/>)
配置JdbcTemplate对象,注入DataSource
<!-- 数据库连接池 -->
<bean id="dataSource" class="com.alibaba.druid.pool.DruidDataSource"
      destroy-method="close">
    <property name="url" value="jdbc:mysql://localhost:3306/user_db" />
    <property name="username" value="root" />
    <property name="password" value="zgq20020820" />
    <property name="driverClassName" value="com.mysql.jdbc.Driver" />
</bean>

<bean id="jdbcTemplate" class="org.springframework.jdbc.core.JdbcTemplate">
    <!-- 给JdbcTemplate注入DataSource-->
    <property name="dataSource" ref="dataSource"/>
</bean>
- 创建Service类,创建dao类,在dao注入jdbcTemplate,去操作数据库
@Repository
class UserDaoImpl implements UserDao {
    @Autowired
    private JdbcTemplate template;

    @Override
    public void add() { }
}


@Service
class UserService {
    @Autowired
    private UserDao userDao;
}
4.2 使用JdbcTemplate
主要演示早Dao层操作数据库:
非常类似我们在JavaWeb利用commons-dbutils-1.7.jar工具类自己写的BaseDao类(只是不用我们获取连接了)
@Repository
class UserDaoImpl implements UserDao {
    @Autowired
    private JdbcTemplate template;

    // 增
    public int add(User user) {
        String sql = "insert into t_user(`id`,`name`) values(?,?)";
        return template.update(sql, user.getId(), user.getName());
    }
    // 改
    public int update(User user) {
        String sql = "update t_user set `name`=? where `id`=?";
        return template.update(sql, user.getName(), user.getId());
    }
    // 删
    public int delete(Integer id) {
        String sql = "delete from t_user where `id`=?";
        return template.update(sql, id);
    }


    // 查询结果是单行单列
    public int queryCount() {
        String sql = "select count(*) from t_user";
        // 第二个参数是分类的类型,第三个参数是占位符
        // 类似我们写的BaseDao里面的queryScalar方法
        return template.queryForObject(sql, Integer.class);
    }
    // 查询单行结果
    public User findOne(Integer id) {
        String sql = "select `id`,`name` from t_user where `id`=?";
        // 注意第二个参数,和DBUtils类似,只是new的对象不同
        // 类似我们写的BaseDao里面的queryScalar方法
        return template.queryForObject(sql, new BeanPropertyRowMapper<User>(User.class), id);
    }
    // 查询集合结果
    public List<User> queryAll() {
        String sql = "select `id`,`name` from t_user";
        // 方法名是query了,参数和上面的方法一样,只是返回是List集合了!!
        // 类似我们写的BaseDao里面的queryMulti方法
        List<User> users = template.query(sql, new BeanPropertyRowMapper<User>(User.class));
        return users;
    }
}
4.2 批量操作
class UserDaoImpl implements UserDao {
    @Autowired
    private JdbcTemplate template;

    // 批量添加
    public int[] batchAdd(List<Object[]> batchArgs) {
        String sql = "insert into t_user(`id`,`name`) values(?,?)";
        // 底层把List遍历,每个元素是一个数组,每一个数组是一条记录,数组[0]则是第一个占位符,数组[1]第二个占位符...
        return template.batchUpdate(sql, batchArgs);  // 返回的是每条记录影响的行数,[1,1,..]
    }
    // 批量修改 ,List中的数组中的元素顺序,需要按照占位符来传入
    public int[] batchUpdate(List<Object[]> batchArgs) {
        String sql = "update t_user set `name`=? where `id`=?";
        return template.batchUpdate(sql, batchArgs);
    }
    // 批量删除
    public int[] batchDelete(List<Object[]> batchArgs) {
        String sql = "delete from t_user where `id`=?";
        return template.batchUpdate(sql, batchArgs);
    }
}
4.3 事务操作
事务一般加在JavaEE三层中的Service层。
Spring事务管理有两种方式:编程式事务管理(写代码try-catch),声明式事务管理(配置就行)
声明式事务管理(底层使用了Aop原理):
Spring相关API:提供了一个接口,代表事务管理器,这个接口针对整合不同的框架提供了不同的实现类。
![[外链图片转存失败,源站可能有防盗链机制,建议将图片保存下来直接上传(img-1n97Zfbl-1661088727960)(Spring5.assets/image-20220112112230967.png)]](https://img-blog.csdnimg.cn/806de676f6114644a7967fbef9e09c34.png)
基于注解:(最多)
准备工作:开启注解扫描,创建druid数据源,创建JdbcTemplate并注入数据源,
创建事务管理器DataSourceTransactionManager并注入数据源,开启事务注解。(这些都在xml里面)
在Service层类上面(类中使用方法都开启了注解)或者类方法上面(该方法开启事务)添加事务注解。@Transactional
@Repository
public class UserDao {
    @Autowired
    private JdbcTemplate template;
    // 多钱
    public void addMoney(String name) {
        System.out.println(name + " 账户少了100元");
    }
    // 少钱
    public void deleteMoney(String name) {
        System.out.println(name + " 账户多了100元");
    }
}


@Service
@Transactional   // 所有方法开启事务
public class UserService {
    @Autowired
    private UserDao userDao;

    // 模拟转账 Lucy给Jack转载100元
    private void accountMoney() {
        userDao.deleteMoney("Lucy");
        userDao.addMoney("Jack");
    }
}
<?xml version="1.0" encoding="UTF-8"?>
<beans xmlns="http://www.springframework.org/schema/beans"
       xmlns:xsi="http://www.w3.org/2001/XMLSchema-instance"
       xmlns:context="http://www.springframework.org/schema/context"
       xmlns:aop="http://www.springframework.org/schema/aop"
       xmlns:tx="http://www.springframework.org/schema/tx"
       xsi:schemaLocation="http://www.springframework.org/schema/beans
                           http://www.springframework.org/schema/beans/spring-beans.xsd
                           http://www.springframework.org/schema/context
                           http://www.springframework.org/schema/context/spring-context.xsd
                           http://www.springframework.org/schema/aop
                           http://www.springframework.org/schema/aop/spring-aop.xsd
                           http://www.springframework.org/schema/tx
                           http://www.springframework.org/schema/tx/spring-tx.xsd">

    <!-- 开启注解扫描-->
    <context:component-scan base-package="com.sutong"></context:component-scan>

    <!-- 数据库连接池 -->
    <bean id="dataSource" class="com.alibaba.druid.pool.DruidDataSource"
          destroy-method="close">
        <property name="url" value="jdbc:mysql://localhost:3306/user_db" />
        <property name="username" value="root" />
        <property name="password" value="zgq20020820" />
        <property name="driverClassName" value="com.mysql.jdbc.Driver" />
    </bean>

    <bean id="jdbcTemplate" class="org.springframework.jdbc.core.JdbcTemplate">
        <!-- 给JdbcTemplate注入DataSource-->
        <property name="dataSource" ref="dataSource"/>
    </bean>

    <!-- 创建事务管理器,jdbc模板使用DataSourceTransactionManager这个类-->
    <bean id="transactionManager"
          class="org.springframework.jdbc.datasource.DataSourceTransactionManager">
        <property name="dataSource" ref="dataSource"/>
    </bean>

    <!-- 开启事务注解,需要tx名称空间-->
    <tx:annotation-driven transaction-manager="transactionManager"></tx:annotation-driven>
</beans>
完全注解开发:
@Configuration   // 作为配置类,替代xml配置文件
@ComponentScan(basePackages = {"com.sutong"}) // 开启组件扫描
@EnableAspectJAutoProxy      // 开启Aspect自动生成代理对象
@EnableTransactionManagement // 开启事务注解
public class SpringConfig {

    // 创建数据库连接池,注意@Bean注解,表示在IOC容器进行创建
    @Bean
    public DruidDataSource getDruidDataSource() {
        DruidDataSource dataSource = new DruidDataSource();
        dataSource.setDriverClassName("com.mysql.jdbc.Driver");
        dataSource.setUrl("jdbc:mysql://localhost:3306/user_db");
        dataSource.setUsername("root");
        dataSource.setPassword("zgq20020820");
        return dataSource;
    }

    // 创建JdbcTemplate,注入DataSource,参数也会去IOC中找,根据类型自动注入
    @Bean
    public JdbcTemplate getJdbcTemplate(DataSource dataSource) {
        JdbcTemplate template = new JdbcTemplate();
        template.setDataSource(dataSource);
        return template;
    }

    // 创建事务管理器对象
    @Bean
    public DataSourceTransactionManager getDataSourceTransactionManager(DataSource dataSource) {
        DataSourceTransactionManager manager = new DataSourceTransactionManager();
        manager.setDataSource(dataSource);
        return manager;
    }
}
@Transactional 注解中的几个常见属性:
Propagation propagation():事务传播行为
即多事务方法(事务方法:对数据库数据有影响的方法)直接相互调用的管理方法,例如开启事务的调用没有开启事务的…Spring有七种行为。Requlrend(默认),Requlrend_New,Supports,Not_Supports,Mandatory,Never,Nested
![[外链图片转存失败,源站可能有防盗链机制,建议将图片保存下来直接上传(img-nDAM2BMe-1661088727960)(Spring5.assets/事务传播行为.jpg)]](https://img-blog.csdnimg.cn/c6960081899f4016bcf80ecd44d9e037.jpeg)
Isolation isolation():事务隔离级别
不考虑隔离性有三个问题:脏读,不可重复读,幻读
MySQL默认可重复读。
![[外链图片转存失败,源站可能有防盗链机制,建议将图片保存下来直接上传(img-qPLVkBq5-1661088727960)(Spring5.assets/隔离级别.jpg)]](https://img-blog.csdnimg.cn/bd85c9bb488949adb0825f5055d03314.jpeg)
int timeout():超时时间
事务要在一定的时间内进行提交,超过时间就进行回滚操作。参数以秒为单位(默认是-1不超时)
boolean readOnly():是否只读
默认是false,可读(查询)可写(增删改)。
Class<? extends Throwable>[] rollbackFor():回滚
设置发生哪些异常进行回滚
Class<? extends Throwable>[] noRollbackFor():不回滚
设置发生哪些异常不进行回滚
@Transactional(propagation = Propagation.REQUIRED,
               isolation = Isolation.REPEATABLE_READ,
               timeout = -1,
               readOnly = false,
               rollbackFor = {NullPointerException.class})
基于xml:(了解)
<!-- 前面的和注解的xml一样,另外还需要利用bean标签创建Dao和Service层对象-->

<!-- 配置通知-->
<tx:advice id="txadvice">
    <!-- 配置事务参数-->
    <tx:attributes>
        <!-- 指定在那个方法上面添加事务,可以多个方法,也可以写个*代表所有方法-->
        <tx:method name="accountMoney" propagation="REQUIRED"/>
    </tx:attributes>
</tx:advice>

<!-- 配置切入点(事务底层用的就是aop)-->
<aop:config>
    <aop:pointcut id="pt" expression="execution(* com.sutong.transaction.UserService.*(..))"/>
    <!-- 配置切面-->
    <aop:advisor advice-ref="txadvice" pointcut-ref="pt"/>
</aop:config>
5. Spring5新功能
- Spring5基于Java8,兼容Java9
- 自带了通用的日志封装,移除了Log4jConfigListener(log4j第一代),Spring5官方建议用log4j的第二代log4j2(第三方)
- 支持
@Nullable注解 ,该注解可以使用在方法属性参数上面,分别表示方法返回值可以为空,属性可以为空,参数可以为空 - 支持函数式风格,GenericApplicationContext
- 支持整合了Junit5(兼容Junit4)
- Spring WebFlux 响应式编程
该文档参考视频:spring5-尚硅谷


 5586
5586


 被折叠的 条评论
为什么被折叠?
被折叠的 条评论
为什么被折叠?
 到【灌水乐园】发言


