


🔥 交流讨论:欢迎加入我们一起学习!
🔥 资源分享:耗时200+小时精选的「软件测试」资料包
🔥 教程推荐:火遍全网的《软件测试》教程
📢欢迎点赞 👍 收藏 ⭐留言 📝 如有错误敬请指正!
一、安装及入门
1.安装及使用条件
- 支持的python版本:python2.6及以上
- 支持的平台:Unix、Posix、Windows
- 安装pytest:pip install –U pytest
- 查看安装的pytest版本:pytest –version
2.入门小栗子
import pytest

# 被测函数
def fun(x):
    return x + 1

# 测试函数
def test_Fun():
    assert fun(3) == 5

if __name__ == '__main__':
    # 执行测试
    pytest.main()
执行结果:

可以看到返回了一个断言失败的结果
二、用例运行
1.pytest用例的设计原则
-
文件名格式符合 test_*.py 及 *_test.py
-
测试函数以 test_ 开头
-
测试类以 Test 开头且类中的方法以 test_ 开头,并且类中不能有__init__ 方法
-
所有的 package 必须要有 __init__.py 文件
2.执行用例的方式
-
直接使用 pytest 命令会执行当前目录及子目录下所有 test_*.py 及 *_test.py 格式的文件
-
若想执行指定文件中的测试用例,则可使用 pytest test_files,test_files 表示指定的用例目录或用例文件。例: pytest test_mod.py 或 pytest testing/
-
pytest –k “MyClass and not method” 按关键字表达式运行用例。这将运行包含与表达式匹配的名称的测试用例,匹配的名称可以是文件名、类名、函数名,并支持 python运算符 or 和 and 操作。上面的示例将运行TestMyClass.test_something但不运行TestMyClass.test_method_simple。
-
pytest test_mod.py::test_func 按节点ID运行测试。每次执行收集到的测试用例集合都会被分配一个唯一的nodeid,其中包含模块文件名,后跟说明符,如类名、函数名及参数,由:: 字符分隔。该命令表示执行指定模块中某条指定的测试用例。
-
pytest –m 自定义标记 运行指定mark标记的测试用例。如:pytest –m slow 这将会执行所有带@pytest.mark.slow装饰器的用例
-
pytest -pyargs pkg.testing 导入pkg.testing并使用其文件系统位置来查找和运行测试,简单说就是从包中运行测试。
3.pytest 常用命令行参数
-
-v 或 --verbose 显示更详细的测试结果信息;例:pytest -v test_case.py
-
-q 或 --quiet 启用“静默模式”,只在测试结果失败时显示详细信息,正常运行时不显示测试过程的详细信息。
-
-s 或 --Silent:禁用捕获测试用例的标准输出和标准错误流,将这些输出显示在控制台上,便于调试和查看打印信息。
-
-n=NUM:启用多线程或多进程运行测试用例,需要安装pytest-xdist插件模块。
-
-k=VALUE:用例的nodeid包含VALUE值则该用例被执行。可以使用通配符或正则表达式来构建匹配规则。
-
-m=LABELNAME:仅执行被@pytest.mark.LABELNAME标记的用例。
-
-x 或 --xfail:如果任何一个用例执行失败,则停止当前线程的测试执行。
-
--maxfail=NUM:当用例运行时,允许的最大失败次数为NUM,超过则立即停止执行。
-
--reruns=NUM:失败的用例尝试重跑NUM次。
-
-r char:用于在测试会话结束时显示测试结果摘要;例:pytest -rf test_case.py 表示测试运行时显示 fail 测试结果的详细信息。(char:(f)ailed, (e)rror, (s)kipped, (x)failed, (X)passed, (P)assed, a(ll)...其中 a 表示除了通过以外的所有结果)
更多参数的使用方式及作用可通过 pytest -h 查看
4.测试结果的状态
- passed:测试通过
- failed:断言失败;预期的失败结果与测试函数返回的失败结果不一致时,测试结果也是该状态
- error:测试的程序代码报错
- xfail:预期失败,测试函数或测试类上加了装饰器 @pytest.mark.xfail()
三、pytest常用
1.assert(断言)的使用
1.1.基础断言:
assert expression :表达式为True时,断言成功,测试结果为 passed;表达式为False时,断言失败,测试结果为 failed。例:
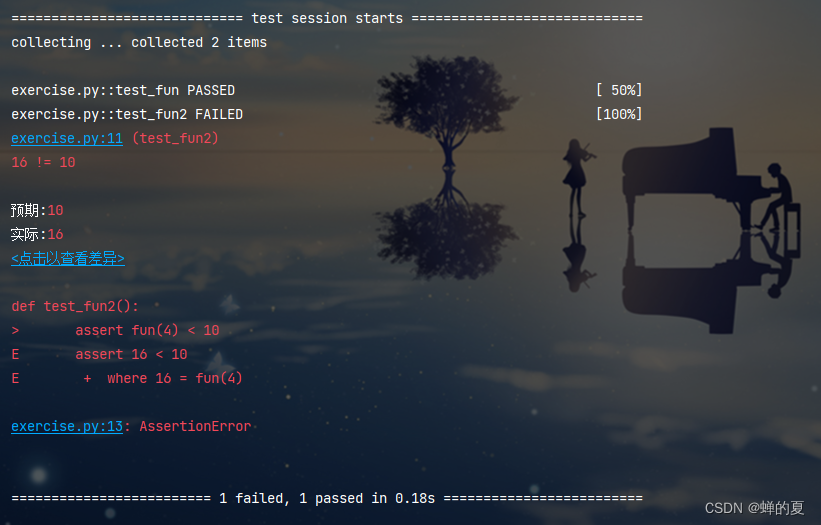
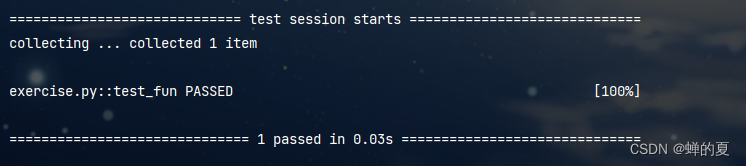
import pytest


def fun(x):
    return x ** 2


def test_fun():
    assert fun(3) == 9


def test_fun2():
    assert fun(4) < 10


if __name__ == "__main__":
    pytest.main()
执行结果:
1.2. 异常断言:
使用 pytest.raises 作为上下文管理器,当测试函数抛出异常时可以获取到对应的异常实例。例:
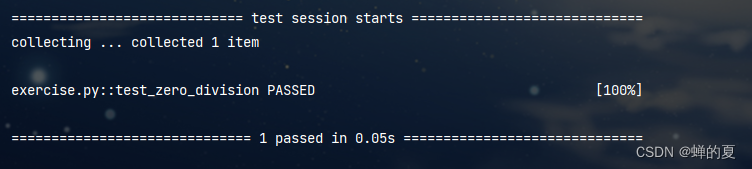
def test_zero_division():
    with pytest.raises(ZeroDivisionError):
        1 / 0
执行结果(抛出的错误与预期的错误一致,则执行成功):
若需要访问测试函数抛出的异常信息,那么可以这样:
import pytest


def zero_division():
    with pytest.raises(ZeroDivisionError) as excinfo:
        1 / 0

	# type, traceback, value 是异常实例的主要属性
    print(excinfo.type)
    print(excinfo.traceback)
    print(excinfo.value)


if __name__ == "__main__":
    zero_division()
执行结果:

注意:断言 value 值时需要将其转换为 str。如:
import pytest


def test_zero_division():
    with pytest.raises(ZeroDivisionError) as excinfo:
        1 / 0		# 这里是函数表达式

        assert 'zero' in str(excinfo.value)  # 从这里获得值
此外,上下文管理还接受 match 关键字参数,用以匹配表达式中的异常,例如:
import pytest


def fun():
    raise ValueError("exception 123 raised")


def test_fun():
    with pytest.raises(ValueError, match=r'.* 123 .*'):
        fun()
执行结果:
2.fixture函数
包含unittest的setUp() 和 tearDown() 方法,用于对测试用例做初始化或清扫工作,使用时更灵活。
那么,如何使用它呢?首先我们来看看fixture函数的初始化参数列表,并通过以下例子逐步熟悉使用它吧!
@pytest.fixture(scope = "function",params=None,autouse=False,ids=None,name=None)
def test():
	pass
2.1、scope:function、class、module、package、session
-
值为session时,表示一次会话(一次运行算一次会话)内该fixture函数只调用一次(如果用到该fixture函数)。
-
值为package时,表示运行测试时每个包前仅调用一次该fixture函数
-
值为module时,表示运行测试时每个模块前仅调用一次该fixture函数(在conftest.py时有效,否则只在fixture函数所在模块有效)。
-
值为class时,表示运行测试时每个测试类前仅调用一次该fixture函数
-
值为function时,表示运行测试时每个测试函数前调用一次该fixture函数。
注意:范围比较大的 fixture 函数将优先被实例化。
小栗子:
# test_fixture.py

import pytest


@pytest.fixture(scope="class")
def return_info():
    print('this is fixture !')
    return 'this is example!'


# 调用fixture
class TestClass:
	# 测试方法(非测试方法不能使用该方式)通过在形参中使用fixture函数名来调用fixture函数并获取其返回值
    def test_case(self, return_info):
        assert 'this' in return_info

    def test_case2(self, return_info):
        assert 'is' in return_info


if __name__ == "__main__":
    pytest.main()
执行结果:
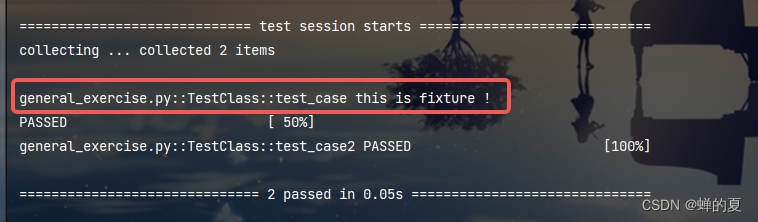
可看到一个测试类里仅执行了一次 fixture 函数。
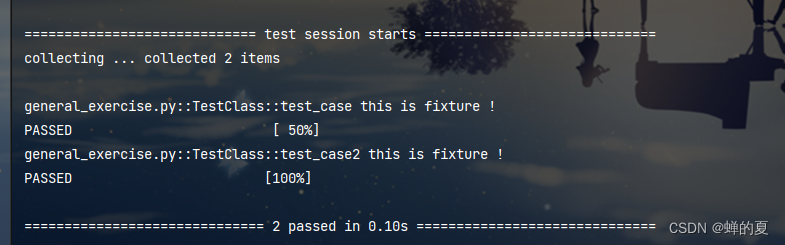
将 @pytest.fixture(scope="class") 中的 scope 值改为 "function" 再运行一次: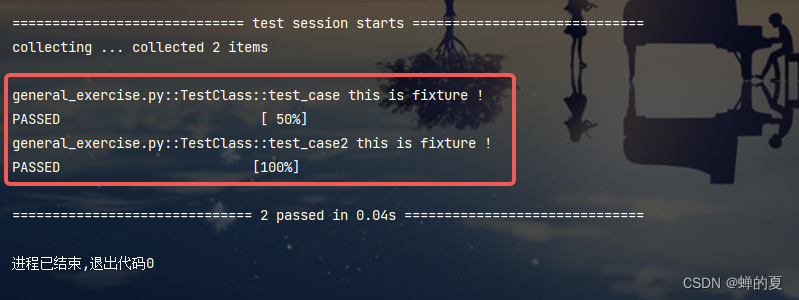
可看到该fixture函数执行了两次!
2.2、params:
-
Fixture函数的可选形参列表(支持列表传入),默认值为None。
-
params的每个元素都会执行调用一次(每个使用到该fixture函数的函数都会被执行一次)
-
与参数ids一起使用,作为每次每个元素调用的标识。
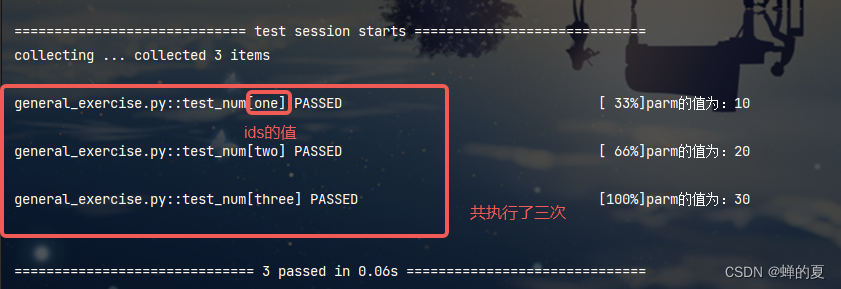
小栗子:
import pytest


@pytest.fixture(scope="class", params=[10, 20, 30], ids=['one', 'two', 'three'])
def return_num(request):  # request:pytest内建fixture函数,有字段param,通过request.param 获取注解中传入的params值
    return request.param  # 这里获取值的写法为固定写法


def test_num(return_num):
    print('parm的值为:{}'.format(return_num))
    assert return_num >= 5


if __name__ == '__main__':
    pytest.main()
执行结果:
2.3、autouse:
默认False,表示不自动调用 fixture 函数。值为True时,该fixture函数调用效果根据scope的值而定,当scope的值为“function”时,测试方法执行前调用一次该fixture函数,且测试函数中,不需要传入该fixture函数名(fixture函数有返回值时仍需通过使用fixture函数名来获取返回值)。
小栗子:
import pytest


@pytest.fixture(scope="function", autouse=True)
def return_info():
    print('this is fixture !')
    return 'this is example!'


# 调用fixture
class TestClass:
    def test_case(self, return_info):	# 仍需通过fixture函数名来获取其返回值
        assert 'this' in return_info

	# 若无需fixture函数的返回值,则可不写fixture函数名,因autouse为True,此时不写fixture函数名仍可调用该fixture函数
    def test_case2(self):
        assert 'is' in 'this is example!'


if __name__ == "__main__":
    pytest.main()
执行结果:
2.4、ids:
搭配 params 使用,有点用但不多。详见上方 params 例子。
2.5、name:
用于在调用fixture函数时,重命名fixture函数名,有点用但不多。
小栗子:
import pytest


@pytest.fixture(name='num')
def return_num():
    return 10


def test_num(num):
    assert num == 20
注意:在调用fixture函数时,只能使用重命名后的函数名num, 使用实际函数名将不会生效
2.6、conftest.py——共享 fixture 函数
可以认为是一个专门存放fixture函数的配置文件,且测试文件(即文件命名符合test_*.py 及 *_test.py)中的测试函数可以直接引用fixture函数名来调用该fixture函数而不需要导入。
小栗子:
# conftest.py
import pytest


@pytest.fixture
def return_num():
    print('这是一个conftest.py中的fixture函数!')
    return 10
# test_case.py
import pytest


def test_num(return_num):
    assert return_num < 100


if __name__ == "__main__":
    pytest.main()
运行测试:
conftest.py 的特性:
-
conftest.py 文件名称固定,不可更改
-
pytest会默认读取conftest.py里面的所有fixture,因此测试文件中引用时无需导入相关 fixture 函数,非测试文件不可直接引入。
-
生效范围:只对同一个package下的所有测试用例生效,且不同目录下可拥有各自的 conftest.py 文件;同一目录下,若有多个conftest.py,且拥有同名的fixture函数,那么调用时将只调用离测试文件近的 conftest.py 中的相关fixture函数。
tips:最顶层的 conftest.py 一般用于初始化动作,如接口测试中的登录获取token、WebUI自动化测试中的初始化driver等。
2.7、fixture函数的后置处理
前面所举的例子,都是 setUp() 的处理,接下来我们看看如何实现 tearDown() 。
使用 yield :
import pytest


@pytest.fixture(autouse=True)
def exercise_yield():
    print('setUp() 部分')
    yield
    print('tearDown() 部分')


def test_num(return_num):
    assert return_num < 100


if __name__ == "__main__":
    pytest.main()
运行测试:
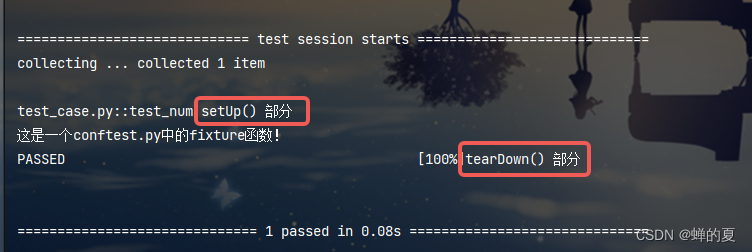
可看到yield之前的部分将在测试运行前被执行,之后的部分在测试运行完成后被执行。
注意:yield之前的代码若抛出异常或断言失败,那么yield之后的代码将不会被执行,当然,使用了该fixture函数的测试代码也不会执行
通过request上下文对象的 addfinalizer 方法来完成后置作用:
import pytest


@pytest.fixture(scope="class", name='num')
def return_num(request):
    print("setUp代码块")

    def print_one():
        print('tearDown代码块 one')

    def print_two():
        print('tearDown代码块 two')

    request.addfinalizer(print_one)
    request.addfinalizer(print_two)


def test_case():
    assert 1


if __name__ == "__main__":
    pytest.main()
运行测试:
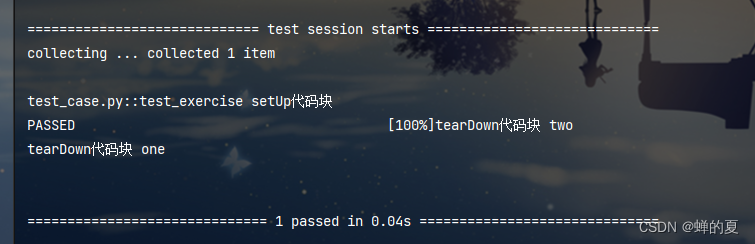
可看到两个addfinalizer 添加的方法都被执行了。
如果 setUp() 部分出现异常,会不会运行addfinalizer() 方法添加的 tearDown() 代码呢,试试看:
import pytest


@pytest.fixture()
def print_info(request):
    print("setUp代码块")
    print(1 / 0)

    def print_one():
        print('tearDown代码块 one')

    request.addfinalizer(print_one)


def test_exercise(print_info):
    assert 1


if __name__ == "__main__":
    pytest.main()
运行测试: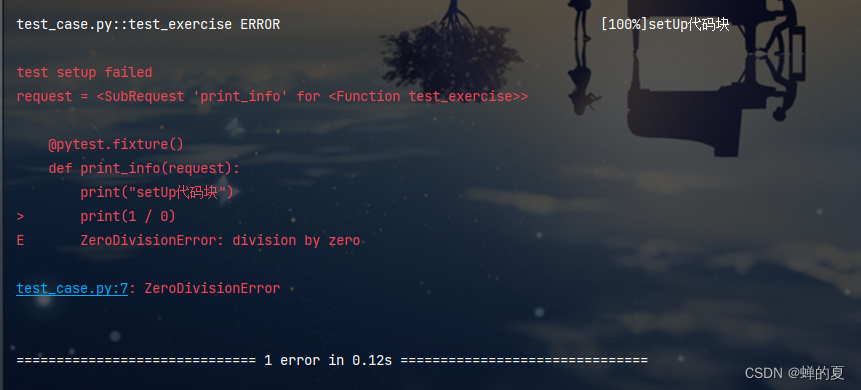
答案是不会。这里我稍微有点疑惑,很多答案都说,终结函数 addfinalizer() 函数即使 setUp() 代码部分抛出异常或断言失败时仍可执行 tearDown() 部分的代码,但实践来看,和yield并无区别,希望有大佬来解答我的疑惑。
两相比较,使用yield 看起来更简洁,终结函数 addfinalizer() 则可添加多个tearDown() 的处理函数。
3.mark 的使用
3.1、常见内置标记
通过使用 pytest.mark 你可以轻松地在测试用例上设置标记。常用的内置标记如下:
-
skip -始终跳过该测试用例。用法:在测试用例前添加装饰器 @pytest.mark.skip(reason) ,可传入的可选参数 reason 表示自定义的描述(关于为什么跳过的描述)
当想要跳过整个模块的用例时,在模块代码中可以用:@pytest.skip(reason, allow_module_level=True) -
skipif -遇到特定情况下跳过该测试用例。
用法:@pytest.mark.skipif(条件表达式, reason),如果条件表达式为True,那么就会跳过该用例。 -
usefixtures -使用指定的fixture方法
用法:@pytest.mark.usefixtures(fixture函数名称)
注意:用此方式使用fixture函数时,无法获取其返回值,必须使用fixture函数名的方式获取其返回值。 -
xfail -遇到特定情况,产生一个“期望失败“的输出,直接使用时,测试通过则标记为XPASS,失败则标记为XFAIL。
用法:@pytest.mark.xfail(condition = None,reason = None,raises = None,run = True,strict = False)
condition(bool):bool表达式
reason(str):标记为xfail的原因
raises(str):期望由测试函数引发的异常,异常若对应则通过测试,不对应无法通过测试
run(bool):如果值为False,那么被标记的函数将不会被执行,并始终标记为xfail
strict(bool):值为False,该函数将在终端输出中显示,并且无论被标记的测试是否通过,都不会导致测试套件整体失败;值为True,被标记的函数在终端输出显示中为xfailed,如果意外地通过测试,将使整体测试套件失败。 -
parametrize -在同一个测试用例上运行多次调用(数据驱动/参数化)。
注意:标记仅对测试用例有效。对fixture函数无效
3.2、自定义标记
在测试用例函数上可以打上自定义的标记,运行测试用例时,可以通过标签名来过滤要运行的测试用例:@pytest.mark.标记名
示例:
import pytest


@pytest.mark.smoke
def test_case_01():
    print('mark is smoke')
    assert 1


@pytest.mark.webtest
def test_case_02():
    print('no smoke,this is webtest')
    assert 1
运行测试 pytest -m "smoke" :
可看到只执行了标记为 “smoke”的测试。测试结果中出现了warnings,这是因为自定义的标记未注册。
注册自定义标记:
- 第一种方法:使用 pytest.ini 文件,该文件须和测试用例在同一个目录,或者在根目录下作用于全局。
# pytest.ini
[pytest]
markers =
    smoke
    webtest
若运行测试时出现错误:UnicodeDecodeError: 'gbk' codec can't decode byte 0xaa in position 48: illegal multibyte sequence 这是解决方法
- 第二种方法:在 conftest.py 文件中使用如下钩子函数注册自定义标记
def pytest_configure(config):
    marker_list = ["smoke: this is smoke mark", "webtest"]
    # 注册自定义标记
    for marker in marker_list:
        config.addinivalue_line("markers", marker)
执行两个自定义标记的测试用例:
pytest –m "smoke or webtest"
运行结果: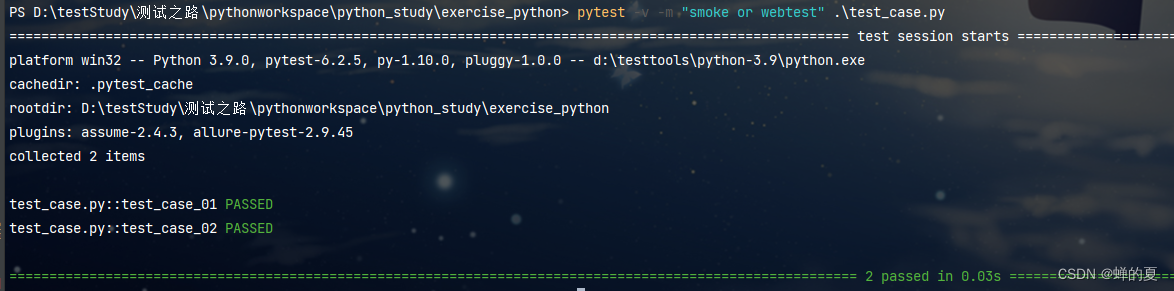
4.参数化
有时我们需要使用不同的值对一个接口进行重复的测试,这时就需要进行参数化了,接下来让我们看看几种常见的参数化方式。
4.1、标记参数化
@pytest.mark.parametrize
用法:在用例类/方法前加上@pytest.mark.parametrize(‘参数名‘,参数列表/参数字典)
- 使用列表:
import pytest


@pytest.mark.parametrize('int_type, float_type', [(10, 9.99), (100, 99.9)])  # 第一种传入多组参数的示例
def test_print(int_type, float_type):
    print(int_type)
    print(float_type)
    assert 1


parametrize = [(66, 66.66), (99, 99.99)]


@pytest.mark.parametrize('int_type, float_type', parametrize)  # 第二种传入多组参数的示例
def test_print_02(int_type, float_type):
    print(int_type)
    print(float_type)
    assert 1
使用列表时,还可装饰多个@pytest.mark.parametrize 进行参数间的排列组合测试:
# -*- coding:utf8 -*-
import pytest


@pytest.mark.parametrize('x', [1, 2])
@pytest.mark.parametrize('y', [3, 4])
def test_01(x, y):
    assert x * y % 2 == 0


if __name__ == "__main__":
    pytest.main()
- 使用字典:
# -*- coding:utf8 -*-
import pytest

test_dict = [{'质数': 2}, {'水仙花数': 153}, {'完全数': 28}]


@pytest.mark.parametrize('case_dict', test_dict)
def test_print(case_dict):
    num_name = [key for key in case_dict.keys()]
    num_value = [value for value in case_dict.values()]
    print('特殊数名:%s, 举例:%s' % (num_name, num_value))
    assert 1
运行测试: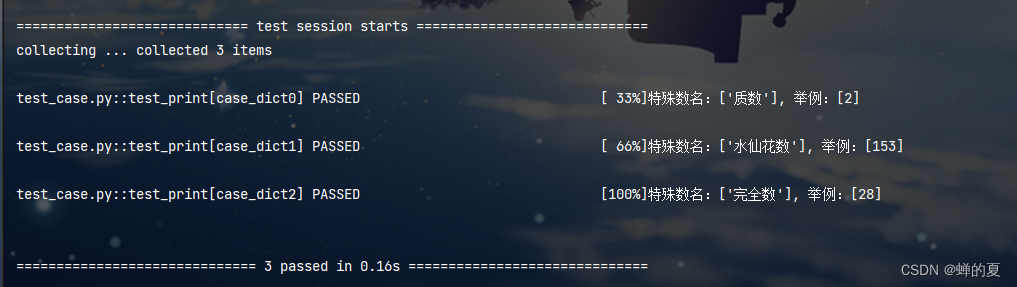
4.2、使用fixture函数进行参数化
# -*- coding:utf8 -*-
import pytest


@pytest.fixture(params=[33, 99])
def request_params(request):
    return request.param


def test_01(request_params):
    assert request_params ** 2 % 3 == 0
运行测试: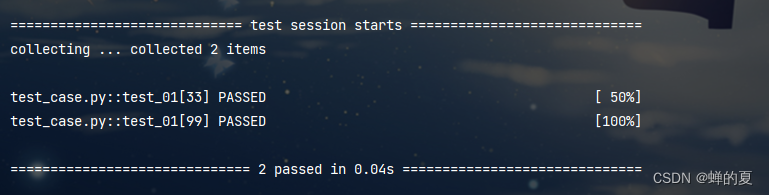
5.常用的pytest配置(pytest.ini文件的使用)
pytest.ini:pytest的配置文件,一个项目中仅存一个,且固定名字不可更改,若需使其作用于全局,则须将其放在项目根目录下。
5.1、markers
用于注册自定义标记:
[pytest]
markers =
    markers_one: this is markers_one
    markers_two
    markers_three
5.2、addopts
用于设置自定义执行参数,pytest运行时以此设置为默认执行条件
[pytest]
# 表示默认执行pytest时显示详细输出、不捕获标准输出,并且每个用例失败时重跑两次
addopts = -v -s --reruns=2
5.3、testpaths
定义测试文件存放路径。pytest会按照此配置去指定路径下寻找测试文件。
[pytest]
# 表示在当前目录下的test文件夹中查找测试文件
testpaths = ./test
5.4、自定义用例执行规则
[pytest]
# 表示pytest会执行所有以test开头的文件
python_files = test*.py
# 表示pytest会执行所有以Test开头的类
python_classes = Test*
# 表示pytest会执行所有以test开头的函数
python_functions = test*
5.5、xfail_strict
用于设置当预期失败的测试用例实际通过时是否应视为错误。如果设置为True,则预期失败的测试用例如果实际通过,将被视为错误。
[pytest]
# 值可设置为 True, False, 0, 1
xfail_strict = True
5.6、log_cli 和 log_cli_level
用于配置pytest的命令行日志记录。log_cli控制是否启用日志记录,而log_cli_level设置日志级别(如DEBUG, INFO, WARNING, ERROR, CRITICAL)
[pytest]
# 值可设置为 True, False, 0, 1
log_cli = True
log_cli_level = INFO
平时测试自己写的自动化测试代码时有用,真正批量运行时不建议使用。
5.7、cache_dir
指定pytest缓存的目录,用于在多次运行之间缓存测试结果,加速测试执行。
[pytest]
cache_dir = .pytest_cache
可通过cmd命令 pytest --help 查看更多配置项的使用:
[pytest] ini-options in the first pytest.ini|tox.ini|setup.cfg file found:

  markers (linelist):   markers for test functions
  empty_parameter_set_mark (string):
                        default marker for empty parametersets
  norecursedirs (args): directory patterns to avoid for recursion
  testpaths (args):     directories to search for tests when no files or directories are given in the command line.
  filterwarnings (linelist):
                        Each line specifies a pattern for warnings.filterwarnings. Processed after -W/--pythonwarnings.
  usefixtures (args):   list of default fixtures to be used with this project
  python_files (args):  glob-style file patterns for Python test module discovery
  python_classes (args):
                        prefixes or glob names for Python test class discovery
  python_functions (args):
                        prefixes or glob names for Python test function and method discovery
  disable_test_id_escaping_and_forfeit_all_rights_to_community_support (bool):
                        disable string escape non-ascii characters, might cause unwanted side effects(use at your own
                        risk)
  console_output_style (string):
                        console output: "classic", or with additional progress information ("progress" (percentage) |
                        "count").
  xfail_strict (bool):  default for the strict parameter of xfail markers when not given explicitly (default: False)
  enable_assertion_pass_hook (bool):
                        Enables the pytest_assertion_pass hook.Make sure to delete any previously generated pyc cache
                        files.
  junit_suite_name (string):
                        Test suite name for JUnit report
  junit_logging (string):
                        Write captured log messages to JUnit report: one of no|log|system-out|system-err|out-err|all
  junit_log_passing_tests (bool):
                        Capture log information for passing tests to JUnit report:
  junit_duration_report (string):
                        Duration time to report: one of total|call
  junit_family (string):
                        Emit XML for schema: one of legacy|xunit1|xunit2
  doctest_optionflags (args):
                        option flags for doctests
  doctest_encoding (string):
                        encoding used for doctest files
  cache_dir (string):   cache directory path.
  log_level (string):   default value for --log-level
  log_format (string):  default value for --log-format
  log_date_format (string):
                        default value for --log-date-format
  log_cli (bool):       enable log display during test run (also known as "live logging").
  log_cli_level (string):
                        default value for --log-cli-level
  log_cli_format (string):
                        default value for --log-cli-format
  log_cli_date_format (string):
                        default value for --log-cli-date-format
  log_file (string):    default value for --log-file
  log_file_level (string):
                        default value for --log-file-level
  log_file_format (string):
                        default value for --log-file-format
  log_file_date_format (string):
                        default value for --log-file-date-format
  log_auto_indent (string):
                        default value for --log-auto-indent
  faulthandler_timeout (string):
                        Dump the traceback of all threads if a test takes more than TIMEOUT seconds to finish.
  addopts (args):       extra command line options
  minversion (string):  minimally required pytest version
  required_plugins (args):
                        plugins that must be present for pytest to run
最后,附 pytest官方文档地址,pytest中文官方文档地址。
最后我邀请你进入我们的【软件测试学习交流群:785128166】, 大家可以一起探讨交流软件测试,共同学习软件测试技术、面试等软件测试方方面面,还会有免费直播课,收获更多测试技巧,我们一起进阶Python自动化测试/测试开发,走向高薪之路
作为一个软件测试的过来人,我想尽自己最大的努力,帮助每一个伙伴都能顺利找到工作。所以我整理了下面这份资源,现在免费分享给大家,有需要的小伙伴可以关注【公众号:程序员二黑】自提!


 7484
7484


 被折叠的 条评论
为什么被折叠?
被折叠的 条评论
为什么被折叠?
 到【灌水乐园】发言


