


1.下载包的方法
点击下载至本地,然后解压 得到
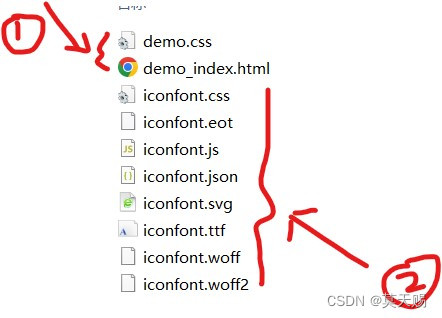
【1】(1)是示例 可去除 (2)是需要引入的 ,新建icon文件夹放入后 在main.js对应引入她的js和css
【2】封装公共组件
<template>
  <svg class="svg-icon" aria-hidden="true">
    <use :xlink:href="iconName"></use>
  </svg>
</template>

  <script>
export default {
  name: "icon-svg",
  props: {
    iconClass: {
      type: String,
      required: true,
      default:'icon-icon_apply_common'
    },
  },
  computed: {
    iconName() {
      return `#${this.iconClass}`;
    },
  },
};
</script>

  <style>
.svg-icon {
  width: 1em;
  height: 1em;
  vertical-align: -0.15em;
  fill: currentColor;
  overflow: hidden;
}
</style>
在main.js引入其组件
import Icons from "./components/icons.vue";
Vue.component("Icons", Icons);
就可以使用了
<Icons ></Icons>2.Font class的在线引入
这样的引入是引入对应的 字体类 对其之前的颜色会去除(类似于黑白)需要自定义颜色,对于简单的图标去改变颜色用这种方式是非常友善的,不用担心fill占据。
【1】复制链接代码,在index.html引入
<link rel="stylesheet" href="//xxxxxxxxx.css">【2】复制图标代码(例:icon-icon_select) 再对应使用
<i class='iconfont icon-icon_select'> </i>3.symbol在线引入
多色图标 ,有时对修改颜色会比较麻烦 因为fill被占据了就很多方法难以去除
【1】复制链接代码,在index.html引入
<script src="//xxxxxxxx.js"></script>【2】之后和 方法1 的【2】及后面步骤一样


 1万+
1万+


 被折叠的 条评论
为什么被折叠?
被折叠的 条评论
为什么被折叠?
 到【灌水乐园】发言


