


目录
Spring是什么?
Spring是一个轻量级控制反转(IoC)和面向切面(AOP)的容器框架
Spring IOC/DI
IOC(Inversion Of Control)控制反转,是面向对象编程中的一种设计原则。
控制:控制对象的创建,整个生命周期的管理,依赖关系管理。
反转:原来是程序创建,现在是第三方容器创建。
优点:1、降低了耦合度
2、灵活性提高
UserDao userDao = new UserDaoImpl();UserDao userDao = Spring客户端.getBean(id标识);
Spring客户端指的是通过ApplicationContext接口实现的类,例如:ClassPathXmlApplicationContext、AnnotationConfigApplicationContext
具体代码:
ApplicationContext context = new ClassPathXmlApplicationContext("applicationContext".xml)
UserDao userDao = context.getBean("userDao",UserDao.class);
其中,最常见的方式是DI(Dependency Injection)依赖注入。它是一种实现IOC的编程思想。
DI的实现方式:
构造函数注入:将依赖对象作为参数传递给类的构造函数。
设值(setter)注入:通过类的setter方法将依赖对象注入到类中。
自动装配:自动分析对象的依赖关系,并自动将需要的依赖注入到对象中。
包括:按名称自动装配、按类型自动装配、按构造函数自动装配和基于 Qualifier 的自动装配等。其中以按名称和按类型自动装配为最常用的两种。
此外,还有字段注入、方法注入等。
byName按名称自动装配:按照 Spring Bean 的名称进行匹配,如果当前 Bean 的名称和其他 Bean 的名称一致,则自动注入。可以使用 @Resource注解实现默认按名称自动装配,也可以使用@Autowired @Qualifier(id标识)
byType按类型自动装配:根据 Bean 类型进行匹配,如果当前 Bean 的类型和其他 Bean 的类型一致,则自动注入。可以使用 @Autowired 注解实现默认按类型自动装配。
设值注入:
public class EmpServiceImpl implements EmpService {

    private EmpDao empDao;
    private String name;

    public String getName() {
        return name;
    }

    public void setName(String name) {
        this.name = name;
    }

    public EmpDao getEmpDao() {
        return empDao;
    }

    public void setEmpDao(EmpDao empDao) {
        this.empDao = empDao;
    }

    @Override
    public void show() {
        System.out.println("注入的name:"+this.name);
        empDao.show();
    }
}
<bean id="empDao" class="com.m0_54698212.dao.EmpDaoImpl"></bean>
<bean id="empService" class="com.m0_54698212.service.EmpServiceImpl">
<!-- 注入引用的对象EmpDao ref:引用 指定id对应的bean-->
<property name="name" value="员工姓名"/>
<property name="empDao" ref="empDao"/>
</bean>构造注入:
注意:默认获取bean的时候,调用的是无参构造实例化,确保有无参构造。
public class EmpServiceImpl implements EmpService {

    private EmpDao empDao;
    private String name;

    public EmpServiceImpl(EmpDao empDao, String name) {
        this.empDao = empDao;
        this.name = name;
    }

    public EmpServiceImpl() {
    }

    @Override
    public void show() {
        System.out.println("注入的name:"+this.name);
        empDao.show();
    }
}
<bean id="empDao" class="com.m0_54698212.dao.EmpDaoImpl"></bean>
<!-- 构造注入-->
<bean id="empService" class="com.m0_54698212.service.EmpServiceImpl">
<!-- <constructor-arg index="0" ref="empDao"/>-->
<!-- <constructor-arg index="1" value="员工姓名"/>-->
<constructor-arg name="name" value="员工姓名"/>
<constructor-arg name="empDao" ref="empDao"/>
</bean>自动装配:
public class EmpServiceImpl implements EmpService {

    private EmpDao empDao;
    private String name;

    public EmpDao getEmpDao() {
        return empDao;
    }

    public void setEmpDao(EmpDao empDao) {
        this.empDao = empDao;
    }

    public String getName() {
        return name;
    }

    public void setName(String name) {
        this.name = name;
    }

    @Override
    public void show() {
        System.out.println("注入的name:"+this.name);
        empDao.show();
    }
}
<!-- autowire="byName" :需要提供get set 方法; 根据名字 :属性名 bean的名字进行匹配 -->
<!-- autowire="byType":根据类型自动注入: 属性的类型 匹配 bean的类型 -->
<bean id="empService" class="com.m0_54698212.service.EmpServiceImpl" ></bean>基于注释的自动装配:
步骤:
1、开启组件扫描
2、使用注解定义 Bean
3、基于注解方式实现依赖注入
| 注解 | 说明 |
|---|---|
| @Component | 该注解用于描述 Spring 中的 Bean,它是一个泛化的概念,仅仅表示容器中的一个组件(Bean),并且可以作用在应用的任何层次,例如 Service 层、Dao 层等。 使用时只需将该注解标注在相应类上即可。 |
| @Repository | 该注解用于将数据访问层(Dao 层)的类标识为 Spring 中的 Bean,其功能与 @Component 相同。 |
| @Service | 该注解通常作用在业务层(Service 层),用于将业务层的类标识为 Spring 中的 Bean,其功能与 @Component 相同。 |
| @Controller | 该注解通常作用在控制层(如 Struts2 的 Action、SpringMVC 的 Controller),用于将控制层的类标识为 Spring 中的 Bean,其功能与 @Component 相同。 |
<!--    注解扫描-->
    <context:component-scan base-package="com.m0_54698212"/>
</beans>
@Repository
public class AccountDaoImpl implements AccountDao{
private List<Account> accounts=new ArrayList<>();
@Override
public List<Account> list() {
System.out.println("查询账户");
return accounts;
}
}@Service
public class AccountServiceImpl implements AccountService{
@Autowired
private AccountDao accountDao;
@Override
public List<Account> list() {
return accountDao.list();
}
}
什么是Aop?
AOP,即面向切面编程(Aspect-Oriented Programming),是对OOP(面向对象)思想的补充 。主要是为了解决程序中的横切关注点(Cross-Cutting Concerns)问题而提出的一种技术。
横切关注点包括日志记录、事务处理、安全控制等与业务逻辑无关的功能模块。
切点(Pointcut):定义了那些类的哪些方法需要被切入。
通知(Advice):定义了切入到方法之前、方法之后、方法返回后或方法抛出异常时所要执行的代码。
切面(Aspect):将切点和通知结合起来,定义了一组关于哪些类的哪些方法在何时被切入的规则。
术语解释:
Joinpoint(连接点):指那些被拦截到的点,在Spring中,指可以被动态代理拦截目标类的方法。
Pointcut(切入点):指要对哪些Joinpoint进行拦截,即被拦截的连接点。
Advice(通知):指拦截到Joinpoint之后要做的事情,即对切入点增强的内容。
Target(目标):指代理的目标对象。
Weaving(植入):指把增强代码应用到目标上,生成代理对象的过程。
Proxy(代理):指生成的代理对象。
Aspect(切面):切入点和通知的结合
Spring Aop通知分类:
before(前置通知):通知方法在目标方法调用之前执行
after(后置通知):通知方法在自标方法返回或异常后调用
after-returning (返回后通知):通知方法会在目标方法返回后调用
after-throwing(抛出异常通知):通知方法会在目标方法抛出异常后调用
around(环绕通知):通知方法会将目标方法封装起来
实现原理:
动态代理:
1、目标接口:jdk动态代理
2、目标类:cglib动态代理
基于xml实现aop:
步骤:
1、引入依赖包:spring-aop,spring-aspects
2、定义切面类
3、在切面类中定义通知方法
4、在xml中配置
<dependency>
      <groupId>org.springframework</groupId>
      <artifactId>spring-aop</artifactId>
      <version>5.3.25</version>
    </dependency>
    <dependency>
      <groupId>org.springframework</groupId>
      <artifactId>spring-aspects</artifactId>
      <version>5.3.25</version>
    </dependency>
public class Trans {
/**
*
* @param joinPoint 连接点
*/
public void startTran(JoinPoint joinPoint){
System.out.println("目标方法的签名:"+joinPoint.getSignature());
System.out.println("开启事务");
}
/**
* 提交事务
* @param joinPoint
* @param result 目标方法返回的结果
*/
public void commitTran(JoinPoint joinPoint,Object result){
System.out.println("目标方法的签名:"+joinPoint.getSignature());
String methodName = joinPoint.getSignature().getName();
System.out.println("提交事务"+methodName);
}
}
}<!-- 将切面类配置成bean-->
<bean id="trans" class="com.m0_54698212.aspect.Trans"/>
<aop:config>
<aop:aspect ref="trans">
<!-- 切入点-->
<aop:pointcut id="p1" expression="execution(* com.m0_54698212.service.*.*(..))"/>
<!-- 配置前置通知-->
<aop:before method="startTran" pointcut-ref="p1"/>
<!-- 正常返回通知-->
<aop:after-returning method="commitTran" returning="result" pointcut-ref="p1"/>
</aop:aspect>
</aop:config>基于注解实现aop:
通知类型的注解分为5种:
| 注解 | 通知 |
|---|---|
| @Before | 通知方法会在目标方法调用之前执行 |
| @After | 通知方法会在目标方法返回或异常后调用 |
| @AfterReturning | 通知方法会在目标方法返回后调用 |
| @AfterThrowing | 通知方法会在目标方法抛出异常后调用 |
| @Around | 通知方法会在目标方法封装起来 |
@Configuration//容器类,相当于applicationContext.xml文件
@ComponentScan(basePackages = "com.m0_54698212")
@EnableAspectJAutoProxy//启用aop的自动代理
public class App
{
    @Bean//将方法的返回值,配置成一个bean
    public UserService userService1(){
        return new UserServiceImpl();
    }
}
@Component
@Aspect
public class MyTrans {
@Pointcut("execution(public * com.m0_54698212.service.*.*(..))")
public void pt(){}
@Pointcut("execution(public * com.m0_54698212.dao.*.*(..))")
public void pt2(){}
//JoinPoint:连接点对象:目标对象中的连接点:获取到要增强的目标方法的信息
//通知
@Before("pt()")
public void startTrans(JoinPoint joinpoint){
System.out.println("目标对象"+joinpoint.getTarget());
System.out.println("方法签名"+joinpoint.getSignature());
//目标方法
String methodName = joinpoint.getSignature().getName();
System.out.println("在目标方法"+ methodName + "开始事务");
}
// @After("pt()")
public void commitTrans(JoinPoint joinPoint){
String methodName = joinPoint.getSignature().getName();
System.out.println("在目标方法"+ methodName + "提交事务");
}
// @AfterReturning(value = "pt()",returning = "res")
public void afterReturning(JoinPoint joinPoint,Object res){
System.out.println("目标方法正常返回果后的通知:");
System.out.println("目标方法返回的结果:"+res);
}
// @AfterThrowing(value = "pt()",throwing = "e")
public void afterThrowing(JoinPoint joinPoint,Exception e){
System.out.println("目标方法发生异常后才会有通知:");
System.out.println(e);
}
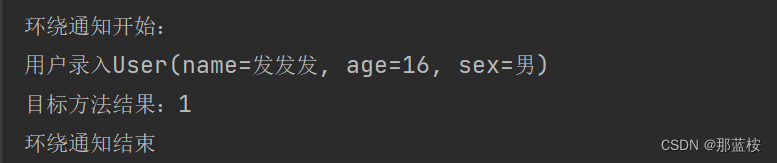
// @Around("pt()")
public Object around(ProceedingJoinPoint joinPoint){
Object res = 0;
try {
System.out.println("环绕通知开始:");
//目标方法的执行
res = joinPoint.proceed();
System.out.println("目标方法结果:"+res);
} catch (Throwable e) {
System.out.println("环绕通知异常:"+e);
} finally {
System.out.println("环绕通知结束");
}
return res;
}
}<context:component-scan base-package="com.m0_54698212"/>
<!-- 启用aop自动代理-->
<aop:aspectj-autoproxy />public class TestAnnotation {
@Test
public void test1(){
ApplicationContext context = new AnnotationConfigApplicationContext(App.class);
UserService userService = context.getBean("userServiceImpl",UserService.class);
userService.add(new User("发发发",16,"男"));
}
}运行结果:


JdbcTemplate:
JdbcTemplate 是 Spring 框架提供的一种简化 JDBC 开发的工具类。
JdbcTemplate 对 JDBC 进行了封装,使得开发者可以更加方便、快捷地操作数据库。在实际开发中,JdbcTemplate 可以帮助我们避免一些低层次的 JDBC 编程错误,提高了开发效率和代码的可维护性。
特点:
1. 封装了 JDBC,提供了更加简洁、方便的操作方式。
2. 提供了查询、更新、批量更新等多种操作方法,可以处理复杂的 SQL 语句。
3. 提供了异常处理、结果集自动映射和资源自动释放等功能,使得开发更加稳定、高效。
<!--引入 jdbc.properties 中的配置-->
    <context:property-placeholder location="classpath:jdbc.properties"></context:property-placeholder>

    <!--定义数据源 Bean-->
    <bean id="dataSource" class="org.springframework.jdbc.datasource.DriverManagerDataSource">
        <!--数据库连接地址-->
        <property name="url" value="${jdbc.url}"/>
        <!--数据库的用户名-->
        <property name="username" value="${jdbc.username}"/>
        <!--数据库的密码-->
        <property name="password" value="${jdbc.password}"/>
        <!--数据库驱动-->
        <property name="driverClassName" value="${jdbc.driver}"/>
    </bean>

    <!--定义JdbcTemplate Bean-->
    <bean id="jdbcTemplate" class="org.springframework.jdbc.core.JdbcTemplate">
        <!--将数据源的 Bean 注入到 JdbcTemplate 中-->
        <property name="dataSource" ref="dataSource"></property>
    </bean>
整合Mybatis:
步骤:
1、引入依赖包
2、配置数据源
<dependency>
      <groupId>org.mybatis</groupId>
      <artifactId>mybatis</artifactId>
      <version>3.5.3</version>
    </dependency>
    <!--    mybatis-spring桥梁-->
    <dependency>
      <groupId>org.mybatis</groupId>
      <artifactId>mybatis-spring</artifactId>
      <version>2.0.3</version>
    </dependency>
    <dependency>
      <groupId>mysql</groupId>
      <artifactId>mysql-connector-java</artifactId>
      <version>8.0.31</version>
    </dependency>
    <dependency>
      <groupId>org.springframework</groupId>
      <artifactId>spring-jdbc</artifactId>
      <version>5.3.24</version>
    </dependency>
    <dependency>
      <groupId>com.alibaba</groupId>
      <artifactId>druid</artifactId>
      <version>1.1.20</version>
    </dependency>
<!-- 启用注解扫描 -->
<context:component-scan base-package="com.m0_54698212"></context:component-scan>
<!-- 加载db.properties-->
<context:property-placeholder location="classpath:db.properties"></context:property-placeholder>
<!-- 配置数据源-->
<bean id="dataSource" class="com.alibaba.druid.pool.DruidDataSource"
init-method="init"
destroy-method="close">
<property name="url" value="${url}"></property>
<property name="username" value="${user}"></property>
<property name="password" value="${pwd}"></property>
<property name="driverClassName" value="${driver}"></property>
<!-- 初始化连接数量-->
<property name="initialSize" value="${initialSize}"></property>
<!-- 最大活动连接数-->
<property name="maxActive" value="${maxActive}"></property>
<!-- 最小空闲连接数,连接池保留不低于空闲连接的数量-->
<property name="minIdle" value="${minIdle}"></property>
<!-- 获取连接时最大的等待时间,超过未获取到连接就抛出异常-->
<property name="maxWait" value="${maxWait}"></property>
<!-- 验证连接是否成功的命令-->
<property name="validationQuery" value="select 1;"></property>
</bean>
<!-- 配置SqlSessionFactoryBean-->
<bean id="sessionFactoryBean" class="org.mybatis.spring.SqlSessionFactoryBean">
<!-- 引用数据源-->
<property name="dataSource" ref="dataSource"></property>
<!-- 配置别名包-->
<property name="typeAliasesPackage" value="com.m0_54698212.entity"></property>
<!-- 指定xml文件-->
<property name="mapperLocations" value="classpath:mapper/*.xml"></property>
</bean>
<!-- 配置dao接口的扫描-->
<bean class="org.mybatis.spring.mapper.MapperScannerConfigurer">
<property name="sqlSessionFactoryBeanName" value="sessionFactoryBean"></property>
<!-- 指定dao接口所在的包-->
<property name="basePackage" value="com.m0_54698212.dao"></property>
</bean>/**
* @Author {那蓝桉}
* @Date: 2023/05/26/ 15:26
* @description
*/
@Configuration//容器类,将类配置成类似于xml的容器
@ComponentScan(basePackages = "com.m0_54698212")//开启注解扫描
@PropertySource(value = "db.properties")//加载键值对properties文件
@MapperScan("com.m0_54698212.dao")//配置dao接口的扫描
public class AppConfig {
//@Value用来获取属性文件中的属性值
@Value("${user}")
private String user;
@Value("${url}")
private String url;
@Value("${pwd}")
private String password;
@Value("${driver}")
private String driver;
@Value("${initialSize}")
private Integer initialSize;
@Value("${maxActive}")
private Integer maxActive;
@Value("${minIdle}")
private Integer minIdle;
@Value("${maxWait}")
private Integer maxWait;
@Bean
public DataSource dataSource(){
// 配置数据源
DruidDataSource dataSource = new DruidDataSource();
dataSource.setUrl(url);
dataSource.setUsername(user);
dataSource.setPassword(password);
dataSource.setDriverClassName(driver);
dataSource.setInitialSize(initialSize);
dataSource.setMaxActive(maxActive);
dataSource.setMinIdle(minIdle);
dataSource.setMaxWait(maxWait);
return dataSource;
}
//配置SqlSessionFactoryBean
@Bean
public SqlSessionFactoryBean sqlSessionFactoryBean() throws IOException {
SqlSessionFactoryBean factoryBean=new SqlSessionFactoryBean();
//引用数据源
factoryBean.setDataSource(dataSource());
//配置别名包
factoryBean.setTypeAliasesPackage("com.m0_54698212.entity");
//配置类,开启小驼峰命名
org.apache.ibatis.session.Configuration configuration=new org.apache.ibatis.session.Configuration();
configuration.setMapUnderscoreToCamelCase(true);
factoryBean.setConfiguration(configuration);
//路径资源匹配解析器对象
PathMatchingResourcePatternResolver resolver=new PathMatchingResourcePatternResolver();
//指定xml文件
factoryBean.setMapperLocations(resolver.getResources("mapper/*.xml"));
return factoryBean;
}
}public class Test{
@Test
public void test(){
ApplicationContext context = new AnnotationConfigApplicationContext(AppConfig.class);
MaterialService materialService = context.getBean(MaterialService.class);
List<Material> list = materialService.findAll();
System.out.println(list);
}
}


 9928
9928


 被折叠的 条评论
为什么被折叠?
被折叠的 条评论
为什么被折叠?
 到【灌水乐园】发言


