


文章目录
使用目的
有时因为工作需要或是客户的电脑环境不同等因素,比如客户的电脑是XP或Windows Vista较低版本的32位操作系统,只能运行32位的程序,这时自己的Python程序也必须支持向下兼容,就得做出2个版本的程序:32位和64位的。
32位操作系统只能运行32位的程序,不能运行64位的程序。64位操作系统能运行32位和64位的程序。
另外,CPU支持64位,但电脑装了32位操作系统,也是不能运行64位的程序。详情
| - | 32位操作系统 | 64位操作系统 |
|---|---|---|
| 32位程序 | 支持 | 支持 (向下兼容) |
| 64位程序 | 不支持 | 支持 |
使用环境
操作系统: Windows 10 LTSC (2018版)
Python版本:3.8.6 (Python3.5及以上版本均可,Python2未测试)
安装x64和x86的Python
Python的版本可以在官网https://www.python.org下载安装。或者是找Python官网提供的FTP服务https://www.python.org/ftp/python/,自己找对应版本来下载。
官网下载:

FTP下载:

具体操作
本文使用FTP的方式下载Python。
下载python-3.8.6.exe和python-3.8.6-amd64.exe。没有指明amd64字样的默认是32位程序。

安装32位程序
步骤1

步骤2

步骤3

步骤4

安装64位程序
步骤1、2、4和安装32位Python的步骤相同。

升级pip
安装完成后,打开32位Python目录:Python38-32\Scripts。用cmd进入Python38-32\Scripts到目录,执行如下命令。
where pip # 显示程序所在目录

看到where pip命令显示有2个路径,需要手动把Python38-32\Scripts目录下的所有文件加个自定义的后缀名,辨别32位Python的pip。

where pip再次查看,发现pip.exe只有64位Python目录的。之后调用32位pip.exe都用pip-32.exe即可。

pip部分命令参考:
pip list								# 查看pip安装的包
pip show [包名]							# 显示包的路径和具体信息
pip install --upgrade [包名]			# 更新包的版本
pip install --default-time=666 [包名]	# 安装包,设定超时时间为666秒
pip install --upgrade --user [包名]		# 更新包的版本,安装在当前用户的家目录下
通过pip list可以看到64位Python下pip安装的包,初次安装pip会有WARNING的提示,提示pip版本低,需要升级pip。
WARNING: You are using pip version 20.2.1; however, version 20.3.3 is available.
You should consider upgrading via the 'f:\program files\python38\python.exe -m pip install --upgrade pip' command.
升级pip错误操作
因为安装Python时勾选了Install for all users,所以升级pip时要加上--user的命令,否则报错:
F:\Program Files (x86)\Python38-32\Scripts>pip install --upgrade pip
Looking in indexes: https://pypi.mirrors.ustc.edu.cn/simple/
Collecting pip
  Using cached https://mirrors.tuna.tsinghua.edu.cn/pypi/web/packages/54/eb/4a3642e971f404d69d4f6fa3885559d67562801b99d7592487f1ecc4e017/pip-20.3.3-py2.py3-none-any.whl (1.5 MB)
Installing collected packages: pip
  Attempting uninstall: pip
    Found existing installation: pip 20.2.1
    Uninstalling pip-20.2.1:
ERROR: Could not install packages due to an EnvironmentError: [WinError 5] 拒绝访问。: 'f:\\program files\\python38\\scripts\\pip.exe'
Consider using the `--user` option or check the permissions.
注意这里有一句Attempting uninstall: pip是卸载pip的意思,因为pip更新包时必须先删除旧的包然后再下载新的包。
因为升级pip失败中途跳出,导致pip被卸载,这时cmd输入pip就会报错。提示No module named 'pip'。
F:\Program Files (x86)\Python38-32\Scripts>pip
Traceback (most recent call last):
  File "f:\program files\python38\lib\runpy.py", line 194, in _run_module_as_main
    return _run_code(code, main_globals, None,
  File "f:\program files\python38\lib\runpy.py", line 87, in _run_code
    exec(code, run_globals)
  File "F:\Program Files\Python38\Scripts\pip.exe\__main__.py", line 4, in <module>
ModuleNotFoundError: No module named 'pip'
重新下载pip的方法一:参考https://www.cnblogs.com/igoodful/p/11479199.html 注意要加--user
重新下载pip的方法二:pip-32 install --upgrade --user pip 即用32位Python的pip去更新pip。
升级pip后,64位和32位的Python共用用户家目录下的pip。 (pip-32 show pip验证)
但下载的包具体是32位还是64位是看你用哪个pip去下载。
pip.exe下载的包在64位Python目录下,是64位的包。
pip-32.exe下载的包在32位Python目录下,是32位的包。
有些包是只有32位的,若在64位Python下载该包,会下载到32位的包。
升级pip报错后重新下载pip还会有部分残留需要手动清除:
F:\Program Files (x86)\Python38-32\Scripts>pip list
Package    Version
---------- -------
-ip        20.2.1    # 残留的包。在Lib\site-packages目录下手动清除
pip        20.3.3
setuptools 49.2.1
升级pip正确操作
pip install --upgrade --user pip
pip升级完成后用pip list验证当前包的版本。pip show pip查看pip的具体路径。
(可选操作):
cmd执行where python.exe会看到2个python:
F:\Program Files (x86)\Python38-32\Scripts>where python
F:\Program Files\Python38\python.exe
F:\Program Files (x86)\Python38-32\python.exe

但cmd执行where py.exe只会看到1个python:
F:\Program Files (x86)\Python38-32\Scripts>where py.exe
C:\Windows\py.exe
而且用py.exe打开的环境一直都是64位的Python,先装32位后装64位也不会影响这个py.exe
F:\Program Files (x86)\Python38-32\Scripts>py
Python 3.8.6 (tags/v3.8.6:db45529, Sep 23 2020, 15:52:53) [MSC v.1927 64 bit (AMD64)] on win32
Type "help", "copyright", "credits" or "license" for more information.
>>>
所以用py.exe去区分64位和32位的Python更方便。方法:
复制32位的Python.exe到C:\Windows目录,重命名:py32.exe
以后在cmd运行32位Python就用py32.exe, 运行64位Python就用py.exe
F:\Program Files (x86)\Python38-32\Scripts>py32
Python 3.8.6 (tags/v3.8.6:db45529, Sep 23 2020, 15:37:30) [MSC v.1927 32 bit (Intel)] on win32
Type "help", "copyright", "credits" or "license" for more information.
>>>
最后:如果装完了32位和64位的Python,发现C:\Windows目录根本没有py.exe,不影响!
复制64位的Python.exe重命名py.exe,再复制32位的Python.exe重命名py32.exe到C:\Windows目录下,同样可以。
安装x64和x86的pyinstaller
x64的pyinstaller安装
pip install pyinstaller	# 安装pyinstaller包
pip show pyinstaller	# 查看pyinstaller包
F:\Program Files (x86)\Python38-32>pip show pyinstaller
Name: pyinstaller
Version: 4.2
Summary: PyInstaller bundles a Python application and all its dependencies into a single package.
Home-page: http://www.pyinstaller.org/
Author: Hartmut Goebel, Giovanni Bajo, David Vierra, David Cortesi, Martin Zibricky
Author-email: None
License: GPLv2-or-later with a special exception which allows to use PyInstaller to build and distribute non-free programs (including commercial ones)
Location: f:\program files\python38\lib\site-packages		# 装在64位Python目录
Requires: pywin32-ctypes, pefile, pyinstaller-hooks-contrib, setuptools, altgraph
Required-by:
x86的pyinstaller安装
pip-32 install pyinstaller	# 安装pyinstaller包
pip-32 show pyinstaller		# 查看pyinstaller包
F:\Program Files (x86)\Python38-32>pip-32 show pyinstaller
Name: pyinstaller
Version: 4.2
Summary: PyInstaller bundles a Python application and all its dependencies into a single package.
Home-page: http://www.pyinstaller.org/
Author: Hartmut Goebel, Giovanni Bajo, David Vierra, David Cortesi, Martin Zibricky
Author-email: None
License: GPLv2-or-later with a special exception which allows to use PyInstaller to build and distribute non-free programs (including commercial ones)
Location: f:\program files (x86)\python38-32\lib\site-packages		# 安装在32位Python目录
Requires: pefile, altgraph, pyinstaller-hooks-contrib, pywin32-ctypes, setuptools
Required-by:
安装完成后用where pyinstaller发现会有2个路径
F:\Program Files (x86)\Python38-32>where pyinstaller
F:\Program Files\Python38\Scripts\pyinstaller.exe
F:\Program Files (x86)\Python38-32\Scripts\pyinstaller.exe
进入32位Python目录:Python38-32\Scripts,重命名32位的pyinstaller.exe为pyinstaller32.exe。区分64位和32位的pyinstaller
分别打包x64和x86的程序
在自己的工程目录下新建hello.py来测试打包x64和x86的程序。
hello.py:
# coding=utf-8
print('hello world')
input('按任意键退出')
打包64位程序
在hello.py目录下用cmd执行
pyinstaller -F hello.py
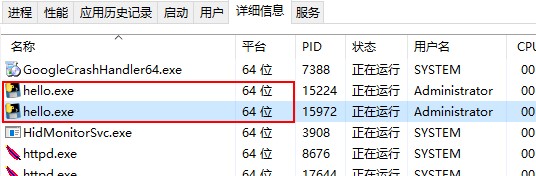
执行完成后会在hello.py的目录生成dist目录,运行dist\hello.exe。
打开任务管理器,在详细信息里查看 平台 的信息,显示为64位。
平台 的显示(win10):在列表头的地方 右键 -> 选择列,找到平台,勾选。
打包32位程序
在hello.py目录下用cmd执行
pyinstaller32 -F hello.py
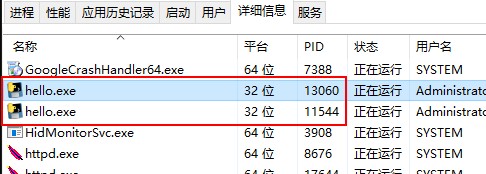
执行完成后会在hello.py的目录生成dist目录,运行dist\hello.exe。
打开任务管理器,在详细信息里查看 平台 的信息,显示为32位。
平台 的显示(win10):在列表头的地方 右键 -> 选择列,找到平台,勾选。
附加:验证x64和x86的pyinstaller
成功执行打包x64和x86的操作后,当前用户目录的\AppData\Roaming目录下会生成一个pyinstaller文件夹,打开后有2个文件夹:bincache00_py38_32bit和bincache00_py38_64bit,表示在不同py版本、不同平台下的pyinstaller缓存文件。


 1571
1571


 被折叠的 条评论
为什么被折叠?
被折叠的 条评论
为什么被折叠?
 到【灌水乐园】发言


