


Vue
Vue2官网
Vue3官网
Vue是一款用于构建用户界面的渐进式JavaScript框架,它基于HTML、CSS和JavaScript构建,并提供了一套声明式的、组件化的编程模型。
Vue的特点:
(1)采用组件化模式,提高代码复用率,且让代码更好维护
(2)声明式编码,让编码人员无需直接操作DOM,提高开发效率
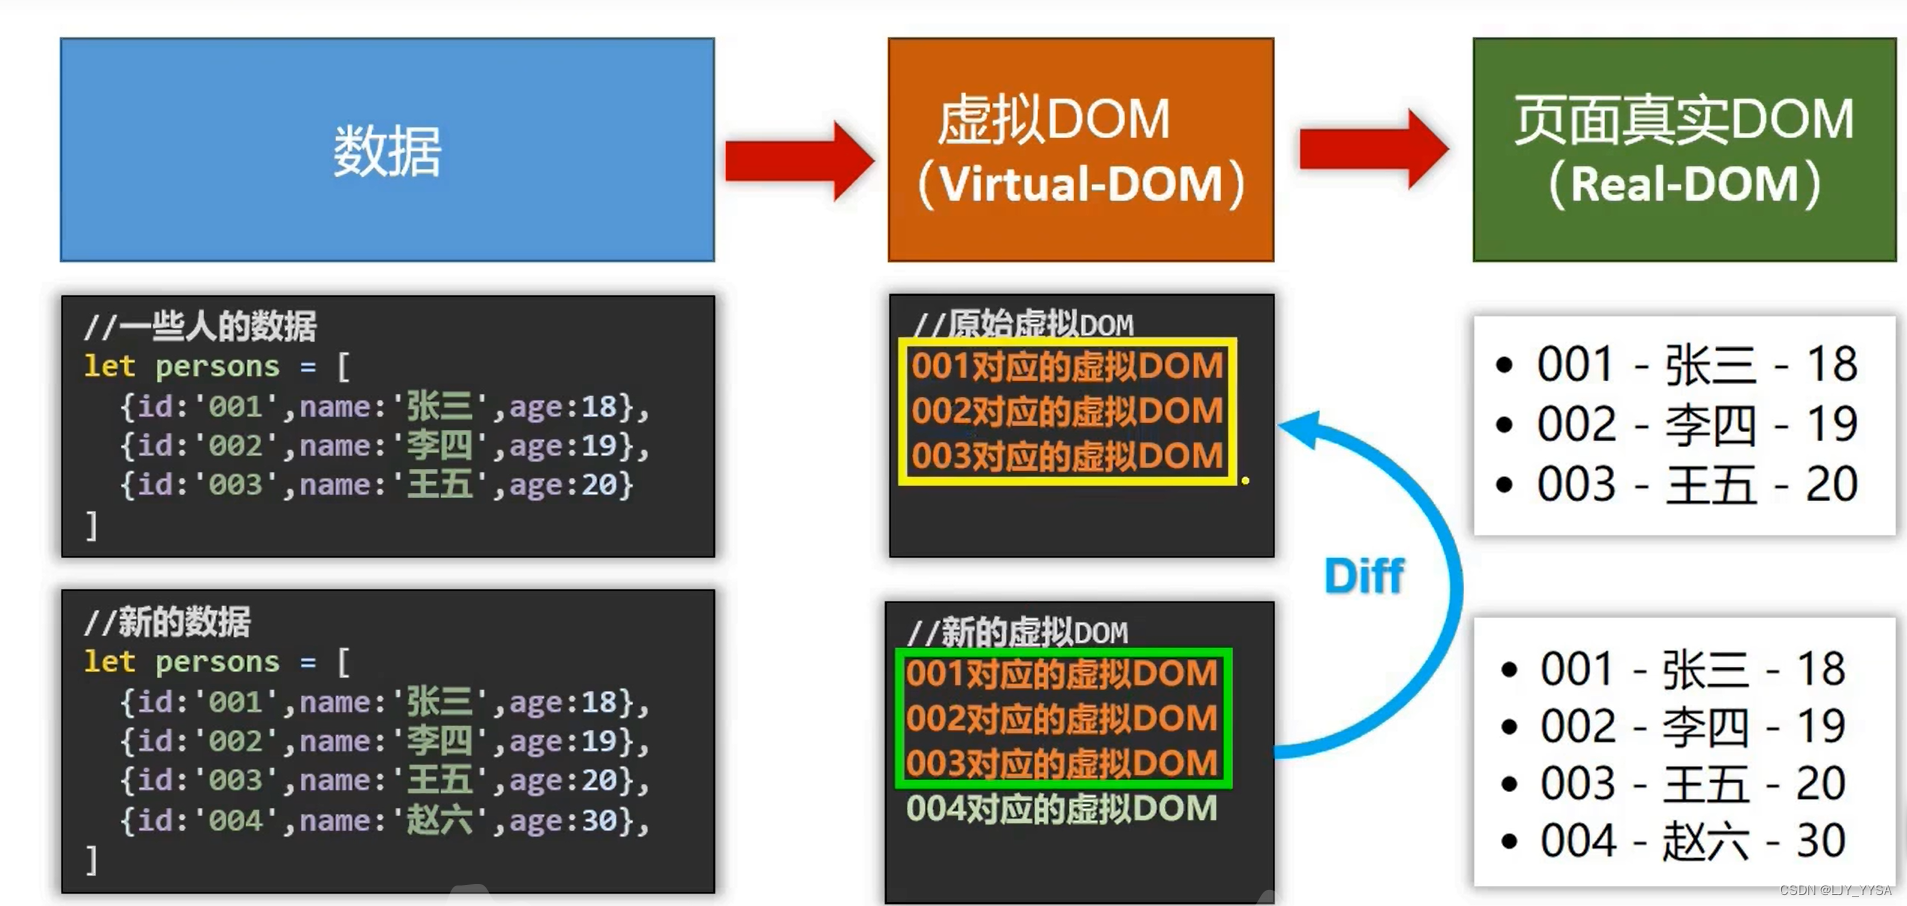
(3)使用虚拟DOM+优秀的Diff算法,尽量复用DOM节点
Vue实例和容器是一一对应的;
root容器里的代码被称为Vue模版
Vue的组件可以按两种不同的风格书写:选项式API和组合式API
Vue简单入门
创建实例
 <!-- 1.准备容器
    2.引包
    3.创建实例
    4.添加配置项 -->
    <div id="app">
        <!-- 这里填写一些用于渲染的代码逻辑 -->

        <h1>{{ msg }}</h1>

    </div>
    <!-- 引入的是开发版本包,包含完整的注释和警告 -->
    <script src="https://cdn.jsdelivr.net/npm/vue@2.7.16/dist/vue.js"></script>
    <!-- 一旦引入VueJS核心包,在全局环境下,就有了Vue构造函数 -->
    <script>
        const app = new Vue({
        //通过el配置选择器,指定
        el: '#app',
        data: {
            msg: 'Hello World!'
        }
    })
    </script>
插值表达式
Vue模版语法有两大类:插值语法和指令语法。
插值语法用于解析标签体内容,指令语法用于解析标签。
作用:利用表达式进行插值,渲染到页面中
语法:{{ 表达式 }}
注意点:
1.使用的数据要存在
2.支持的是表达式,不是语句
3.不能在标签属性中使用
    <div id="app">
        <h1>{{ nickname }}</h1>
    </div>
    <script src="https://cdn.jsdelivr.net/npm/vue@2.7.16/dist/vue.js"></script>
    <script>
        const app = new Vue({
        el: '#app',
        data: {
            nickname: 'tony'
        }
    })
    </script>
数据绑定:
单向绑定(v-bind):数据只能从data流向页面
双向绑定(v-model):数据不仅能从data流向页面,还可以从页面流向data
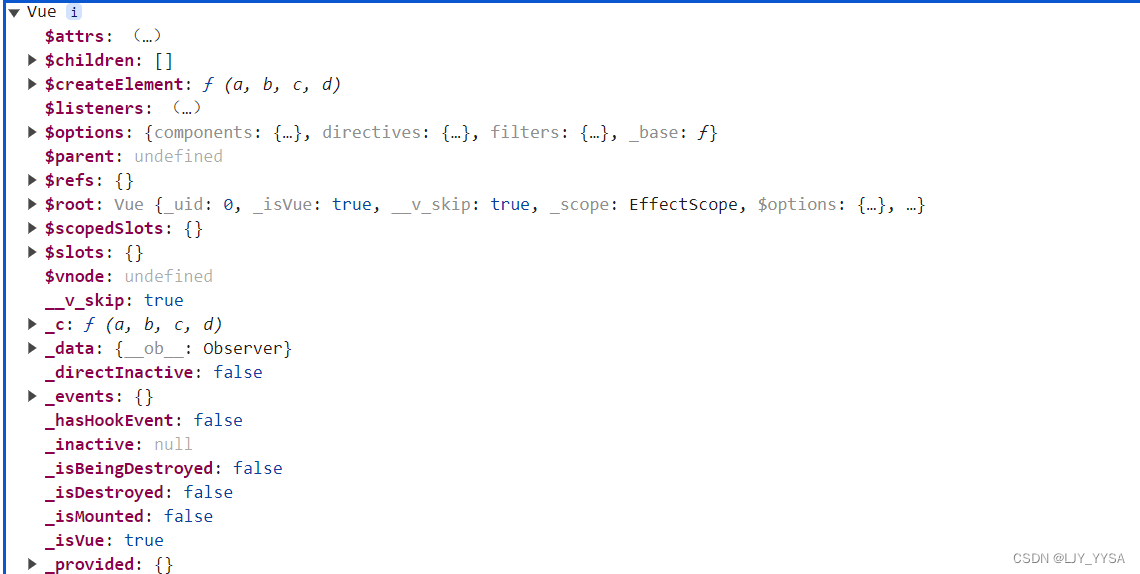
Vue对象
const vm = new Vue()
console.log(vm);
Vue实例中的一些属性:
Vue原型的一些属性:
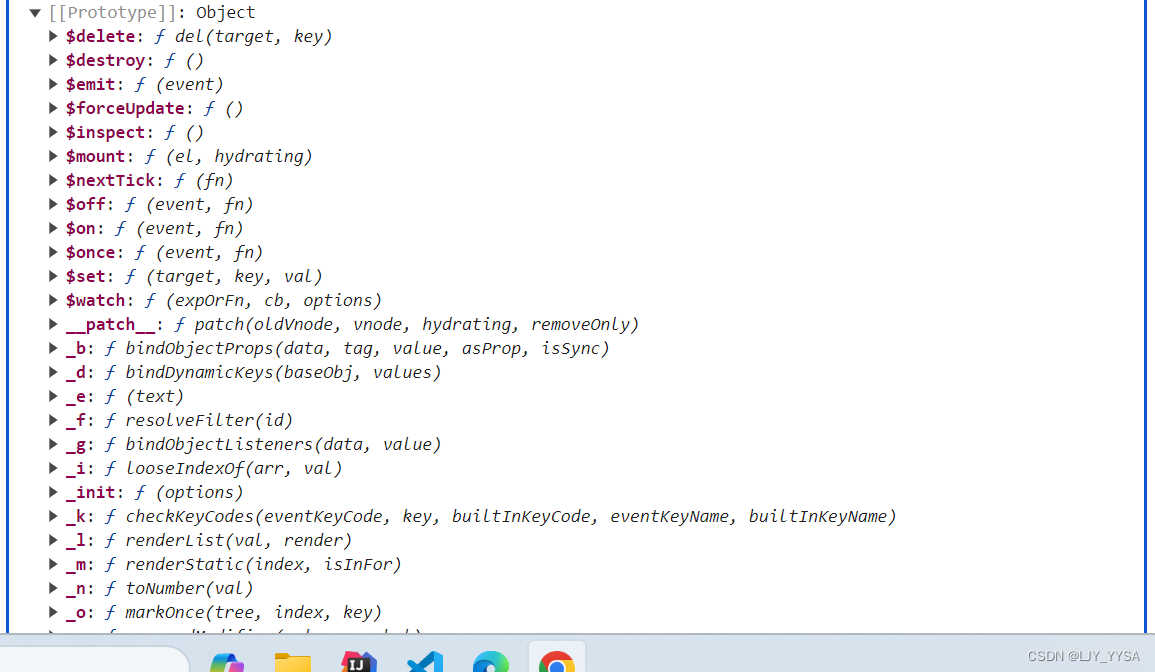
这些属性都是可以在{{ }}里面使用
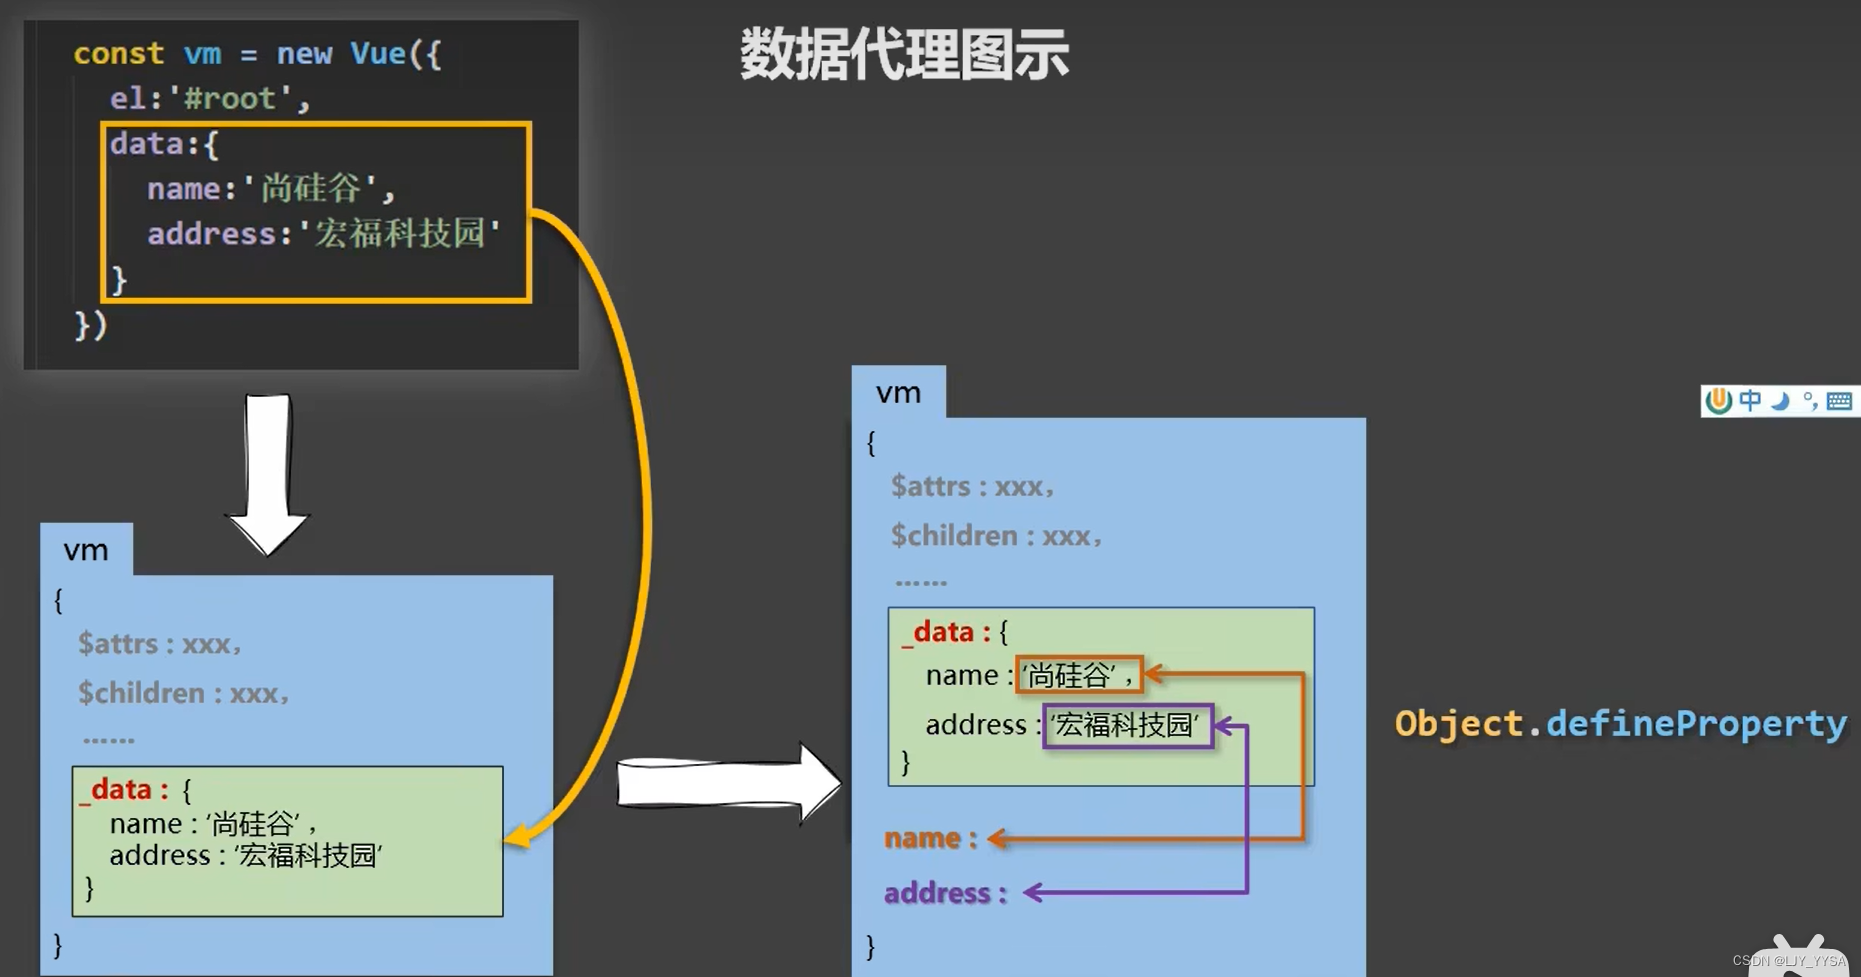
数据代理
数据代理:通过一个对象代理对另一个对象中属性的操作
difineProperty方法
<script>
        let number = 18
        let person = {
            name:'张三',
            sex:'男'
        }
        Object.defineProperty(person,'age',{
            value: 18,
            enumerable: true,   //是否可枚举,默认是false
            writable: true,    //是否可修改,默认是false
            configurable: true,  //是否可删除,默认是false
            get(){
                return number
            },
            set(value){
                number = value
            }
        })
    </script>
Vue中的数据代理:通过vm对象来代理data对象中属性的操作(读/写)
好处:更加方便的操作data中的数据
基本原理:
(1)通过Object.defineProperty()把data对象中所有属性添加到vm上。
(2)为每一个添加到vm上的属性,都指定一个getter、setter
(3)在getter、setter内部去操作data中对应的属性
下面是一个示例,展示如何通过Object.defineProperty()把data对象中的属性添加到Vue实例上:
var data = {
  message: 'Hello, Vue!',
  count: 0
};

var vm = {}; // 创建一个空对象,作为Vue实例

// 使用 Object.keys(data) 获取 data 对象中的所有属性名
Object.keys(data).forEach(function(key) {
  // 使用 Object.defineProperty() 把 data 对象中的每个属性添加到 vm 上
  Object.defineProperty(vm, key, {
    get: function() {
      return data[key]; // 返回对应的属性值
    },
    set: function(newValue) {
      data[key] = newValue; // 设置对应的属性值
    }
  });
});

// 现在可以通过 vm 来访问和修改 data 中的属性,例如:
console.log(vm.message); // 输出 'Hello, Vue!'
vm.count++; // 修改 count 属性的值
console.log(data.count); // 输出 1
Vue响应式特性
响应式:数据变化,视图自动更新
修改了数据,Vue监听到数据修改,进行Dom操作,进而更新视图
如何访问或修改数据:data中的数据最终会被添加到实例上
开发者工具
安装Vue插件

Vue指令
指令:带有V-前缀的特殊属性
v-html:设置元素的innerHTML,语法:v-html=‘表达式’
v-html
<div id="app">
        <div v-html="msg"></div>>
    </div>
    <script src="https://cdn.jsdelivr.net/npm/vue@2.7.16/dist/vue.js"></script>
    <script>
        const app = new Vue({
        el: '#app',
        data: {
            msg: `<a href="http://www.baidu.com">
                百度
            </a> `
        }
    })
    </script>
v-show和v-if
v-show=“表达式”,true显示,false隐藏 (简单的显示隐藏)
场景:频繁切换显示隐藏的场景
v-if=“表达式”, true显示,false隐藏 (条件渲染)
场景:要么显示,要么隐藏,不频繁切换的场景
<!--
        v-show底层原理: 切换css的display: none来控制显示隐藏
        v-if底层原理: 根据判断条件控制元素的创建和移出
     -->

    <div id="app">
        <div v-show="flag">AAAA</div>>
        <div v-if="flag">BBBBB</div>>
    </div>
    <script src="https://cdn.jsdelivr.net/npm/vue@2.7.16/dist/vue.js"></script>
    <script>
        const app = new Vue({
        el: '#app',
        data: {
            msg: `<a href="http://www.baidu.com">
                百度
            </a> `,
            flag : false,
        }
    })
    </script>
v-else和v-else-if
作用:辅助v-if进行判断渲染
注意:紧挨着v-if工作
	<div id="app">
        <div v-if="gender===1">男</div>
        <div v-else>女</div>
        <div v-if="score>=90">优秀</div>
        <div v-else-if="score>=70">及格</div>
        <div v-else-if="score>=60">不及格</div>
    </div>
    <script src="https://cdn.jsdelivr.net/npm/vue@2.7.16/dist/vue.js"></script>
    <script>
        const app = new Vue({
        el: '#app',
        data: {
            gender : 1,
            score: 80
        }
    })
    </script>
v-on(@)
作用:注册事件=添加监听+提供处理逻辑
语法:(1)v-on:事件名=‘内联语句’
(2)v-on:事件名=“methods中的函数名”
(1)v-on:事件名=‘内联语句’
<div id="app">
        <button v-on:click="count++">+</button>
        <!-- 可以简写,将  v-on:  替换成@ -->
        <button @click="count++">+</button>
        <span>{{count}}</span>
        <button v-on:click="count--">-</button>

    </div>
    <script src="https://cdn.jsdelivr.net/npm/vue@2.7.16/dist/vue.js"></script>
    <script>
        const app = new Vue({
        el: '#app',
        data: {
            count: 1,
        }
    })
    </script>
(2)v-on:事件名=“methods中的函数名”
<div id="app">

        <button @click="fn">切换显示隐藏</button>
        <h1 v-show="flag">AAAAAAAAA</h1>
    </div>
    <script src="https://cdn.jsdelivr.net/npm/vue@2.7.16/dist/vue.js"></script>
    <script>
        const app = new Vue({
        el: '#app',
        data: {
            flag: true,
        },
        methods: {
            fn(){
                this.flag=!this.flag        //这里不能直接使用flag变量
            }
        }
    })
    </script>
v-on调用传参
<div id="app">

        <div>小黑自动售货机
            <button @click="fn(5)">可乐5元</button>        //调用传参
            <button @click="fn(10)">咖啡10元</button>		//调用传参
        </div>
        <div>余额:{{num}}元</div>
    </div>
    <script src="https://cdn.jsdelivr.net/npm/vue@2.7.16/dist/vue.js"></script>
    <script>
        const app = new Vue({
        el: '#app',
        data: {
            num: 1000,
        },
        methods: {
            fn(pay){
                this.num-=pay;
            }
        }
    })
    </script>
Vue中的事件修饰符:
1.prevent:阻止默认事件
2.stop:阻止事件冒泡
3.once: 事件只触发一次
4.capture: 使用事件的捕获模式
5.self: 只有event.target是当前操作的元素是才触发事件
6.passive: 事件的默认行为立即执行,无需等待事件回调执行完毕
v-bind
作用:动态的设置html的标签属性
语法:v-bind:属性名=“表达式”
<div id="app">
        <img v-bind:src="imgUrl">
        <!-- 可以将 v-bind 去掉-->
        <img :src="imgUrl">
    </div>
    <script src="https://cdn.jsdelivr.net/npm/vue@2.7.16/dist/vue.js"></script>
    <script>
        const app = new Vue({
        el: '#app',
        data: {
            imgUrl: "C:\\XX\\XX"
        }
    })
    </script>
v-bind对于样式控制的增强
        <!-- 第一种方式 -->
        <div class="box" :class="class类名:布尔值,class类名:布尔值"></div>
        <!-- 第二种方式 -->
        <div class="box" :class="class类名,class类名"></div>
v-bind对于style的控制
对于background-color这种无效的标识符需要引号引起来
//background-color要用引号引起来
<div :style="{width:'200px',height:'300px','background-color':'green'}">你好</div>
v-for
作用:基于数据循环,多次渲染整个元素
	<div id="app">
        <ul>
            <!-- v-for的默认行为会尝试原地修改元素,加key来解决 -->
            <li v-for="(item,index) in list" :key="index.id">{{item}}-{{index}}</li>
        </ul>
    </div>
    <script src="https://cdn.jsdelivr.net/npm/vue@2.7.16/dist/vue.js"></script>
    <script>
        const app = new Vue({
        el: '#app',
        data: {
            list: ['111','222','333','444']
        }
    })
    </script>
v-model
作用:给表单元素使用,双向数据绑定 ->可以快速获取或设置表单元素内容
(1)数据变化 -> 视图自动更新
(2)视图变化 -> 数据自动更新
<div id="app">
        <input type="text" v-model="username">
        <input type="password" v-model="password">
    </div>
    <script src="https://cdn.jsdelivr.net/npm/vue@2.7.16/dist/vue.js"></script>
    <script>
        const app = new Vue({
        el: '#app',
        data: {
            username: 324,
            password: 523532
        }
    })
    </script>
<div id="app">
        <input type="text" v-model="username">
        <input type="password" v-model="password">
        <button @click="login">登录</button>
        <button @click="reset">重置</button>
    </div>
    <script src="https://cdn.jsdelivr.net/npm/vue@2.7.16/dist/vue.js"></script>
    <script>
        const app = new Vue({
        el: '#app',
        data: {
            username: 324,
            password: 523532
        },
        methods:{
            login(){
                console.log(this.username,this.password);
            },
            reset(){
                this.username='';
                this.password='';
            }
        }
    })
    </script>
v-model应用于其他表单元素
指令修饰符
.enter .trim .number .stop阻止冒泡
	<div id="app">
        <!-- .trim可以去除空格 -->
        姓名:<input type="text" v-model.trim="name">
        <!-- .number可以将输入框中输入的数字字符串转化为数字 -->
        年龄:<input type="text" v-model.number="age">
        <div class="father" @click="fatherfn" style="width: 100px;height: 100px;background-color:aqua;">
            <!-- .stop阻止冒泡 -->
            <div class="son" @click.stop="sonfn" style="width: 50px;height: 50px;background-color:bisque"></div>
        </div>

    </div>
    <script src="https://cdn.jsdelivr.net/npm/vue@2.7.16/dist/vue.js"></script>
    <script>
        const app = new Vue({
        el: '#app',
        data: {
            name: '',
            age: ''
        },
        methods:{
            fatherfn(){
                console.log('father被点击');
            },
            sonfn(){
                console.log('son被点击');
            }
        }

    })
    </script>
计算属性
概念:基于现有的数据,计算出来的新属性。依赖的数据变化,自动重新计算
计算属性会被放到vm对象中去
get():
get的作用:当有人读取fullname时,get就会被调用,且返回值就作为fullName的值
get什么时候被调用:1.初次读取fullName时。 2.所依赖的数据发生变化时。
注意:get的this指向为vm实例,所以使用this.属性名来访问
set():
set什么时候被调用:当fullname被修改的时候
<div id="app">
        <div>礼物总数:{{ total }}</div>
    </div>
    <script src="https://cdn.jsdelivr.net/npm/vue@2.7.16/dist/vue.js"></script>
    <script>
        const vm = new Vue({
        el: '#app',
        data: {
            list: [
                {id: 1},
                {id: 2},
                {id: 3}
            ]
        },
        computed: {            //计算属性
            total(){
            	get(){
            		return this.list.reduce((sum,item) => sum+item.id,0)
            	}
            }
        }

    })
    </script>
computed计算属性 vs methods方法
computed有缓存特性:计算属性会对计算出来的结果缓存,再次使用直接读取缓存,当依赖项变化了,会自动重新计算,并再次缓存,所以性能好
计算属性完整写法
<div id="app">
        姓:<input type="text" v-model="fistname"></input>
        +
        名:<input type="text" v-model="lastname"></input>=
        <div> {{fullname}} </div>
        <button @click="changeName" :style="{width: '100px',height: '100px'}">改名卡</button>
    </div>
    <script src="https://cdn.jsdelivr.net/npm/vue@2.7.16/dist/vue.js"></script>
    <script>
        const app = new Vue({
        el: '#app',
        data: {
            fistname: '',
            lastname: ''
        },
        methods:{
            changeName(){
                this.fullname='吕小布';
            }
        },
        computed: {
            fullname: {
                get(){
                    return this.fistname+''+this.lastname;
                },
                //当fullname被修改赋值时,会执行set方法
                set(value){
                    this.fistname=value.slice(0,1);
                    this.lastname=value.slice(1);
                }
        const app = new Vue({
        el: '#app',
        data: {
            words:'',
        },
        watch: {
        //oldValue基本不怎么使用, 也可以省略掉
            words (newValue,oldValue){
                console.log('变化了',newValue,oldValue);
            }
        }


    })
    </script>
监视(侦听)属性
监视属性的两种写法:
(1).new Vue时传入watch配置
(2)通过vm.$watch监视
简写方式:
<div id="app">
        请输入:<input type="text" v-model="obj.words"></input>
    </div>
    <script src="https://cdn.jsdelivr.net/npm/vue@2.7.16/dist/vue.js"></script>
    <script>
        const vm = new Vue({
        el: '#app',
        data: {
            obj: {
                words: ''
            }
        },
        watch: {
            'obj.words' (newValue,oldValue){
                console.log('变化了',newValue,oldValue);
            }
        }、
    })
    </script>
不省略handler的写法
<script>
        const vm = new Vue({
            el: '#app',
            data: {
                obj: {
                    words: ''
                }
            },
            watch: {
                immediate: true, //初始化时让handler调用一下
                deep: true,  //深度监视
                //handler什么时候调用?当'obj.words'发生改变时。
                'obj.words': {
                    handler(newValue,oldValue){

                    }
                }
            }
        })
</script>
watch与computed的区别:
(1)computed能完成的功能,watch都可以。
(2)反过来则不行:watch里面可以处理异步逻辑,而computed不可以。
两个原则:
(1)所被Vue管理的函数,最好写成普通函数,这样this的指向才是vm或组件实例对象
(2)所有不被Vue管理的函数(定时器的回调函数、ajax的回调函数等),最好写成箭头函数
,这样this的指向才是vm或组件实例对象
翻译实例
<div id="app">
        请输入:<input type="text" v-model="obj.words"></input>
        翻译后的结果:
        <div>
            <div class="transbox">{{result}}</div>
        </div>
    </div>
    <script src="https://cdn.jsdelivr.net/npm/vue@2.7.16/dist/vue.js"></script>
    <script src="https://cdn.jsdelivr.net/npm/axios@1.1.2/dist/axios.min.js"></script>
    <script>
        const app = new Vue({
        el: '#app',
        data: {
            obj: {
                words: ''
            },
            result: '',
            //下面这句话可以省略
            timer: null  //延时器id
        },
        watch: {
             'obj.words' (newValue,oldValue){
                //每次定时器触发后重置
                clearTimeout(this.timer)
                //防抖:延迟执行,触发之后过段时间再触发,防止频繁触发影响性能
                this.timer=setTimeout(async()=>{
                    const res = await axios({
                    url: 'https://applet-base-api-t.itheima.net/api/translate',
                    method: 'get',
                    params: {
                        words: newValue
                    }
                })
                this.result = res.data.data;
                console.log(res)
                },3000)
            }
        }

    })
    </script>
上面代码几个易犯错点:
(1)Vue实例的el属性中指定的挂载点是"#app",但在HTML中需要有一个id为"app"的DOM元素
(2)async要放到setTimeout里面
(3)使用clearTimeout
watch的完整写法:
(1)deep: true 对复杂数据类型深度监视
(2)immediate: true 初始化立刻执行一次handler方法
<div id="app">
        <div>
        <select v-model="obj.lang">
            <option value="italy">意大利语</option>
            <option value="english">英语</option>
            <option value="german">德语</option>
        </select>
        </div>
        请输入:<input type="text" v-model="obj.words"></input>
        翻译后的结果:
            <div class="transbox">{{result}}</div>
    </div>
    <script src="https://cdn.jsdelivr.net/npm/vue@2.7.16/dist/vue.js"></script>
    <script src="https://cdn.jsdelivr.net/npm/axios@1.1.2/dist/axios.min.js"></script>
    <script>
        const app = new Vue({
        el: '#app',
        data: {
            obj: {
                words: '蔡鸡',
                lang: 'italy'
            },
            result: '',
            timer: null  //延时器id
        },
        watch: {
            obj: {
                deep: true,
                immediate: true,
                //handler只会在数据修改的时候触发
                handler (newValue){
                    clearTimeout(this.timer)
                    this.timer=setTimeout(async()=>{
                    const res = await axios({
                    url: 'https://applet-base-api-t.itheima.net/api/translate',
                    method: 'get',
                    params: newValue
                    })
                    this.result = res.data.data;
                    console.log(res)
                    },300)
                }
            }
        }


    })
    </script>
注意点:
(1)deep: true 对复杂类型深度监视
(2)handler只会在数据修改的时候触发,如果输入框一开始有默认值,则不会翻译,所以使用immediate: true 初始化立刻执行一次handler方法
watch侦听器的语法有两种:
(1)简单写法:监视简单类型的变化
(2)完整写法:添加额外的配置项(深度监视复杂类型,立刻执行)
Vue2核心技术与实战(实战暂时没写)
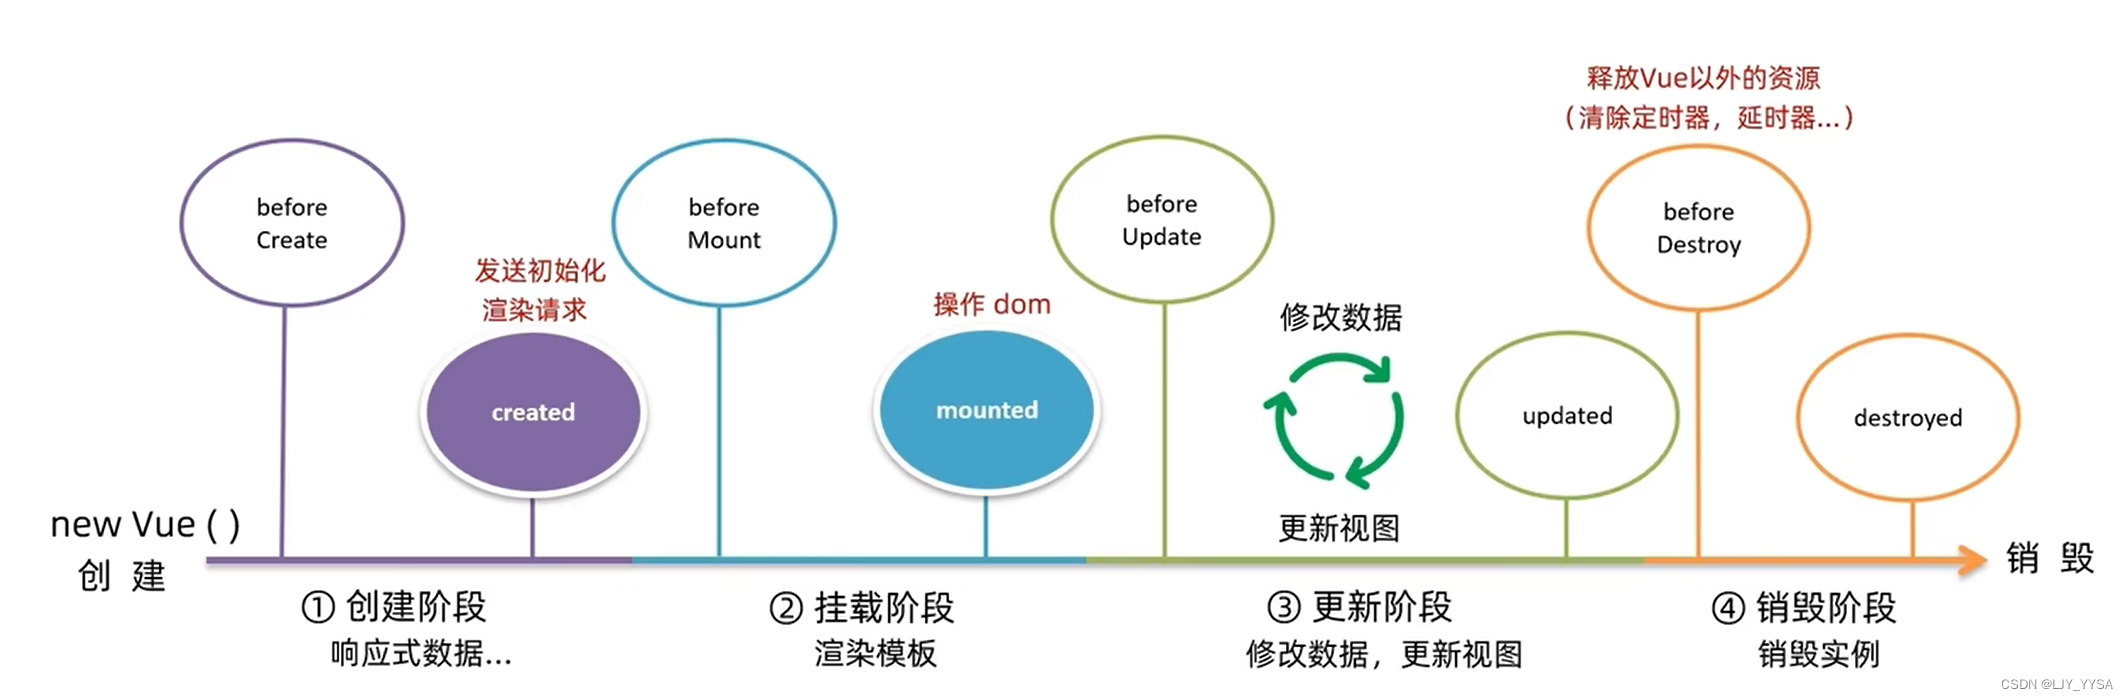
生命周期
Vue的生命周期: 一个Vue实例从创建到销毁的整个过程。
生命周期的四个阶段:创建、挂载、更新、销毁
(1)创建阶段:主要是为组件进行初始化工作,准备响应式数据
(2)挂载阶段:渲染模版
(3)更新阶段:数据修改,更新视图
(4)销毁阶段:销毁实例
所以发送初始化渲染请求应在创建阶段之后,操作DOM应在挂载阶段之后
生命周期函数(钩子函数)
在生命周期过程中,会自动运行一些函数,被称为生命周期钩子 - - -> 让开发者可以在特定阶段运行自己的代码
<div id="app">
<h1>{{count}}</h1>
<button class="btn" @click="count++">+</button>
</div>
<script src="https://cdn.jsdelivr.net/npm/vue@2.7.16/dist/vue.js"></script>
<script src="https://cdn.jsdelivr.net/npm/axios@1.1.2/dist/axios.min.js"></script>
<script>
const app = new Vue({
el: '#app',
data: {
count: 100
},
beforeCreate(){
console.log('beforeCreate 响应式数据之前',this.count);
},
created(){
console.log('created 响应式数据之后',this.count);
},
beforeMount(){
console.log('beforeMount 渲染数据之前',document.querySelector('h1').innerHTML);
},
mounted(){
console.log('beforeMount 渲染数据之后',document.querySelector('h1').innerHTML);
},
//这个能得到更改前的DOM
beforeUpdate(){
console.log('beforeUpdate 数据修改了,视图没更新',document.querySelector('h1').innerHTML);
},
//这个得到的是更改后的DOM
updated(){
console.log('beforeUpdate 数据修改了,视图已经更新了',document.querySelector('h1').innerHTML);
},
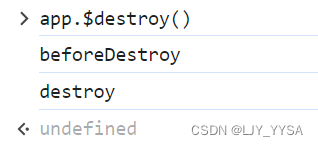
beforeDestroy(){
console.log('beforeDestroy');
},
destroyed(){
console.log('destroy');
//通常在这里清除掉一些Vue以外的资源占用,定时器,延时器等等
}
})
</script>
destroy阶段:
created应用
初始化渲染:
<div id="app">
        <ul>
            <li>
                <div class="left" v-for=" (item,index) in list" :key="item.id">
                    <div class="title"> {{item.title}}</div>
                        <div class="info">
                            <span>{{item.source}}</span>
                            <span>{{item.time}}</span>
                        </div>
                </div>
                <div class="right">
                    <img :src="item.img" alt="">
                </div>
            </li>
        </ul>
    </div>
    <script src="https://cdn.jsdelivr.net/npm/vue@2.7.16/dist/vue.js"></script>
    <script src="https://cdn.jsdelivr.net/npm/axios@1.1.2/dist/axios.min.js"></script>
    <script>
        const app = new Vue({
        el: '#app',
        data: {
            list: []
        },
        async created(){
            const res = await new axios({
                url:'http://hmajax.itheima.net/api/news',
                method: 'get',
            })
            this.list = res.data.data;
        }


    })
    </script>
mounted应用:
一进入页面,就立刻获得焦点
<div id="app">
        <input type="text" v-model="words">
    </div>
    <script src="https://cdn.jsdelivr.net/npm/vue@2.7.16/dist/vue.js"></script>
    <script src="https://cdn.jsdelivr.net/npm/axios@1.1.2/dist/axios.min.js"></script>
    <script>
        const app = new Vue({
        el: '#app',
        data: {
            words: '',
        },
        async mounted(){
            document.querySelector('input').focus()
        }


    })
    </script>
工程化开发入门
工程化开发&脚手架Vue CLI
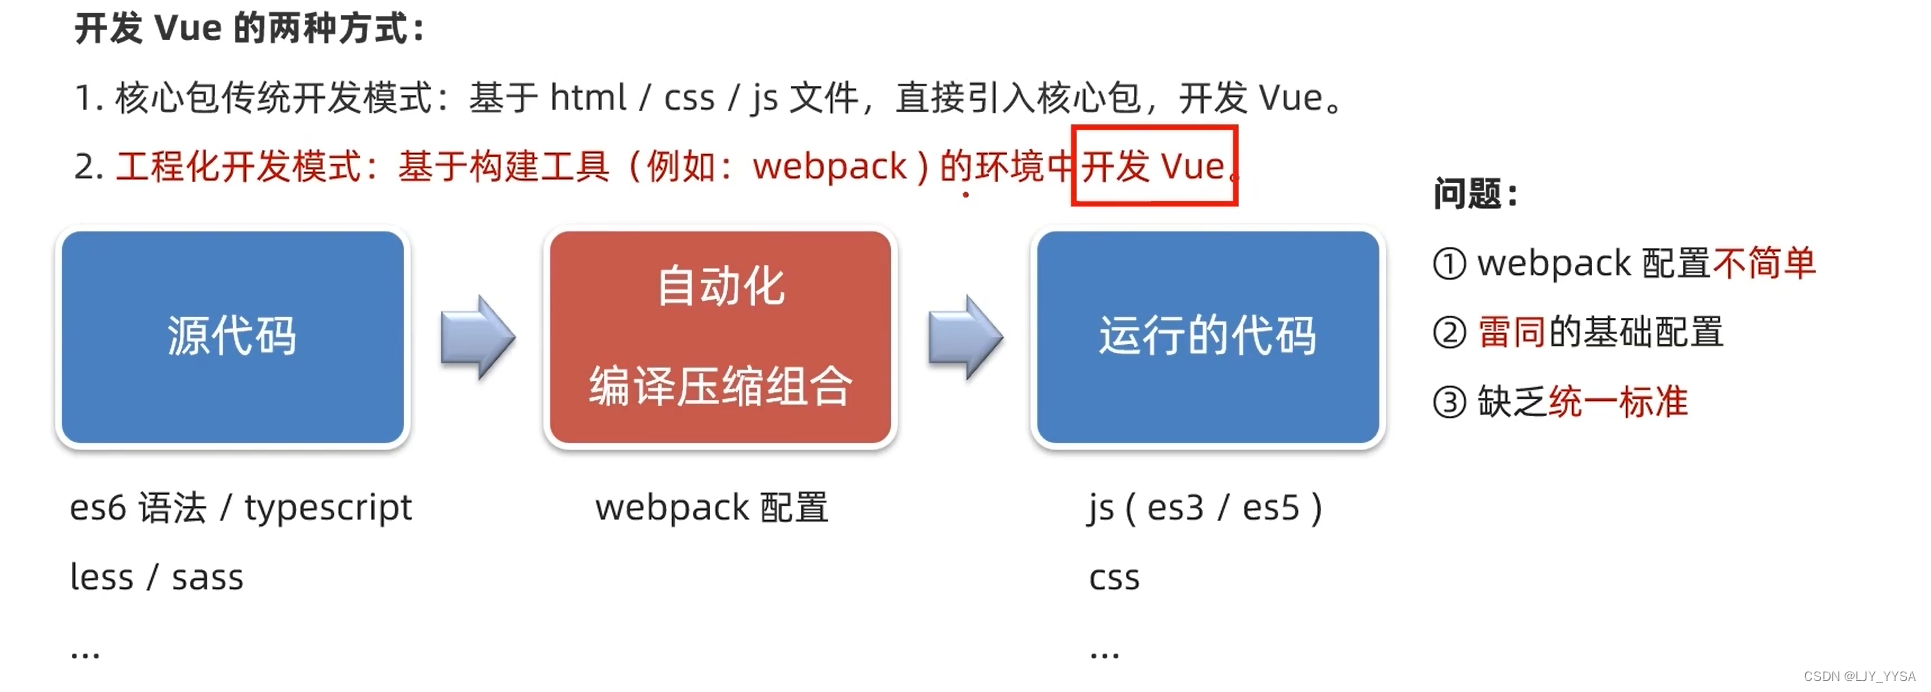
基本介绍:
Vue CLI是Vue官方提供的一个全局命令工具,可以帮助我们快速创建一个开发Vue项目的标准化基础架子。【集成了webpack配置】
使用步骤:
(1)npm i @vue/cli -g
(2)查看vue版本:vue --version
(3)创建项目架子:vue create project-name
(4)启动项目: npm run serve
脚手架目录文件介绍
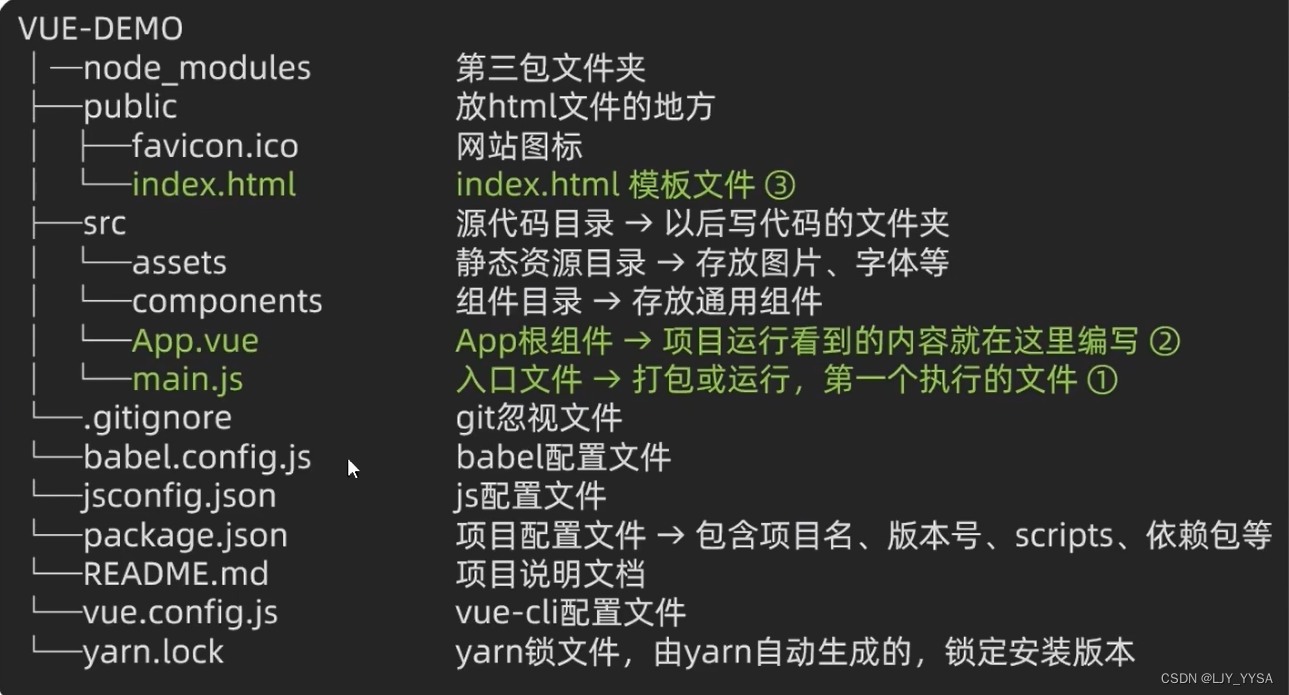
(1)index.html
工程化开发模式中,这里不再直接编写模版语法,而是通过App.vue提供结构渲染
<!DOCTYPE html>
<html lang="">
  <head>
    <meta charset="utf-8">
    <meta http-equiv="X-UA-Compatible" content="IE=edge">
    <meta name="viewport" content="width=device-width,initial-scale=1.0">
    <link rel="icon" href="<%= BASE_URL %>favicon.ico">
    <title><%= htmlWebpackPlugin.options.title %></title>
  </head>
  <body>
    <noscript>
      <strong>We're sorry but <%= htmlWebpackPlugin.options.title %> doesn't work properly without JavaScript enabled. Please enable it to continue.</strong>
    </noscript>
    <div id="app"></div>
    <!-- 工程化开发模式中,这里不再直接编写模版语法,而是通过App.vue提供结构渲染 -->
    <!-- built files will be auto injected -->
  </body>
</html>
(2)main.js文件:
//文件核心作用:导入App.vue,基于App.vue创建结构渲染index.html
import Vue from 'vue'
import App from './App.vue'

//提示:当前处于什么环境(生产环境、开发环境)
Vue.config.productionTip = false

//Vue实例化,提供render方法 -> 基于App.vue创建结构渲染index.html
//el与$mount('选择器')作用一致,用于指定Vue指定的容器
new Vue({
  // render: h => h(App),
  //上面的代码等同与下面
  render: (createElement) => {
    return createElement(App)
  }
}).$mount('#app')
(3)App.vue
是App根组件,项目想呈现的内容就在此编写
大致执行流程:
运行npm run serve会执行main.js文件,而main.js文件中会1.导入Vue,2.导入App.vue,3.实例化Vue,将App.vue渲染到index.html容器中
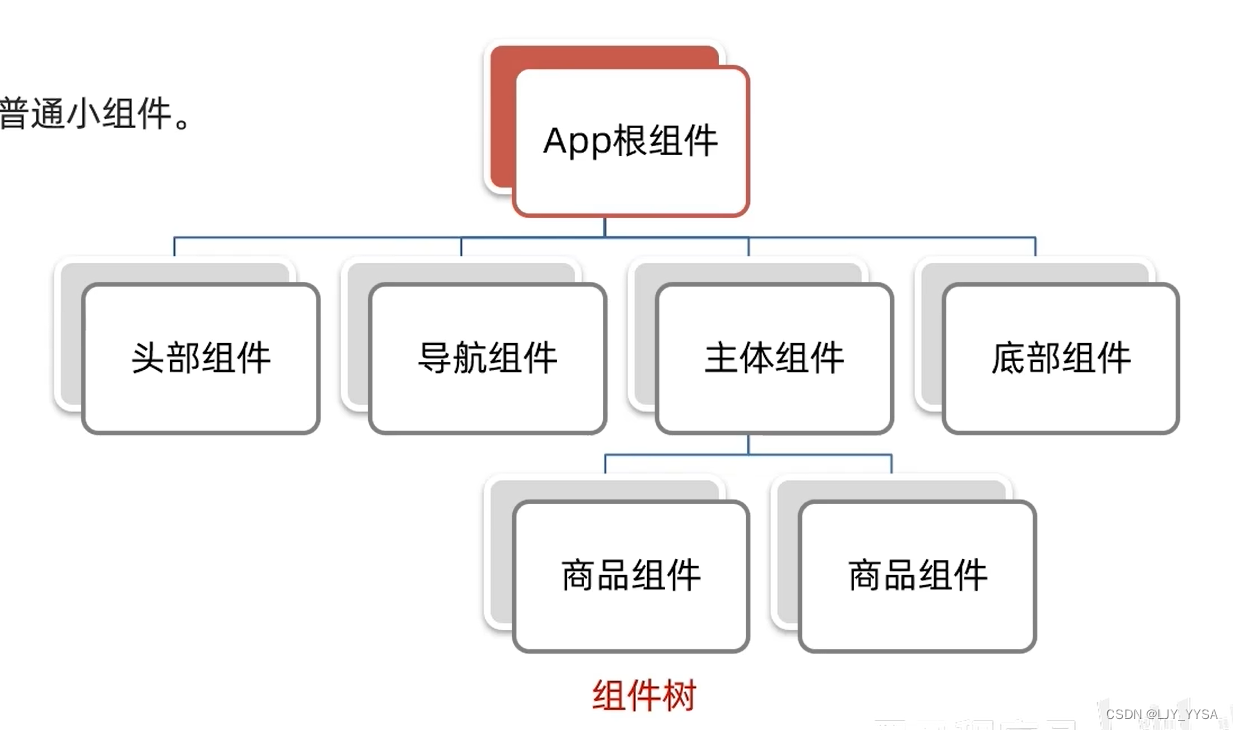
组件化开发&根组件
组件化:一个页面可以拆分成一个个组件,每个组件有着自己独立的结构、样式、行为。
好处:便于维护,利于复用 ->提升开发效率
分类:普通组件、根组件
根组件:整个应用最上层的组件,包裹所有普通的小组件
App.vue(单文件组件)的三个组成部分
(1)template:结构(有且只有一个根元素)
(2)script:js逻辑
(3)style:样式(可支持less,需要装包)
普通组件的注册使用
组件注册的两种方式:
(1)局部注册:只能在注册的组件内使用
1.创建.vue文件(三个组成部分)
2.在使用的组件内导入并注册
(2)全局注册:所有组件内都能使用
局部注册
步骤:
(1)创建组件
在components文件夹下创建HmHeader.vue文件
<template>
  <div class="hm-header">
    我是hm-header
  </div>
</template>

<script>
export default {

}
</script>

<style>
    .hm-header{
        height: 100px;
        line-height: 100px;
        text-align: center;
        font-size: 30px;
        background-color: #8064a2;
        color: white;
    }
</style>
(2)导入注册使用
在App.vue中的<script>中导入:
import HmHeader from './components/HmHeader.vue'
注册:
export default {
  components: {
    //组件名: 组件对象
    HmHeader: HmHeader
  }
}
使用:
<div class="App">
    <!-- 头部组件 -->
    <HmHeader></HmHeader>
    <!-- 主体组件 -->

    <!-- 底部组件 -->
    </div>
全局注册
步骤:
(1)创建.vue文件
<template>
    <button class="hmbutton">全局组件</button>
</template>

<script>
export default {

}
</script>

<style>
    .hmbutton {
        width: 100px;
        height: 50px;
        background-color: #1786e7;
    }
</style>
(2)main.js中进行全局注册
main.js
//文件核心作用:导入App.vue,基于App.vue创建结构渲染index.html
import Vue from 'vue'
import App from './App.vue'
import HmButton from './components/HmButton.vue'

//提示:当前处于什么环境(生产环境、开发环境)
Vue.config.productionTip = false
//进行全局注册
Vue.component('HmButton',HmButton)
new Vue({
  render: h => h(App),
}).$mount('#app')
(3)App.vue中使用全局组件
组件基础
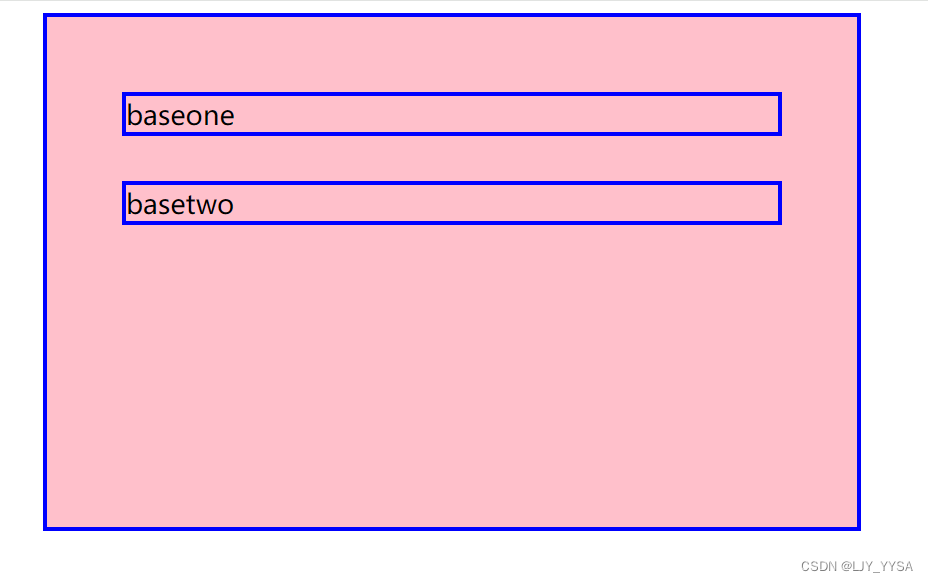
scoped
默认情况下,写在组件中的样式会全局生效 ->因此很容易造成多个组件之间的样式冲突问题
1.全局样式:默认组件中的样式会作用到全局
2.局部样式:可以给组件加上scoped属性,可以让样式只作用于当前组件
baseOne.vue中
<template>
  <div>
    baseone
  </div>
</template>

<script>
export default {

}
</script>

<!-- 不加scoped,会作用于全局 -->
<style scoped>
    div {
        border: 3px solid blue;
        margin: 30px;
    }
</style>
style不加scoped,会作用于全局
scoped原理:
(1)给当前组件模版的所有元素,都会被添加上一个自定义属性data-v-hash值
(2)css选择器后面,被自动处理,添加上了属性选择器 [data-v-hash值]
最终效果是:必须是当前组件的元素,才会有这个自定义属性,才会被这个样式作用到
data是一个函数
一个组件的data选项必须是一个函数 ->保证每个组件实例,维护独立的一份数据对象
其实也就是每次创建新的组件实例,都会新执行一次data函数,得到一个新对象
export default {
    data(){
        return {
            XXX
        }
    }
}
组件通信
含义:组件与组件之间的数据传递
(1)组件的数据是独立的,无法直接访问其他组件的数据
(2)但是又想用其他组件的数据 -> 组件通信
组件关系的分类:
(1)父子关系
(2)非父子关系
父子通信
父传子:
(1)子组件:
<template>
    <div >
        {{ title }}
    </div>
</template>
<script>
export default {
    props: ['title']
}
</script>
<style>
</style>
(2)父组件App.vue
<template>
    <div class="App">
    <!-- 这里是关键 -->
    <sonComponent :title="myTitle"></sonComponent>
    </div>
</template>

<script>
import sonComponent from './components/sonComponent.vue';
export default {
  data(){
    return {
      myTitle: '蔡鸡'
    }
  },
  components: {
    sonComponent
  }
}
</script>

<style>
  .App {
    width: 500px;
    height: 300px;
    background-color: pink;
    margin: 0 auto;
    padding: 20px;
  }
</style>
子传父
(1)子组件通过$emit,向父组件发送消息通知
<template>
    <div >
        {{ title }}
        <button @click="changeFn">修改title</button>
    </div>
</template>

<script>
export default {
    props: ['title'],
    methods: {
        changeFn(){
        //通过$emit,向父组件发送消息通知
            this.$emit('changeTitle','徐坤')
        }
    }
}
</script>
<style>
</style>
(2)父组件对消息进行监听
<template>
    <div class="App">
      <!-- 这里是关键 -->
    <sonComponent :title="myTitle" @changeTitle="handleChange"></sonComponent>
    </div>
</template>
(3)父组件中实现处理函数
<script>
import sonComponent from './components/sonComponent.vue';
export default {
  data(){
    return {
      myTitle: '蔡鸡'
    }
  },
  components: {
    sonComponent
  },
  methods: {
    handleChange(newTitle){
      console.log(newTitle);
      this.myTitle=newTitle;
    }
  }
}
</script>
props校验
props: {
	校验的属性名: {
		type: Number,   //类型
		required: true,     //非空
		default: 0,   //默认值
		validator (value) {
			//编写判断处理逻辑
		}
	}
}
单项数据流:父组件的prop更新,会单向向下流动,影响到子组件。
非父子通信
event bus事件总线
**作用:**非父子组件之间,进行简易消息传递。(复杂场景 -> Vuxe)
(1)utils文件夹下新建一个EvevtBus.js文件
import Vue from "vue";
const Bus = new Vue();
export default Bus;
(2)发送文件
<script>
import Bus from '../utils/EventBus'
export default {
    methods: {
        clickSend() {
            Bus.$emit('sendMsg', '利用EventBus传递的消息')
        }
    }
}
</script>
(3)接收文件
<script>
import Bus from '../utils/EventBus'
export default {
    created(){
        Bus.$on('sendMsg',(msg) =>{
            this.msg = msg
        })
    },
    data (){
        return {
            msg: '',
        }
    }
}
</script>
App.vue文件
<template>
    <div class="App">
      <receiveComponent></receiveComponent>
      <sendComponent></sendComponent>
    </div>
</template>

<script>
import receiveComponent from './components/receiveComponent.vue';
import sendComponent from './components/sendComponent.vue';
export default {
  components: {
    receiveComponent,
    sendComponent

  }
}
</script>
provide&inject
provide&inject作用:跨层级共享数据
(1)App.vue中使用provide
<template>
    <div class="App">
      <sonComponent></sonComponent>
      <button @click="change" style=" width: 100px height: 40px"> 点击修改颜色和年龄</button>
    </div>
</template>

<script>
import sonComponent from './components/sonComponent.vue'
export default {
  provide(){
    return {
      color: this.color,    //简单类型是非响应式的
      userInfo: this.userInfo  //复杂类型是响应式的
    }
  },
  data (){
    return {
      color: 'green',
      userInfo: {
        userName: 'hk',
        userAge: 22
      }
    }
  },
  components: {
    sonComponent,
  },
  methods: {
    change(){
      this.color = 'blue';
      this.userInfo.userAge = 18;
      console.log(this.color);
    }
  }
}
</script>

<style>
  .App {
    width: 500px;
    height: 300px;
    background-color: pink;
    margin: 0 auto;
    padding: 20px;
  }
</style>
**注意:**由于简单类型是非响应式的,所以一般都包装成对象
grandsonComponent.vue中使用inject
<template>
    <div>
        <div>{{color}}</div>
        <div>{{userInfo.userName}}</div>
        <div>{{ userInfo.userAge }}</div>

    </div>
</template>

<script>
export default {
    inject: ['color','userInfo']
}
</script>

<style>

</style>
v-model原理
原理: v-model本质上是一个语法糖。例如应用在输入框上,就是value属性和input属性的合写
<input :value=“msg” @input=“msg = $event.target.value” type=“text” > 简写为:
<input v-model=“msg” type=“text”>
表单类组件如何封装
1.表单类组件封装
(1)父传子:数据应该是父组件传过来的,v-model拆解绑定数据。
(2)子传父:监听输入,子传父传值给父组件修改
因为数据是父组件传过来的,在props中,所以子组件不能直接修改,也就不能用v-model,所以要进行拆解。
App.vue中:
<template>
    <div class="App">
      <BaseSelect :cityId="selectId" @changeId="selectId=$event"></BaseSelect>
    </div>
</template>

<script>
import BaseSelect from './components/BaseSelect.vue';
export default {
  data (){
    return {
      selectId: '102'
    }
  },
  components: {
    BaseSelect,
  }
}
</script>

<style>
  .App {
    width: 500px;
    height: 300px;
    background-color: pink;
    margin: 0 auto;
    padding: 20px;
  }
</style>
BaseSelect.vue中
<template>
  <div>
    <select :value="cityId" @change="handleChange">
        <option value="101">北京</option>
        <option value="102">上海</option>
        <option value="103">广州</option>
        <option value="104">深圳</option>
    </select>
  </div>
</template>

<script>
export default {
    props: {
        cityId: String,
    },
    methods: {
        handleChange(e){
            this.$emit('changeId',e.target.value)
        }
    }
}
</script>
<style>
</style>
2.v-model简化代码
父组件v-model简化代码,实现子组件和父组件数据双向绑定
(1)子组件:props通过value接收,事件触发input
(2)父组件:v-model给组件直接绑数据
App.vue
<template>
    <div class="App">
      <BaseSelect v-model="selectId"></BaseSelect>
    </div>
</template>

<script>
import BaseSelect from './components/BaseSelect.vue';
export default {
  data (){
    return {
      selectId: '102'
    }
  },
  components: {
    BaseSelect,
  }
}
</script>

<style>
  .App {
    width: 500px;
    height: 300px;
    background-color: pink;
    margin: 0 auto;
    padding: 20px;
  }
</style>
BaseSelect.vue
<template>
  <div>
    <select :value="value" @change="handleChange">
        <option value="101">北京</option>
        <option value="102">上海</option>
        <option value="103">广州</option>
        <option value="104">深圳</option>
    </select>
  </div>
</template>

<script>
export default {
    props: {
        value: String,
    },
    methods: {
        handleChange(e){
            this.$emit('input',e.target.value)
        }
    }
}
</script>

<style>

</style>
.sync修饰符
作用:可以实现子组件与父组件数据的双向绑定,简化代码
特点:prop属性名,可以自定义,非固定位value
父组件:
<BaseSelect :visible.sync=“isShow”> </BaseSelect> 等同于下面:
<BaseSelect :visible=“isShow” @updete:visible=“isShow=$event”> </BaseSelect>
子组件:
props: {
visible: Boolean
},
this.$emit('update:visible',false);
ref和refs
作用:利用ref和$ref可以用于获取dom元素,或组件实例
特点:查找范围 -> 当前组件内(更精确稳定)
(1)获取dom:
1.目标标签-添加ref属性
<div ref="chartRef"></div>
2.恰当时机,通过this.$refs.XXX,获取目标标签
console.log(this.$refs.chartRef);
Vue异步更新、$nextTick
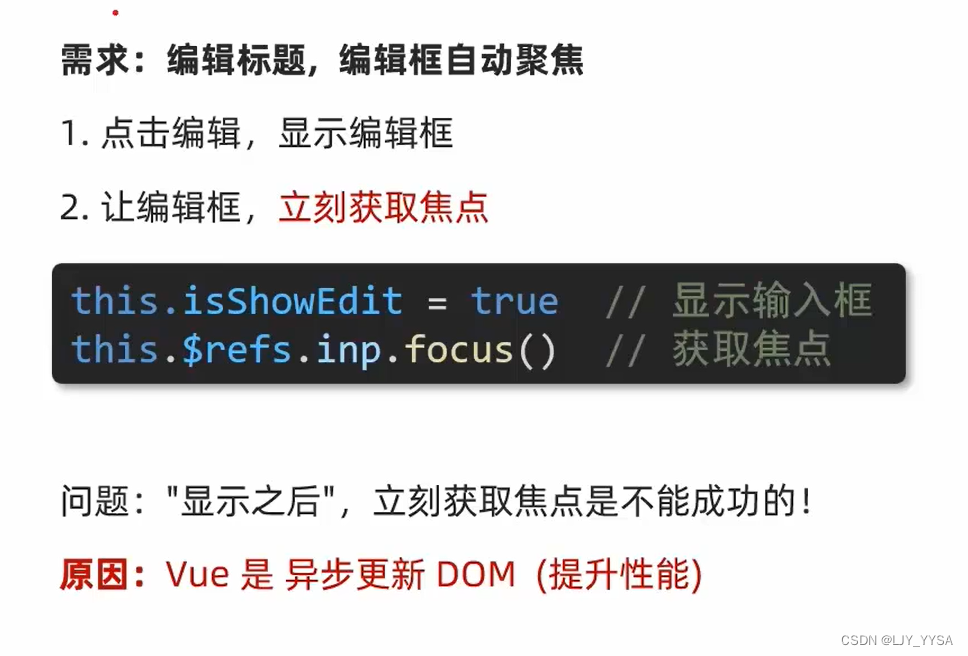
由于Vue是异步更新,所以下面代码的自动获取焦点有问题:
<template>
    <div class="App">
      <div ref="inp" v-if="isShow">
          <input v-model="editValue" type="text">
          <button>确认</button>
      </div>
      <div v-else>
        <span>{{title}}</span>
        <button @click="handleEdit">编辑</button>
      </div>
    </div>
</template>

<script>
export default {
  data (){
    return {
      title: '大标题',
      editValue: '',
      isShow: false
    }
  },
  methods: {
    handleEdit(){
      this.isShow=true;
      this.$refs.inp.focus();
    }
  }
}
</script>

<style>
  .App {
    width: 500px;
    height: 300px;
    background-color: pink;
    margin: 0 auto;
    padding: 20px;
  }
</style>
使用$nextTick即可
使用setTimeout也可以实现,但并不精准
methods: {
    handleEdit(){
      this.isShow=true;
      this.$nextTick(()=>{     //nextTick会等dom更新完,立刻执行准备的函数体
        this.$refs.inp.focus();
      })
    }
  }
自定义指令
全局注册:
Vue.directive('指令名', {
	//inserted会在指令所在的元素,被插入到页面中时触发
    "inserted" (el){
    	//el就是指令所绑定的元素
      el.focus();
    }
  })
局部注册: (放在export default里面)
directive: {
    "指令名" {
      inserted(){
        el.focus()
      }
    }
  }
使用: v-指令名
插槽
插槽-默认插槽

用法:
(1)在需要定制的位置,使用slot占位
<slot>我是后背内容</slot>
(2)在使用组件时,在组件标签内填入内容
插槽-具名插槽
具名插槽语法:
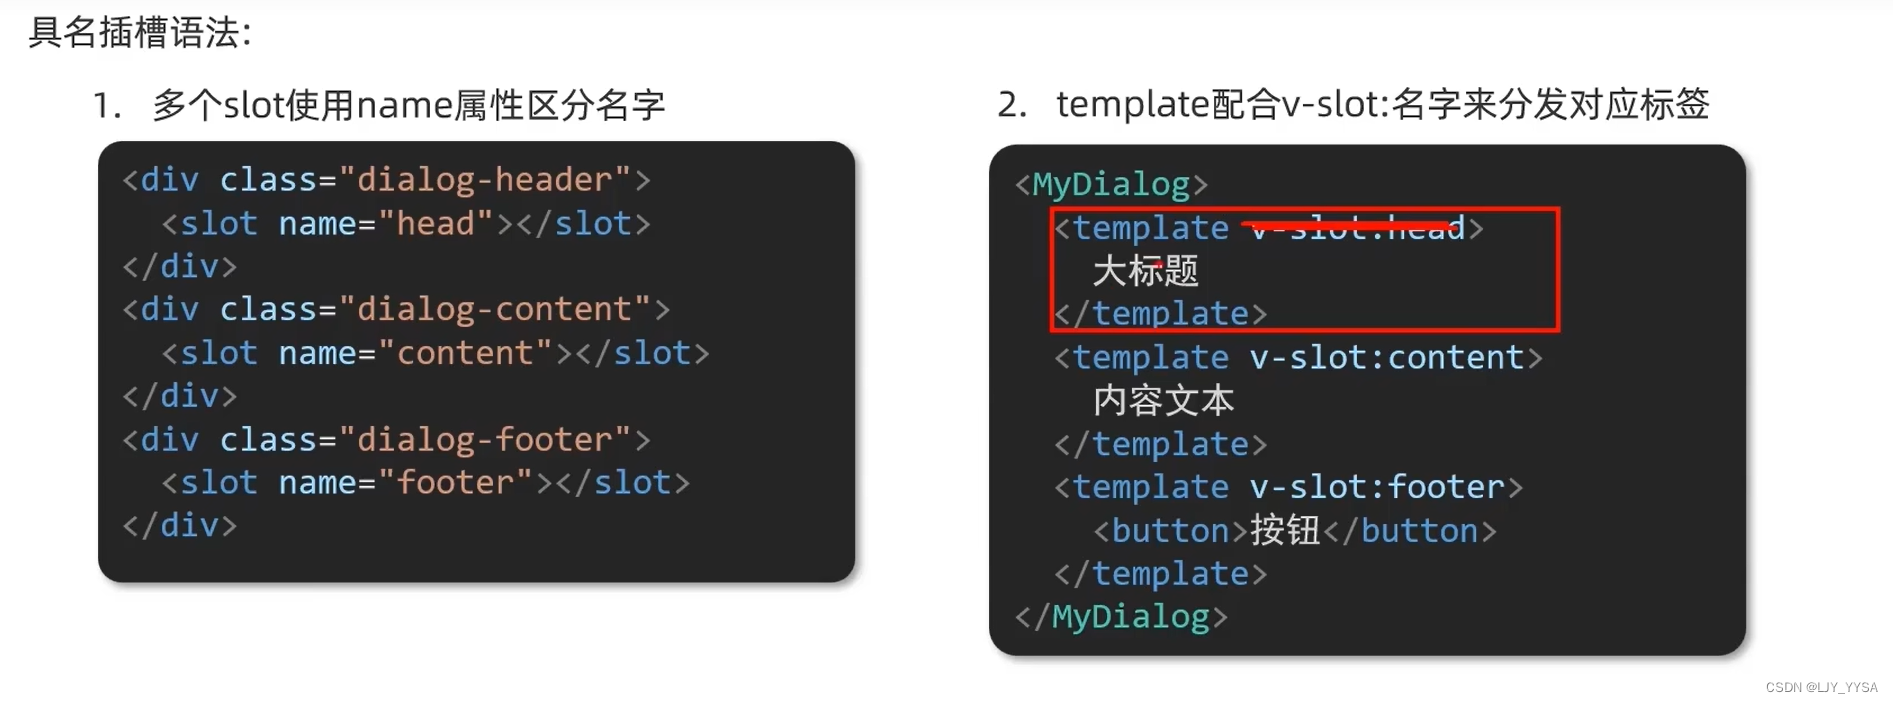
v-slot:插槽名 可以简化成#插槽名
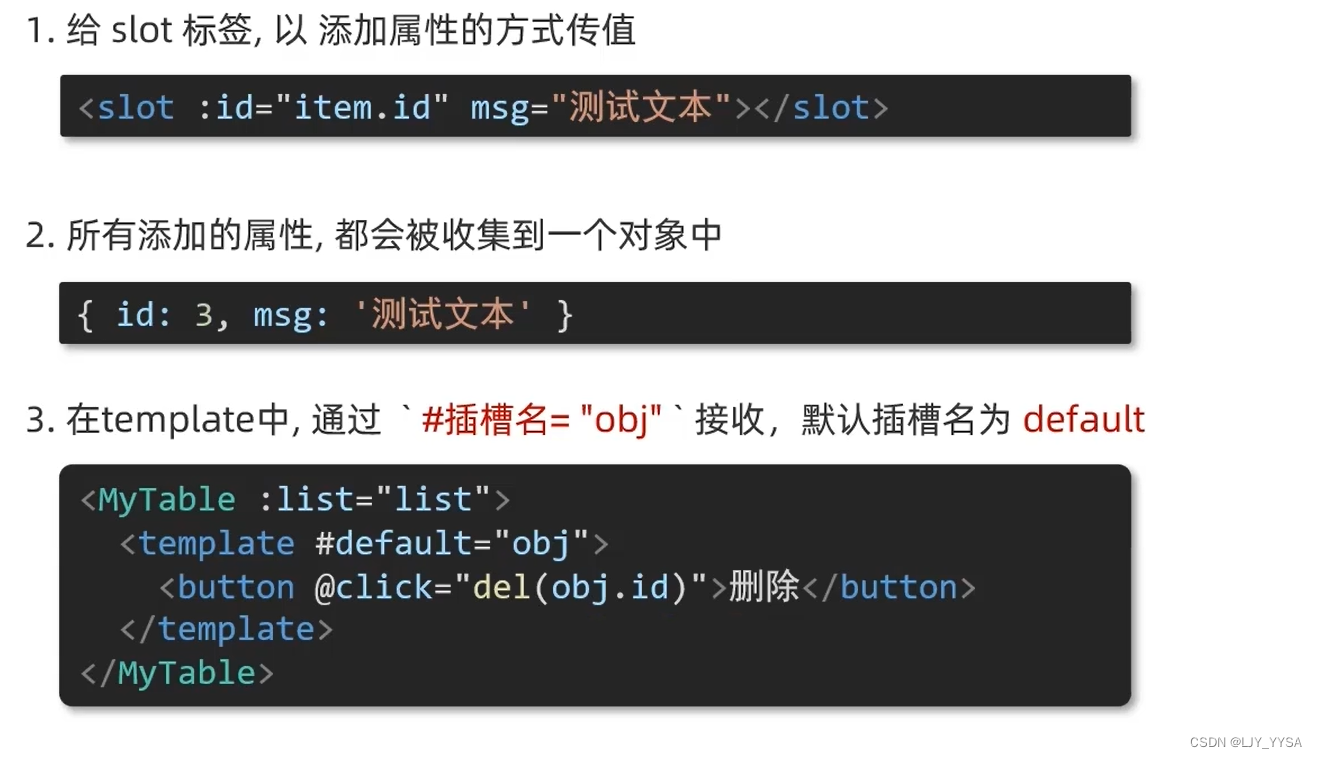
插槽-作用域插槽
插槽分类:默认插槽 和 具名插槽
作用域插槽是插槽的一个传参语法
作用域插槽:定义slot插槽的同时,是可以传值的。给插槽上可以绑定数据,将来使用组件时可以使用。
步骤:
单页应用程序
单页与多页的区别:
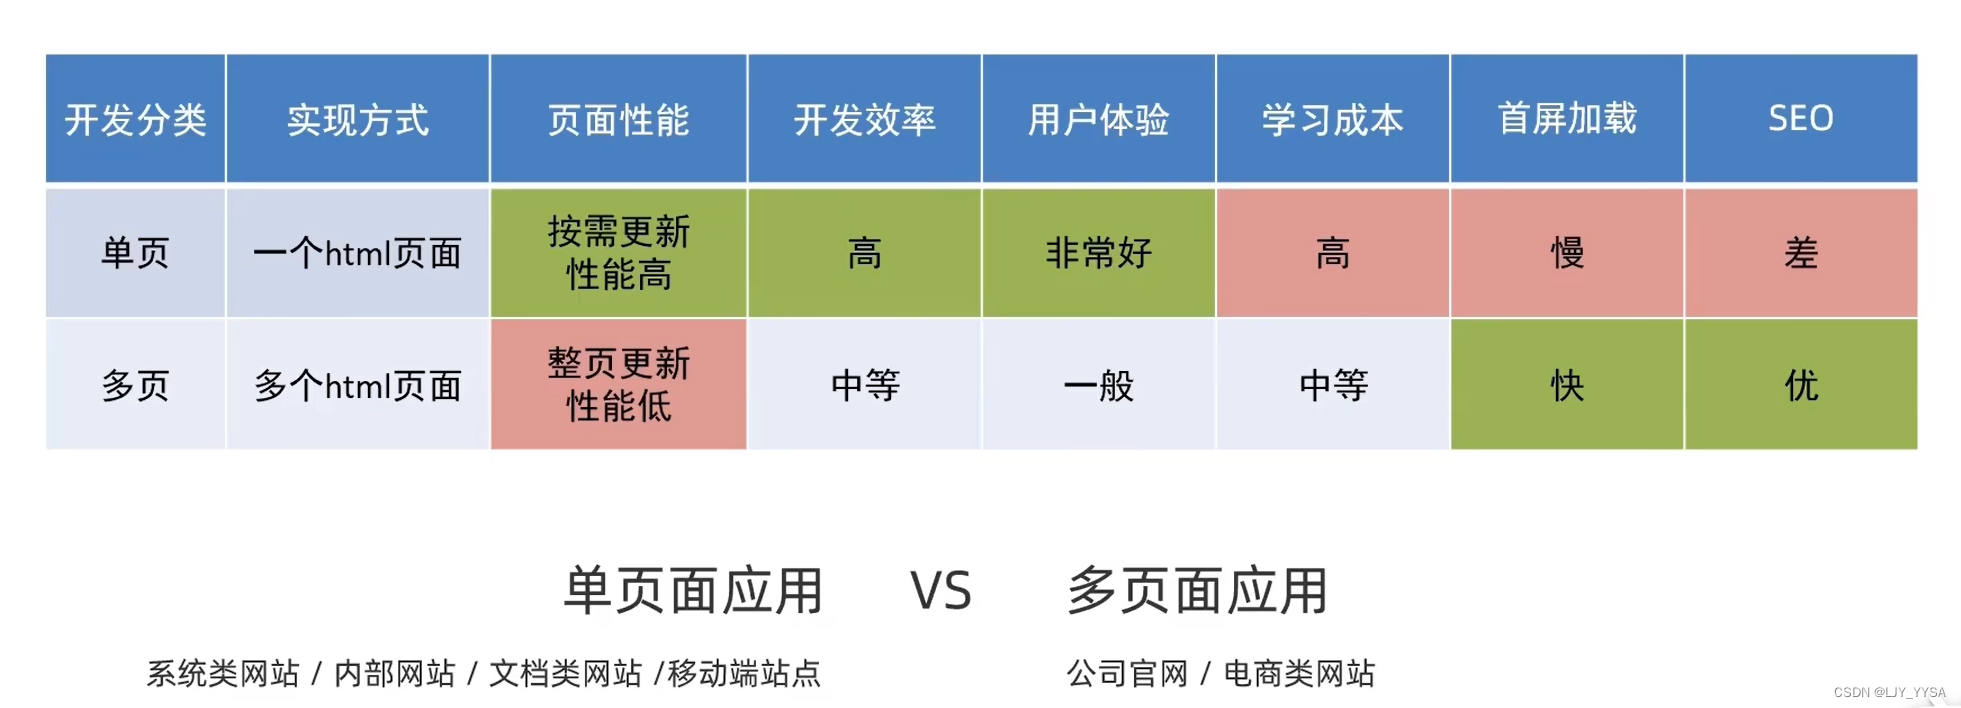
单页面优缺点:
优点:按需更新性能高,开发效率高,用户体验好(这些优点的最大原因就是页面按需更新)
缺点:学习成本高,首屏加载慢,不利于SEO(搜索引擎优化)
要按需更新,首先要明确访问路径和组件的对应关系(通过路由)
Vue中路由:路径和组件的映射关系,通过路由就能知道不同的路径,应该匹配渲染哪个组件
VueRouter
作用:修改地址栏路径时,切换显示匹配的组件
VueRouter官网
VueRouter的使用(5+2)
5个基础步骤(固定)
(1)下载:下载VueRouter模块到当前工程,版本3.6.5
Vue2 VueRouter3.x Vuex3.x
Vue3 VueRouter4.x Vuex4.x

(2)main.js中引入
import VueRouter from 'vue-router'
(3)安装注册 Vue.use(Vue插件)
Vue.use(VueRouter) //VueRouter插件初始化
(4)创建路由对象
const router = new VueRouter()
(5)注入,将路由对象注入到new Vue实例中,建立关联
new Vue({
  render: h => h(App),
  router
}).$mount('#app')
完整的main.js文件
//文件核心作用:导入App.vue,基于App.vue创建结构渲染index.html
import Vue from 'vue'
import App from './App.vue'
import VueRouter from 'vue-router'
Vue.use(VueRouter)

const router = new VueRouter()
//提示:当前处于什么环境(生产环境、开发环境)
Vue.config.productionTip = false

new Vue({
  render: h => h(App),
  router
}).$mount('#app')
2个核心步骤:
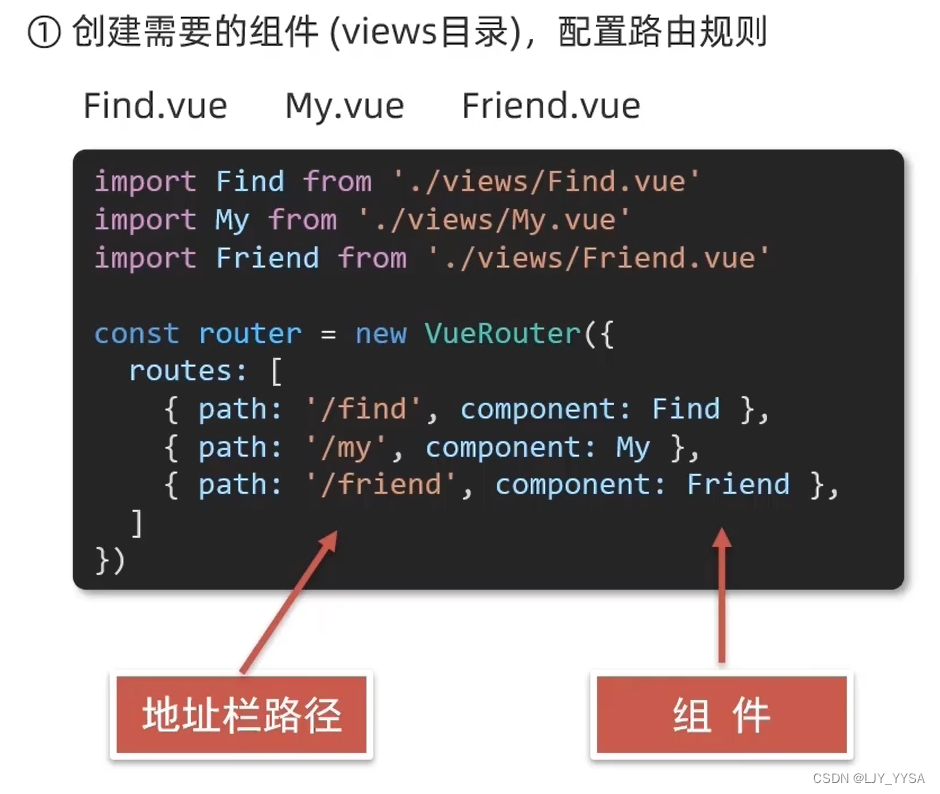
(1)创建需要的组件(views目录),配置路由规则
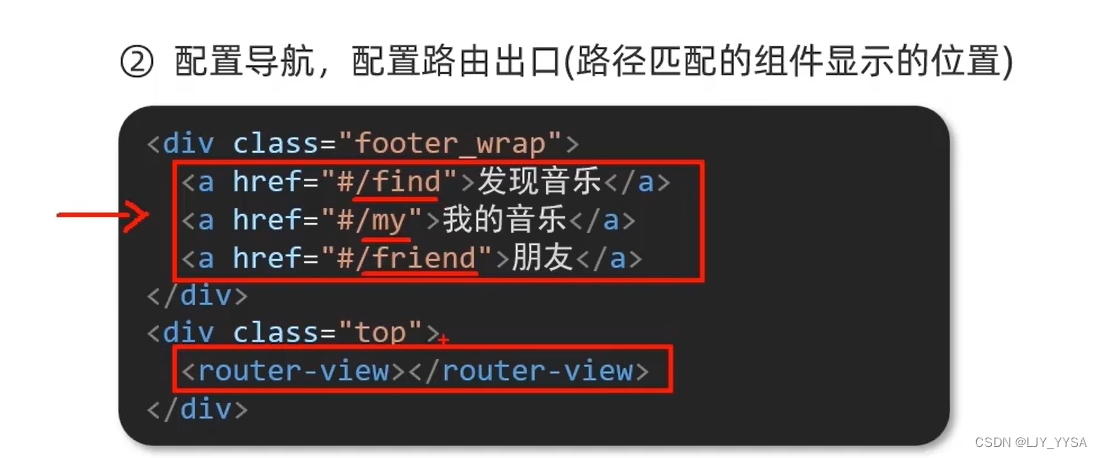
(2)配置导航,配置路由出口(路径匹配的组件显示的位置)
router-view用来控制组件所展示的位置的
案例:
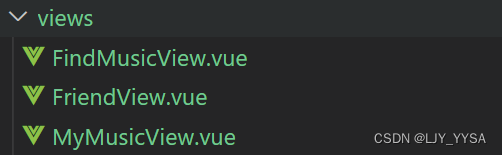
1.先在view文件夹下创建三个组件
2.在main.js中配置路由规则
//文件核心作用:导入App.vue,基于App.vue创建结构渲染index.html
import Vue from 'vue'
import App from './App.vue'
import VueRouter from 'vue-router'

// 1.先引入三个组件
import Find from './views/FindMusicView.vue';
import Friend from './views/FriendView.vue';
import My from './views/MyMusicView.vue';

Vue.use(VueRouter)
// 2.配置路由规则
const router = new VueRouter({
  routes: [
    {path: '/find',component: Find},
    {path: '/friend',component: Friend},
    {path: '/my',component: My}
  ]
})
//提示:当前处于什么环境(生产环境、开发环境)
Vue.config.productionTip = false

new Vue({
  render: h => h(App),
  router
}).$mount('#app')
3.在App.vue中配置导航,配置路由出口
<template>
    <div class="App">
      <!-- 1.配置导航 -->
      <div class="footer_wrap">
      <a href="#/find">发现音乐</a><br>
      <a href="#/friend">朋友</a><br>
      <a href="#/my">我的音乐</a>
      </div>
      <div class="top">
        <!-- 2.路由出口 -> 匹配的组件所展示的位置 -->
        <router-view></router-view>
      </div>

    </div>

</template>
组件存放目录问题
组件分类:页面组件 & 复用组件
src/views文件夹:存放页面组件-页面展示-配合路由用
scr/components文件夹:存放复用组件-展示数据-用于复用
路由模块封装
(1)在src文件夹下创建一个router文件夹,router文件夹里放一个index.js文件
// 使用绝对路径来查找文件,@表示src文件夹
import FindMusicView from '@/views/FindMusicView'
import MyMusicView from '@/views/MymusicView'
import FriendView from '@/views/FriendView'

import Vue from 'vue'
import VueRouter from 'vue-router'
Vue.use(VueRouter)
const router = new VueRouter({
    routes: [
        {path: '/find',component:FindMusicView},
        {path: '/my',component:MyMusicView},
        {path: '/friend',component:FriendView},
    ]
})
export default router
(2)在main.js中导入并挂载
//文件核心作用:导入App.vue,基于App.vue创建结构渲染index.html
import Vue from 'vue'
import App from './App.vue'
import router from './router/index'

//提示:当前处于什么环境(生产环境、开发环境)
Vue.config.productionTip = false

new Vue({
  render: h => h(App),
  router
}).$mount('#app')
导航链接(router-link)
vue-router提供了一个全局组件router-link(取代a标签):
(1)能跳转,配置to属性指定路径(必须)。同无需#
(2)能高亮,默认就会提供高亮类名,可以直接设置高亮样式
App.vue
<template>
    <div class="App">
      <!-- 1.配置导航 -->
      <div class="footer_wrap">
      <router-link to="/find">发现音乐</router-link>
      <router-link to="/friend">朋友</router-link>
      <router-link to="/my">我的音乐</router-link>
      <!-- 谷歌禁止子自动播放,添加muted静音播放即可 -->
      <video src="视频url" autoplay="autoplay" muted="muted"></video>
      </div>
      <div class="top">
        <!-- 2.路由出口 -> 匹配的组件所展示的位置 -->
        <router-view></router-view>
      </div>

    </div>

</template>

router-link自动给当前导航添加了两个高亮类名:router-link-active、route-link-exact-active
(1)router-link-active 模糊匹配(用的多)
to=“/my” 可以匹配 /my /my/a /my/b
(2)router-link-exact-active 精确匹配
to=“/my” 仅仅可以匹配 /my
自定义匹配的类名
在index.js文件中:
// 使用绝对路径来查找文件,@表示src文件夹
import FindMusicView from '@/views/FindMusicView'
import MyMusicView from '@/views/MyMusicView'
import FriendView from '@/views/FriendView'

import Vue from 'vue'
import VueRouter from 'vue-router'
Vue.use(VueRouter)
const router = new VueRouter({
    routes: [
        {path: '/find',component:FindMusicView},
        {path: '/my',component:MyMusicView},
        {path: '/friend',component:FriendView},
    ],
    linkActiveClass: 'active',    //配置模糊匹配的类名
    linkExactActiveClass: 'exact-active'   //配置精确匹配的类名

})
export default router

声明式导航-跳转传参
查询参数传参
(1)to=“/path?参数名=值”
链接.vue中
<router-link to="/find?key=发现音乐">发现音乐</router-link>
(2)$route.query.参数名
跳转.vue中,在created()函数中
created(){
	console.log(this.$route.query.key);
}
动态路由传参
(1)index.js文件
    routes: [
    	// 使用     :参数名
        {path: '/find/:words',component:FindMusicView},
        {path: '/my',component:MyMusicView},
        {path: '/friend',component:FriendView},
    ]
(2)App.vue文件
<router-link to="/find/发现音乐">发现音乐</router-link>
(3)FindMusicView中使用this.$route.query.words来获取传递的参数
两种传参方式的区别:
(1)查询参数传参比较适合传多个参数
(2)动态路由传参传单个参数比较方便,且优雅简洁
路由重定向
重定向 => 匹配path后,强制跳转path路径
{path: '/',redirect: '/home'},
Vue路由-404
作用: 当路径找不到匹配时,给个提示页面
位置: 配在路由最后
{path: '*',component: NotFind}
Vue路由-模式设置
问题: 路由的路径看起来不自然,有#
hash路由(默认):例如: http://localhost:8080/#/home
history路由(常用):例如:http://localhost:8080/home
但是如果使用history模式,地址栏就没有#,需要后台配置访问规则
const router = new VueRouter({
    routes: [
        {path: '/',redirect: '/my',component:MyMusicView},
        {path: '/find',component:FindMusicView},
        {path: '/my',component:MyMusicView},
        {path: '/friend',component:FriendView},
        {path: '*',component: NotFind}
    ],
    //将mode改为history
    mode: "history",
    linkActiveClass: 'active',    //配置模糊匹配的类名
    linkExactActiveClass: 'exact-active'   //配置精确匹配的类名

})
编程式导航 - 基本跳转
问题:前面的跳转是基于router-link的链接跳转,但是如果是点击按钮进行跳转呢
编程式导航:用JS代码来进行跳转
两种语法:
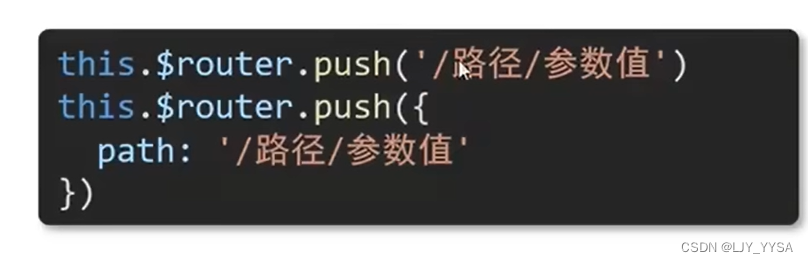
path路径跳转
App.vue中
<button  @click="goSearch"> 点击进入我的音乐</button>
methods: {
	 //简写方式
    goSearch(){
      this.$router.push('/my')
    }
    //完整写法
    goSearch() {
      this.$router.push({
        path: '/my'
      })
    }

  }
name命名路由跳转(适合path路径长的场景)
App.vue中
goSearch() {
      this.$router.push({
        name: 'my_usename'
      })
    }
index.js中:
routes: [
        {path: '/',redirect: '/find',component:FindMusicView},
        {path: '/find',component:FindMusicView},
        {name:'my_usename',path: '/my',component:MyMusicView},      //使用了name
        {path: '/friend',component:FriendView},
        {path: '*',component: NotFind}
    ]
编程式导航 - 路由传参
两种传参方式:查询参数+动态路由传参
两种跳转方式:对于两种传参方式都支持:
(1)path路径跳转传参
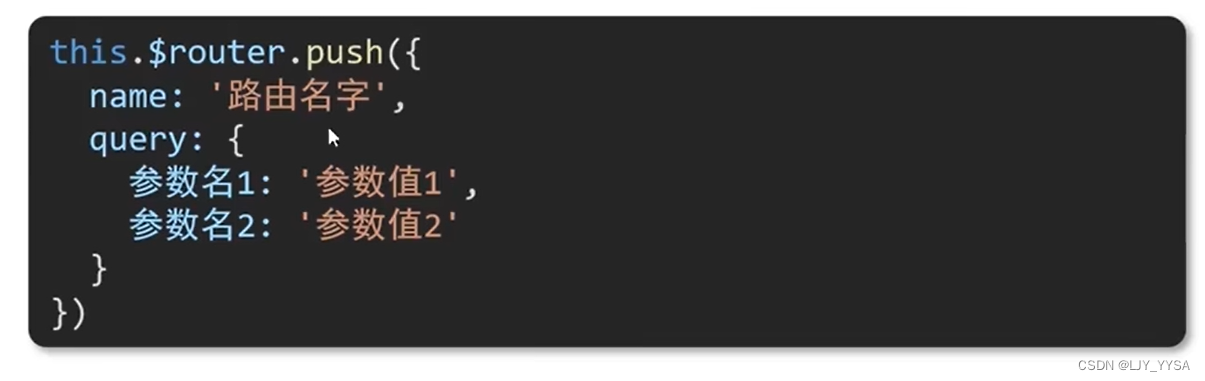
1.query传参 (注意router和route的区别)

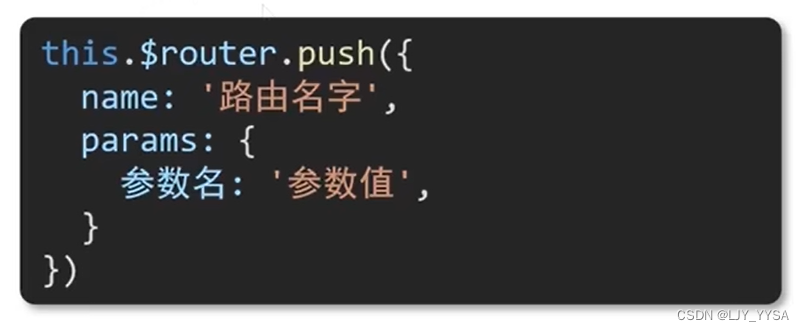
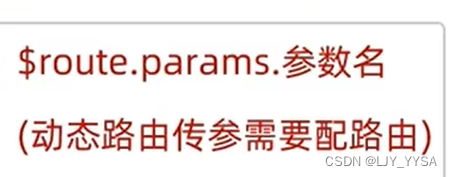
2.动态路由传参:
(2)name命名路由跳转传参
1.query传参
2.动态路由
二级路由
缓存组件
keep-alive是Vue的内置组件,当它包裹动态组件时,会缓存不活动的组件实例,而不是销毁他们。
keep-alive是一个抽象组件:它本身不会渲染一个DOM元素,也不会出现在父组件链中。
优点:在组件切换过程中,把切换出去的组件保留在内存中,防止重复渲染DOM,减少加载时间及性能消耗,提高用户体验性。
keep-alive的三个属性:

组件被缓存后,就不会执行组件的created、mounted、destroyed等钩子,所以被缓存的组件多了另外两个生命周期钩子:
(1)actived 激活时,组件被看到时触发
(2)deactived 失活时,离开页面组件看不见触发
基于VueCli自定义创建项目
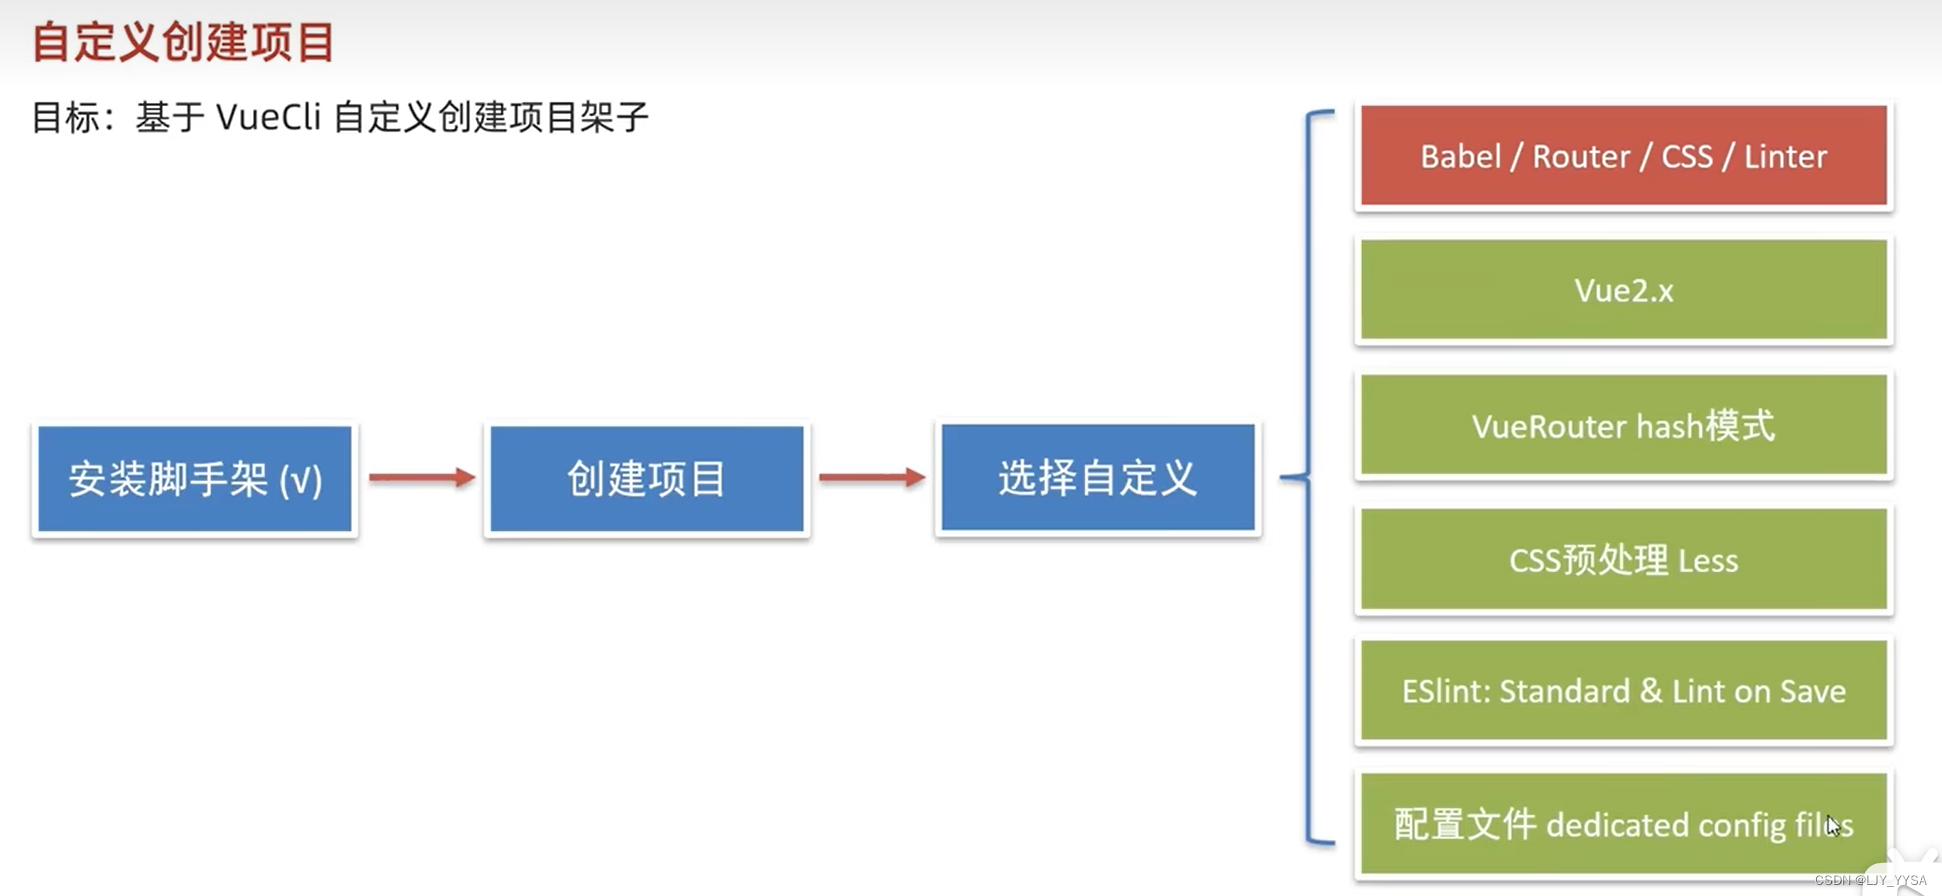
步骤:

期间进行一些自定义设置


ESlint代码规范
JavaScript Standard Style
有自动修正和手动修正两种方式
vuex
vuex是一个vue的状态管理工具,状态就是数据,简单理解就是vuex是一个插件,可以帮助我们管理vue通用的数据(多组件共享的数据)
场景:
(1)某个状态在很多个组件来使用(例如个人信息)
(2)多个组件共同维护一份数据(购物车)
优势:
(1)共同维护一份数据,数据集中化管理
(2)响应式变化
(3)操作简洁(vuex提供了一些辅助函数)
步骤:

(1)使用npm install vuex@3
(2)@/store/index.js中
// 这里面存放vuex相关的核心代码
import Vue from 'vue'
import Vuex from 'vuex'

Vue.use(Vuex)

const store = new Vuex.Store()

export default store
(3)main.js文件
import Vue from 'vue'
import App from './App.vue'
import store from '@/store/index'
Vue.config.productionTip = false

new Vue({
  render: h => h(App),
  store
}).$mount('#app')
核心概念-state概念
1.提供数据:
State提供唯一的公共数据源,所有共享的数据都要统一放到Store中的State中存储
在state对象中可以添加我们要共享的数据
提供数据:
Index.js文件
// 这里面存放vuex相关的核心代码
import Vue from 'vue'
import Vuex from 'vuex'

Vue.use(Vuex)

const store = new Vuex.Store({
  state: {
    count: 101
  }
})

export default store
使用数据:
通过store直接访问
{{ $store.state.count }}
mapState辅助函数
帮助我们把store中的数据自动映射到组件的计算属性中
在想用数据的文件中
import { mapState } from 'vuex'
export default {
  name: 'App',
  components: {
    Son1,
    Son2
  },
  computed: {
    ...mapState(['count'])
  }
}
</script>
核心概念-mutations
vuex同样遵循单向数据流,组件中不能直接修改仓库的数据
使用strict: true 可以开启严格模式,this.$store.state.count++ 这种语句会直接报错
基本使用:
在index.js中使用mutations
// 这里面存放vuex相关的核心代码
// 这里面存放vuex相关的核心代码
import Vue from 'vue'
import Vuex from 'vuex'

Vue.use(Vuex)

const store = new Vuex.Store({
  state: {
    count: 101,
    title: '原标题'
  },
  mutations: {
    addCount (state, n) {
      state.count += n
    },
    addTitle (state, newTitle) {
      state.title = newTitle
    }
  }
})

export default store
在需要进行修改数据的vue中调用mutations中定义的函数
<template>
  <div id="app">
    <h1>{{ count }}</h1>
    <h1>{{ title }}</h1>
    <Son1></Son1>
    <Son2></Son2>
    <button @click="handleAdd(1)" style="width: 50px; height: 50px;">+1</button>
    <button @click="handleAdd(5)" style="width: 50px; height: 50px;">+5</button>
    <button @click="changeTitle('黑马程序员')" style="width: 50px; height: 50px;">改标题</button>
    <input type="text" :value="title" @input="handelTitle">
  </div>
</template>

<script>
import Son1 from '@/components/Son1'
import Son2 from '@/components/Son2'
import { mapState } from 'vuex'
export default {
  name: 'App',
  components: {
    Son1,
    Son2
  },
  computed: {
    ...mapState(['count', 'title'])
  },
  methods: {
    handleAdd (n) {
      this.$store.commit('addCount', n)
    },
    changeTitle (newTitle) {
      this.$store.commit('addTitle', newTitle)
    },
    handelTitle (e) {
      this.$store.commit('addTitle', e.target.value)
    }
  }
}
</script>

<style lang="less">
#app {
  font-family: Avenir, Helvetica, Arial, sans-serif;
  -webkit-font-smoothing: antialiased;
  -moz-osx-font-smoothing: grayscale;
  text-align: center;
  color: #2c3e50;
  margin-top: 60px;
}
</style>
mapMutations
mapMutations和mapState很像,他是把位于mutations中的方法提取了出来,映射到组件methods中
在App.vue中
import { mapState, mapMutations } from 'vuex'

//methods中
...mapMutations(['addTitle'])

//template中就可以直接使用addTitle方法了
<button @click="addTitle('黑马程序员')" style="width: 50px; height: 50px;">改标题</button>
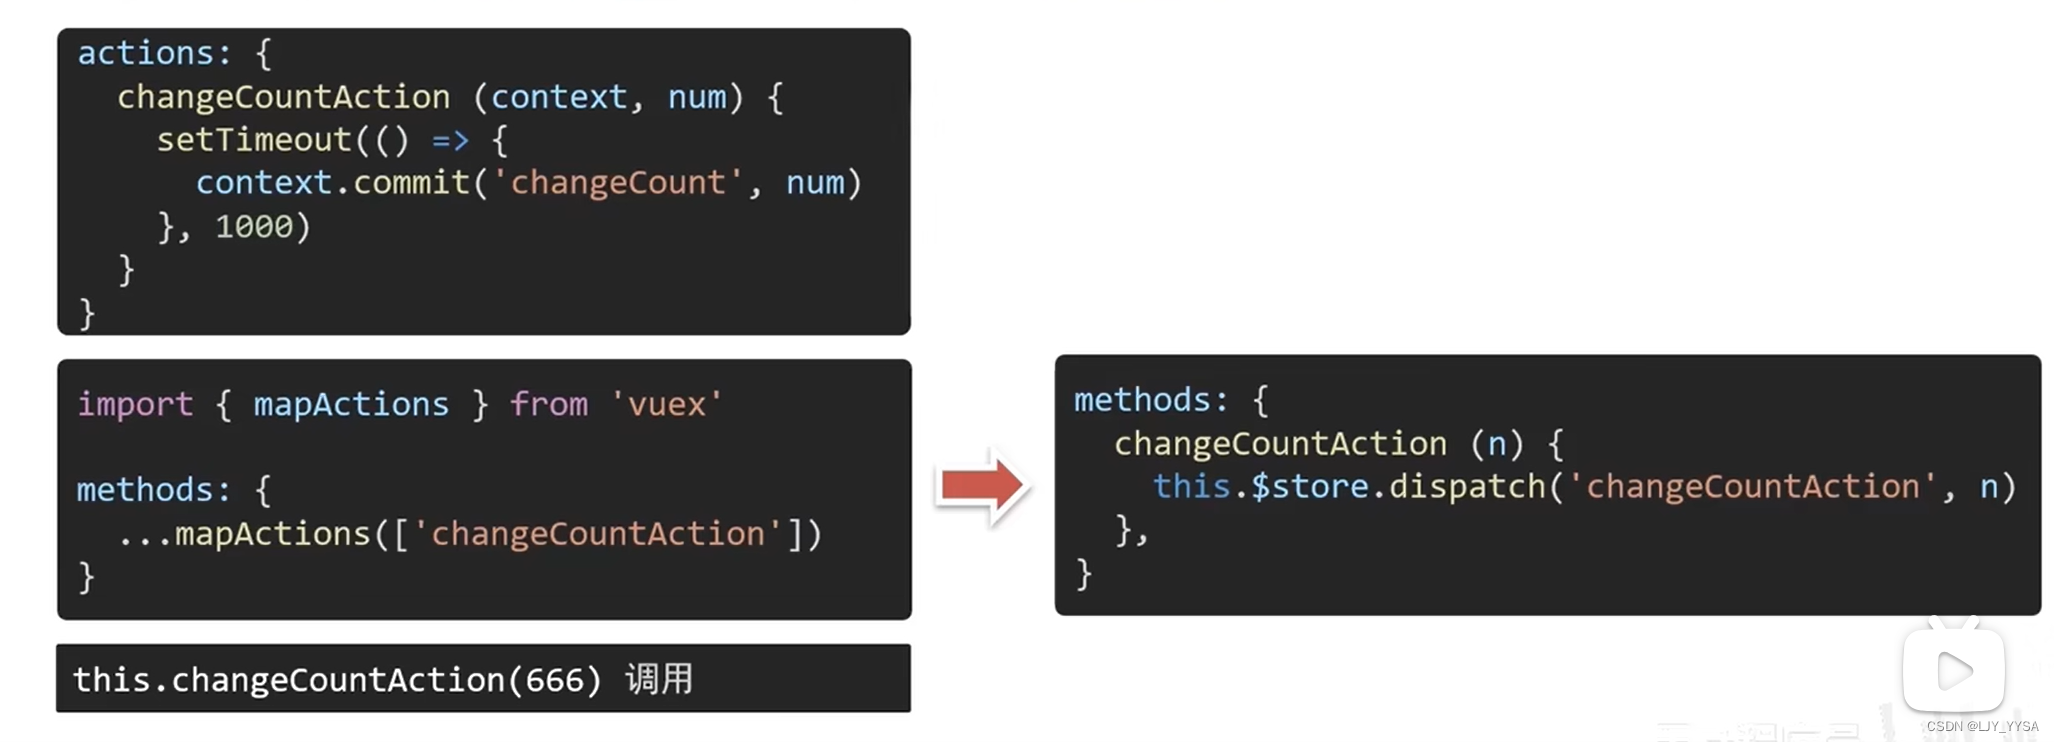
核心概念-actions
用来处理异步操作的
说明: mutations必须是同步的(便于监测数据变化,记录调试)
index.js中
actions: {
	changeCountAction (context, num) {
		setTimeout(() => {
			context.commit('changeCount', num)
		}, 1000)
	}
}
App.vue中
handleChange () {
	// 同步的是commit, 异步的是dispatch
	this.$store.dispatch('changeCountAction', 666)
}
mapActions
步骤:
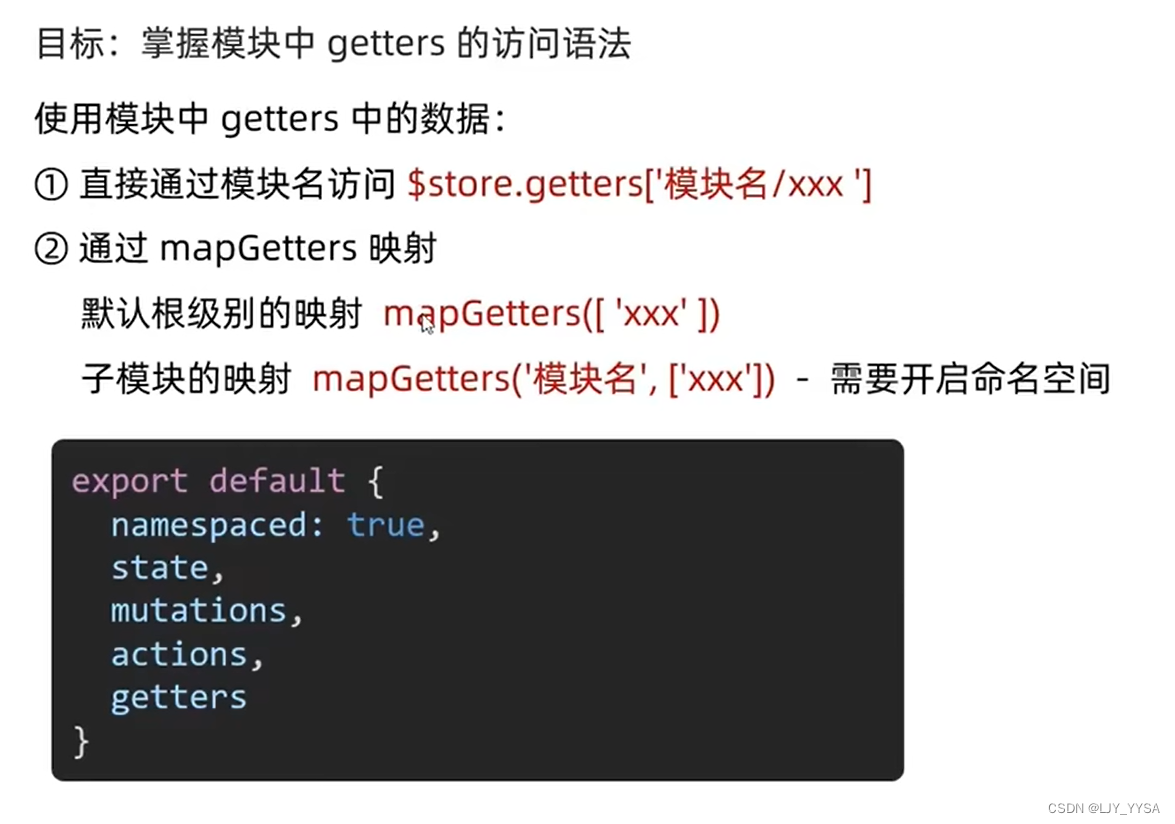
核心概念-getters
**说明:**除了state之外,有时还需要从state中派生出一些状态,这些状态是依赖state的,此时会用到getters
getters: {
    filterList (state) {
      return state.list.filter(item => item > 5)
    }
  }
第一种方式:直接使用
<div>{{ $store.getters.filterList }}</div>
第二种方式:
<div>{{ filterList }}</div>

computed: {
    ...mapGetters(['filterList'])
  }
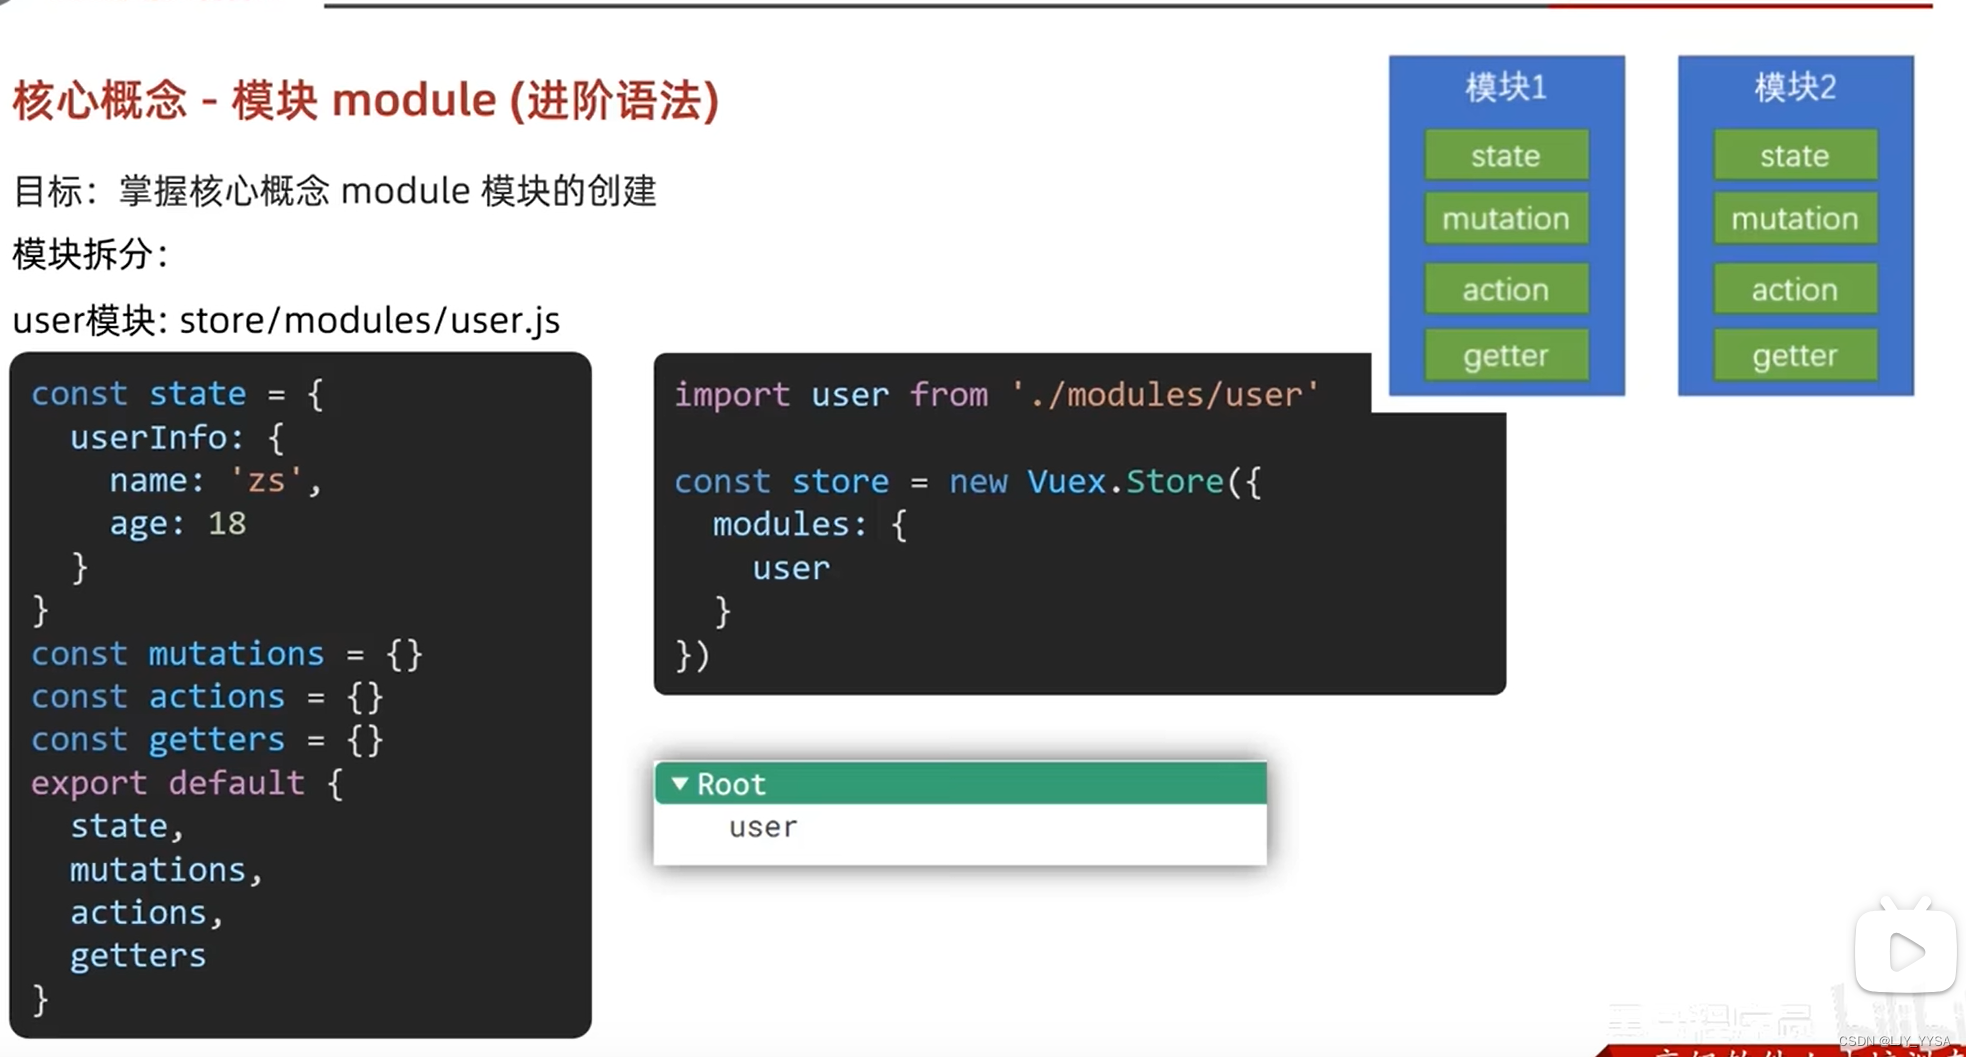
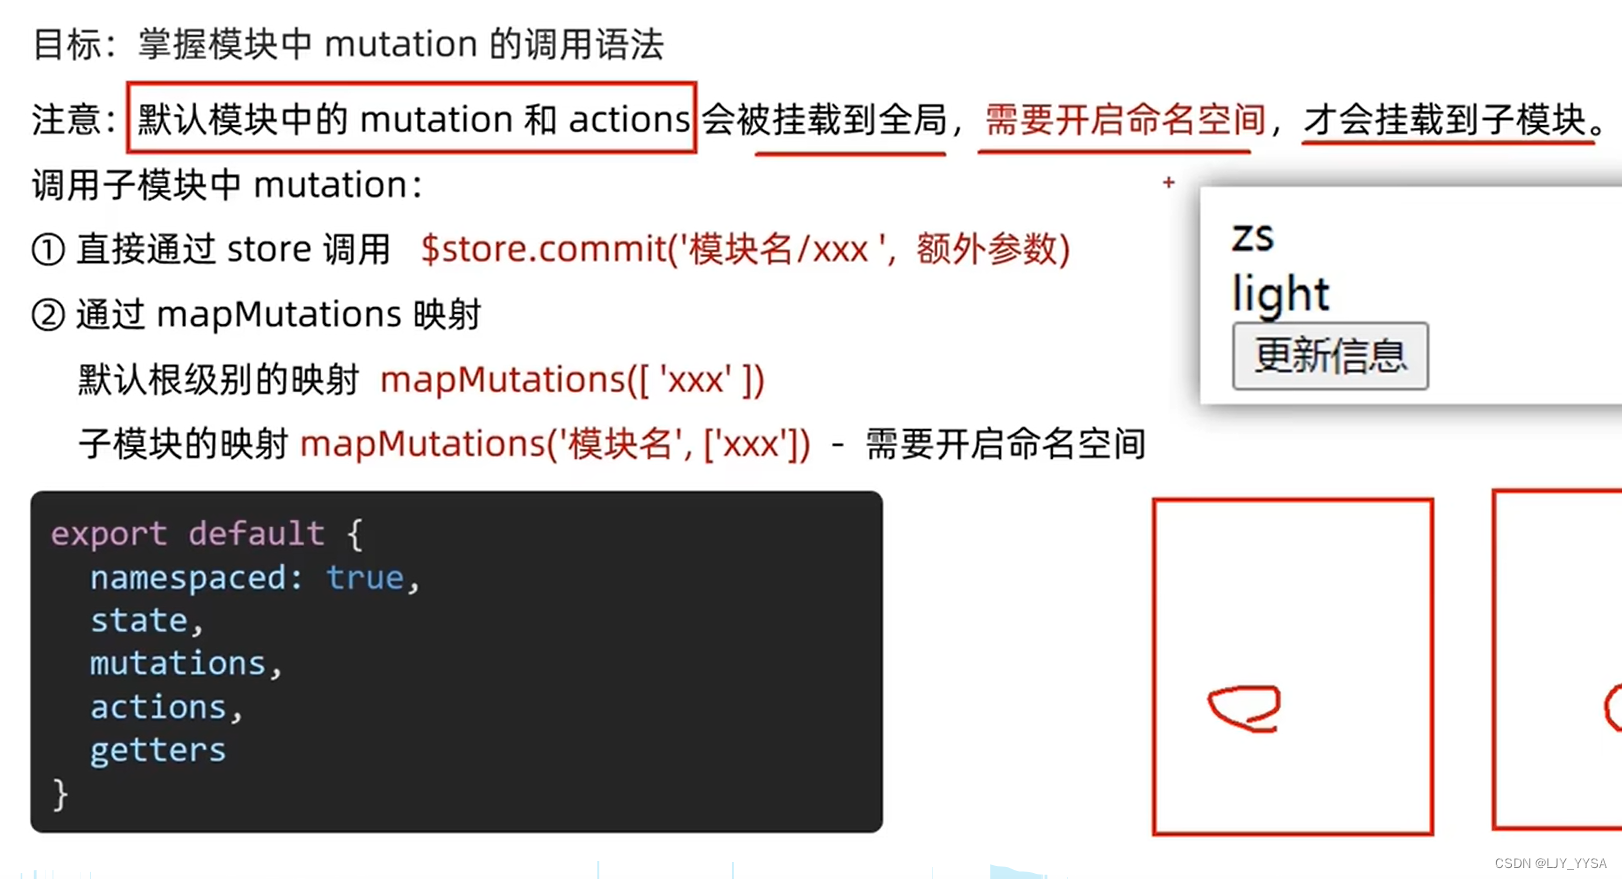
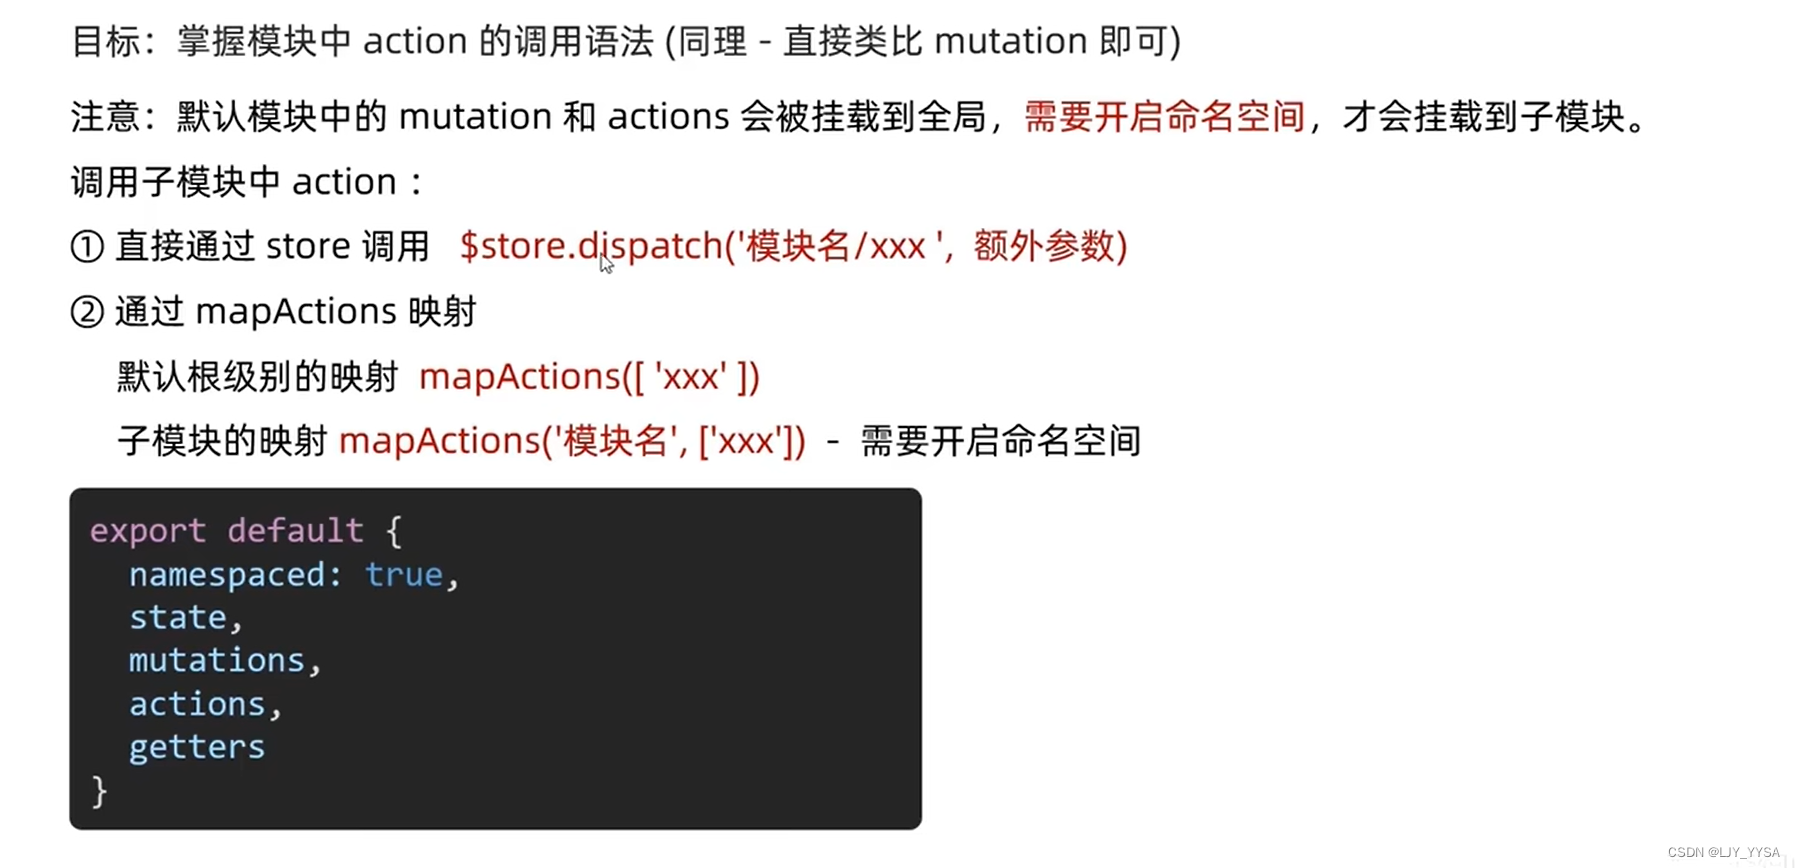
核心概念-模块module
由于vuex使用单一状态树,应用的所有状态会集中到一个比较大的对象。当应用变得非常复杂时,store对象就有可能变得相当臃肿
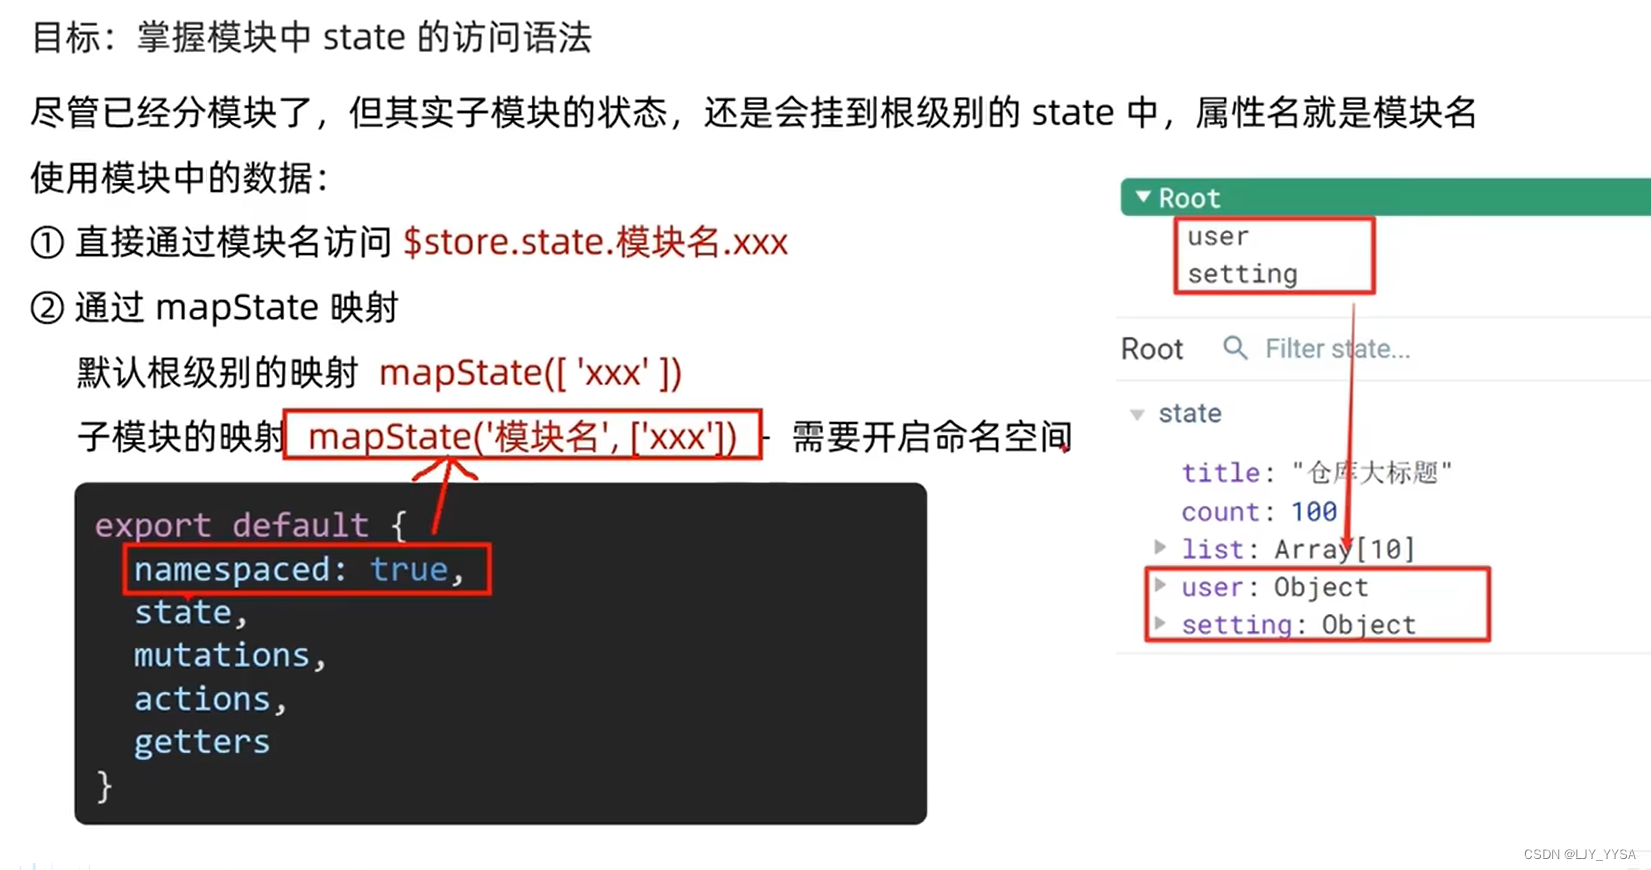
掌握模块中state的访问语法
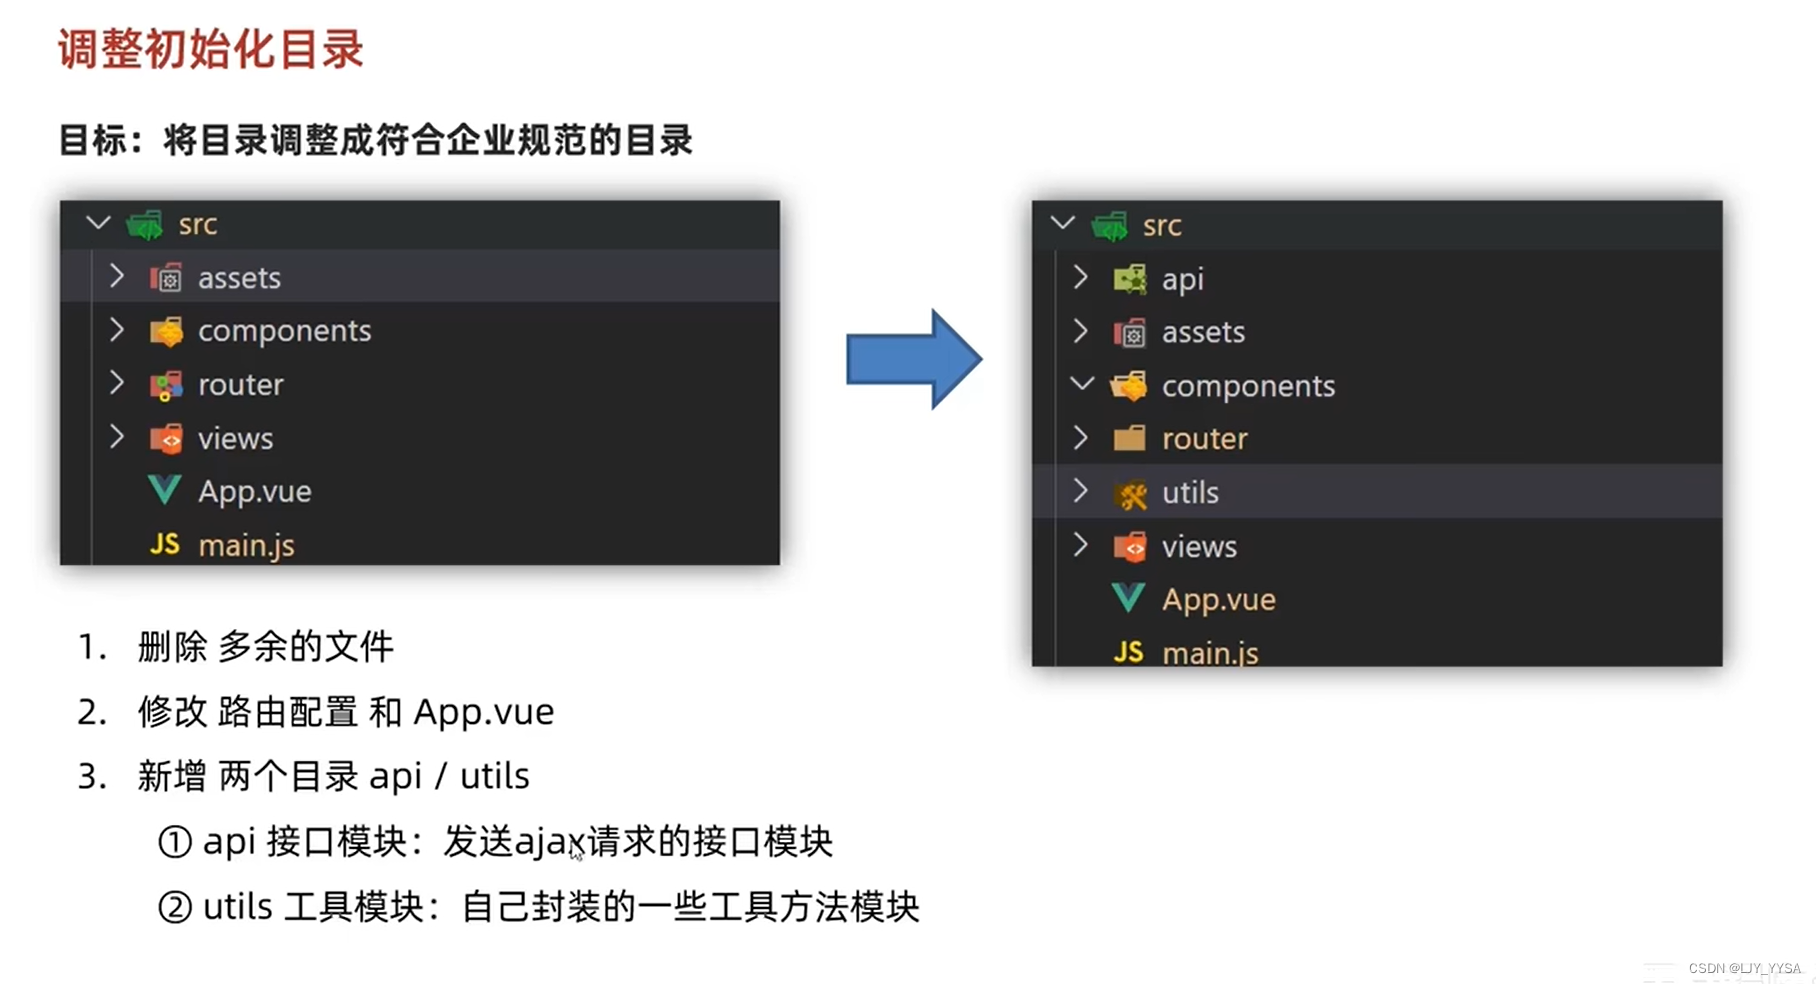
创建项目
调整初始化目录,将目录调整为符合企业规范的目录
认识第三方Vue组件库 vant-ui
Vue的组件库并不是唯一的,一般会按照不同的平台进行分类:
(1)PC端: element-ui(element-plus) ant-design-vue(阿里)
(2)移动端: vant-ui Mint UI(饿了么) Cube UI(滴滴)
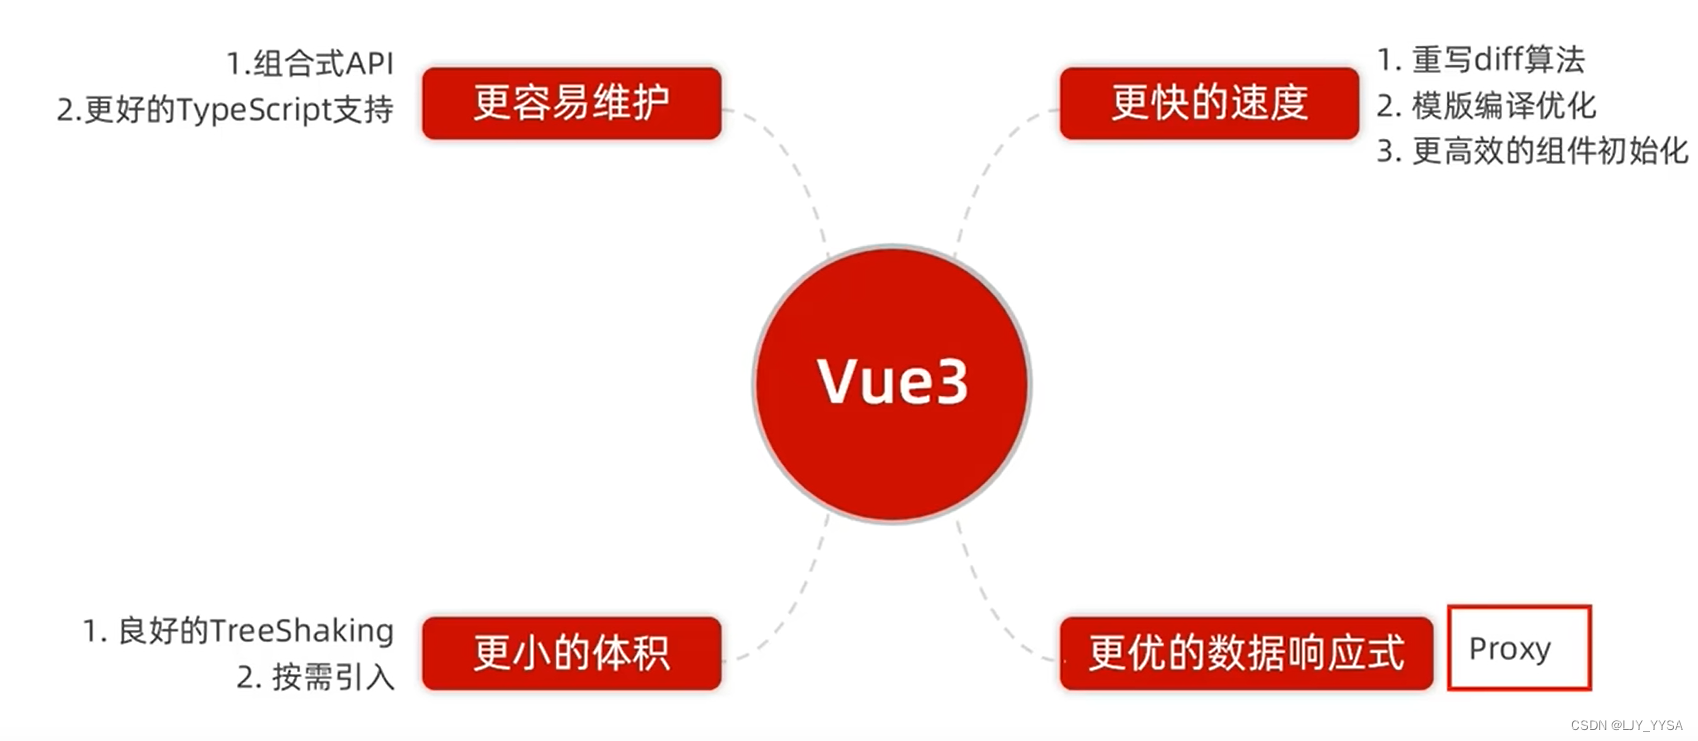
Vue3
Vue3的优势:
认识create-vue
create-vue是Vue官方新的脚手架工具,底层切换到了Vite(下一代构建工具),为开发提供极速响应
创建Vue3项目
1.前提环境条件:nodojs的版本必须高于16.0
2.创建一个Vue3项目
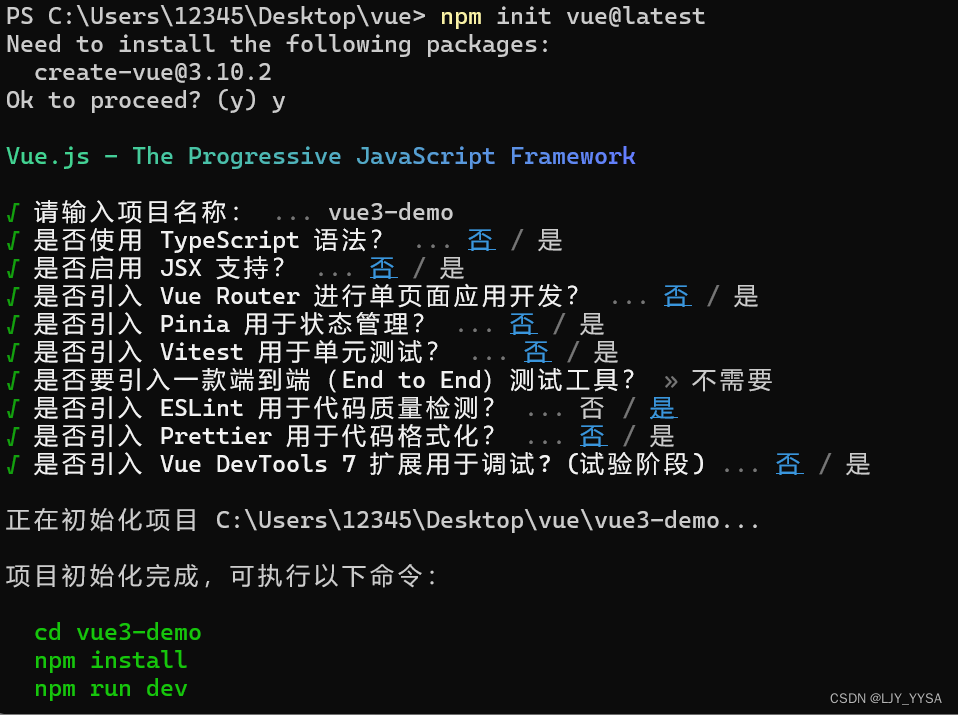
npm init vue@latest
Vue3项目目录
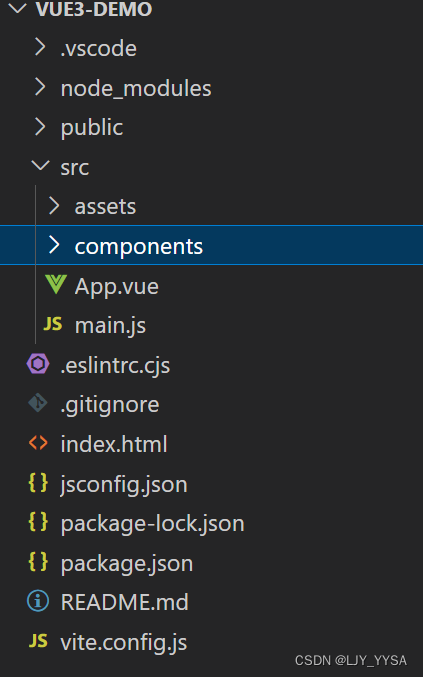
(1)assets中存放一些静态资源,图片,CSS文件之类的
(2)components中存放组件
(3)App.vue
<!-- 加上setup允许在script中直接编写组合式API -->
<script setup>
import HelloWorld from './components/HelloWorld.vue'
import TheWelcome from './components/TheWelcome.vue'
</script>

<template>
  <!-- 不再要求唯一根元素了 -->
  <header>
    <img alt="Vue logo" class="logo" src="./assets/logo.svg" width="125" height="125" />

    <div class="wrapper">
      <HelloWorld msg="You did it!" />
    </div>
  </header>

  <main>
    <TheWelcome />
  </main>
</template>

<style scoped>
header {
  line-height: 1.5;
}

.logo {
  display: block;
  margin: 0 auto 2rem;
}

@media (min-width: 1024px) {
  header {
    display: flex;
    place-items: center;
    padding-right: calc(var(--section-gap) / 2);
  }

  .logo {
    margin: 0 2rem 0 0;
  }

  header .wrapper {
    display: flex;
    place-items: flex-start;
    flex-wrap: wrap;
  }
}
</style>
(4)main.js
import './assets/main.css'

import { createApp } from 'vue'
import App from './App.vue'

createApp(App).mount('#app')
(5)index.html ——最终挂载的页面
(6)package中配置项变成了vue和vite
组合式API - setup选项
setup
(1)执行时机,比beforeCreate还要早
(2)setup函数中,获取不到this(this是undifined)
(3)数据和函数,需要再setup最后return,才能模版中应用
(4)通过setup语法糖简化代码
<!-- 加上setup允许在script中直接编写组合式API
<script>
export default {
setup() {
const message = 'hello Vue3'
const logMessage = () => {
console.log(message);
}
return {
message,
logMessage
}
},
beforeCreate () {
console.log('beforeCreate函数')
}
}
</script> -->
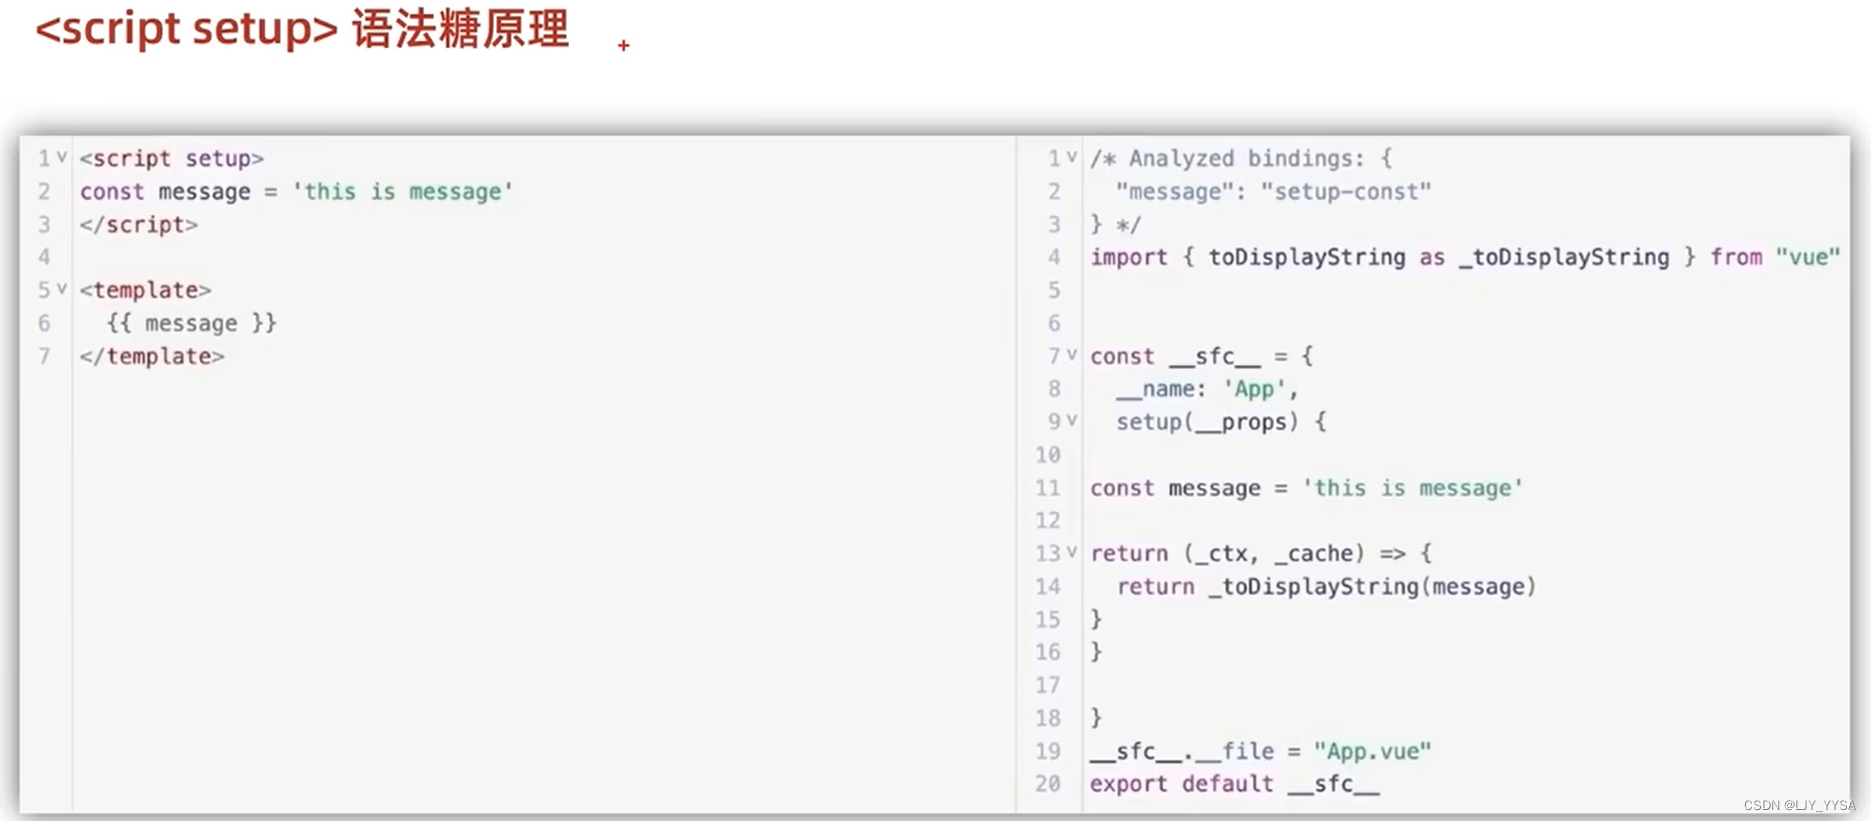
<script setup>
const message = 'this s a message'
const logMessage = () => {
console.log(message);
}
</script>
<template>
<div>{{message}}</div>
</template>
<style scoped>
</style>
setup语法糖原理
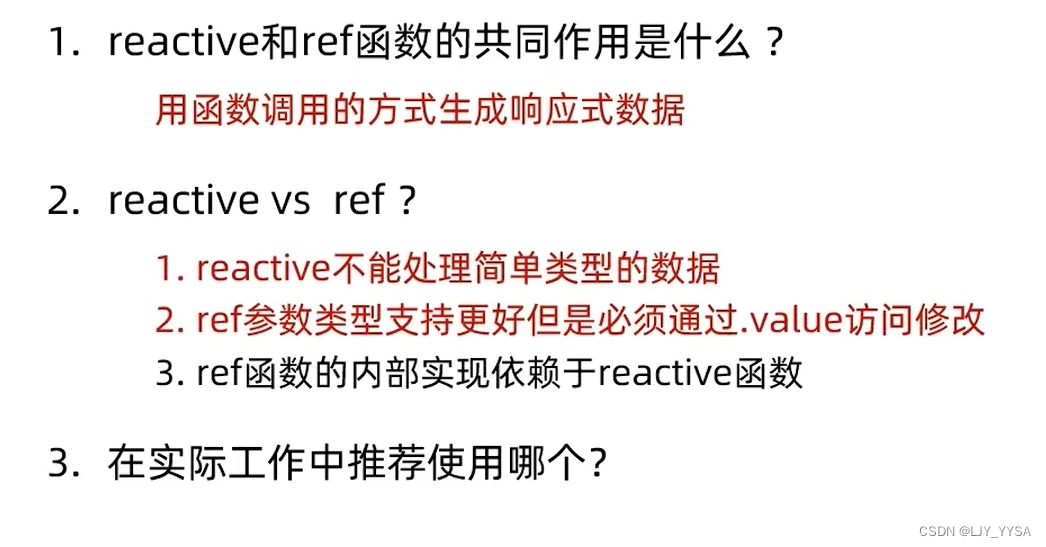
组合式API - reactive
reactive和ref的共同作用是用函数调用的方式生成响应式数据
<script setup>
  //reactive: 接收一个对象类型的数据,返回一个响应式的对象
  import { reactive } from 'vue'
  const state = reactive({
    count: 100
  })
  const setCount = () => {
    state.count++
  }
</script>
<template>
  <div>{{state.count}}</div>
  <button @click="setCount">+1</button>
</template>

<style scoped>

</style>
组合式API - ref
本质: 是在原有传入数据的基础上,外层包了一层对象,包成了复杂类型
底层: 包成复杂类型之后,再借助reactive实现响应式
注意 (1)需要通过.value
(2)在template中,访问数据不需要加.value
<script setup>
  import { ref } from 'vue';
  const count = ref(0)
  console.log(count.value);
  const setCount = () => {
    count.value++
  }
</script>
<template>
  <div>{{ count }}</div>
  <button @click="setCount">+1</button>
</template>

<style scoped>

</style>
组合式API - computed
<script setup>
  import { computed, ref } from 'vue';
  const list = ref([1,2,3,4,5,6,7,8,9])
  const computedList = computed(() => {
    return list.value.filter(item => item > 2)
  })
  const addFn = () => {
    list.value.push(666)
  }
</script>
<template>
  <div>原始数据:{{ list }}</div>
  <div>计算后的数据:{{ computedList }}</div>
  <button @click="addFn">+666</button>
</template>

<style scoped>

</style>
注意:
(1)computed的get、set方法与Vue2是一样的
(2)计算属性中不应该有“副作用”:比如异步请求/修改dom
(3)避免直接修改计算属性的值(计算属性应该是只读的,特殊情况可以配置get set)
组合式API - watch函数
作用:侦听一个或者多个数据的变化,数据变化时执行回调函数
两个额外参数:1.immediate(立即执行)2.deep(深度侦听)
<script setup>
  import { ref, watch } from 'vue';
  const count = ref(0)
  const nickname = ref('张三')
  const userInfo = ref({
    name: 'zs',
    age: 12
  })
  const addFn = () => {
    count.value++
  }
  const changeNickname = () => {
    nickname.value = '李四'
  }
  //1.监视单个数据的变化
  // watch(count, (newValue, oldValue) => {
  //   console.log(newValue,oldValue);
  // })
  //2.监视多个数据的变化
  // watch([count, nickname], (newArr,oldArr) => {
  //   console.log(newArr, oldArr);
  // })
  //3.immediate 立刻执行
  // watch(count, (newValue, oldValue) => {
  //   console.log(newValue, oldValue);
  // }, {
  //   immediate: true
  // })
  //4.deep 深度监视,默认watch进行的是浅层监视
  //const ref1 = ref(简单类型) 可以直接监视
  //const ref2 = ref(复杂类型) 监视不到复杂类型内部数据的变化
  // watch(count, (newValue, oldValue) => {
  //   console.log(newValue, oldValue);
  // }, {
  //   immediate: true,
  //   deep: true
  // })
  //5.对于对象中的属性进行监视
  watch(() => userInfo.value.age, (newValue,oldValue) => {
    console.log(newValue, oldValue)
  })
  const changeAge = () => {
    userInfo.value.age++
  }
</script>
<template>
    <div>{{ count }}</div>
    <button @click="addFn">+1</button>
    <div>{{ nickname }}</div>
    <button @click="changeNickname">修改昵称</button>
    <div>{{ userInfo }}</div>
    <button @click="changeAge">修改年龄</button>

</template>

<style scoped>

</style>
组合式API - 生命周期函数
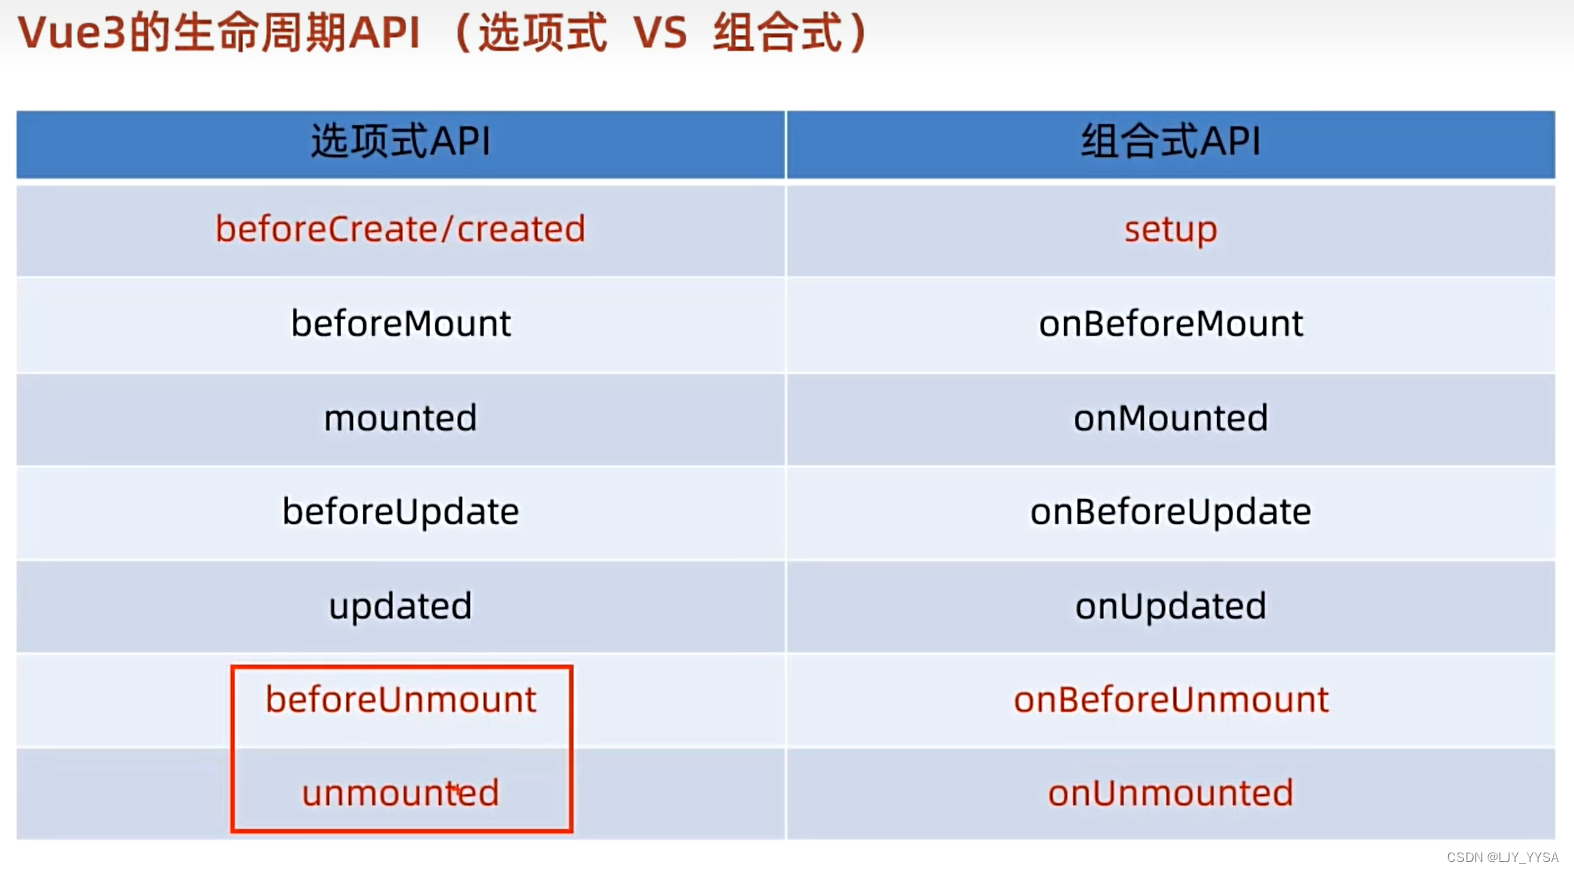
组合式支持调用多次,不会冲突
组合式API - 父子通信
父传子:
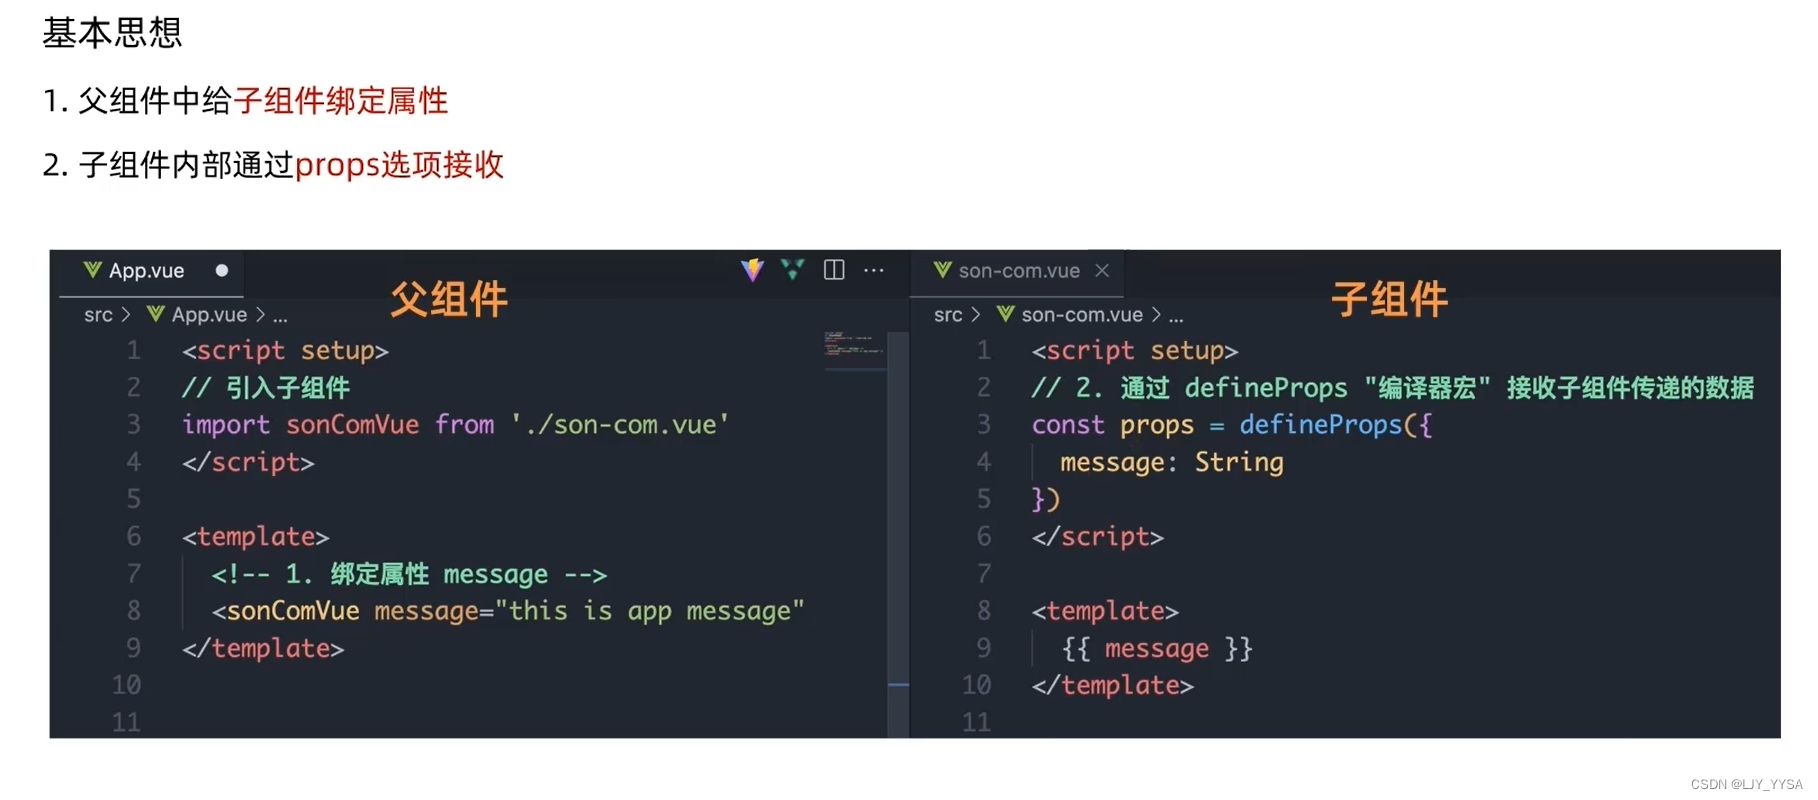
之所以通过defineProps接收数据是因为已经使用了setup
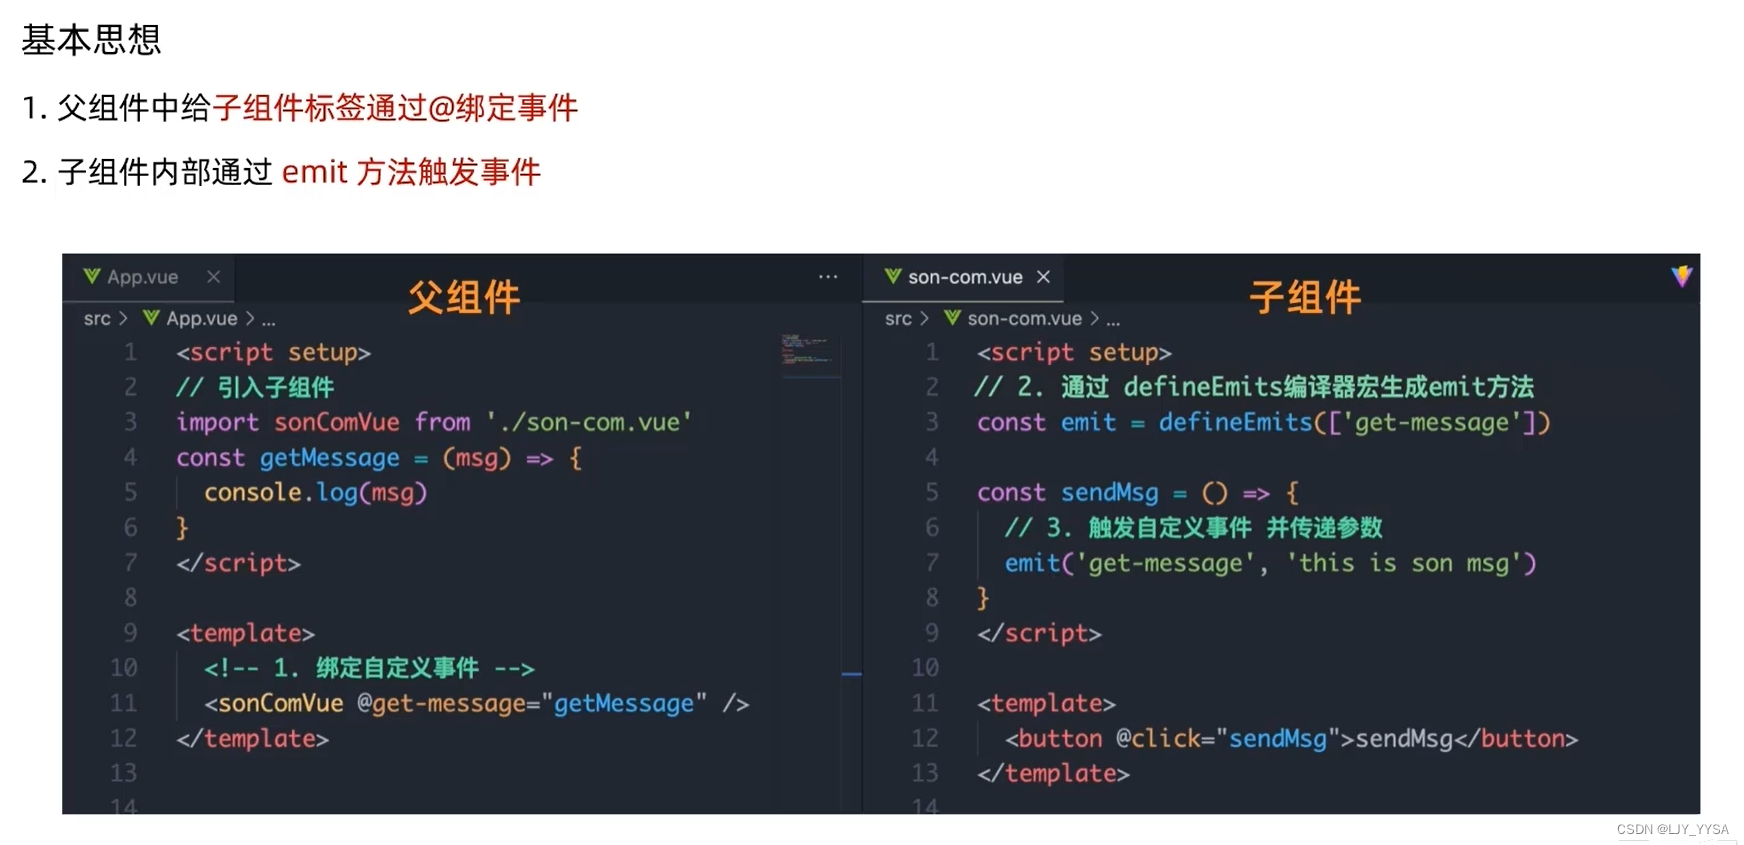
子传父:
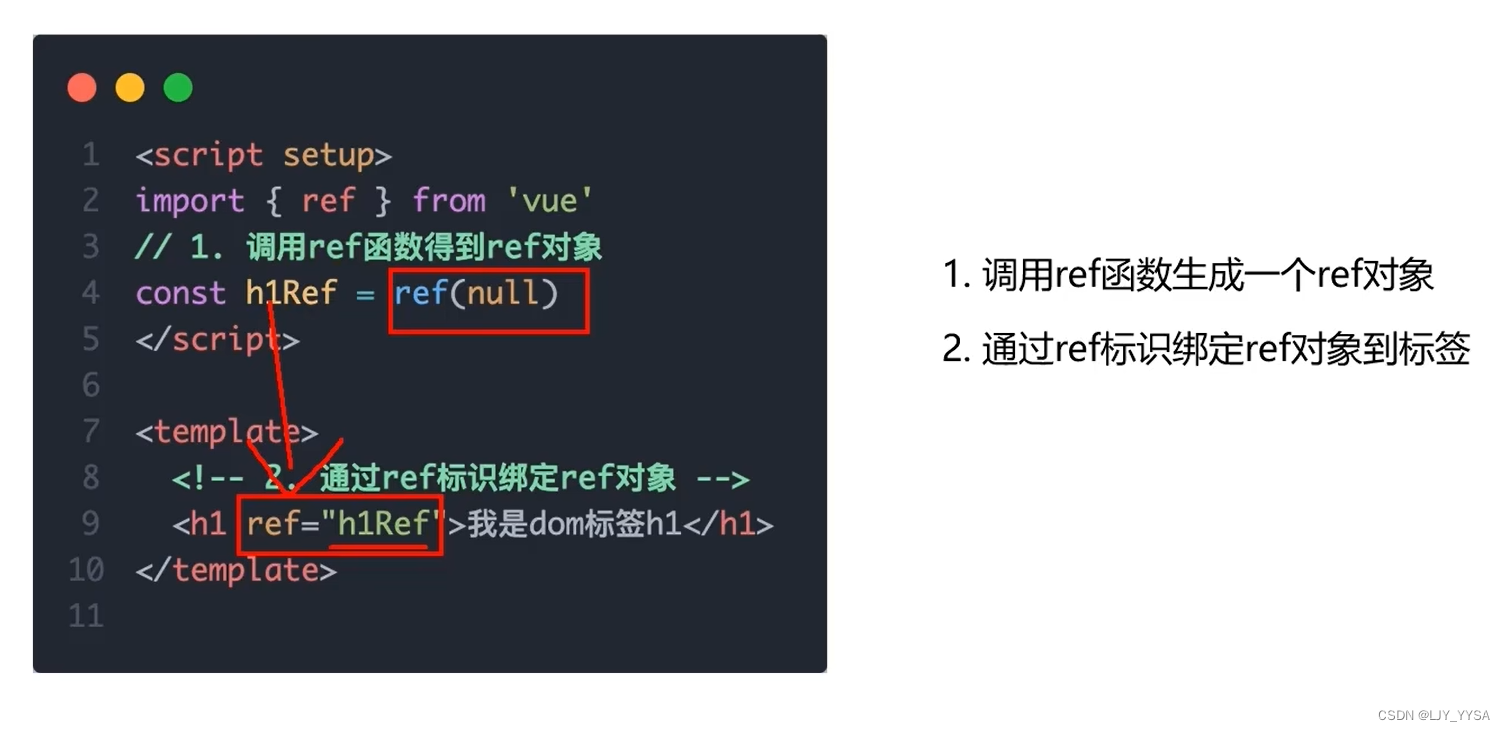
组合式API - 模版引用和defineExpose宏函数
模版引用
通过ref标识获取真实的dom对象或者组件实例对象
获取模版引用的时机是:组件挂载完毕
直接使用console.log(inp.value)返回的是null,
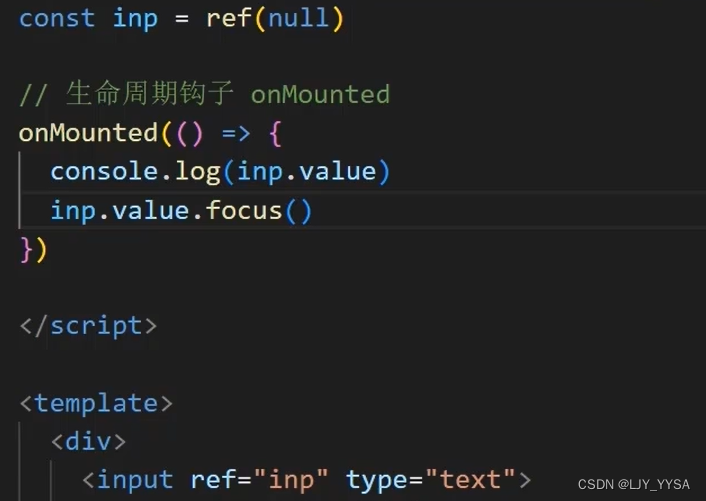
defineExpose宏函数
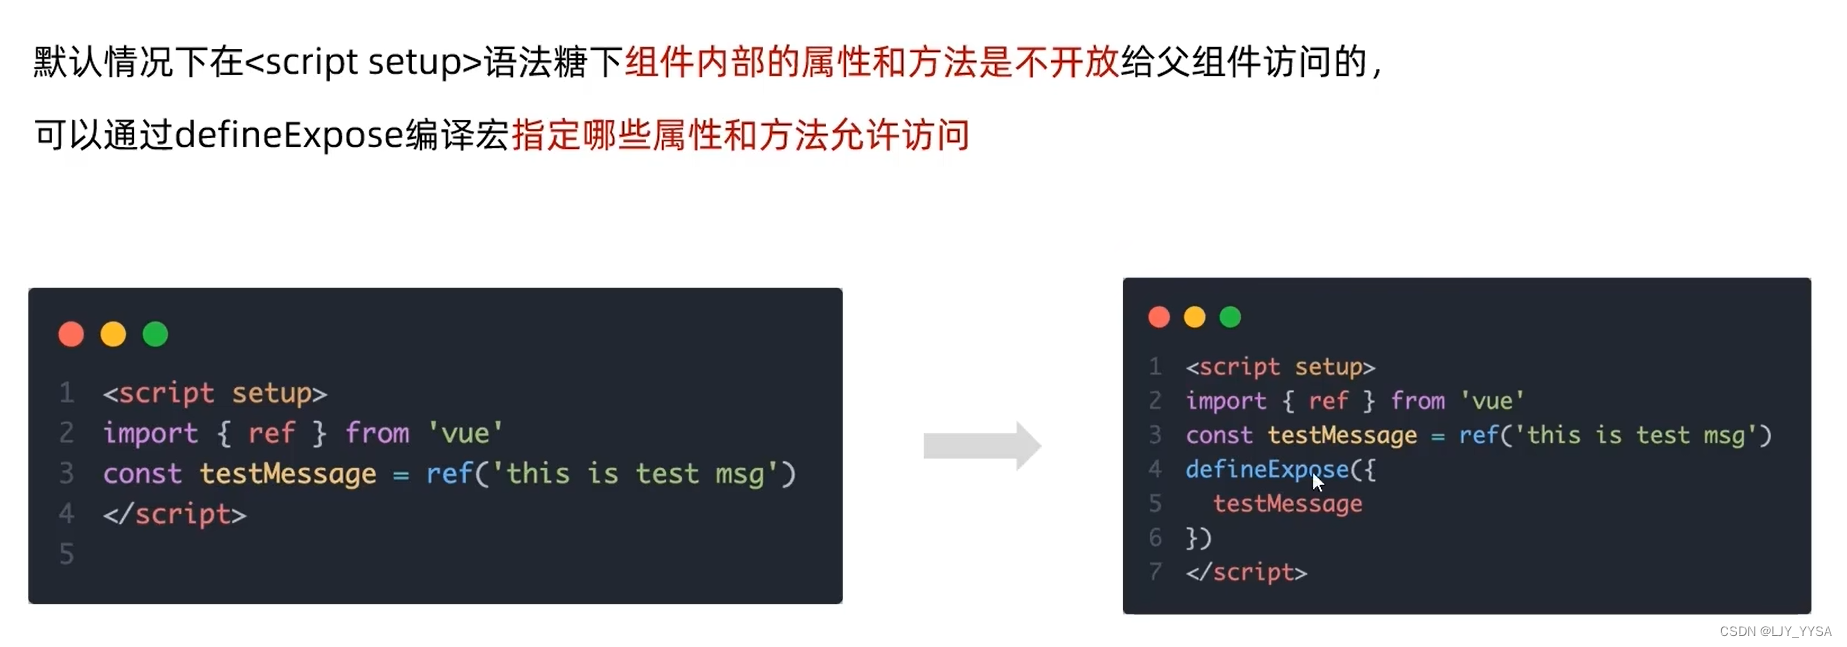
组合式API - provide和inject
作用和场景:顶层组件向任意的底层组件传递数据和方法,实现跨层组件通信
传递普通数据

传递响应式数据
const count = ref(100)
provide('count', count)
const count = inject('count')
跨层传递函数
给子孙后代传递可以修改数据的方法
provide('changeCount', (newCount) => {
	count.value = newCount
})
const changeCount = inject('changeCount')
//然后就可以使用changeCount函数了
Vue3.3新特性-defineOptions

Pinia
Pinia是Vue的最新状态管理工具,是Vuex的替代品
优势:
(1)提供更加简单的API(去掉了mutatian)
(2)提供符合组合式风格的API(和Vue3新语法统一)
(3)去掉了modules的概念,每一个store都是一个独立的模块
(4)配合TypeScript更加友好,提供可靠的类型推断
main.js中
import { createApp } from 'vue'
import { createPinia } from 'pinia'
import App from './App.vue'

createApp(App).use(createPinia).mount('#app')


 563
563


 被折叠的 条评论
为什么被折叠?
被折叠的 条评论
为什么被折叠?
 到【灌水乐园】发言


