


shiro介绍
什么是shiro
shiro是Apache的一个开源框架,它将软件系统的安全认证相关的功能抽取出来,实现用户身份认证,权限授权、加密、会话管理等功能,组成了一个通用的安全认证框架。它可以实现如下的功能:
1.验证用户
2.对用户执行访问控制,如:判断用户是否具有角色admin,判断用户是否拥有访问的资源权限。
3.在任何环境下使用SessionAPI。例如C/S程序
4.可以使用多个用户数据源。例如一个是Oracle数据库,另外一个是MySQL数据库。
5.单点登录(SSO)功能
6."Remember Me"服务,类似于购物车的功能,shiro官方建议开启。
为何使用shiro
因为shiro将安全认证相关的功能抽取出来组成了一个框架,因此使用shiro就可以非常快速的完成认证、授权等功能的开发,降低系统成本。
shiro使用广泛,shiro可以运行在web应用,非web应用,集群分布式应用中越来越多的用户开始使用shiro.
Spring中有Spring security(原名Acegi), 是一个权限框架,它和Spring的依赖过于紧密,没有shiro使用简单。shiro不依赖于Spring,而shiro就相对独立最主要是因为shiro使用简单‘灵活,所以现在越来越多的用户选择shiro。
shiro核心组成部分
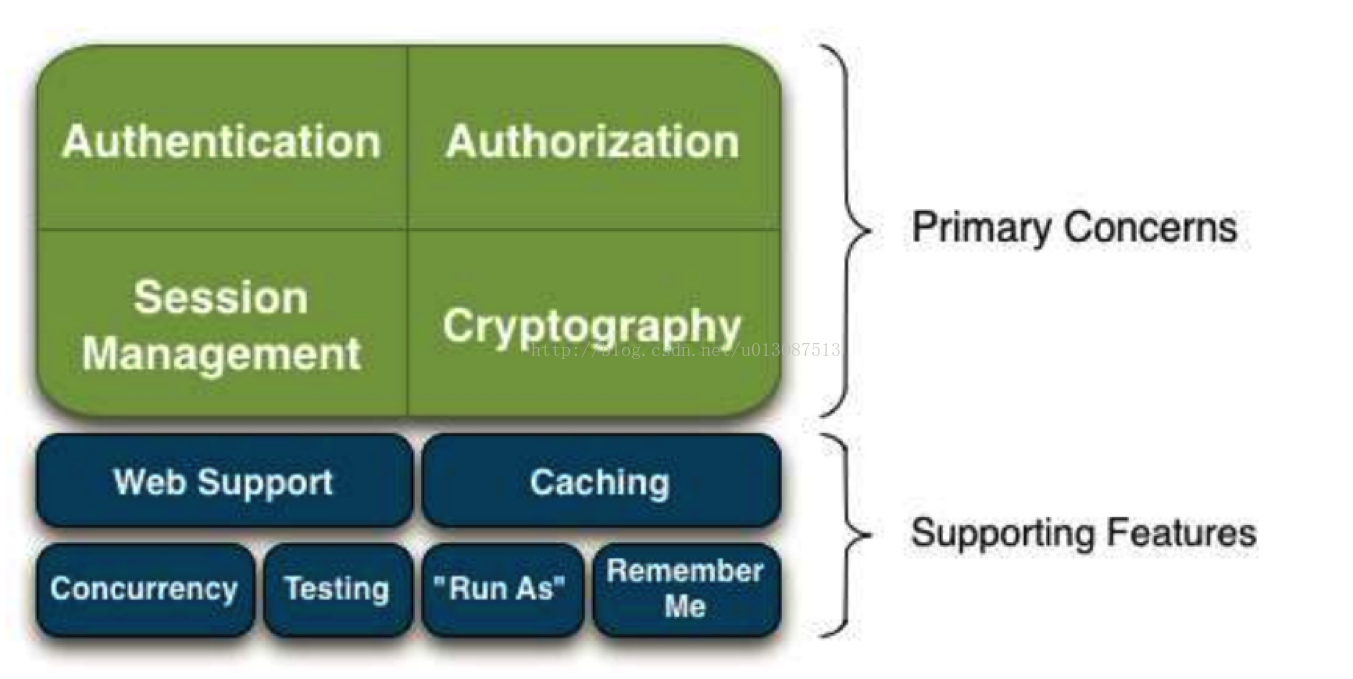
shiro的4大组成部分——身份认证,授权,会话管理和加密
Authentication:身份验证(身份认证),简称"登录"。
Authorization:授权,给用户给用户分配角色或者权限资源。
Session Manager:用户Session管理器,可以让C/S程序也使用Session来控制权限。
Cryptography:将JDK中复杂的密码加密方式进行封装。
除了以上功能,shiro还提供很多扩展功能:
Web Support:主要针对web应用提供一些常用功能。
Caching:缓存可以使程序运行更有效率。
Concurrency:多线程相关功能。
Testing:帮助我们进行测试相关的功能。
“Run As”:一个允许用户假设为另一个用户身份(如果允许)的功能,有时候在管理脚本时很有用。
“Remember Me”:记住用户身份,提供类似购物车的功能。
shiro运行大致流程:
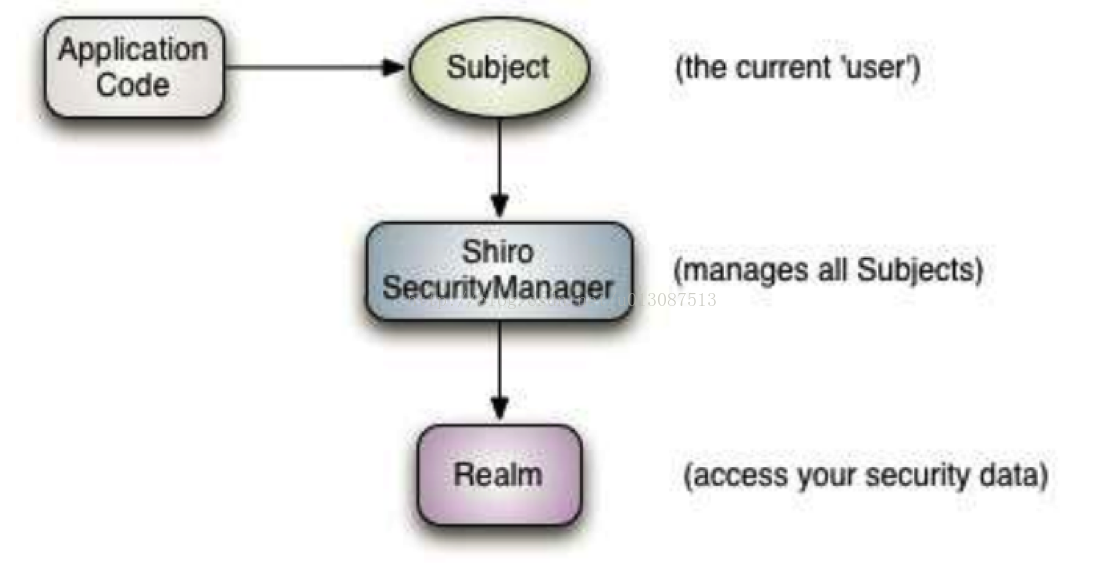
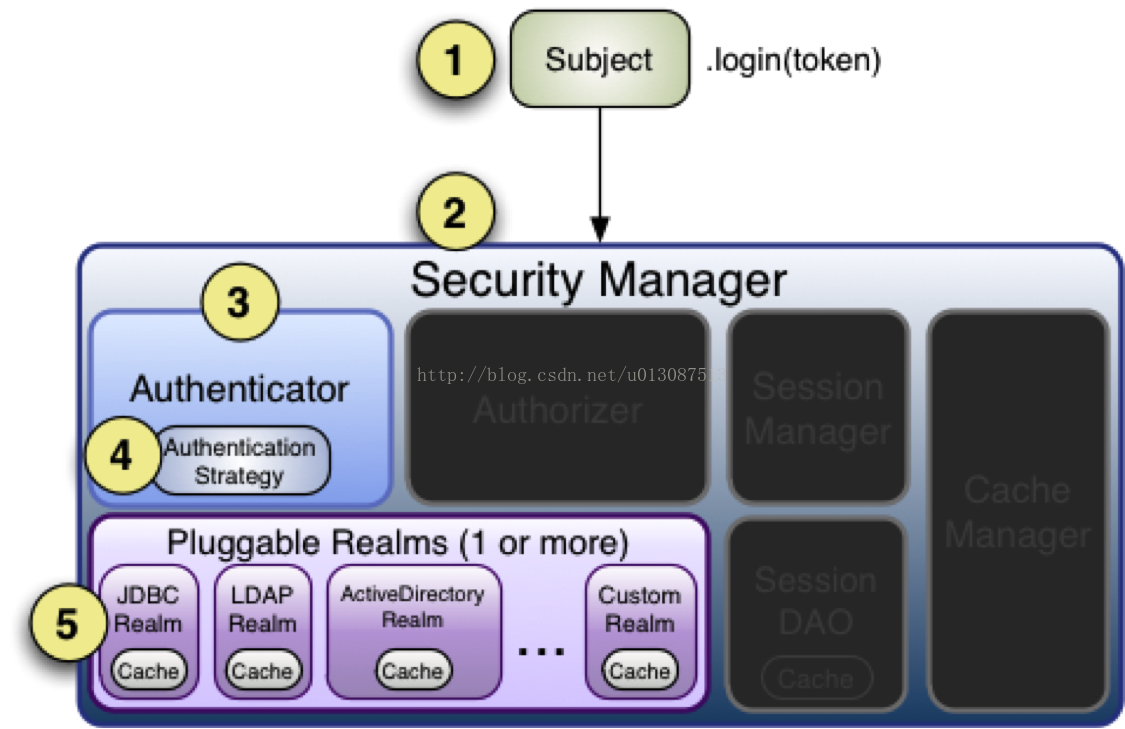
Subject——主体,是与程序进行交互的对象,可以是人也可以是服务或其他程序,通常理解为用户。所有的Subject实例都必须绑定到一个SecurityManager上。我们与Subject交互,运行时shiro会自动转化为与SecurityManager交互的特定的subject的交互。
SecurityManager——SecurityManager是shiro的核心,初始化时协调各个模块运行。然而,一旦SecurityManager协调完毕,SecurityManager会被单独留下,且我们只需要去操作Subject即可,无需操作SecurityManager。但是需要了解的是当我们与一个Subject进行交互时,实质上是SecurityManager在处理Subject的安全操作。
Realms——Realms在shiro中作为程序和安全数据之间的"桥梁"或"连接器"。它用于获取安全数据来判断subject是否能够登录,subject拥有什么权限。有点类似于DAO。在配置realms时,需要至少一个realm。而且shiro提供了一些常用的Realms来连接数据源,如LDAP数据源的JndiLdapRealm,JDBC数据源的JdbcRealm,ini文件数据源的iniRealm,Properties文件数据源的PropertiesRealm,等等,我们也可以插入自己的Realm实现来代表自定义的数据源。像其他组件一样,Realms也是由SecurityManager控制。
shiro架构
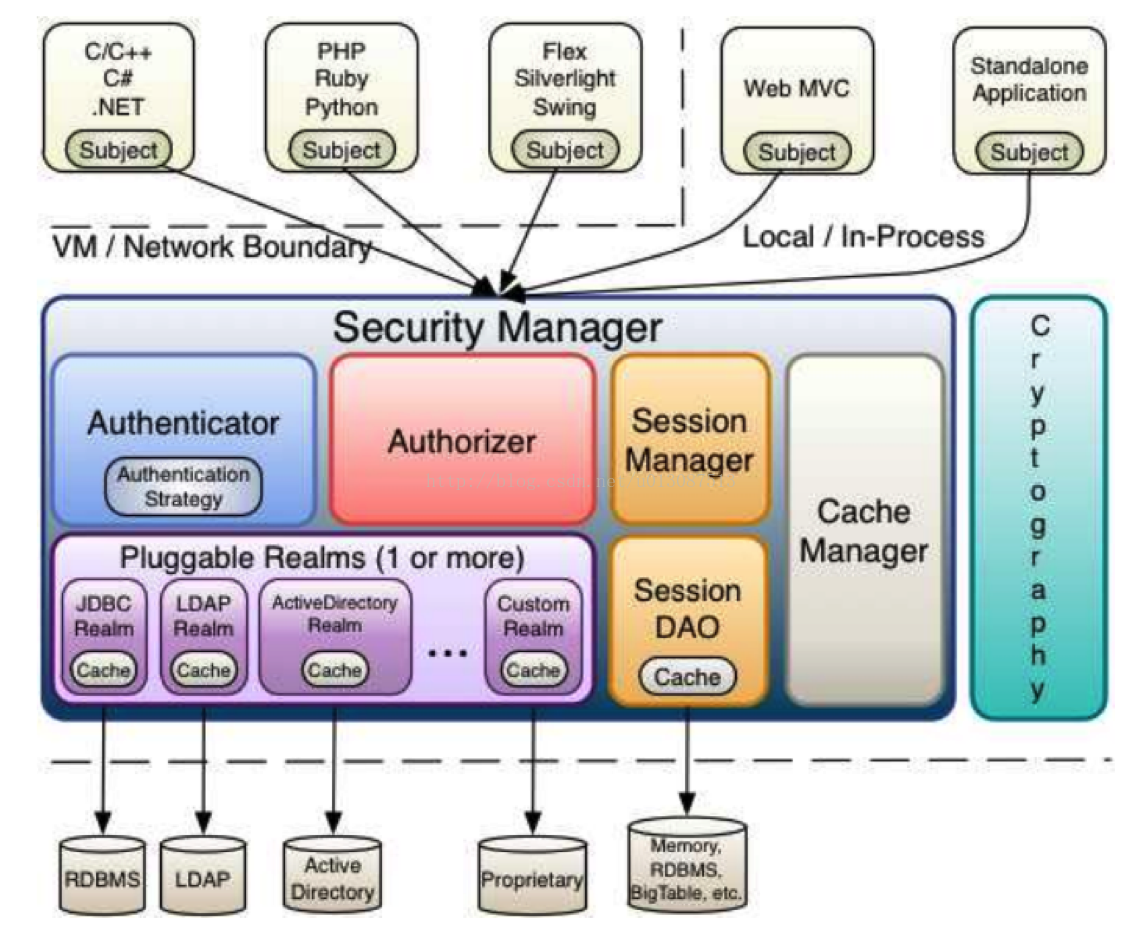
Subject:(org.apache.shiro.subject.Subject) 即主体,简称用户,主体既可以是用户也可以是程序,主体访问系统,系统需要对主体进行认证、授权。 外部应用与subject进行交互,Subject记录了当前操作用户,将用户的概念理解为当前操作的主体,可能是一个通过浏览器请求的用户,也可能是一个运行的程序。 Subject在shiro中是一个接口,接口中定义了很多认证授权相关的方法,外部程序通过subject进行认证授权,而Subject是通过SecurityManager安全管理器进行认证授权。
SecurityManager:(org.apache.shiro.mgt.SecurityManager)如上所述,SecurityManager是shiro的核心,协调shiro的各个组件。SecurityManager就是安全管理器,负责对全部的subject进行安全管理。通过SecurityManager可以完成Subject的认证、授权等,实质上SecurityManager是通过Authenticator对主体进行认证,通过Authorizer对主体进行授权,通过SessionManager进行会话管理等等。SecurityManager是一个接口,继承了Authenticator,Authorizer,SessionManager这三个接口。
Authenticator:(org.apache.shiro.authc.Authenticator) 即认证器,对用户身份进行认证,Authenticator是一个接口,shiro提供ModularRealmAuthenticator实现类,通过ModularRealmAuthenticator基本上可以满足大多数需求,也可以自定义认证器。
Authorizer:(org.apache.shiro.authz.Authorizer)即授权器,用户在通过认证器认证通过后,在访问时需要通过授权器判断用户是否有此功能的操作权限。最终是通过认证器对主体进行授权的。
Realm:(org.apache.shiro.realm.Realm)Realm即领域,相当于DataSource数据源,通过Realm存取认证、授权相关数据。SecurityManager通过认证器对主体进行安全认证需要通过Realm获取用户身份数据,比如:如果用户身份数据在数据库,那么Realm就需要从数据库获取用户的身份信息。授权也是如此,也需要通过Realm取出授权相关信息。注意:不要将Realm理解成只是从数据源获取数据,在Realm中还有认证授权校验的相关代码
SessionManager:(org.apache.shiro.session.SessionManager)会话管理。web应用中一般是web容器对Session进行管理,shiro框架定义了一套会话管理,它不依赖于web容器的Session,所以shiro可以使用在非web应用上,也可以将分布式应用的会话集中在一点进行管理,此特性可使它实现单点登录。
SessionDAO:SessionDAO即会话dao,是对Session会话操作的一套接口,比如要将Session存储到数据库,可以通过JDBC将会话存储到数据库。针对个性化的Session数据存储(存到数据库)需要使用SessionDAO。
CacheManager:(org.apahce.shiro.cache.CacheManager)缓存管理器,主要对Session和授权数据进行缓存,比如将授权数据通过cachemanager进行缓存管理,和ehcache整合对缓存数据进行管理,可以减少不必要的后台访问,提高应用效率,增加用户体验。
Cryptography:(org.apache.shiro.crypto.*)密码管理,提供了一套加密/解密组件,对JDK中的加密解密算法进行了封装,方便开发。比如提供常用的散列、加/解密等功能,比如MD5散列算法。
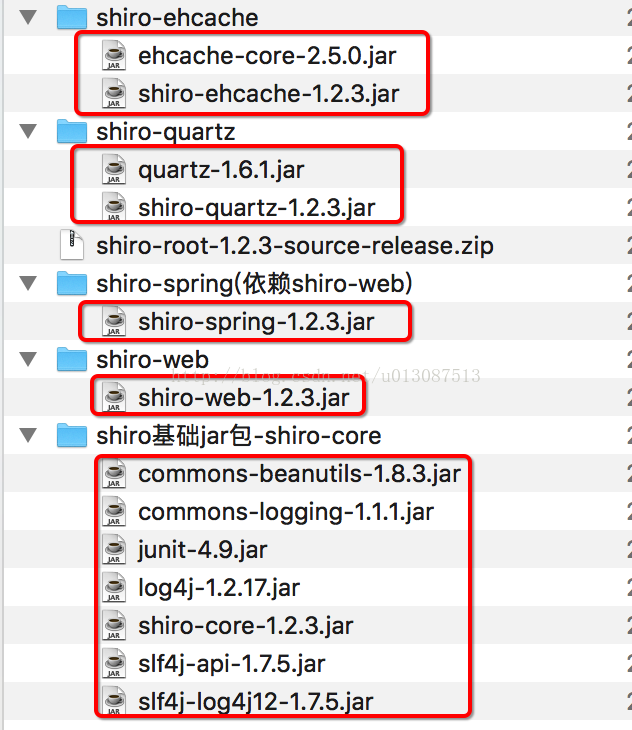
shiro相关jar
与其他Java开源框架类似,将shiro的jar包加入项目就可以使用shiro提供的功能了。shiro-core时核心包必须选用,还提供了与web整合的shiro-web、与Spring整合的shiro-spring、与任务调度quartz整合的shiro-quartz、与ehcache整合的shiro-ehcache。下边是shiro各个jar包的Maven坐标。
<dependency>
	<groupId>org.apache.shiro</groupId>
	<artifactId>shiro-core</artifactId>
	<version>1.2.3</version>
</dependency>
<dependency>
	<groupId>org.apache.shiro</groupId>
	<artifactId>shiro-web</artifactId>
	<version>1.2.3</version>
</dependency>
<dependency>
	<groupId>org.apache.shiro</groupId>
	<artifactId>shiro-spring</artifactId>
	<version>1.2.3</version>
</dependency>
<dependency>
	<groupId>org.apache.shiro</groupId>
	<artifactId>shiro-ehcache</artifactId>
	<version>1.2.3</version>
</dependency>
<dependency>
	<groupId>org.apache.shiro</groupId>
	<artifactId>shiro-quartz</artifactId>
	<version>1.2.3</version>
</dependency>
也可以通过引入shiro-all包括shiro所有的包
<dependency>
	<groupId>org.apache.shiro</groupId>
	<artifactId>shiro-all</artifactId>
	<version>1.2.3</version>
</dependency>
相关jar包如下所示:
shiro认证
shiro认证过程
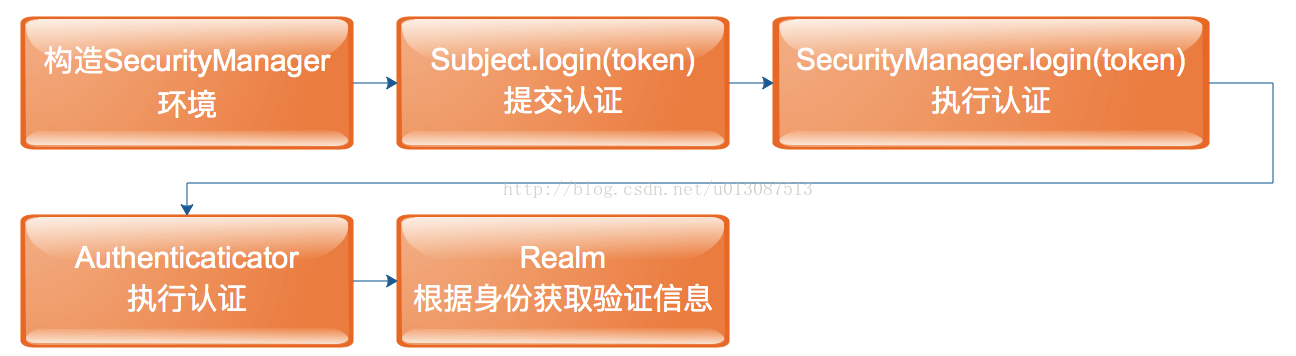
1.应用程序构建了一个终端用户认证信息AuthenticationToken实例后,调用Subject.login方法。
2.Subject的实例通常是DelegatingSubject类(或子类)的实例对象,在认证开始时,会委托应用程序设置的SecurityManager实例调用securityManager.login(token)方法。
3.SecurityManager接受到token(令牌)信息后会委托内置的Authenticator的实例(通常是ModularRealmAuthenticator类的实例)调用authenticator.authenticate(token)。ModularRealmAuthenticator在认证过程中会对设置的一个或多个Realm实例进行适配,它实际上为shiro提供了一个可插拔的认证机制。
4.如果在应用程序中配置类多个Realm,ModularRealmAuthenticator会根据配置的AuthenticationStrategy(认证策略)来进行多Realm的认证过程。在Realm被调用后,AuthenticationStrategy将对每一个Realm的结果做出响应。注意:如果应用程序中仅配置了一个Realm,Realm将被直接调用而无需再配置认证策略。
5.判断每一个Realm是否支持提交的token,如果支持,Realm将调用getAuthenticationInfo(token);getAuthenticationInfo方法就是实际认证处理,我们通过覆盖Realm的doGetAuthenticationInfo方法来编写我们自定义的认证处理。
shiro的认证流程图如下:
shiro入门程序(用户登录和退出)
创建Java工程
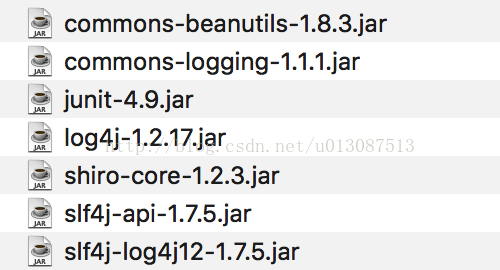
加入shiro-core的jar包以及依赖包
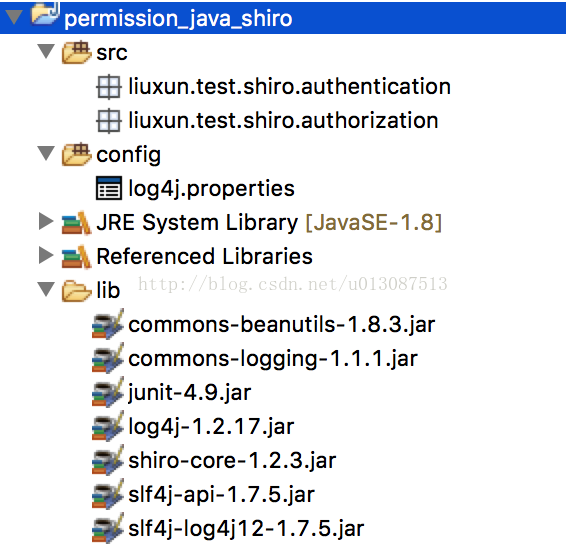
工程结构如下:
log4j.properties日志配置文件
log4j.rootLogger=debug, stdout

log4j.appender.stdout=org.apache.log4j.ConsoleAppender
log4j.appender.stdout.layout=org.apache.log4j.PatternLayout
log4j.appender.stdout.layout.ConversionPattern=%d %p [%c] - %m %n
shiro-first.ini
通过shiro-first.ini配置文件初始化SecurityManager环境,创建SecurityManager工厂。
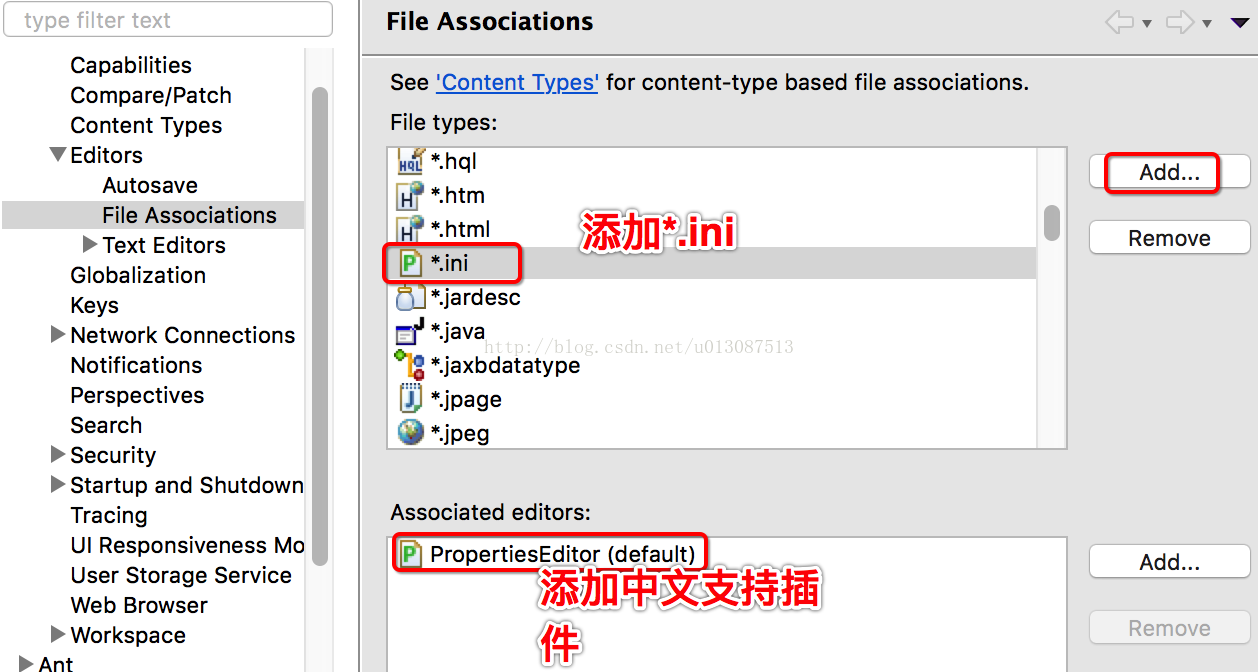
配置MyEclipse支持ini,添加中文支持插件Properties Editor 地址是 http://propedit.sourceforge.jp/eclipse/updates/
在MyEclipse配置后,在classpath创建shiro.ini配置文件,为了方便测试将用户名和密码配置在shiro-first.ini文件中
#对用户信息进行配置
[users]
#用户账号和密码
zhangsan=123456
lisi=654321
入门程序认证代码
// 用户登录和退出
@Test
public void testLoginAndLogout() {
// 创建SecurityManager工厂。通过ini配置文件创建securityManager
Factory<SecurityManager> factory = new IniSecurityManagerFactory("classpath:shiro-first.ini");
// 创建SecurityManager
SecurityManager securityManager = factory.getInstance();
// 将securityManager设置到当前的运行环境中
SecurityUtils.setSecurityManager(securityManager);
// 从SecurityUtils中创建一个subject
Subject subject = SecurityUtils.getSubject();
// 在认证提交前准备token(令牌)
// 这里的账号和密码 将来是由用户输入进去的
UsernamePasswordToken token = new UsernamePasswordToken("zhangsan", "123456");
//执行认证提交
try {
//执行认证提交
subject.login(token);
} catch (AuthenticationException e) {
e.printStackTrace();
}
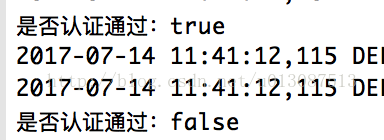
// 是否认证通过
boolean isAuthenticated = subject.isAuthenticated();
System.out.println("是否认证通过:"+isAuthenticated);
//退出操作
subject.logout();
// 是否认证通过
isAuthenticated = subject.isAuthenticated();
System.out.println("是否认证通过:"+isAuthenticated);
}
认证执行流程
1.通过ini配置文件创建SecurityManager
2.创建token令牌,token中有用户提交的认证信息即用户名和密码
3.执行subject.login(token)方法提交认证,最终由securityManager通过Authenticator进行认证
4.Authenticator的实现ModularRealmAuthenticator调用realm从ini配置文件取出用户真实的账号和密码,这里使用的是iniRealm(shiro自带)
5.initRealm先根据先根据token中的账号去ini中查找账号,如果查找不到则给ModularRealmAuthenticator返回null,如果查到用户信息,就给ModularRealmAuthenticator返回用户信息(账号和密码)
6.ModularRealmAuthenticator接收IniRealm返回Authentication认证信息,如果返回的认证信息是null,ModularRealmAuthenticator抛出异常(org.apache.shiro.authc.UnknownAccountException)如果返回的认证信息不是null(说明inirealm找到了用户),对IniRealm返回用户密码 (在ini文件中存在)和 token中的密码 进行对比,如果不一致抛出异常(org.apache.shiro.authc.IncorrectCredentialsException)
常见的认证异常
UnknownAccountException
账号不存在异常如下:org.apache.shiro.authc.UnknownAccountException: No account found for user…
IncorrectCredentialsException
当输入密码错误会抛此异常,如下:org.apache.shiro.authc.IncorrectCredentialsException: Submitted credentials for token [org.apache.shiro.authc.UsernamePasswordToken - zhangsan, rememberMe=false] did not match the expected credentials.
更多如下:
DisabledAccountException(帐号被禁用)
LockedAccountException(帐号被锁定)
ExcessiveAttemptsException(登录失败次数过多)
ExpiredCredentialsException(凭证过期)等
小结
ModularRealmAuthenticator作用进行认证,需要调用realm查询用户信息(在数据库中存在用户信息)
ModularRealmAuthenticator进行密码对比(认证过程)。
realm:需要根据token中的身份信息去查询数据库(入门程序使用ini配置文件),如果查到用户返回认证信息,如果查询不到返回null。
自定义Realm
上边的程序中使用的是Shiro自带的iniRealm。iniRealm从配置文件中读取用户的信息,大部分情况下需要从系统的数据库中读取用户信息,所以需要自定义Realm。
shiro中提供的Realm接口的实现
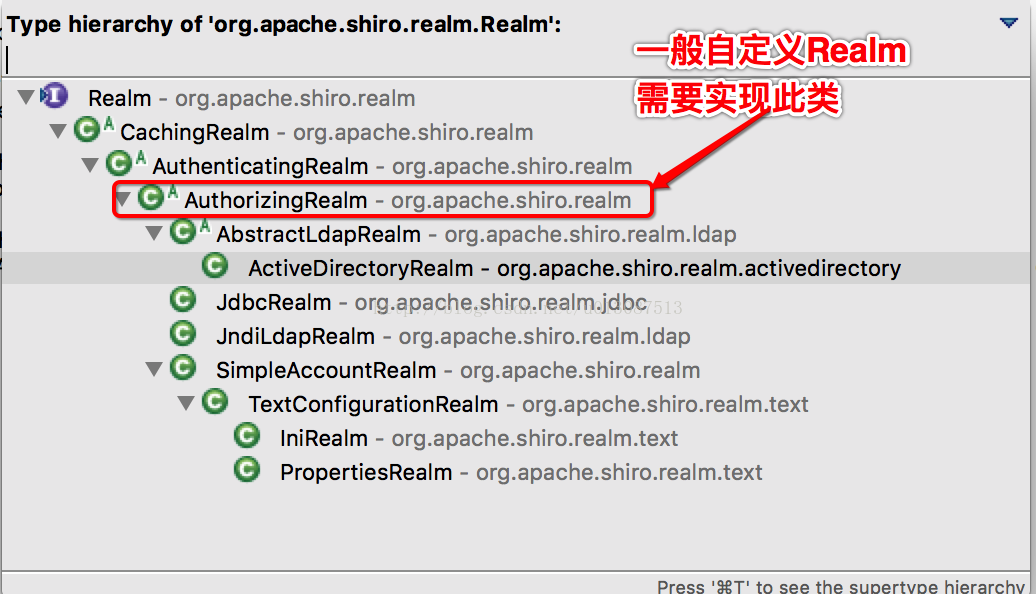
实现自定义Realm
public class CustomRealm extends AuthorizingRealm {
	// 设置Realm的名称
	@Override
	public String getName() {
		return super.getName();
	}

	// 支持UsernamePasswordToken
	@Override
	public boolean supports(AuthenticationToken token) {
		return token instanceof UsernamePasswordToken;
	}

	// 用于认证
	@Override
	protected AuthenticationInfo doGetAuthenticationInfo(AuthenticationToken token) throws AuthenticationException {

		// token是用户输入的
		// 第一步从token中取出身份信息
		String usercode = (String) token.getPrincipal();

		// 第二步:根据用户输入的usercode从数据库查询
		// ......

		// 如果查询不到返回null
		// 数据库中用户账号是zhangsan
		if (!usercode.equals("zhangsan")) {
			return null;
		}

		// 模拟从数据库中查询到密码
		String password = "123456";

		// 如果查询到返回认证信息AuthenticationInfo
		SimpleAuthenticationInfo simpleAuthenticationInfo = new SimpleAuthenticationInfo(usercode, password,
				this.getName());

		return simpleAuthenticationInfo;
	}

	// 用于授权
	@Override
	protected AuthorizationInfo doGetAuthorizationInfo(PrincipalCollection principals) {

		return null;
	}
}
shiro-realm.ini
需要在shiro-realm.ini配置realm注入到securityManager
[main]
#自定义realm
customRealm=liuxun.test.shiro.realm.CustomRealm
#将realm设置到SecurityManager,相当于Spring中的注入
securityManager.realms=$customRealm
测试代码
测试代码同入门程序,将ini的地址修改为shiro-realm.ini
分别模拟账号不存在、密码错误、账号和密码正确进行测试
散列算法
散列算法一般用于生成一段文本的摘要信息,散列算法不可逆,将内容可以生成摘要,无法将摘要转成原始内容。散列算法常用于对密码进行散列,常用的散列算法有MD5、SHA。
一般散列算法需要提供一个salt(盐)与原始内容生成摘要信息,这样做的目的是为了安全性,比如:111111的md5值是:96e79218965eb72c92a549dd5a330112,拿着“96e79218965eb72c92a549dd5a330112”去md5破解网站很容易进行破解,如果要是对111111和salt(盐,一个随机数)进行散列,这样虽然密码都是111111加不同的盐会生成不同的散列值。
md5散列测试程序
package liuxun.test.shiro.authentication;

import org.apache.shiro.crypto.hash.Md5Hash;
import org.apache.shiro.crypto.hash.SimpleHash;

public class MD5Test {
	public static void main(String[] args) {
		//原始密码
		String source = "123456";
		//盐
		String salt = "qwerty";
		//散列次数
		int hashIterations = 2;
		//上边散列1次:48474f975022f960bc2afbe49be581e8
		//上边散列2次:13f79dafcbbedc313273e2b891ac84d3

		//构造方法中:
		//第一个参数:明文,原始密码
		//第二个参数:盐,通过使用随机字符串
		//第三个参数:散列的次数,比如散列两次,相当于md5(md5(''))
		Md5Hash md5Hash = new Md5Hash(source, salt, hashIterations);

		String password_md5 = md5Hash.toString();
		System.out.println(password_md5);

		//使用后SimpleHash
		//第一个参数:散列算法
		SimpleHash simpleHash = new SimpleHash("md5", source, salt, hashIterations);
		System.out.println(simpleHash.toString());
	}
}
建议对MD5进行散列时加salt(盐),相当于对原始密码+盐进行散列
正常使用时散列算法:
在程序中对"原始密码+盐"进行散列,将散列值存储到数据库中,并且还要将盐存储在数据库中,如果进行密码比对时,使用相同方法,将原始密码+盐进行散列,进行比对。
自定义Realm支持散列算法
实际应用中是将盐和散列后的值存在数据库中,自动Realm从数据库中取出盐和加密后的值,由shiro完成密码校验。
新建Realm(CustomRealmMd5)
// 用于认证
	@Override
	protected AuthenticationInfo doGetAuthenticationInfo(AuthenticationToken token) throws AuthenticationException {

		// token保存了用户输入的身份信息userName和password
		// 第一步:从token中取出身份信息
		String userCode = (String) token.getPrincipal();

		// 第二步:根据用户输入的userCode从数据库查询
		// ....
		// 如果查询不到返回null 假设用户输入的账号是zhansgan
		// 模拟从数据库中查询账号是zhangsan的用户
		if (!userCode.equals("zhangsan")) {
			return null;
		}

		// 模拟从数据库中查询到密码(散列值)
		// 按照固定规则加密的结果,此密码是在数据库中存储的,原始密码是123456 盐是qwerty
		String password = "48474f975022f960bc2afbe49be581e8";
		// 盐,随机字符串,此随机字符串也是在数据库中存储的,模拟从数据库中获取
		String salt = "qwerty";

		// 如果查询到则返回认证信息AuthenticationInfo
		SimpleAuthenticationInfo simpleAuthenticationInfo = new SimpleAuthenticationInfo(userCode, password,
				ByteSource.Util.bytes(salt), this.getName());

		return simpleAuthenticationInfo;
	}
配置散列Realm
在classpath下配置shiro-realm-md5.ini
[main]
#定义凭证匹配器
credentialsMatcher=org.apache.shiro.authc.credential.HashedCredentialsMatcher
#散列算法
credentialsMatcher.hashAlgorithmName=md5
#散列次数
credentialsMatcher.hashIterations=1

#将凭证匹配器设置到Realm
customRealm=liuxun.test.shiro.realm.CustomRealmMd5
customRealm.credentialsMatcher=$credentialsMatcher
#将Realm设置到securityManager
securityManager.realms=$customRealm
测试代码同上,修改ini文件路径即可
shiro授权
授权有三个核心元素:权限、角色和用户。
shiro权限声明通常是使用冒号分隔的表达式,权限表达式示例如下:
user:view 可查询用户数据
user:view,edit 可查询或编辑用户数据
user:*或user 可对用户数据进行所有操作
user:edit:123 可编辑id为123的用户数据。
Shiro支持两种角色模式:
1、传统角色:一个角色代表着一系列的操作,当需要对某一操作进行授权验证时,只需判断是否是该角色即可。这种角色权限相对简单、模糊,不利于扩展。
2、权限角色:一个角色拥有一个权限的集合。授权验证时,需要判断当前角色是否拥有该权限。这种角色权限可以对该角色进行详细的权限描述,适合更复杂的权限设计。
shiro内部授权处理机制

1.在应用程序中调用授权验证方法(Subject的isPermitted*或hasRole*等)
2.Subject的实例通常是DelegatingSubject(或子类)的实例对象,在认证开始时,会委托应用程序设置的securityManager实例调用相应的isPermitted*或hasRole*方法。
3.接下来SecurityManager会委托内置的Authorizer的实例(默认是ModularRealmAuthorizer类的实例,类似于认证实例,它同样支持一个或多个Realm实例认证)调用相应的授权方法。
4.每一个Realm将检查是否实现了相同的Authorizer接口。然后,将调用Realm自己相应的授权验证方法。
注意:
当使用多个Realm时,不同于认证策略处理方式,在授权处理过程中:
(1) 当调用Realm出现异常时,将立即抛出异常,结束授权验证。
(2) 只要有一个Realm验证成功,那么将认为授权成功,立即返回,结束认证。
Shiro有3中认证策略的具体实现:
(1) AtLeastOneSuccessfulStrategy 只要有一个(或更多)的Realm验证成功,那么认证将被视为成功 (2) FirstSuccessfulStrategy 第一个Realm验证成功,整体认证将被视为成功,且后续Realm将被忽略 (3) AllSuccessfulStrategy 所有Realm成功,认证才视为成功
shiro授权流程

shiro授权方式
shiro支持三种方式的授权:编程式、注解式、标签式
方式一:编程式,通过写if/else授权代码块完成
Subject subject = SecurityUtils.getSubject();
if(subject.hasRole(“admin”)){
//有权限
}else{
// 无权限
}
方式二:注解式,通过在执行的Java方法上放置相应的注解完成。
@RequiresRoles(“admin”)
public void hello(){
//有权限
}
方式三:JSP/GSP标签,页面通过相应的标签完成
<shiro:hasRole name=“admin”>
</shiro:hasole>
授权测试
shiro-permission.ini
创建存放权限的配置文件shiro-permission.ini 如下:
#用户
[users]
#用户zhang的密码是123,此用户具有role1和role2两个角色
zhang=123,role1,role2
wang=123,role2

#权限
[roles]
#角色role1对资源user拥有create、update权限
role1=user:create,user:update
#角色role2对资源user拥有create、delete权限
role2=user:create,user:delete
#role3对资源user拥有create权限
role3=user:create
在ini文件中用户、角色、权限的配置规则是:
" 用户名=密码,角色1,角色2 … "
“ 角色=权限1,权限2… ”
首先根据用户名查找角色,再根据角色查找权限,角色是权限的集合
权限字符串规则
权限字符串的规则是:“资源标识符:操作:资源实例标识符”,意思是对哪个资源的哪个实例具有什么操作,“:”是资源/操作/实例的分割符,权限字符串也可以使用*通配符。
例子:
用户创建权限:user:create,或user:create:*
用户修改实例001的权限:user:update:001
用户实例001的所有权限:user:*:001
权限测试代码
测试代码同认证代码,注意ini地址改为shiro-permission.ini,主要掌握其授权方法
注意:在用户认证通过后才能执行下边的授权
// 角色授权、资源授权测试
	@Test
	public void testAuthorization() {

		// 创建SecurityManager工厂
		Factory<SecurityManager> factory = new IniSecurityManagerFactory("classpath:shiro-permission.ini");

		// 创建SecurityManager
		SecurityManager securityManager = factory.getInstance();

		// 将SecurityManager设置到系统运行环境,和Spring整合后将SecurityManager配置在Spring容器中,一般单例管理
		SecurityUtils.setSecurityManager(securityManager);

		// 创建subject
		Subject subject = SecurityUtils.getSubject();

		// 创建token令牌
		UsernamePasswordToken token = new UsernamePasswordToken("zhangsan", "123");

		// 执行认证
		try {
			subject.login(token);
		} catch (AuthenticationException e) {
			e.printStackTrace();
		}

		System.out.println("认证状态:" + subject.isAuthenticated());

		// 认证通过后执行授权

		// 基于角色的授权
		// hasRole传入角色标识
		boolean ishasRole = subject.hasRole("role1");
		System.out.println("单个角色判断 " + ishasRole);
		// hasAllRoles 是否拥有多个角色
		boolean hasAllRoles = subject.hasAllRoles(Arrays.asList("role1", "role2", "role3"));
		System.out.println("多个角色判断 " + hasAllRoles);

		//使用check方法进行授权,如果授权不通过会抛出异常,用于断言
		subject.checkRole("role2");

		//基于资源的权限
		//isPermitted传入权限标识符
		boolean isPermitted = subject.isPermitted("user:create:1");
		System.out.println("单个权限判断 "+isPermitted);

		boolean isPermittedAll = subject.isPermittedAll("user:create:1","user:delete");
		System.out.println("多个权限判断 "+isPermittedAll);

		//使用check方法进行授权测试,如果授权不通过会抛出异常
		subject.checkPermission("item:delete");
	}
使用check方法测试授权失败会抛出异常:org.apache.shiro.authz.UnauthorizedException
自定义Realm授权
上边的程序通过shiro-permission.ini对权限信息进行静态配置,实际开发中从数据库中获取权限数据。就需要自定义Realm,由Realm从数据库查询权限数据。Realm根据用户身份信息查询权限数据,将权限数据返回给authorizer(授权器)
自定义Realm授权代码
在原来自定义的Realm类中完善doGetAuthorizationInfo方法,此方法需要完成以下功能:根据用户身份信息从数据库中查询权限字符串,由shiro进行授权。
// 用于授权
	@Override
	protected AuthorizationInfo doGetAuthorizationInfo(PrincipalCollection principals) {

		//从principals获取身份信息
		//将getPrimaryPrincipal方法返回值转为真实类型
		//(在上边的doGetAuthenticationInfo认证通过后填充到SimpleAuthenticationInfo中身份类型)
		String userCode = (String) principals.getPrimaryPrincipal();

		//根据身份信息从数据库中获取权限信息
		//模拟从数据库中取到的数据
		List<String>  permissions = new ArrayList<String>();
		permissions.add("user:create");//用户创建
		permissions.add("items:add");//商品添加权限
		//....

		//查询到权限数据,返回授权信息(要包括上边的permissions)
		SimpleAuthorizationInfo simpleAuthorizationInfo = new SimpleAuthorizationInfo();
		//将上边查询到的授权信息填充到simpleAuthorizationInfo对象中
		simpleAuthorizationInfo.addStringPermissions(permissions);

		return simpleAuthorizationInfo;
	}
shiro-realm.ini
ini配置文件还使用认证阶段用的,不用改变(即在shiro-realm.ini中配置自定义realm,将realm设置到securityManager)。注意:shiro-realm是配置自定义的Realm,是从数据库中获取权限数据,所以不需要再配置[roles]了。
[main]
#自定义realm
customRealm=liuxun.test.shiro.realm.CustomRealm
#将realm设置到SecurityManager,相当于Spring中的注入
securityManager.realms=$customRealm
测试代码
同上边的授权测试代码,注意ini地址为shiro-realm.ini
授权执行流程总结
1.对subject进行授权,调用isPermitted(“permission串”)
2.SecurityManager执行授权,通过ModularRealmAuthorizer执行授权
3.ModularRealmAuthorizer执行realm(自定义的CustomRealm)从数据库查询权限数据(调用realm的授权方法doGetAuthorizationInfo)
4.realm从数据库查询权限数据,返回给ModularRealmAuthorizer
5.ModularRealmAuthorizer调用PermissionResolver进行权限串比对
6.如果比对后,isPermitted中"permission串" 在realm查询到的权限数据中,说明用户访问permission串有权限,否则没有权限,抛出异常。
shiro认证和授权入门Demo
项目结构如下:
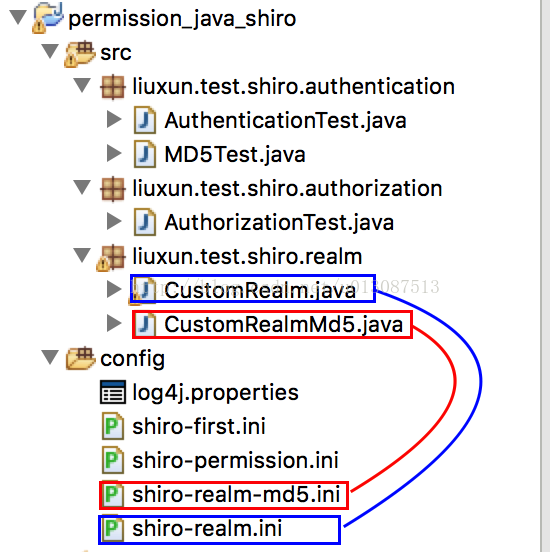
此Demo已经上传GitHub(https://github.com/LX1993728/permission_java_shiro)
其代码具体如下:
AuthenticationTest.java 测试认证
package liuxun.test.shiro.authentication;

import org.apache.shiro.SecurityUtils;
import org.apache.shiro.authc.AuthenticationException;
import org.apache.shiro.authc.UsernamePasswordToken;
import org.apache.shiro.config.IniSecurityManagerFactory;
import org.apache.shiro.mgt.SecurityManager;
import org.apache.shiro.subject.Subject;
import org.apache.shiro.util.Factory;
import org.junit.Test;

/**
 * 认证测试
 *
 * @author liuxun
 *
 */
public class AuthenticationTest {

	// 用户登录和退出
	@Test
	public void testLoginAndLogout() {

		// 创建SecurityManager工厂。通过ini配置文件创建securityManager
		Factory<SecurityManager> factory = new IniSecurityManagerFactory("classpath:shiro-first.ini");

		// 创建SecurityManager
		SecurityManager securityManager = factory.getInstance();

		// 将securityManager设置到当前的运行环境中
		SecurityUtils.setSecurityManager(securityManager);

		// 从SecurityUtils中创建一个subject
		Subject subject = SecurityUtils.getSubject();

		// 在认证提交前准备token(令牌)
		// 这里的账号和密码 将来是由用户输入进去的
		UsernamePasswordToken token = new UsernamePasswordToken("zhangsan", "123456");

		//执行认证提交
		try {
			//执行认证提交
			subject.login(token);
		} catch (AuthenticationException e) {
			e.printStackTrace();
		}

		// 是否认证通过
		boolean isAuthenticated = subject.isAuthenticated();
		System.out.println("是否认证通过:"+isAuthenticated);

		//退出操作
		subject.logout();

		// 是否认证通过
		isAuthenticated = subject.isAuthenticated();
		System.out.println("是否认证通过:"+isAuthenticated);
	}

	//自定义Realm
	@Test
	public void testCustomRealm() {

		// 创建SecurityManager工厂。通过ini配置文件创建securityManager
		Factory<SecurityManager> factory = new IniSecurityManagerFactory("classpath:shiro-realm.ini");

		// 创建SecurityManager
		SecurityManager securityManager = factory.getInstance();

		// 将securityManager设置到当前的运行环境中
		SecurityUtils.setSecurityManager(securityManager);

		// 从SecurityUtils中创建一个subject
		Subject subject = SecurityUtils.getSubject();

		// 在认证提交前准备token(令牌)
		// 这里的账号和密码 将来是由用户输入进去的
		UsernamePasswordToken token = new UsernamePasswordToken("zhangsan", "123456");

		//执行认证提交
		try {
			//执行认证提交
			subject.login(token);
		} catch (AuthenticationException e) {
			e.printStackTrace();
		}

		// 是否认证通过
		boolean isAuthenticated = subject.isAuthenticated();
		System.out.println("是否认证通过:"+isAuthenticated);

	}
	//自定义Realm实现散列值匹配
	@Test
	public void testCustomRealmMd5() {

		// 创建SecurityManager工厂。通过ini配置文件创建securityManager
		Factory<SecurityManager> factory = new IniSecurityManagerFactory("classpath:shiro-realm-md5.ini");

		// 创建SecurityManager
		SecurityManager securityManager = factory.getInstance();

		// 将securityManager设置到当前的运行环境中
		SecurityUtils.setSecurityManager(securityManager);

		// 从SecurityUtils中创建一个subject
		Subject subject = SecurityUtils.getSubject();

		// 在认证提交前准备token(令牌)
		// 这里的账号和密码 将来是由用户输入进去的
		UsernamePasswordToken token = new UsernamePasswordToken("zhangsan", "123456");

		//执行认证提交
		try {
			//执行认证提交
			subject.login(token);
		} catch (AuthenticationException e) {
			e.printStackTrace();
		}

		// 是否认证通过
		boolean isAuthenticated = subject.isAuthenticated();
		System.out.println("是否认证通过:"+isAuthenticated);

	}
}
MD5Test.java 测试shiro散列算法
package liuxun.test.shiro.authentication;

import org.apache.shiro.crypto.hash.Md5Hash;
import org.apache.shiro.crypto.hash.SimpleHash;

public class MD5Test {
	public static void main(String[] args) {
		//原始密码
		String source = "123456";
		//盐
		String salt = "qwerty";
		//散列次数
		int hashIterations = 2;
		//上边散列1次:48474f975022f960bc2afbe49be581e8
		//上边散列2次:13f79dafcbbedc313273e2b891ac84d3

		//构造方法中:
		//第一个参数:明文,原始密码
		//第二个参数:盐,通过使用随机字符串
		//第三个参数:散列的次数,比如散列两次,相当于md5(md5(''))
		Md5Hash md5Hash = new Md5Hash(source, salt, hashIterations);

		String password_md5 = md5Hash.toString();
		System.out.println(password_md5);

		//使用后SimpleHash
		//第一个参数:散列算法
		SimpleHash simpleHash = new SimpleHash("md5", source, salt, hashIterations);
		System.out.println(simpleHash.toString());
	}
}
AuthorizationTest 测试授权
package liuxun.test.shiro.authorization;

import java.util.Arrays;

import org.apache.shiro.SecurityUtils;
import org.apache.shiro.authc.AuthenticationException;
import org.apache.shiro.authc.UsernamePasswordToken;
import org.apache.shiro.config.IniSecurityManagerFactory;
import org.apache.shiro.mgt.SecurityManager;
import org.apache.shiro.subject.Subject;
import org.apache.shiro.util.Factory;
import org.junit.Test;

/**
 * 授权测试
 *
 * @author liuxun
 *
 */
public class AuthorizationTest {

	// 角色授权、资源授权测试
	@Test
	public void testAuthorization() {

		// 创建SecurityManager工厂
		Factory<SecurityManager> factory = new IniSecurityManagerFactory("classpath:shiro-permission.ini");

		// 创建SecurityManager
		SecurityManager securityManager = factory.getInstance();

		// 将SecurityManager设置到系统运行环境,和Spring整合后将SecurityManager配置在Spring容器中,一般单例管理
		SecurityUtils.setSecurityManager(securityManager);

		// 创建subject
		Subject subject = SecurityUtils.getSubject();

		// 创建token令牌
		UsernamePasswordToken token = new UsernamePasswordToken("zhangsan", "123");

		// 执行认证
		try {
			subject.login(token);
		} catch (AuthenticationException e) {
			e.printStackTrace();
		}

		System.out.println("认证状态:" + subject.isAuthenticated());

		// 认证通过后执行授权

		// 基于角色的授权
		// hasRole传入角色标识
		boolean ishasRole = subject.hasRole("role1");
		System.out.println("单个角色判断 " + ishasRole);
		// hasAllRoles 是否拥有多个角色
		boolean hasAllRoles = subject.hasAllRoles(Arrays.asList("role1", "role2", "role3"));
		System.out.println("多个角色判断 " + hasAllRoles);

		// 使用check方法进行授权,如果授权不通过会抛出异常,用于断言
		subject.checkRole("role2");

		// 基于资源的权限
		// isPermitted传入权限标识符
		boolean isPermitted = subject.isPermitted("user:create:1");
		System.out.println("单个权限判断 " + isPermitted);

		boolean isPermittedAll = subject.isPermittedAll("user:create:1", "user:delete");
		System.out.println("多个权限判断 " + isPermittedAll);

		// 使用check方法进行授权测试,如果授权不通过会抛出异常
		subject.checkPermission("item:delete");
	}

	// 自定义Realm进行资源授权测试
	@Test
	public void testAuthorizationCustomRealm() {

		// 创建SecurityManager工厂
		Factory<SecurityManager> factory = new IniSecurityManagerFactory("classpath:shiro-realm.ini");

		// 创建SecurityManager
		SecurityManager securityManager = factory.getInstance();

		// 将SecurityManager设置到系统运行环境,和Spring整合后将SecurityManager配置在Spring容器中,一般单例管理
		SecurityUtils.setSecurityManager(securityManager);

		// 创建subject
		Subject subject = SecurityUtils.getSubject();

		// 创建token令牌
		UsernamePasswordToken token = new UsernamePasswordToken("zhangsan", "123");

		// 执行认证
		try {
			subject.login(token);
		} catch (AuthenticationException e) {
			e.printStackTrace();
		}

		System.out.println("认证状态:" + subject.isAuthenticated());

		// 认证通过后执行授权

		// 基于资源的授权,调用isPermitted方法会调用CustomRealm从数据库中查询正确权限数据
		// isPermitted传入权限标识符,判断user:create:1是否在CustomRealm查询到的权限数据之内
		boolean isPermitted = subject.isPermitted("user:create:1");
		System.out.println("单个权限判断 " + isPermitted);

		boolean isPermittedAll = subject.isPermittedAll("user:create:1", "user:delete");
		System.out.println("多个权限判断 " + isPermittedAll);

		// 使用check方法进行授权测试,如果授权不通过会抛出异常
		subject.checkPermission("item:add:1");
	}

}
CustomRealm.java 自定义Realm
package liuxun.test.shiro.realm;

import java.util.ArrayList;
import java.util.List;

import org.apache.shiro.authc.AuthenticationException;
import org.apache.shiro.authc.AuthenticationInfo;
import org.apache.shiro.authc.AuthenticationToken;
import org.apache.shiro.authc.SimpleAuthenticationInfo;
import org.apache.shiro.authc.UsernamePasswordToken;
import org.apache.shiro.authz.AuthorizationInfo;
import org.apache.shiro.authz.SimpleAuthorizationInfo;
import org.apache.shiro.realm.AuthorizingRealm;
import org.apache.shiro.subject.PrincipalCollection;

public class CustomRealm extends AuthorizingRealm {
	// 设置Realm的名称
	@Override
	public String getName() {
		return "CustomRealm";
	}

	// 支持UsernamePasswordToken
	@Override
	public boolean supports(AuthenticationToken token) {
		return token instanceof UsernamePasswordToken;
	}

	// 用于认证
	@Override
	protected AuthenticationInfo doGetAuthenticationInfo(AuthenticationToken token) throws AuthenticationException {

		// token是用户输入的
		// 第一步从token中取出身份信息
		String usercode = (String) token.getPrincipal();

		// 第二步:根据用户输入的usercode从数据库查询
		// ......

		// 如果查询不到返回null
		// 数据库中用户账号是zhangsan
		if (!usercode.equals("zhangsan")) {
			return null;
		}

		// 模拟从数据库中查询到密码
		String password = "123456";

		// 如果查询到返回认证信息AuthenticationInfo
		SimpleAuthenticationInfo simpleAuthenticationInfo = new SimpleAuthenticationInfo(usercode, password,
				this.getName());

		return simpleAuthenticationInfo;
	}

	// 用于授权
	@Override
	protected AuthorizationInfo doGetAuthorizationInfo(PrincipalCollection principals) {

		//从principals获取身份信息
		//将getPrimaryPrincipal方法返回值转为真实类型
		//(在上边的doGetAuthenticationInfo认证通过后填充到SimpleAuthenticationInfo中身份类型)
		String userCode = (String) principals.getPrimaryPrincipal();

		//根据身份信息从数据库中获取权限信息
		//模拟从数据库中取到的数据
		List<String>  permissions = new ArrayList<String>();
		permissions.add("user:create");//用户创建
		permissions.add("items:add");//商品添加权限
		//....

		//查询到权限数据,返回授权信息(要包括上边的permissions)
		SimpleAuthorizationInfo simpleAuthorizationInfo = new SimpleAuthorizationInfo();
		//将上边查询到的授权信息填充到simpleAuthorizationInfo对象中
		simpleAuthorizationInfo.addStringPermissions(permissions);

		return simpleAuthorizationInfo;
	}
}
CustomRealmMd5.java 自定义Realm处理散列算法
package liuxun.test.shiro.realm;

import org.apache.shiro.authc.AuthenticationException;
import org.apache.shiro.authc.AuthenticationInfo;
import org.apache.shiro.authc.AuthenticationToken;
import org.apache.shiro.authc.SimpleAuthenticationInfo;
import org.apache.shiro.authc.UsernamePasswordToken;
import org.apache.shiro.authz.AuthorizationInfo;
import org.apache.shiro.realm.AuthorizingRealm;
import org.apache.shiro.subject.PrincipalCollection;
import org.apache.shiro.util.ByteSource;

public class CustomRealmMd5 extends AuthorizingRealm {
	// 设置Realm名称
	@Override
	public void setName(String name) {
		super.setName("CustomRealmMd5");
	}

	// 支持UsernamePasswordToken
	@Override
	public boolean supports(AuthenticationToken token) {
		return token instanceof UsernamePasswordToken;
	}

	// 用于认证
	@Override
	protected AuthenticationInfo doGetAuthenticationInfo(AuthenticationToken token) throws AuthenticationException {

		// token保存了用户输入的身份信息userName和password
		// 第一步:从token中取出身份信息
		String userCode = (String) token.getPrincipal();

		// 第二步:根据用户输入的userCode从数据库查询
		// ....
		// 如果查询不到返回null 假设用户输入的账号是zhansgan
		// 模拟从数据库中查询账号是zhangsan的用户
		if (!userCode.equals("zhangsan")) {
			return null;
		}

		// 模拟从数据库中查询到密码(散列值)
		// 按照固定规则加密的结果,此密码是在数据库中存储的,原始密码是123456 盐是qwerty
		String password = "48474f975022f960bc2afbe49be581e8";
		// 盐,随机字符串,此随机字符串也是在数据库中存储的,模拟从数据库中获取
		String salt = "qwerty";

		// 如果查询到则返回认证信息AuthenticationInfo
		SimpleAuthenticationInfo simpleAuthenticationInfo = new SimpleAuthenticationInfo(userCode, password,
				ByteSource.Util.bytes(salt), this.getName());

		return simpleAuthenticationInfo;
	}

	// 用于授权
	@Override
	protected AuthorizationInfo doGetAuthorizationInfo(PrincipalCollection principals) {
		return null;
	}

}
log4j.properties
log4j.rootLogger=debug, stdout

log4j.appender.stdout=org.apache.log4j.ConsoleAppender
log4j.appender.stdout.layout=org.apache.log4j.PatternLayout
log4j.appender.stdout.layout.ConversionPattern=%d %p [%c] - %m %n
shiro-first.ini 用于用户身份信息从配置文件中取
#对用户信息进行配置
[users]
#用户账号和密码
zhangsan=123456
lisi=654321
shiro-permission.ini 用于用户权限和身份信息从配置文件中取
#用户
[users]
#用户zhang的密码是123,此用户具有role1和role2两个角色
zhangsan=123,role1,role2
wang=123,role2

#权限
[roles]
#角色role1对资源user拥有create、update权限
role1=user:create,user:update
#角色role2对资源user拥有create、delete权限
role2=user:create,user:delete
#role3对资源user拥有create权限
role3=user:create
shiro-realm.ini 用于配置自定义Realm 从数据库中获取身份和权限以及角色信息
[main]
#自定义realm
customRealm=liuxun.test.shiro.realm.CustomRealm
#将realm设置到SecurityManager,相当于Spring中的注入
securityManager.realms=$customRealm
shiro-realm-md5.ini用于配置自定义Realm 从数据库中获取身份和权限以及角色信息 以及散列配置
[main]
#定义凭证匹配器
credentialsMatcher=org.apache.shiro.authc.credential.HashedCredentialsMatcher
#散列算法
credentialsMatcher.hashAlgorithmName=md5
#散列次数
credentialsMatcher.hashIterations=1

#将凭证匹配器设置到Realm
customRealm=liuxun.test.shiro.realm.CustomRealmMd5
customRealm.credentialsMatcher=$credentialsMatcher
#将Realm设置到securityManager
securityManager.realms=$customRealm


 280
280


 被折叠的 条评论
为什么被折叠?
被折叠的 条评论
为什么被折叠?
 到【灌水乐园】发言


