


在Kubernetes上部署Hadoop
思路:
- 基于Hadoop集群中所有节点使用一致的配置文件考虑,建立支持ReadWriteMany的PVC挂载到POD内用来存放Hadoop配置文件(一份配置文件在所有POD之间共享)。
- 使用StatefulSet部署,保证稳定的网络环境,各个POD启动时,首先根据网络环境动态修改配置文件内容。
- 启动Hadoop集群时,不使用nameNode上的start-all.sh脚本,该脚本依赖SSH,而是分别在各个节点上启动对应的进程,如此一来,**scale**就非常方便了。
1、环境介绍
[root@master-0 ~]# kubectl get nodes -o wide
NAME       STATUS    ROLES     AGE       VERSION           EXTERNAL-IP   OS-IMAGE                KERNEL-VERSION          CONTAINER-RUNTIME
master-0   Ready     master    13d       v1.9.2+coreos.0   <none>        CentOS Linux 7 (Core)   3.10.0-862.el7.x86_64   docker://1.13.1
worker-0   Ready     <none>    13d       v1.9.2+coreos.0   <none>        CentOS Linux 7 (Core)   3.10.0-862.el7.x86_64   docker://1.13.1
worker-1   Ready     <none>    13d       v1.9.2+coreos.0   <none>        CentOS Linux 7 (Core)   3.10.0-862.el7.x86_64   docker://1.13.1
2、构建镜像
Hadoop并没有官方镜像文件,需要自行创建或者使用社区版镜像,这里我创建自己的Hadoop镜像文件,基于Centos 7.5和Hadoop 2.9.1构建:
FROM 192.168.101.88:5000/base/centos:7.5.1804
MAINTAINER leichen.china@gmail.com

ADD CentOS-Base.repo /etc/yum.repos.d
ADD jdk-7u80-linux-x64.tar.gz /opt
ADD hadoop-2.9.1.tar.gz /opt

RUN yum install -y which

ENV JAVA_HOME /opt/jdk1.7.0_80
ENV HADOOP_HOME /opt/hadoop-2.9.1
ENV PATH $JAVA_HOME/bin:$PATH
脚本:docker build -t 192.168.101.88:5000/dmcop2/hadoop:dm-2.9.1 .
说明:这里添加的CentOS-Base.repo文件为阿里的YUM源,目前自带的源因为YUM服务器已经改为HTTPS无法使用:
[root@master-0 build]# cat CentOS-Base.repo

# CentOS-Base.repo

#

# The mirror system uses the connecting IP address of the client and the


# update status of each mirror to pick mirrors that are updated to and


# geographically close to the client.  You should use this for CentOS updates


# unless you are manually picking other mirrors.

#

# If the mirrorlist= does not work for you, as a fall back you can try the


# remarked out baseurl= line instead.

#
#

[base]
name=CentOS-$releasever - Base - mirrors.aliyun.com
failovermethod=priority
baseurl=https://mirrors.aliyun.com/centos/$releasever/os/$basearch/
        https://mirrors.aliyuncs.com/centos/$releasever/os/$basearch/
        https://mirrors.cloud.aliyuncs.com/centos/$releasever/os/$basearch/
gpgcheck=1
gpgkey=http://mirrors.aliyun.com/centos/RPM-GPG-KEY-CentOS-7


#released updates

[updates]
name=CentOS-$releasever - Updates - mirrors.aliyun.com
failovermethod=priority
baseurl=https://mirrors.aliyun.com/centos/$releasever/updates/$basearch/
        https://mirrors.aliyuncs.com/centos/$releasever/updates/$basearch/
        https://mirrors.cloud.aliyuncs.com/centos/$releasever/updates/$basearch/
gpgcheck=1
gpgkey=http://mirrors.aliyun.com/centos/RPM-GPG-KEY-CentOS-7


#additional packages that may be useful

[extras]
name=CentOS-$releasever - Extras - mirrors.aliyun.com
failovermethod=priority
baseurl=https://mirrors.aliyun.com/centos/$releasever/extras/$basearch/
        https://mirrors.aliyuncs.com/centos/$releasever/extras/$basearch/
        https://mirrors.cloud.aliyuncs.com/centos/$releasever/extras/$basearch/
gpgcheck=1
gpgkey=http://mirrors.aliyun.com/centos/RPM-GPG-KEY-CentOS-7


#additional packages that extend functionality of existing packages

[centosplus]
name=CentOS-$releasever - Plus - mirrors.aliyun.com
failovermethod=priority
baseurl=https://mirrors.aliyun.com/centos/$releasever/centosplus/$basearch/
        https://mirrors.aliyuncs.com/centos/$releasever/centosplus/$basearch/
        https://mirrors.cloud.aliyuncs.com/centos/$releasever/centosplus/$basearch/
gpgcheck=1
enabled=0
gpgkey=http://mirrors.aliyun.com/centos/RPM-GPG-KEY-CentOS-7


#contrib - packages by Centos Users

[contrib]
name=CentOS-$releasever - Contrib - mirrors.aliyun.com
failovermethod=priority
baseurl=https://mirrors.aliyun.com/centos/$releasever/contrib/$basearch/
        https://mirrors.aliyuncs.com/centos/$releasever/contrib/$basearch/
        https://mirrors.cloud.aliyuncs.com/centos/$releasever/contrib/$basearch/
gpgcheck=1
enabled=0
gpgkey=http://mirrors.aliyun.com/centos/RPM-GPG-KEY-CentOS-7
3、搭建NFS
因为Hadoop需要在各个节点之间共享,而且各个节点都需要能编辑文件内容,所以需要支持ReadWriteMany的PersistentVolume,这里我选择使用NFS。并不是所有的,详见官方文档。
部署步骤:略
4、部署Hadoop
4.1、创建PVC
apiVersion: v1
kind: PersistentVolume
metadata:
  name: hadoop-config-nfs-pv
  labels:
    release: hadoop-config
spec:
  capacity:
    storage: 16Mi
  accessModes:
    - ReadWriteMany
  persistentVolumeReclaimPolicy: Retain
  nfs:
    path: /home/nfs/data/hadoop-config
    server: 192.168.112.240
---
apiVersion: v1
kind: PersistentVolumeClaim
metadata:
  name: hadoop-config-nfs-pvc
spec:
  accessModes:
    - ReadWriteMany
  resources:
    requests:
      storage: 16Mi
  selector:
    matchLabels:
      release: hadoop-config
使用NSF来存放配置文件,hadoop-config-nfs-pvc将挂载到所有的Hadoop集群中的POD中~
4.2、启动脚本和配置文件
apiVersion: v1
kind: ConfigMap
metadata:
  name: hadoop-custom-config-cm
  labels:
    app: hadoop
data:
  bootstrap.sh: |-
    #!/bin/bash

    cd /root/bootstrap

    # Don't override slaves、core-site.xml and yarn-site.xml
    rm -f $HADOOP_HOME/etc/hadoop/slaves $HADOOP_HOME/etc/hadoop/core-site.xml $HADOOP_HOME/etc/hadoop/yarn-site.xml

    # Copy original hadoop file to $HADOOP_CONF_DIR
    cp -a $HADOOP_HOME/etc/hadoop/* $HADOOP_CONF_DIR

    # Get this node's FQDN
    FQDN=`ping $HOSTNAME -c 1 | grep PING | awk '{print $2}'`

    # If this node is nameNode, set it's FQDN to core-site.xml file and yarn-site.xml file
    if [[ "$NODE_TYPE" =~ "NN" ]]; then
      # Apply custom config file context
      for cfg in ./*; do
        if [[ ! "$cfg" =~ bootstrap.sh ]]; then
          cat $cfg > $HADOOP_CONF_DIR/${cfg##*/}
        fi
      done

      # Set nameNode's FQDN to file
      echo $FQDN > $HADOOP_CONF_DIR/NameNode

      # Replace nameNode's FQDN
      sed -i 's/${NAME_NODE_FQDN}/'$FQDN'/g' `grep '${NAME_NODE_FQDN}' -rl $HADOOP_CONF_DIR`

      # Format HDFS if not formatted yet
      if [[ ! -e $HADOOP_CONF_DIR/hdfs-namenode-format.out ]]; then
        $HADOOP_HOME/bin/hdfs namenode -format -force -nonInteractive &> $HADOOP_CONF_DIR/hdfs-namenode-format.out
        $HADOOP_HOME/bin/hdfs namenode -format -force -nonInteractive &> $HADOOP_CONF_DIR/hdfs-namenode-format.out
      fi

      # Start hadoop nameNode daemon
      $HADOOP_HOME/sbin/hadoop-daemon.sh start namenode
    fi

    # If this node is ResourceManager
    if [[ "$NODE_TYPE" =~ "RM" ]]; then
      $HADOOP_HOME/sbin/yarn-daemon.sh start resourcemanager
    fi

    # If this node is nodeManager, add it to slave
    if [[ "$NODE_TYPE" =~ "NM" ]]; then
      sed -i '/'$FQDN'/d' $HADOOP_CONF_DIR/slaves
      echo $FQDN >> $HADOOP_CONF_DIR/slaves

      # Waiting nameNode set NAME_NODE_FQDN
      while [[ ! -e $HADOOP_CONF_DIR/NameNode || -z $NAME_NODE_FQDN ]]; do
        echo "Waiting for nameNode set NAME_NODE_FQDN" && sleep 2 && NAME_NODE_FQDN=`cat $HADOOP_CONF_DIR/NameNode`
      done

      # Start hadoop nodeManager daemon
      while [[ -z `curl -sf http://$NAME_NODE_FQDN:8088/ws/v1/cluster/info` ]]; do
        echo "Waiting for $FQDN" && sleep 2
      done
      $HADOOP_HOME/sbin/yarn-daemon.sh start nodemanager
    fi

    # If this node is dataNode, add it to slave
    if [[ "$NODE_TYPE" =~ "DN" ]]; then
      sed -i '/'$FQDN'/d' $HADOOP_CONF_DIR/slaves
      echo $FQDN >> $HADOOP_CONF_DIR/slaves

      # Waiting nameNode set NAME_NODE_FQDN
      while [[ ! -e $HADOOP_CONF_DIR/NameNode || -z $NAME_NODE_FQDN ]]; do
        echo "Waiting for nameNode set NAME_NODE_FQDN" && sleep 2 && NAME_NODE_FQDN=`cat $HADOOP_CONF_DIR/NameNode`
      done

      # Start hadoop dataNode daemon
      while [[ -z `curl -sf http://$NAME_NODE_FQDN:50070` ]]; do
        echo "Waiting for $NAME_NODE_FQDN" && sleep 2
      done
      $HADOOP_HOME/sbin/hadoop-daemon.sh start datanode
    fi

    # keep running
    sleep infinity
  hdfs-site.xml: |-
    <?xml version="1.0" encoding="UTF-8"?>
    <?xml-stylesheet type="text/xsl" href="configuration.xsl"?>
    <!--
      Licensed under the Apache License, Version 2.0 (the "License");
      you may not use this file except in compliance with the License.
      You may obtain a copy of the License at

        http://www.apache.org/licenses/LICENSE-2.0

      Unless required by applicable law or agreed to in writing, software
      distributed under the License is distributed on an "AS IS" BASIS,
      WITHOUT WARRANTIES OR CONDITIONS OF ANY KIND, either express or implied.
      See the License for the specific language governing permissions and
      limitations under the License. See accompanying LICENSE file.
    -->

    <!-- Put site-specific property overrides in this file. -->

    <configuration>
      <property>
        <name>dfs.name.dir</name>
        <value>/root/hadoop/dfs/name</value>
      </property>
      <property>
        <name>dfs.data.dir</name>
        <value>/root/hadoop/dfs/data</value>
      </property>
      <property>
        <name>dfs.replication</name>
        <value>3</value>
      </property>
      <property>
        <name>dfs.rpc-bind-host</name>
        <value>0.0.0.0</value>
      </property>
      <property>
        <name>dfs.servicerpc-bind-host</name>
        <value>0.0.0.0</value>
      </property>
    </configuration>
  core-site.xml: |-
    <?xml version="1.0" encoding="UTF-8"?>
    <?xml-stylesheet type="text/xsl" href="configuration.xsl"?>
    <!--
      Licensed under the Apache License, Version 2.0 (the "License");
      you may not use this file except in compliance with the License.
      You may obtain a copy of the License at

        http://www.apache.org/licenses/LICENSE-2.0

      Unless required by applicable law or agreed to in writing, software
      distributed under the License is distributed on an "AS IS" BASIS,
      WITHOUT WARRANTIES OR CONDITIONS OF ANY KIND, either express or implied.
      See the License for the specific language governing permissions and
      limitations under the License. See accompanying LICENSE file.
    -->

    <!-- Put site-specific property overrides in this file. -->

    <configuration>
      <property>
        <name>fs.defaultFS</name>
        <value>hdfs://${NAME_NODE_FQDN}:9000</value>
      </property>
      <property>
        <name>hadoop.tmp.dir</name>
        <value>/root/hadoop/tmp</value>
      </property>
    </configuration>
  mapred-site.xml: |-
    <?xml version="1.0"?>
    <?xml-stylesheet type="text/xsl" href="configuration.xsl"?>
    <!--
      Licensed under the Apache License, Version 2.0 (the "License");
      you may not use this file except in compliance with the License.
      You may obtain a copy of the License at

        http://www.apache.org/licenses/LICENSE-2.0

      Unless required by applicable law or agreed to in writing, software
      distributed under the License is distributed on an "AS IS" BASIS,
      WITHOUT WARRANTIES OR CONDITIONS OF ANY KIND, either express or implied.
      See the License for the specific language governing permissions and
      limitations under the License. See accompanying LICENSE file.
    -->

    <!-- Put site-specific property overrides in this file. -->

    <configuration>
      <property>
        <name>mapreduce.framework.name</name>
        <value>yarn</value>
      </property>
    </configuration>
  yarn-site.xml: |-
    <?xml version="1.0"?>
    <!--
      Licensed under the Apache License, Version 2.0 (the "License");
      you may not use this file except in compliance with the License.
      You may obtain a copy of the License at

        http://www.apache.org/licenses/LICENSE-2.0

      Unless required by applicable law or agreed to in writing, software
      distributed under the License is distributed on an "AS IS" BASIS,
      WITHOUT WARRANTIES OR CONDITIONS OF ANY KIND, either express or implied.
      See the License for the specific language governing permissions and
      limitations under the License. See accompanying LICENSE file.
    -->
    <configuration>

    <!-- Site specific YARN configuration properties -->
      <property>
        <name>yarn.resourcemanager.hostname</name>
        <value>${NAME_NODE_FQDN}</value>
      </property>
      <property>
        <name>yarn.resourcemanager.bind-host</name>
        <value>0.0.0.0</value>
      </property>
      <property>
        <name>yarn.nodemanager.bind-host</name>
        <value>0.0.0.0</value>
      </property>
      <property>
        <name>yarn.timeline-service.bind-host</name>
        <value>0.0.0.0</value>
      </property>
      <property>
        <name>yarn.nodemanager.aux-services</name>
        <value>mapreduce_shuffle</value>
      </property>
      <property>
        <name>yarn.nodemanager.aux-services.mapreduce_shuffle.class</name>
        <value>org.apache.hadoop.mapred.ShuffleHandler</value>
      </property>
      <property>
        <name>yarn.nodemanager.vmem-check-enabled</name>
        <value>false</value>
      </property>

    </configuration>
1、使用ConfigMap来存放初始配置文件和启动脚本bootstrap.sh
2、配置文件的内容在POD启动并执行bootstrap.sh脚本时,首先覆盖原始配置文件,然后根据节点类型和网络地址修改配置文件内容
3、节点类型通过环境变量设置,包括:NN(NameNode)、DN(DataNode)、RM(ResourceManager)、NM(NodeManager)。bootstrap.sh将根据不同的节点类型启动不同的进程
我本意是想将所有的Hadoop进程分开部署,尽量在一个容器中只运行一个进行,但是没怎么接触过Hadoop,后面有机会会按照这种方式进行尝试~
这种启动方式不依赖SSH,不需要在镜像中部署SSH服务,不需要建立SSH等效性
4.3、创建NameNode
apiVersion: v1
kind: Service
metadata:
  name: hadoop-nn-service
  labels:
    app: hadoop-nn
spec:
  ports:
    - port: 9000
      name: hdfs
    - port: 50070
      name: name-node
  clusterIP: None
  selector:
    app: hadoop-nn
---
apiVersion: apps/v1
kind: StatefulSet
metadata:
  name: hadoop-nn
spec:
  replicas: 1
  revisionHistoryLimit: 10
  selector:
    matchLabels:
      app: hadoop-nn
  serviceName: hadoop-nn-service
  template:
    metadata:
      labels:
        app: hadoop-nn
    spec:
      containers:
        - name: hadoop-nn
          image: 192.168.101.88:5000/dmcop2/hadoop:dm-2.9.1
          command: ["bash", "-c", "chmod +x /root/bootstrap/bootstrap.sh && /root/bootstrap/bootstrap.sh"]
          env:
            - name: HADOOP_CONF_DIR
              value: /etc/hadoop
            - name: NODE_TYPE
              value: NN,RM
          volumeMounts:
            - name: hadoop-config-volume
              mountPath: /etc/hadoop
            - name: hadoop-custom-config-volume
              mountPath: /root/bootstrap
            - name: dfs-name-dir-volume
              mountPath: /root/hadoop/dfs/name
            - name: dfs-data-dir-volume
              mountPath: /root/hadoop/dfs/data
            - name: hadoop-tmp-dir-volume
              mountPath: /root/hadoop/tmp
      volumes:
        - name: hadoop-config-volume
          persistentVolumeClaim:
            claimName: hadoop-config-nfs-pvc
        - name: hadoop-custom-config-volume
          configMap:
            name: hadoop-custom-config-cm
        - name: dfs-name-dir-volume
          emptyDir: {}
        - name: dfs-data-dir-volume
          emptyDir: {}
        - name: hadoop-tmp-dir-volume
          emptyDir: {}
1、挂载共享目录hadoop-config-nfs-pvc
2、使用StatefulSet进行部署,StatefulSet使用headless-services确保POD基本稳定的网络ID
3、在构建镜像时未制定CMD,这里使用command来执行bootstrap.sh,等以后稳定了,将bootstrap.sh打包到镜像文件中,以简化部署
4、通过环境变量设置**NODE_TYPE**,目前NameNode和ResourceManager运行同一个容器内,这里没运行SecondaryNameNode
5、数据存储可以使用volumeClaimTemplates来处理(如果能让DaemonSet部署时,网络状态固定,可以在对应的节点上挂载磁盘,并使用hastPath来映射存储,更符合Hadoop的分布式,有待尝试),这里先简单使用emptyDir
4.4、创建DataNode
apiVersion: v1
kind: Service
metadata:
  name: hadoop-dn-service
  labels:
    app: hadoop-dn
spec:
  ports:
    - port: 9000
      name: hdfs
    - port: 50010
      name: data-node-trans
    - port: 50075
      name: data-node-http
  clusterIP: None
  selector:
    app: hadoop-dn
---
apiVersion: apps/v1
kind: StatefulSet
metadata:
  name: hadoop-dn
spec:
  replicas: 3
  revisionHistoryLimit: 10
  selector:
    matchLabels:
      app: hadoop-dn
  serviceName: hadoop-dn-service
  template:
    metadata:
      labels:
        app: hadoop-dn
    spec:
      containers:
        - name: hadoop-dn
          image: 192.168.101.88:5000/dmcop2/hadoop:dm-2.9.1
          command: ["bash", "-c", "chmod +x /root/bootstrap/bootstrap.sh && /root/bootstrap/bootstrap.sh"]
          env:
            - name: HADOOP_CONF_DIR
              value: /etc/hadoop
            - name: NODE_TYPE
              value: DN,NM
          volumeMounts:
            - name: hadoop-config-volume
              mountPath: /etc/hadoop
            - name: hadoop-custom-config-volume
              mountPath: /root/bootstrap
            - name: dfs-name-dir-volume
              mountPath: /root/hadoop/dfs/name
            - name: dfs-data-dir-volume
              mountPath: /root/hadoop/dfs/data
            - name: hadoop-tmp-dir-volume
              mountPath: /root/hadoop/tmp
      volumes:
        - name: hadoop-config-volume
          persistentVolumeClaim:
            claimName: hadoop-config-nfs-pvc
        - name: hadoop-custom-config-volume
          configMap:
            name: hadoop-custom-config-cm
        - name: dfs-name-dir-volume
          emptyDir: {}
        - name: dfs-data-dir-volume
          emptyDir: {}
        - name: hadoop-tmp-dir-volume
          emptyDir: {}
1、挂载共享目录hadoop-config-nfs-pvc
2、与NameNode类似,只是**NODE_TYPE**被设置为
DN,NM,表示DataNode和NodeManager进行运行在同一个容器中3、设置replicas为3,Hadoop集群启动后会有三个数据节点
4.5、创建Web UI Service
apiVersion: v1
kind: Service
metadata:
  name: hadoop-ui-service
  labels:
    app: hadoop-nn
spec:
  ports:
    - port: 8088
      name: resource-manager
    - port: 50070
      name: name-node
  selector:
    app: hadoop-nn
  type: NodePort
1、Headless services不提供外部服务访问,单独创建一个Service,这里使用NodePort来暴露端口
5、测试
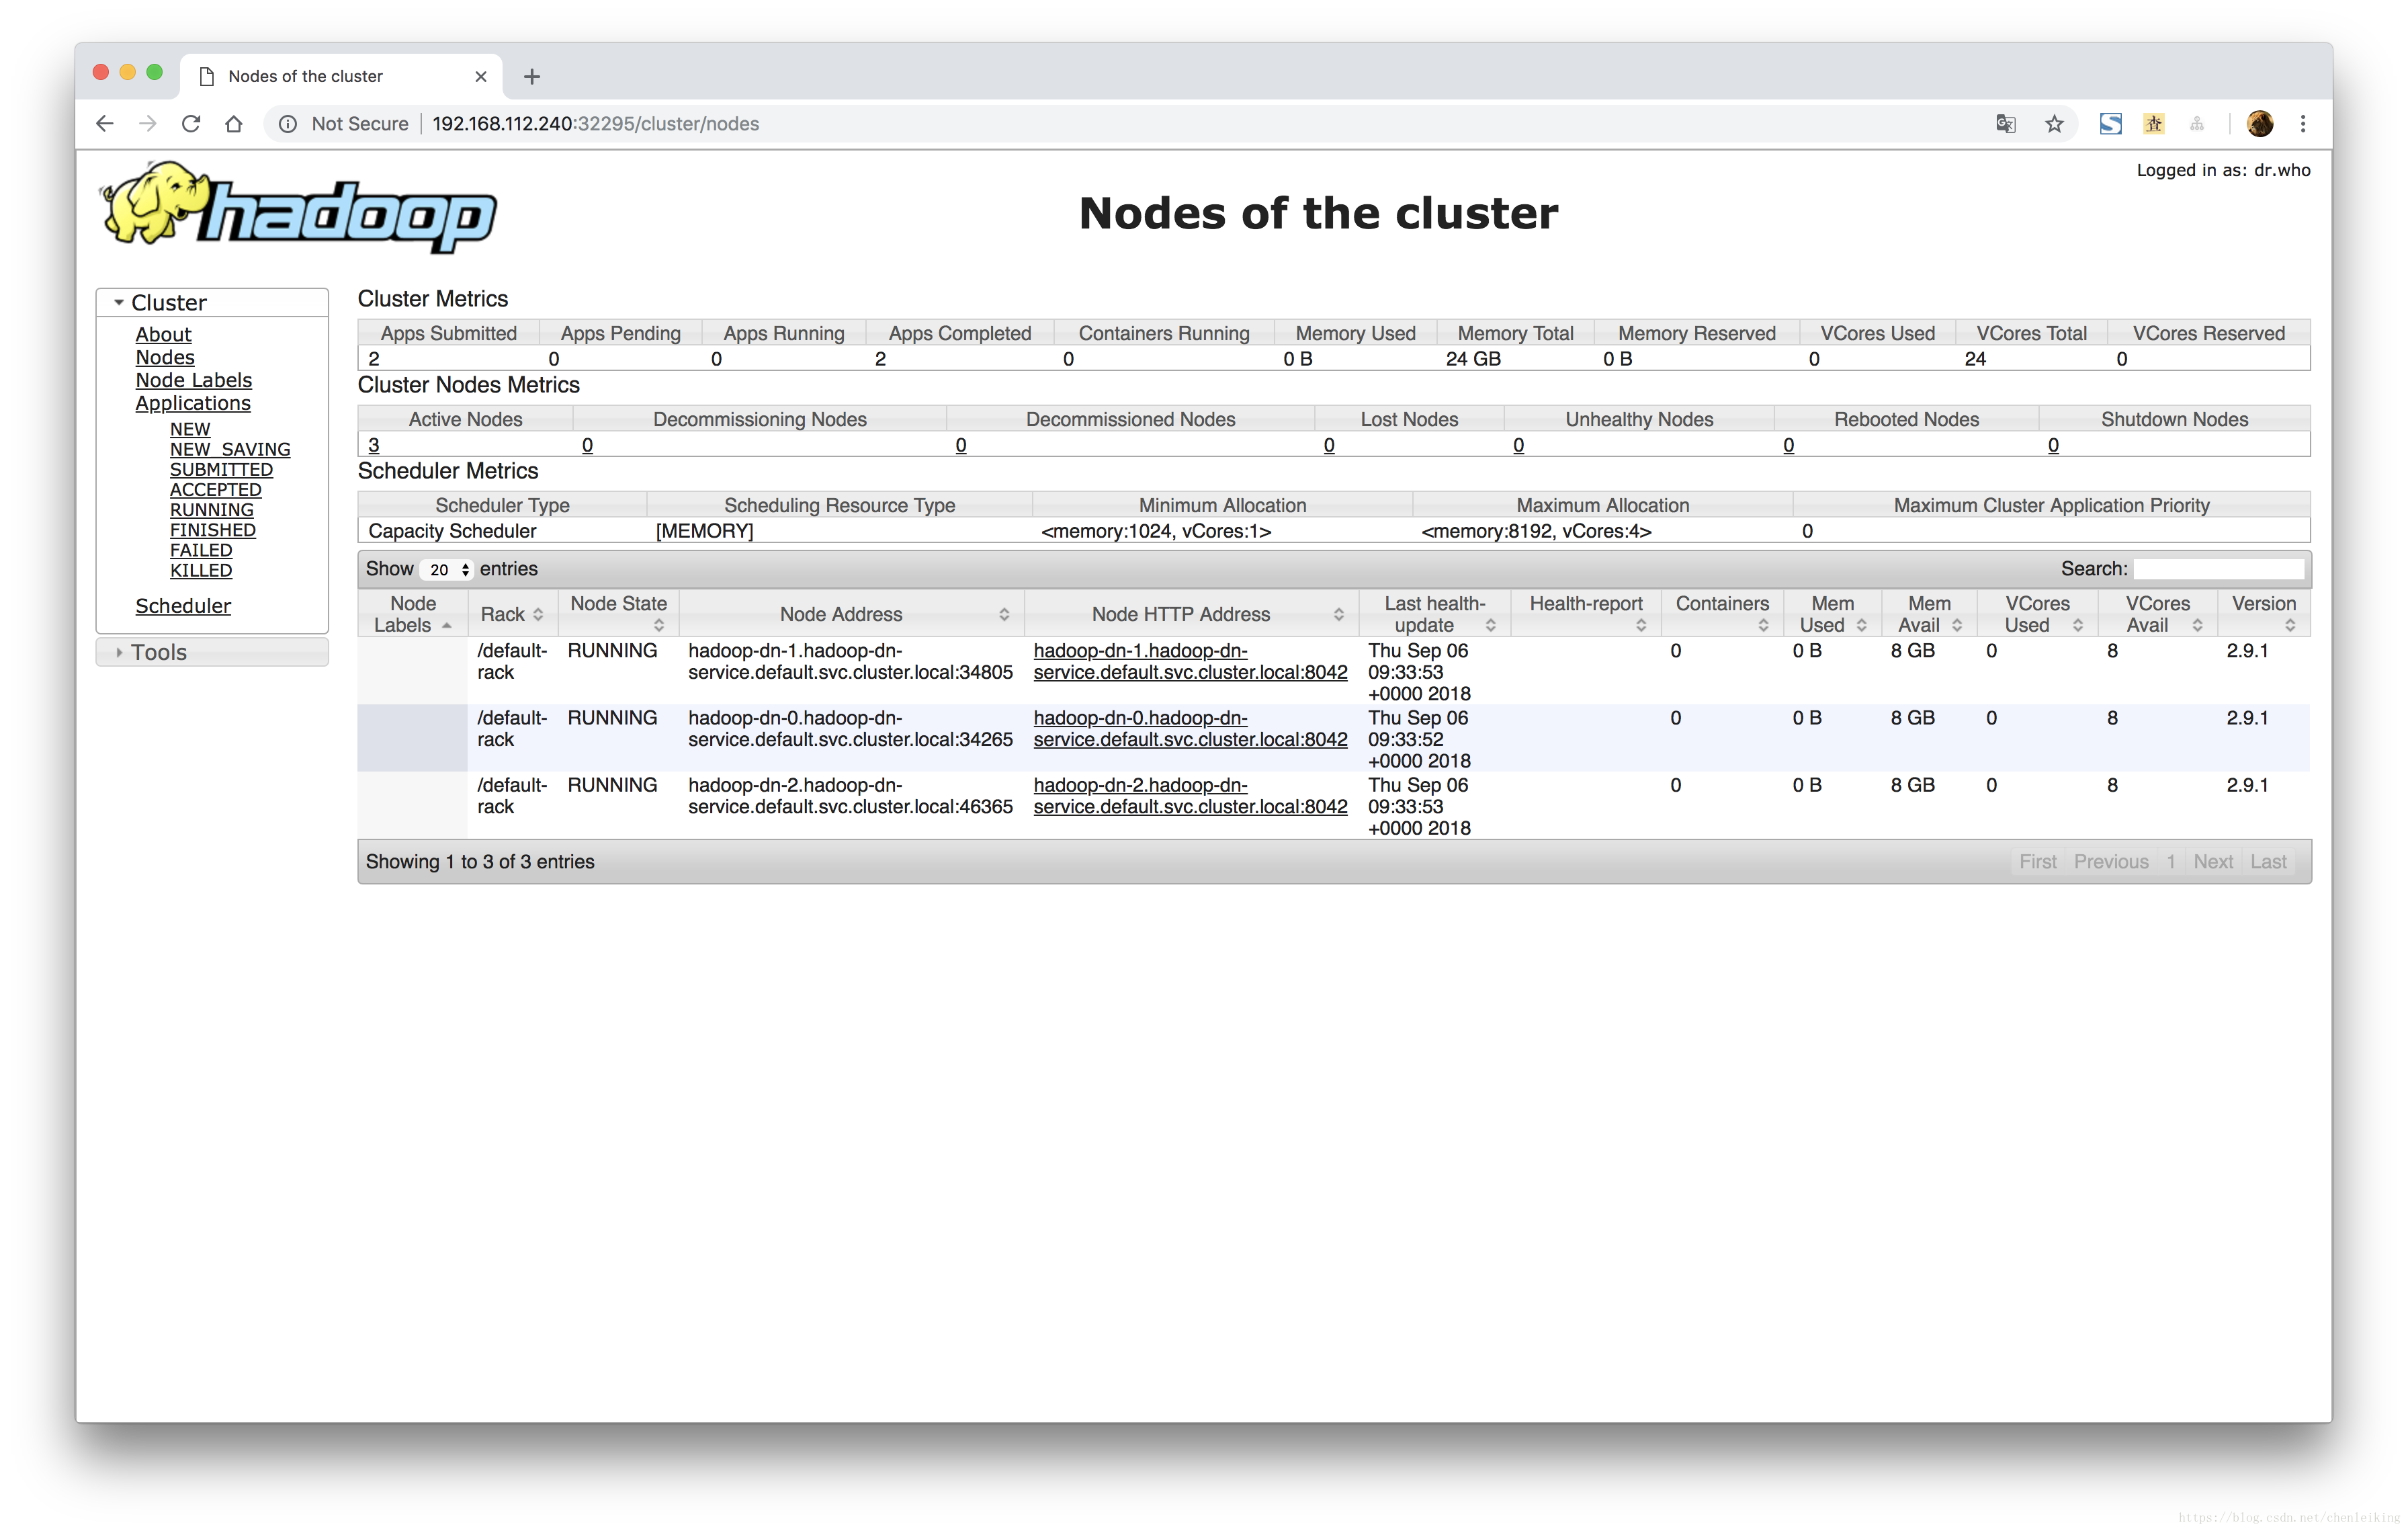
5.1、访问Web UI
[root@master-0 ~]# kubectl get svc
NAME                         TYPE        CLUSTER-IP      EXTERNAL-IP   PORT(S)                          AGE
hadoop-dn-service            ClusterIP   None            <none>        9000/TCP,50010/TCP,50075/TCP     2h
hadoop-nn-service            ClusterIP   None            <none>        9000/TCP,50070/TCP               2h
hadoop-ui-service            NodePort    10.233.21.71    <none>        8088:32295/TCP,50070:31127/TCP   2h

5.2、增加数据节点
[root@master-0 ~]# kubectl get statefulset
NAME        DESIRED   CURRENT   AGE
hadoop-dn   3         3         2h
hadoop-nn   1         1         2h
[root@master-0 ~]# kubectl scale statefulset hadoop-dn --replicas=4
statefulset "hadoop-dn" scaled
[root@master-0 ~]# kubectl get statefulset
NAME        DESIRED   CURRENT   AGE
hadoop-dn   4         4         2h
hadoop-nn   1         1         2h

6、注意事项
- 因为只在第一次启动集群时需要执行格式化,所以在执行完格式化之后,将格式化命令的输出内容存放到共享存储中,以此判断是否已经格式化;
- 共享存储(PVC)中的文件不会在你删除部署的时候自动删除,即使你设置了Recycle,而且NFS也支持Recycle,可能是因为设置了ReadWriteMany的缘故吧,所以重新部署前请自行判断是否要删除NFS上的配置文件;
- 目前增加数据节点之后,不会自动做rebalance,需要在NN上手动执行。后期考虑在NN上部署一个REST应用,用以执行shell脚本;


 1167
1167

 被折叠的 条评论
为什么被折叠?
被折叠的 条评论
为什么被折叠?
 到【灌水乐园】发言


