


目录
pthread
1.概念
pthread是一套通用的多线程API,可以在Unix/Linux/Windows等系统跨平台使用。使用C语言编写,需要程序员自己管理线程的生命周期,使用难度比极大,我们在iOS开发中几乎不适用pthread,但是我们可以来了解一下。
- 全称 POSIX Thread,POSIX(Portable Operating System Interface)表示可移植操作系统接口;
- 一套用 C 语言写的通用的多线程 API;
- 适用于 Unix / Linux / Windows 等系统;
- 跨平台/可移植;
- 使用难度大、使用频率低;
- 线程生命周期由程序员管理;
- 现在 iOS 中用到 pthread 的多数情况是使用 pthread_mutex 互斥锁,性能较高。
2.pthread的使用
- 添加头文件
#import <pthread.h> - 创建线程,并开启线程执行任务
pthread_create() // 创建一个线程
pthread_exit() // 终止当前线程
pthread_cancel() // 中断另外一个线程的运行
pthread_join() // 阻塞当前的线程,直到另外一个线程运行结束
pthread_attr_init() // 初始化线程的属性
pthread_attr_setdetachstate() // 设置脱离状态的属性(决定这个线程在终止时是否可以被结合)
pthread_attr_getdetachstate() // 获取脱离状态的属性
pthread_attr_destroy() // 删除线程的属性
pthread_kill() // 向线程发送一个信号
举例使用:
void *run(void *param) {    // 新线程调用方法,里边为需要执行的任务
   NSLog(@"%@", [NSThread currentThread]);

   return NULL;
}

int main(int argc, const char * argv[]) {
    // 1. 创建线程: 定义一个pthread_t类型变量
    pthread_t thread;
    // 2. 开启线程: 执行任务
    pthread_create(&thread, NULL, run, NULL);
    // 3. 设置子线程的状态设置为 detached,该线程运行结束后会自动释放所有资源
    pthread_detach(thread);
    NSLog(@"%@", [NSThread currentThread]); // 如果不要这一行,很可能直接return 0,线程还没调用,直接return 0了
    return 0;
}
/*
create中间有4个参数
第一个:线程编号的地址
第二个:线程属性,默认为NULL
第三个:线程要执行的函数 void * (*)(void *)
第四个:函数的参数,参数类型:void *
返回值:0代表成功,非0代表失败
 */
输出结果:

就是这个用起来感觉太繁琐了,很古老,用了其他的再用这个感觉就是降维打击。。。
NSThread
1.概念
NSThread 是苹果官方提供的,使用起来比 pthread 更加面向对象,简单易用,可以直接操作线程对象。不过也需要需要程序员自己管理线程的生命周期(主要是创建),我们在开发的过程中偶尔使用 NSThread。比如我们会经常调用[NSThread currentThread]来显示当前的进程信息。
- 使用更加面向对象;
- 简单易用,可直接操作线程对象;
- 语言 OC,线程生命周期由程序员管理,偶尔使用。
2.创建、启动线程
先创建线程,再启动线程:
// 方式一:
// 1.创建线程
NSThread *thread = [[NSThread alloc] initWithTarget:self selector:@selector(run) object:nil];
// 2.启动线程
[thread start]; // 线程一启动就会执行其中的 run 方法

- (void)run {
    NSLog(@"%@", [NSThread currentThread]);
}


// 方式二:
NSThread *thread = [[NSThread alloc] initWithBlock:^{
    NSLog(@"%@", [NSThread currentThread]);
}];
[thread start];
输出结果:

创建线程后自动启动线程
// 方式一:
// 创建线程后自动启动线程
[NSThread detachNewThreadSelector:@selector(run) toTarget:self withObject:nil];

- (void)run {
    NSLog(@"%@", [NSThread currentThread]);
}


// 方式二:
[NSThread detachNewThreadWithBlock:^{
	NSLog(@"%@", [NSThread currentThread]);
}];
输出结果:

隐式创建并启动线程
[self performSelectorInBackground:@selector(run) withObject:nil];

- (void)run {
    NSLog(@"%@", [NSThread currentThread]);
}
输出结果:

3.线程相关用法
// 获得主线程
+ (NSThread *)mainThread;

// 判断是否为主线程
- (BOOL)isMainThread;
+ (BOOL)isMainThread;

// 获得当前线程
NSThread *current = [NSThread currentThread];

// 线程的名字——setter方法
- (void)setName:(NSString *)n;

// 线程的名字——getter方法
- (NSString *)name;
4.线程状态控制方法
启动方法
// 线程由就绪态变成运行态。当线程任务执行完毕,自动进入死亡状态
- (void)start;
阻塞(暂停)线程方法
+ (void)sleepUntilDate:(NSDate *)date;
+ (void)sleepForTimeInterval:(NSTimeInterval)ti;// 这里的参数是NSTimeInterval类型的,其值始终是以秒为单位的,直接用数字就行了
// 线程进入阻塞状态
强制停止线程
// 程序进入死亡状态
+ (void)exit;
5.线程之间的通讯
我们常常会在子线程进行耗时操作,操作结束后回到主线程刷新UI,这就涉及到了子线程和主线程之间的通信:
// 在主线程上执行操作
- (void)performSelectorOnMainThread:(SEL)aSelector withObject:(id)arg waitUntilDone:(BOOL)wait;
- (void)performSelectorOnMainThread:(SEL)aSelector WithObject:(id)arg waitUntilDone:(BOOL)wait modes:(NSArray<NSString *> *)array;

// 在指定线程上执行操作
- (void)performSelector:(SEL)aSelector onThread:(NSThread *)thr withObject:(id)arg waitUntilDone:(BOOL)wait modes:(NSArray *)array NS_AVAILABLE(10_5, 2_0);
- (void)performSelector:(SEL)aSelector onThread:(NSThread *)thr withObject:(id)arg waitUntilDone:(BOOL)wait NS_AVAILABLE(10_5, 2_0);

// 在当前线程上执行操作,调用NSObject的performSelector:相关方法
- (id)performSelector:(SEL)aSelector;
- (id)performSelector:(SEL)aSelector withObject:(id)object;
- (id)performSelector:(SEL)aSelector withObject:(id)object1 withObject:(id)object2;
我们平时使用网络请求的时候就经常需要回到主线程再进行操作,现在我们已经学到了很多回到主线程执行操作的方法了:
5.1 NSOperationQueue回到主线程操作
[[NSOperationQueue mainQueue] addOperationWithBlock:^{
 	// 回到主线程的操作
}];
5.2 NSThread回到主线程操作
[self performSelectorOnMainThread:@selector(WantToGoBackMianThread:) withObject:nil waitUntilDone:YES];
/*
selector:执行的方法
arg:传给方法的参数
wait:为NO,不阻塞主线程的执行
	 为YES,阻塞主线程的执行
*/
- (void)WantToGoBackMianThread:(id)object{
     // 回到主线程的操作
}
5.3 GCD回到主线程操作
dispatch_async(dispatch_get_main_queue(), ^{
   // 回到主线程的操作
});
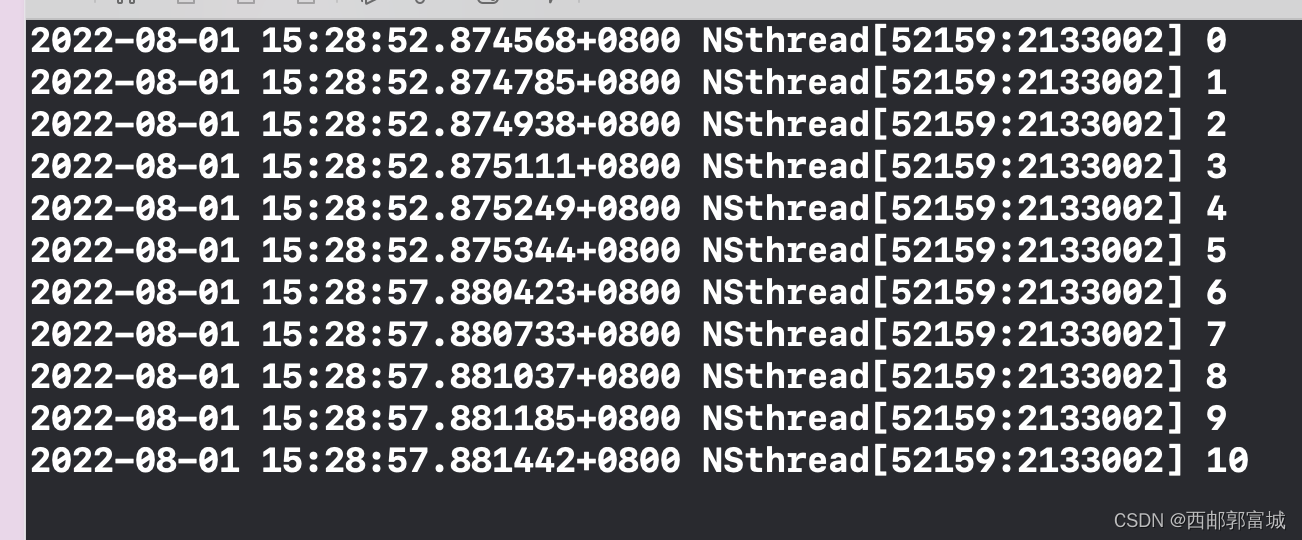
6.线程的状态、生命周期
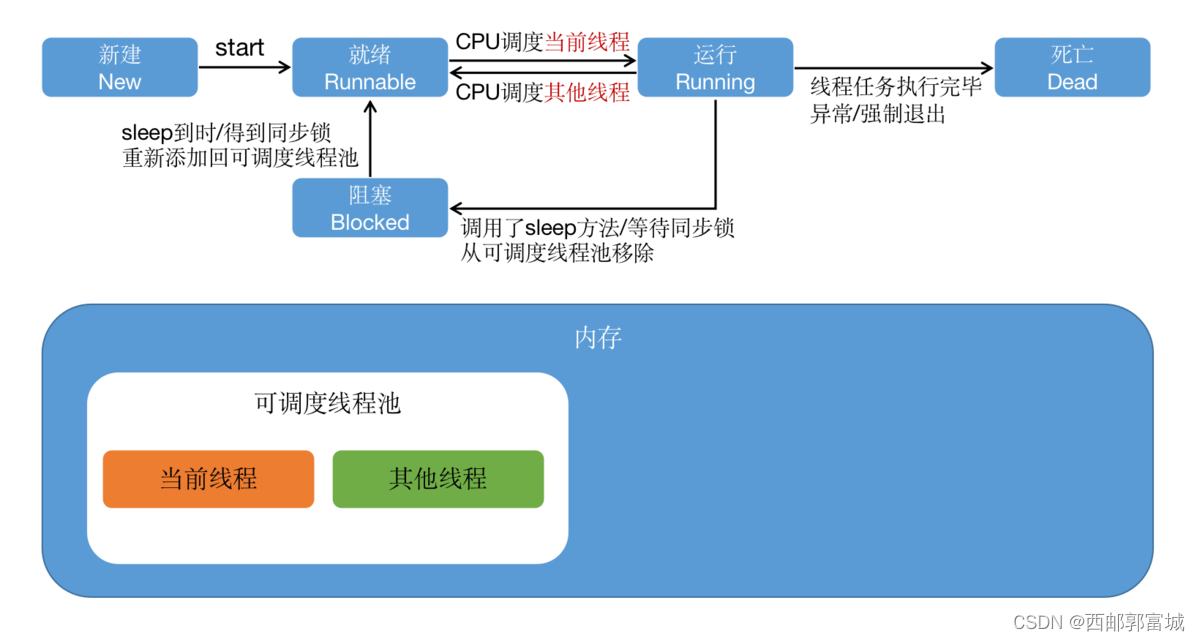
- (void)touchesBegan:(NSSet<UITouch *> *)touches withEvent:(UIEvent *)event {
    //新建状态
    NSThread *thread = [[NSThread alloc] initWithTarget:self selector:@selector(demo) object:nil];
    //就绪状态
    [thread start];
}

- (void)demo {
    //运行状态
    for (int i = 0; i < 20; i++) {
        NSLog(@"%d",i);
        if (i == 5) {
            //阻塞状态
            [NSThread sleepForTimeInterval:5];
        }
        if (i == 10) {
            //线程退出,死亡状态
            [NSThread exit];
        }
    }
}
输出结果:
7.NSThread线程安全
线程安全解决的方案:给线程加锁,在一个线程执行该操作的时候,不允许其他线程进行操作。iOS实现线程加锁有很多种方式,@synchronized、 NSLock、NSRecursiveLock、NSCondition、NSConditionLock、pthread_mutex、dispatch_semaphore、OSSpinLock、atomic(property) set/get等等各种方式,来保证线程安全,从而解决线程同步问题。
8.线程池的原理
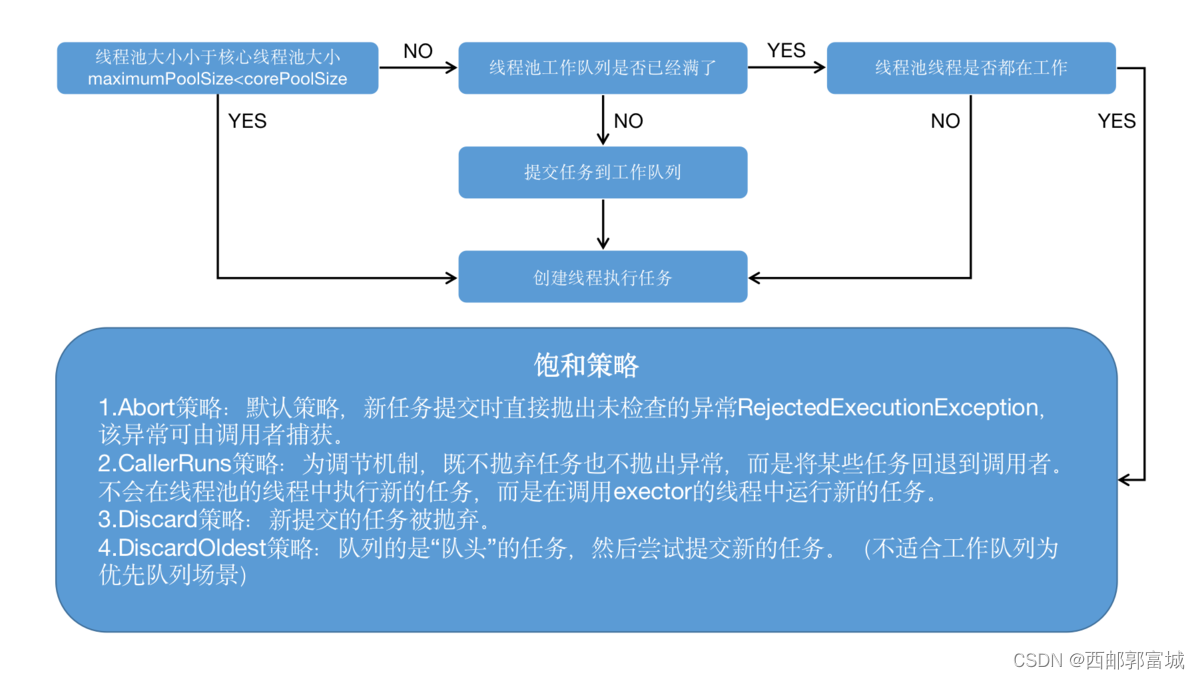
| 参数名 | 代表含义 |
|---|---|
| corePoolSize | 线程池的基本大小(核心线程池大小) |
| maximumPoolSize | 线程池的最大大小 |
| keepAliveTime | 线程池中超过 corePoolSize 数目的空闲线程的最大存活时间 |
| unit | keepAliveTime 参数的时间单位 |
| workQueue | 任务阻塞队列 |
| threadFactory | 新建线程的工厂 |
| handler | 当提交的任务数超过 maximumPoolSize 与 workQueue 之和时,任务会交给 RejectedExecutionHandler 来处理 |


 96
96


 被折叠的 条评论
为什么被折叠?
被折叠的 条评论
为什么被折叠?
 到【灌水乐园】发言


