


Spring
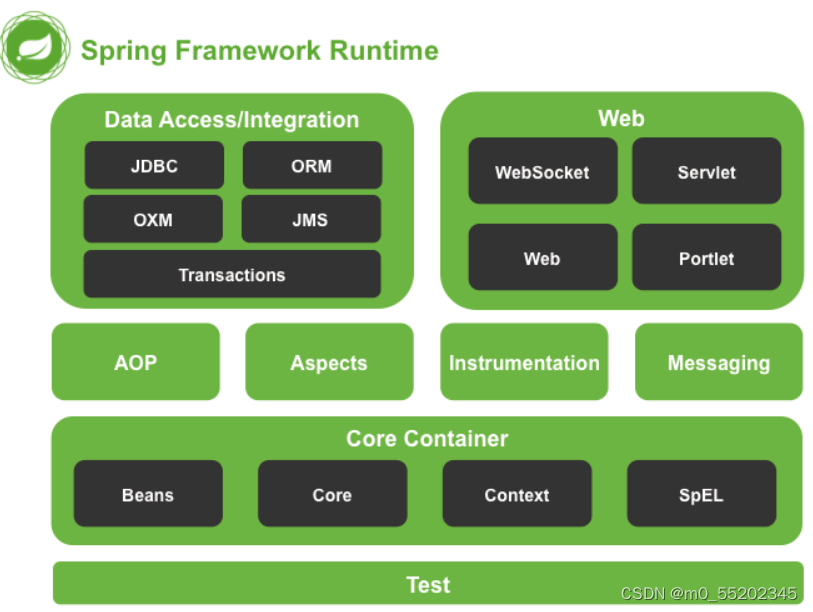
Spring体系结构
Spring快速入门
Spring程序开发步骤
- 导入Spring开发的基本包坐标
- 编写Dao接口和实现类
- 创建Spring核心配置文件
- 在Spring配置文件中配置UserDaoImpl
- 使用Spring的API获得Bean实例
Spring配置文件
Bean标签的基本配置
Bean标签范围配置
scope:指对象的作用范围,取值如下
| 取值范围 | 说明 |
|---|---|
| singleton | 默认值,单例的 |
| prototype | 多例的 |
| request | WEB项目中,Spring创建一个Bean对象,将对象存入request域中 |
| session | WEB项目中,Spring创建一个Bean对象,将对象存入到Session域中 |
| global session | WEB项目中,应用在Portlet环境,如果没有Portlet环境那么globalSession相当于session |
总结
- 当scope的取值为singleton时
Bean的实例化个数:1个
Bean的实例化时机:当Spring核心文件被加载时,实例化配置的Bean实例
Bean的生命周期:
- 对象的创建:当应用加载,创建容器时,对象就被创建了
- 对象的运行:只要容器在,对象一直活着
- 对象的销毁:当应用卸载,销毁容器时,对象就被销毁了 - 当scope的取值为prototype时
Bean的实例化个数:多个
Bean的实例化时机:当调用getBean()方法时实例化Bean
- 对象创建:当使用对象时,创建新的对象实例
- 对象运行:只要对象在使用中,就一直活着
- 对象销毁:当对象长时间不用时,被Java的垃圾回收器回收
Bean生命周期配置
- init-method: 指定类中的初始化方法
- destory-method:指定类中的销毁方法
Bean实例化的三种方式
- 无参构造方法实例化
<bean id="userDao" class="com.jf.dao.impl.UserDaoImpl"/>
- 工厂静态方法
<bean id="userDao" class="com.jf.factory.StaticFactory" factory-method="getUserDao"/>
- 工厂实例方法
    <bean id="userFactory" class="com.jf.factory.DynamicFactory"/>
    <bean id="userDao" factory-bean="userFactory" factory-method="getUserDao"/>
Bean的依赖注入概念
依赖注入(Dependency Injection):它是Spring框架核心IOC的具体实现。
在编写程序时,通过控制反转,把对象的创建交给了Spring,但是代码中不可能出现没有依赖的情况。
IOC解耦只是降低它们的依赖关系,但不会消除。例如:业务层仍会调用持久层的方法。
这种业务层和持久层的依赖关系,在使用Spring后,就让Spring来维护了。
简单的说,就是等框架把持久层的对象传入业务层,而不用我们自己去获取。
Bean的依赖注入方式
- Set方法(保证service层有set方法)
<?xml version="1.0" encoding="UTF-8"?>
<beans xmlns="http://www.springframework.org/schema/beans"
       xmlns:xsi="http://www.w3.org/2001/XMLSchema-instance"
       xmlns:p="http://www.springframework.org/schema/p"
       xsi:schemaLocation="http://www.springframework.org/schema/beans http://www.springframework.org/schema/beans/spring-beans.xsd">

    <!--依赖注入 方法一  set方法-->
    <bean id="userDao" class="com.jf.dao.impl.UserDaoImpl"/>

    <bean id="userService" class="com.jf.service.impl.UserServiceImpl">
        <property name="userDao" ref="userDao"/>
    </bean>
	<!--依赖注入 p命名空间-->
    <bean id="userDao" class="com.jf.dao.impl.UserDaoImpl"/>
    <bean id="userService" class="com.jf.service.impl.UserServiceImpl" p:userDao-ref="userDao"/>
</beans>
- 构造器 (保证service层有 有参构造器)
<?xml version="1.0" encoding="UTF-8"?>
<beans xmlns="http://www.springframework.org/schema/beans"
       xmlns:xsi="http://www.w3.org/2001/XMLSchema-instance"
       xmlns:p="http://www.springframework.org/schema/p"
       xsi:schemaLocation="http://www.springframework.org/schema/beans http://www.springframework.org/schema/beans/spring-beans.xsd">

    <bean id="userDao" class="com.jf.dao.impl.UserDaoImpl"/>
    <bean id="userService" class="com.jf.service.impl.UserServiceImpl">
        <!--name 指代 构造器注入的 对象名  ref 指代的是依赖注入 bean的 id-->
        <constructor-arg name="userDao" ref="userDao"/>
    </bean>
</beans>
Bean的依赖注入的数据类型
除了对象的引用可以注入,普通的数据类型,集合等都可以在容器中进行注入
注入数据的三种数据类型
- 普通数据注入
- 引用数据类型
- 集合数据类型
<?xml version="1.0" encoding="UTF-8"?>
<beans xmlns="http://www.springframework.org/schema/beans"
       xmlns:xsi="http://www.w3.org/2001/XMLSchema-instance"
       xmlns:p="http://www.springframework.org/schema/p"
       xsi:schemaLocation="http://www.springframework.org/schema/beans http://www.springframework.org/schema/beans/spring-beans.xsd">

    <bean id="userDao" class="com.jf.dao.impl.UserDaoImpl">
        <!--List-->
        <property name="strList">
            <list>
                <value>aaa</value>
                <value>bbb</value>
            </list>
        </property>
        <!--Map-->
        <property name="userMap">
            <map>
                <entry key="u1" value-ref="user1"/>
                <entry key="u2" value-ref="user2"/>
            </map>
        </property>
        <!--properties-->
        <property name="properties">
            <props>
                <prop key="p1">Java</prop>
                <prop key="p2">C++</prop>
                <prop key="p2">C#</prop>
            </props>
        </property>
    </bean>

    <bean id="user1" class="com.jf.domain.User">
        <property name="addr" value="China"/>
        <property name="name" value="Tom"/>
    </bean>

    <bean id="user2" class="com.jf.domain.User">
        <property name="addr" value="England"/>
        <property name="name" value="Alice"/>
    </bean>

    <bean id="userService" class="com.jf.service.impl.UserServiceImpl">
        <!--name 指代 构造器注入的 对象名  ref 指代的是依赖注入 bean的 id-->
        <constructor-arg name="userDao" ref="userDao"/>
    </bean>
</beans>
引入其他配置文件(分模块开发)
实际开发中,Spring的配置文件内容非常多,这就导致Spring配置很繁杂且体积大,所以,可以将部分配置拆解到其他配置文件中,而在Spring主配置文件通过import标签进行加载
<import resource="applicationContext-user.xml"/>
Spring相关的API
ApplicationContext实现类
1.ClassPathXmlApplicationContext
它是从类的根路径下加载配置文件推荐使用
ApplicationContext app = new ClassPathXmlApplicationContext("applicationContext.xml");
2.FileSystemXmlApplicationContext
从磁盘路径上加载配置文件,配置文件可以在磁盘的任意位置
ApplicationContext app = new FileSystemXmlApplicationContext("F:\\project\\Spring\\spring_ioc\\src\\main\\resources\\applicationContext.xml");
3.AnnotationConfigApplicationContext
当使用注解配置容器对象时,需要使用此类来创建spring容器。它用来读取注解
getBean()方法的使用
    public Object getBean(String name) throws BeansException {
        this.assertBeanFactoryActive();
        return this.getBeanFactory().getBean(name);
    }
    public <T> T getBean(Class<T> requiredType) throws BeansException {
        this.assertBeanFactoryActive();
        return this.getBeanFactory().getBean(requiredType);
    }
Spring配置数据源
数据源(连接池)的作用
- 数据源(连接池)是提高程序性能出现的
- 实现实例化数据源,初始化部分连接资源
- 使用连接资源时从数据源获取
- 使用完毕后将连接资源归还给数据源
常见的数据源(连接池):DBCP、C3P0
数据源的开发步骤
1.导入数据源的坐标和数据库驱动坐标
2.创建数据源对象
3.设置数据源的基本连接数据
4.使用数据源获取连接资源和归还连接资源
public class DataSourceTest {

    //测试手动创建c3p0数据源
    @Test
    public void test1() throws PropertyVetoException, SQLException {
        ComboPooledDataSource dataSource = new ComboPooledDataSource();
        dataSource.setDriverClass("com.mysql.jdbc.Driver");
        dataSource.setJdbcUrl("jdbc:mysql://localhost:3306/test");
        dataSource.setUser("root");
        dataSource.setPassword("123456");
        Connection connection = dataSource.getConnection();
        System.out.println(connection);
        connection.close();
    }

    //测试手动创建druid数据源
    @Test
    public void test2() throws PropertyVetoException, SQLException {
        DruidDataSource dataSource = new DruidDataSource();
        dataSource.setDriverClassName("com.mysql.jdbc.Driver");
        dataSource.setUrl("jdbc:mysql://localhost:3306/test");
        dataSource.setUsername("root");
        dataSource.setPassword("123456");
        Connection connection = dataSource.getConnection();
        System.out.println(connection);
        connection.close();
    }
}
抽取配置文件
jdbc.properties
jdbc.driver=com.mysql.jdbc.Driver
jdbc.url=jdbc:mysql://localhost:3306/test
jdbc.username=root
jdbc.password=123456
//抽取配置文件
    @Test
    public void test3() throws PropertyVetoException, SQLException {

        // 读取配置文件
        ResourceBundle rb = ResourceBundle.getBundle("jdbc");
        DruidDataSource datasource = new DruidDataSource();
        datasource.setDriverClassName(rb.getString("jdbc.driver"));
        datasource.setUrl(rb.getString("jdbc.url"));
        datasource.setUsername(rb.getString("jdbc.username"));
        datasource.setPassword(rb.getString("jdbc.password"));
        Connection connection = datasource.getConnection();
        System.out.println(connection);
        connection.close();
    }
Spring管理数据源
applicationContext.xml
<?xml version="1.0" encoding="UTF-8"?>
<beans xmlns="http://www.springframework.org/schema/beans"
       xmlns:xsi="http://www.w3.org/2001/XMLSchema-instance"
       xsi:schemaLocation="http://www.springframework.org/schema/beans http://www.springframework.org/schema/beans/spring-beans.xsd">
    <bean id="dataSource" class="com.mchange.v2.c3p0.ComboPooledDataSource">
        <property name="driverClass" value="com.mysql.jdbc.Driver"/>
        <property name="jdbcUrl" value="jdbc:mysql://localhost:3306/test"/>
        <property name="user" value="root"/>
        <property name="password" value="123456"/>
    </bean>
</beans>
// 测试Spring容器产生数据源对象
    @Test
    public void test4() throws Exception{
        ApplicationContext app = new ClassPathXmlApplicationContext("applicationContext.xml");
        ComboPooledDataSource dataSource = (ComboPooledDataSource) app.getBean("dataSource");
        Connection connection = dataSource.getConnection();
        System.out.println(connection);
        connection.close();
    }
抽取配置文件
<?xml version="1.0" encoding="UTF-8"?>
<beans xmlns="http://www.springframework.org/schema/beans"
       xmlns:xsi="http://www.w3.org/2001/XMLSchema-instance"
       xmlns:context="http://www.springframework.org/schema/context"
       xsi:schemaLocation="http://www.springframework.org/schema/beans http://www.springframework.org/schema/beans/spring-beans.xsd
                      http://www.springframework.org/schema/context http://www.springframework.org/schema/context/spring-context.xsd">
    <!--加载外部的properties文件-->
    <context:property-placeholder location="jdbc.properties"/>
    <bean id="dataSource" class="com.mchange.v2.c3p0.ComboPooledDataSource">
        <property name="driverClass" value="${jdbc.driver}"/>
        <property name="jdbcUrl" value="${jdbc.url}"/>
        <property name="user" value="${jdbc.username}"/>
        <property name="password" value="${jdbc.password}"/>
    </bean>
</beans>
Spring注解开发
Spring原始注解
spring原始注解主要替代<Bean>的配置
| 注解 | 说明 |
|---|---|
| @Component | 使用在类上用于实例化Bean |
| @Controller | 使用在web层类上用于实例化Bean |
| @Service | 使用在service层类上用于实例化Bean |
| @Repository | 使用在dao层类上用于实例化Bean |
| @Autowired | 使用在字段上用于根据类型依赖注入 |
| @Qualifier | 结合@Autowired一起使用用于根据名称进行依赖注入 |
| @Resource | 相当于@Autowired+@Qualifier,按照名称进行注入 |
| @Value | 注入普通属性 |
| @Scope | 标注Bean的作用范围 |
| @PostConstruct | 使用在方法上标注该方法是Bean的初始化方法 |
| @PreDestroy | 使用在方法上标注该方法是Bean的销毁方法 |
applicationContext.xml 配置组件扫描
<?xml version="1.0" encoding="UTF-8"?>
<beans xmlns="http://www.springframework.org/schema/beans"
       xmlns:xsi="http://www.w3.org/2001/XMLSchema-instance"
       xmlns:context="http://www.springframework.org/schema/context"
       xsi:schemaLocation="http://www.springframework.org/schema/beans http://www.springframework.org/schema/beans/spring-beans.xsd
                      http://www.springframework.org/schema/context http://www.springframework.org/schema/context/spring-context.xsd">

    <!--配置组件扫描-->
    <context:component-scan base-package="com.jf"/>

    <!--加载外部的properties文件-->
    <context:property-placeholder location="jdbc.properties"/>
    <bean id="dataSource" class="com.mchange.v2.c3p0.ComboPooledDataSource">
        <property name="driverClass" value="${jdbc.driver}"/>
        <property name="jdbcUrl" value="${jdbc.url}"/>
        <property name="user" value="${jdbc.username}"/>
        <property name="password" value="${jdbc.password}"/>
    </bean>
</beans>
dao层
package com.jf.dao.impl;

import com.jf.dao.UserDao;
import org.springframework.stereotype.Repository;

//<bean id="userDao" class="com.jf.dao.impl.UserDaoImpl"/>
@Repository("userDao")
public class UserDaoImpl implements UserDao {
    @Override
    public void save() {
        System.out.println("sava running");
    }
}
service层
package com.jf.service.impl;

import com.jf.dao.UserDao;
import com.jf.service.UserService;
import org.springframework.beans.factory.annotation.Autowired;
import org.springframework.beans.factory.annotation.Qualifier;
import org.springframework.stereotype.Service;

//  <bean id="userService" class="com.jf.service.impl.UserServiceImpl">
@Service("userService")
//@Scope("prototype")
public class UserServiceImpl implements UserService {

    @Value("${jdbc.driver}")
    private String driver;

    //<property name="userDao" ref="userDao"/>
    @Autowired // 按照数据类型从Spring容器中进行匹配
    @Qualifier("userDao") // 是按照id的名称 从Spring容器中进行匹配 但是此处@Qualifier 要结合@Autowired使用
    // @Resouce(name="userDao") 相当于@Autowired+@Qualifier
    UserDao userDao;

	// 使用注解 set方法可以省略
    public void setUserDao(UserDao userDao) {
        this.userDao = userDao;
    }

    @Override
    public void save() {
        userDao.save();
    }
    @PostConstruct
    public void init(){
        System.out.println("service init");
    }

    @PreDestroy
    public void destory(){
        System.out.println("service destory");
    }
}
Spring新注解
原始注解无法搞定非自定义Bean
原始注解无法搞定组件扫描
原始注解无法搞定加载properties文件配置
原始注解无法搞定import引入配置文件
| 注解 | 说明 |
|---|---|
| @Configuration | 用于指定当前类是个Spring配置类,当创建容器时会从该类上加载注解 |
| @ComponentScan | 用于指定Spring在初始化容器时要扫描的包。作用和在Spring的xml配置文件中的<context:component-scan base-package="com.jf"/>一样的 |
| @Bean | 使用在方法上,标注将该方法的返回值存储到Spring容器中 |
| @PropertySource | 用于加载.properties文件中的配置 |
| @import | 用于导入其他配置类 |
application核心配置类
package com.jf.config;

import org.springframework.context.annotation.*;

@Configuration // 标志该类是Spring的核心配置类
// <!--配置组件扫描-->
//    <context:component-scan base-package="com.jf"/>
@ComponentScan("com.jf")
// <import resource=""
@Import({DataSourceConfiguration.class})
public class SpringConfiguration {

}
dataSouce配置类
package com.jf.config;

import com.mchange.v2.c3p0.ComboPooledDataSource;
import org.springframework.beans.factory.annotation.Value;
import org.springframework.context.annotation.Bean;
import org.springframework.context.annotation.PropertySource;

import javax.sql.DataSource;
import java.beans.PropertyVetoException;

//     <!--加载外部的properties文件-->
//    <context:property-placeholder location="jdbc.properties"/>
@PropertySource("jdbc.properties")
//     <!--加载外部的properties文件-->
//    <context:property-placeholder location="jdbc.properties"/>
@PropertySource("jdbc.properties")
public class DataSourceConfiguration {
    @Value("${jdbc.driver}")
    private String driver;
    @Value("${jdbc.url}")
    private String jdbcUrl;
    @Value("${jdbc.username}")
    private String userName;
    @Value("${jdbc.password}")
    private String passWord;

    @Bean("dataSource") // Spring会将当前方法的返回值以指定名称存储到Spring容器中
    public DataSource getDataSource() throws PropertyVetoException {
        ComboPooledDataSource dataSource = new ComboPooledDataSource();
        dataSource.setDriverClass(driver);
        dataSource.setJdbcUrl(jdbcUrl);
        dataSource.setUser(userName);
        dataSource.setPassword(passWord);
        return dataSource;
    }
}
Spring集成Junit
- 让SpringJunit负责创建Spring容器,但是需要指定配置文件的名称
- 将需要进行测试的Bean直接在测试类中进行注入
Spring集成Junit步骤
1.导入Spring集成Junit的坐标
2.使用@Runwith注解替换原来的运行期
3.使用@ContextConfiguration指定配置文件或配置类
4.使用@Autowired注入需要测试的对象
5.创建测试方法进行测试
package com.jf.test;

import com.jf.service.UserService;
import org.junit.Test;
import org.junit.runner.RunWith;
import org.springframework.beans.factory.annotation.Autowired;
import org.springframework.test.context.ContextConfiguration;
import org.springframework.test.context.junit4.SpringJUnit4ClassRunner;

import javax.sql.DataSource;
import java.sql.SQLException;

@RunWith(SpringJUnit4ClassRunner.class)
//@ContextConfiguration(classes = SpringConfiguration.class)
@ContextConfiguration(value = "classpath:applicationContext.xml")
public class SpringJunitTest {

    @Autowired
    private UserService userService;

    @Autowired
    private DataSource dataSource;

    @Test
    public void test1() throws SQLException {
        userService.save();
        System.out.println(dataSource.getConnection());
    }
}
pom.xml
<?xml version="1.0" encoding="UTF-8"?>
<project xmlns="http://maven.apache.org/POM/4.0.0"
         xmlns:xsi="http://www.w3.org/2001/XMLSchema-instance"
         xsi:schemaLocation="http://maven.apache.org/POM/4.0.0 http://maven.apache.org/xsd/maven-4.0.0.xsd">
    <parent>
        <artifactId>Spring</artifactId>
        <groupId>com.jf</groupId>
        <version>1.0-SNAPSHOT</version>
    </parent>
    <modelVersion>4.0.0</modelVersion>

    <artifactId>spring_ioc_anno</artifactId>

    <properties>
        <maven.compiler.source>8</maven.compiler.source>
        <maven.compiler.target>8</maven.compiler.target>
    </properties>

    <dependencies>
        <!-- https://mvnrepository.com/artifact/mysql/mysql-connector-java -->
        <dependency>
            <groupId>mysql</groupId>
            <artifactId>mysql-connector-java</artifactId>
            <version>5.1.32</version>
        </dependency>

        <!-- https://mvnrepository.com/artifact/c3p0/c3p0 -->
        <dependency>
            <groupId>c3p0</groupId>
            <artifactId>c3p0</artifactId>
            <version>0.9.1.2</version>
        </dependency>

        <!-- https://mvnrepository.com/artifact/com.alibaba/druid -->
        <dependency>
            <groupId>com.alibaba</groupId>
            <artifactId>druid</artifactId>
            <version>1.1.10</version>
        </dependency>

        <!-- https://mvnrepository.com/artifact/junit/junit -->
        <dependency>
            <groupId>junit</groupId>
            <artifactId>junit</artifactId>
            <version>4.12</version>
            <scope>test</scope>
        </dependency>

        <dependency>
            <groupId>org.springframework</groupId>
            <artifactId>spring-context</artifactId>
            <version>5.0.5.RELEASE</version>
        </dependency>

        <!-- https://mvnrepository.com/artifact/org.springframework/spring-test -->
        <dependency>
            <groupId>org.springframework</groupId>
            <artifactId>spring-test</artifactId>
            <version>5.0.5.RELEASE</version>
            <scope>test</scope>
        </dependency>
    </dependencies>
</project>
Spring与Web环境集成
ApplicationContext应用上下文获取方式
在Web项目中,可以使用ServletContextListener监听Web应用的启动,我们可以在Web应用启动时,就加载spring的配置文件,创建应用上下文对象ApplicationContext,在将其存储到最大域servletContext域中,这样就可以在任意位置从域中获得应用上下文ApplicationContext对象了。
<?xml version="1.0" encoding="UTF-8"?>
<web-app xmlns="http://xmlns.jcp.org/xml/ns/javaee"
         xmlns:xsi="http://www.w3.org/2001/XMLSchema-instance"
         xsi:schemaLocation="http://xmlns.jcp.org/xml/ns/javaee http://xmlns.jcp.org/xml/ns/javaee/web-app_4_0.xsd"
         version="4.0">

    <!--全局初始化参数-->
    <context-param>
        <param-name>contextConfigLocation</param-name>
        <param-value>applicationContext.xml</param-value>
    </context-param>

    <servlet>
        <servlet-name>UserServlet</servlet-name>
        <servlet-class>com.jf.web.UserServlet</servlet-class>
    </servlet>
    <servlet-mapping>
        <servlet-name>UserServlet</servlet-name>
        <url-pattern>/userServlet</url-pattern>
    </servlet-mapping>

	<!--配置监听器,用于启动项目就构建Spring容器-->
    <listener>
        <listener-class>com.jf.listener.ContextLoaderListener</listener-class>
    </listener>
</web-app>
监听器类
public class ContextLoaderListener implements ServletContextListener {

    @Override
    public void contextInitialized(ServletContextEvent servletContextEvent) {
        // 将Spring的应用上下文对象存储到ServletContext域中
        // 读取web.xml中的全局参数
        ServletContext servletContext = servletContextEvent.getServletContext();
        String contextConfigLocation = servletContext.getInitParameter("contextConfigLocation");
        ApplicationContext app = new ClassPathXmlApplicationContext(contextConfigLocation);
        servletContext.setAttribute("app",app);
        System.out.println("Spring init sccess");
    }

    @Override
    public void contextDestroyed(ServletContextEvent servletContextEvent) {

    }
}
web层
public class UserServlet extends HttpServlet {
    @Override
    protected void doGet(HttpServletRequest req, HttpServletResponse resp) throws ServletException, IOException {
        ServletContext servletContext = req.getServletContext();
        //ApplicationContext app = (ApplicationContext) servletContext.getAttribute("app");
        ApplicationContext app = WebApplicationContextUtils.getWebApplicationContext(servletContext);
        UserService userService = app.getBean(UserService.class);
        userService.save();
    }
}
获取Applciationcontext工具
public class WebApplicationContextUtils {
    public static ApplicationContext getWebApplicationContext(ServletContext servletContext){
        return (ApplicationContext) servletContext.getAttribute("app");
    }
}
Spring提供获取上下文的工具
Spring提供了一个监听器ContextLoaderListener就是对上诉功能的封装,该监听器内部加载了Spring配置文件,创建应用上下文对象,并存储到ServletContext域中,提供了一个客户端工具WebApplicationContextUtils供使用者获取应用上下文对象
步骤
1.在web.xml中配置ContextLoaderListener监听器(导入spring-web坐标)
        <dependency>
            <groupId>org.springframework</groupId>
            <artifactId>spring-web</artifactId>
            <version>5.0.5.RELEASE</version>
        </dependency>
2.使用WebApplicationContextUtils获得应用上下文对象ApplicationContext
web.xml
<?xml version="1.0" encoding="UTF-8"?>
<web-app xmlns="http://xmlns.jcp.org/xml/ns/javaee"
         xmlns:xsi="http://www.w3.org/2001/XMLSchema-instance"
         xsi:schemaLocation="http://xmlns.jcp.org/xml/ns/javaee http://xmlns.jcp.org/xml/ns/javaee/web-app_4_0.xsd"
         version="4.0">

    <!--全局初始化参数-->
    <context-param>
        <param-name>contextConfigLocation</param-name>
        <!--classpath:applicationContext.xml  classpath标准写法-->
        <param-value>classpath:applicationContext.xml</param-value>
    </context-param>

    <servlet>
        <servlet-name>UserServlet</servlet-name>
        <servlet-class>com.jf.web.UserServlet</servlet-class>
    </servlet>
    <servlet-mapping>
        <servlet-name>UserServlet</servlet-name>
        <url-pattern>/userServlet</url-pattern>
    </servlet-mapping>

    <listener>
        <listener-class>org.springframework.web.context.ContextLoaderListener</listener-class>
    </listener>
</web-app>
public class UserServlet extends HttpServlet {
    @Override
    protected void doGet(HttpServletRequest req, HttpServletResponse resp) throws ServletException, IOException {
        ServletContext servletContext = req.getServletContext();
        ApplicationContext app = WebApplicationContextUtils.getWebApplicationContext(servletContext);
        UserService userService = app.getBean(UserService.class);
        userService.save();
    }
}
SpringMVC概述
SpringMVC是一种基于Java的实现MVC设计模型的请求驱动类型的轻量级WEB框架,属于SpringFrameWork的后续产品,已经融合在SpringWebFlow中。
SpringMVC,通过一套注解,让一个简单的Java类成为处理请求的控制器,而无须实现任何接口。同时它还支持RESTful编程风格的请求
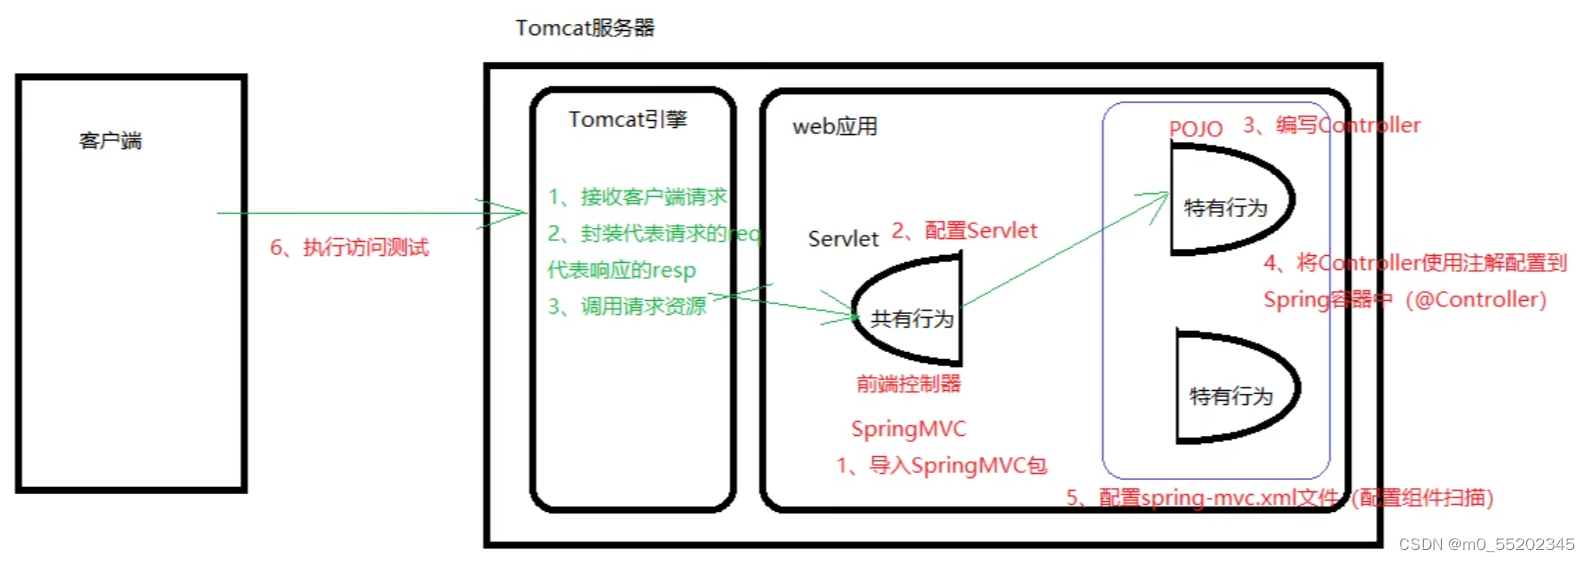
1.导入SpringMVC包
2.配置Servlet
3.编写Controller
4.将Controller使用注解配置到Spring容器中(@Controller
5.配置组件扫描(spring-mvc.xml文件(配置组件扫描))
6.执行访问测试
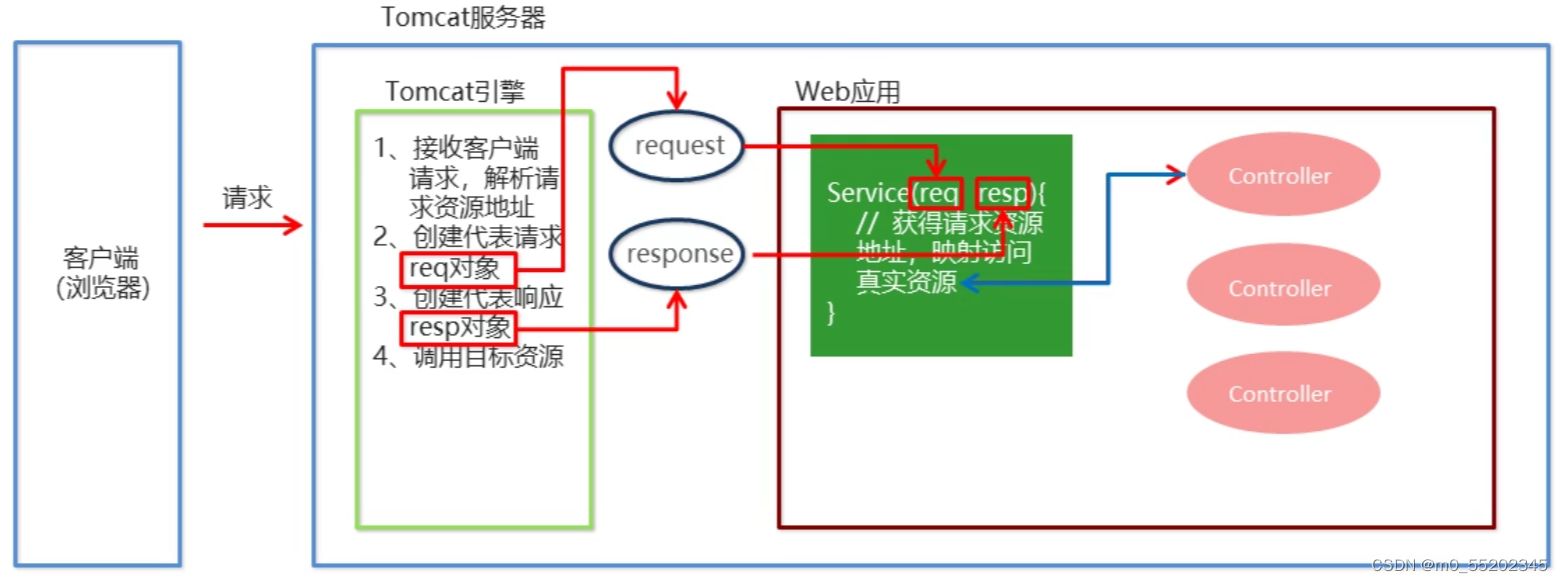
SpringMVC快速入门
需求:客户端发起请求,服务器端接收请求,执行逻辑并进行视图跳转
开发步骤:
1.导入SpringMVC相关坐标
2.配置SpringMVC核心控制器DispathcerServlet
3.创建Controller类和视图页面
4.使用注解配置Controller类中业务方法的映射地址
5.配置SpringMVC核心配置文件spring-mvc.xml
6.客户端发起请求测试
SpringMVC流程图示
SpringMVC组件解析
SpringMVC执行流程
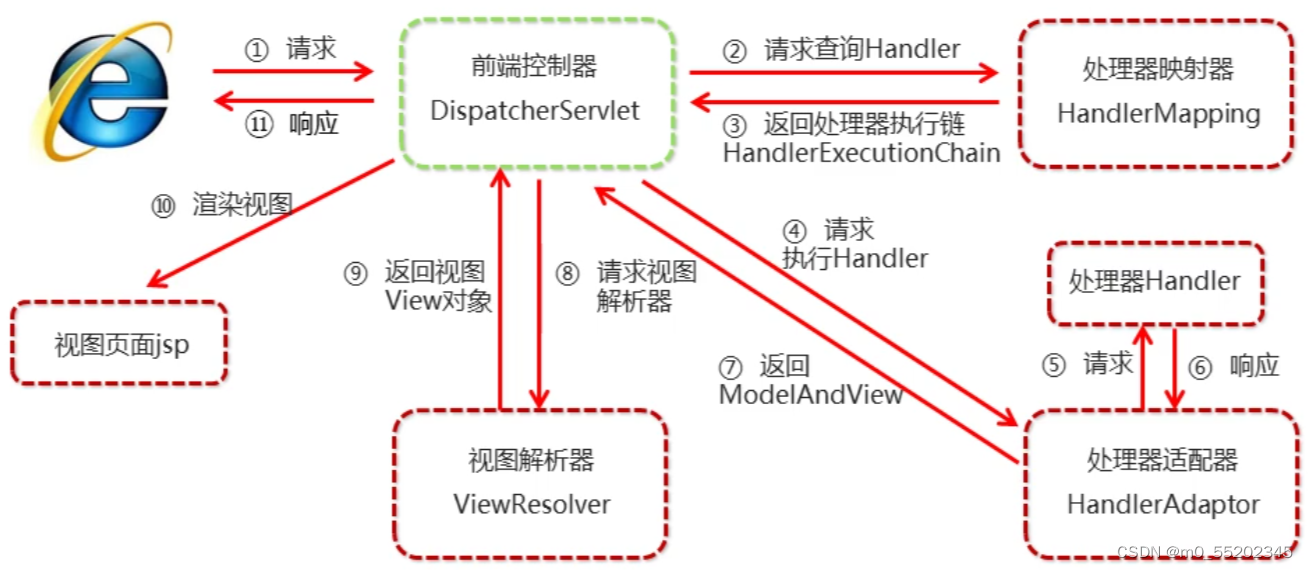
1.用户发送请求至前端控制器DispatcherServlet
2.DispatcherServlet收到请求调用HandlerMapping处理器映射器
3.处理器映射器找到具体的处理器(可以根据xml配置、注解进行查找),生成处理器对象及处理器拦截器(如有则生成)一并返回给DispatcherServlet
4.DispatcherServlet调用HandlerAdapter处理器适配器
5.HandlerAdapter经过适配调用具体的处理器(Controller,也叫后端控制器)
6.Controller执行完成返回ModelAndView
7.HandlerAdapter将Controller执行结果ModelAndView返回给DispatcherServlet
8.DispatcherServlet将ModelAndView传给ViewResover视图解析器
9.ViewReslover解析后返回具体View
10.DispatcherServlet根据View进行渲染视图(即将模型数据填充至视图中)。DispatcherServlet相应用户
SpringMVC注解解析
@RequestMapping 请求映射
作用:用于建立请求URL和处理请求方法之间的对应关系
位置:
- 类上,请求URL的第一级访问目录。此处不写的话,就相当于应用的根目录
- 方法上,请求URL的第二级访问目录,与类上的使用@ReqestMapping标注的一级目录一起组成访问虚拟路径
属性: - value:用于指定请求的URL 。它和path属性的作用是一样的
- method:用于指定请求的方式
- params:用于指定限制请求参数的条件。它支持简单的表达式。要求请求参数的key和value必须和配置的一模一样
例如: - params={“accountName”},表示请求参数必须有accountName
- params={“moeny!100”},表示请求参数中money不能是100
@Controller
@RequestMapping(value = "/user")
public class UserController {

    @Autowired
    @Qualifier("userService")
    private UserService userService;

    @RequestMapping(value = "/quick",method = RequestMethod.GET,params = {"username"})
    public String save(){
        userService.save();
        System.out.println("Controller save running");
        return "/success.jsp";
    }
}
SpringMVC 命名空间引入和组件扫描
1.mvc命名空间引入
<?xml version="1.0" encoding="UTF-8"?>
<beans xmlns="http://www.springframework.org/schema/beans"
       xmlns:xsi="http://www.w3.org/2001/XMLSchema-instance"
       xmlns:context="http://www.springframework.org/schema/context"

       xsi:schemaLocation="http://www.springframework.org/schema/beans
       http://www.springframework.org/schema/beans/spring-beans.xsd
       http://www.springframework.org/schema/context
       http://www.springframework.org/schema/context/spring-context.xsd">

    <context:component-scan base-package="com.jf">
        <context:exclude-filter type="annotation" expression="org.springframework.stereotype.Controller"/>
    </context:component-scan>

</beans>
2.组件扫描
SpringMVC基于Spring容器,所以在进行SpringMVC操作时,需要将Controller存储到Spring容器中,如果使用@Controller注解标注的话,就需要使用<context:component-scan base-package="com.jf.controller"/>进行组件扫描
SpringMVC的xml配置解析
1.视图解析器
SpringMVC有默认组件配置,默认组件配置都是DispatcherServlet.properties配置文件中配置的。
org.springframework.web.servlet.view.InternalResourceViewResolver
解析器默认配置
REDIRECT_URL_PREFIX = "redirect:" – 重定向(重定向前缀)
FORWARD_URL_PREFIX = "forward:" – 转发前缀(默认)
prefix = " " --视图名称前缀
suffix = " " – 视图名称后缀
SpringMVC的数据响应方式
1.页面跳转
- 直接返回字符串
此方式会将返回的字符串与视图解析器的前后缀拼接后跳转 - 通过ModelAndView对象返回
@Controller
@RequestMapping(value = "/user")
public class UserController {

    @Autowired
    @Qualifier("userService")
    private UserService userService;

    @RequestMapping(value = "/quick",method = RequestMethod.GET,params = {"username"})
    public String save(){
        userService.save();
        System.out.println("Controller save running");
        return "redirect:/jsp/success.jsp";
    }

    @RequestMapping("/quick2")
    public ModelAndView save2(){
        /**
         * Model:模型 作用封装数据
         * View: 视图 作用展示数据
         */
        ModelAndView modelAndView = new ModelAndView();
        // 设置视图
        modelAndView.setViewName("success");
        // 设置模型数据
        modelAndView.addObject("username","jf");
        return modelAndView;
    }

    @RequestMapping("/quick3")
    public ModelAndView save3(ModelAndView modelAndView){

        // 设置视图
        modelAndView.setViewName("success");
        // 设置模型数据
        modelAndView.addObject("username","jf2");
        return modelAndView;
    }

    @RequestMapping("/quick4")
    public String save4(Model model){
        model.addAttribute("username","jf3");
        return "success";
    }

    @RequestMapping("/quick5")
    // TomCat  提供 HttpServletRequest 对象
    public String save5(HttpServletRequest request){
        request.setAttribute("username","jf4");
        return "success";
    }
}
2.回写数据
- 直接返回字符串
web基础阶段,客户端访问服务器端,如果想直接回写字符串作为响应体返回的话,只需要使用response.getWriter().print(“Hello world”)即可
1.通过SpringMVC框架注入的response对象,使用response.getWriter().print(“Hello world”)回写数据,此时不需要视图跳转,业务方法返回值为void
 @RequestMapping("/quick6")
    public void save6(HttpServletResponse response) throws IOException {
        response.getWriter().print("hello jf");
    }
2.将需要回写的字符串直接返回,但此时需要通过@ResponseBody注解告知SpringMVC框架,方法返回的字符串不是跳转而是直接在http响应体中返回
    @RequestMapping("/quick7")
    @ResponseBody // 告知SpringMVC框架,不进行视图跳转,直接进行数据响应
    public String save7() throws IOException {
        return "hello jf1";
    }
- 返回对象或集合
通过SpringMVC帮助我们对对象或集合进行json字符串的转换并回写,为处理器适配器配置消息转换参数,指定使用jackson进行对象或集合的转换,因此需要在springmvc-xml中进行如下配置
<!--手动配置处理器映射器HandlerAdapter-->
    <bean class="org.springframework.web.servlet.mvc.method.annotation.RequestMappingHandlerAdapter">
        <property name="messageConverters">
            <list>
                <bean class="org.springframework.http.converter.json.MappingJackson2HttpMessageConverter"/>
            </list>
        </property>
    </bean>
    @RequestMapping("/quick9")
    @ResponseBody
    // 期望SpringMVC自动将User转换成json格式的字符串
    public User save9() throws IOException {
        User user = new User();
        user.setUserName("Alice");
        user.setAge(29);
        return user;
    }

    @RequestMapping("/quick10")
    @ResponseBody
    // 期望SpringMVC自动将User转换成json格式的字符串
    public List<String> save10() throws IOException {
        ArrayList<String> strList = new ArrayList<>();
        strList.add("aa");
        return strList;
    }
以上方法上添加@ResponseBody就可以返回json格式的字符串,但是这样配置比较麻烦,可以使用mvc的注解驱动代替上述配置
<?xml version="1.0" encoding="UTF-8"?>
<beans xmlns="http://www.springframework.org/schema/beans"
       xmlns:xsi="http://www.w3.org/2001/XMLSchema-instance"
       xmlns:context="http://www.springframework.org/schema/context"
       xmlns:mvc="http://www.springframework.org/schema/mvc"
       xsi:schemaLocation="
       http://www.springframework.org/schema/beans
       http://www.springframework.org/schema/beans/spring-beans.xsd
       http://www.springframework.org/schema/context
       http://www.springframework.org/schema/context/spring-context.xsd
       http://www.springframework.org/schema/mvc
       http://www.springframework.org/schema/mvc/spring-mvc.xsd">
    <!--Controller的组件扫描-->
    <context:component-scan base-package="com.jf.controller"/>

    <!--手动配置内部资源视图解析器-->
    <bean id="viewResolver" class="org.springframework.web.servlet.view.InternalResourceViewResolver">
        <!--/jsp/success.jsp-->
        <property name="prefix" value="/jsp/"/>
        <property name="suffix" value=".jsp"/>
    </bean>
    <mvc:annotation-driven/>
</beans>
SpringMVC获得请求数据
客户端请求参数的格式是:name=value&name=value…
服务器端要获得请求的参数,有时还需要进行数据的封装,SpringMVC可以接收如下类型参数:
1.基本类型参数
Controller中的业务方法的参数名称要与请求参数的name一致,参数值会自动映射匹配

    // SpringMVC获得请求数据
    // 基本类型参数
    @RequestMapping("/quick11")
    @ResponseBody
    public String save11(String userName,int age) throws IOException {
        return "input success";
    }
2.pojo类型
Controller中的业务方法的POJO参数的属性名与请求参数的name一致,参数值会自动映射匹配
    // pojo类型
    @RequestMapping("/quick12")
    @ResponseBody
    public String save12(User user) throws IOException {
        System.out.println(user);
        return "input pojo success";
    }
public class User {

    private String userName;
    private int age;

    public String getUserName() {
        return userName;
    }

    public void setUserName(String userName) {
        this.userName = userName;
    }

    public int getAge() {
        return age;
    }

    public void setAge(int age) {
        this.age = age;
    }

    @Override
    public String toString() {
        return "User{" +
                "userName='" + userName + '\'' +
                ", age=" + age +
                '}';
    }
}


3.数组类型参数
Controller中的业务方法的参数名称要与请求参数的name一致,参数值会自动映射匹配
    // 数组类型
    @RequestMapping("/quick13")
    @ResponseBody
    public String save12(String[] strs) throws IOException {
        System.out.println(Arrays.toString(strs));
        return "input array success";
    }

4.集合类型参数
- 获得集合参数时,要将集合参数包到一个POJO中才可以
public class VO {

    private List<User> userList;

    public List<User> getUserList() {
        return userList;
    }

    public void setUserList(List<User> userList) {
        this.userList = userList;
    }

    @Override
    public String toString() {
        return "VO{" +
                "userList=" + userList +
                '}';
    }
}
    // 集合类型
    @RequestMapping("/quick14")
    @ResponseBody
    public String save13(VO vo) throws IOException {
        System.out.println(vo);
        return "input form success";
    }
form.jsp 用于提交集合数据
<%--
  Created by IntelliJ IDEA.
  User: 18744
  Date: 2022/5/8
  Time: 23:56
  To change this template use File | Settings | File Templates.
--%>
<%@ page contentType="text/html;charset=UTF-8" language="java" %>
<html>
<head>
    <title>Title</title>
</head>
<body>
<form action="${pageContext.request.contextPath}/user/quick14" method="post">
    <%--表明是第几个User对象的userName age--%>
    <input type="text" name="userList[0].userName"><br/>
    <input type="text" name="userList[0].age"><br/>
    <input type="text" name="userList[1].userName"><br/>
    <input type="text" name="userList[1].age"><br/>
    <input type="submit" value="提交">
</form>
</body>
</html>
- 当使用ajax提交时,可以指定contentType为json形式,那么在方法参数位置使用@RequestBody可以直接接收集合数据而无需使用POJO进行包装
    // 集合类型
    @RequestMapping("/quick15")
    @ResponseBody
    public String save14(@RequestBody List<User> userList) throws IOException {
        System.out.println(userList);
        return "input ajax success";
    }
<%@ page contentType="text/html;charset=UTF-8" language="java" %>
<html>
<head>
    <title>Title</title>
    <script src="${pageContext.request.contextPath}/js/jquery-3.3.1.min.js"></script>
    <script>
        var userList = new Array();
        userList.push({userName:"zhangsan",age:18});
        userList.push({userName:"lisi",age:28});

        $.ajax({
            type:"POST",
            url:"${pageContext.request.contextPath}/user/quick15",
            data:JSON.stringify(userList),
            contentType:"application/json;charset=utf-8"
        })
    </script>
</head>
<body>

</body>
</html>
由于引入jquery,需要在springmvc.xml中配置<mvc:resources mapping="/js/**" location="/js/"/>,用于开放静态资源的访问
或者 <mvc:default-servlet-handler/>SpringMVC找不到静态资源,交由原始框架进行寻找
解决请求数据乱码问题
在web.xml文件中配置全局filter
    <!--配置全局过滤filter-->
    <filter>
        <filter-name>CharacterEncodingFilter</filter-name>
        <filter-class>org.springframework.web.filter.CharacterEncodingFilter</filter-class>
        <init-param>
            <param-name>encoding</param-name>
            <param-value>UTF-8</param-value>
        </init-param>
    </filter>
    <filter-mapping>
        <filter-name>CharacterEncodingFilter</filter-name>
        <url-pattern>/*</url-pattern>
    </filter-mapping>
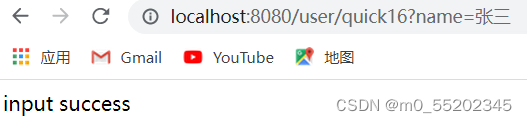
参数绑定注解@requestParam
当请求参数名称与Controller的业务方法参数名称不一致时,就需要通过@RequestParam注解显示的绑定
    // 参数绑定注解
    @RequestMapping("/quick16")
    @ResponseBody
    public String save15(@RequestParam(value = "name",required = true,defaultValue = "jf") String userName) throws IOException {
        System.out.println(userName);
        return "input success";
    }
注解参数
@RequestParam
1.value:与请求参数名称
2.required:此在指定的请求参数是否必须包括,默认是true,提交时如果没有此参数则报错
3.defaultValue:当没有指定请求参数时,则使用指定的默认值赋值
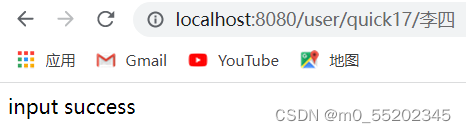
获得Restful风格的参数
Restful是一种软件架构风格、设计风格、而不是标准,只是提供了一组设计原则和约束条件。主要用于客户端和服务器交互的软件,基于这个风格设计的软件可以更简洁,更有层次,更易于实现缓存机制等。
Restful风格的请求是使用"url+请求方式",表示一次请求的目的,HTTP协议里面四个表示操作方式的动词如下:
- GET:用于获取资源
- POST:用于新建资源
- PUT:用于更新资源
- DELETE:用于删除资源
例如: - /user/1 GET: 得到id=1 的 user
- /user/1 DELETE: 删除id=1 的 user
    // Restful 风格
    @RequestMapping("/quick17/{name}")
    @ResponseBody
    //@PathVariable(value = "name") 占位符
    public String save16(@PathVariable(value = "name") String userName) throws IOException {
        System.out.println(userName);
        return "input success";
    }
自定义类型转换器
- SpringMVC默认已经提供了一些常用的类型转换器,例如客户端提交的字符串转换成int类型进行参数设置
自定义类型转换器开发步骤:
1.定义转换器类实现Converter接口
2.在配置文件中声明转换器
3.在<mvc:annotation-driven/>中引用转换器
public class DateConverter implements Converter<String, Date> {
    @Override
    public Date convert(String dateStr) {
        // 将日期字符串转换成日期对象
        SimpleDateFormat sdf = new SimpleDateFormat("yyyy-MM-dd");
        Date date = null;
        try {
            date = sdf.parse(dateStr);
        } catch (ParseException e) {
            e.printStackTrace();
        }
        return date;
    }
}
    <!--声明转换器-->
    <bean id="conversionService2" class="org.springframework.context.support.ConversionServiceFactoryBean">
        <property name="converters">
            <list>
                <bean class="com.jf.converter.DateConverter"/>
            </list>
        </property>
    </bean>

	<mvc:annotation-driven conversion-service="conversionService2"/>
获得Servlet相关API
SpringMVC支持使用原始ServletAPI对象作为控制器方法的参数进行注入,常用对象如下:
1.HttpServletRequest
2.HttpServletResponse
3.HttpSession
    // 引用Servlet相关API
    @RequestMapping("/quick19")
    @ResponseBody
    public void save18(HttpServletRequest request, HttpServletResponse response, HttpSession httpSession) throws IOException {
        System.out.println(request);
        System.out.println(response);
        System.out.println(httpSession);
    }

获得请求头
1.@RequestHeader
使用@RequestHeader可以获得请求头信息,相当于web阶段request.getHeader(name)
注解属性
- value:请求头的名称
- required:是否必须携带此请求头
2.@CookieValue
获得指定Cookie的值
注解属性
- value:指定cookie的名称
- required:是否必须携带此cookie
    // 获取请求头
    @RequestMapping("/quick20")
    @ResponseBody
    public void save19(@RequestHeader(value = "User-Agent",required = false) String userAgent,@CookieValue(value = "JSESSIONID") String jsessionId) throws IOException {
        System.out.println(userAgent);
        System.out.println(jsessionId);
    }
文件上传
文件上传客户端三要素
1.表单项 type=“file”
2.表单的提交方式是post
3.表单的enctype属性是多部分表单形式,及enctype=“multipart/form-data”
单文件上传
<body>
    <form action="${pageContext.request.contextPath}/user/quick21" method="post" enctype="multipart/form-data">
        名称<input type="text" name="userName"><br/>
        文件<input type="file" name="uploadFile"><br/>
        <input type="submit" value="提交">
    </form>
</body>
    // 文件上传
    @RequestMapping("/quick21")
    @ResponseBody
    public void save20(String userName, MultipartFile uploadFile) throws IOException {
        System.out.println(userName);
        // 获得上传文件的名称
        String filename = uploadFile.getOriginalFilename();
        uploadFile.transferTo(new File("E:\\ExerciseJava\\"+filename));
    }
springmvc.xml
    <!--配置文件上传解析器-->
    <bean id="multipartResolver" class="org.springframework.web.multipart.commons.CommonsMultipartResolver">
        <!--上传文件总大小-->
        <property name="maxUploadSize" value="5242800"/>
        <!--上传单个文件的大小-->
        <property name="maxUploadSizePerFile" value="5242800"/>
        <!--上传文件的编码类型-->
        <property name="defaultEncoding" value="UTF-8"/>
    </bean>
多文件上传
    @RequestMapping("/quick21")
    @ResponseBody
    public void save20(String userName, MultipartFile[] uploadFile) throws IOException {
        System.out.println(userName);
        for (MultipartFile multipartFile : uploadFile) {
            String filename = multipartFile.getOriginalFilename();
            multipartFile.transferTo(new File("E:\\ExerciseJava\\" + filename));
        }
    }
<body>
    <form action="${pageContext.request.contextPath}/user/quick21" method="post" enctype="multipart/form-data">
        名称<input type="text" name="userName"><br/>
        文件1<input type="file" name="uploadFile"><br/>
        文件2<input type="file" name="uploadFile"><br/>
        <input type="submit" value="提交">
    </form>
</body>
SpringJDBCTemplate基本使用
JdbcTemplate概述
它是spring框架中提供的一个对象,是对原始繁琐的Jdbc API对象的简单封装。spring框架为我们提供了很多的操作模板类
JdbcTemplate开发步骤
1.导入spring-jdbc和spring-tx坐标
2.创建数据库表和实体
3.创建JdbcTemplate对象
4.执行数据库操作
@RunWith(SpringJUnit4ClassRunner.class)
@ContextConfiguration("classpath:applicationContext.xml")
public class jdbcTemplateCRUDTest {

    @Autowired
    private JdbcTemplate jdbcTemplate;

    @Test
    public void testUpdate(){
        jdbcTemplate.update("update account set money=? where name = ?",1000,"tom");
    }

    @Test
    public void testDelete(){
        jdbcTemplate.update("delete from account where name=?","tom");
    }

    @Test
    public void testInert(){
        jdbcTemplate.update("insert into account values (?,?)","Alice",500);
    }

    @Test
    public void testQueryAll(){
        List<Account> accounts = jdbcTemplate.query("select * from account", new BeanPropertyRowMapper<Account>(Account.class));
        System.out.println(accounts);
    }

    @Test
    public void testQueryOne(){
        Account account = jdbcTemplate.queryForObject("select * from Account where name=?", new BeanPropertyRowMapper<Account>(Account.class), "Alice");
        System.out.println(account);
    }

    @Test
    public void testQueryCount(){
        Long count = jdbcTemplate.queryForObject("select count(*) from account",Long.class);
        System.out.println(count);
    }
}
applicationContext.xml
<?xml version="1.0" encoding="UTF-8"?>
<beans xmlns="http://www.springframework.org/schema/beans"
       xmlns:xsi="http://www.w3.org/2001/XMLSchema-instance"
       xmlns:context="http://www.springframework.org/schema/context"
       xsi:schemaLocation="http://www.springframework.org/schema/beans http://www.springframework.org/schema/beans/spring-beans.xsd
                           http://www.springframework.org/schema/context http://www.springframework.org/schema/context/spring-context.xsd
">
    <context:property-placeholder location="jdbc.properties"/>
    <!--数据源对象-->
    <bean id="dataSouce" class="com.mchange.v2.c3p0.ComboPooledDataSource">
        <property name="driverClass" value="${jdbc.driver}"/>
        <property name="jdbcUrl" value="${jdbc.url}"/>
        <property name="user" value="${jdbc.username}"/>
        <property name="password" value="${jdbc.password}"/>
    </bean>

    <!--jdbc模板对象-->
    <bean id="jdbcTemplate" class="org.springframework.jdbc.core.JdbcTemplate">
        <property name="dataSource" ref="dataSouce"/>
    </bean>

</beans>
SpringMVC拦截器
拦截器(intercepter)的作用
SpringMVC拦截器类似于Servlet开发中的过滤器Fliter,用于对处理器进行预处理和后处理
将拦截器按一定的顺序联结成一条链,这条链称为拦截器链(Interceptor Chain)。在访问被拦截的方法或字段时,拦截器链中的拦截器就会按之前定义的顺序被调用。拦截器也是AOP思想的具体实现
拦截器和过滤器区别
| 区别 | 过滤器(Filter) | 拦截器(Interceptor) |
|---|---|---|
| 使用范围 | 时servlet规范中的一部分,任何JavaWeb工程都可以使用 | 是SpringMVC框架自己的,只有使用了SpringMVC框架的工程才能使用 |
| 拦截范围 | 在url-pattern中配置了/*后,可以对所有要访问的资源拦截 | 在<mvc:mapping path=" “/>中配置了/**之后,也可以对所有资源进行拦截,但是可以通过<mvc:exclude-mapping path=” "/>标签排除不需要拦截的资源 |
拦截器快速入门
步骤
1.创建拦截器类实现HandlerInterceptor接口
2.配置拦截器
3.测试拦截器
拦截器方法说明
| 方法名 | 说明 |
|---|---|
| preHandle() | 方法将在请求处理之前进行调用,该方法的返回值是布尔值Boolean类型的,当它返回为false时,表示请求结束,后续的Interceptor和Controller都不会再执行;当返回值为true时就会继续调用下一个Interceptor的preHandle方法 |
| postHandle() | 该方法是在当前请求进行处理之后被调用,前提是preHandle方法的返回值为true时才能被调用,且它会在DispatcherServlet进行视图返回渲染之前被调用,所以我们可以在这个方法中对Controller处理之后的ModelAndView对象进行操作 |
| afterCompletion() | 该方法将在整个请求结束之后,也就是在DispatcherServlet渲染了对应的视图之后执行,前提是preHandle方法的返回值为true时才能被调用 |
public class PrivilegeInterceptor implements HandlerInterceptor {

    @Override
    public boolean preHandle(HttpServletRequest request, HttpServletResponse response, Object handler) throws Exception {
        // 判断用户是否登录 判断session中有没有user
        HttpSession session = request.getSession();
        User user = (User) session.getAttribute("user");
        if(user == null){
            response.sendRedirect(request.getContextPath()+"/login.jsp");
            return false;
        }
        // 放行 访问目标资源
        return true;
    }
}
    <!--配置权限拦截器-->
    <mvc:interceptors>
        <mvc:interceptor>
            <mvc:mapping path="/**"/>
            <mvc:exclude-mapping path="/user/login"/>
            <bean class="com.jf.interceptor.PrivilegeInterceptor"/>
        </mvc:interceptor>
    </mvc:interceptors>
SpringMVC 异常处理
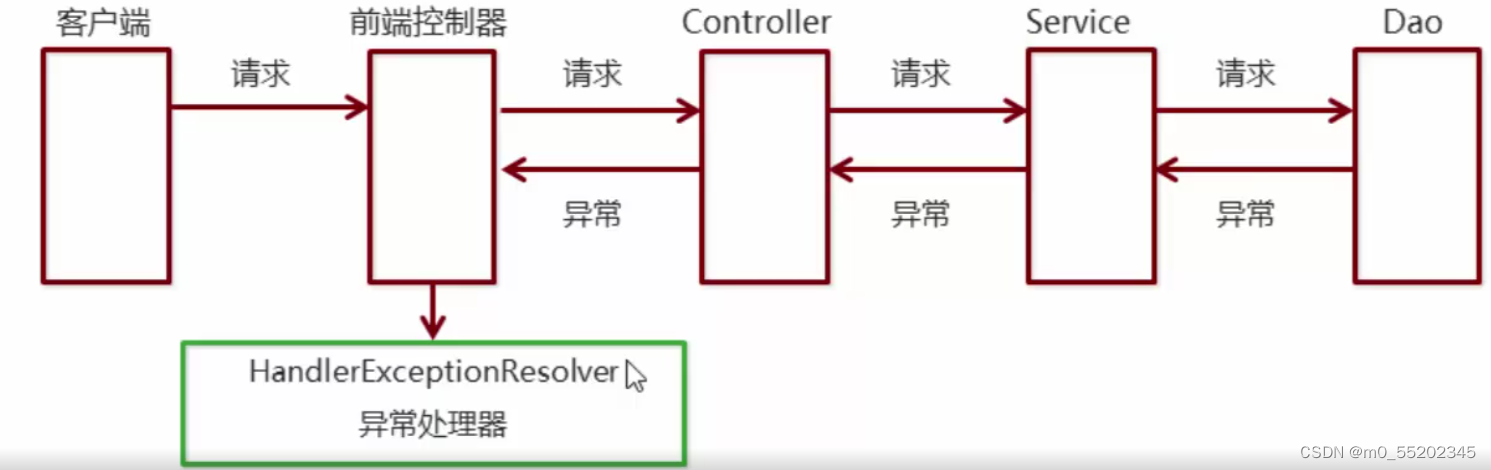
SpringMVC异常处理思路
系统中异常包括两类:预期异常和运行时异常RuntimeException
系统的Dao、Service、Controller 异常出现都通过throws Exception向上抛出,最后由SpringMVC前端控制器交由异常处理器进行异常处理
SpringMVC 异常处理的两种方式
1.使用SpringMVC提供的简单异常处理器SimpleMappingExceptionResolver
即 异常与页面简单的映射
    <!--配置简单映射异常处理器-->
    <bean class="org.springframework.web.servlet.handler.SimpleMappingExceptionResolver">
        <property name="defaultErrorView" value="error"/>
        <property name="exceptionMappings">
            <map>
                <entry key="com.jf.exception.MyException" value="error"/>
                <entry key="java.lang.ClassNotFoundException" value="error"/>
                <entry key="java.lang.ClassCastException" value="error1"/>
                <entry key="com.jf.exception.MyException" value="error2"/>
            </map>
        </property>
    </bean>
2.实现Spring的异常处理接口HandlerExceptionResolver自定义自己的异常处理器
步骤:
1.创建异常处理器类实现HandlerExceptionResolver
2.配置异常处理器
3.编写异常页面
4.测试页面跳转
public class MyExceptionResolver implements HandlerExceptionResolver {
    @Override
    /**
     * 参数Exception:异常对象
     * 返回值:ModelAndView 要跳转的错误视图的信息
     */
    public ModelAndView resolveException(HttpServletRequest httpServletRequest, HttpServletResponse httpServletResponse, Object o, Exception e) {

        ModelAndView modelAndView = new ModelAndView();
        if(e instanceof MyException){
            modelAndView.addObject("info","自定义异常");
        }else if (e instanceof ClassCastException){
            modelAndView.addObject("info","类转换异常");
        }
        modelAndView.setViewName("error");
        return modelAndView;
    }
}
spring-mvc.xml
<!--自定义异常处理器-->
    <bean class="com.jf.resolver.MyExceptionResolver"/>


 2467
2467


 被折叠的 条评论
为什么被折叠?
被折叠的 条评论
为什么被折叠?
 到【灌水乐园】发言


