


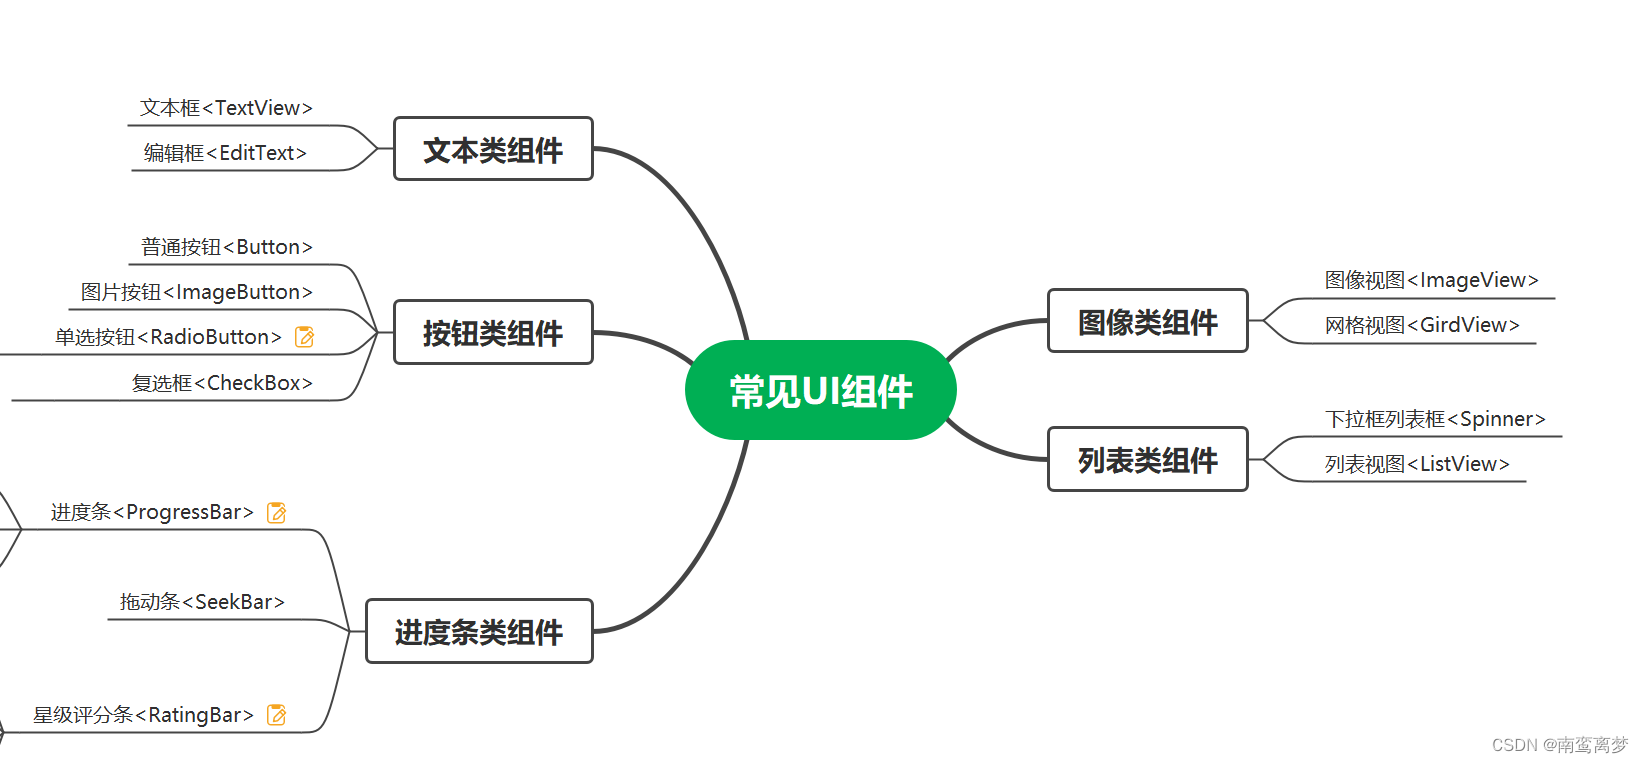
一、常见UI组件
二、详细介绍组件属性及应用
(1)单选按钮- - -RedioButton
通常情况下,RedioButton组件需要与RedioGroup组件一起使用,组成一个单选按钮组。
- 在改变单选按钮组的值时获取
<LinearLayout
        android:id="@+id/sex"
        android:layout_width="wrap_content"
        android:layout_height="wrap_content"
        android:layout_marginStart="50sp"
        android:layout_below="@id/ratingbar"
        android:orientation="horizontal">
    <TextView
        android:layout_width="wrap_content"
        android:layout_height="wrap_content"
        android:gravity="center_horizontal"
        android:text="性别:"
        android:textColor="@color/black"
        android:textSize="18sp"/>
    <RadioGroup
        android:id="@+id/siglecheck"
        android:layout_width="match_parent"
        android:layout_height="wrap_content"
        android:orientation="horizontal">
        <RadioButton
            android:layout_height="match_parent"
            android:layout_width="wrap_content"
            android:id="@+id/radio1"
            android:text="男"
            android:checked="true"/>
        <RadioButton
            android:layout_height="match_parent"
            android:layout_width="wrap_content"
            android:id="@+id/radio2"
            android:text="女"/>
    </RadioGroup>
</LinearLayout>
RadioGroup sex=(RadioGroup)findViewById(R.id.siglecheck) ;
sex.setOnCheckedChangeListener(new RadioGroup.OnCheckedChangeListener() {
     @Override
     public void onCheckedChanged(RadioGroup group, int checkedId)     {
        RadioButton r = (RadioButton) findViewById(checkedId);

        AlertDialog.Builder builder=new AlertDialog.Builder(RatingbarActivity.this);
        //r.getText()获取被选中的单选的按钮的值;
        builder.setMessage("您的性别是:"+r.getText());
        builder.setPositiveButton("确定",null).show();

   }

(2)复选框- - -CheckBox
xml文件
 <TextView
        android:layout_width="wrap_content"
        android:layout_height="wrap_content"
        android:layout_marginTop="10dp"
        android:layout_marginLeft="10dp"
        android:text="你未来想要选择的职业是:"
        android:textColor="@color/black"
        android:textSize="18sp"/>

      <CheckBox
       android:id="@+id/radio1"
       android:layout_width="wrap_content"
       android:layout_height="wrap_content"
       android:checked="true"
       android:text="c++工程师" />

      <CheckBox
          android:layout_height="wrap_content"
            android:layout_width="wrap_content"
            android:id="@+id/radio2"
            android:text="算法工程师"/>
<CheckBox
    android:layout_height="wrap_content"
    android:layout_width="wrap_content"
    android:id="@+id/radio3"
    android:text="嵌入式工程师"/>

<Button
    android:id="@+id/btn"
    android:layout_width="wrap_content"
    android:layout_height="wrap_content"
    android:layout_gravity="center"
    android:text="提交"/>
java代码
ublic class CheckBoxActivity extends AppCompatActivity {
    Button btn;
    CheckBox checkbox1,checkbox2,checkbox3;
    protected  void onCreate(Bundle savedIntanceState){
        super.onCreate(savedIntanceState);
        setContentView(R.layout.activity_main);

        btn=(Button) findViewById(R.id.btn);
        checkbox1=(CheckBox) findViewById(R.id.radio1);
        checkbox2=(CheckBox) findViewById(R.id.radio2);
        checkbox3=(CheckBox) findViewById(R.id.radio3);

        btn.setOnClickListener(new View.OnClickListener() {
            @Override
            public void onClick(View view) {
                String checked="";
                String spolit="  ";
                if(checkbox1.isChecked()){
                    checked+=checkbox1.getText().toString()+spolit;
                }
                if(checkbox2.isChecked()){
                    checked+=checkbox2.getText().toString()+spolit;
                }
                if(checkbox3.isChecked()){
                    checked+=checkbox3.getText().toString()+spolit;
                }
                //显示被选中的复选框对应的信息
                Toast.makeText(CheckBoxActivity.this,checked,Toast.LENGTH_LONG).show();
            }
        });
    }

}

(3).普通按钮–Button
- 更改按钮颜色和样式
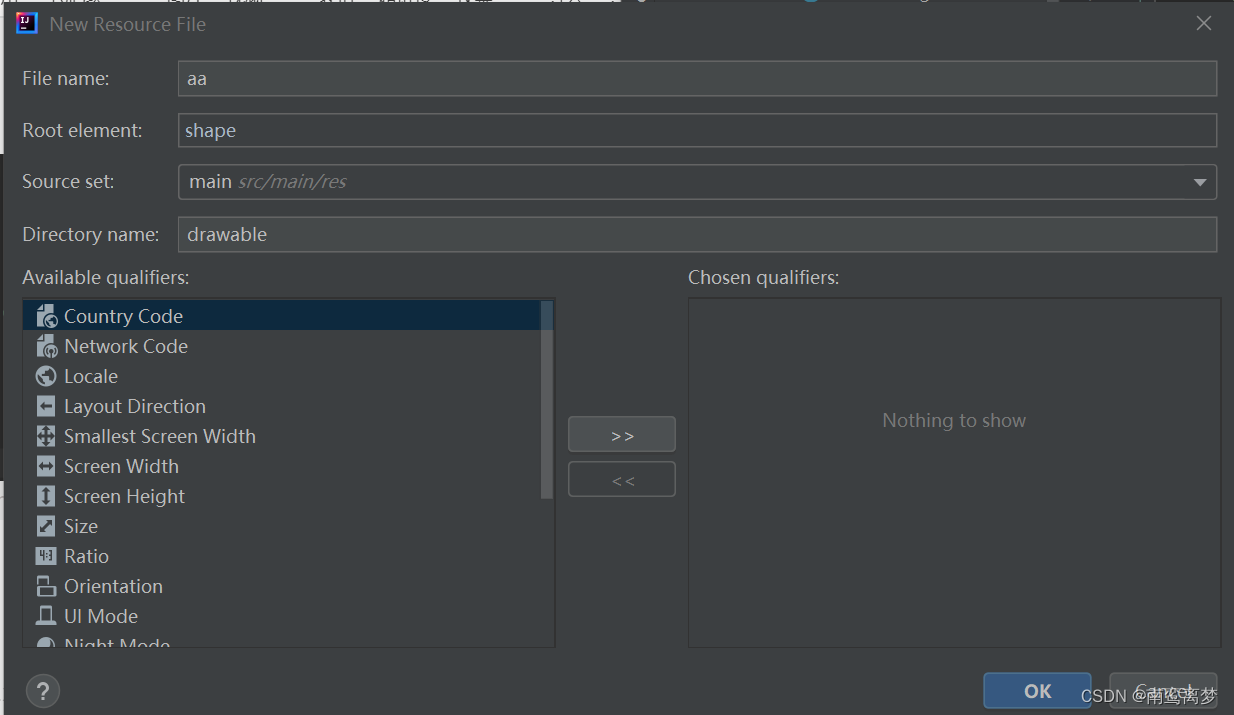
在drawable目录中新建Drawable Resource File文件
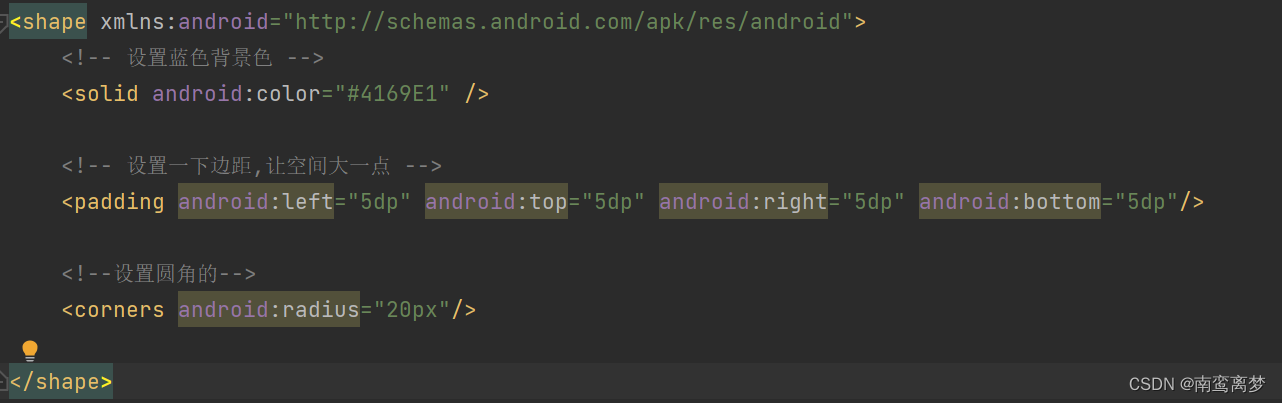
修改样式
Button背景无法修改,一直呈现亮紫色:
原因:由于新版本的主题问题导致
方法:①打开app/res/values/themes/themes.xml ②修改style,如下


 231
231


 被折叠的 条评论
为什么被折叠?
被折叠的 条评论
为什么被折叠?
 到【灌水乐园】发言


