


1.Spinner
Spinner用于从一串列表中选择某项,功能类似于单选按钮的组合
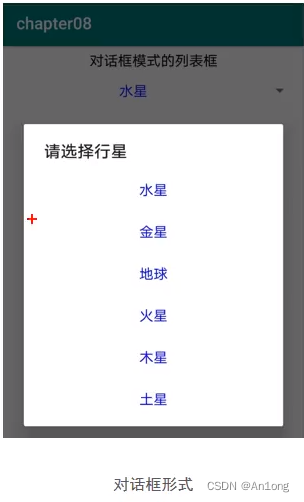
其包含两种模式
列表框(dropdown) 对话框(dialog)

<LinearLayout xmlns:android="http://schemas.android.com/apk/res/android"
    xmlns:app="http://schemas.android.com/apk/res-auto"
    xmlns:tools="http://schemas.android.com/tools"
    android:layout_width="match_parent"
    android:layout_height="match_parent"
    tools:context=".SpinnerActivity"
    android:orientation="vertical">

    <TextView
        android:layout_width="match_parent"
        android:layout_height="wrap_content"
        android:text="下拉模式的列表框"
        android:textSize="17sp"/>

    <Spinner
        android:id="@+id/sp_dropdown"
        android:layout_width="match_parent"
        android:layout_height="wrap_content"
        android:spinnerMode="dropdown"/>

</LinearLayout>我们现在定义了一个下拉框,但是此时我们要显示数据,它是个列表,此时我们使用适配器
2.Adapter
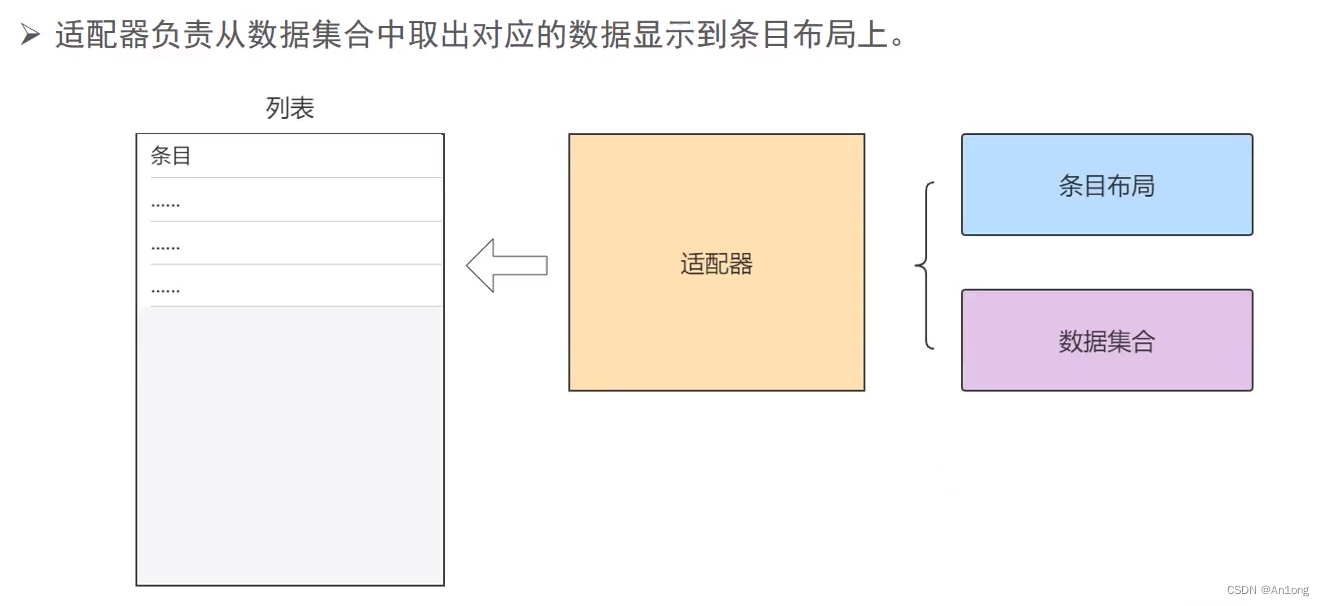
ArrayAdapter
最简单的适配器,只展示一行数据
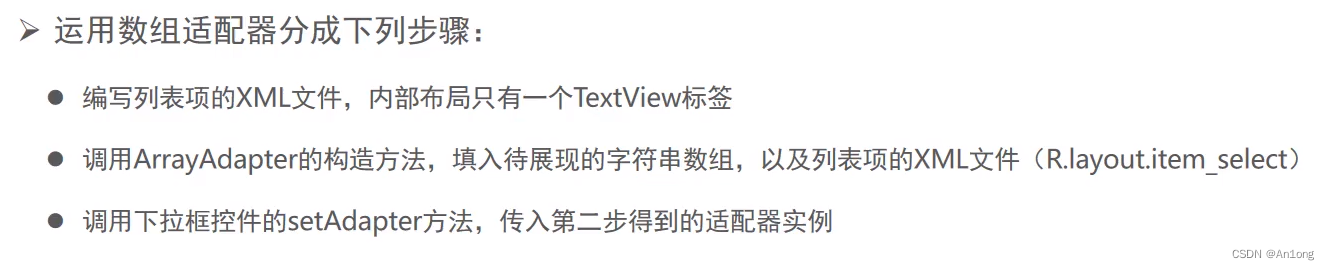
所以说我们现在重要的是需要两个参数,一个你自定义的组件框,一个你需要传入的数据
组件框 ,其中tool:text是为了展示效果,启动时不会添加进去
<TextView xmlns:android="http://schemas.android.com/apk/res/android"
    xmlns:tools="http://schemas.android.com/tools"
    android:layout_width="match_parent"
    android:layout_height="50dp"
    android:gravity="center"
    android:textColor="#0000ff"
    android:textSize="17sp"
    tools:text="火星">


</TextView>
效果图
效果图
使用时,直接给适配器传入模板与数据即可
主活动布局
<?xml version="1.0" encoding="utf-8"?>
<LinearLayout xmlns:android="http://schemas.android.com/apk/res/android"
    xmlns:app="http://schemas.android.com/apk/res-auto"
    xmlns:tools="http://schemas.android.com/tools"
    android:layout_width="match_parent"
    android:layout_height="match_parent"
    tools:context=".SpinnerActivity"
    android:orientation="vertical">

    <TextView
        android:layout_width="match_parent"
        android:layout_height="wrap_content"
        android:text="下拉模式的列表框"
        android:textSize="17sp"/>

    <Spinner
        android:id="@+id/sp_dropdown"
        android:layout_width="match_parent"
        android:layout_height="wrap_content"
        android:spinnerMode="dropdown"/>

</LinearLayout>
package com.wal.tdfa;
import androidx.appcompat.app.AppCompatActivity;
import android.os.Bundle;
import android.view.View;
import android.widget.AdapterView;
import android.widget.ArrayAdapter;
import android.widget.Spinner;
import android.widget.TextView;
import android.widget.Toast;
public class SpinnerActivity extends AppCompatActivity implements AdapterView.OnItemSelectedListener {
//定义下划的数据信息
private final static String[] starArray = {"月球","地球","太阳","金星","水星","火星","土星","木星"};
private Spinner sp_dropdown;
@Override
protected void onCreate(Bundle savedInstanceState) {
super.onCreate(savedInstanceState);
setContentView(R.layout.activity_spinner);
sp_dropdown = findViewById(R.id.sp_dropdown);
//声明一个下拉列表的数组适配器
ArrayAdapter<String> startAdapter = new ArrayAdapter<>(this,R.layout.item_select,starArray);
//将适配器传递给需要的
sp_dropdown.setAdapter(startAdapter);
//默认显示就是下标0,这行可以省略
sp_dropdown.setSelection(0);
//给下拉框选择监听器,一旦用户选中某一项,救触发
sp_dropdown.setOnItemSelectedListener(this);
}
@Override
public void onItemSelected(AdapterView<?> parent, View view, int position, long id) {
Toast.makeText(SpinnerActivity.this,"您选择的是" + starArray[position],Toast.LENGTH_SHORT).show();
}
@Override
public void onNothingSelected(AdapterView<?> parent) {
}
} 最终效果
最终效果
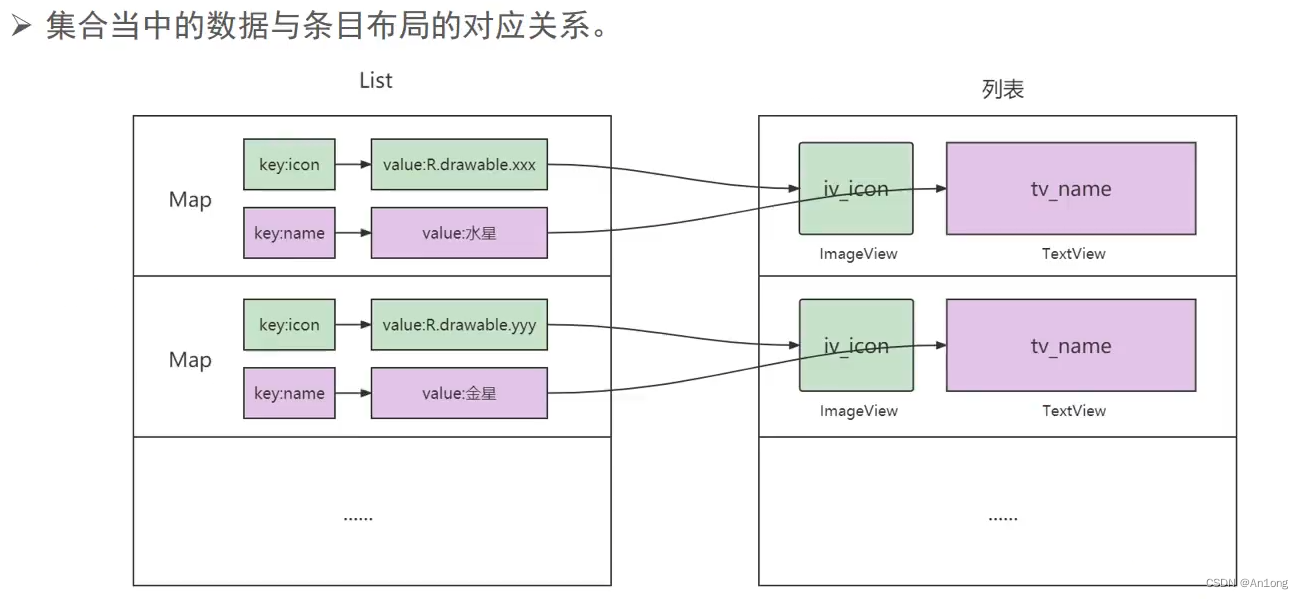
SimpleAdapter
允许在列表项中同时展示文本与图片
我们同样先自定义一个条目布局
<LinearLayout xmlns:android="http://schemas.android.com/apk/res/android"
    android:orientation="horizontal"
    xmlns:tools="http://schemas.android.com/tools"
    android:layout_width="match_parent"
    android:layout_height="match_parent">

    <ImageView
        android:id="@+id/sp_icon"
        android:layout_width="0dp"
        android:layout_height="50dp"
        android:layout_weight="1"
        tools:src="@drawable/ic_launcher_background" />

    <TextView
        android:id="@+id/sp_text"
        android:layout_width="0dp"
        android:layout_height="50dp"
        android:layout_weight="3"
        android:gravity="center"
        android:text="地球"
        android:textColor="#ff0000"
        android:textSize="17sp" />

</LinearLayout>
主活动我们还是使用上例中的样子,SimpleAdapter底层是List中存储Map键值队来建立映射关系
对应的java代码中应该这样写
import androidx.appcompat.app.AppCompatActivity;

import android.os.Bundle;
import android.view.View;
import android.widget.AdapterView;
import android.widget.SimpleAdapter;
import android.widget.Spinner;
import android.widget.Toast;

import java.util.ArrayList;
import java.util.HashMap;
import java.util.List;
import java.util.Map;

public class SpinnerIconActivity extends AppCompatActivity implements AdapterView.OnItemSelectedListener {

    private static final int[] plantArray = {R.drawable.ic_launcher_background,R.drawable.ic_launcher_foreground,R.drawable.ic_launcher_background,
            R.drawable.ic_launcher_background,R.drawable.ic_launcher_background,R.drawable.ic_launcher_background,R.drawable.ic_launcher_background};
    private final static String[] starArray = {"月球","地球","太阳","金星","水星","火星","土星","木星"};
    private Spinner sp_dropdown;

    @Override
    protected void onCreate(Bundle savedInstanceState) {
        super.onCreate(savedInstanceState);
        setContentView(R.layout.activity_spinner_icon);

        //使用simpleAdapter之前需要定义"图片条目与图片数据","字体条目与字体数据"的映射关系,因为底层是键值对关系
        List<Map<String,Object>> list = new ArrayList<>();
        //遍历数据数组至list,搭建起映射关系
        for (int i = 0; i < plantArray.length; i++) {
            Map<String,Object> item = new HashMap<>();
            item.put("icon",plantArray[i]);
            item.put("name",starArray[i]);
            list.add(item);
        }

        //使用simpleAdapter,传入list映射关系数据,自定义条目,集合的键,条目中组件的id
        SimpleAdapter simpleAdapter = new SimpleAdapter(SpinnerIconActivity.this,list,R.layout.item_simple,
                new String[]{"icon","name"},
                new int[]{R.id.sp_icon,R.id.sp_text});

        //找到spinner并传入适配器
        sp_dropdown = this.findViewById(R.id.sp_icondropdown);
        sp_dropdown.setAdapter(simpleAdapter);

        sp_dropdown.setOnItemSelectedListener(this);
    }

    @Override
    public void onItemSelected(AdapterView<?> parent, View view, int position, long id) {
        Toast.makeText(this,"您选择的是" + starArray[position],Toast.LENGTH_SHORT).show();
    }

    @Override
    public void onNothingSelected(AdapterView<?> parent) {

    }
}
3.Fragment
传统的Activity并不能很好的处理大屏问题,需要一个碎片化的东西能够划区域的展示内容,且有属于自己的独立可操作空间。

在手机上A滑倒下一页B就是碎片之间的切换
静态注册
由于是静态注册,所以我们需要去指定是哪一个类
定义碎片
<?xml version="1.0" encoding="utf-8"?>
<FrameLayout xmlns:android="http://schemas.android.com/apk/res/android"
    xmlns:tools="http://schemas.android.com/tools"
    android:layout_width="match_parent"
    android:layout_height="match_parent"
    tools:context=".fragment.StaticFragment">

    <!-- TODO: Update blank fragment layout -->
    <TextView
        android:layout_width="match_parent"
        android:layout_height="match_parent"
        android:text="这是一个碎片" />

</FrameLayout>
指定它的java类,我们使用的时候是通过指定这个类来使用
import android.os.Bundle;
import androidx.fragment.app.Fragment;
import android.view.LayoutInflater;
import android.view.View;
import android.view.ViewGroup;
import com.wal.androiddemo.R;
public class StaticFragment extends Fragment {
@Override
public View onCreateView(LayoutInflater inflater, ViewGroup container,
Bundle savedInstanceState) {
// 调用
return inflater.inflate(R.layout.fragment_static, container, false);
}
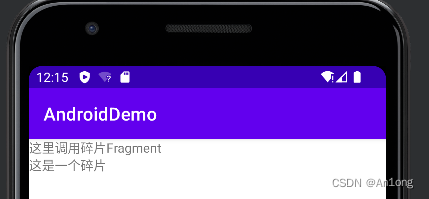
}我们在主活动种调用
<?xml version="1.0" encoding="utf-8"?>
<LinearLayout xmlns:android="http://schemas.android.com/apk/res/android"
    xmlns:app="http://schemas.android.com/apk/res-auto"
    xmlns:tools="http://schemas.android.com/tools"
    android:layout_width="match_parent"
    android:layout_height="match_parent"
    android:orientation="vertical"
    tools:context=".FragmentStaticActivity">


    <TextView
        android:layout_width="match_parent"
        android:layout_height="wrap_content"
        android:text="这里调用碎片Fragment"/>


    <fragment
        android:id="@+id/fragment_static"
        android:name="com.wal.androiddemo.fragment.StaticFragment"
        android:layout_width="match_parent"
        android:layout_height="60dp"/>


</LinearLayout>
查看效果
生命周期
 动态注册
动态注册
3、RecyleView
功能更强大的ListView,使用时必须要创建一个Holder,同时它也没有默认的点击方法和布局,这些都需要自己设置
recycleview时需要用到的adapter,复用性强,需要时候就自己改其中的部分即可
package com.wal.androiddemo.adapter;

import android.content.Context;
import android.view.LayoutInflater;
import android.view.View;
import android.view.ViewGroup;
import android.widget.TextView;

import androidx.annotation.NonNull;
import androidx.recyclerview.widget.RecyclerView;

import com.wal.androiddemo.R;

public class LinearCourseFinishAdapter extends RecyclerView.Adapter <RecyclerView.ViewHolder>{
    @NonNull
    private Context mContext;
    private OnItemClickListener mListener;
    //private List<String> list;

    public LinearCourseFinishAdapter(Context context , OnItemClickListener listener){
        this.mContext = context;
        this.mListener = listener;
    }

    @Override
    public  RecyclerView.ViewHolder onCreateViewHolder(@NonNull ViewGroup parent, int viewType) {
        //viewType可以通过这个,展示不同的item
        return new LinearViewHolder(LayoutInflater.from(mContext).inflate(R.layout.course_finish_item, parent, false));
        //这里需要传入每个item长什么样的布局,需要去layout中去画我们的布局
    }

    @Override
    //通过getItemViewType的返回值来选择具体的item显示
    public void onBindViewHolder(@NonNull RecyclerView.ViewHolder holder, final int position) {
        ((LinearViewHolder)holder).textView.setText("四级词汇");
        //如果是直接用viewholder的话,是不能用test view的
        //将点击事件放到外面
        holder.itemView.setOnClickListener(new View.OnClickListener() {
            @Override
            public void onClick(View v) {
                //Toast.makeText(mContext,"click..."+position,Toast.LENGTH_SHORT).show();
                mListener.onClick(position);
            }
        });
    }

    //去控制viewType的方法,根据位置的奇偶性来区分
    @Override
    public int getItemViewType(int position) {
        if(position % 2 == 0){
            return 0;//偶数
        }else{
            return 1;
        }
    }

    @Override
    public int getItemCount() {
        return 1;
    }

    class LinearViewHolder extends RecyclerView.ViewHolder{
        private TextView textView;

        public LinearViewHolder(View itemView){
            super(itemView);
            textView = itemView.findViewById(R.id.finish_title);
        }
    }


    //接口
    public interface  OnItemClickListener{
        void onClick(int pos);
    }
}


 1901
1901


 被折叠的 条评论
为什么被折叠?
被折叠的 条评论
为什么被折叠?
 到【灌水乐园】发言


