


文章目录
playbook剧本
- playbooks 本身由以下各部分组成
- Tasks:任务,即通过 task 调用 ansible 的模板将多个操作组织在一个 playbook 中运行
- Variables:变量
- Templates:模板
- Handlers:处理器,当changed状态条件满足时,(notify)触发执行的操作
- Roles:角色
创建剧本
##示例:
vim test1.yaml


---     #yaml文件以---开头,以表明这是一个yaml文件,可省略

- name: first play       #定义一个play的名称,可省略
  gather_facts: false    #设置不进行facts信息收集,这可以加快执行速度,可省略
  hosts: webservers      #指定要执行任务的被管理主机组,如多个主机组用冒号分隔
  remote_user: root      #指定被管理主机上执行任务的用户
  tasks:                 #定义任务列表,任务列表中的各任务按次序逐个在hosts中指定的主机上执行
   - name: test connection    #自定义任务名称
     ping:               #使用 module: [options] 格式来定义一个任务
   - name: disable selinux
     command: '/sbin/setenforce 0'    #command模块和shell模块无需使用key=value格式

    ignore_errors: True
#如执行命令的返回值不为0,就会报错,tasks停止,可使用 ignore_errors 忽略失败的任务

   - name: disable firewalld

     service: name=firewalld state=stopped
     #使用 module: options 格式来定义任务,option使用key=value格式

   - name: install httpd
     yum: name=httpd state=latest
   - name: install configuration file for httpd
     copy: src=/opt/httpd.conf dest=/etc/httpd/conf/httpd.conf
     #这里需要一个事先准备好的/opt/httpd.conf文件

     notify: "restart httpd"
     #如以上操作后为changed的状态时,会通过notify指定的名称触发对应名称的handlers操作

   - name: start httpd service
     service: enabled=true name=httpd state=started

#handlers中定义的就是任务,此处handlers中的任务使用的是service模块
  handlers:
   - name: restart httpd         #notify和handlers中任务的名称必须一致
     service: name=httpd state=restarted


##Ansible在执行完某个任务之后并不会立即去执行对应的handler,而是在当前play中所有普通任务都执行完后再去执行handler,这样的好处是可以多次触发notify,但最后只执行一次对应的handler,从而避免多次重启。
##创建安装apache服务的剧本

vim demo1.yaml
- name: the first play for install apache
  gather_facts: false
  hosts: dbservers
  remote_user: root
  tasks:
  - name: disable firewalld
    service: name=firewalld state=stopped enabled=no
  - name: disable selinux
    command: '/usr/sbin/setenforce 0'
    ignore_errors: true
  - name: disable selinux forever
    replace: path=/etc/selinux/config regexp='enforcing' replace='disabled'
  - name: mount cdrom
    mount: src=/dev/sr0 path=/mnt fstype=iso9660 state=mounted
  - name: install apache
    yum: name=httpd state=latest
  - name: prepare httpd configuration file
    copy: src=/opt/httpd.conf dest=/etc/httpd/conf/httpd.conf
    notify: "reload httpd"
  - name: start httpd
    service: name=httpd state=started enabled=yes
  handlers:
  - name: reload httpd
    service: name=httpd state=reloaded
##执行playbook剧本

ansible-playbook demo1.yaml

运行剧本
-k(–ask-pass):用来交互输入ssh密码
-K(-ask-become-pass):用来交互输入sudo密码
-u:指定用户
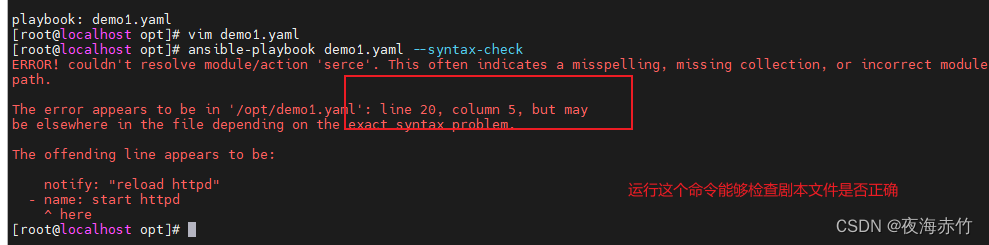
ansible-playbook demo1.yaml --syntax-check
#检查yaml文件的语法是否正确
ansible-playbook demo1.yaml --list-task
#检查tasks任务
ansible-playbook demo1.yaml --list-hosts
#检查生效的主机
ansible-playbook demo1.yaml --start-at-task='install httpd'
#指定从某个task开始运行
定义和引用变量
vim demo2.yaml
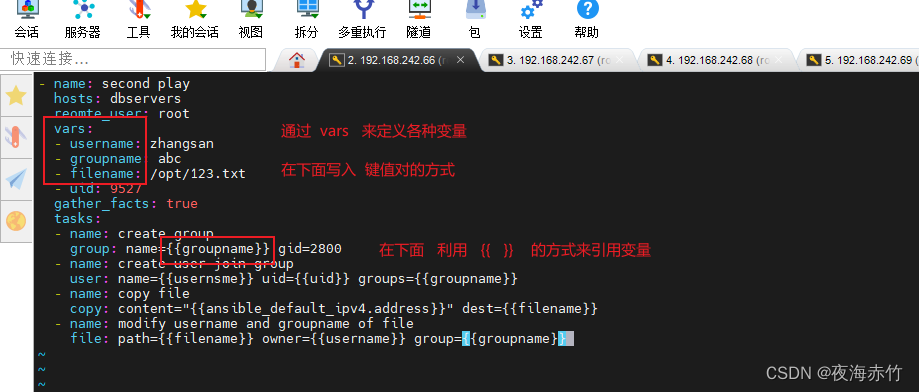
- name: second play
  hosts: dbservers
  reomte_user: root
  vars:
  - username: zhangsan
  - groupname: abc
  - filename: /opt/123.txt
  - uid: 9527
  gather_facts: true
  tasks:
  - name: create group
    group: name={{groupname}} gid=2800
  - name: create user join group
    user: name={{usernsme}} uid={{uid}} groups={{groupname}}
  - name: copy file
    copy: content="{{ansible_default_ipv4.address}}" dest={{filename}}
  - name: modify username and groupname of file
    file: path={{filename}} owner={{username}} group={{groupname}}
##运行playbook剧本

ansible-playbook demo2.yaml

###也可以在命令行中定义变量

ansible-playbook demo2.yaml -e "username=lisi" -e "groupname=nba" -e "filename=/opt/456.txt" -e "uid=9528"
指定远程主机sudo切换用户
##修改 ssh配置文件,禁止  root  用户直接登陆

vim /etc/ssh/sshd_config

#PermitRootLogin yes
##将这个配置项设置为no,就能够禁止root用户登陆

###设置用户密码

echo 123 | passwd --stdin zhangsan
###给登陆用户提权
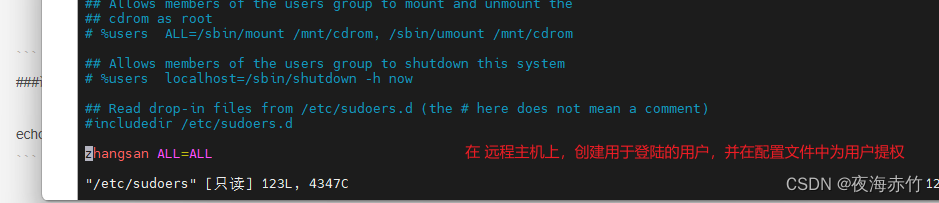
vim /etc/sudoers
#添加
zhangsan ALL=ALL
##修改剧本文件

vim demo2.yaml
- name: second play
  hosts: dbservers
  remote_user: zhangsan
  become: yes             #2.6版本以后的参数,之前是sudo,意思为是否切换用户运行,就是是否提权
  become_user: root               #指定sudo用户为root
  vars:
  - username: zhangsan
  - groupname: abc
  - filename: /opt/123.txt
  - uid: 9527
  gather_facts: true
  tasks:
  - name: create group
    group: name={{groupname}} gid=2800
  - name: create user join group
    user: name={{username}} uid={{uid}} groups={{groupname}}
  - name: copy file
    copy: content="{{ansible_default_ipv4.address}}" dest={{filename}}
  - name: modify username and groupname of file
    file: path={{filename}} owner={{username}} group={{groupname}}

##运行剧本文件

ansible-playbook demo2.yaml -e "username=lisi" -e "groupname=nba" -e "filename=/opt/456.txt" -e "uid=9528" -k -K

SSH password:               ##输入SSH密码,但这里是配置文件中登陆的用户的密码

when条件判断
- 在Ansible中,提供的唯一一个通用的条件判断是when指令,当when指令的值为true时,则该任务执行,否则不执行该任务
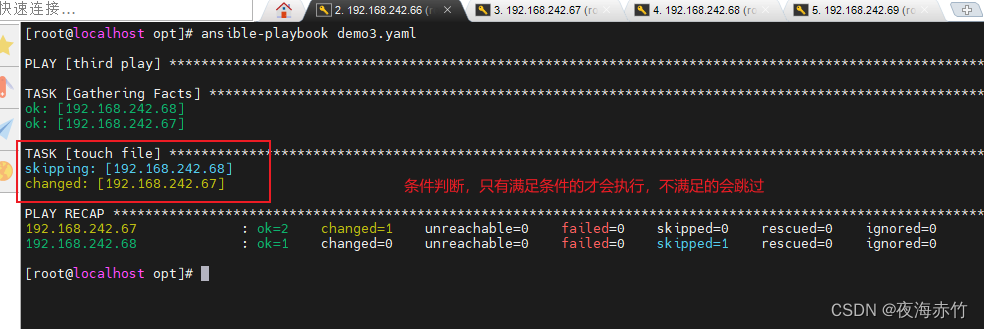
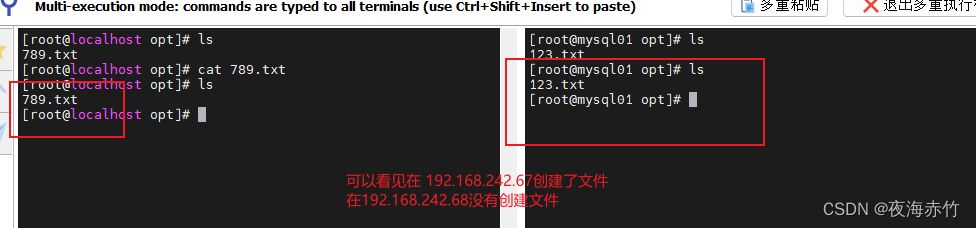
- name: third play
  hosts: all
  remote_user: root
  tasks:
  - name: touch file
    file: path=/opt/789.txt state=touch
    when: ansible_default_ipv4.address != "192.168.242.68"
    #when: inventory_hostname == "192.168.242.68"
剧本格式
- name: fouth play
  hosts: dbservers
  remote_user: root
  vars:
    myfile:
    - /opt/a
    - /opt/b
    - /opt/c
    - /opt/d
  tasks:
  - name: touch directory
    with_items: "{{myfile}}"
    file: path={{item}} state=directory

  - name: touch file
    with_items:
    - /root/a
    - /root/b
    - /root/c
    - /root/d
    file:
      path: "{{item}}"
      state: touch
task任务 模块语法格式:
横向格式:
模块名: 参数选项1=值  参数选项2={{变量名}}  ...

纵向格式:
模块名:
  参数选项1: 值
  参数选项2: "{{变量名}}"
迭代
with_items
with_items 和 变量 的语法格式
横向格式:
with_items: ["值1", "值2", "值3"]

值为对象(键值对字段)时:
with_items:
- {key1: value1, key2: value2, ...}
- {key1: value3, key2: value4, ...}

纵向格式:
with_items:
- 值1
- 值2
- 值3

值为对象(键值对字段)时:
with_items:
- key1: value1
  key2: value2
- key1: value3
  key2: value4
- name: fifth play
  hosts: dbservers
  remote_user: root
  tasks:
  - name: touch file
    with_items:
    - {filename: /opt/a, username: zhangsan, groupname: nba}
    - {filename: /opt/b, username: lisi, groupname: abc}
    file: path={{item.filename}}  owner={{item.username}} group={{item.groupname}} state=touch

  - name: create dir
    with_items:
    - filename: /opt/cd
      username: zhangsan
      groupname: nba
    - filename: /opt/ef
      username: lisi
      groupname: abc
    file:
      path: "{{item.filename}}"
      owner: "{{item.username}}"
      group: "{{item.groupname}}"
      state: directory

with_list
- hosts: dbservers
  remote_user: root
  gather_facts: no
  tasks:
  - debug:
      msg: "{{item}}"
    with_list:
    - [ 1, 2, 3 ]
    - [ a, b ]

with_flattened
- hosts: dbservers
  remote_user: root
  gather_facts: no
  tasks:
  - debug:
      msg: "{{item}}"
    with_flattened:
    - [ 1, 2, 3 ]
    - [ a, b ]

- with_list、with_items、with_flattened之间的区别:
- 在处理简单的单层列表时,他们没有区别,
- 但是当处理嵌套的多层列表时,with_items与with_flattened会将嵌套列表”拉平展开”,循环的处理每个元素,
- 而with_list只会处理最外层的列表,将最外层的列表中的每一项循环处理,loop可以替代with_list。
with_together
- hosts: dbservers
  remote_user: root
  gather_facts: no
  tasks:
  - debug:
      msg: "{{item}}"
    with_together:
    - [ 1, 2, 3 ]
    - [ a, b, c ]
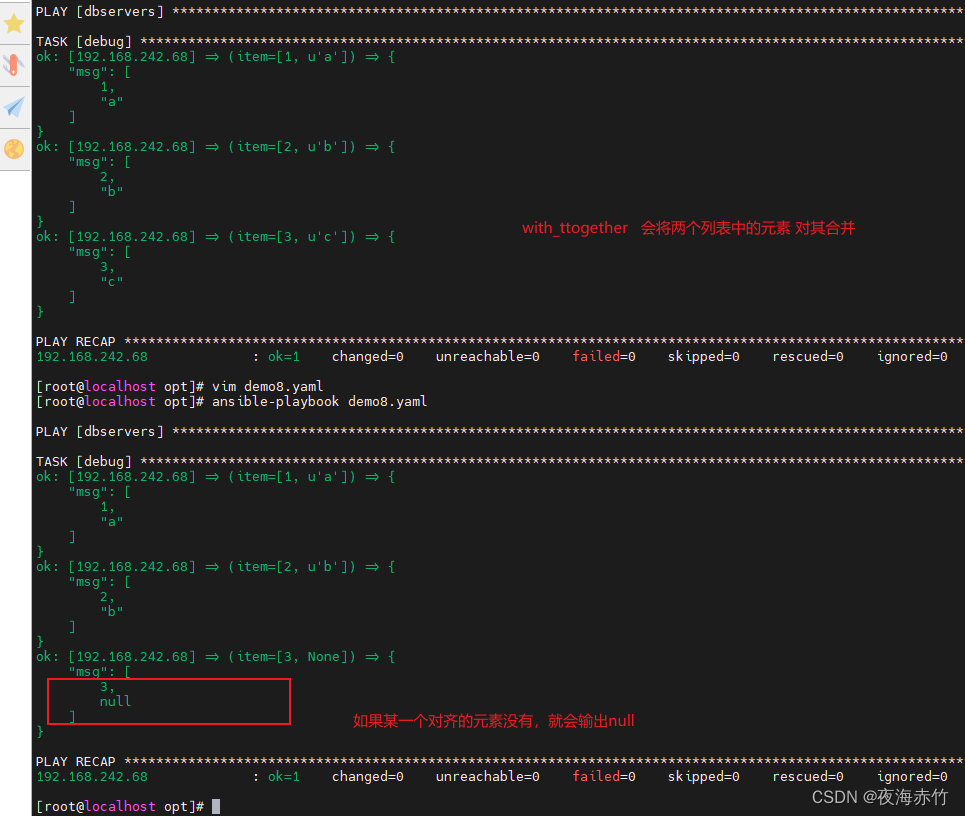
- with_together可以将两个列表中的元素”对齐合并”:
- 第一个小列表中的第1个值会与第二个小列表中的第1个值合并在一起输出,
- 第一个小列表中的第2个值会与第二个小列表中的第2个值合并在一起输出,
- 第一个小列表中的第3个值会与第二个小列表中的第3个值合并在一起输出,如果第二个小列表中的第3个元素没有值则输出null
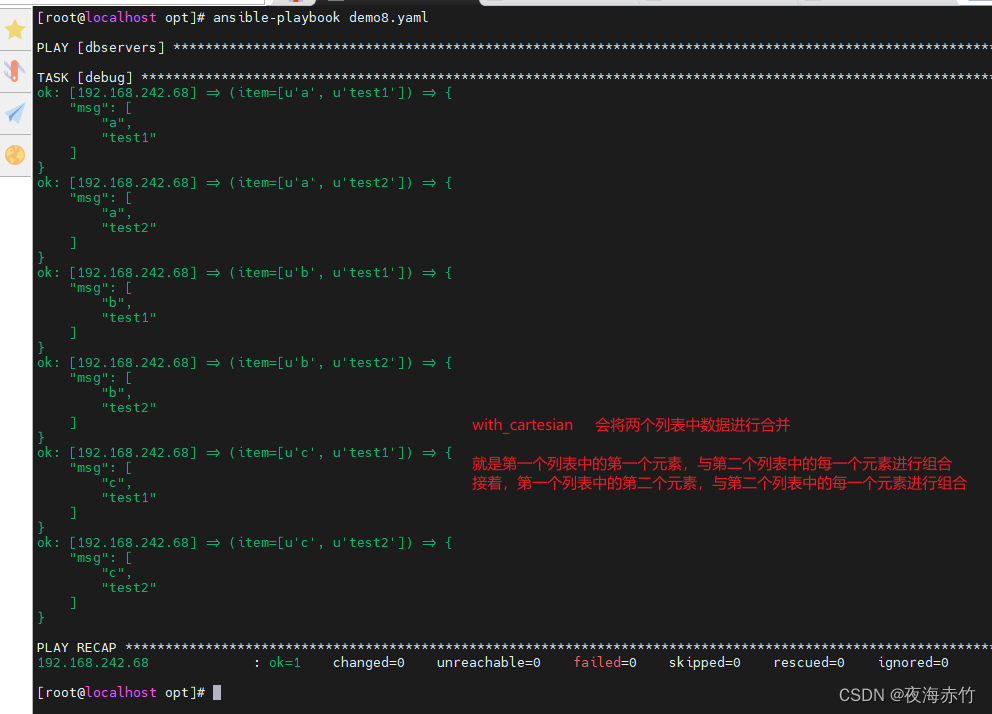
with_cartesian
- hosts: dbservers
  remote_user: root
  gather_facts: no
  tasks:
  - debug:
      msg: "{{item}}"
    with_cartesian:
    - [ a, b, c ]
    - [ test1, test2 ]
- with_cartesian的作用就是将每个小列表中的元素按照两两组合循环的处理每个组合,比如第一个小列表中的每个元素与第二个小列表中的每个元素都两两组合在了一起。
with_nested
- hosts: dbservers
  remote_user: root
  gather_facts: no
  vars:
    test:
      - a
      - b
      - c
    demo:
      - test1
      - test2
  tasks:
  - debug:
      msg: "{{ item[0] }},{{ item[1] }}"
    with_nested:
    - "{{test}}"
    - "{{demo}}"

Templates模块
- Jinja是基于Python的模板引擎。Template类是Jinja的一个重要组件,可以看作是一个编译过的模板文件,用来产生目标文本,传递Python的变量给模板去替换模板中的标记。
vim httpd.conf.j2


就是复制httpd配置文件,进行修改,创建模板文件

Listen {{ip_port}}
ServerName {{host_name}}
DocumentRoot "{{root_dir}}"
vim demo6.yaml
- name: sixth play
  hosts: all
  remote_user: root
  vars:
  - pkg: httpd

  tasks:
  - name: install apache
    yum: name=httpd state=latest
  - name: create root dir
    file: state=directory path={{item}}
    with_items:
    - /var/www/html/accp
    - /var/www/html/benet
  - name: create index.html in www.accp.com
    copy: content="<h1>this is accp web</h1>" dest=/var/www/html/accp/index.html
    when: ansible_default_ipv4.address == "192.168.242.67"
  - name: create index.html in www.benet.com
    copy: content="<h1>this is benet web</h1>" dest=/var/www/html/benet/index.html
    when: inventory_hostname == "192.168.242.68"
  - name: prepare configuration file
    template: src=/etc/ansible/playbook/httpd.conf.j2 dest=/etc/httpd/conf/httpd.conf
    notify: "reload apache"
  - name: start apache
    service: name={{pkg}} state=started enabled=yes

  handlers:
  - name: reload apache
    service: name={{pkg}} state=reloaded


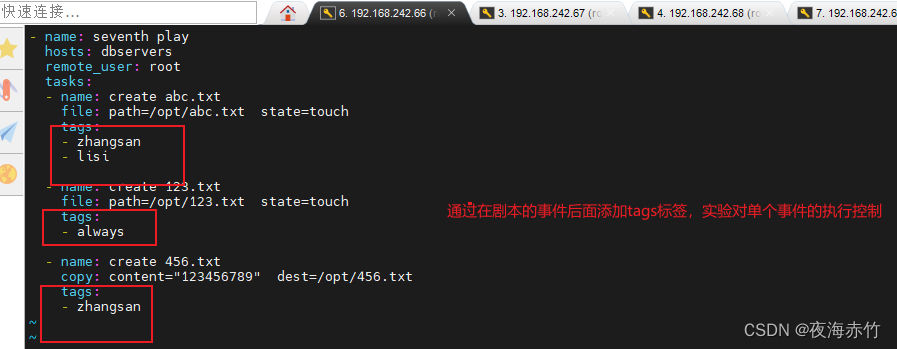
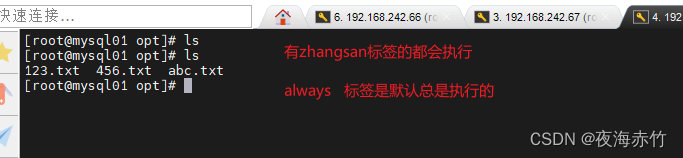
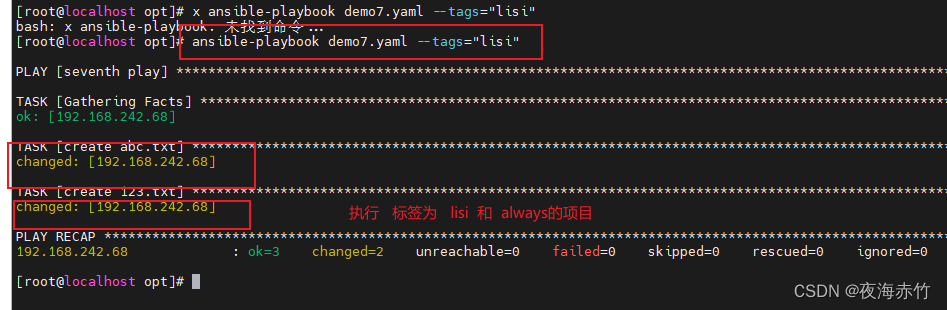
tags模块
- 可以在一个playbook中为某个或某些任务定义“标签”,在执行此playbook时通过ansible-playbook命令使用–tags选项能实现仅运行指定的tasks。
- playbook还提供了一个特殊的tags为always。作用就是当使用always作为tags的task时,无论执行哪一个tags时,定义有always的tags都会执行。
- name: seventh play
  hosts: dbservers
  remote_user: root
  tasks:
  - name: create abc.txt
    file: path=/opt/abc.txt  state=touch
    tags:
    - zhangsan
    - lisi

  - name: create 123.txt
    file: path=/opt/123.txt  state=touch
    tags:
    - always

  - name: create 456.txt
    copy: content="123456789"  dest=/opt/456.txt
    tags:
    - zhangsan
##运行

ansible-playbook demo7.yaml --tags="zhangsan"
ansible-playbook demo7.yaml --tags="lisi"


 75
75


 被折叠的 条评论
为什么被折叠?
被折叠的 条评论
为什么被折叠?
 到【灌水乐园】发言


