


目录
1.2.1 SpringBoot中resources项目结构
一、SpringBoot
1.1 SpringBoot介绍
1.1.1 SpringBoot产生的背景
Servlet->Struts2->Spring->SpringMVC,技术发展过程中,对使用者来说越来越简单,成本越来越低。
SSM框架搭建WEB项目的时候需要做什么?
1.引入Spring,SpringMVC,Mybatis依赖关系;
2.编写配置文件;Spring +SpringMVC+MyBatis Web.xml
3.编写代码;
问题:Spring框架存在了大量的xml配置文件和依赖关系,为了解决这些问题,出现了Springboot框架。
1.1.2 什么是SpringBoot
Springboot是Spring平台的一个全新的框架,目的是简化Spring框架应用中的初始化搭建和开发过程。
SpringBoot基于Spring4进行的设计。使用“约定优于配置”的方式来简化开发过程,从而使开发人员不再需要定义过多的配置,boot使用Maven来管理依赖关系。
1.1.3 使用SpringBoot的好处
1.无需xml配置文件;
2.无需手动管理jar包的依赖关系,使用Maven来进行统一管理;
3.无需外部服务器,有内置的tomcat服务器,可以直接启动项目;
4.配置热部署和自动启动;
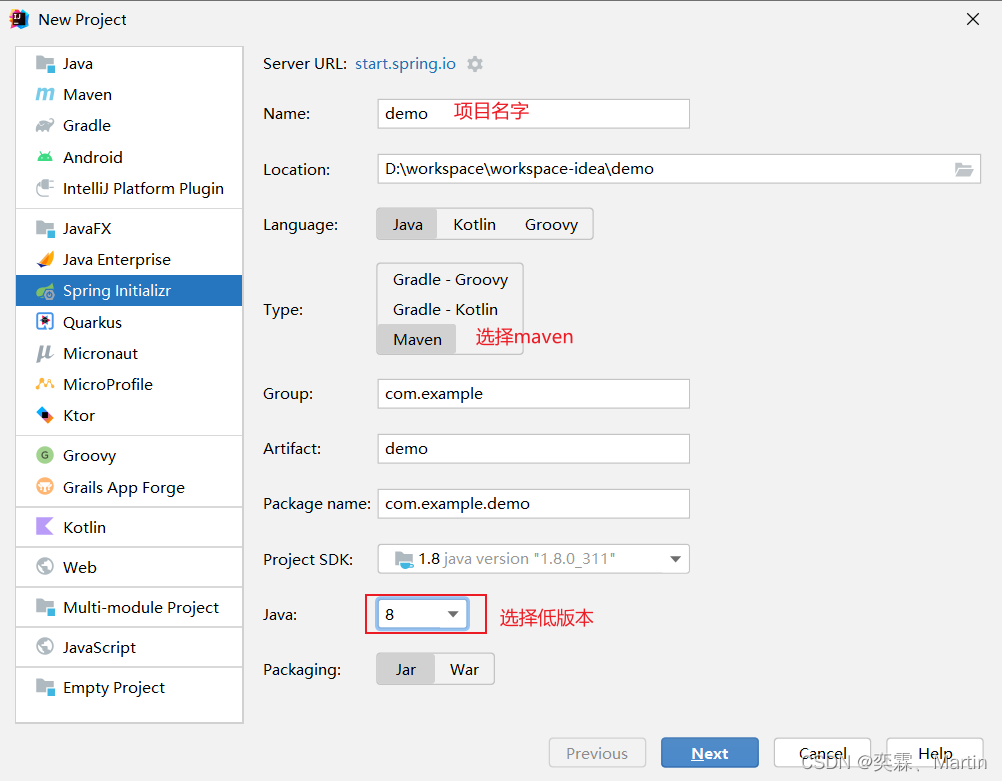
1.2 搭建项目
idea版本为2021.3.2
http://start.spring.io https://start.aliyun.com/
第一步:
第二步:
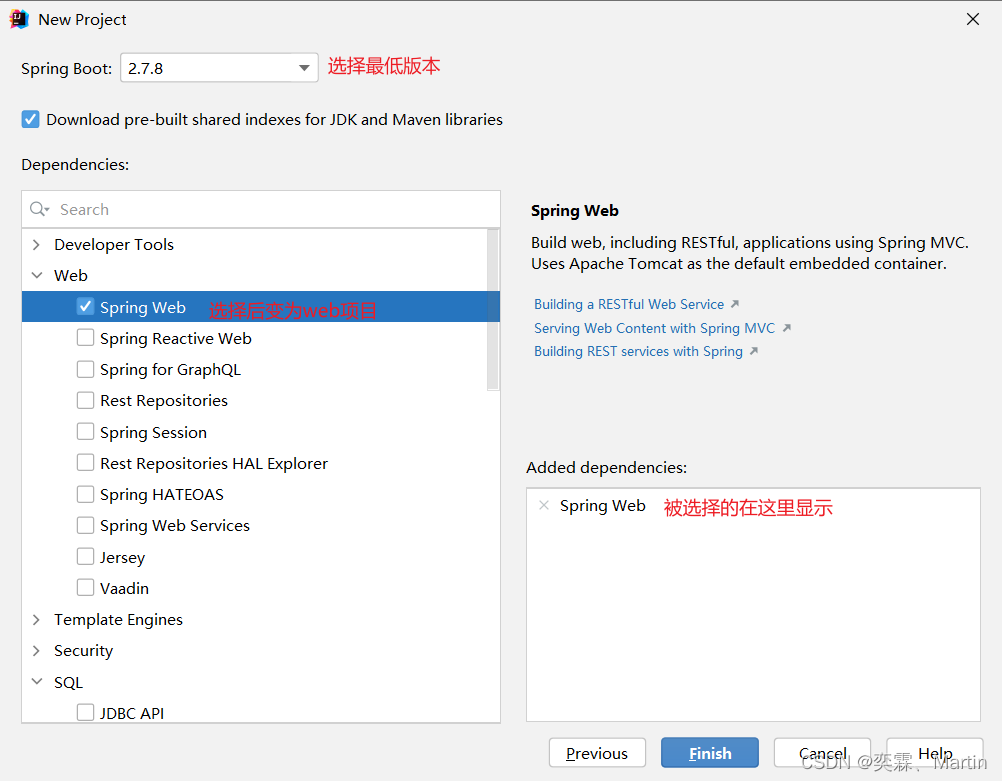
【Developer Tools】-【Springboot Web DevTools】:实现热部署
【Web】-【Spring Web】
【Template Engines】-【Thymeleaf】添加Thymeleaf模板
【SQL】-【MyBatis-Framework】+【MySQL Driver】
后续依赖可以在pom文件中进行添加
1.2.1 SpringBoot中resources项目结构

static:存放静态资源,比如:css,js,图片
templates:模板文件
application.properties:springboot配置文件
applicatio.yml也是springboot配置文件
bootstrap.properties 是配置文件中心 分布式项目时会使用
bootstrap.yml
banner的在线地址:http://www.network-science.de/ascii/配置文件格式:
properties文件:key-value的格式
yml文件:阶梯状得配置格式,相同级别只能出现一次
properties文件和yml文件中有相同属性时,properties文件得优先级高于yml文件推荐使用yml文件,格式清晰
如果两个文件里面包含有相同的属性 只加载properties文件里面的内容 yml里面的改属性的值被忽略
1.2.2 SpringBoot的基本配置
以yml形式的文件配置:
#设置端口号
# 设置上下文的路径 :必须以/为开头
server:
port: 8888
# servlet:
# context-path: /test2
#配置视图
spring:
mvc:
view:
prefix: /
suffix: .jsp
# 配置时间转换格式
jackson:
date-format: yyyy-MM-dd HH:mm:ss
time-zone: GMT+8
# 配置数据源
datasource:
driver-class-name: com.mysql.cj.jdbc.Driver
url: jdbc:mysql://localhost:3306/test_zzz_test?useSSL=false&serverTimezone=Asia/Shanghai
username: root
password: 密码
# 设置mapper文件所在的位置
mybatis:
mapper-locations: classpath:mapper/ *.xml
#
configuration:
log-impl: org.apache.ibatis.logging.stdout.StdOutImpl
#输出日志的另一种方法:Mybatis自带的日志写法:要配上mybatis的jar包1.2.3 跳转jsp页面
1、在pom文件中添加依赖
<!-- 支持跳转jsp页面 -->
<dependency>
    <groupId>javax.servlet</groupId>
    <artifactId>jstl</artifactId>
</dependency>
<dependency>
    <groupId>org.apache.tomcat.embed</groupId>
    <artifactId>tomcat-embed-jasper</artifactId>
</dependency>2、在main文件夹下创建webapp文件夹
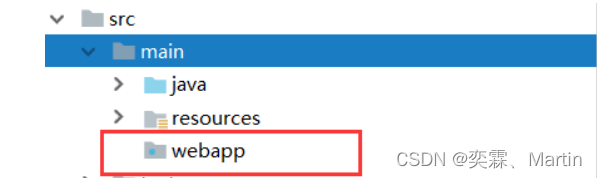
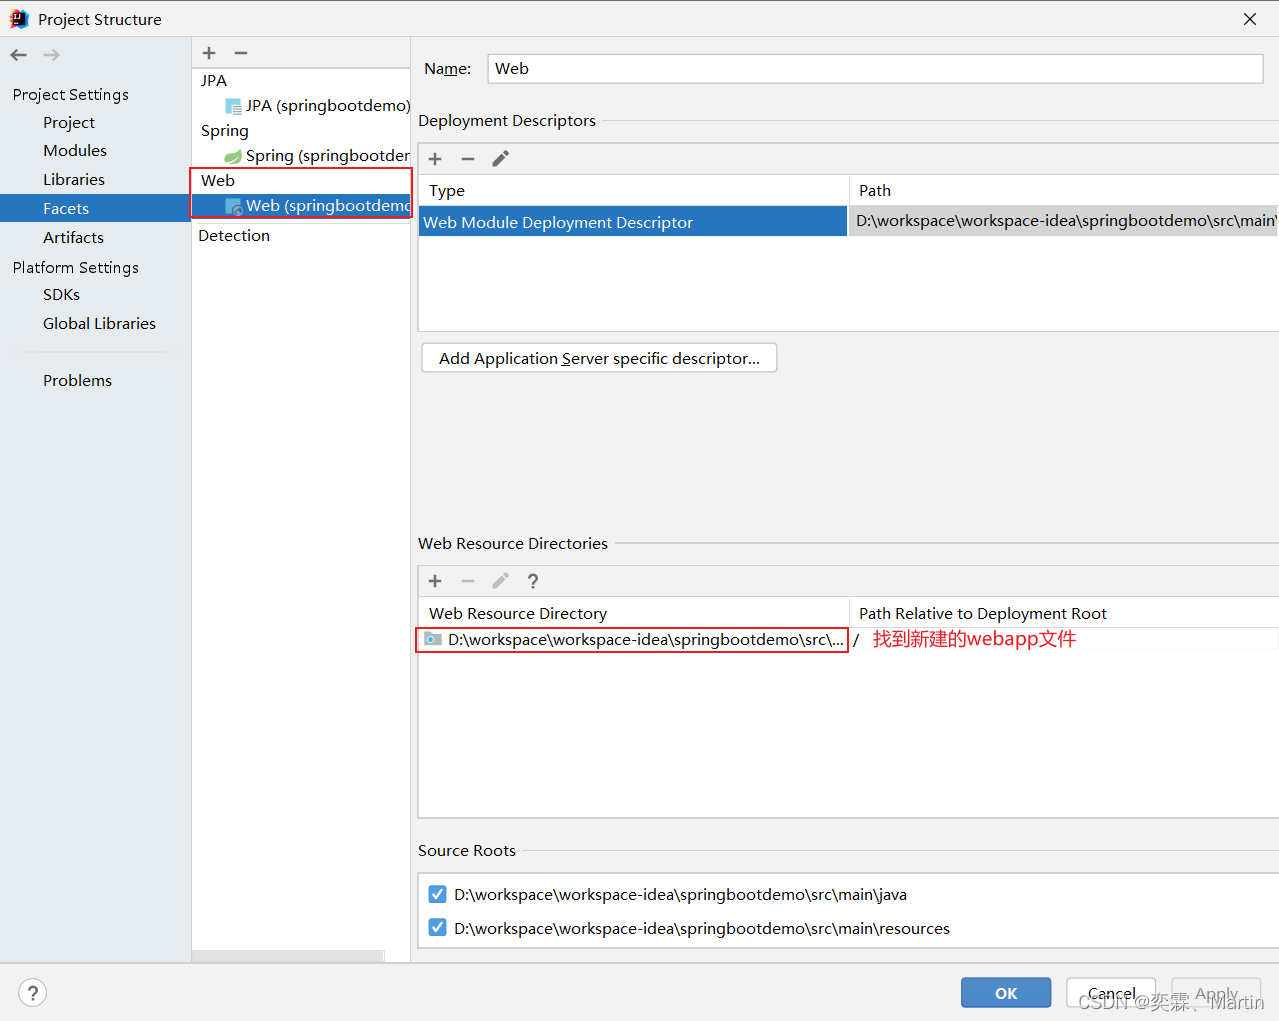
3、在webapp文件夹下创建jsp页面
controller页 面代码:
面代码:
@Controller
public class IndexController {
/**
* 测试跳转jsp页面
* @return
*/
@GetMapping("index")
public String index(){
return "index";
}
/**
* 测试向前台发送json数据
*/
@GetMapping("sec")
@ResponseBody
public User testSend(){
System.out.println("000");
return new User("test",new Date());
}
}1.2.4 配置热部署
1、在pom中添加依赖
        <dependency>
            <!-- optional设置为true 否则热部署无效-->
            <groupId>org.springframework.boot</groupId>
            <artifactId>spring-boot-devtools</artifactId>
            <scope>true</scope>
            <optional>true</optional>
</dependency> 修改插件配置
<build>
<plugins>
<plugin>
<groupId>org.springframework.boot</groupId>
<artifactId>spring-boot-maven-plugin</artifactId>
<configuration>
<!--fork:如果没有该项配置,整个devtools不会起作用-->
<fork>true</fork>
</configuration>
</plugin>
</plugins>
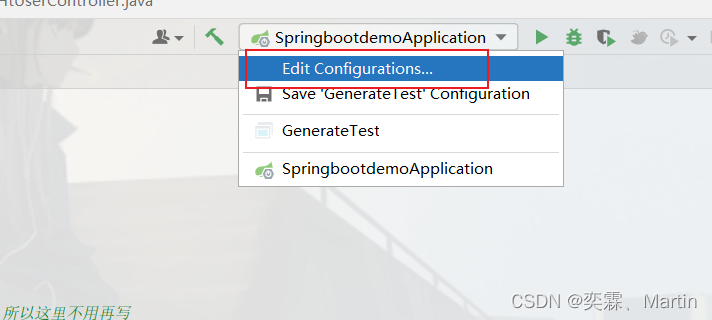
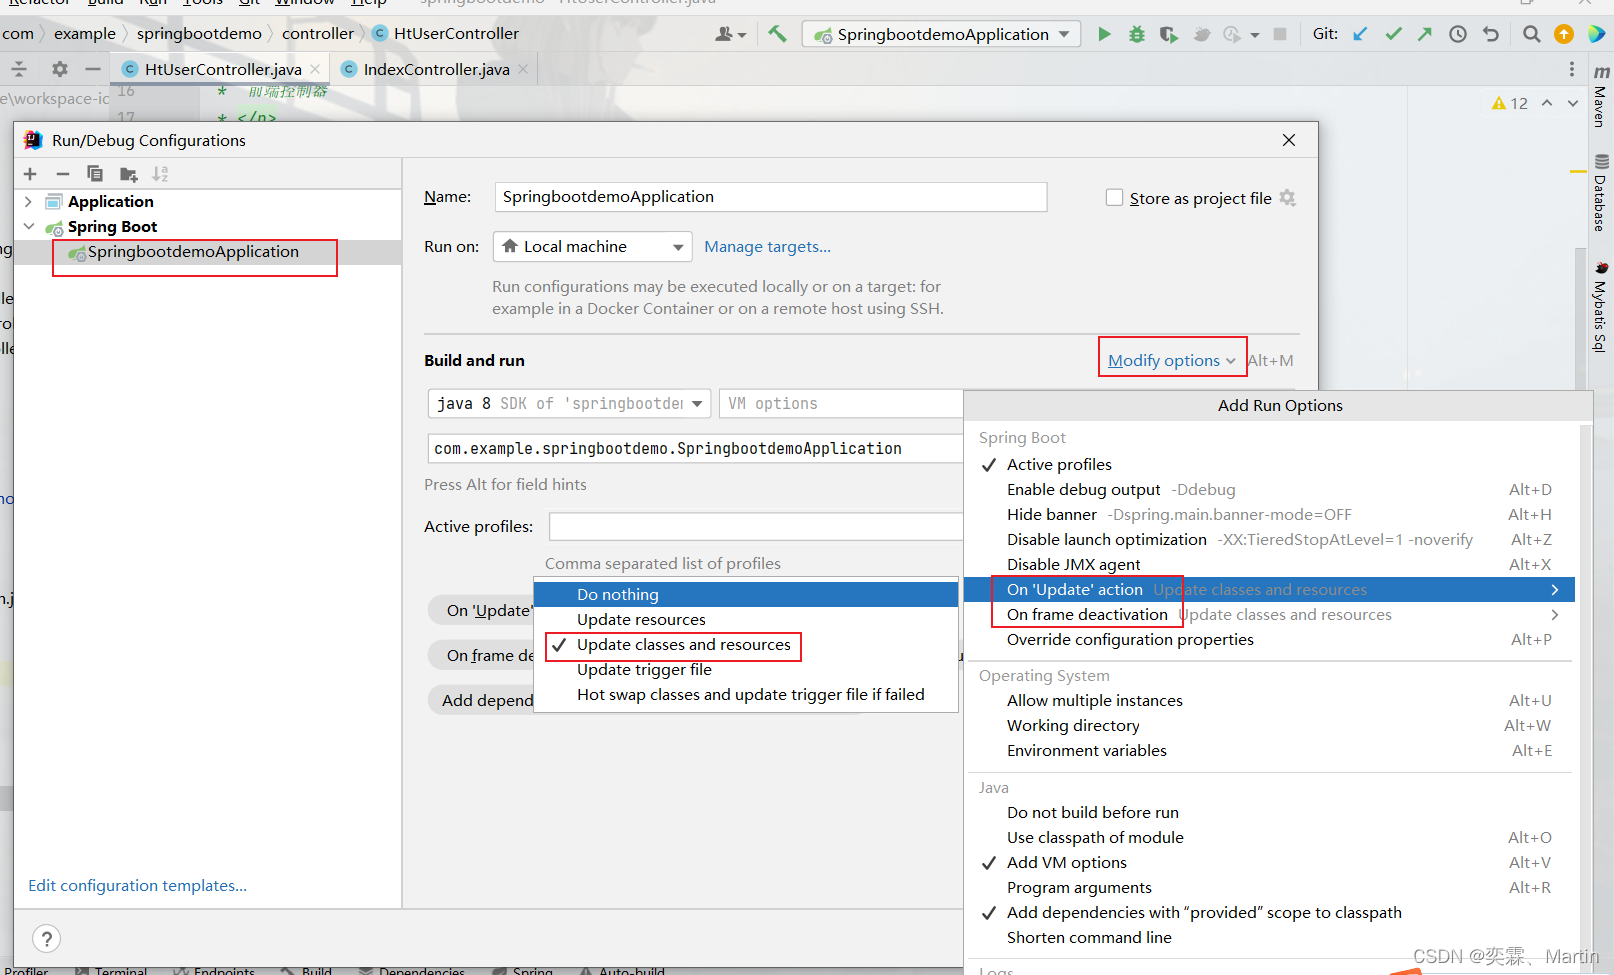
</build>2、然后修改系统设置:
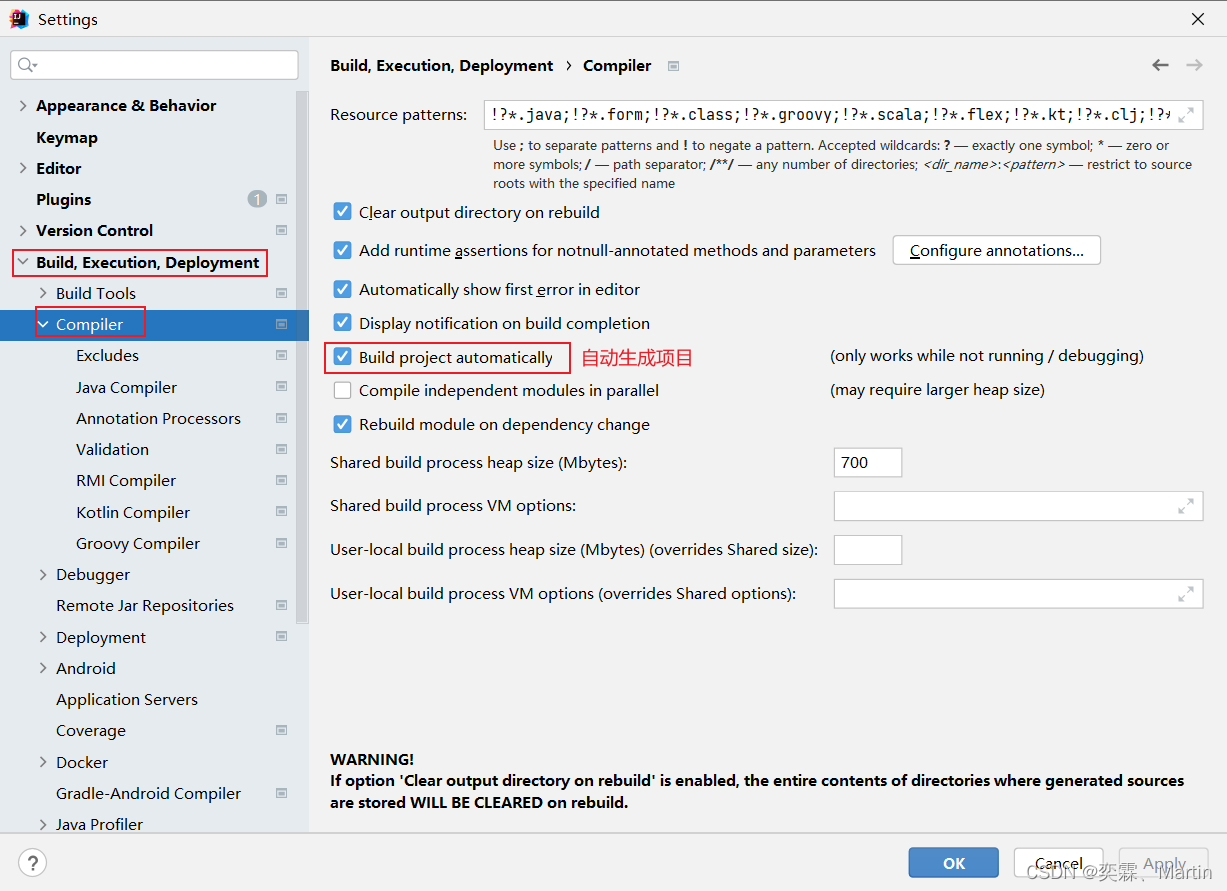
3、进行项目配置
按快捷键ctrl+alt+s hift+/会跳出来一个菜单,选registry
然后在弹出的菜单列表中往下滑找一个c开头的 compiler.automake.allow.when.app.running 即允许在工程运行时进行自动编译.
如果idea版本比较高,没有这种选项
这里还有另外一种做法:
1.2.5 整合mybatis开发web项目
1、在pom文件中添加mybatis 和 通用Mapper 依赖
      <!--mybatis持久层操作-->
        <dependency>
            <groupId>org.mybatis.spring.boot</groupId>
            <artifactId>mybatis-spring-boot-starter</artifactId>
            <version>1.3.2</version>
        </dependency>
        <!--通用的Mapper-->
        <dependency>
            <groupId>tk.mybatis</groupId>
            <artifactId>mapper-spring-boot-starter</artifactId>
            <version>RELEASE</version>
        </dependency>
通用Mapper中的方法:
 方法:List<T> select(T record);
    说明:根据实体中的属性值进行查询,查询条件使用等号
    方法:T selectByPrimaryKey(Object key);
    说明:根据主键字段进行查询,方法参数必须包含完整的主键属性,查询条件使用等号
    方法:List<T> selectAll();
    说明:查询全部结果,select(null)方法能达到同样的效果
    方法:T selectOne(T record);
    说明:根据实体中的属性进行查询,只能有一个返回值,有多个结果是抛出异常,查询条件使用等号
    方法:int selectCount(T record);
    说明:根据实体中的属性查询总数,查询条件使用等号
Insert
    方法:int insert(T record);
    说明:保存一个实体,null的属性也会保存,不会使用数据库默认值
    方法:int insertSelective(T record);
    说明:保存一个实体,null的属性不会保存,会使用数据库默认值
Update
    方法:int updateByPrimaryKey(T record);
    说明:根据主键更新实体全部字段,null值会被更新
    方法:int updateByPrimaryKeySelective(T record);
    说明:根据主键更新属性不为null的值
Delete
    方法:int delete(T record);
    说明:根据实体属性作为条件进行删除,查询条件使用等号
    方法:int deleteByPrimaryKey(Object key);
    说明:根据主键字段进行删除,方法参数必须包含完整的主键属性
 Example方法
    方法:List<T> selectByExample(Object example);
    说明:根据Example条件进行查询
    重点:这个查询支持通过Example类指定查询列,通过selectProperties方法指定查询列
    方法:int selectCountByExample(Object example);
    说明:根据Example条件进行查询总数
    方法:int updateByExample(@Param("record") T record, @Param("example") Object example);
    说明:根据Example条件更新实体record包含的全部属性,null值会被更新
    方法:int updateByExampleSelective(@Param("record") T record, @Param("example") Object example);
    说明:根据Example条件更新实体record包含的不是null的属性值
    方法:int deleteByExample(Object example);
    说明:根据Example条件删除数据
2、mybatis输出日志
mybatis
configuration:
log-impl: org.apache.ibatis.logging.stdout.StdOutImpl
#输出日志的另一种方法:Mybatis自带的日志写法
# 输出的日志的值是写dao接口的路径
#logging:
# level:
# com.example.springbootdemo.mapper: debug3、集成分页的插件
<!--分页-->
<dependency>
    <groupId>com.github.pagehelper</groupId>
    <artifactId>pagehelper-spring-boot-starter</artifactId>
    <version>1.2.13</version>
</dependency>
编写controller service dao 的文件
启动类:
//将接口生成代理注入到spring中
//1、在这个启动类中加上MapperScan注解
//2、或者是在对应的dao接口中加上@Mapper注解
@SpringBootApplication
@MapperScan("com.example.springbootdemo.dao")
public class SpringbootdemoApplication {
public static void main(String[] args) {
SpringApplication.run(SpringbootdemoApplication.class, args);
}
}
controller:
@RestController
@RequestMapping("/ht-user")
//@CrossOrigin 已经在另外一个类中配置过,所以这里不用再写
public class HtUserController {
@Resource
private IHtUserService htUserService;
@GetMapping
public Result getAll(HtUser user, Page page){
return new Result(htUserService.listByNameAndSex(user,page));
}
}
service:
public interface IHtUserService extends IService<HtUser> {
Page listByNameAndSex(HtUser user, Page page);
}
@Service
public class HtUserServiceImpl extends ServiceImpl<HtUserMapper, HtUser> implements IHtUserService {
@Override
public Page listByNameAndSex(HtUser user, Page page) {
QueryWrapper queryWrapper = new QueryWrapper();
if (StringUtils.isNotBlank(user.getUsername())){
queryWrapper.like("username",user.getUsername());
}
if (StringUtils.isNotBlank(user.getSex())){
queryWrapper.like("sex",user.getSex());
}
Page page1 = this.page(page, queryWrapper);
// 返回当前字节里面的一个查询条件的结果
return page1;
}
}
dao:
public interface HtUserMapper extends BaseMapper<HtUser> {
}1.2.6 前后端时间格式转换
@Data
@AllArgsConstructor
@NoArgsConstructor
public class User {
private String name;
// 如果使用的是 LocalDateTime 格式话的时间应该是 yyyy-MM-dd'T'HH:mm:ss.SSS'Z'
// @JsonFormat:规定的是后端向前端传递数据的格式 这里的格式也可以在application.properties文件中进行规定
// @JsonFormat(pattern = "yyyy-MM-dd HH:mm:ss")
// @DateTimeFormat:规定的是前端向后端传递数据格式
@DateTimeFormat(pattern = "yyyy-MM-dd")
private Date birthday;
}1.2.7 配置德鲁伊监测
datasource:
type: com.alibaba.druid.pool.DruidDataSource
username: root
password: 密码
driver-class-name: com.mysql.jdbc.Driver
url: jdbc:mysql:///test?useSSL=false&serverTimezone=UTC
filters: stat,wall
配置文件的设置
package com.aaa.springboot01.config;
import com.alibaba.druid.pool.DruidDataSource;
import com.alibaba.druid.support.http.StatViewServlet;
import com.alibaba.druid.support.http.WebStatFilter;
import org.springframework.boot.context.properties.ConfigurationProperties;
import org.springframework.boot.web.servlet.FilterRegistrationBean;
import org.springframework.boot.web.servlet.ServletRegistrationBean;
import org.springframework.context.annotation.Bean;
import org.springframework.context.annotation.Configuration;
import javax.sql.DataSource;
@Configuration
public class DruidConfig {
@Bean
public ServletRegistrationBean druidServlet(){
ServletRegistrationBean ser=new ServletRegistrationBean(new StatViewServlet(),"/druid/*");
//设置密码
// ser.addInitParameter("loginUsername","druid");
// ser.addInitParameter("loginPassword","druid");
return ser;
}
/**
* 监控
*/
@Bean
public FilterRegistrationBean filterRegistrationBean(){
FilterRegistrationBean filterRegistrationBean=new FilterRegistrationBean();
filterRegistrationBean.setFilter(new WebStatFilter());
filterRegistrationBean.addUrlPatterns("/**");
filterRegistrationBean.addInitParameter("exclusions","/static/*,*.js,*.gif,*.jpg,*.png,*.css,*.ico,/druid/*");
return filterRegistrationBean;
}
@Bean
@ConfigurationProperties(prefix = "spring.datasource")
public DataSource druidDataSource(){
return new DruidDataSource();
}
}1.2.8 jsp中获取项目的路径遇到的问题
在JSP中我们有${pageContext.request.ContextPath}来定位。
但是在使用SpringBoot时,一般我们都不推荐再使用JSP这个技术了。这也是官方文档为什么又没JSP与SpringBoot的使用的教程的原因。
此时我们可以通过拦截器,在返回的使用,在requst中注入我们的路径。
import org.slf4j.Logger;
      import org.slf4j.LoggerFactory;
      import org.springframework.context.annotation.Bean;
      import org.springframework.context.annotation.Configuration;
      import org.springframework.web.servlet.config.annotation.InterceptorRegistration;
      import org.springframework.web.servlet.config.annotation.InterceptorRegistry;
      import org.springframework.web.servlet.config.annotation.WebMvcConfigurerAdapter;
      import org.springframework.web.servlet.handler.HandlerInterceptorAdapter;
      import javax.servlet.http.HttpServletRequest;
      import javax.servlet.http.HttpServletResponse;
      /**
       *
       */
      @Configuration
      public class WebRequestPathConfig extends WebMvcConfigurerAdapter {
              private final static Logger logger = LoggerFactory.getLogger(WebRequestPathConfig.class);
                @Bean
                public RequestExtendPathInterceptor getRequestExtendPathInterceptor() {
                        return new RequestExtendPathInterceptor();
                }
                public void addInterceptors(InterceptorRegistry registry) {
                        InterceptorRegistration addInterceptor = registry.addInterceptor(getRequestExtendPathInterceptor());
                        // 拦截配置
                        addInterceptor.addPathPatterns("/**");
                }
                private class RequestExtendPathInterceptor extends HandlerInterceptorAdapter {
                        @Override
                        public boolean preHandle(HttpServletRequest request, HttpServletResponse response, Object handler)
                                        throws Exception {
                                String scheme = request.getScheme();
                                String serverName = request.getServerName();
                                int port = request.getServerPort();
                                String path = request.getContextPath();
                                String basePath = scheme + "://" + serverName + ":" + port + path;
                                logger.info(basePath);
                                request.setAttribute("basePath", basePath);
                                return true;
                        }
                }
        }
1.3 SpringBoot自动配置原理
SpringBoot项目无需各种配置文件,启动类中一个main方法,就能把项目启动起来。那么我们看看SpringBoot是如何进行自动配置和启动的。
run方法从一个使用了默认配置的指定资源启动一个SpringApplication并返回ApplicationContext对象,这个默认配置如何指定呢?

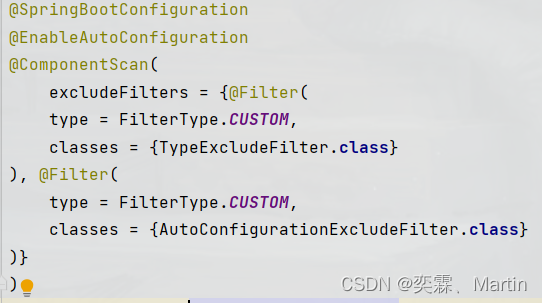
这个默认配置来源于@SpringBootApplication注解,这个注解是个复合注解,里面还包含了其他注解。
其中有三个注解是比较重要的
1.@SpringBootConfiguration:
这个注解的底层是一个@Configuration注解,意思被@Configuration注解修饰的类是一个IOC容器,支持JavaConfig的方式来进行配置;
2.@ComponentScan:
这个就是扫描注解的意思,默认扫描当前类所在的包及其子包下包含的注解,将@Controller/@Service/@Component/@Repository等注解加载到IOC容器中;
3.@EnableAutoConfiguration:
这个注解表明启动自动装配,里面包含连个比较重要的注解@AutoConfigurationPackage和@Import。
3.1.@AutoConfigurationPackage和@ComponentScan一样,也是将主配置类所在的包及其子包里面的组件扫描到IOC容器中,但是区别是@AutoConfigurationPackage扫描@Enitity、@MapperScan等第三方依赖的注解,@ComponentScan只扫描@Controller/@Service/@Component/@Repository这些常见注解。所以这两个注解扫描的对象是不一样的。
3.2.@Import(AutoConfigurationImportSelector.class)是自动装配的核心注解,AutoConfigurationImportSelector.class中有个selectImports方法selectImports方法还调用了getCandidateConfigurations方法

getCandidateConfigurations方法中,我们可以看下断言,说找不到META-INF/spring.factories,由此可见,这个方法是用来找META-INF/spring.factories文件的

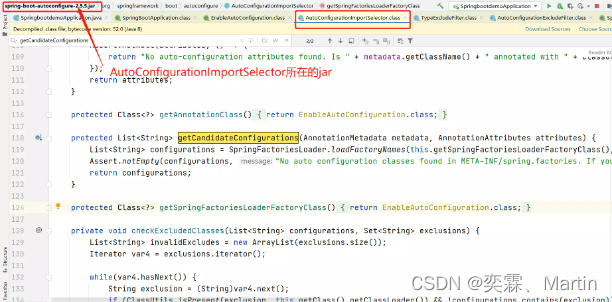
我们可以定位到这个方法所在的类处于spring-boot-autoconfigure-2.5.5*.jar包中,找到这个jar中对应的spring.factories文件

spring.factories文件是一组组的key=value的形式,包含了key为EnableAutoConfiguration的全类名,value是一个AutoConfiguration类名的列表,以逗号分隔。

最终,@EnableAutoConfiguration注解通过@SpringBootApplication注解被间接的标记在了SpringBoot的启动类上,SpringApplicaton.run方法的内部就会执行selectImports方法,进而找到所有JavaConfig配置类全限定名对应的class,然后将所有自动配置类加载到IOC容器中。
1.3.1 配置原理举例
那么这些类是如何获取默认属性值的呢?以ServletWebServerFactoryAutoConfiguration为例,它是Servlet容器的自动配置类
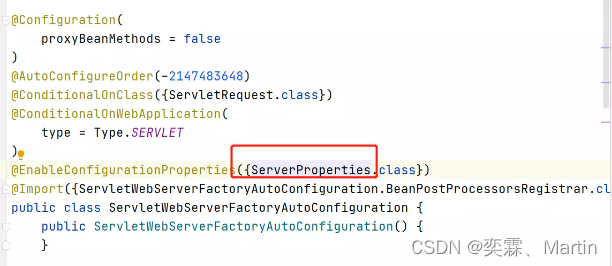
该类上开启了@EnableConfigurationProperties(ServerProperties.class)注解,最终找到了ServerProperties类。
至此,我们大致可以了解。在全局配置的属性如:server.port等,通过@ConfigurationProperties注解,绑定到对应的XxxxProperties配置实体类上封装为一个bean,然后再通过@EnableConfigurationProperties注解导入到Spring容器中。
1.4 Thymeleaf
1.4.1 Thymeleaf介绍
Thymeleaf是一个全新得模板引擎,可以用来替代jsp页面。是spring4推荐使用得一个模板引擎。
特点:
1.Thymeleaf支持HTML原型,在服务不运行得情况下,可以直接运行,可以让美工在浏览器上直接查看页面的静态效果,也可以支持开发人员在服务器运行时查询动态页面效果。
2.在html标签中增加了额外得属性来达到模版+数据得展示方式,在浏览器解析html页面时,会自动忽略html标签中未定义得属性,达到可以显示静态页面效果;当有数据返回时,thymeleaf标签会动态得替换掉静态内容,显示动态页面。
3.提供了标准和spring标准两种语言,实现jstl,ognl表达式得效果。
4.使用方便,学习简单,快速得实现表单得数据绑定。
1.4.2 Thymeleaf使用
1、配置Thymeleaf
server.servlet.context-path=/springboot03
•
# 数据库配置
spring.datasource.driver-class-name=com.mysql.cj.jdbc.Driver
spring.datasource.url=jdbc:mysql://127.0.0.1:3306/yiibaidb?useSSL=false&serverTimezone=UTC
spring.datasource.username=root
spring.datasource.password=admin
•
# thymeleaf模板配置
spring.thymeleaf.suffix=.html
spring.thymeleaf.cache=false
spring.thymeleaf.mode=HTML5
spring.thymeleaf.encoding=UTF-8
2、编写controller层代码
@Controller
public class TestController {
    @RequestMapping("test")
    public String test(Model model){
        model.addAttribute("msg","测试方法调用成功");
        return "success";
    }
}
3、创
建Thymeleaf模板
在templates创建html页面在html页面上引入thymeleaf命名空间
<html lang="en" xmlns:th="http://wwww.thymeleaf.org" > 4、 在html标签中使用thymeleaf标签获取服务器返回得数据信息
<span th:text="${msg}">success</span>5、直接访问templates下模板文件
# 静态资源路径
spring.resources.static-locations=classpath:/META-INF/resources/,classpath:/resources/, classpath:/static/,classpath:/public/,classpath:/templates/
配置好静态资源路径后,就可以将templates下的静态文件当成根目录下的静态网页来访问了。
1.4.3 Thymeleaf常用标签
1.1 th:text
用于文本的显示,并且可以进行简单的计算。
<td  th:text="${username}">mlm</td> ---> <td>maliming</td>
<td  th:text="9+7">2018</td> ---> <td>16</td>
1.2 th:utext
用于html的文本替换,常用于富文本编辑器编辑后的内容显示到前台页面上。
<p th:utext="${article.content}"></p> ---> <p>my name is <b>maliming</b></p>1.3 th:if
用于判断条件,还可以多条件 and,or(二元操作符),!,not非(一元操作符)。
<div th:if="${user} != null">show</div>如果user对象为空则不显示,不为空则显示
---> <div>show</div>
<div th:if="${user} != null and ${otherUser} != null">show</div> 运算符还可以写在${}里show -> show运算符放在了 {} 内部, 此时整个 {} 内的表达式用 ognl/spel 引擎计算; 如果运算符放在外部, 那么 thymeleaf 引擎负责计算。
1.4 th:unless
用于判断条件,与th:if作用相反。
<div th:if="${user} != null">show</div>如果user对象不为空则不显示,为空则显示
---> <div>show</div>
1.5 th:switch th:case
用于多个同等级相同目的判断,多选一时使用。
<div th:switch="${user.name}">
    <p th:case="maliming">first</p>若${user.name}中的值为maliming则显示,否则不显示
    <p th:case="${otherUser.name}">second</p>
</div>
1.6 th:action
用于定义后台控制器的路径,表单的提交地址,相当于<form>标签的action属性。
<form th:action="@{user/login}" method="post"></form>1.7 th:each
用于遍历集合中的对象,相当于jstl中的c:forEach标签。
① List集合循环遍历
<tr th:each="user,userStat:${list}">
    <td th:text="${user.name}"></td>
    <td th:text="userStat.index"></td>
</tr>
其中的user是临时变量,相当于for(User user : users)中的user,userStat称为状态变量,属性有index:当前迭代对象的index(从0开始计算);count: 当前迭代对象的index(从1开始计算), size:被迭代对象的大小,current:当前迭代变量,even/odd:布尔值,当前循环是否是偶数/奇数(从0开始计算), first:布尔值,当前循环是否是第一个,last:布尔值,当前循环是否是最后一个。
② Map集合循环遍历
<div th:each="map:${maps}" th:text="${map}"></div>③ 数组循环遍历
<tr>
    <td th:each="array:${arrays}" th:text="${array}"></td>
</tr>
1.8 th:value
用于属性赋值。
<option th:value="${user.name}"></option> -> <option value="maliming"></option>1.9 th:src
用于外部资源的引入,例如图片,js文件。
<img th:src="@{../images/myself.jpg}"/>或
<script th:src="@{../static/login.js}"></script>
1.10 th:href
用于定义超链接,相当于<a></a>>标签的href属性。
<a th:href="@{/user/selectUser?(currentPage=1,reTypeid=${reTypeid},inquiry=${inquiry})}"></a> 传参。1.11 th:remove
用于删除。可以表达式传参。
<table border="1">
    <thead>
          <tr>
             <th>编号</th>
             <th>用户名</th>
             <th>姓名</th>
             <th>性别</th>
          </tr>
    </thead>
    <tbody th:remove="all-but-first" 或者表达式th:remove="${choice}? all : all-but-first">
          <tr>
             <td>1</td>
             <td>xxxxxxxx@qq.com</td>
             <td>Tom</td>
             <td>男</td>
          </tr>
          <tr>
             <td>3</td>
             <td>xxxxxxxx@qq.com</td>
             <td>Lucy13</td>
             <td>女</td>
           </tr>
    </tbody>
</table>
这里的<tbody></tbody>标签中有th:remove="all-but-first",意思是只保留<tbody></tbody>标签中的第一个字标签,也就是name为Tom的所在<tr></tr>,其他的子标签则会删除,th:remove有五个属性值。all:删除所在标签和内容及其所属的所有子标签。body:删除所在标签的内容及其所属的所有子标签。tag:删除所在标签,不删除任何所属的子标签。all-but-first:删除除第一个子标签外的其他子标签。none:不起作用,什么也不做。
1.12 th:selected
用于选择框设置选中值。通常和th:each一起使用。
<select>
<option th:selected="${user.name} == ${otherUser.name}"></option> 若相等就默认选中此<option></option>
</select>
1.13 th:object
用于表单数据对象绑定,后台controller中参数保持一致,和选择(星号)表达式。
<form th:object="${user}">
    <input th:value="*{name}"/> *号代替了${user}
</form>
1.14 th:attr
用于设置任意属性
<input th:attr="value=${user.name}"/> 设置单个属性。
<input th:attr="value=${user.username},name=username"/> 设置多个属性之间用逗号隔开。
1.4.4 Thymeleaf中的内置对象
dates:日期格式化内置对象,具体方法可以参照java.util.Date;
<span th:text="${#dates.format(user.date, ‘yyyy-MM-dd‘)}">日期</span>
   或者
<span th:text="${#dates.format(billingForm.startTime,‘yyyy-MM-dd HH:mm:ss‘)}">时间</span>
calendars:类似于#dates,但是 是java.util.Calendar类的方法;
numbers: 数字格式化;
strings:字符串格式化,具体方法可以参照java.lang.String,如startsWith、contains等;
objects:参照java.lang.Object;
bools:判断boolean类型的工具;
arrays:数组操作的工具;
lists:列表操作的工具,参照java.util.List;
sets:Set操作工具,参照java.util.Set;
maps:Map操作工具,参照java.util.Map;
aggregates:操作数组或集合的工具;
messages:操作消息的工具。


 677
677


 被折叠的 条评论
为什么被折叠?
被折叠的 条评论
为什么被折叠?
 到【灌水乐园】发言


