


目录
二、SpringSecurity02
2.1 JWT概述
2.1.1 JWT介绍
Json web token (JWT),是为了在网络应用环境间传递声明而执行的一种基于JSON的开放标准((RFC7519).该token被设计为紧凑且安全的,特别适用于分布式站点的单点登录(SSO)场景。JWT的声明一般被用来在身份提供者和服务提供者间传递被认证的用户身份信息,以便于从资源服务器获取资源,也可以增加一些额外的其它业务逻辑所必须的声明信息,该token也可直接被用于认证,也可被加密。
2.1.2 跨域认证问题
互联网服务离不开用户认证。一般流程是下面这样。
1、用户向服务器发送用户名和密码。
2、服务器验证通过后,在当前对话(session)里面保存相关数据,比如用户角色、登录时间等等。
3、服务器向用户返回一个session_id,写入用户的Cookie。
4、用户随后的每一次请求,都会通过Cookie,将session_id传回服务器。
5、服务器收到 session_id,找到前期保存的数据,由此得知用户的身份。
这种模式的问题在于,扩展性(scaling)不好。单机当然没有问题,如果是服务器集群,或者是跨域的服务导向架构,就要求session 数据共享,每台服务器都能够读取session。
举例来说,A网站和B网站是同一家公司的关联服务。现在要求,用户只要在其中一个网站登录,再访问另一个网站就会自动登录,请问怎么实现?
一种解决方案是 session 数据持久化,写入数据库或别的持久层。各种服务收到请求后,都向持久层请求数据。这种方案的优点是架构清晰,缺点是工程量比较大。另外,持久层万一挂了,就会单点失败。
另一种方案是服务器索性不保存 session 数据了,所有数据都保存在客户端,每次请求都发回服务器。JWT就是这种方案的一个代表。
JWT: 影响了网络带宽。
2.2 JWT的原理
JWT的原理是,服务器认证以后,生成一个JSON对象,发回给用户,就像下面这样。
{
"姓名":"张三",
"角色":"管理员",
"到期时间":"1979年1月1日0点0分"
}
以后,用户与服务端通信的时候,都要发回这个JSON对象。服务器完全只靠这个对象认定用户身份。为了防止用户篡改数据,服务器在生成这个对象的时候,会加上签名(详见后文)。
服务器就不保存任何 session 数据了,也就是说,服务器变成无状态了,从而比较容易实现扩展。
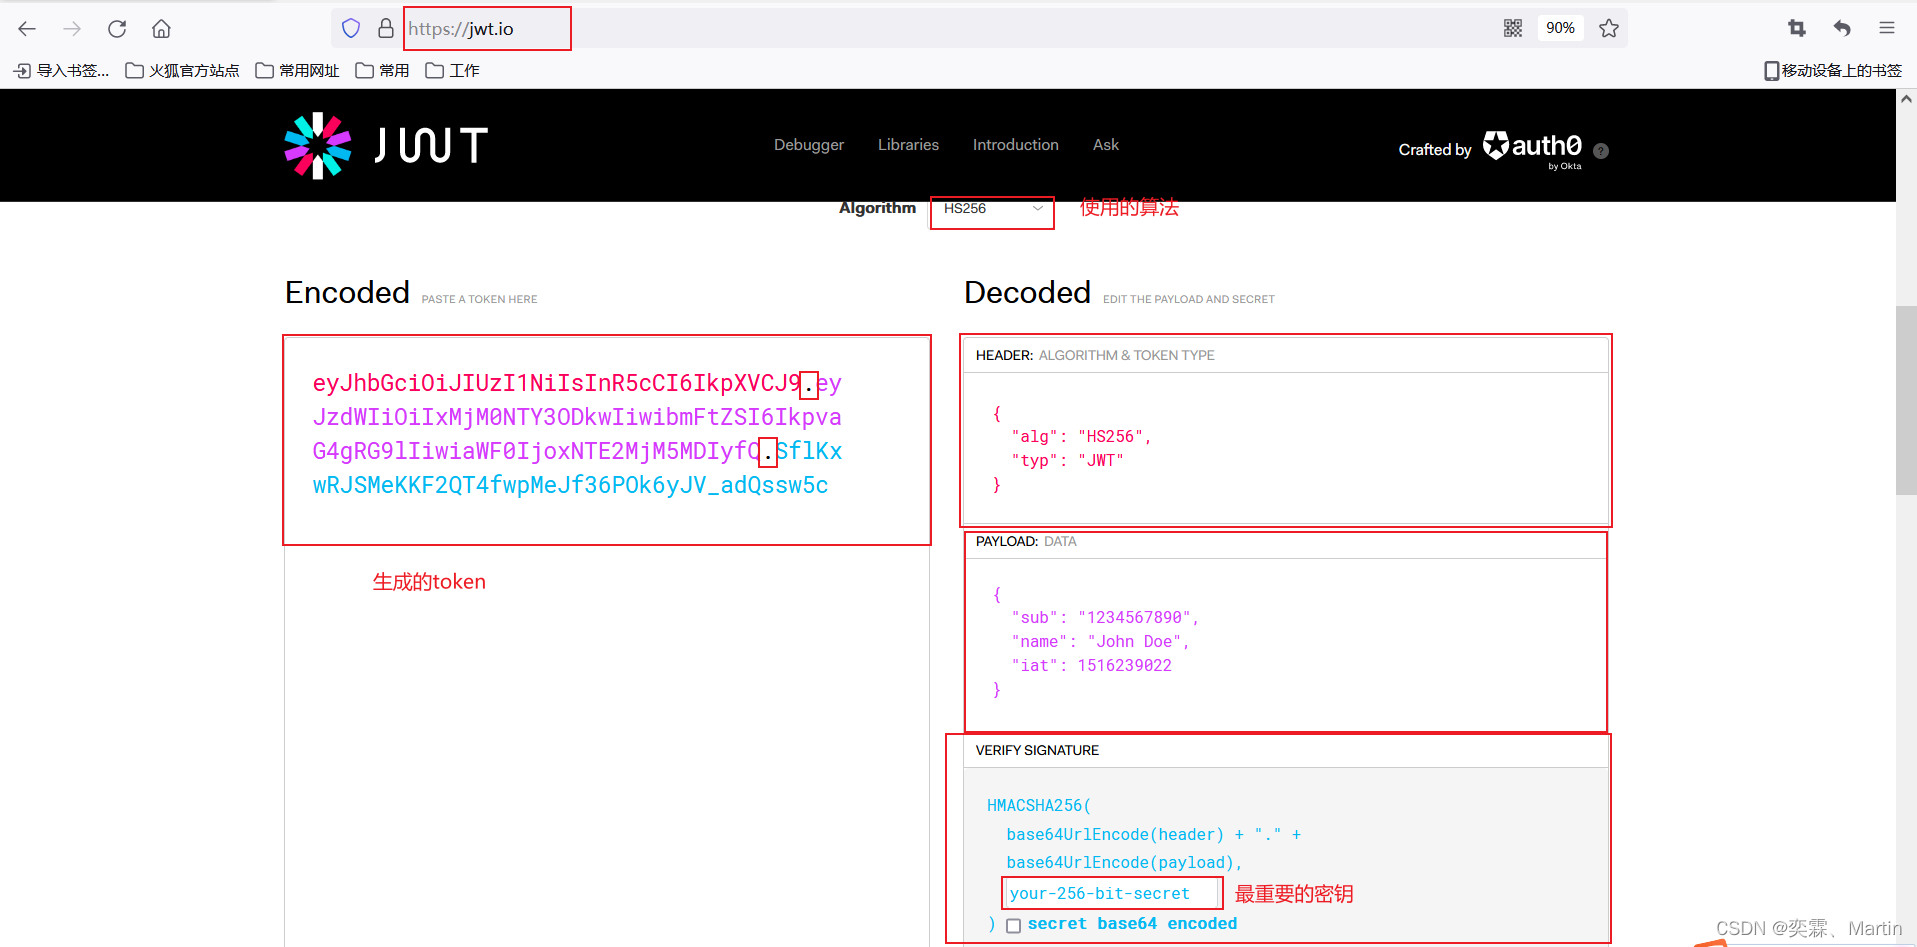
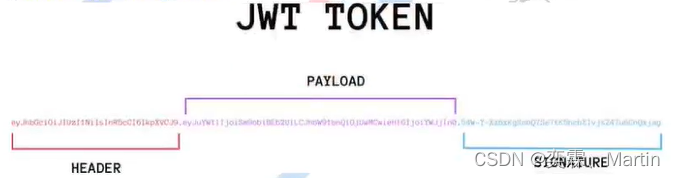
2.3 JWT的数据结构
JWT的形式大概是这样:
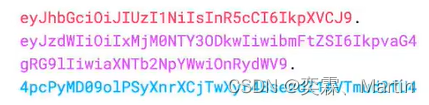
它是一个很长的字符串,中间用点(.)分隔成三个部分。注意,JWT内部是没有换行的,这里只是为了便于展示,将它写成了几行。
JWT的三个部分依次如下:
① Header (头部)
② Payload(负载 载荷)
③ Signature(签名)
写成一行(Header.Payload.Signature),如下:
2.3.1 Header
Header 部分是一个JSON对象,描述JWT的元数据,通常是下面的样子。
{ "alg": "HS256",
"typ": "JWT" }
解释:
alg属性表示签名的算法(algorithm),默认是 HMAC SHA256 (写成 HS256)
typ属性表示这个令牌(token)的类型(type), JWT令牌统一写为JWT。
最后,将上面的JSON对象使用Base64URL算法转成字符串。
2.3.2 Payload
Payload 部分也是一个JSON对象,用来存放实际需要传递的数据。
JWT规定了7个官方字段,供选用。
iss (issuer):签发人
exp (expiration time):过期时间
sub (subject):主题
aud (audience):受众
nbf (Not Before):生效时间
iat (lssued At):签发时间
jti (JWT ID):编号
除了官方字段,你还可以在这个部分定义私有字段,下面就是一个例子。
{
"sub": "1234567890", "name" : "John Doe",
“userid”:2
"admin": true }
注意,JWT 默认是不加密的,任何人都可以读到,所以不要把秘密信息(比如password)放在这个部分。
2.3.3 Signature
Signature部分是对前两部分的签名,防止数据篡改。
首先,需要指定一个密钥(secret)。这个密钥只有服务器才知道,不能泄露给用户。然后,使用Header里面指定的签名算法(默认是 HMAC SHA256),按照下面的公式产生签名。
HMACSHA256( base64UrlEncode(header) + ".”"+base64UrlEncode(payload), secret)
算出签名以后,把 Header、Payload、Signature 三个部分拼成一个字符串,每个部分之间用"点"(.)分隔,就可以返回给用户。
2.4 JWT的使用方式
客户端收到服务器返回的 JWT,可以储存在Cookie里面,也可以储存在 localStorage或者SessionStorage。
此后,客户端每次与服务器通信,都要带上这个JWT。你可以把它放在Cookie里面自动发送,但是这样不能跨域,所以更好的做法是放在HTTP请求的头信息Authorization字段里面。
Authorization: Bearer <token>
token: <token>
2.5 JWT的使用
2.5.1 引入JWT依赖
        <!--引入jwt,生成token-->
        <dependency>
            <groupId>com.auth0</groupId>
            <artifactId>java-jwt</artifactId>
            <version>4.2.1</version>
        </dependency>
2.5.2 编写JWT工具类
package com.example.securitysql;
import com.auth0.jwt.JWT;
import com.auth0.jwt.algorithms.Algorithm;
import com.auth0.jwt.interfaces.DecodedJWT;
import com.auth0.jwt.interfaces.Verification;
import java.util.*;
/**
* token工具类
*/
public class JWTUtils {
//声明密钥
private static String secret = "密钥";
/**
* 通过jwt生成token令牌
*/
public static String getToken(Map<String,Object> map){
//声明一个map当做头部标签
Map<String,Object> head=new HashMap<>();
head.put("alg","HS256");
head.put("typ","JWT");
//使用时间工具(Calendar)获取过期时间
Calendar calendar=Calendar.getInstance(); //获取当前时间
calendar.set(Calendar.SECOND,7200); //在这个时间点加上7200秒
Date expire = calendar.getTime(); //获取时间增加后的时间点(也就是我们要使用的过期时间)
//组装token的三部分
String token = JWT.create()
.withHeader(head) //头部标签
.withIssuedAt(new Date()) //官方的载荷内容:签发时间
.withExpiresAt(expire) //官方的载荷内容:过期时间
.withSubject("测试玩玩") //官方的载荷内容:主题
.withClaim("map", map) //定义自己的载荷内容
.sign(Algorithm.HMAC256(secret)); //定义签名
return token;
}
/**
* 检验token是否正确
* @param token
*/
public static boolean validateToken(String token){
try { // 如果根据密钥检验token没有错误,就返回true,否则返回false
//获取签名(密钥)
Verification require = JWT.require(Algorithm.HMAC256(secret));
//检验token
DecodedJWT verify = require.build().verify(token);
return true;
}catch (Exception e){
//打印异常信息
e.printStackTrace();
}
return false;
}
/**
* 获取token中指定的数据
*/
public static Map<String,Object> getInfo(String token){
Verification require = JWT.require(Algorithm.HMAC256("qy160-niu"));
DecodedJWT verify = require.build().verify(token);
String token1 = verify.getToken(); //获取的是token值
String payload = verify.getPayload(); //获取token中的载荷部分值
String header = verify.getHeader(); //获取token中的头部标签值
String signature = verify.getSignature(); // 获取token中的签名标签值
Map<String, Object> map = verify.getClaim("map").asMap(); //获取原始载荷中的内容并转换为map类型的数据
return map;
}
}测试类:
package com.example.securitysql;
import java.util.HashMap;
import java.util.Map;
//测试类
public class TestJWTUtils {
public static void main(String[] args) {
//测试生成token
HashMap<String , Object> map = new HashMap<>();
map.put("username","test");
map.put("list",new Integer[]{1,2,3});
//数组类型要是包装类:Expected map containing Map, List, Boolean, Integer, Long, Double, String and Date
String token = JWTUtils.getToken(map);
//测试校验token
System.out.println("token值是否正确:"+JWTUtils.validateToken(token));
//测试获取token内的信息
Map<String, Object> info = JWTUtils.getInfo(token);
System.out.println("username信息:"+info.get("username"));
System.out.println("list信息:"+info.get("list"));
}
}以上所有代码算是一个前后端不分离的项目:
gitee地址如下:securitysql: SpringBoot+SpringSecurity+thymeleaf完成前后端不分离
2.6 编写前后端不分离的项目
2.6.1、pom文件
<?xml version="1.0" encoding="UTF-8"?>
<project xmlns="http://maven.apache.org/POM/4.0.0" xmlns:xsi="http://www.w3.org/2001/XMLSchema-instance"
xsi:schemaLocation="http://maven.apache.org/POM/4.0.0 https://maven.apache.org/xsd/maven-4.0.0.xsd">
<modelVersion>4.0.0</modelVersion>
<parent>
<groupId>org.springframework.boot</groupId>
<artifactId>spring-boot-starter-parent</artifactId>
<version>2.3.12.RELEASE</version>
<relativePath/> <!-- lookup parent from repository -->
</parent>
<groupId>com.example</groupId>
<artifactId>securityseparate</artifactId>
<version>0.0.1-SNAPSHOT</version>
<name>securityseparate</name>
<description>securityseparate</description>
<properties>
<java.version>1.8</java.version>
</properties>
<dependencies>
<dependency>
<groupId>org.springframework.boot</groupId>
<artifactId>spring-boot-starter-security</artifactId>
</dependency>
<dependency>
<groupId>org.springframework.boot</groupId>
<artifactId>spring-boot-starter-web</artifactId>
</dependency>
<dependency>
<groupId>mysql</groupId>
<artifactId>mysql-connector-java</artifactId>
<scope>runtime</scope>
</dependency>
<dependency>
<groupId>org.projectlombok</groupId>
<artifactId>lombok</artifactId>
<optional>true</optional>
</dependency>
<dependency>
<groupId>org.springframework.boot</groupId>
<artifactId>spring-boot-starter-test</artifactId>
<scope>test</scope>
</dependency>
<dependency>
<groupId>org.springframework.security</groupId>
<artifactId>spring-security-test</artifactId>
<scope>test</scope>
</dependency>
<!--mybatis-plus-->
<dependency>
<groupId>com.baomidou</groupId>
<artifactId>mybatis-plus-boot-starter</artifactId>
<version>3.4.1</version>
</dependency>
<!--mp的代码生成器的依赖-->
<dependency>
<groupId>com.baomidou</groupId>
<artifactId>mybatis-plus-generator</artifactId>
<version>3.4.1</version>
</dependency>
<dependency>
<groupId>org.apache.velocity</groupId>
<artifactId>velocity-engine-core</artifactId>
<version>2.2</version>
</dependency>
<!--swagger2的坐标:版本过高会导致后面在排除错误的接口文档时发生错误-->
<dependency>
<groupId>com.spring4all</groupId>
<artifactId>swagger-spring-boot-starter</artifactId>
<version>1.9.1.RELEASE</version>
</dependency>
<!--swagger图形化界面-->
<dependency>
<groupId>com.github.xiaoymin</groupId>
<artifactId>swagger-bootstrap-ui</artifactId>
<version>1.7.8</version>
</dependency>
<!--引入jwt,生成token-->
<dependency>
<groupId>com.auth0</groupId>
<artifactId>java-jwt</artifactId>
<version>4.2.1</version>
</dependency>
<dependency>
<groupId>com.alibaba</groupId>
<artifactId>fastjson</artifactId>
<version>2.0.12</version>
</dependency>
</dependencies>
<build>
<plugins>
<plugin>
<groupId>org.springframework.boot</groupId>
<artifactId>spring-boot-maven-plugin</artifactId>
<configuration>
<excludes>
<exclude>
<groupId>org.projectlombok</groupId>
<artifactId>lombok</artifactId>
</exclude>
</excludes>
</configuration>
</plugin>
</plugins>
</build>
</project>2.6.2 启动类
package com.example.securityseparate;
import org.mybatis.spring.annotation.MapperScan;
import org.springframework.boot.SpringApplication;
import org.springframework.boot.autoconfigure.SpringBootApplication;
import org.springframework.security.config.annotation.method.configuration.EnableGlobalMethodSecurity;
@SpringBootApplication
@EnableGlobalMethodSecurity(prePostEnabled = true)
@MapperScan(basePackages = "com.example.securityseparate.dao")
public class SecurityseparateApplication {
public static void main(String[] args) {
SpringApplication.run(SecurityseparateApplication.class, args);
}
}2.6.3 JWT工具类
package com.example.securityseparate.util;
import com.auth0.jwt.JWT;
import com.auth0.jwt.algorithms.Algorithm;
import com.auth0.jwt.interfaces.DecodedJWT;
import com.auth0.jwt.interfaces.Verification;
import java.util.Calendar;
import java.util.Date;
import java.util.HashMap;
import java.util.Map;
/**
* token工具类
*/
public class JWTUtils {
//声明密钥
private static String secret = "密钥";
/**
* 通过jwt生成token令牌
*/
public static String getToken(Map<String,Object> map){
//声明一个map当做头部标签
Map<String,Object> head=new HashMap<>();
head.put("alg","HS256");
head.put("typ","JWT");
//使用时间工具(Calendar)获取过期时间
Calendar calendar=Calendar.getInstance(); //获取当前时间
calendar.set(Calendar.SECOND,7200); //在这个时间点加上7200秒
Date expire = calendar.getTime(); //获取时间增加后的时间点(也就是我们要使用的过期时间)
//组装token的三部分
String token = JWT.create()
.withHeader(head) //头部标签
.withIssuedAt(new Date()) //官方的载荷内容:签发时间
.withExpiresAt(expire) //官方的载荷内容:过期时间
.withSubject("测试玩玩") //官方的载荷内容:主题
.withClaim("map", map) //定义自己的载荷内容
.sign(Algorithm.HMAC256(secret)); //定义签名
return token;
}
/**
* 检验token是否正确
* @param token
*/
public static boolean validateToken(String token){
try { // 如果根据密钥检验token没有错误,就返回true,否则返回false
//获取签名(密钥)
Verification require = JWT.require(Algorithm.HMAC256(secret));
//检验token
DecodedJWT verify = require.build().verify(token);
return true;
}catch (Exception e){
//打印异常信息
e.printStackTrace();
}
return false;
}
/**
* 获取token中指定的数据
*/
public static Map<String,Object> getInfo(String token){
Verification require = JWT.require(Algorithm.HMAC256("密钥"));
DecodedJWT verify = require.build().verify(token);
String token1 = verify.getToken(); //获取的是token值
String payload = verify.getPayload(); //获取token中的载荷部分值
String header = verify.getHeader(); //获取token中的头部标签值
String signature = verify.getSignature(); // 获取token中的签名标签值
Map<String, Object> map = verify.getClaim("map").asMap(); //获取原始载荷中的内容并转换为map类型的数据
return map;
}
}2.6.4 配置文件
server.port=8081
spring.datasource.driver-class-name=com.mysql.cj.jdbc.Driver
spring.datasource.url=jdbc:mysql://localhost:3306/security?serverTimezone=Asia/Shanghai&useUnicode=true&characterEncoding=utf-8
spring.datasource.username=root
spring.datasource.password=密码
mybatis-plus.configuration.log-impl=org.apache.ibatis.logging.stdout.StdOutImpl
2.6.5 配置类
前后端分离和不分离项目最大的不同就在于这个配置类的不同
package com.example.securityseparate.config;
import com.alibaba.fastjson.JSON;
import com.example.securityseparate.service.MyUserDetailService;
import com.example.securityseparate.util.JWTUtils;
import com.example.securityseparate.vo.Result;
import org.springframework.beans.factory.annotation.Autowired;
import org.springframework.context.annotation.Bean;
import org.springframework.context.annotation.Configuration;
import org.springframework.security.access.AccessDeniedException;
import org.springframework.security.config.annotation.authentication.builders.AuthenticationManagerBuilder;
import org.springframework.security.config.annotation.web.builders.HttpSecurity;
import org.springframework.security.config.annotation.web.configuration.WebSecurityConfigurerAdapter;
import org.springframework.security.core.Authentication;
import org.springframework.security.core.AuthenticationException;
import org.springframework.security.core.GrantedAuthority;
import org.springframework.security.core.userdetails.User;
import org.springframework.security.crypto.bcrypt.BCryptPasswordEncoder;
import org.springframework.security.crypto.password.PasswordEncoder;
import org.springframework.security.web.access.AccessDeniedHandler;
import org.springframework.security.web.authentication.AuthenticationFailureHandler;
import org.springframework.security.web.authentication.AuthenticationSuccessHandler;
import javax.servlet.ServletException;
import javax.servlet.http.HttpServletRequest;
import javax.servlet.http.HttpServletResponse;
import java.io.IOException;
import java.io.PrintWriter;
import java.util.Collection;
import java.util.HashMap;
import java.util.List;
import java.util.Map;
import java.util.stream.Collectors;
/**
* 如果SpringBoot的版本过高,WebSecurityConfigurerAdapter就过时了
* 前后端分离项目,不能有页面
*/
@Configuration
public class MySecurityConfig extends WebSecurityConfigurerAdapter {
/**
* 密码加密器,自定义构建多个用户时,用户的密码必须使用密码加密器进行加密
*/
@Bean
public PasswordEncoder passwordEncoder(){
return new BCryptPasswordEncoder();
}
@Autowired
private MyUserDetailService myUserDetailService;
@Override
protected void configure(AuthenticationManagerBuilder auth) throws Exception {
/**
* userDetailsService代表使用的是数据库
* 传递一个userDetailsService对象,查询数据库完成相应的功能
*/
auth.userDetailsService(myUserDetailService).passwordEncoder(passwordEncoder());
}
@Override
protected void configure(HttpSecurity http) throws Exception {
//放行登录表单
http.formLogin()
.loginProcessingUrl("/login") //放行自己表单的登录处理路径[因为自己的表单提交路径为 /login]
.successHandler(successHandler()) //成功处理类:参数类型为AuthenticationSuccessHandler
.failureHandler(failureHandler()) //失败处理类:参数类型为AuthenticationFailureHandler
.permitAll();
//权限不足处理类:参数类型为AccessDeniedHandler
http.exceptionHandling().accessDeniedHandler(handler());
//禁用csrf的校验
http.csrf().disable();
//其他资源认证即可访问
http.authorizeRequests().anyRequest().authenticated();
}
/**
* 定义登陆成功处理类的参数,成功后可以返回json数据(这里使用的依赖是阿里的fastjson)
* @return
*/
private AuthenticationSuccessHandler successHandler(){
return new AuthenticationSuccessHandler() {
@Override
public void onAuthenticationSuccess(HttpServletRequest request, HttpServletResponse response, Authentication authentication) throws IOException, ServletException {
//1、定义响应json数据的编码格式
response.setContentType("application/json;charset=utf-8");
PrintWriter writer = response.getWriter();
/**
* 用户的信息已经封装到authentication对象中
*其中用户的权限信息存储在Principal中,数据结构形式是User类型的,所以这里强制转换为User类型即可
*/
//2、获取当前登录用户的所有信息
User user = (User) authentication.getPrincipal();
//3、获取当前登录用户的用户名
String username = user.getUsername();
//4、获取当前的登录用户的权限,并将权限中的权限码放到一个集合中
Collection<GrantedAuthority> authorities = user.getAuthorities();
List<String> collect = authorities.stream().map(item -> item.getAuthority()).collect(Collectors.toList());
//5、将用户名和用户权限封装到map对象中
Map<String,Object> map = new HashMap<>();
map.put("username",username);
map.put("authorities",collect);
//6、使用自己编写的token工具类生成token
String token = JWTUtils.getToken(map);
//7、响应一个公共实体类
Result<String> result = new Result<>(token);
//8、将生成的实体类对象转换成json数据
String jsonString = JSON.toJSONString(result);
//9、将生成的json数据响应给前端
writer.print(jsonString);
//10、关闭数据流
writer.flush();
writer.close();
}
};
}
/**
* 定义登陆失败处理类的参数,失败后返回异常即可
* @return
*/
private AuthenticationFailureHandler failureHandler(){
return new AuthenticationFailureHandler() {
@Override
public void onAuthenticationFailure(HttpServletRequest request, HttpServletResponse response, AuthenticationException e) throws IOException, ServletException {
//1、定义响应json数据的编码格式
response.setContentType("application/json;charset=utf-8");
PrintWriter writer = response.getWriter();
//7、响应一个公共实体类
Result<String> result = new Result(500,e.getMessage());
//8、将生成的实体类对象转换成json数据
String jsonString = JSON.toJSONString(result);
//9、将生成的json数据响应给前端
writer.print(jsonString);
//10、关闭数据流
writer.flush();
writer.close();
}
};
}
/**
* 定义权限不足处理类的参数,权限不足时返回异常
* @return
*/
private AccessDeniedHandler handler(){
return new AccessDeniedHandler() {
@Override
public void handle(HttpServletRequest request, HttpServletResponse response, AccessDeniedException e) throws IOException, ServletException {
//1、定义响应json数据的编码格式
response.setContentType("application/json;charset=utf-8");
PrintWriter writer = response.getWriter();
//7、响应一个公共实体类
Result<String> result = new Result(403,e.getMessage());
//8、将生成的实体类对象转换成json数据
String jsonString = JSON.toJSONString(result);
//9、将生成的json数据响应给前端
writer.print(jsonString);
//10、关闭数据流
writer.flush();
writer.close();
}
};
}
}2.6.6 controller层
package com.example.securityseparate.controller;
import org.springframework.security.access.prepost.PreAuthorize;
import org.springframework.security.core.Authentication;
import org.springframework.security.core.context.SecurityContext;
import org.springframework.security.core.context.SecurityContextHolder;
import org.springframework.web.bind.annotation.GetMapping;
import org.springframework.web.bind.annotation.RequestMapping;
import org.springframework.web.bind.annotation.RestController;
import java.security.Principal;
/**
* @author Lei
* @create 2023-03-09 0:01
*/
@RestController
@RequestMapping("user")
public class UserController {
/**
* 第一种:
* 容器会自动注入给参数为 Principal的参数
* @param principal
* @return
*/
@GetMapping("info")
public Principal info(Principal principal){
return principal;
}
/** 第二种
* 登录成功后springSecurity会把当前的用户信息保存到【SecurityContext】中,也就是类似于Session中
* 所有的用户信息都会封装到 Authentication 中
*/
@GetMapping("getInfo")
public Authentication getInfo(){
SecurityContext context = SecurityContextHolder.getContext();
Authentication authentication = context.getAuthentication();
return authentication;
}
@GetMapping("query")
@PreAuthorize("hasAuthority('user:query')")
//拥有这样的一个权限就可以访问上面的资源,使用这个注解需要在启动类中加上@EnableGlobalMethodSecurity(prePostEnabled = true)注解
public String query(){
return "用户查询";
}
@GetMapping("insert")
@PreAuthorize("hasAuthority('user:insert')")
public String insert(){
return "用户添加";
}
@GetMapping("update")
@PreAuthorize("hasAuthority('user:update')")
public String update(){
return "用户修改";
}
@GetMapping("delete")
@PreAuthorize("hasAuthority('user:delete')")
public String delete(){
return "用户删除";
}
@GetMapping("export")
@PreAuthorize("hasAuthority('user:export')")
public String export(){
return "用户导出";
}
}
2.6.7 service层
package com.example.securityseparate.service;
import com.baomidou.mybatisplus.core.conditions.query.QueryWrapper;
import com.example.securityseparate.dao.SysUserMapper;
import com.example.securityseparate.entity.SysPermission;
import com.example.securityseparate.entity.SysUser;
import org.springframework.beans.factory.annotation.Autowired;
import org.springframework.security.core.authority.SimpleGrantedAuthority;
import org.springframework.security.core.userdetails.User;
import org.springframework.security.core.userdetails.UserDetails;
import org.springframework.security.core.userdetails.UserDetailsService;
import org.springframework.security.core.userdetails.UsernameNotFoundException;
import org.springframework.stereotype.Service;
import javax.annotation.Resource;
import java.util.List;
import java.util.stream.Collectors;
@Service
public class MyUserDetailService implements UserDetailsService {
@Resource
private SysUserMapper userMapper;
@Override
public UserDetails loadUserByUsername(String username) throws UsernameNotFoundException {
//1、根据用户名username查找用户信息
QueryWrapper<SysUser> queryWrapper = new QueryWrapper<>();
queryWrapper.eq("username",username);
SysUser sysUser = userMapper.selectOne(queryWrapper);
if (sysUser==null){
throw new RuntimeException("账号不存在");
}
//2、如果用户不为空,查找用户对应的权限
List<SysPermission> permissionById = userMapper.findPermissionById(sysUser.getUserid());
//3、将权限转变为指定类型的权限集合
//3.1方法一:使用增强for循环
// Collection<SimpleGrantedAuthority> authorities = new ArrayList<>();
// for (SysPermission item: permissionById) {
// //这里权限数组中只要权限的权限码
// SimpleGrantedAuthority simpleGrantedAuthority = new SimpleGrantedAuthority(item.getPercode());
// authorities.add(simpleGrantedAuthority);
// }
/**
* 3.2方法二:使用Stream流
* map:把集合中的元素变成另一种类型
* item -> new SimpleGrantedAuthority(item.getPercode()):将每一个permission类型的值变为SimpleGrantedAuthority类型
* collect(Collectors.toList()):重新收集为集合
*/
List<SimpleGrantedAuthority> authorities = permissionById.stream().map(item -> new SimpleGrantedAuthority(item.getPercode())).collect(Collectors.toList());
/**4、返回指定类型的数据(UserDetails)
* User(String username, String password, Collection<? extends GrantedAuthority> authorities)
* 用户名、密码、一个指定了泛型的集合(集合中是权限)
*/
UserDetails userDetails = new User(sysUser.getUsername(), sysUser.getUserpwd(),authorities);
return userDetails;
}
}2.6.8 dao层
public interface SysUserMapper extends BaseMapper<SysUser> {
//根据用户id查询权限信息
public List<SysPermission> findPermissionById(Integer userid);
}
<?xml version="1.0" encoding="UTF-8"?>
<!DOCTYPE mapper PUBLIC "-//mybatis.org//DTD Mapper 3.0//EN" "http://mybatis.org/dtd/mybatis-3-mapper.dtd">
<mapper namespace="com.example.securityseparate.dao.SysUserMapper">
<!--根据用户id查找用户权限:需要三表联查,角色表(sys_role),角色权限表(sys_role_permission),权限表(sys_permission)-->
<select id="findPermissionById" resultType="com.example.securityseparate.entity.SysPermission">
select p.* from sys_permission p,sys_role_permission rp,sys_user_role ur
where p.perid=rp.perid and rp.roleid=ur.roleid and ur.userid=#{userid}
</select>
</mapper>测试
开启项目,进行登录,登录失败,会跳转失败到失败的页面
登陆成功,访问权限不足的时候,页会跳转到权限不足的页面
2.6.9 前端代码
main.js
import Vue from 'vue'
import App from './App.vue'
import router from './router'
import './plugins/element.js'
import axios from 'axios'
Vue.config.productionTip = false
// 挂载到Vue对象上
Vue.prototype.$axios=axios;
// 配置axios基础路径
axios.defaults.baseURL="http://localhost:8081/"
new Vue({
router,
render: h => h(App)
}).$mount('#app')login.vue
<template>
<div class="login_container">
<!-- 登录盒子 -->
<div class="login_box">
<!-- 头像 -->
<div class="avatar_box">
<img src="@/assets/logo.png" alt="">
</div>
<!-- 登录表单 -->
<el-form :model="loginForm" ref="LoginFormRef" :rules="loginFormRules" label-width="0px" class="login_form">
<!-- 用户名 -->
<el-form-item prop="username">
<el-input v-model="loginForm.username" prefix-icon="el-icon-user-solid" ></el-input>
</el-form-item>
<!-- 密码 -->
<el-form-item prop="password">
<el-input type="password" v-model="loginForm.password" prefix-icon="el-icon-s-grid"></el-input>
</el-form-item>
<!-- 按钮 -->
<el-form-item class="btns">
<el-button type="primary" @click="login">登录</el-button>
<el-button type="info" @click="resetLoginForm">重置</el-button>
</el-form-item>
</el-form>
</div>
</div>
</template>
<script>
export default {
name: "Login",
data() {
return {
//数据绑定
loginForm: {
username: '张三',
password: '123456'
},
//表单验证规则
loginFormRules: {
username: [
{ required: true, message: '请输入登录名', trigger: 'blur' },
{
min: 1,
max: 10,
message: '登录名长度在 3 到 10 个字符',
trigger: 'blur'
}
],
password: [
{ required: true, message: '请输入密码', trigger: 'blur' },
{
min: 6,
max: 15,
message: '密码长度在 6 到 15 个字符',
trigger: 'blur'
}
]
}
}
},
methods:{
//添加表单重置方法
resetLoginForm() {
//this=>当前组件对象,其中的属性$refs包含了设置的表单ref
// console.log(this)
this.$refs.LoginFormRef.resetFields()
},
//登录方法
login(){
this.$axios.post("/login?username="+this.loginForm.username+"&password="+this.loginForm.password).then(result=>{
if(result.data.code===200){
//保存token到localStorage
sessionStorage.setItem("token",result.data.t);
//页面跳转
this.$router.push("/index")
}else{
this.$message.error(result.data.msg);
}
})
},
}
}
</script>
<style scoped>
.login_container {
background-color: #2b5b6b;
height: 100%;
}
.login_box {
width: 450px;
height: 300px;
background: #fff;
border: 1px solid #42b983;
border-radius: 3px;
position: absolute;
left: 50%;
top: 50%;
transform: translate(-50%, -50%);
}
.login_box>.avatar_box {
height: 130px;
width: 130px;
border: 1px solid #eee;
border-radius: 50%;
padding: 10px;
box-shadow: 0 0 10px #ddd;
position: absolute;
left: 50%;
transform: translate(-50%, -50%);
background-color: #fff;
}
.login_box>.avatar_box>img {
width: 100%;
height: 100%;
border-radius: 50%;
background-color: #eee;
}
.login_form {
position: absolute;
bottom: 0;
width: 100%;
padding: 0 20px;
box-sizing: border-box;
}
.btns {
display: flex;
justify-content: flex-end;
}
</style>index.vue
<template>
<div id="app">
<el-button type="danger" round @click="ins()">添加</el-button>
<el-button type="danger" round @click="del()">删除</el-button>
<el-button type="danger" round @click="upd()">修改</el-button>
<el-button type="danger" round @click="que()">查询</el-button>
<el-button type="danger" round @click="ex()">导入</el-button>
</div>
</template>
<script>
export default {
name: 'index',
data() {
return {
tableData: [],
}
},
//加载完毕执行后的方法
created() {
},
//自定义的方法
methods: {
ins(){
this.$axios.post("/user/insert").then(result=>{
this.$message.success("用户添加");
})
},
del(){
this.$axios.post("/user/delete").then(result=>{
this.$message.success("用户删除");
})
},
upd(){
this.$axios.post("/user/update").then(result=>{
this.$message.success("用户修改");
})
},
que(){
this.$axios.post("/user/query").then(result=>{
this.$message.success("用户查询");
})
},
ex(){
this.$axios.post("/user/export").then(result=>{
this.$message.success("用户导出");
})
}
}
}
</script>
<style>
</style>index.js
const routes = [
  {
    path: '/',
    name: 'home',
    component: HomeView
  },
  {
      path:'/index',
      name:'index',
      component:()=>import('@/views/test/index.vue')
  },
  {
      path:'/login',
      name:'Login',
      component:()=>import('@/views/test/Login.vue')
  },
  {
    path: '/about',
    name: 'about',
    component: () => import(/* webpackChunkName: "about" */ '../views/AboutView.vue')
  }
]
2.6.10 跨域配置
package com.example.securityseparate.config;
import org.springframework.context.annotation.Bean;
import org.springframework.context.annotation.Configuration;
import org.springframework.web.cors.CorsConfiguration;
import org.springframework.web.cors.UrlBasedCorsConfigurationSource;
import org.springframework.web.filter.CorsFilter;
/**
* 这里的跨域配置类只是解决了前后端的跨域配置问题,
* 还需要解决security的跨域问题:解决方法在配置类(MySecurityConfig)中添加security跨域 http.cors();
*/
@Configuration
public class CrossOriginConfig {
/**
*全局跨域请求和局部跨域请求写一个即可
*全局跨域请求可以写在启动类中,也可以单独写一个类
*如果是单独写一个类,那么启动类和跨域请求类 只需要写一个@MapperScan注解
*/
@Bean
public CorsFilter corsFilter() {
final UrlBasedCorsConfigurationSource source = new UrlBasedCorsConfigurationSource();
final CorsConfiguration corsConfiguration = new CorsConfiguration();
// corsConfiguration.setAllowCredentials(true);
corsConfiguration.addAllowedHeader("*");// 允许所有的头
corsConfiguration.addAllowedOrigin("*");// 允许所有源发出的请求
corsConfiguration.addAllowedMethod("*");// 允许所有的方法 如果不写的话默认是允许GET POST
source.registerCorsConfiguration("/**", corsConfiguration);// 所有的路径,这里写完就不用再Controller中写跨域请求
return new CorsFilter(source);
}
/** 两个跨域配置使用一个即可
* 允许跨域调用的过滤器
*/
// @Bean
// public CorsFilter corsFilter() {
// CorsConfiguration corsConfiguration = new CorsConfiguration();
// corsConfiguration.setAllowCredentials(Boolean.TRUE);
corsConfiguration.addAllowedOriginPattern("*");
// corsConfiguration.addAllowedOrigin("*");
// corsConfiguration.addAllowedHeader("*");
// corsConfiguration.addAllowedMethod("*");
// UrlBasedCorsConfigurationSource urlBasedCorsConfigurationSource = new UrlBasedCorsConfigurationSource();
// urlBasedCorsConfigurationSource.registerCorsConfiguration("/**", corsConfiguration);
// return new CorsFilter(urlBasedCorsConfigurationSource);
// }
}在MySecurityConfig类中添加security的跨域配置
@Override
protected void configure(HttpSecurity http) throws Exception {
//放行登录表单
http.formLogin()
.loginProcessingUrl("/login") //放行自己表单的登录处理路径[因为自己的表单提交路径为 /login]
.successHandler(successHandler()) //成功处理类:参数类型为AuthenticationSuccessHandler
.failureHandler(failureHandler()) //失败处理类:参数类型为AuthenticationFailureHandler
.permitAll();
//权限不足处理类:参数类型为AccessDeniedHandler
http.exceptionHandling().accessDeniedHandler(handler());
//禁用csrf的校验
http.csrf().disable();
//SpringSecurity允许跨域
http.cors();
//其他资源认证即可访问
http.authorizeRequests().anyRequest().authenticated();
}当前实现的效果是,即使不登录,也能直接访问任何一个资源
现在想实现的效果是,不登录的时候不让访问别的资源
2.6.11 前置路由守卫
编写在main.js中
// 设置前置路由守卫:to:要跳转的路径  from:从哪里来   next:下一步
router.beforeEach((to,from,next)=>{
    //获取要跳转的路径
    let path = to.path;
    //如果访问的就是登录页面就放行
    if(path=='/login'){
        return next();
    }

    //判断是否登录
    let token = sessionStorage.getItem("token");
    //在前端里面,if语句判断时,只要变量有值,就代表是true
    if(token){
        return next();
    }
    return next("/login");
})
此时将token存在了sessionStorage中,设置了路由守卫之后只有在登陆后才能访问资源,即使是新开一个窗口也不能进行访问
另外,前后端分离之后,每次前端向后台发出请求时都需要添加token令牌,因为有很多的访问,所以每次添加就会很麻烦。
2.6.12 请求拦截器
写在main.js中
//设置请求拦截器-->前端访问后端接口时,可以添加一些操作
//这里就是在每次请求时,都给请求头添加token
axios.interceptors.request.use(config=>{
    let token = sessionStorage.getItem("token");
    if(token){
        config.headers.token=token;
    }
    return config;
})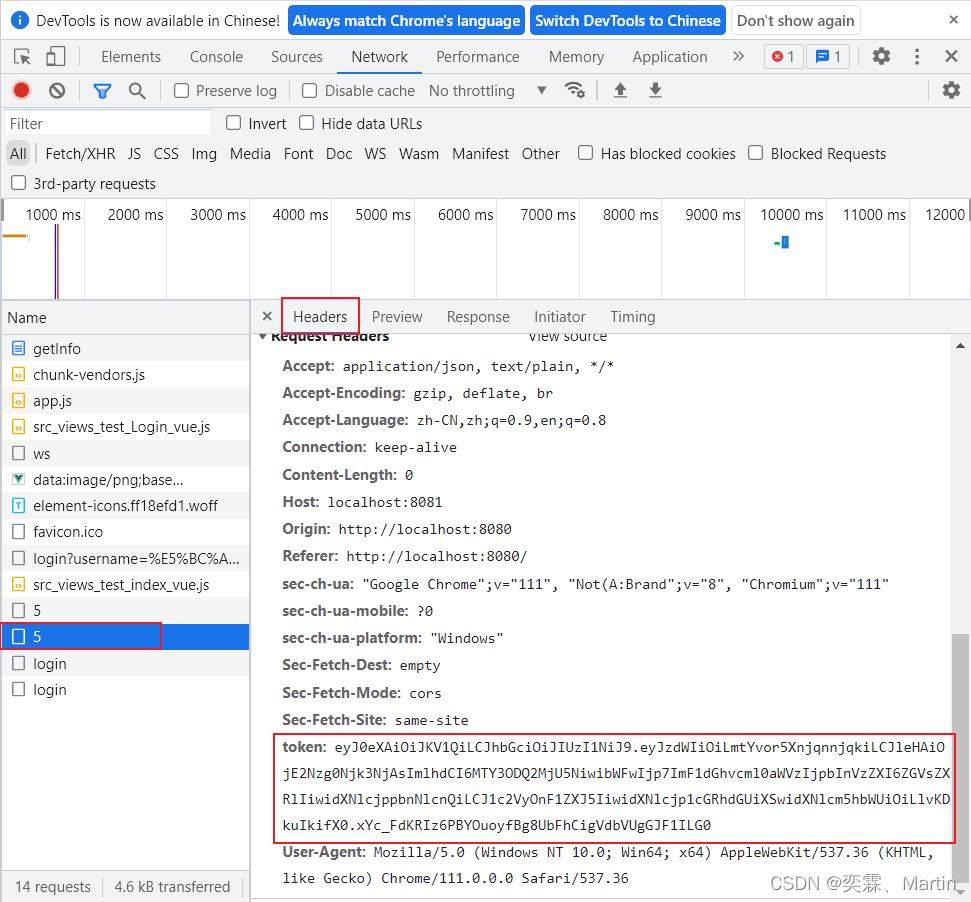
这样每一个发向后台的请求都会携带token令牌
在每次响应失败时,回调函数中需要单独处理失败的情况,会增多代码量,也会更加麻烦
2.6.13 响应拦截器
写在main.js中
//设置响应拦截器-->服务器响应结果后会先经过响应拦截器
//每次请求如果失败都要单独的处理失败情况,这里使用响应拦截器对失败情况进行统一处理
//只有在请求成功时才能进入到请求的回调函数
axios.interceptors.response.use(response=>{
    if(response.data.code===200){
        //这里也可以直接返回response.data,这样在回调函数中就可以直接调用data中的数据
        return response;
    }else if(response.data.code===500){
        Vue.prototype.$message.error("服务器错误");
        //拒绝该请求,防止请求继续向后响应
        return Promise.reject(new Error())
    }else if(response.data.code===403){
        Vue.prototype.$message.error("权限不足");
        return Promise.reject(new Error())
    }else{
        //当没有重写一次请求过滤器,使用默认的过滤器验证sessionid时,登录用户后,点击页面按钮,就会提示未登录
        Vue.prototype.$message.error("未登录");
        return Promise.reject(new Error())
    }
})
只有成功的请求才能进入回调函数
现在因为是前后端分离项目,前端的请求在发向后端时要经历一系列的过滤器链,其中有一个过滤器(OncePerRequestFilter)是用来判断sessionid是否相同的,但是在前后端分离的情况下,前后端的sessionid是肯定不同的,所以可以自定义一个过滤器继承这个过滤器抽象类重写并覆盖其中的方法
2.6.14 登录过滤器
package com.example.securityseparate.filter;
import com.alibaba.fastjson.JSON;
import com.example.securityseparate.util.JWTUtils;
import com.example.securityseparate.vo.Result;
import org.springframework.security.authentication.UsernamePasswordAuthenticationToken;
import org.springframework.security.core.authority.SimpleGrantedAuthority;
import org.springframework.security.core.context.SecurityContext;
import org.springframework.security.core.context.SecurityContextHolder;
import org.springframework.stereotype.Component;
import org.springframework.util.StringUtils;
import org.springframework.web.filter.OncePerRequestFilter;
import javax.servlet.FilterChain;
import javax.servlet.ServletException;
import javax.servlet.http.HttpServletRequest;
import javax.servlet.http.HttpServletResponse;
import java.io.IOException;
import java.io.PrintWriter;
import java.util.List;
import java.util.Map;
import java.util.stream.Collectors;
/**
* 登录过滤器,判断前端用户是否登录,并验证token
*OncePerRequestFilter:一次请求过滤器
*/
@Component
public class LoginFilter extends OncePerRequestFilter {
@Override
protected void doFilterInternal(HttpServletRequest request, HttpServletResponse response, FilterChain filterChain) throws ServletException, IOException {
//1、获取当前的请求路径
String path = request.getServletPath();
//2.1、如果当前是请求登录界面,就放行当前过滤器
if ("/login".equals(path)){
filterChain.doFilter(request,response);
//这里使用return,是为了防止代码继续向下运行,提高效率
return;
}
//2.2、如果登录就获取请求头token
String token = request.getHeader("token");
//如果token内容不为空,并且通过校验
if (StringUtils.hasText(token)&& JWTUtils.validateToken(token)){
//把当前登陆者的信息放入securityContext,以便后面使用
SecurityContext context = SecurityContextHolder.getContext();
//获取token中信息
Map<String, Object> info = JWTUtils.getInfo(token);
//获取信息中的用户名
Object username = info.get("username");
//获取信息中的用户权限,并转换为
List<String> authorities = (List<String>) info.get("authorities");
List<SimpleGrantedAuthority> collect = authorities.stream().map(item -> new SimpleGrantedAuthority(item)).collect(Collectors.toList());
//将用户名、密码(密码不能存,所以设置为null)和权限封装进对象
UsernamePasswordAuthenticationToken authenticationToken = new UsernamePasswordAuthenticationToken(username,null,collect);
//将对象放到securityContext中
context.setAuthentication(authenticationToken);
//过滤器链继续向后传递
filterChain.doFilter(request,response);
//终止当前方法,不再向后判断
return;
}
//2.3如果没有登录
response.setContentType("application/json;charset=utf-8");
PrintWriter writer = response.getWriter();
//7、响应一个公共实体类
Result<String> result = new Result(401,"未登录",null);
//8、将生成的实体类对象转换成json数据
String jsonString = JSON.toJSONString(result);
//9、将生成的json数据响应给前端
writer.print(jsonString);
//10、关闭数据流
writer.flush();
writer.close();
}
}自定义完过滤器链之后,要把定义的过滤器添加到过滤器链中
添加到MySecurityConfig配置类中
@Override
protected void configure(HttpSecurity http) throws Exception {
//将自定义的过滤器添加到过滤器链中并添加到 UsernamePasswordAuthenticationFilter 过滤器前面
http.addFilterBefore(loginFilter, UsernamePasswordAuthenticationFilter.class);
//放行登录表单
http.formLogin()
.loginProcessingUrl("/login") //放行自己表单的登录处理路径[因为自己的表单提交路径为 /login]
.successHandler(successHandler()) //成功处理类:参数类型为AuthenticationSuccessHandler
.failureHandler(failureHandler()) //失败处理类:参数类型为AuthenticationFailureHandler
.permitAll();
//权限不足处理类:参数类型为AccessDeniedHandler
http.exceptionHandling().accessDeniedHandler(handler());
//禁用csrf的校验
http.csrf().disable();
//SpringSecurity允许跨域
http.cors();
//其他资源认证即可访问
http.authorizeRequests().anyRequest().authenticated();
}此外,还需要修改controller层的代码
package com.example.securityseparate.controller;
import com.example.securityseparate.vo.Result;
import org.springframework.security.access.prepost.PreAuthorize;
import org.springframework.security.core.Authentication;
import org.springframework.security.core.context.SecurityContext;
import org.springframework.security.core.context.SecurityContextHolder;
import org.springframework.web.bind.annotation.GetMapping;
import org.springframework.web.bind.annotation.PostMapping;
import org.springframework.web.bind.annotation.RequestMapping;
import org.springframework.web.bind.annotation.RestController;
import java.security.Principal;
@RestController
@RequestMapping("user")
public class UserController {
/**
* 第一种:
* 容器会自动注入给参数为 Principal的参数
* @param principal
* @return
*/
@GetMapping("info")
public Result info(Principal principal){
return new Result<>(principal);
}
/** 第二种
* 登录成功后springSecurity会把当前的用户信息保存到【SecurityContext】中,也就是类似于Session中
* 所有的用户信息都会封装到 Authentication 中
*/
@GetMapping("getInfo")
public Result getInfo(){
SecurityContext context = SecurityContextHolder.getContext();
Authentication authentication = context.getAuthentication();
return new Result<>(authentication);
}
@PostMapping("query")
@PreAuthorize("hasAuthority('user:query')")
//拥有这样的一个权限就可以访问上面的资源,使用这个注解需要在启动类中加上@EnableGlobalMethodSecurity(prePostEnabled = true)注解
public Result query(){
return new Result("用户查询");
}
@PostMapping("insert")
@PreAuthorize("hasAuthority('user:insert')")
public Result insert(){
return new Result("用户添加");
}
@PostMapping("update")
@PreAuthorize("hasAuthority('user:update')")
public Result update(){
return new Result("用户修改");
}
@PostMapping("delete")
@PreAuthorize("hasAuthority('user:delete')")
public Result delete(){
return new Result("用户删除");
}
@PostMapping("export")
@PreAuthorize("hasAuthority('user:export')")
public Result export(){
return new Result("用户导出");
}
}登录成功后,会显示五个按钮,现在服务器已经查询到了用户的权限,点击上面的按钮,如果有相应的权限就会弹出相应的内容,如果没有此权限,就会提示权限不足
数据库和第一讲里面的数据库是同一个数据库项目
gitee地址:securityseparate: springboot+SpringSecurity+jwt完成前后端分离


 9905
9905


 被折叠的 条评论
为什么被折叠?
被折叠的 条评论
为什么被折叠?
 到【灌水乐园】发言


