


作业要求:
请大家根据课程教学内容完成类微信的门户页面框架设计,APP最少必须包含4个tab页面。框架设计需要使用fragment,activity,不得使用UNIAPP技术进行开发(H5或者小程序);
主要内容:
设计目标、功能说明、代码解析、运行展示截图、源码仓库地址;
设计目标
内容要求:根据课程教学内容实现类微信的门户页面框架设计,至少包含4个tab页,能实现tab页之间的点击切换;
技术实现:使用布局(layouts)和分段(fragment),对控件进行点击监听;
类比微信,进入微信之后屏幕会大致分为三部分,页面最上面的部分显示顶部标题,页面中间部分具有显示框显示内容,页面底部具有选择框,同时具有选择事件。页面底部选择框会有不同图标,点击之后中间显示框的页面同步改变,从而进入不同的功能界面。页面设计布局要清晰美观。
一、功能说明
实现界面展示:

- 页面最上方是顶部标题
- 页面中间是显示框
- 页面最下方有四个按钮
- 当光标移到其中一个按钮时图标发亮,点击时中间显示框显示内容切换到与图标相应的功能界面
我发现不只是微信,很多APP都采取这样的布局,在这样的布局之中,最基本也是最重要的功能就是点击下方的图标,中间部分跳转成相应内容,在接下来的实验操作中我们将对此进行实现。
二、界面分析
1.顶部标题
运用一个容器框包含一个文本框,进行顶部标题的显示
(建xml文件,其中用linearlayout、textview可实现框的建立和背景颜色的变化、字体颜色和居中变化)
2.中间内容
运用一个容器框包含一个文本框,文本框里包含功能界面内容
(写4个xml文件分别代表4个小图标代表的内容,textview显示具体内容)
3.底部图标
运用1个容器框,里面包含4个小图标水平排列,每个小图标下面标注文字
(建立1个容器框包含底部其他所有图标,建立1个容器框用imageButton导入图片,textview显示按钮对应功能名称,并且要实现点击下方的图标,中间部分变为相应内容)
三、功能实现及代码解析
在本次类微信页面设计中,首先需要将页面基本的上中下部分结构搭建出来,之后再利用 Fragment 完成页面切换功能,接下来功能实现有两部分: UI 设计与页面切换功能。
(一)UI设计
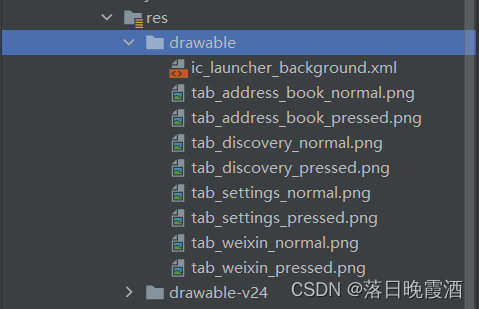
- 在网上下载8个对应的图标文件(因为要做出点击与未点击的不同效果,有四个tab一共需要八张pang格式图片),并进行如下命名;

把下载好的8个png格式图标复制粘贴放在/app/res/drawble 目录下;
2.在layout文件夹中创建top.xml文件,并设置其样式颜色大小居中排序等,其代码实现如下:
<?xml version="1.0" encoding="utf-8"?>
<LinearLayout xmlns:android="http://schemas.android.com/apk/res/android"
    android:layout_width="match_parent"
    android:layout_height="wrap_content"
    android:orientation="vertical">

    <TextView
        android:id="@+id/textView"
        android:layout_width="match_parent"
        android:layout_height="66dp"
        android:layout_weight="1"
        android:background="@color/black"
        android:gravity="center"
        android:text="MyWeChat"
        android:textColor="@color/white"
        android:textSize="35sp" />

</LinearLayout>3.在layout文件夹中创建bottom.xml文件,并设置其样式,样式为一个外层 horizental 的 LinearLayout 中平铺四个内层 vertical 的 LinearLayout。内层 LinearLayout 中放一个 ImageButton 显示小图标和一个 TextView显示功能名称。在每个 LinearLayout 中加上 onClick 属性,并在其中的 ImageButton 里设置 clickable=“false”,来实现光标移到其中一个按钮时图标发亮,其代码实现如下:
<?xml version="1.0" encoding="utf-8"?>
<LinearLayout xmlns:android="http://schemas.android.com/apk/res/android"
    xmlns:app="http://schemas.android.com/apk/res-auto"
    android:layout_width="match_parent"
    android:layout_height="wrap_content">

    <LinearLayout
        android:id="@+id/linearLayout1"
        android:layout_width="wrap_content"
        android:layout_height="match_parent"
        android:layout_weight="1"
        android:orientation="vertical">

        <ImageView
            android:id="@+id/tab_weixin_img"
            android:layout_width="match_parent"
            android:layout_height="39dp"
            android:background="#c8b6da"
            android:clickable="false"
            android:contentDescription="@string/app_name"
            app:srcCompat="@drawable/tab_weixin_normal" />

        <TextView
            android:id="@+id/tab_weixin_text"
            android:layout_width="match_parent"
            android:layout_height="wrap_content"
            android:clickable="false"
            android:gravity="center"
            android:text="微信"
            android:textColor="#2c3c5b"
            android:textSize="15sp" />
    </LinearLayout>

    <LinearLayout
        android:id="@+id/linearLayout2"
        android:layout_width="wrap_content"
        android:layout_height="match_parent"
        android:layout_weight="1"
        android:orientation="vertical">

        <ImageView
            android:id="@+id/tab_address_book_img"
            android:layout_width="match_parent"
            android:layout_height="39dp"
            android:background="#c8b6da"
            android:clickable="false"
            android:contentDescription="@string/app_name"
            app:srcCompat="@drawable/tab_address_book_normal" />

        <TextView
            android:id="@+id/tab_friends_text"
            android:layout_width="match_parent"
            android:layout_height="wrap_content"
            android:clickable="false"
            android:gravity="center"
            android:text="通讯录"
            android:textColor="#2c3c5b"
            android:textSize="15sp" />


    </LinearLayout>

    <LinearLayout
        android:id="@+id/linearLayout3"
        android:layout_width="wrap_content"
        android:layout_height="match_parent"
        android:layout_weight="1"
        android:orientation="vertical">

        <ImageView
            android:id="@+id/tab_discovery_img"
            android:layout_width="match_parent"
            android:layout_height="39dp"
            android:background="#c8b6da"
            android:clickable="false"
            android:contentDescription="@string/app_name"
            app:srcCompat="@drawable/tab_discovery_normal" />

        <TextView
            android:id="@+id/tab_contacts_text"
            android:layout_width="match_parent"
            android:layout_height="wrap_content"
            android:clickable="false"
            android:gravity="center"
            android:text="发现"
            android:textColor="#2c3c5b"
            android:textSize="15sp" />
    </LinearLayout>

    <LinearLayout
        android:id="@+id/linearLayout4"
        android:layout_width="wrap_content"
        android:layout_height="match_parent"
        android:layout_weight="1"
        android:orientation="vertical">

        <ImageView
            android:id="@+id/tab_settings_img"
            android:layout_width="match_parent"
            android:layout_height="39dp"
            android:background="#c8b6da"
            android:clickable="false"
            android:contentDescription="@string/app_name"
            app:srcCompat="@drawable/tab_settings_pressed" />

        <TextView
            android:id="@+id/tab_settings_text"
            android:layout_width="match_parent"
            android:layout_height="wrap_content"
            android:clickable="false"
            android:gravity="center"
            android:text="设置"
            android:textColor="#2c3c5b"
            android:textSize="15sp" />
    </LinearLayout>

</LinearLayout>
4.修改原有的 activity_main.xml 文件,在一个外层LinearLayout 里利用 include 和FrameLayout 标签进行 top 和 bottom 的布局。先为fragment类创建实例对象定义一个FragmentManager来控制Fragment,再写一个初始化Fragment的函数,将四个fragment放到FrameLayout中.activity_main.xml文件代码实现如下:
<?xml version="1.0" encoding="utf-8"?>
<androidx.constraintlayout.widget.ConstraintLayout xmlns:android="http://schemas.android.com/apk/res/android"
    xmlns:app="http://schemas.android.com/apk/res-auto"
    xmlns:tools="http://schemas.android.com/tools"
    android:layout_width="match_parent"
    android:layout_height="match_parent"
    tools:context=".MainActivity">

    <include
        android:id="@+id/include"
        layout="@layout/top"
        android:layout_width="0dp"
        android:layout_height="wrap_content"
        app:layout_constraintBottom_toBottomOf="parent"
        app:layout_constraintEnd_toEndOf="parent"
        app:layout_constraintHorizontal_bias="0.0"
        app:layout_constraintStart_toStartOf="parent"
        app:layout_constraintTop_toTopOf="parent"
        app:layout_constraintVertical_bias="0.001" />

    <include
        android:id="@+id/include2"
        layout="@layout/layout_button"
        android:layout_width="0dp"
        android:layout_height="62dp"
        app:layout_constraintBottom_toBottomOf="parent"
        app:layout_constraintEnd_toEndOf="parent"
        app:layout_constraintHorizontal_bias="0.0"
        app:layout_constraintStart_toStartOf="parent"
        app:layout_constraintTop_toTopOf="parent"
        app:layout_constraintVertical_bias="0.996" />

    <FrameLayout
        android:id="@+id/framelayout"
        android:layout_width="0dp"
        android:layout_height="0dp"
        app:layout_constraintBottom_toTopOf="@+id/include2"
        app:layout_constraintEnd_toEndOf="parent"
        app:layout_constraintHorizontal_bias="1"
        app:layout_constraintStart_toStartOf="parent"
        app:layout_constraintTop_toBottomOf="@+id/include"
        app:layout_constraintVertical_bias="1">

    </FrameLayout>

</androidx.constraintlayout.widget.ConstraintLayout>到这里UI设计基本完成,接下来实现页面切换。
(二)页面切换功能
- 界面布局设计完成之后,新建四个空白的 Fragment

分别设置xml页面其中的 TextView 内容,例如以下为BlankFragment1的代码:(其余3个类似)
package com.example.mywechat0176;

import android.os.Bundle;

import androidx.fragment.app.Fragment;

import android.view.LayoutInflater;
import android.view.View;
import android.view.ViewGroup;

public class BlankFragment1 extends Fragment {

    // TODO: Rename parameter arguments, choose names that match
    // the fragment initialization parameters, e.g. ARG_ITEM_NUMBER

    @Override
    public View onCreateView(LayoutInflater inflater, ViewGroup container,
                             Bundle savedInstanceState) {
        // Inflate the layout for this fragment
        //inflater.inflate();提词器
        return inflater.inflate(R.layout.tab01, container, false);
    }
}2.在主程序MainActivity中,首先找到四个 Fragment 和所有控件,再把四个 fragment 放到 FrameLayout 中去。
在主程序MainActivity里写一个函数 selectTab 进行切换控制,为实现点击按钮后变色,我们可以定义一个selectFragment()函数来实现:传入一个参数,通过调用transaction的show()函数,展示对应的页面,并通过setImageResource()函数将ImageButton的文件路径改变。
 public void select(int i){
        hide();
        switch (i){
            case 1:showFrament(fragment1);
                break;
            case 2:showFrament(fragment2);
                break;
            case 3:showFrament(fragment3);
                break;
            case 4:showFrament(fragment4);
                break;
            default:
                break;
        }
为实现点击按钮之后可以跳转到相应的页面,在这个函数中我们首先将所有的 Fragment 隐藏,再依据每个按钮对应的数字进行中间 content 内容的切换,在点击button后再显示出选择的页面。我们可以选择自定义一个**HideFragment()**函数,调用hide()函数隐藏四个界面。
private void showFrament(Fragment fragment) {
        transaction.show(fragment);
    }

    private void hide(){
        transaction=manager.beginTransaction()
                .hide(fragment1)
                .hide(fragment2)
                .hide(fragment3)
                .hide(fragment4);
        transaction.commit();
}3.然后对点击事件进行监听,为每个按钮设置相应的数字,selectTab 函数才知道哪个数字对应哪个按钮。在监听函数 onClick 中,首先要将所有图标设置为normal,(点击后切换成pressed),随后再根据相应点击的 LinearLayout 设置数字。
// 监听响应函数
    @Override
    public void onClick(View v) {
        resetImg();
        switch (v.getId()){
            case R.id.linear_chat:
                Log.v("wsm","第一个tab被点击");
                selectTab(1);
                break;
            case R.id.linear_friend:
                Log.v("wsm","第二个tab被点击");
                selectTab(2);
                break;
            case R.id.linear_contact:
                Log.v("wsm","第三个tab被点击");
                selectTab(3);
                break;
            case R.id.linear_setting:
                Log.v("wsm","第四个tab被点击");
                selectTab(4);
                break;
        }
    }
// 还原初始图标函数
    private void resetImg() {
        imgChat.setImageResource(R.drawable.tab_weixin_normal);
        imgFriend.setImageResource(R.drawable.tab_find_frd_normal);
        imgContact.setImageResource(R.drawable.tab_address_normal);
        imgSetting.setImageResource(R.drawable.tab_settings_normal);
    }
设置局部监听(对底部LinearLayout的监听),由于目前设置的监听为全局监听,十分消耗内存,所以重新编写一个函数 initEvent() 仅对底部的四个 LinearLayout 进行监听.
// 设置局部监听
    private void initEvent() {
        tabChat.setOnClickListener(this);
        tabFriend.setOnClickListener(this);
        tabContact.setOnClickListener(this);
        tabSetting.setOnClickListener(this);
    }
在 onCreate 函数中调用初始化控件函数 initView()、控件监听函数 initEvent()、初始化Fragment函数 initFragment()、控制页面切换函数 selectTab() 并设置默认值1。
    @Override
    protected void onCreate(Bundle savedInstanceState) {
        super.onCreate(savedInstanceState);
        setContentView(R.layout.layout_main);

        // 初始化LinearLayout和ImageButton
        initView();
        // 设置控件的监听函数
        initEvent();
        // 初始化Fragment
        initFragment();
        selectTab(1);
    }
四、运行展示截图
点击run->run'app',项目开始运行,类微信程序页面启动

初始页面如下
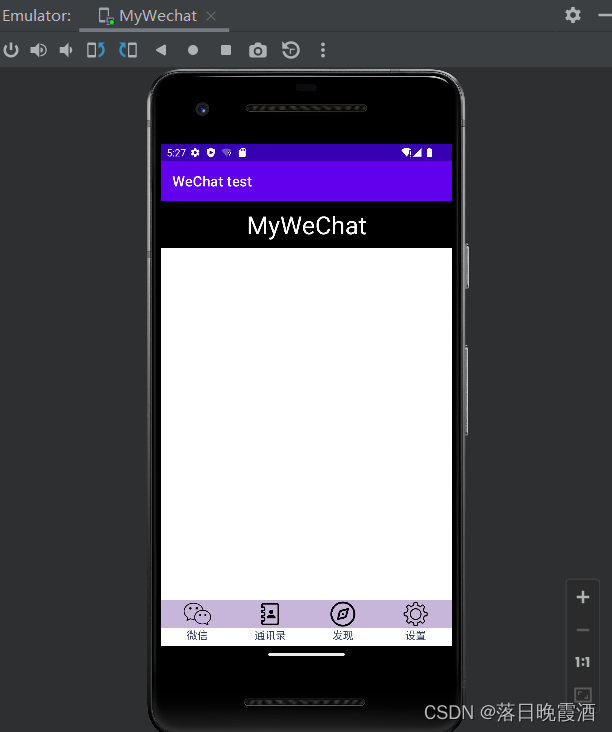
点击第一个“微信”按钮

点击第二个“通讯录”按钮

点击第三个“发现”按钮

点击第四个“设置”按钮

五、实验总结
本次实验进行了类微信的门户页面框架设计,上课的时候跟着老师的教学,熟悉了AndroidStudio的使用方法,在界面设计上并没有遇到太多困难,都是一些基本操作。标题部分建xml文件,其中用linearlayout、textview可实现框的建立和背景颜色的变化、字体颜色和居中变化等。底部图标就是要建立1个容器框包含底部其他所有图标,建立1个容器框用imageButton导入图片,textview显示按钮对应功能名称。UI设计不难,熟悉了AS里面的一些使用方式,可以很快完成界面设计。
本次实验主要的难点的如何实现页面切换功能。我们将页面基本的上中下部分结构搭建出来之后,再利用 Fragment 完成页面切换功能。Fragment的使用我还不熟悉导致我花费了大量的时间查找资料,研究如何调用函数。 最后我学会了onCreate 函数中调用初始化控件函数 initView()、控件监听函数 initEvent()、初始化Fragment函数 initFragment()、控制页面切换函数 selectTab() 并设置默认值1等。实现了当光标移到其中一个按钮时图标发亮,点击时中间显示框显示内容切换到与图标相应的功能界面。
总的来说,这是一次有趣的Android Studio移动开发技术实验。从跟着老师上课学习基本理论知识一步步操作,到最后进行类微信页面设计上手实操。这其中的感受和学习到的东西是不一样的,实验过程会遇到各种各样的问题,然后去搜索问题寻找解决方法,我更能感受到“实践是检验真理的唯一标准”这句话的含义了。本次实验前前后后花了3天多的时间才完成,最后的将AndroidStudio代码上传GitHub也花费了不少时间,主要是要进行git的相关配置。但是好在这次配置成功后,以后代码上传就容易多了。最后期待在接下来的课程中,跟着老师学到更多有用有趣的移动开发技术知识!


 1371
1371


 被折叠的 条评论
为什么被折叠?
被折叠的 条评论
为什么被折叠?
 到【灌水乐园】发言


