


一. 介绍
MySQL主从复制是一种常用的数据库高可用性解决方案,通过在主数据库上记录的数据变更,同步到一个或多个从数据库,实现数据的冗余备份和读写分离。在Docker环境下搭建MySQL主从复制和读写分离,不仅方便管理,还能充分发挥Docker的轻量、可移植性等特性。
二. 准备工作
在开始搭建之前,请确保你的系统已经安装好Docker和Docker Compose
三. 步骤
1. Docker安装三台mysql服务器
- 一主二从,mysql1是主,mysql2和mysql3为从
# 安装第一台MySQL
docker run -d -e MYSQL_ROOT_PASSWORD=123456 -p 3301:3306 --name=mysql1  mysql:5.6

# 安装第二台MySQL
docker run -d -e MYSQL_ROOT_PASSWORD=123456 -p 3302:3306  --name=mysql2  mysql:5.6

# 安装第三台MySQL
docker run -d -e MYSQL_ROOT_PASSWORD=123456 -p 3303:3306  --name=mysql3  mysql:5.6
2. 修改三台容器配置文件(/etc/mysql/mysql.conf.d/mysqld.cnf)
- mysql1配置文件
# Copyright (c) 2014, 2016, Oracle and/or its affiliates. All rights reserved.
#
# This program is free software; you can redistribute it and/or modify
# it under the terms of the GNU General Public License, version 2.0,
# as published by the Free Software Foundation.
#
# This program is also distributed with certain software (including
# but not limited to OpenSSL) that is licensed under separate terms,
# as designated in a particular file or component or in included license
# documentation.  The authors of MySQL hereby grant you an additional
# permission to link the program and your derivative works with the
# separately licensed software that they have included with MySQL.
#
# This program is distributed in the hope that it will be useful,
# but WITHOUT ANY WARRANTY; without even the implied warranty of
# MERCHANTABILITY or FITNESS FOR A PARTICULAR PURPOSE.  See the
# GNU General Public License, version 2.0, for more details.
#
# You should have received a copy of the GNU General Public License
# along with this program; if not, write to the Free Software
# Foundation, Inc., 51 Franklin St, Fifth Floor, Boston, MA  02110-1301 USA

#
# The MySQL  Server configuration file.
#
# For explanations see
# http://dev.mysql.com/doc/mysql/en/server-system-variables.html

[mysqld]
pid-file	= /var/run/mysqld/mysqld.pid
socket		= /var/run/mysqld/mysqld.sock
datadir		= /var/lib/mysql
#log-error	= /var/log/mysql/error.log
# Disabling symbolic-links is recommended to prevent assorted security risks
symbolic-links=0


# 加入下方两行配置
server-id=1   #任意自然数n,只要保证每台MySQL主机不重复就可以了。
log-bin=mysql-bin   #开启二进制日志
- myslq2配置文件
# Copyright (c) 2014, 2016, Oracle and/or its affiliates. All rights reserved.
#
# This program is free software; you can redistribute it and/or modify
# it under the terms of the GNU General Public License, version 2.0,
# as published by the Free Software Foundation.
#
# This program is also distributed with certain software (including
# but not limited to OpenSSL) that is licensed under separate terms,
# as designated in a particular file or component or in included license
# documentation.  The authors of MySQL hereby grant you an additional
# permission to link the program and your derivative works with the
# separately licensed software that they have included with MySQL.
#
# This program is distributed in the hope that it will be useful,
# but WITHOUT ANY WARRANTY; without even the implied warranty of
# MERCHANTABILITY or FITNESS FOR A PARTICULAR PURPOSE.  See the
# GNU General Public License, version 2.0, for more details.
#
# You should have received a copy of the GNU General Public License
# along with this program; if not, write to the Free Software
# Foundation, Inc., 51 Franklin St, Fifth Floor, Boston, MA  02110-1301 USA

#
# The MySQL  Server configuration file.
#
# For explanations see
# http://dev.mysql.com/doc/mysql/en/server-system-variables.html

[mysqld]
pid-file	= /var/run/mysqld/mysqld.pid
socket		= /var/run/mysqld/mysqld.sock
datadir		= /var/lib/mysql
#log-error	= /var/log/mysql/error.log
# Disabling symbolic-links is recommended to prevent assorted security risks
symbolic-links=0

# 加入下方两行配置
server-id=2   #任意自然数n,只要保证每台MySQL主机不重复就可以了。
log-bin=mysql-bin   #开启二进制日志
- mysql3配置文件
# Copyright (c) 2014, 2016, Oracle and/or its affiliates. All rights reserved.
#
# This program is free software; you can redistribute it and/or modify
# it under the terms of the GNU General Public License, version 2.0,
# as published by the Free Software Foundation.
#
# This program is also distributed with certain software (including
# but not limited to OpenSSL) that is licensed under separate terms,
# as designated in a particular file or component or in included license
# documentation.  The authors of MySQL hereby grant you an additional
# permission to link the program and your derivative works with the
# separately licensed software that they have included with MySQL.
#
# This program is distributed in the hope that it will be useful,
# but WITHOUT ANY WARRANTY; without even the implied warranty of
# MERCHANTABILITY or FITNESS FOR A PARTICULAR PURPOSE.  See the
# GNU General Public License, version 2.0, for more details.
#
# You should have received a copy of the GNU General Public License
# along with this program; if not, write to the Free Software
# Foundation, Inc., 51 Franklin St, Fifth Floor, Boston, MA  02110-1301 USA

#
# The MySQL  Server configuration file.
#
# For explanations see
# http://dev.mysql.com/doc/mysql/en/server-system-variables.html

[mysqld]
pid-file	= /var/run/mysqld/mysqld.pid
socket		= /var/run/mysqld/mysqld.sock
datadir		= /var/lib/mysql
#log-error	= /var/log/mysql/error.log
# Disabling symbolic-links is recommended to prevent assorted security risks
symbolic-links=0


# 加入下方两行配置
server-id=3   #任意自然数n,只要保证每台MySQL主机不重复就可以了。
log-bin=mysql-bin   #开启二进制日志
3. 重启MySQL容器
docker restart mysql1
docker restart mysql2
docker restart mysql3
4. 配置主库
docker exec -it mysql1 /bin/bashmysql -uroot -p123456# 查看主库配置是否生效
SHOW VARIABLES LIKE 'server_id';
5. 为从库创建同步账户
- root 为创建的同步用户的用户名
- 123456为同步用户的密码
GRANT REPLICATION CLIENT,REPLICATION SLAVE ON *.* TO root@'%' IDENTIFIED BY '123456'; - 验证
mysql> use mysql;
Database changed
mysql> select user,host,password from user;
+------+-----------+-------------------------------------------+
| user | host | password |
+------+-----------+-------------------------------------------+
| root | localhost | *6BB4837EB74329105EE4568DDA7DC67ED2CA2AD9 |
| root | % | *6BB4837EB74329105EE4568DDA7DC67ED2CA2AD9 |
+------+-----------+-------------------------------------------+
6. 修改从库数据
- 进入从库
docker exec -it mysql2 /bin/bash

mysql -uroot -p123456
- 查看主库ip
docker inspect mysql1
{
        ''''''

    "Gateway": "172.17.0.1",
    "GlobalIPv6Address": "",
    "GlobalIPv6PrefixLen": 0,
    "IPAddress": "172.17.0.6",  # 此为主库ip--设置同步所用
    "IPPrefixLen": 16,
    "IPv6Gateway": "",

        ''''''
}
- 查看主库同步状态
# 在主库中输入如下查看
mysql> show master status\G;
*************************** 1. row ***************************
             File: mysql-bin.000001  # 此为日志文件名--设置同步所用
         Position: 338  # 此为同步位置--设置同步所用
- 在两个从库执行如下代码
CHANGE MASTER TO MASTER_HOST='172.17.0.6',
MASTER_PORT=3306,
MASTER_USER='root',
MASTER_PASSWORD='123456',
MASTER_LOG_FILE='mysql-bin.000001',
MASTER_LOG_POS=338;

# Query OK, 0 rows affected, 2 warnings (0.02 sec)

# CHANGE MASTER TO MASTER_HOST='172.17.0.6', #主库IP
# MASTER_PORT=3306,   #主服务器端口
# MASTER_USER='user', #主服务器用户名
# MASTER_PASSWORD='123456', #主服务器用户密码
# MASTER_LOG_FILE='mysql-bin.000001', #日志文件名,获取方法往上看
# MASTER_LOG_POS=338;   #同步位置,获取方式往上看
- 启动从库同步
mysql> start slave;
Query OK, 0 rows affected (0.00 sec)
- 检测同步状态
mysql> show  slave status\G
*************************** 1. row ***************************
               Slave_IO_State: Waiting for master to send event
                  Master_Host: 172.17.0.6
                  Master_User: root
                  Master_Port: 3306
                Connect_Retry: 60
              Master_Log_File: mysql-bin.000001
          Read_Master_Log_Pos: 338
               Relay_Log_File: mysqld-relay-bin.000002
                Relay_Log_Pos: 283
        Relay_Master_Log_File: mysql-bin.000001
             Slave_IO_Running: Yes
            Slave_SQL_Running: Yes
              Replicate_Do_DB:
          Replicate_Ignore_DB:
           Replicate_Do_Table:
       Replicate_Ignore_Table:
      Replicate_Wild_Do_Table:
  Replicate_Wild_Ignore_Table:
                   Last_Errno: 0
                   Last_Error:
                 Skip_Counter: 0
          Exec_Master_Log_Pos: 338
              Relay_Log_Space: 457
              Until_Condition: None
               Until_Log_File:
                Until_Log_Pos: 0
           Master_SSL_Allowed: No
           Master_SSL_CA_File:
           Master_SSL_CA_Path:
              Master_SSL_Cert:
            Master_SSL_Cipher:
               Master_SSL_Key:
        Seconds_Behind_Master: 0
Master_SSL_Verify_Server_Cert: No
                Last_IO_Errno: 0
                Last_IO_Error:
               Last_SQL_Errno: 0
               Last_SQL_Error:
  Replicate_Ignore_Server_Ids:
             Master_Server_Id: 1
                  Master_UUID: ce3fdd70-be78-11ee-978e-0242ac110006
             Master_Info_File: /var/lib/mysql/master.info
                    SQL_Delay: 0
          SQL_Remaining_Delay: NULL
      Slave_SQL_Running_State: Slave has read all relay log; waiting for the slave I/O thread to update it
           Master_Retry_Count: 86400
                  Master_Bind:
      Last_IO_Error_Timestamp:
     Last_SQL_Error_Timestamp:
               Master_SSL_Crl:
           Master_SSL_Crlpath:
           Retrieved_Gtid_Set:
            Executed_Gtid_Set:
                Auto_Position: 0
1 row in set (0.00 sec)
如果
Slave_IO_Running不为Yes请检查 MASTER_LOG_FILE 的值是否正确,就是
mysql-bin.000001和338这两个数据
- 修改示例如下
stop slave;
Query OK, 0 rows affected (0.00 sec)

mysql> CHANGE MASTER TO MASTER_HOST='172.17.0.6',
    -> MASTER_PORT=3306,
    -> MASTER_USER='root',
    -> MASTER_PASSWORD='123456',
    -> MASTER_LOG_FILE='mysql-bin.000001',
    -> MASTER_LOG_POS=338;
Query OK, 0 rows affected, 2 warnings (0.01 sec)

mysql> start alve;
7. 检测是否完成
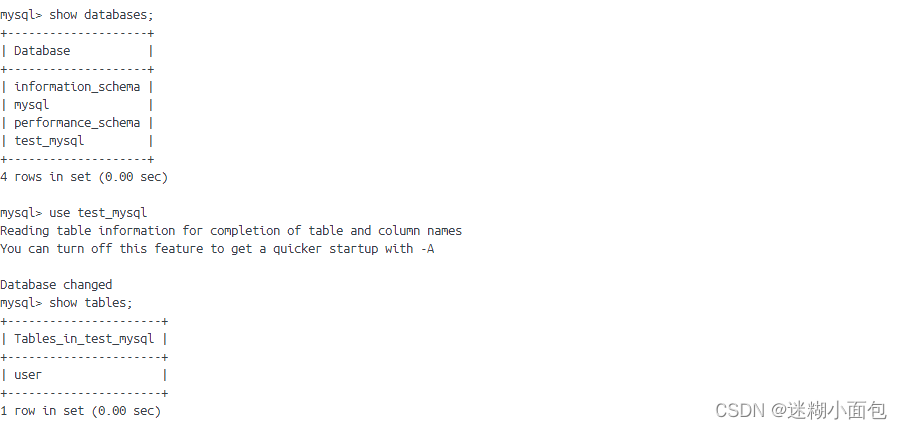
在主库上创建数据库及表
create database test_mysql charset=utf8;
use test_mysql;
create table user(id int primary key auto_increment);
此时从库出现数据库和数据表
四. 注意事项
- 配置文件中的密码、端口、数据库名称等信息,请根据实际情况进行修改。
- 定期备份数据库以保证数据的安全性。
- 注意MySQL版本的兼容性。
五. 总结
通过Docker搭建MySQL主从复制和读写分离,不仅简化了部署过程,还提高了系统的可维护性。合理配置主从关系和读写分离,可以优化数据库性能,提高系统的稳定性和可用性。


 2582
2582


 被折叠的 条评论
为什么被折叠?
被折叠的 条评论
为什么被折叠?
 到【灌水乐园】发言


