1.SpringBoot的介绍
为什么用SpringBoot
Spring Boot makes it easy to create stand-alone, production-grade Spring based Applications that you can “just run”.
能快速创建出生产级别的Spring应用
SpringBoot优点
- Create stand-alone Spring applications:创建独立Spring应用
- Embed Tomcat, Jetty or Undertow directly (no need to deploy WAR files):内嵌web服务器
- Provide opinionated ‘starter’ dependencies to simplify your build configuration:自动starter依赖,简化构建配置
- Automatically configure Spring and 3rd party libraries whenever possible:自动配置Spring以及第三方功能
- Provide production-ready features such as metrics, health checks, and externalized configuration:提供生产级别的监控、健康检查及外部化配置
- Absolutely no code generation and no requirement for XML configuration:无代码生成、无需编写XML
- SpringBoot是整合Spring技术栈的一站式框架
- SpringBoot是简化Spring技术栈的快速开发脚手架
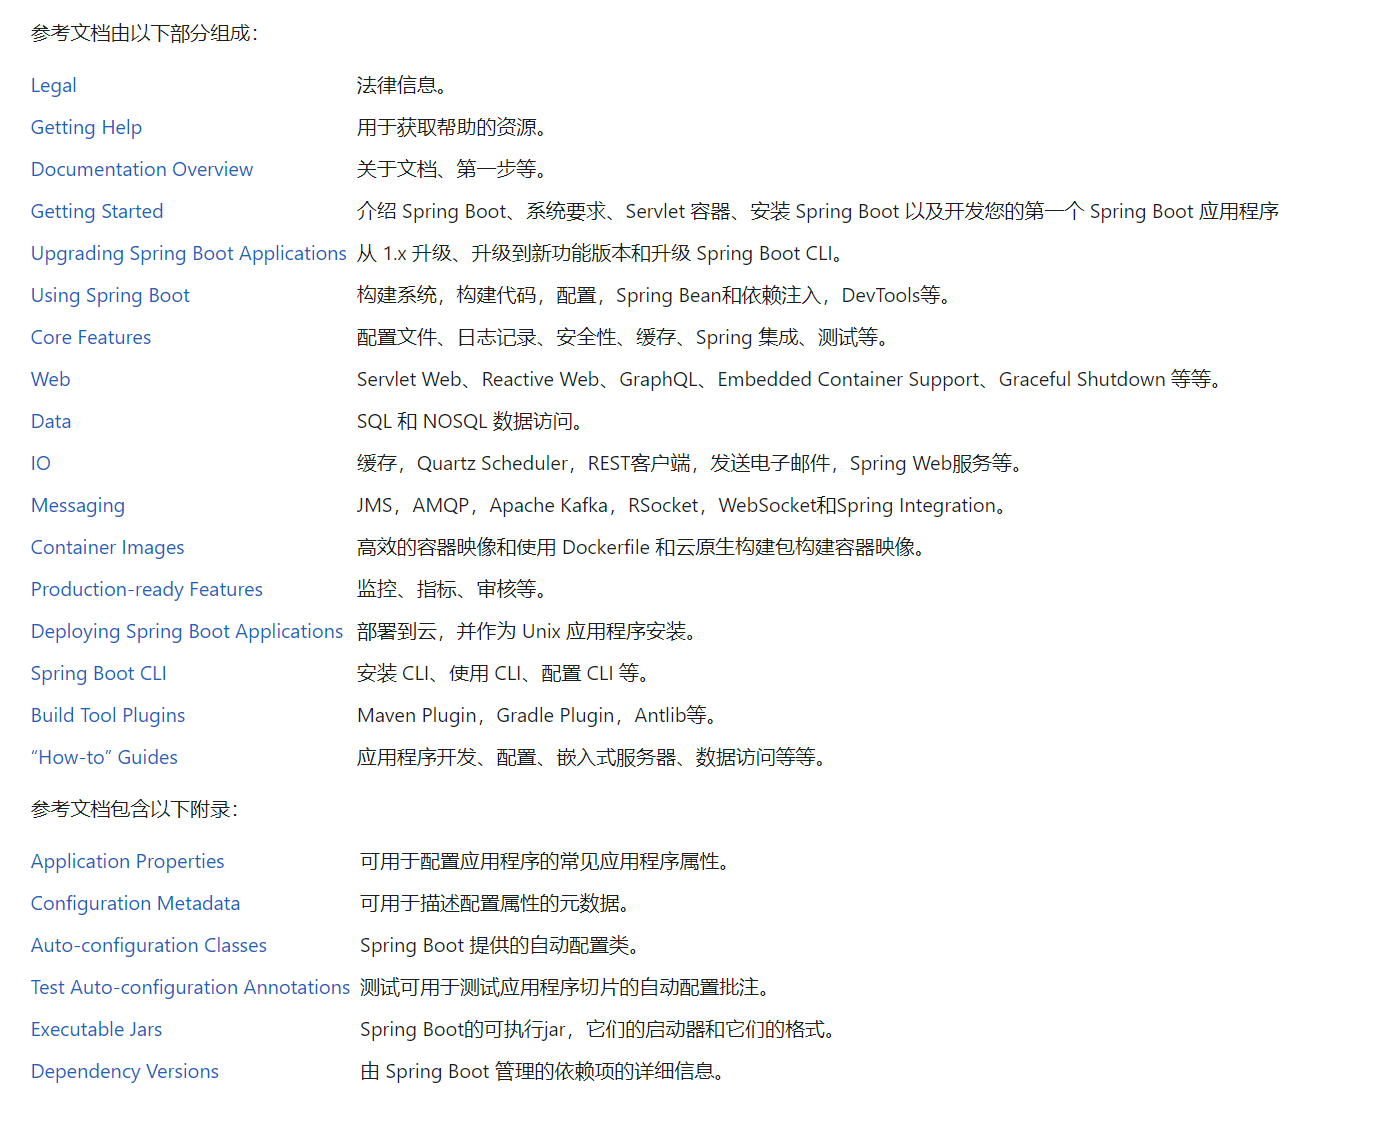
官网文档架构

2.SpringBoot2入门
系统要求
- Java 8 & 兼容java14 .
- Maven 3.3+
- idea 2019.1.2
maven设置
<mirrors>
    <mirror>
        <id>nexus-aliyun</id>
        <mirrorOf>central</mirrorOf>
        <name>Nexus aliyun</name>
        <url>http://maven.aliyun.com/nexus/content/groups/public</url>
    </mirror>
</mirrors>

<profiles>
    <profile>
        <id>jdk-1.8</id>
        <activation>
            <activeByDefault>true</activeByDefault>
            <jdk>1.8</jdk>
        </activation>
        <properties>
            <maven.compiler.source>1.8</maven.compiler.source>
            <maven.compiler.target>1.8</maven.compiler.target>
            <maven.compiler.compilerVersion>1.8</maven.compiler.compilerVersion>
        </properties>
    </profile>
</profiles>
3.了解自动配置原理
SpringBoot特点
-
依赖管理
-
父项目做依赖管理
<parent> <groupId>org.springframework.boot</groupId> <artifactId>spring-boot-dependencies</artifactId> <version>2.3.4.RELEASE</version> </parent> -
开发导入starter场景启动器
- 见到很多 spring-boot-starter-:就某种场景
- 只要引入starter,这个场景的所有常规需要的依赖我们都自动引入
- SpringBoot所有支持的场景:Developing with Spring Boot
- 见到的 -spring-boot-starter: 第三方为我们提供的简化开发的场景启动器。
- 所有场景启动器最底层的依赖
<dependency> <groupId>org.springframework.boot</groupId> <artifactId>spring-boot-starter</artifactId> <version>2.7.1</version> <scope>compile</scope> </dependency> -
无需关注版本号,自动版本仲裁
- 引入依赖默认都可以不写版本
- 引入非版本仲裁的jar,要写版本号。
-
可以修改默认版本号
-
查看spring-boot-dependencies里面规定当前依赖的版本 用的 key。
-
在当前项目里面重写配置
<properties>
    <mysql.version>5.1.43</mysql.version>
</properties>
-
-
-
自动配置
-
自动配好Tomcat
- 引入Tomcat依赖。
- 配置Tomcat
<dependency> <groupId>org.springframework.boot</groupId> <artifactId>spring-boot-starter-tomcat</artifactId> <version>2.7.1</version> <scope>compile</scope> </dependency> -
自动配好SpringMVC
- 引入SpringMVC全套组件
- 自动配好SpringMVC常用组件(功能)
-
默认的包结构
- 主程序所在包及其下面的所有子包里面的组件都会被默认扫描进来
- 无需以前的包扫描配置
- 想要改变扫描路径,@SpringBootApplication(scanBasePackages=“pers.itqiqi”) 或者@ComponentScan 指定扫描路径
@SpringBootApplication 等同于 @SpringBootConfiguration @EnableAutoConfiguration @ComponentScan("pers.itqiqi.boot") -
各种配置拥有默认值
- 默认配置最终都是映射到某个类上,如:MultipartProperties
- 配置文件的值最终会绑定每个类上,这个类会在容器中创建对象
-
按需加载所有自动配置项
- 非常多的starter
- 引入了哪些场景这个场景的自动配置才会开启
- SpringBoot所有的自动配置功能都在 spring-boot-autoconfigure 包里面
-
容器功能
-
组件添加
-
@Configuration
- 基本使用
- Full模式与Lite模式
#############################Configuration使用示例############################################## /** * 1、配置类里面使用@Bean标注在方法上给容器注册组件,默认也是单实例的 * 2、配置类本身也是组件 * 3、proxyBeanMethods:代理bean的方法 * Full(proxyBeanMethods = true)、【保证每个@Bean方法被调用多少次返回的组件都是单实例的】 * Lite(proxyBeanMethods = false)【每个@Bean方法被调用多少次返回的组件都是新创建的】 * 组件依赖必须使用Full模式默认。其他默认是否Lite模式 * * * */ @Configuration(proxyBeanMethods = false) //告诉SpringBoot这是一个配置类 == 配置文件 public class MyConfig { /** * Full:外部无论对配置类中的这个组件注册方法调用多少次获取的都是之前注册容器中的单实例对象 * @return */ @Bean //给容器中添加组件。以方法名作为组件的id。返回类型就是组件类型。返回的值,就是组件在容器中的实例 public User user01(){ User zhangsan = new User("zhangsan", 18); //user组件依赖了Pet组件 zhangsan.setPet(tomcatPet()); return zhangsan; } @Bean("tom") public Pet tomcatPet(){ return new Pet("tomcat"); } } ################################@Configuration测试代码如下##################################### @SpringBootConfiguration @EnableAutoConfiguration @ComponentScan("pers.itqiqi.boot") public class MainApplication { public static void main(String[] args) { //1、返回我们IOC容器 ConfigurableApplicationContext run = SpringApplication.run(MainApplication.class, args); //2、查看容器里面的组件 String[] names = run.getBeanDefinitionNames(); for (String name : names) { System.out.println(name); } //3、从容器中获取组件 Pet tom01 = run.getBean("tom", Pet.class); Pet tom02 = run.getBean("tom", Pet.class); System.out.println("组件:"+(tom01 == tom02)); //4、com.atguigu.boot.config.MyConfig$$EnhancerBySpringCGLIB$$51f1e1ca@1654a892 MyConfig bean = run.getBean(MyConfig.class); System.out.println(bean); //如果@Configuration(proxyBeanMethods = true)代理对象调用方法。SpringBoot总会检查这个组件是否在容器中有。 //保持组件单实例 User user = bean.user01(); User user1 = bean.user01(); System.out.println(user == user1); User user01 = run.getBean("user01", User.class); Pet tom = run.getBean("tom", Pet.class); System.out.println("用户的宠物:"+(user01.getPet() == tom)); } } -
@Bean、@Component、@Controller、@Service、@Repository
-
@ComponentScan、@Import
// 给容器中自动创建出这两个类型的组件、默认组件的名字就是全类名 @Import({User.class, DBHelper.class}) @Configuration(proxyBeanMethods = false) //告诉SpringBoot这是一个配置类 == 配置文件 public class MyConfig { } -
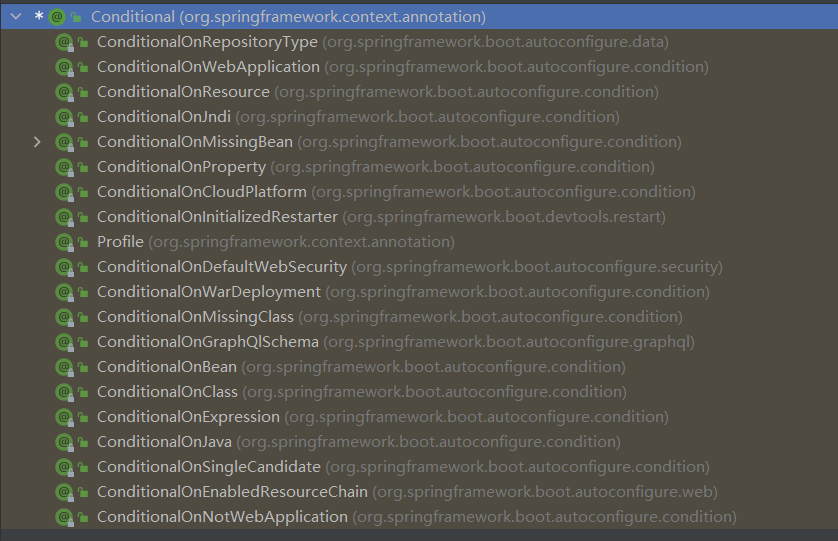
@Conditional
条件装配:满足Conditional指定的条件,则进行组件注入

-
-
自动配置原理入门
-
引导加载自动配置类
-
@Configuration:代表当前是一个配置类
-
@ComponentScan:指定扫描哪些,Spring注解
-
@EnableAutoConfiguration
@AutoConfigurationPackage @Import(AutoConfigurationImportSelector.class) public @interface EnableAutoConfiguration {}- @AutoConfigurationPackage:指定了默认的包规则
- @Import(AutoConfigurationImportSelector.class)
-
-
按需开启自动配置项
虽然我们127个场景的所有自动配置启动的时候默认全部加载。xxxxAutoConfiguration按照条件装配规则(@Conditional),最终会按需配置。
-
修改默认配置
SpringBoot默认会在底层配好所有的组件。但是如果用户自己配置了以用户的优先
@Bean
@ConditionalOnMissingBean
public CharacterEncodingFilter characterEncodingFilter() {}
总结:
- SpringBoot先加载所有的自动配置类 xxxxxAutoConfiguration
- 每个自动配置类按照条件进行生效,默认都会绑定配置文件指定的值。xxxxProperties里面拿。xxxProperties和配置文件进行了绑定
- 生效的配置类就会给容器中装配很多组件
- 只要容器中有这些组件,相当于这些功能就有了
- 定制化配置
- 用户直接自己@Bean替换底层的组件
- 用户去看这个组件是获取的配置文件什么值就去修改。
-
4.Web开发

请求参数处理
-
rest使用与原理
- @xxxMapping
- Rest风格支持(使用HTTP请求方式动词来表示对资源的操作)
- 以前:/getUser* 获取用户 /deleteUser 删除用户 /editUser 修改用户 /saveUser 保存用户
- *现在: /user *GET-*获取用户 *DELETE-*删除用户 *PUT-*修改用户 *POST-*保存用户
@RestController public class UserController { // @RequestMapping(value = "/user",method = RequestMethod.GET) @GetMapping("/user") public String getUser(){ return "GET-张三"; } // @RequestMapping(value = "/user",method = RequestMethod.POST) @PostMapping("/user") public String saveUser(){ return "POST-张三"; } // @RequestMapping(value = "/user",method = RequestMethod.PUT) @PutMapping("/user") public String putUser(){ return "PUT-张三"; } // @RequestMapping(value = "/user",method = RequestMethod.DELETE) @DeleteMapping("/user") public String deleteUser(){ return "DELETE-张三"; } } -
普通参数与基本注解
- @PathVariable:接收路径中的参数
- @RequestParam:获取路径中?后的参数
- @RequestBody:获取实体对象
- @RequestHeader:获取请求头中的信息
- @CookieValue:获取cookie中的信息
拦截器
-
HandlerInterceptor 接口
@Component public class LoginInterceptor implements HandlerInterceptor { @Override public boolean preHandle(HttpServletRequest request, HttpServletResponse response, Object handler) throws Exception { String token = request.getHeader("token"); if (token != null && !token.equals("")) { return true; } else { response.setContentType("application/json; charset=utf-8"); response.getWriter().print("您没有登录!!"); return false; } } } -
配置拦截器
@Configuration public class AuthenticationMvcConfiguration implements WebMvcConfigurer { @Autowired private LoginInterceptor loginInterceptor; @Override public void addInterceptors(InterceptorRegistry registry) { registry.addInterceptor(loginInterceptor) .addPathPatterns("/**"); } } -
拦截器原理
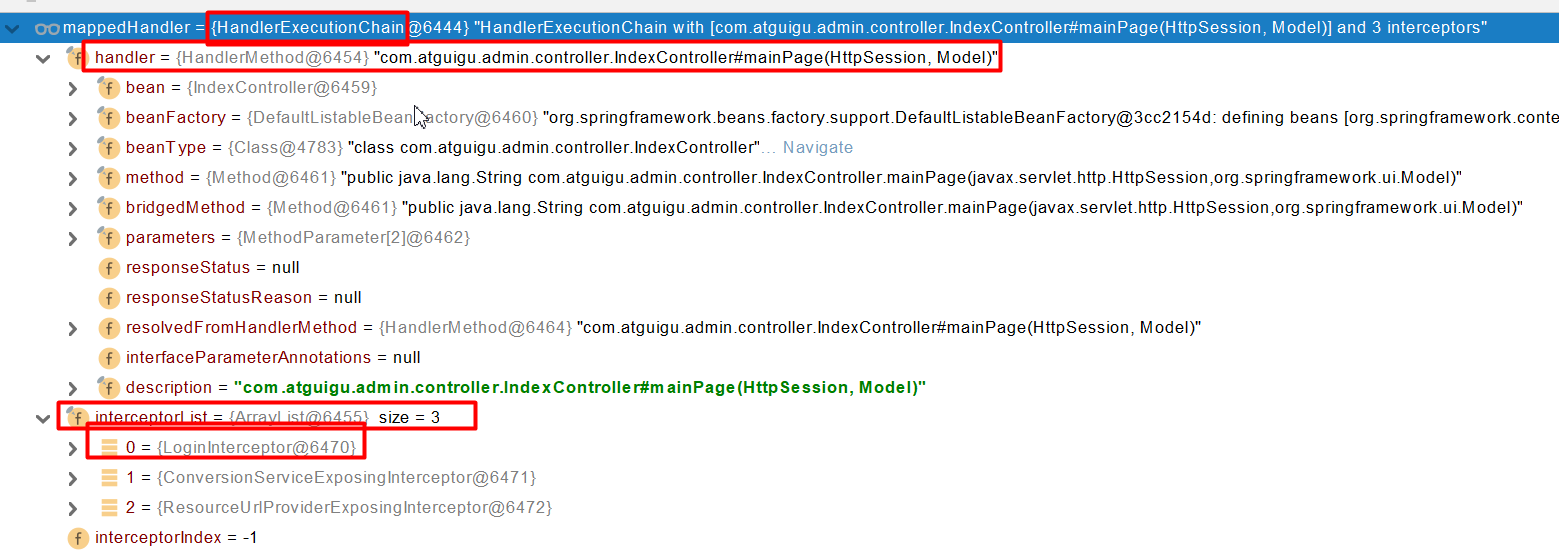
- 根据当前请求,找到**HandlerExecutionChain【**可以处理请求的handler以及handler的所有 拦截器】
- 先来顺序执行 所有拦截器的 preHandle方法
- 如果当前拦截器prehandler返回为true。则执行下一个拦截器的preHandle
- 如果当前拦截器返回为false。直接 倒序执行所有已经执行了的拦截器的 afterCompletion;
- 如果任何一个拦截器返回false。直接跳出不执行目标方法
- 所有拦截器都返回True。执行目标方法
- 倒序执行所有拦截器的postHandle方法。
- 前面的步骤有任何异常都会直接倒序触发 afterCompletion
- 页面成功渲染完成以后,也会倒序触发 afterCompletion

[外链图片转存失败,源站可能有防盗链机制,建议将图片保存下来直接上传(img-E6wutOWB-1657953244668)(https://kevin-pic.oss-cn-beijing.aliyuncs.com/Typora-img/image (1)].png)
文件上传
/**
     * 文件上传
     *
     */
@PostMapping("/upload")
public String upload(@RequestParam MultipartFile file) {
    log.info("文件的名称为:{}", file.getOriginalFilename());
    log.info("文件的大小为:{}", String.format("%.2f",(file.getSize()/1024.1/1024.0)) + "MB");
    log.info("文件的类型为:{}", file.getContentType());
    log.info("文件的扩展名为:{}", Objects.requireNonNull(file.getOriginalFilename()).substring(file.getOriginalFilename().lastIndexOf(".")));
    return null;
}
5.数据访问
整合 MyBatis-Plus
-
导入依赖
<dependency> <groupId>mysql</groupId> <artifactId>mysql-connector-java</artifactId> <scope>runtime</scope> </dependency> <!-- https://mvnrepository.com/artifact/com.alibaba/druid-spring-boot-starter --> <dependency> <groupId>com.alibaba</groupId> <artifactId>druid-spring-boot-starter</artifactId> <version>1.2.11</version> </dependency> <!-- https://mvnrepository.com/artifact/com.baomidou/mybatis-plus-boot-starter --> <dependency> <groupId>com.baomidou</groupId> <artifactId>mybatis-plus-boot-starter</artifactId> <version>3.5.2</version> </dependency> -
编写application.yml
spring: datasource: url: jdbc:mysql://localhost:3306/test username: root password: 123456 type: com.alibaba.druid.pool.DruidDataSource druid: # WebStatFilter配置 web-stat-filter: enabled: true # StatViewServlet配置 stat-view-servlet: enabled: true login-username: admin login-password: 123456 reset-enable: false filter: # 配置StatFilter stat: log-slow-sql: true slow-sql-millis: 2000 # 配置WallFilter wall: config: drop-table-allow: false -
创建表
DROP TABLE IF EXISTS user; CREATE TABLE user ( id BIGINT(20) NOT NULL COMMENT '主键ID', name VARCHAR(30) NULL DEFAULT NULL COMMENT '姓名', age INT(11) NULL DEFAULT NULL COMMENT '年龄', email VARCHAR(50) NULL DEFAULT NULL COMMENT '邮箱', PRIMARY KEY (id) ); -
插入数据
DELETE FROM user; INSERT INTO user (id, name, age, email) VALUES (1, 'Jone', 18, 'test1@baomidou.com'), (2, 'Jack', 20, 'test2@baomidou.com'), (3, 'Tom', 28, 'test3@baomidou.com'), (4, 'Sandy', 21, 'test4@baomidou.com'), (5, 'Billie', 24, 'test5@baomidou.com'); -
创建实体类
@Data @TableName("user") public class User { @TableField("id") private Long id; @TableField("name") private String name; @TableField("age") private Integer age; @TableField("email") private String email; } -
编写UserMapper
@Mapper public interface UserMapper extends BaseMapper<User> {} -
编写UserService
public interface UserService { List<User> getAllUser(); } -
编写UserServiceImpl实现类
@Service public class UserServiceImpl implements UserService { @Autowired private UserMapper userMapper; /** * 获取全部的用户 * @return 返回全部用户的List集合 */ @Override public List<User> getAllUser() { return userMapper.selectList(null); } } -
编写UserController类
@RestController
public class UserController {

    @Autowired
    private UserService userService;

    @GetMapping("/user")
    public String getAllUser() throws JsonProcessingException {
        ObjectMapper objectMapper = new ObjectMapper();
        return objectMapper.writeValueAsString(userService.getAllUser());
    }

}
NoSQL
Redis 是一个开源(BSD许可)的,内存中的数据结构存储系统,它可以用作数据库、缓存和消息中间件。 它支持多种类型的数据结构,如 字符串(strings), 散列(hashes), 列表(lists), 集合(sets), 有序集合(sorted sets) 与范围查询, bitmaps, hyperloglogs 和 地理空间(geospatial) 索引半径查询。 Redis 内置了 复制(replication),LUA脚本(Lua scripting), LRU驱动事件(LRU eviction),事务(transactions) 和不同级别的 磁盘持久化(persistence), 并通过 **Redis哨兵(Sentinel)**和自动 **分区(Cluster)**提供高可用性(high availability)。
-
引入依赖
<dependency> <groupId>org.springframework.boot</groupId> <artifactId>spring-boot-starter-data-redis</artifactId> </dependency> -
编写application.yml
spring: redis: url: redis://123456@127.0.0.1:6379 -
测试
@Autowired
StringRedisTemplate stringRedisTemplate;

@Test
void redisTest() {
    ValueOperations<String, String> opsForValue = stringRedisTemplate.opsForValue();
    opsForValue.set("test", "test1", 10, TimeUnit.SECONDS);
    System.out.println(opsForValue.get("test"));
}
6.单元测试
JUnit5常用注解
- **@Test 😗*表示方法是测试方法。但是与JUnit4的@Test不同,他的职责非常单一不能声明任何属性,拓展的测试将会由Jupiter提供额外测试
- **@ParameterizedTest 😗*表示方法是参数化测试,下方会有详细介绍
- **@RepeatedTest 😗*表示方法可重复执行,下方会有详细介绍
- **@DisplayName 😗*为测试类或者测试方法设置展示名称
- **@BeforeEach 😗*表示在每个单元测试之前执行
- **@AfterEach 😗*表示在每个单元测试之后执行
- **@BeforeAll 😗*表示在所有单元测试之前执行
- **@AfterAll 😗*表示在所有单元测试之后执行
- **@Tag 😗*表示单元测试类别,类似于JUnit4中的@Categories
- **@Disabled 😗*表示测试类或测试方法不执行,类似于JUnit4中的@Ignore
- **@Timeout 😗*表示测试方法运行如果超过了指定时间将会返回错误
- **@ExtendWith 😗*为测试类或测试方法提供扩展类引用
断言(assertions)
断言(assertions)是测试方法中的核心部分,用来对测试需要满足的条件进行验证。这些断言方法都是 org.junit.jupiter.api.Assertions 的静态方法。
-
简单断言
方法 说明 assertEquals 判断两个对象或两个原始类型是否相等 assertNotEquals 判断两个对象或两个原始类型是否不相等 assertSame 判断两个对象引用是否指向同一个对象 assertNotSame 判断两个对象引用是否指向不同的对象 assertTrue 判断给定的布尔值是否为 true assertFalse 判断给定的布尔值是否为 false assertNull 判断给定的对象引用是否为 null assertNotNull 判断给定的对象引用是否不为 null -
数组断言
通过 assertArrayEquals 方法来判断两个对象或原始类型的数组是否相等
@Test @DisplayName("array assertion") public void array() { assertArrayEquals(new int[]{1, 2}, new int[] {1, 2}); } -
组合断言
assertAll 方法接受多个 org.junit.jupiter.api.Executable 函数式接口的实例作为要验证的断言,可以通过 lambda 表达式很容易的提供这些断言
@Test @DisplayName("assert all") public void all() { assertAll("Math", () -> assertEquals(2, 1 + 1), () -> assertTrue(1 > 0) ); } -
异常断言
在JUnit4时期,想要测试方法的异常情况时,需要用**@Rule注解的ExpectedException变量还是比较麻烦的。而JUnit5提供了一种新的断言方式Assertions.assertThrows()** ,配合函数式编程就可以进行使用。
@Test @DisplayName("异常测试") public void exceptionTest() { ArithmeticException exception = Assertions.assertThrows( //扔出断言异常 ArithmeticException.class, () -> System.out.println(1 % 0) ); } -
超时断言
Junit5还提供了Assertions.assertTimeout() 为测试方法设置了超时时间
@Test @DisplayName("超时测试") public void timeoutTest() { //如果测试方法时间超过1s将会异常 Assertions.assertTimeout(Duration.ofMillis(1000), () -> Thread.sleep(500)); } -
快速失败
通过 fail 方法直接使得测试失败
@Test
@DisplayName("fail")
public void shouldFail() {
    fail("This should fail");
}
前置条件(assumptions)
JUnit 5 中的前置条件(assumptions【假设】)类似于断言,不同之处在于不满足的断言会使得测试方法失败,而不满足的前置条件只会使得测试方法的执行终止。前置条件可以看成是测试方法执行的前提,当该前提不满足时,就没有继续执行的必要。
@DisplayName("前置条件")
public class AssumptionsTest {
    private final String environment = "DEV";

    @Test
    @DisplayName("simple")
    public void simpleAssume() {
        assumeTrue(Objects.equals(this.environment, "DEV"));
        assumeFalse(() -> Objects.equals(this.environment, "PROD"));
    }

    @Test
    @DisplayName("assume then do")
    public void assumeThenDo() {
        assumingThat(
            Objects.equals(this.environment, "DEV"),
            () -> System.out.println("In DEV")
        );
    }
}
assumeTrue 和 assumFalse 确保给定的条件为 true 或 false,不满足条件会使得测试执行终止。assumingThat 的参数是表示条件的布尔值和对应的 Executable 接口的实现对象。只有条件满足时,Executable 对象才会被执行;当条件不满足时,测试执行并不会终止。
嵌套测试
JUnit 5 可以通过 Java 中的内部类和@Nested 注解实现嵌套测试,从而可以更好的把相关的测试方法组织在一起。在内部类中可以使用@BeforeEach 和@AfterEach 注解,而且嵌套的层次没有限制。
@DisplayName("A stack")
class TestingAStackDemo {

    Stack<Object> stack;

    @Test
    @DisplayName("is instantiated with new Stack()")
    void isInstantiatedWithNew() {
        new Stack<>();
    }

    @Nested
    @DisplayName("when new")
    class WhenNew {

        @BeforeEach
        void createNewStack() {
            stack = new Stack<>();
        }

        @Test
        @DisplayName("is empty")
        void isEmpty() {
            assertTrue(stack.isEmpty());
        }

        @Test
        @DisplayName("throws EmptyStackException when popped")
        void throwsExceptionWhenPopped() {
            assertThrows(EmptyStackException.class, stack::pop);
        }

        @Test
        @DisplayName("throws EmptyStackException when peeked")
        void throwsExceptionWhenPeeked() {
            assertThrows(EmptyStackException.class, stack::peek);
        }

        @Nested
        @DisplayName("after pushing an element")
        class AfterPushing {

            String anElement = "an element";

            @BeforeEach
            void pushAnElement() {
                stack.push(anElement);
            }

            @Test
            @DisplayName("it is no longer empty")
            void isNotEmpty() {
                assertFalse(stack.isEmpty());
            }

            @Test
            @DisplayName("returns the element when popped and is empty")
            void returnElementWhenPopped() {
                assertEquals(anElement, stack.pop());
                assertTrue(stack.isEmpty());
            }

            @Test
            @DisplayName("returns the element when peeked but remains not empty")
            void returnElementWhenPeeked() {
                assertEquals(anElement, stack.peek());
                assertFalse(stack.isEmpty());
            }
        }
    }
}
参数化测试
利用**@ValueSource**等注解,指定入参,我们将可以使用不同的参数进行多次单元测试,而不需要每新增一个参数就新增一个单元测试,省去了很多冗余代码。
@ValueSource: 为参数化测试指定入参来源,支持八大基础类以及String类型,Class类型
@NullSource: 表示为参数化测试提供一个null的入参
@EnumSource: 表示为参数化测试提供一个枚举入参
@CsvFileSource:表示读取指定CSV文件内容作为参数化测试入参
@MethodSource:表示读取指定方法的返回值作为参数化测试入参(注意方法返回需要是一个流)
@ParameterizedTest
@ValueSource(strings = {"one", "two", "three"})
@DisplayName("参数化测试1")
public void parameterizedTest1(String string) {
    System.out.println(string);
    Assertions.assertTrue(StringUtils.isNotBlank(string));
}


@ParameterizedTest
@MethodSource("method")    //指定方法名
@DisplayName("方法来源参数")
public void testWithExplicitLocalMethodSource(String name) {
    System.out.println(name);
    Assertions.assertNotNull(name);
}

static Stream<String> method() {
    return Stream.of("apple", "banana");
}
7.指标监控
SpringBoot Actuator
未来每一个微服务在云上部署以后,我们都需要对其进行监控、追踪、审计、控制等。SpringBoot就抽取了Actuator场景,使得我们每个微服务快速引用即可获得生产级别的应用监控、审计等功能。
使用
<dependency>
    <groupId>org.springframework.boot</groupId>
    <artifactId>spring-boot-starter-actuator</artifactId>
</dependency>
- 访问 http://localhost:8080/actuator/**
- 暴露所有监控信息为HTTP
management:
  endpoints:
    enabled-by-default: true #暴露所有端点信息
    web:
      exposure:
        include: '*'  #以web方式暴露
spring-boot-admin
spring-boot-admin开源地址:codecentric/spring-boot-admin: Admin UI for administration of spring boot applications (github.com)
使用
-
server端导入依赖
<dependency> <groupId>de.codecentric</groupId> <artifactId>spring-boot-admin-starter-server</artifactId> </dependency> -
在主启动类添加注解:
@EnableAdminServer -
配置application.yml
spring: application: name: spring-boot-admin-server server: port: 12000 -
client端导入依赖
<dependency> <groupId>de.codecentric</groupId> <artifactId>spring-boot-admin-starter-client</artifactId> </dependency> -
配置application.yml
spring:
  application:
    name: spring-boot-client
  boot:
    admin:
      client:
        url: http://localhost:12000
        instance:
          service-host-type: ip  # 使用ip注册进来
server:
  port: 12001
management:
  endpoints:
    web:
      exposure:
        include: '*'


 7254
7254


 被折叠的 条评论
为什么被折叠?


