


springmvc域对象共享数据
向请求域共享数据
1.使用ServletAPI向请求域对象共享数据
    public String HelloWorld(HttpServletRequest request) {
        request.setAttribute("test","Hello,ServletAPI");
        return "success";
    }
2.使用ModelAndView向请求域对象共享数据(官方推荐)
    public ModelAndView testModelAndView(){
        //ModelAndView有两个方面的功能:1、在请求域共享数据   2、设置逻辑视图
        ModelAndView modelAndView = new ModelAndView();
        modelAndView.addObject("faith","以吾之血肉,筑新世界之长城");
        modelAndView.setViewName("success");
        return modelAndView;
    }

3.使用Model向request域对象共享数据(老师用的最多)
    public String testModel(Model model){
        model.addAttribute("fashion","青丝俏佳人,白玉俊公子");
        return "success";
    }
4.使用ModelMap向request域对象共享数据
ModelAndView有Model和View的功能
功能1:向请求域共享数据,也只能是请求域
功能2:设置逻辑视图,实现页面跳转
    public String testModelMap(ModelMap modelMap){
        modelMap.addAttribute("testRequestScope", "hello,ModelMap,request");
        return "success";
    }
5.使用map向request域对象共享数据
域对象本质是map集合
    public String testMap(Map<String, Object> map){
        map.put("testRequestScope", "hello,Map,request");
        return "success";
    }
Model、ModelMap、Map的关系
本质上都是 BindingAwareModelMap 类型的
org.springframework.validation.support.BindingAwareModelMap
 System.out.println(model.getClass().getName());
 System.out.println(modelMap.getClass().getName());
 System.out.println(map.getClass().getName());
向会话域共享数据
springmvc也是有自己的方式,但是麻烦。要先把数据共享到请求域,再把数据共享到session域
,还不如直接用ServletAPI
    @RequestMapping("/testSession")
    public String testSession(HttpSession session){
        session.setAttribute("heart", "商心慈:他潇洒,他无畏,他豪气无双——《蛊真人》");
        return "success";
    }
向应用域共享数据 ServletContext类型
自然,这里也是可以通过request来获取ServletContext的
ServletContext application =request).getServletContext();
    @RequestMapping("/testApplication")
    public String testApplication(HttpSession session){
        ServletContext servletContext = session.getServletContext();
        servletContext.setAttribute("answer", "古月方源:让人从内心深处相信某个可能,不是靠说服,而是引导啊——《蛊真人》");
        return "success";
    }
深入研究一下:
不管哪种方式,最终执行完控制器方法,返回都是ModelAndView。方法栈打了断点
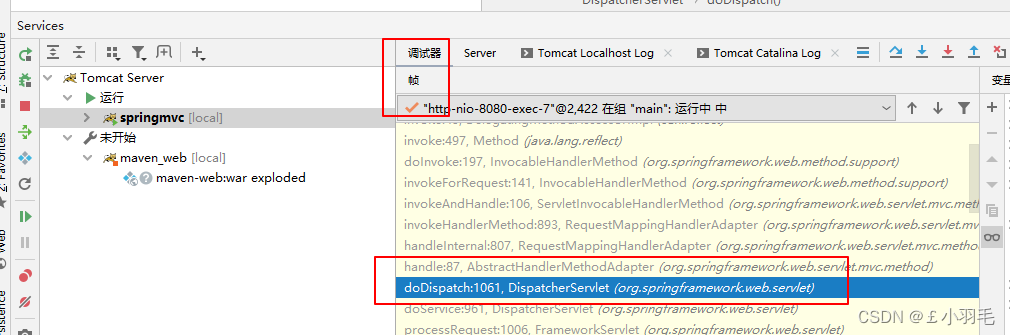
也就是说这个1061这一行代码调用了控制器方法,变量mv的类型就是ModelAndView

SpringMVC中的视图
SpringMVC中的视图是View接口,视图的作用渲染数据,将模型Model中的数据展示给用户
转发可以获取请求域数据
跨域:重定向可以跨域(访问百度),转发只能访问服务器内部资源
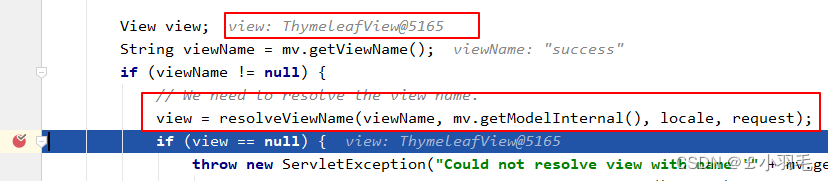
视图一:ThymeleafView
如果视图没有前缀,创建的就是Thymeleaf视图,上面我们一直用的都是Thymeleaf视图
这个我们在springMVC.xml中就配置了Thymeleaf视图解析器
    <!-- 配置Thymeleaf视图解析器 -->
    <bean id="viewResolver" class="org.thymeleaf.spring5.view.ThymeleafViewResolver">
        <property name="order" value="1"/>
        <property name="characterEncoding" value="UTF-8"/>
        <property name="templateEngine">
            <bean class="org.thymeleaf.spring5.SpringTemplateEngine">
                <property name="templateResolver">
                    <bean class="org.thymeleaf.spring5.templateresolver.SpringResourceTemplateResolver">

                        <!-- 视图前缀 -->
                        <property name="prefix" value="/WEB-INF/templates/"/>

                        <!-- 视图后缀 -->
                        <property name="suffix" value=".html"/>
                        <property name="templateMode" value="HTML5"/>
                        <property name="characterEncoding" value="UTF-8" />
                    </bean>
                </property>
            </bean>
        </property>
    </bean>
视图一:ThymeleafView
当控制器方法中所设置的视图名称没有任何前缀时,此时的视图名称会被SpringMVC配置文件中所配置的视图解析器解析。
视图名称拼接视图前缀和视图后缀所得到的最终路径,会通过转发的方式实现跳转
@RequestMapping("/testHello")
public String testHello(){
return "hello";
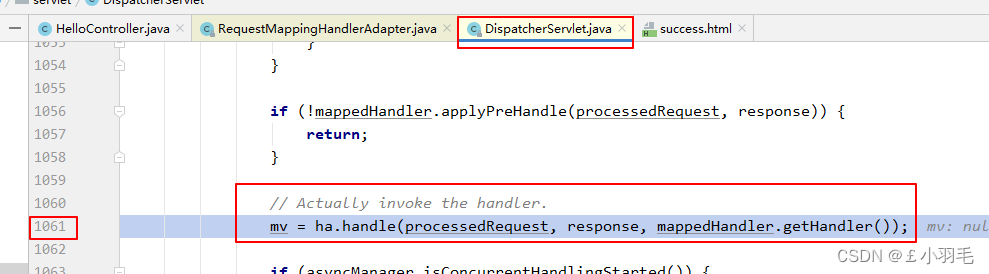
}源码分析:在DispatcherServlet中打如下断点:

个行断点内容如下:都是重要步骤啊
//1061
mv = ha.handle(processedRequest, response, mappedHandler.getHandler());
//1078
processDispatchResult(processedRequest, response, mappedHandler, mv, dispatchException);
//1371
view = resolveViewName(viewName, mv.getModelInternal(), locale, request);
//1139
render(mv, request, response);
跟踪到最后一个断点处。
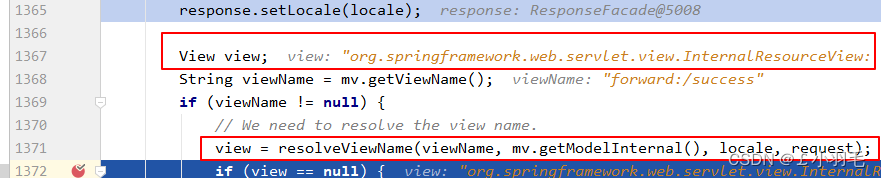
视图二:转发视图 InternalResourceView
将前缀"forward:"去掉,剩余部分作为最终路径通过转发的方式实现跳转,
哪怕你用了,也要往thymeleaf的视图里跳,所以已经不使用了
用了ThymeleafView之后,就不用默认的转发视图了。
ThymeleafView也是通过转发跳转页面的。
    @RequestMapping("/testInternalResourceView")
    public String testInternalResourceView(){
        return "forward:/testModel";
    }

    @RequestMapping("/testModel")
    public String testModel(Model model){
        model.addAttribute("fashion","青丝俏佳人,白玉俊公子");
        return "success";
    }
测试结果:

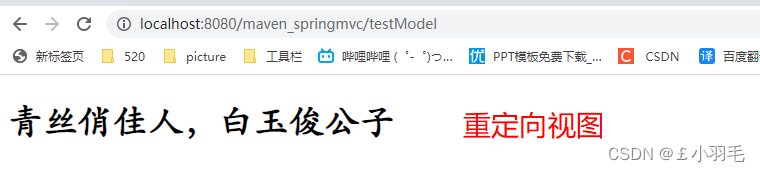
视图三:重定向视图 RedirectView
重定向视图在解析时,会先将redirect:前缀去掉,然后会判断剩余部分是否以/开头,若是则会自动拼接上下文路径
Thymeleaf是必须由服务器解析,所以不能通过重定向跳转,必须通过转发来访问。
有了Thymeleaf以后,重定向也只能重定向到转发到某一个页面的请求
    @RequestMapping("/testRedirectView")
    public String testRedirectView(){
        return "redirect:/testModel";
    }

    @RequestMapping("/testModel")
    public String testModel(Model model){
        model.addAttribute("fashion","青丝俏佳人,白玉俊公子");
        return "success";
    }

视图控制器view-controller
当控制器方法中,仅仅用来实现页面跳转,即只需要设置视图名称时,可以将处理器方法使用<view-controller>标签进行表示
在springMVC.xml中加入标签:
path:设置要处理的请求的请求路径
view-name:设置该请求要跳转到的页面所对应的逻辑视图
    <!--
        若浏览器发送的请求,在处理请求时,只需要设置一个视图名称,实现页面跳转
        此时就可以通过视图控制器mvc:view-controller标签设置映射关系
    -->
    <mvc:view-controller path="/" view-name="index"></mvc:view-controller>
出现问题:
当设置了任何一个视图控制器<view-controller>之后,之前通过@RequestMapping注解所映射的请求全部失效解决办法:在springMVC.xml中加入标签:
开启mvc注解驱动
<mvc:annotation-driven />
开启mvc注解驱动这个标签,在很多功能都要用到
比如还有处理静态资源访问不到的问题,处理json的问题@RequestBody,@ResponseBody
RESTful风格
REST:Representational State Transfer,表现层资源状态转移
操作的资源一样,路径就是一样的。用4种请求方式分别表示对资源不同的处理方式
服务器中一切皆资源
以前:我要怎么去操作这个资源,我要干什么?
现在:我们要操作的是什么资源,要用什么名词来表示(restful)
URI既是资源的名称,也是资源在Web上的地址
URI:统一资源标示符,,指在资源在服务器的路径,从上下文开始
REST 中 URL 风格设计:
REST 风格提倡 URL 地址使用统一的风格设计,
从前到后 各个单词使用斜杠分开,
不使用问号键值对方式携带请求参数,
而是将要发送给服务器的数据作为URL 地址的一部分,以保证整体风格的一致性
HTTP 协议里面,四个表示操作方式的动词:
GET 用来获取资源,POST 用来新建资源,
PUT 用来更新资源,DELETE 用来删除资源。
| 请求方式 | 以前 | RESTful风格 |
| get | getUserById?id=1 | user/1 |
| post | saveUser | user(数据在请求体) |
| delete | deleteUser?id=1 | user/1 |
| put | updateUser | user(数据在请求体) |
问题:浏览器向服务器只能发送get和post请求方式。如何发送一个put和delete请求?
SpringMVC 提供了 HiddenHttpMethodFilter帮助我们将 POST 请求转换为 DELETE 或 PUT 请求
HiddenHttpMethodFilter 处理请求方式的过滤器
HiddenHttpMethodFilter 处理put和delete请求的条件:
条件1:保证请求方式为post
条件2:必须传输请求参数_method,_method的值才是这个请求真正的请求方式设置隐藏域,没必要用户看到, <input type="hidden" name="_method" value="put"/> <input type="hidden" name="_method" value="delete"/>
在web.xml中注册该过滤器
<filter>
    <filter-name>HiddenHttpMethodFilter</filter-name>
    <filter-class>org.springframework.web.filter.HiddenHttpMethodFilter</filter-class>
</filter>
<filter-mapping>
    <filter-name>HiddenHttpMethodFilter</filter-name>
    <url-pattern>/*</url-pattern>
</filter-mapping>
HiddenHttpMethodFilter源码,doFilterInternal()方法
protected void doFilterInternal(HttpServletRequest request, HttpServletResponse response, FilterChain filterChain){

	HttpServletRequest requestToUse = request;
	if ("POST".equals(request.getMethod()) && request.getAttribute(WebUtils.ERROR_EXCEPTION_ATTRIBUTE) == null) {
		String paramValue = request.getParameter(this.methodParam);
		if (StringUtils.hasLength(paramValue)) {
			String method = paramValue.toUpperCase(Locale.ENGLISH);
			if (ALLOWED_METHODS.contains(method)) {
				requestToUse = new HttpMethodRequestWrapper(request, method);
			}
		}
	}
	filterChain.doFilter(requestToUse, response);
}
获取请求参数"_method"的值,如果它有值,并且值是put,delete,patch中的一种,才能执行到最核心的机密。
requestToUse = new HttpMethodRequestWrapper(request, method);


RESTful实现增删改查案例:
为了方便,就不给看EmployeeDao 还有实体类,页面啥的了,看看页面演示的效果
Restful实现功能一:查询列表
RESTful风格中,GET 用来获取资源
@Controller
public class EmployeeController {
    @Autowired(required = false)
    private EmployeeDao employeeDao;

    @RequestMapping(value = "/employee", method = RequestMethod.GET)
    public String getemplist(Model model) {
        Collection<Employee> employeeList = employeeDao.getAll();
        model.addAttribute("employeeList", employeeList);
        return "employee_list";
    }
}
employee_list.html代码如下:
<table>
    <tr th:colspan="4">employeeList</tr>
    <tr>
        <th>id</th>
        <th>lastName</th>
        <th>email</th>
        <th>gender</th>
        <th>options(<a href="">add</a>)</th>

    </tr>
    <tr th:each="employee : ${employeeList}">
        <td th:text="${employee.id}"></td>
        <td th:text="${employee.lastName}"></td>
        <td th:text="${employee.email}"></td>
        <td th:text="${employee.gender}"></td>
        <td>
            <a href="">delete</a>
            <a href="">update</a>
        </td>
    </tr>
</table>
浏览器页面显示的效果:

Restful实现功能二:跳转添加页面,实现添加功能
在web.xml中加入视图控制器标签,因为符合只实现页面跳转,没有任何功能的特性
<mvc:view-controller path="/toAdd" view-name="employee_add"></mvc:view-controller>employee_add.html页面核心内容如下:
<form th:action="@{/employee}" method="post">
</form>
employee_add.html页面效果如下:

RESTful风格中, POST 用来新建资源
    @RequestMapping(value = "/employee",method = RequestMethod.POST)
    public String addEmployee(Employee employee){
        employeeDao.save(employee);
        //添加成功,重定向
        return "redirect:/employee";
    }
返回boolean值
if (hrService.updateHrPasswd(oldpass, pass, hrid)) {
    return RespBean.ok("更新成功!");
}
return RespBean.error("更新失败!");
返回修改的行数
        if (hrService.updateUserface(url, id) == 1) {
            Hr hr = (Hr) authentication.getPrincipal();
            hr.setUserface(url);
            SecurityContextHolder.getContext().setAuthentication(new UsernamePasswordAuthenticationToken(hr, authentication.getCredentials(), authentication.getAuthorities()));
            return RespBean.ok("更新成功!", url);
        }
        return RespBean.error("更新失败!");
Restful实现功能三:跳转修改页面,实现修改功能
根据id查询,回显数据
<a th:href="@{'/employee/'+${employee.id}}">update</a> @RequestMapping(value = "/employee/{id}",method = RequestMethod.GET)
public String getEmployeeById(@PathVariable("id") Integer id, Model model){
Employee employee = employeeDao.get(id);
model.addAttribute("employee",employee);
return "employee_update";
}性别回显的时候,因为是单选框,特殊一点,employee_update.html页面源代码如下:
<input type="radio" name="gender" value="1" th:field="${employee.gender}">male
<input type="radio" name="gender" value="0" th:field="${employee.gender}">female
效果如下:

我们这个演示案例里,
添加员工和修改员工调用的是同一个方法save()。
判断id是否为空,id为空则是添加功能。id不为空则是修改功能
    public void save(Employee employee){
        if(employee.getId() == null){
            employee.setId(initId++);
        }
        employees.put(employee.getId(), employee);
    }
所以在employee_update.html页面中有这样俩行关键代码。
一个刚刚也说了,修改必须要传id,另一个就是要把请求方式传为put,要有一个“_method”,设置真正的请求方式!
<form th:action="@{/employee}" method="post">
    <input type="hidden" name="_method" value="put">
    <input type="hidden" name="id" th:value="${employee.id}">
</form>
RESTful风格中,PUT 用来更新资源
    @RequestMapping(value = "/employee", method = RequestMethod.PUT)
    public String updateEmployee(Employee employee){
        employeeDao.save(employee);
        return "redirect:/employee";
    }
Restful实现功能四:实现删除功能(这四个里最难的)
使用点击a标签,来控制form表单的提交
<a @click="deleteEmployee()" th:href="@{'/employee/'+${employee.id}}">delete</a>
<form method="post">
   <input type="hidden" name="_method" value="delete">
</form>

<script type="text/javascript">
deleteEmployee(){
    //获取form表单
    var form = document.getElementsByTagName("form")[0];
    //将超链接的href,即要发送的请求的请求路径赋值给form表单的action属性
    form.action = event.target.href;
    //超链接控制表单提交
    form.submit();
    //阻止超链接的默认行为
    event.preventDefault();
}
</script>
RESTful风格中,DELETE 用来删除资源。
    @RequestMapping(value = "/employee/{id}", method = RequestMethod.DELETE)
    public String deleteEmployee(@PathVariable("id") Integer id){
        employeeDao.delete(id);
        return "redirect:/employee";
    }
@RequestMapping的派生注解:
@GetMapping("/employee")
@PostMapping("/employee")
@PutMapping("/employee")
@DeleteMapping("/employee/{id}")


 1804
1804


 被折叠的 条评论
为什么被折叠?
被折叠的 条评论
为什么被折叠?
 到【灌水乐园】发言


