


1.3 ACL运行资源管理
包含物理资源和逻辑资源。
1.3.1 运行资源管理概述
按顺序申请:Device -> Context -> Stream,然后根据实际需求调用aclrtGetRunMode接口获取软件栈的运行模式(当同一个应用既支持在Host运行,也支持在Device运行时,在编程时需要就需要根据运行模式来判断后续的接口调用逻辑,这时需要提前获取运行模式。)。
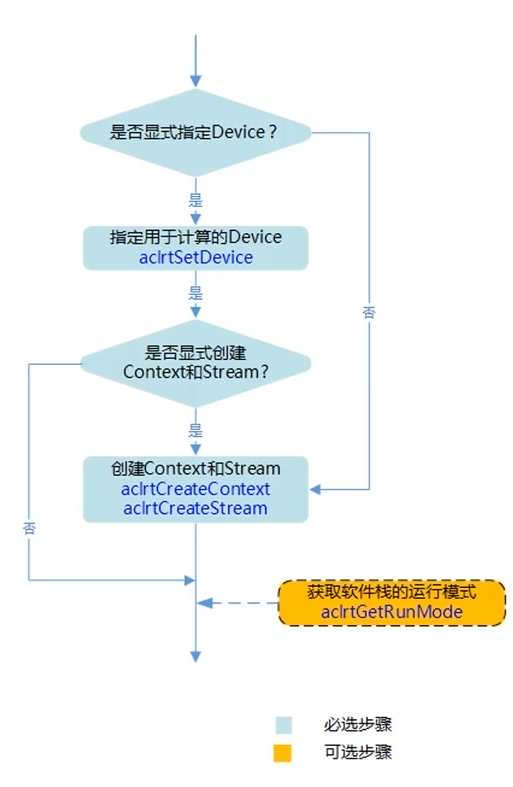
- 显示指定Device:调用aclrtSetDevice接口
- 显示创建Context和Stream:调用aclrtCreateContext和aclrtCreateStream
- 不显示创建二者:系统会默认的使用Context和Stream。二者是在调用aclreSetDevice是隐式创建的,默认Context和默认Stream作为接口入参时,传入NULL即可。
- 不显示指定Device:调用aclrtCreateContext和alcrtCreateStream显示创建Context与Stream。系统在显示创建Context时,会调用aclrtSetDevice接口指定运行的Device,Device ID通过aclrtCreateContext传入
aclrtGetRunMode判断进程是在Device还是HOST上。如果HOST上,需要进行HOST和Device之间的数据传输;进程部署在Device上则不需要。
Device是物理硬件;Context是逻辑上的资源集合;Stream控制异步进程
一个Context对应一个唯一Device。切换Device时直接setcardcontext。

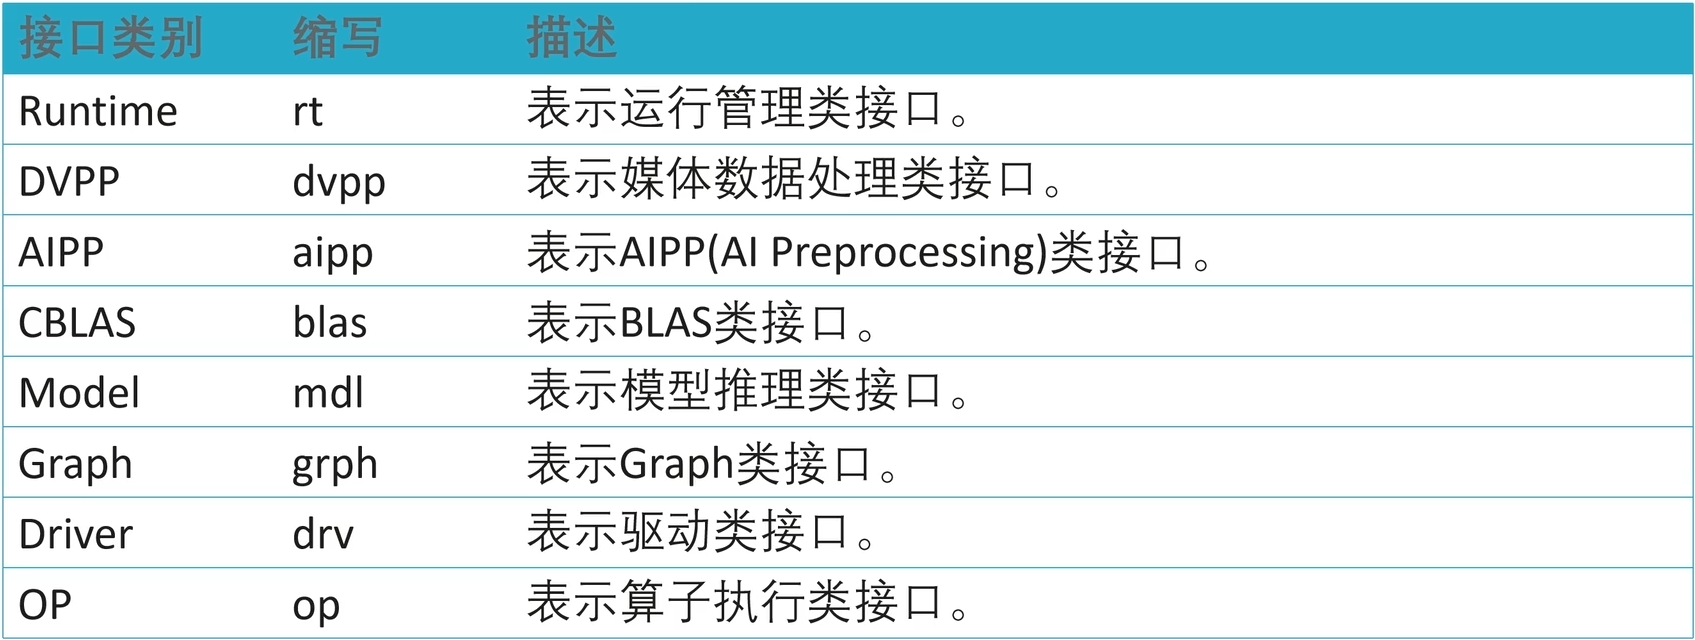
接口命名规则
1.3.2 Device管理
参数带 * (传入指针)表示是输出;不带 * (传入变量)表示是输入
aclError aclrtGetDeviceCount(uint32_t *count):获取当前可用device数量
aclError aclrtGetRunMode(aclrtRunMode *runMode):获取运行模式。runMode是枚举类型,0表示Device的CPU上;1表示HOST的CPU上
aclError aclrtSetDevice(int32_t deviceId):指定运算的Device并隐式创建Context和Stream。
此处会产生一个默认的Stream。
- 可在进程或线程中指定用于运算的Device,若多次调用aclrtSetDevice接口指定同一个Device,仅需调用一次acrtResetDevice接口复位Device。
- 在不同进程或线程中可指定同一个Device用于运算。
- 在某一进程中指定Device,该进程内的多个线程可共用此Device显式创建Context (aclrtCreateContext接口)
- 多Device场景下,可在进程中通过acIrtSetDevice接口切换到其它Device。
aclError aclrtResetDevice(int32_t deviceld):释放Device资源。释放Event/显式创建的Stream→释放显式创建的Context→>ResetDevice
aclError aclrtGetDevice(int32_t deviceld):获取正在运行的Device ID
Device Demo
ret表示函数的返回错误代码
# include <iostream>
# include "acl/acl.h"
# define INFO_LOG(fmt, args...) fprintf(stdout, "[INFO] " fmt "\n", ##args)
# define WARN_LOG(fmt, args...) fprintf(stdout, "[WARN] " fmt "\n", ##args)
# define ERROR_LOG(fmt, args...) fprintf(stdout, "[ERROR] " fmt "\n", ##args)
using namespace std;

int main(){
	/*
		ACL初始化和销毁步骤不变,中间扩增Device申请与销毁代码
	*/
	INFO_LOG("HELLO WORLD");
	// ACL初始化
	const char *aclConfigPath = "acl.json";
	aclError ret = aclInit(aclConfigPath);
	if (ret != ACL_ERROR_NONE){	// 判断初始化成功
		ERROR_LOG("acl init failed");
	}
	INFO_LOG("acl init success");


	// 获取有多少Device
	uint32_t count;
	ret = aclrtGetDeviceCount(&count) ;
	INFO_LOG( "Device count: %d", count);

	// 指定Device
	ret = aclrtSetDevice(0);
	INFO_LOG( "set device 0 success." );

	// 查看当前Device
	int32_t deviceId;
	ret = aclrtGetDevice(&deviceId);
	INFO_LOG( "current deviceID:%d", deviceId);

	ret = aclrtSetDevice(1);
	INFO_LOG( "set device 1 success." );
	ret = aclrtGetDevice(&deviceId);
	INFO_LOG( "current deviceID: %d" , deviceId);

	// 查看运行模式
	aclrtRunMode runMode;
	ret = aclrtGetRunMode(&runMode);
	INFO_LOG( "current run mode: %d . ", runMode );

	// 复位Device
	ret = aclrtResetDevice(0);
	INFO_LOG( "Reset device 0 success." );
	ret = aclrtResetDevice(1);
	INFO_LOG( "Reset device 1 success. " );

	ret = aclFinalize();
	// ACL销毁
	if (ret != ACL_ERROR_NONE){
		ERROR_LOG("finalize acl failed");
	}
	INFO_LOG("end to finalize acl");
	return 0;
}
同样,需要先编译cmake . -DCMAKE_CXX_COMPILER=g++ -DCMAKE_SKIP_RPATH=TRUE, make
然后cd到目录下,运行touch acl.json -> ./main
上述device_demo是在有两个device时运行的。当device仅有一个时虽然不会报错,但
ret=aclrtSetDevice(1)不会执行
1.3.3 Context管理
aclError aclrtCreateContext(aclrtContext *context, int32_t deviceId):显示创建Context,该Context中包含两个Stream,一个默认Stream和一个执行内部同步的Stream。
- 若不调用aclrtCreateContext接口显式创建Context,那系统会使用默认Context,该默认Context是在调用aclrtSetDevice接口时隐式创建的。
- 若在某一进程内创建多个Context(无Context数量限制),当前线程在同一时刻内只能使用其中一个Context,建议通过aclrtSetCurrentContext接口明确指定当前线程的Context,增加程序的可维护性。
aclError aclrtDestroyContext(aclrtContext context):释放Context资源
aclError aclrtSetCurrentContext(aclrtContext context):指定线程的context。在需要指定context的线程内执行。推荐在某一线程中创建的Context只在该线程内使用
- 如果在某线程(例如: thread1)中调用aclrtCreateContext接口显式创建一个Context(例如: ctx1),则可以不调用aclrtSetCurrentContext接口指定该线程的Context,系统默认将ctx1作为thread1的Context。(显示创建的Context不需要指定)
- 如果没有调用aclrtCreateContext接口显式创建Context,则系统将默认Context作为线程的Context,此时,不能通过aclrtDestroyContext接口来释放默认Context。(不显示创建的Context不能显示释放)
- 如果多次调用acIrtSetCurrentContext接口设置线程的Context,以最后一次为准。
aclError aclrtGetCurrentContext(aclrtContext *context): 获取线程的Context
context Demo
# include <iostream>
# include "acl/acl.h"
# define INFO_LOG(fmt, args...) fprintf(stdout, "[INFO] " fmt "\n", ##args)
# define WARN_LOG(fmt, args...) fprintf(stdout, "[WARN] " fmt "\n", ##args)
# define ERROR_LOG(fmt, args...) fprintf(stdout, "[ERROR] " fmt "\n", ##args)
using namespace std;

int main(){
	/*
		不显示创建device,在调用aclrtCreateContext是默认指定device
	*/
	INFO_LOG("Context Demo");
	// ACL初始化
	const char *aclConfigPath = "acl.json";
	aclError ret = aclInit(aclConfigPath);
	if (ret != ACL_ERROR_NONE){	// 判断初始化成功
		ERROR_LOG("acl init failed");
	}
	INFO_LOG("acl init success");

	int32_t deviceId = 0;
	aclrtContext context1;
	aclrtContext context2;
	ret = aclrtCreateContext(&context1, deviceId);	// 显示创建Context1
	if (ret != ACL_ERROR_NONE){
		ERROR_LOG("acl create context1 failed");
	}
	INFO_LOG("create context1 success");

	ret = aclrtCreateContext(&context2, deviceId);	// 显示创建Context2
	if (ret != ACL_ERROR_NONE){
		ERROR_LOG("acl create context2 failed");
	}
	INFO_LOG("create context2 success");

	aclrtContext context3;
	ret = aclrtGetCurrentContext(&context3); // 获取当前的context
	if (ret != ACL_ERROR_NONE){
		ERROR_LOG("acl get current context failed");
	}
	INFO_LOG("acl get current context success");

	// 比较 输出当前进程是哪个context
	if(context2 == context3){	// 比较地址
		INFO_LOG("current context is context2");
	}
	else if (context1 == context3){
		INFO_LOG("current context is context1");
	}
	else ERROR_LOG("current context compare failed");

	// 将context设置为context1
	ret = aclrtSetCurrentContext(context1);
	if (ret != ACL_ERROR_NONE){
		ERROR_LOG("acl set current failed");
	}
	INFO_LOG("set current context as context1 successed");

	 // 查看更换context是否成功
	ret = aclrtGetCurrentContext(&context3);
	if (ret != ACL_ERROR_NONE){
		ERROR_LOG("acl get current context failed");
	}
	INFO_LOG("acl get current context success");

	if(context2 == context3){
	INFO_LOG("current context is context2");
	}
	else if (context1 == context3){
		INFO_LOG("current context is context1");
	}
	else ERROR_LOG("current context compare failed");

	// 销毁context
	ret = aclrtDestroyContext(context1);
	INFO_LOG("context1 is destroyed");
	ret = aclrtDestroyContext(context2);
	INFO_LOG("context2 is destroyed");

	// 销毁acl
	ret = aclFinalize();
	if (ret != ACL_ERROR_NONE){
		ERROR_LOG("finalize acl failed");
	}
	INFO_LOG("end to finalize acl");
	return 0;
}
然后编写对应的CMakeLists.txt;执行cmake . -DCMAKE_CXX_COMPILER=g++ -DCMAKE_SKIP_RPATH=TRUE;make;touch acl.json;./main
- result

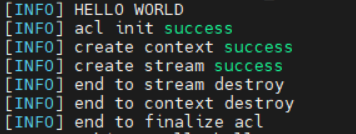
1.3.4 Stream管理
在ACL中,Stream是一个任务队列,通过Stream管理任务并行。即Stream根据发送过来的任务依次执行; 不同Stream中的任务并行执行。一个默认Context下会挂一个默认Stream,如果不显式创建Stream,可使用默认Stream。
aclError aclrtCreateStream(aclrtStream *stream):创建一个Stream。硬件资源最多支持1024个Stream。
每个进程对应一个默认Stream,此默认接口是调用aclrtSetDevice接口指定用于运算的Device时隐式创建的。系统最大支持8个默认Stream
aclError aclrtDestroyStream(aclrtStream stream):销毁stream。销毁前需调用aclrtSynchronizeStream接口确保Stream中任务都已完成
??????????????aclrtSynchronizeStream:视频中没讲,埋坑
Stream Demo
# include <iostream>
# include "acl/acl.h"
// 设置宏
# define INFO_LOG(fmt, args...) fprintf(stdout, "[INFO] " fmt "\n", ##args)
# define WARN_LOG(fmt, args...) fprintf(stdout, "[WARN] " fmt "\n", ##args)
# define ERROR_LOG(fmt, args...) fprintf(stdout, "[ERROR] " fmt "\n", ##args)
using namespace std;

int main(){
	/*
		注意创建与销毁顺序恰好相反
	*/

	INFO_LOG("HELLO WORLD");
	// ACL初始化
	const char *aclConfigPath = "acl.json";
	aclError ret = aclInit(aclConfigPath);
	if (ret != ACL_ERROR_NONE){	// 判断初始化成功
		ERROR_LOG("acl init failed");
	}
	INFO_LOG("acl init success");

	// 创建context
	int32_t deviceId = 0;
	aclrtContext context;
	ret = aclrtCreateContext(&context, deviceId);
	if (ret != ACL_ERROR_NONE){
		ERROR_LOG("context create failed");
	}
	INFO_LOG("create context success");

	// 创建stream
	aclrtStream stream;
	ret = aclrtCreateStream(&stream);
	if (ret != ACL_ERROR_NONE){
		ERROR_LOG("stream create failed");
	}
	INFO_LOG("create stream success");

	// 销毁stream
	ret = aclrtDestroyStream(stream);
	if (ret != ACL_ERROR_NONE){
		ERROR_LOG("stream destroy failed");
	}
	INFO_LOG("end to stream destroy");

	// 销毁context
	ret = aclrtDestroyContext(context);
	INFO_LOG("end to context destroy");

	ret = aclFinalize();
	// ACL销毁
	if (ret != ACL_ERROR_NONE){
		ERROR_LOG("finalize acl failed");
	}
	INFO_LOG("end to finalize acl");
	return 0;
}
- result
1.4 内存管理与数据传输
通常加速计算在Device,而模型、数据集等加载在HOST上。
1.4.1 内存管理概述
任何用于参与ACL在Device侧运算的内存,都不能是C/C++原生内存管理接口,而是必须调用ACL相关接口进行管理。 ACL设备管理上,是要区分HOST和Device的(aclrtGetRunMode返回运行模式)。
- 二者分设:如Atlas300,模型数据等都在HOST加载;然后传输到Device侧运算;运算结果再返回HOST
- 二者合设:只有Device,模型数据等都在Device上加载
1.4.2 内存管理接口
1. Host侧申请与释放
aclError aclrtMallocHost(void **hostPtr, size_t size):申请Host侧内存。申请的内存不能直接在Device上使用,需要显式拷贝到Device上。这个内存只能通过aclrtFreeHost释放。
aclError aclrtFreeHost(void *hostPtr)
2. Device侧申请与释放
aclError aclrtMalloc(void **devPtr, size_t size, aclrtMemMallocPolicy policy):申请Device侧内存。policy指内存分配规则。
aclError aclrtFree(void *devPtr)
3. 新申请的内存初始化
-
同步
aclError aclrtMemset(void *devPtr, size_t maxCount, int32_t value, size_t count):内存赋初值。 -
异步
aclError aclrtMemsetAsync(void *devPtr, size_t maxCount, int_32 value, size_t count, aclrtStream stream):异步初始化
4. HOST与Device之间拷贝
-
同步
aclError aclrtMemcpy(void *dst, size_t destMax, const void *src, size_t count, aclrtMemcpyKind kind)- dst:目的内存地址指针
- destMax:目的内存地址的最大内存长度
- src:源内存地址指针
- count:内存复制长度
- kind:aclrtMemcpyKind枚举。
ACL_MEMCPY_HOST_TO_HOST:Host -> HostACL_MEMCPY_HOST_TO_DEVICE:Host -> DeviceACL_MEMCPY_DEVICE_TO_HOST:Device -> HostACL_MEMCPY_DEVICE_TO_DEVICE:Device -> Device
-
异步
aclError aclrtMemcpyAsync(void *dst, size_t destMax, const void *src, size_t count, aclrtMemcpyKind kind, aclrtStream stream)- stream
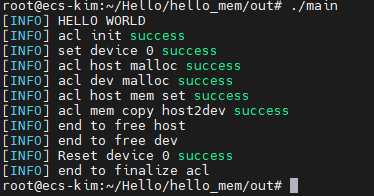
1.4.3 内存管理Demo
# include <iostream>
# include "acl/acl.h"
// 设置宏
# define INFO_LOG(fmt, args...) fprintf(stdout, "[INFO] " fmt "\n", ##args)
# define WARN_LOG(fmt, args...) fprintf(stdout, "[WARN] " fmt "\n", ##args)
# define ERROR_LOG(fmt, args...) fprintf(stdout, "[ERROR] " fmt "\n", ##args)
using namespace std;

int main(){
	/*
		注意创建与销毁顺序恰好相反
	*/

	INFO_LOG("HELLO WORLD");
	// ACL初始化
	const char *aclConfigPath = "acl.json";
	aclError ret = aclInit(aclConfigPath);
	if (ret != ACL_ERROR_NONE){	// 判断初始化成功
		ERROR_LOG("acl init failed");
	}
	INFO_LOG("acl init success");

	ret = aclrtSetDevice(0);
	INFO_LOG("set device 0 success");

	void *hostMemPtr_;
	size_t hostMemSize = 32;
	void *devMemPtr_;
	size_t devMemSize = 32;

	// 申请Host内存
	ret = aclrtMallocHost(&hostMemPtr_, hostMemSize);
	if (ret != ACL_ERROR_NONE){
		ERROR_LOG("host malloc failed");
	}
	INFO_LOG("acl host malloc success");

	// 申请Device内存
	ret = aclrtMalloc(&devMemPtr_, devMemSize, ACL_MEM_MALLOC_HUGE_FIRST); // 注意相比HOST多一个参数
	if (ret != ACL_ERROR_NONE){
		ERROR_LOG("device malloc failed");
	}
	INFO_LOG("acl dev malloc success");

	// 初始化HOST
	ret = aclrtMemset(hostMemPtr_, 32, 1, 32);	// host内存内容重置为1
	if (ret != ACL_ERROR_NONE){
		ERROR_LOG("acl host mem set failed");
	}
	INFO_LOG("acl host mem set success");

	// 拷贝 HOST -> Device
	ret = aclrtMemcpy(devMemPtr_, devMemSize, hostMemPtr_, hostMemSize, ACL_MEMCPY_HOST_TO_DEVICE);
	if (ret != ACL_ERROR_NONE){
		ERROR_LOG("acl mem copy host2dev failed");
	}
	INFO_LOG("acl mem copy host2dev success");

	// 释放
	ret = aclrtFreeHost(hostMemPtr_);
	if (ret != ACL_ERROR_NONE){
		ERROR_LOG("host free failed");
	}
	INFO_LOG("end to free host");

	ret = aclrtFree(devMemPtr_);
	if (ret != ACL_ERROR_NONE){
		ERROR_LOG("device free failed");
	}
	INFO_LOG("end to free dev");

	ret = aclrtResetDevice(0);
	INFO_LOG("Reset device 0 success");

	ret = aclFinalize();
	// ACL销毁
	if (ret != ACL_ERROR_NONE){
		ERROR_LOG("finalize acl failed");
	}
	INFO_LOG("end to finalize acl");
	return 0;
}
- result


 1974
1974


 被折叠的 条评论
为什么被折叠?
被折叠的 条评论
为什么被折叠?
 到【灌水乐园】发言


