


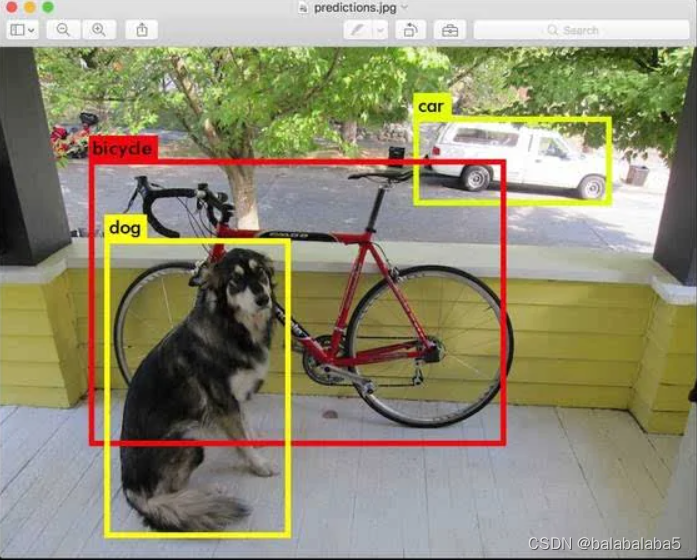
这个是百度上面经典的对象检测结果图,准确检测且识别到了狗、自行车、小汽车。
目前物体(目标)检测的主流方法有YOLO和faster RCNN,而SSD囊括了YOLO速度快和faster RCNN准确率高的优点。具体的SSD算法结构我就不在这里进行阐述,在这个项目里,不用训练,只用CPU,采用opencv+SSD+深度神经网络DNN的方法做到物体检测,在准确率和速度上面都十分可观。
目录
对图片内的物体进行检测识别:
1、导入图片、配置文件、权重文件、coco.name
配置和权重是在训练的时候生成的,将这些文件放到程序里就可以越过训练这步直接进行测试了。coco数据集是经典的公开数据集,里面包含了91种物体的图片以供物体检测的算法测试。
import cv2

img = cv2.imread('lena.png')

classNames = []
classFile = 'coco.names'
with open(classFile, 'rt') as f:
    classNames = f.read().rstrip('\n').split('\n')
print(classNames)

configPath = 'ssd_mobilenet_v3_large_coco_2020_01_14.pbtxt'
weightsPath = 'frozen_inference_graph.pb'

cv2.imshow('OutPut', img)
cv2.waitKey(0)
open()函数用于打开文件,'rt'模式是可读、文本的模式打开。
f.read().rstrip('\n').split('\n')里,read()是指一次性读取全部内容,速度很快,适用于内容较少的时候;rstrip()是指删除头和尾的字符,并且返回字符串的副本;split()是指通过指定分隔符对字符串进行切片,这里的'\n'是换行符。
2、模型参数的设置:
## 构建网络
net = cv2.dnn_DetectionModel(weightsPath,configPath)
net.setInputSize(320, 320)
net.setInputScale(1.0/ 127.5)
net.setInputMean((127.5, 127.5, 127.5))
net.setInputSwapRB(True)- net.setInputSize: 输入尺寸的大小。这个大小是训练的时候设定的,可以在配置文件里面找到。
- net.setInputScale:设置帧(图像)的比例因子值。就是使用第二种归一化方式对图像进行处理(后面会说一下归一化的两种方法与适用范围)。
- net.setInputMean:设置帧(图像)的平均值。每一个通道都需要减去这个值。
- net.setInputSwapRB:是否交换第一通道和第三通道。opencv导入的图片格式为BGR,而模型在训练的时候格式都是RGB,所以该参数设置为True,使图像变成RGB格式。
这里说一下归一化的两种方法:
- img/255,范围在[0,1];
- img-mean/mean,范围在[-1,1]。
两种归一化的差别具体请看这个链接里的内容。我个人的总结就是,如果图像的深颜色区域也很重要,那么使用第二种归一化方法。
3、使用对象检测器,在图像上显示物体位置、识别结果、置信度
classIds, confs, bbox = net.detect(img, confThreshold=0.5)
print(classIds,confs,bbox)

if len(classIds) != 0:
    for classId, confidence, box in zip(classIds.flatten(), confs.flatten(), bbox):
        cv2.rectangle(img, box, color=(0, 255, 0), thickness=2)
        cv2.putText(img, classNames[classId-1],(box[0]+10,box[1]+30),
                    cv2.FONT_HERSHEY_SIMPLEX, 1, (0, 255, 0), 2)
        cv2.putText(img, str(round(confidence*100, 2)),(box[0]+200,box[1]+30),
                    cv2.FONT_HERSHEY_SIMPLEX, 1, (0, 255, 0), 2)
net.detect()函数:第一个参数是需要检测识别的图片,第二个是检测识别的阈值。有三个返回值,分别是识别结果、置信度和物体位置信息。三个返回值都是二维数组。
如果置信度超过了阈值0.5,那么三个返回值都不会为空,进入if条件内进行下一步的操作。
这个for循环是想获取返回值里面的内容,因为如果检测到两个物体,那么会有两组返回值,以此类推。又不想写三个for循环语句,那么调用zip()函数。
zip函数里面classIds.flatten(), confs.flatten(), bbox的含义是将classIds和confs换成一维数据给classId和confidence变量里进行保存。
zip()函数将对象中对应的元素打包成一个个元组,然后返回由这些元组组成的列表。
举个简单的例子:
a = [1, 2, 3]
b = [4, 5, 6]
zipped = zip(a,b)
print(list(zipped))
输出结果为:[(1, 4), (2, 5), (3, 6)]。
因此,现在classId里是一个物体的ID,即识别结果;confidence是那个物体的置信度;box是那个物体的位置信息(左上角横坐标,左上角纵坐标,宽,高)。
cv2.rectangle():在图像上画出矩形框函数。不作过多解释。
cv2.putText():在图像放置文本函数。这里需要注意一下,使用net.detect()函数进行物体识别的时候,ID索引的起始值是从1开始的,也就是classId最小值为1。而程序的索引都是从0开始的,所以classNames[classId-1]这里需要-1。
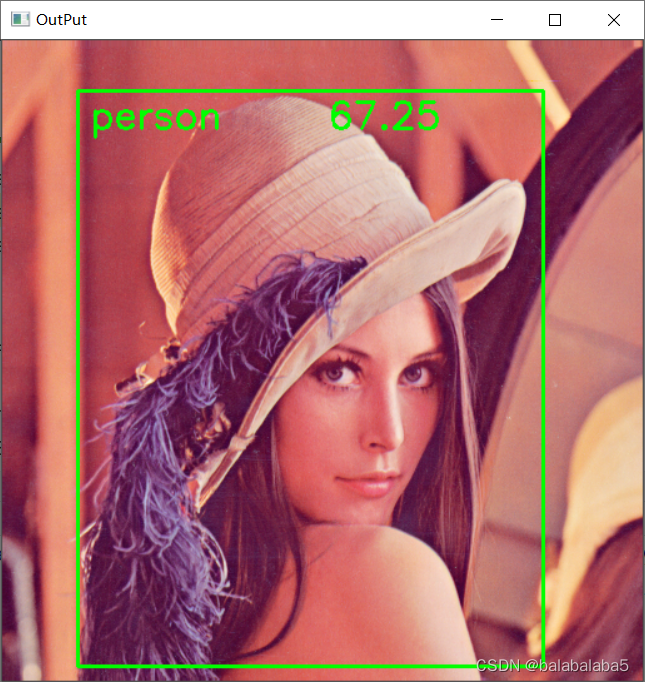
最终图片的识别结果:
完整代码:
import cv2

img = cv2.imread('lena.png')

classNames = []
classFile = 'coco.names'
with open(classFile, 'rt') as f:
    classNames = f.read().rstrip('\n').split('\n')
print(classNames)

configPath = 'ssd_mobilenet_v3_large_coco_2020_01_14.pbtxt'
weightsPath = 'frozen_inference_graph.pb'

net = cv2.dnn_DetectionModel(weightsPath,configPath)
net.setInputSize(320, 320)
net.setInputScale(1.0/ 127.5)
net.setInputMean((127.5, 127.5, 127.5))
net.setInputSwapRB(True)

classIds, confs, bbox = net.detect(img, confThreshold=0.5)
print(classIds,confs,bbox)

if len(classIds) != 0:
    for classId, confidence, box in zip(classIds.flatten(), confs.flatten(), bbox):
        cv2.rectangle(img, box, color=(0, 255, 0), thickness=2)
        cv2.putText(img, classNames[classId-1],(box[0]+10,box[1]+30),
                    cv2.FONT_HERSHEY_SIMPLEX, 1, (0, 255, 0), 2)
        cv2.putText(img, str(round(confidence*100, 2)),(box[0]+200,box[1]+30),
                    cv2.FONT_HERSHEY_SIMPLEX, 1, (0, 255, 0), 2)


cv2.imshow('OutPut', img)
cv2.waitKey(0)
实时检测识别物体:
这个和前面对图像进行检测识别的类似,只需要打开摄像头捕获图像就行。
完整代码:
import cv2

# img = cv2.imread('lena.png')
cap = cv2.VideoCapture(1)
cap.set(3, 640) #摄像头的宽度
cap.set(4, 480) #摄像头的高度
cap.set(10, 100) #摄像头的亮度

classNames = []
classFile = 'coco.names'
with open(classFile, 'rt') as f:
    classNames = f.read().rstrip('\n').split('\n')
print(classNames)

configPath = 'ssd_mobilenet_v3_large_coco_2020_01_14.pbtxt'
weightsPath = 'frozen_inference_graph.pb'

net = cv2.dnn_DetectionModel(weightsPath,configPath)
net.setInputSize(320, 320)
net.setInputScale(1.0/ 127.5)
net.setInputMean((127.5, 127.5, 127.5))
net.setInputSwapRB(True)

while True:
    success, img = cap.read()
    classIds, confs, bbox = net.detect(img, confThreshold=0.5)

    if len(classIds) != 0:
        for classId, confidence, box in zip(classIds.flatten(), confs.flatten(), bbox):
            cv2.rectangle(img, box, color=(0, 255, 0), thickness=2)
            cv2.putText(img, classNames[classId-1],(box[0]+10,box[1]+30),
                        cv2.FONT_HERSHEY_SIMPLEX, 1, (0, 255, 0), 2)
            cv2.putText(img, str(round(confidence*100, 2)),(box[0]+200,box[1]+30),
                        cv2.FONT_HERSHEY_SIMPLEX, 1, (0, 255, 0), 2)


    cv2.imshow('OutPut', img)
    if cv2.waitKey(1) & 0xFF == ord('q'):
        break
实验结果:

会发现这个绿色的框十分不稳定,有时有重叠的物体时,没有办法确定这个识别结果到底是什么。
接下来使用非极大值抑制(NMS)的方法,使得检测识别的结果更加平滑。
SSD算法结构最突出的一个特点之一就是会保留每个特征层里面的候选框,然后对每个候选框进行预测,总共会产生上千个候选框。所以在使用SSD算法的时候,得采用非极大值抑制的方法对模型进行优化。
非极大值抑制(NMS)
1、调用函数
indices = cv2.dnn.NMSBoxes(bbox,confs, 0.5, nms_threshold=nms_thres=0.2)opencv里面有直接的函数进行非极大值抑制。
cv2.dnn.NMSBoxes():从左到右的参数分别是边界框的位置信息(格式需要是List的数据类型)、置信度(格式需要是float类型的List)、使用对象检测器是设置的阈值、非最大抑制的阈值(这个阈值越小,将减少更多的候选框)。
2、更改bbox和confs的数据类型
    bbox = list(bbox)
    confs = list(np.array(confs).reshape(1,-1)[0])
    confs = list(map(float,confs))
更改结束之后才能调用cv2.dnn.NMSBoxes()函数。
3、在视频上显示边界位置、识别结果
调用完函数之后已经做到了抑制候选框的效果,也就是使检测到的物体位置和结果更加平滑,不会出现识别两个结果从而闪烁了。
剩下的这些代码就是让视频的图像可以显示边界位置和识别结果。
## indices是识别结果,且是二维数组。比如[[0]]
for i in indices:
        i = i[0]    # 想获得一维数组,所以就是i[0]了
        box = bbox[i]
        x,y,w,h = box[0],box[1],box[2],box[3]
        cv2.rectangle(img, (x,y), (x+w,y+h), color=(0, 255, 0), thickness=2)
        cv2.putText(img, classNames[classIds[i][0]-1],(box[0]+10,box[1]+30),
                    cv2.FONT_HERSHEY_SIMPLEX, 1, (0, 255, 0), 2)
实验结果:

完整代码:
import cv2
import numpy as np

thres = 0.45
nms_thres = 0.2

# img = cv2.imread('lena.png')
cap = cv2.VideoCapture(1)
cap.set(3, 640) #摄像头的宽度
cap.set(4, 480) #摄像头的高度
cap.set(10, 100) #摄像头的亮度

classNames = []
classFile = 'coco.names'
with open(classFile, 'rt') as f:
    classNames = f.read().rstrip('\n').split('\n')

configPath = 'ssd_mobilenet_v3_large_coco_2020_01_14.pbtxt'
weightsPath = 'frozen_inference_graph.pb'

net = cv2.dnn_DetectionModel(weightsPath,configPath)
net.setInputSize(320, 320)
net.setInputScale(1.0/127.5)
net.setInputMean((127.5, 127.5, 127.5))
net.setInputSwapRB(True)

while True:
    success, img = cap.read()
    classIds, confs, bbox = net.detect(img, confThreshold=thres)  # 设置的阈值
    bbox = list(bbox)
    confs = list(np.array(confs).reshape(1,-1)[0])
    confs = list(map(float,confs))

    indices = cv2.dnn.NMSBoxes(bbox,confs, thres, nms_threshold=nms_thres)
    print(indices)

    for i in indices:
        i = i[0]
        box = bbox[i]
        x,y,w,h = box[0],box[1],box[2],box[3]
        cv2.rectangle(img, (x,y), (x+w,y+h), color=(0, 255, 0), thickness=2)
        cv2.putText(img, classNames[classIds[i][0]-1],(box[0]+10,box[1]+30),
                    cv2.FONT_HERSHEY_SIMPLEX, 1, (0, 255, 0), 2)

    cv2.imshow('OutPut', img)
    if cv2.waitKey(1) & 0xFF == ord('q'):
        break
遇到的错误及解决:
cv2.error: OpenCV(4.2.0) C:\projects\opencv-python\opencv\modules\dnn\src\dnn.cpp:562: error: (-2:Unspecified error) Can't create layer "FeatureExtractor/MobilenetV3/Conv/hard_swish/add" of type "AddV2" in function 'cv::dnn::dnn4_v20191202::LayerData::getLayerInstance'解决方案:
把opencv卸了然后重新安装最新版本。但我这边最新版本它不能关键字提示,所以我后来下的是4.5.1.48版本。
pip install opencv-python==4.5.1.48 -i https://pypi.tuna.tsinghua.edu.cn/simple


 919
919


 被折叠的 条评论
为什么被折叠?
被折叠的 条评论
为什么被折叠?
 到【灌水乐园】发言


