


12-生命周期
文章目录
1.前言
需求:实现一个自动减少透明度的文本效果
效果如下:
首先我们可以通过在Vue实例的外部添加一个定时器来控制Vue实例中透明度数值的变化
<!-- 以下说明页面的代码如同 -->
<div id="root" :x="x">
    <h2>n的值为:{{n}}</h2>
    <button @click="add">点我n+1</button>
    <button @click="bye">点我销毁vm</button>
</div>
new Vue({
    el:'#root',
    data:{
        //透明度值
        opacity:1,
    },
})
// 外部的定时器
setInterval(() => {
    vm.opacity-=0.01;
    if (vm.opacity<=0) {
        vm.opacity=1
    }
}, 16);
但是这样写不符合Vue整体的写法,不利于后期维护
这时我们可以使用Vue中的生命周期中的mounted钩子函数
const vm=new Vue({
    el:'#root',
    data:{
        opacity:1,
    },
    //Vue完成模板的解析并把初始的真实DOM元素放入页面后(挂载完毕)调用mounted
    mounted(){
        setInterval(() => {
            this.opacity-=0.01;
            if (this.opacity<=0) {
                this.opacity=1
            }
        }, 16);
    },
})
2.生命周期
1.又名为:生命周期回调函数、生命周期函数、生命周期钩子。
2.是什么:Vue在关键时刻帮我们调用的一些特殊名称的函数。
3.生命周期函数的名字不可更改,但函数的具体内容是程序员根据需求编写的。
4.生命周期函数中的this指向是vm或组件实例对象。
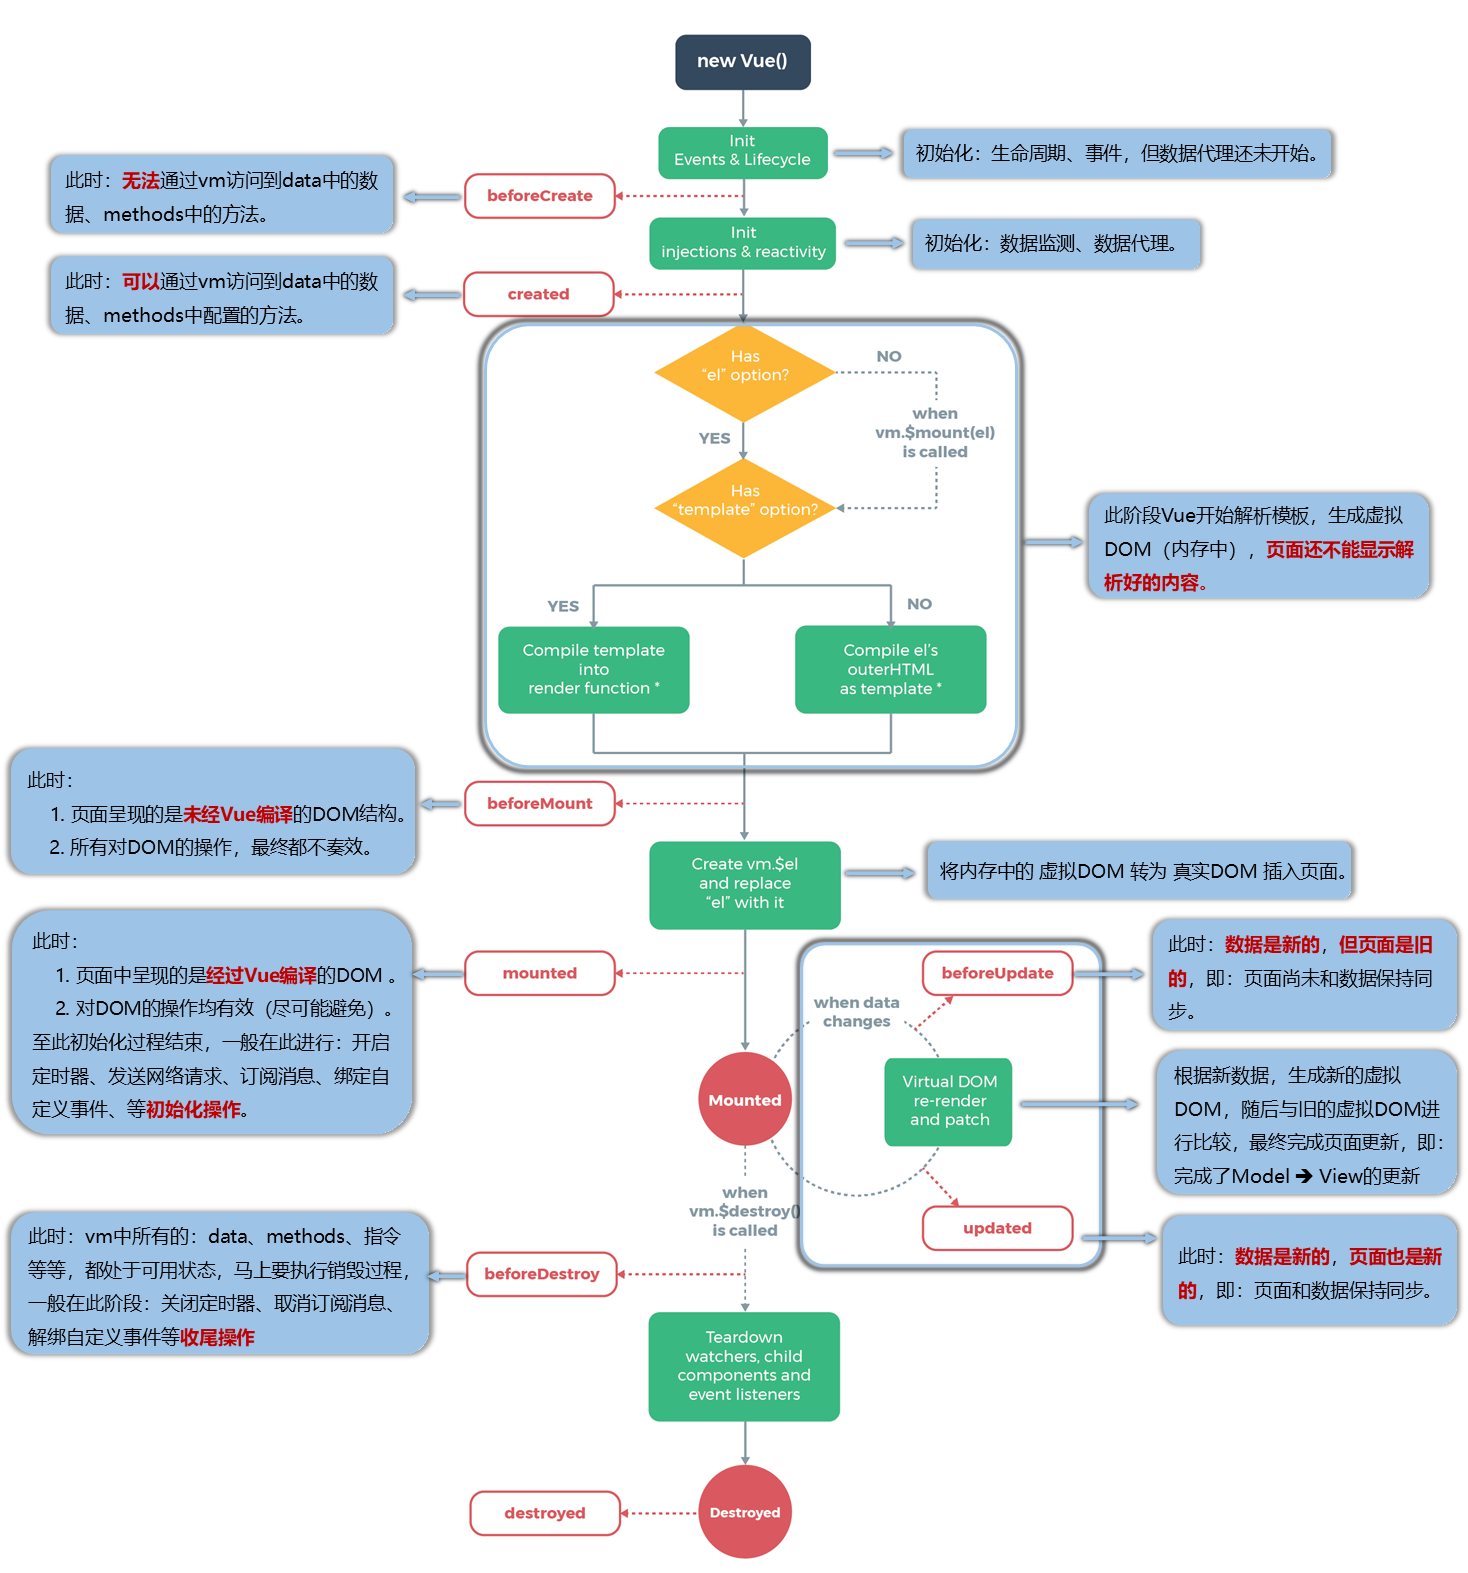
3.分析生命周期
1).创建阶段(数据代理,数据监测的创建)

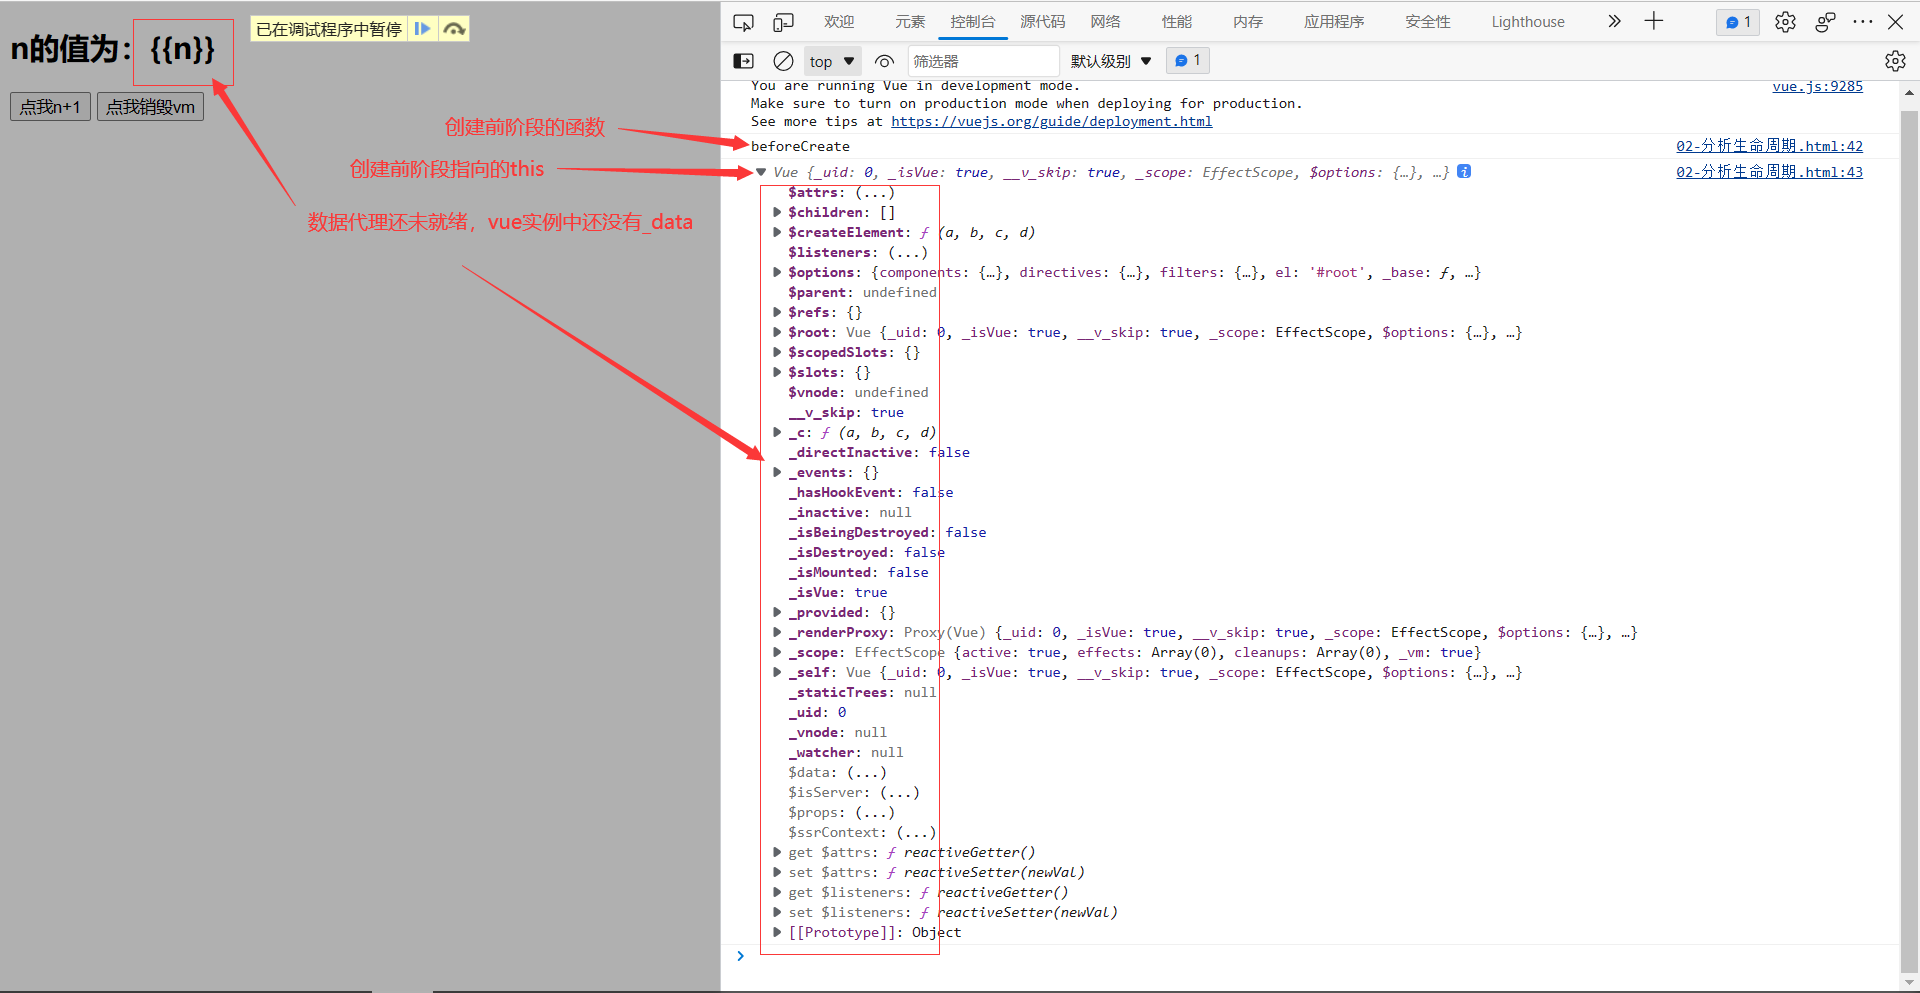
①.创建前阶段(beforeCreate)
beforeCreate(){
    console.log("beforeCreate");
    console.log(this);
    debugger;//断点
},
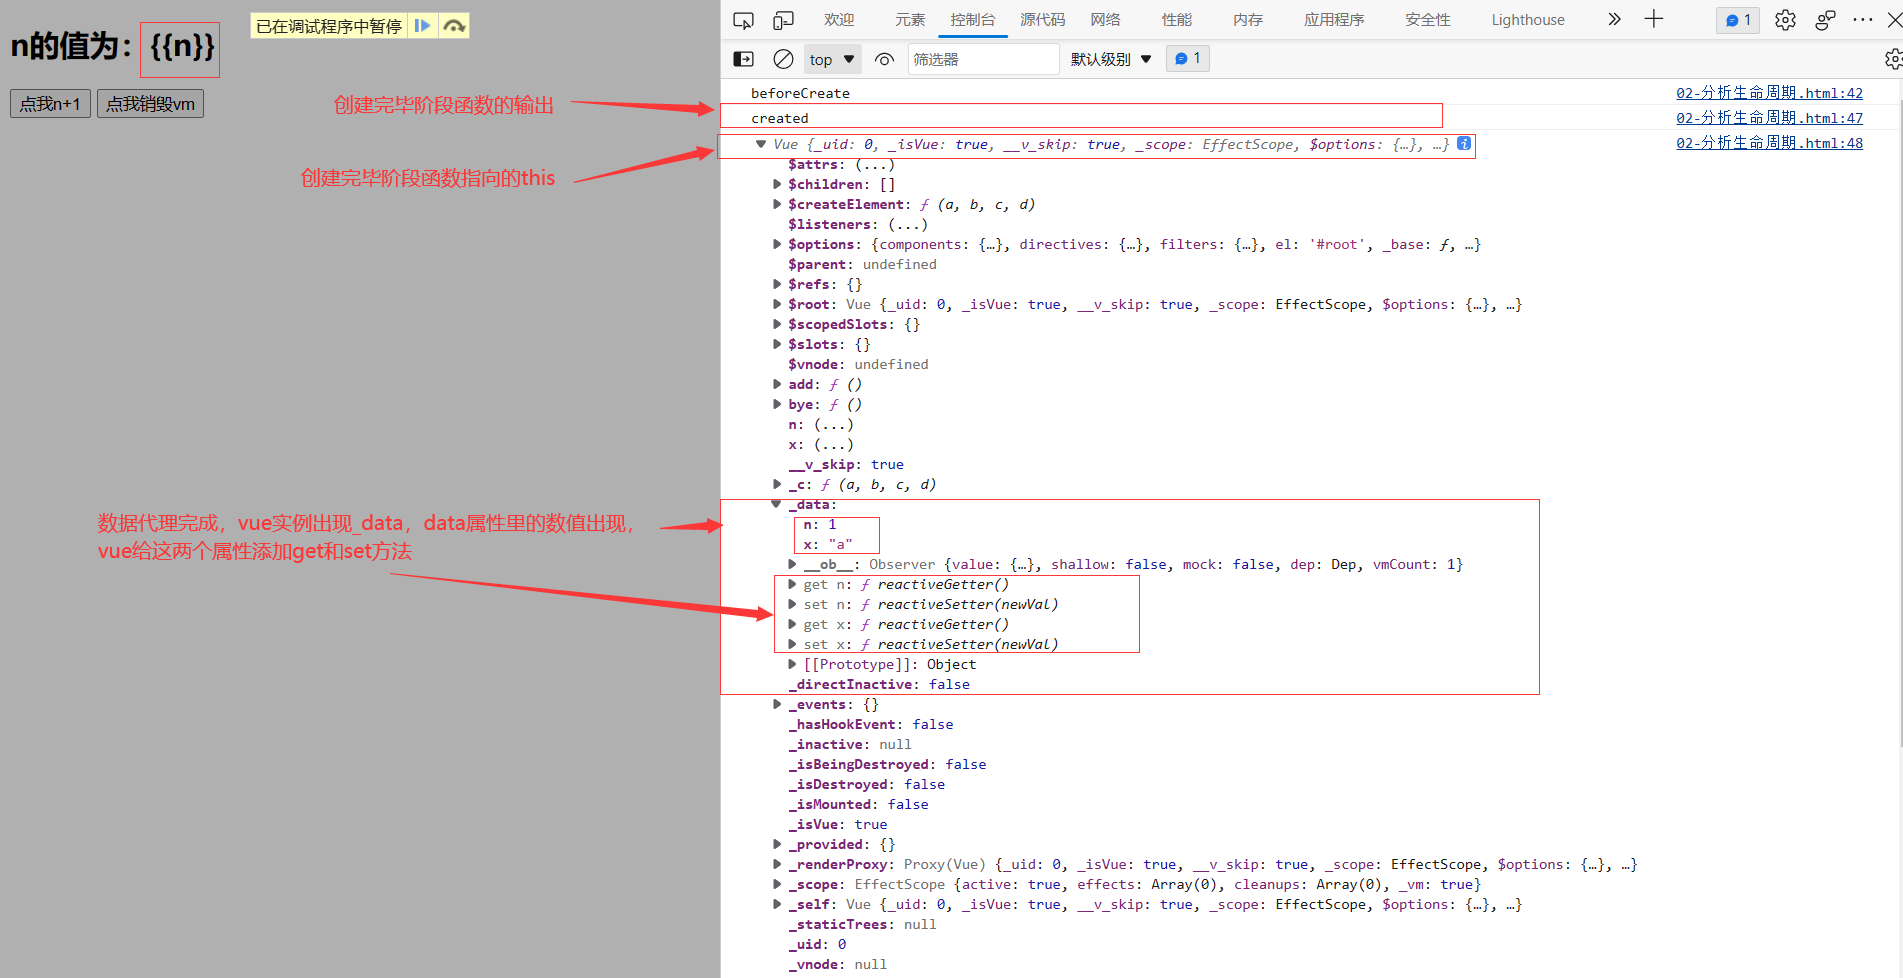
②.创建完成阶段(created)
created() {
    console.log("created");
    console.log(this);
    debugger;//断点
},
2).解析模版(VUE中处于创建阶段和挂在阶段之间的行为)
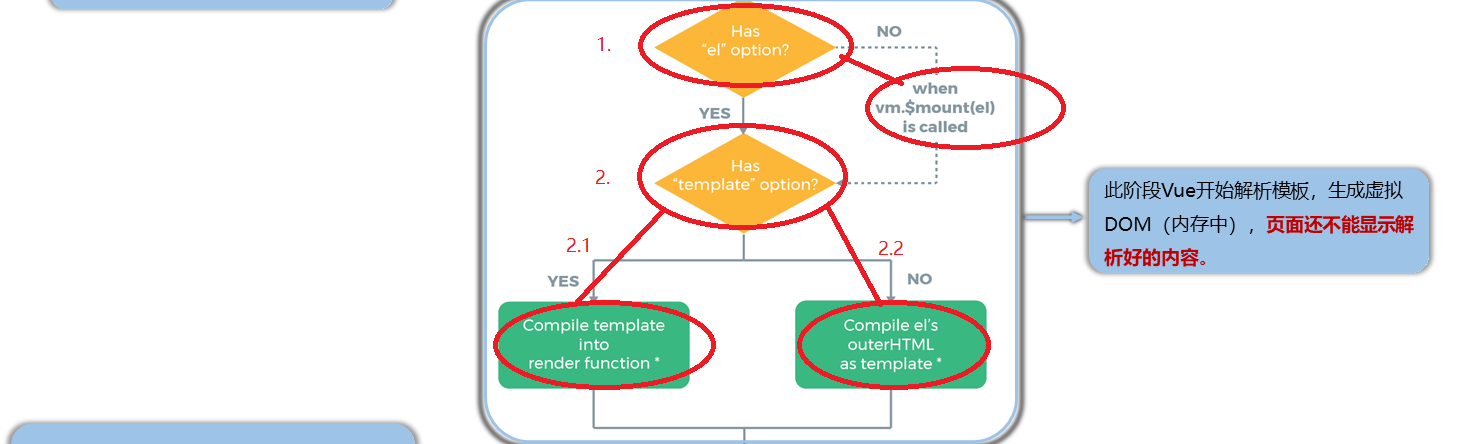
①.检查是否绑定了容器
VUE会先判断Vue实例中是否有设置所绑定的DOM元素容器,如果有即进行第2步,没有需要通过vm.$mount(el)方法来设置Vue实例所绑定的DOM元素容器,否则不会将Vue实例中的数据渲染在网页上
new Vue({
	//没有设置el属性
    data:{
        n:1,
        x:'a',
    },
})

可以发现当没有在控制台输入vm.$mount(‘#root’)时,网页显示的内容就是为纯文本,并没有与Vue实例产生关联,{{n}}展示在页面上仍是纯文本的{{n}},并没有渲染成‘1’。
②.检查是否设置template属性
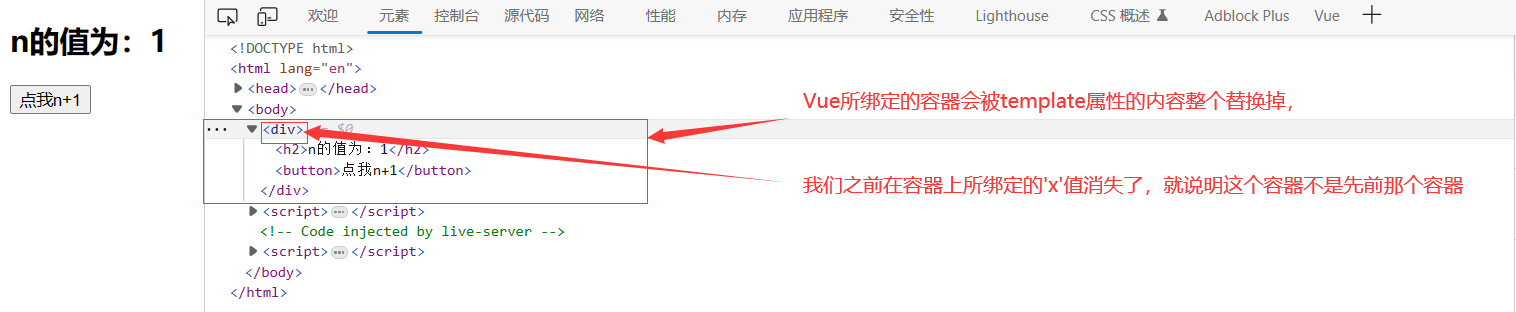
a.有设置template属性
template属性里面的内容将会作为模版整个替换掉Vue实例所绑定的容器
<div id="root" :x="x">
	<h2>n的值为:{{n}}</h2>
	<button @click="add">点我n+1</button>
	<button @click="bye">点我销毁vm</button>
</div>
<script>
    Vue.config.productionTip=false;
    const vm=new Vue({
        el:'#root',
        template:`
            <div>
                <h2>n的值为:{{n}}</h2>
                <button @click="add">点我n+1</button>
    		</div>
        `,  //必须包在一个容器中,不然会报错;将此作为模版,并且整个替代上面的容器
        data:{
            n:1,
            x:'a',
        },
    })
</script>
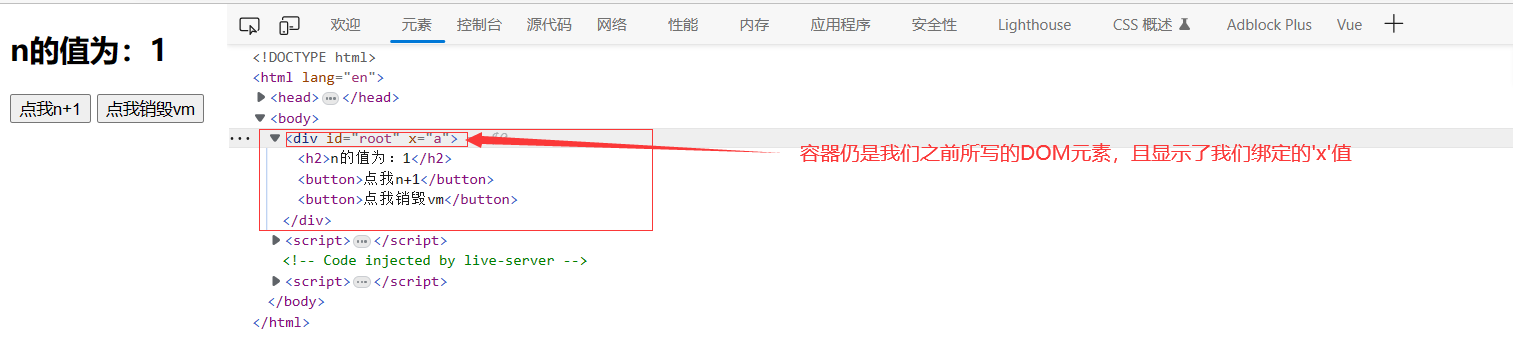
b.没有设置template属性
Vue会将el属性所绑定的容器作为外壳容器,将Vue实例中的数据渲染在对应的标签位置
<div id="root" :x="x">
	<h2>n的值为:{{n}}</h2>
	<button @click="add">点我n+1</button>
	<button @click="bye">点我销毁vm</button>
</div>
<script>
    Vue.config.productionTip=false;
    const vm=new Vue({
        el:'#root',
        data:{
            n:1,
            x:'a',
        },
    })
</script>
3).挂载阶段

①.挂载前阶段(beforeMount)
beforeMount() {
    console.log("beforeMount");
    document.querySelector('h2').innerText='哈哈'    //无效
    console.log(this);
    debugger;//断点
},

可以发现当我们取消断点继续执行程序后,我们修改的DOM元素会立刻被Vue的渲染覆盖掉

②.挂载完毕阶段(mounted)
mounted() {
    console.log("mounted");
    document.querySelector('h2').innerText='哈哈'    //有效
    console.log(this);
    debugger;//断点
    console.log(this.$el instanceof HTMLElement);   //判断vm.$el是不是真实DOM元素
},

可以发现当我们在挂载完毕阶段修改的DOM元素并不会被Vue的渲染所覆盖

4).更新阶段
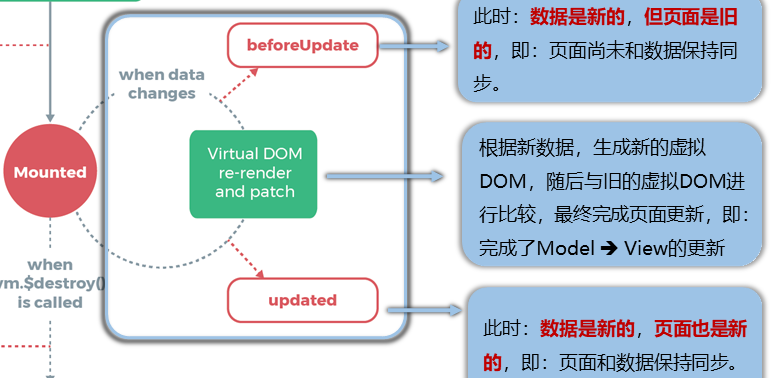
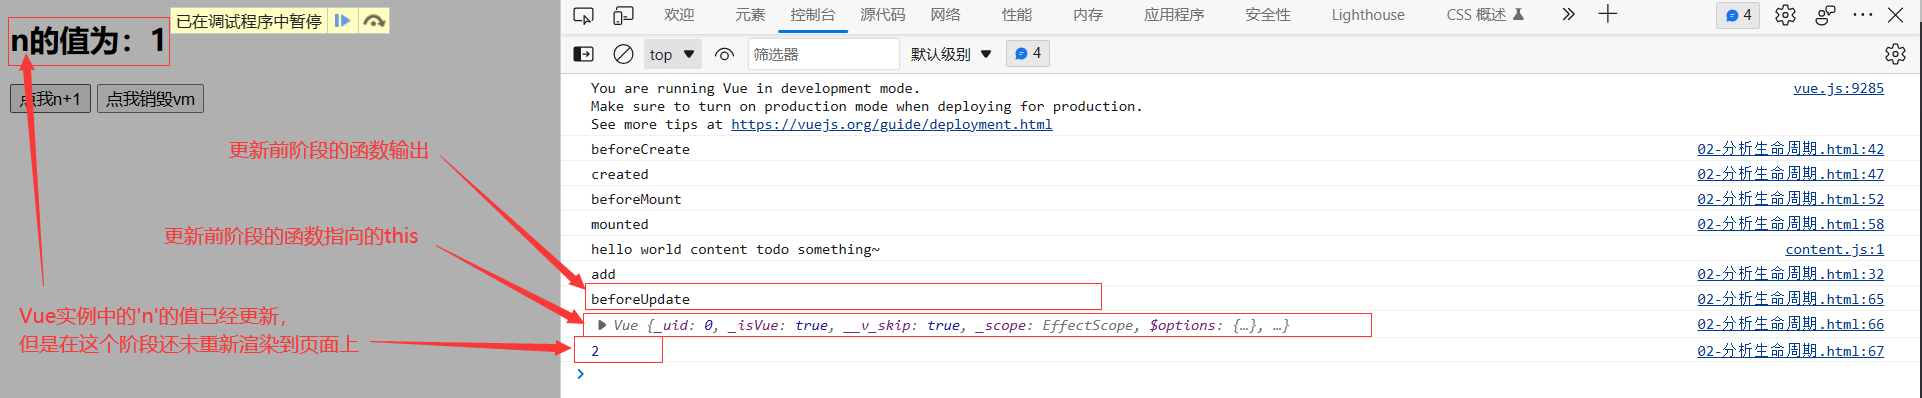
①.更新前的阶段(beforeUpdate)
beforeUpdate() {
    console.log("beforeUpdate");
    console.log(this);
    console.log(this.n);
    debugger;
},
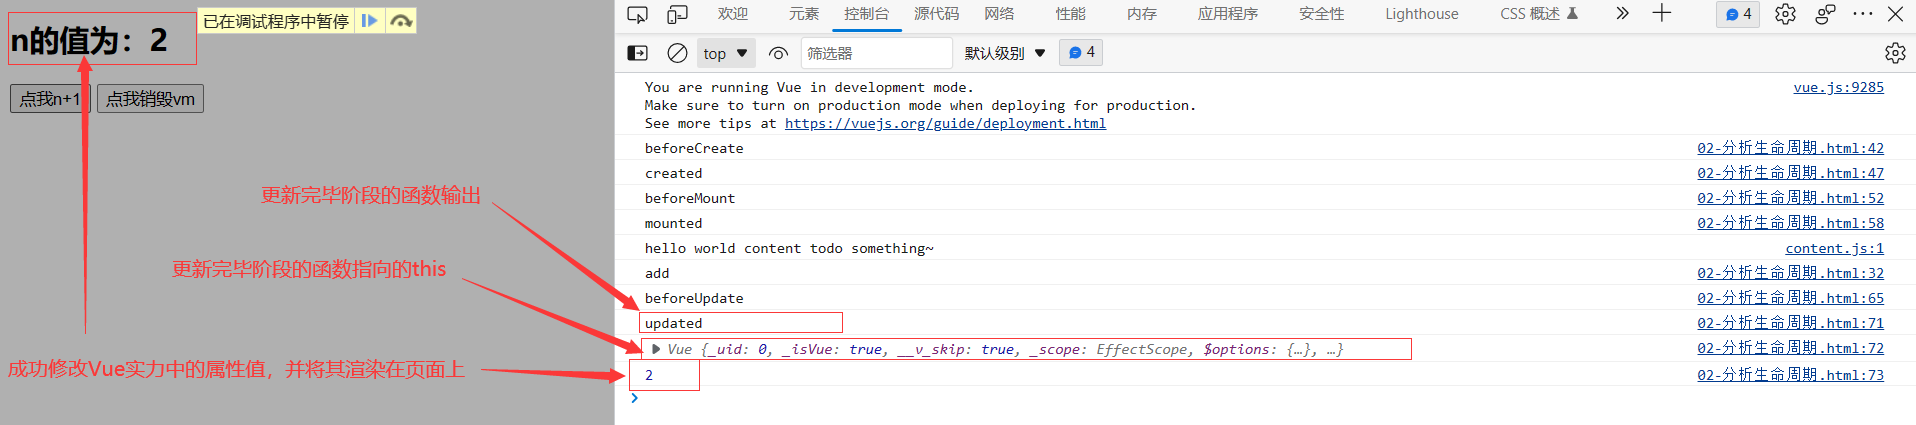
②.更新完毕的阶段(updated)
updated() {
    console.log("updated");
    console.log(this);
    console.log(this.n);
    debugger;
},
5).销毁阶段
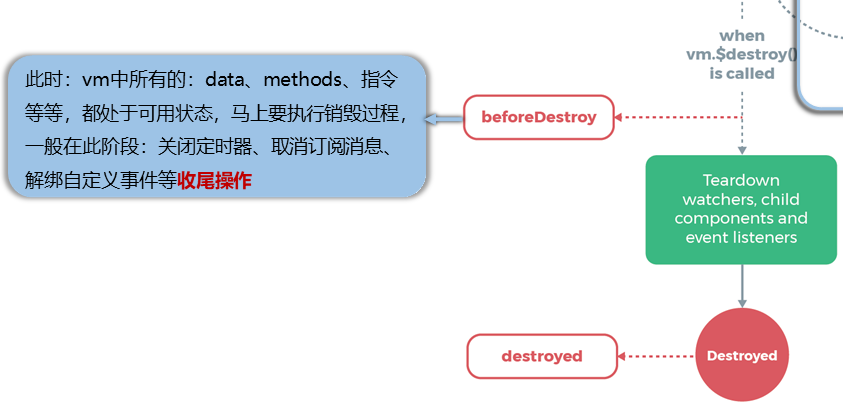
①.销毁前的阶段(beforeDestroy)
methods: {
add(){
console.log('add');
this.n++;
},
bye(){
console.log('bye');
this.$destroy()
},
},
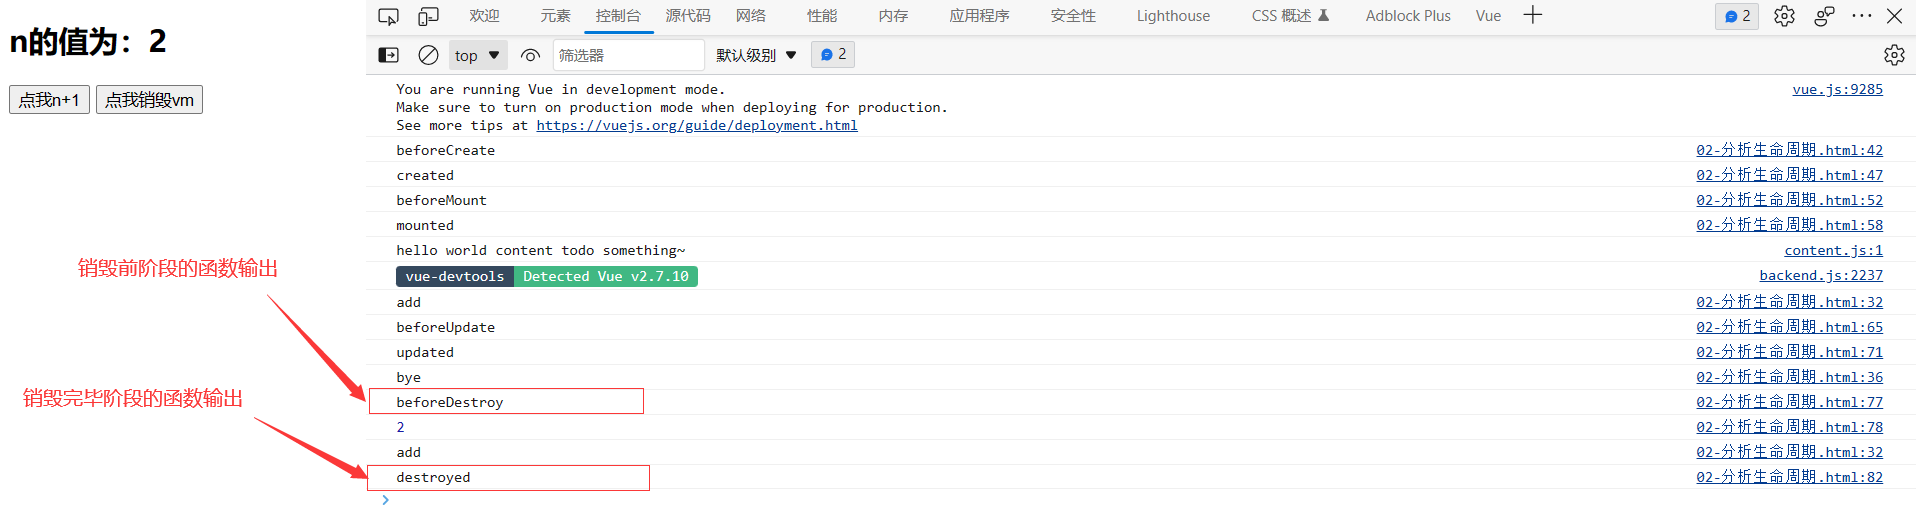
beforeDestroy() {
console.log("beforeDestroy");
console.log(this.n);
this.add(); //vm销毁后,所有事件都停止生效
},
可以发现当销毁掉Vue实例后,实例对象中带有的事件就不能生效了

当Vue实例销毁后,VUE开发工具中的实例也会清除

②.销毁完毕的阶段(destroyed)
destroyed() {
    console.log("destroyed");
},
当Vue实例销毁后,VUE开发工具中的实例也会清除
②.销毁完毕的阶段(destroyed)
destroyed() {
    console.log("destroyed");
},


 257
257


 被折叠的 条评论
为什么被折叠?
被折叠的 条评论
为什么被折叠?
 到【灌水乐园】发言


