


03-React的生命周期
1.引入生命周期
需求:定义组件实现以下功能:
- 让指定的文本做显示 / 隐藏的渐变动画
- 从完全可见,到彻底消失,耗时2S
- 点击“小时”按钮从界面中卸载组件

实现:
-
创建基础结构的类式组件
//  1.创建函数式组件
class Left extends React.Component {
    // renderi调用的时机:初始化渲染、状态更新之后
    render() {
        return (
            <div>
                <h2>React学不会怎么办?</h2>
                <button>消失</button>
            </div>
        )
    }
};
//  2.渲染组件到页面
ReactDOM.render(<Left />, document.getElementById('test'));
给
h2标签添加透明度属性,并将透明度的数值初始化在状态中class Left extends React.Component { state = { opacity: 1 } render() { return ( <div> <h2 style={{ opacity: this.state.opacity }}>React学不会怎么办?</h2> <button>消失</button> </div> ) } };为
button标签绑定点击事件,使得可以控制组件的销毁class Left extends React.Component { state = { opacity: 1 } death = () => { // 卸载组件 ReactDOM.unmountComponentAtNode(document.getElementById('test')) } render() { return ( <div> <h2 style={{ opacity: this.state.opacity }}>React学不会怎么办?</h2> <button onClick={this.death}>消失</button> </div> ) } };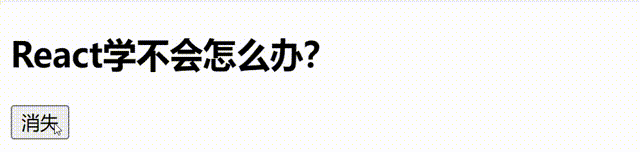
-
控制组件的透明度
为组件添加一个开始变化透明度的按钮
//  1.创建函数式组件
        class Left extends React.Component {
            state = {
                opacity: 1
            }
            death = () => {
                // 清除定时器
                // clearInterval(this.timer);
                // 卸载组件
                ReactDOM.unmountComponentAtNode(document.getElementById('test'))
            }
            // renderi调用的时机:初始化渲染、状态更新之后
            render() {
                return (
                    <div>
                        <h2 style={{ opacity: this.state.opacity }}>React学不会怎么办?</h2>
                        <button onClick={this.death}>消失</button>
                        <button onClick={this.action}>开始变化</button>
                    </div>
                )
            }
        };
为‘开始变化’按钮添加控制透明度变化的事件
//  1.创建函数式组件
        class Left extends React.Component {
            state = {
                opacity: 1
            }
            death = () => {
                // 清除定时器
                clearInterval(this.timer);
                // 卸载组件
                ReactDOM.unmountComponentAtNode(document.getElementById('test'))
            }
            action = () => {
                setInterval(() => {
                    //获取原状态
                    let { opacity } = this.state;
                    // 减小0.1
                    opacity -= 0.1
                    if (opacity <= 0) opacity = 1
                    // 设置新的透明度
                    this.setState({ opacity })
                }, 200)
            }
            // renderi调用的时机:初始化渲染、状态更新之后
            render() {
                return (
                    <div>
                        <h2 style={{ opacity: this.state.opacity }}>React学不会怎么办?</h2>
                        <button onClick={this.death}>消失</button>
                        <button onClick={this.action}>开始变化</button>
                    </div>
                )
            }
        };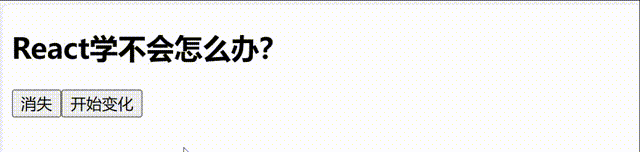
-
那有没有可能能够让组件一开始就自动变化透明度呢?——使用React中的生命周期
componentDidMount生命周期:组件挂载完毕后的的生命周期钩子// 1.创建函数式组件 class Left extends React.Component { state = { opacity: 1 } // 组件挂载完毕 componentDidMount() { // console.log('@'); this.timer= setInterval(() => { //获取原状态 let { opacity } = this.state; // 减小0.1 opacity -= 0.1 if (opacity <= 0) opacity = 1 // 设置新的透明度 this.setState({ opacity }) }, 200) } // renderi调用的时机:初始化渲染、状态更新之后 render() { return ( <div> <h2 style={{ opacity: this.state.opacity }}>React学不会怎么办?</h2> <button onClick={this.death}>消失</button> </div> ) } };
-
当销毁掉组件后,需要一并将定时器销毁掉,这时就可以使用React中的销毁前生命周期
componentWillUnmount生命周期:组件销毁前的生命周期// 1.创建函数式组件 class Left extends React.Component { state = { opacity: 1 } death = () => { // 卸载组件 ReactDOM.unmountComponentAtNode(document.getElementById('test')) } // 组件挂载完毕 componentDidMount() { // console.log('@'); this.timer= setInterval(() => { //获取原状态 let { opacity } = this.state; // 减小0.1 opacity -= 0.1 if (opacity <= 0) opacity = 1 // 设置新的透明度 this.setState({ opacity }) }, 200) } // 组件将要卸载 componentWillUnmount(){ // 清除定时器 clearInterval(this.timer); } // renderi调用的时机:初始化渲染、状态更新之后 render() { return ( <div> <h2 style={{ opacity: this.state.opacity }}>React学不会怎么办?</h2> <button onClick={this.death}>消失</button> </div> ) } };
2.React的旧生命周期
1).理解:
- 组件从创建到死亡它会经历一些特定的阶段。
- React组件中包含一系列勾子函数(生命周期回调函数), 会在特定的时刻调用。
- 我们在定义组件时,会在特定的生命周期回调函数中,做特定的工作。
2).生命周期流程图(旧):
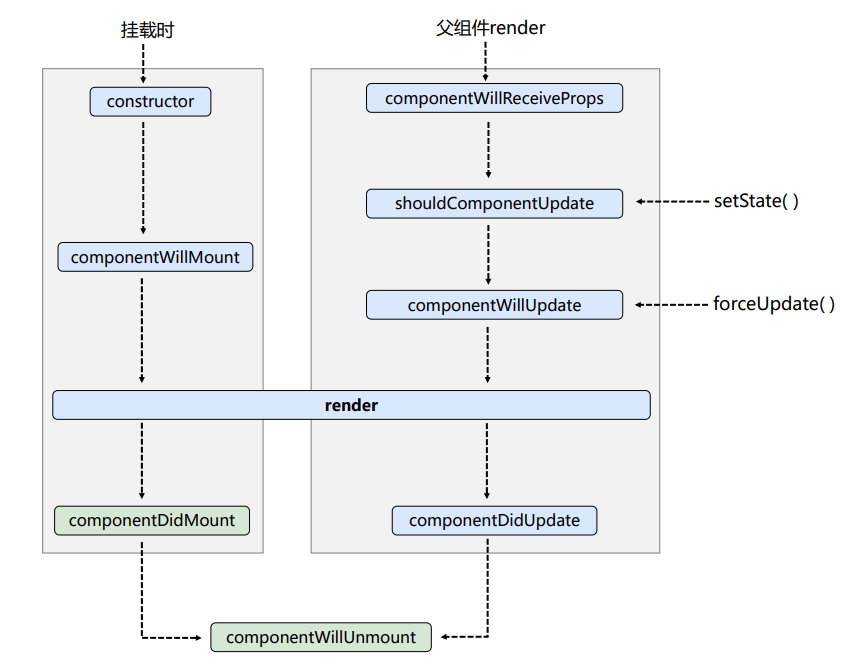
3).生命周期的三个阶段(旧):
a.初始化阶段:
由ReactDOM.render()触发—初次渲染
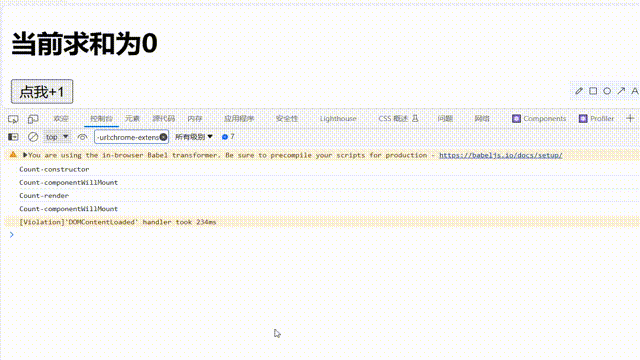
1.constructor()
2.componentwillMount()
3.render()
4.componentDidMount() ====>常用:一般在这个钩子函数做一些初始化的事,例如:开启定时器、发送网络请求、订阅消息
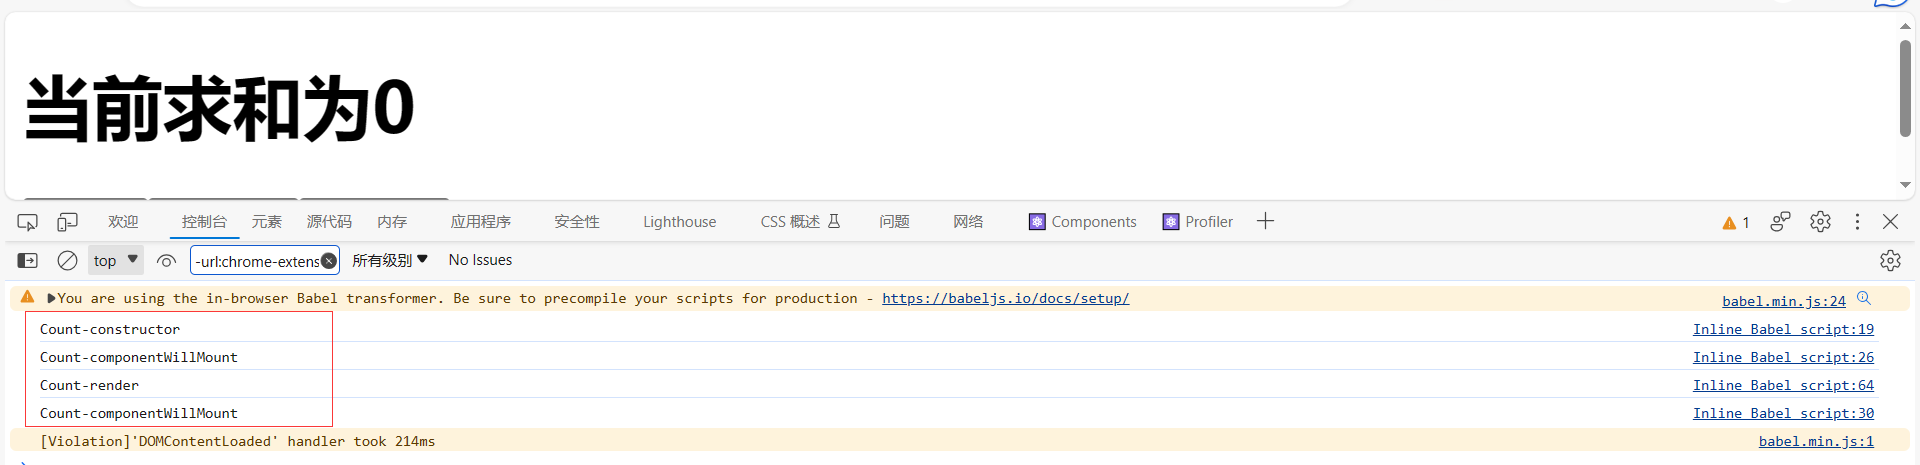
//  1.创建函数式组件
        class Count extends React.Component {
            constructor(props){
                console.log('Count-constructor');
                super(props)
                // 初始化状态
                this.state={count:0}
            }
            // 组件将要挂载的钩子
            componentWillMount(){
                console.log('Count-componentWillMount');
            }
            // 组件挂载完毕的钩子
            componentDidMount(){
                console.log('Count-componentWillMount');
            }
            render() {
                console.log('Count-render');
                return (
                    <div>
                       <h2>当前求和为{this.state.count}</h2>
                    </div>
                )
            }
        };
b.更新阶段:
由组件内部this.setState()或父组件render触发
1.shouldComponentUpdate()
2.componentwillUpdate()
3.render() ====>必须使用的一个
4.componentDidUpdate()
①.由组件内部this.setState()触发
//  1.创建函数式组件
        class Count extends React.Component {
            constructor(props){
                console.log('Count-constructor');
                super(props)
                // 初始化状态
                this.state={count:0}
            }
            // 组件将要挂载的钩子
            componentWillMount(){
                console.log('Count-componentWillMount');
            }
            // 组件挂载完毕的钩子
            componentDidMount(){
                console.log('Count-componentWillMount');
            }
            // 控制组件更新的“阀门”
            shouldComponentUpdate(){
                console.log('Count-shouldComponentUpdate');
                return true
            }
            // 组件将要更新的钩子
            componentWillUpdate(){
                console.log('Count-componentWillUpdate');
            }
            // 组件更新完毕的钩子
            componentDidUpdate(){
                console.log('Count-componentDidUpdate');
            }
            add=()=>{
                const {count}=this.state;
                this.setState({count:count+1})
            }
            // 卸载组件的按钮的回调
            death=()=>{
                // 卸载组件
                ReactDOM.unmountComponentAtNode(document.getElementById('test'))
            }
            render() {
                console.log('Count-render');
                return (
                    <div>
                       <h1>当前求和为{this.state.count}</h1>
                       <button onClick={this.add}>点我+1</button>
                    </div>
                )
            }
        };
注意点:
-
shouldComponentUpdate的生命周期函数需要返回一个为ture的值,不能为false,否则组件不会更新视图// 1.创建函数式组件 class Count extends React.Component { constructor(props){ console.log('Count-constructor'); super(props) // 初始化状态 this.state={count:0} } // 组件将要挂载的钩子 componentWillMount(){ console.log('Count-componentWillMount'); } // 组件挂载完毕的钩子 componentDidMount(){ console.log('Count-componentWillMount'); } // 控制组件更新的“阀门” shouldComponentUpdate(){ console.log('Count-shouldComponentUpdate'); return false } // 组件将要更新的钩子 componentWillUpdate(){ console.log('Count-componentWillUpdate'); } // 组件更新完毕的钩子 componentDidUpdate(){ console.log('Count-componentDidUpdate'); } add=()=>{ const {count}=this.state; this.setState({count:count+1}) } render() { console.log('Count-render'); return ( <div> <h2>当前求和为{this.state.count}</h2> <button onClick={this.add}>点我+1</button> </div> ) } };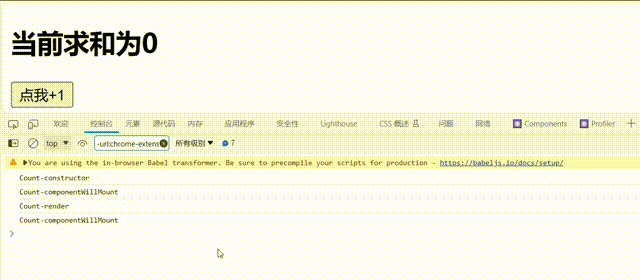
可以看到控制台只输出了
'Count-shouldComponentUpdate并且视图没有更新 -
React的类式组件在创建后,会带有一个
forceUpdate的方法,这个方法可以将组件强制更新// 1.创建函数式组件 class Count extends React.Component { constructor(props){ console.log('Count-constructor'); super(props) // 初始化状态 this.state={count:0} } // 组件将要挂载的钩子 componentWillMount(){ console.log('Count-componentWillMount'); } // 组件挂载完毕的钩子 componentDidMount(){ console.log('Count-componentWillMount'); } // 控制组件更新的“阀门” shouldComponentUpdate(){ console.log('Count-shouldComponentUpdate'); return true } // 组件将要更新的钩子 componentWillUpdate(){ console.log('Count-componentWillUpdate'); } // 组件更新完毕的钩子 componentDidUpdate(){ console.log('Count-componentDidUpdate'); } add=()=>{ const {count}=this.state; this.setState({count:count+1}) } // 强制更新的按钮的回调 force=()=>{ this.forceUpdate() } render() { console.log('Count-render'); return ( <div> <h2>当前求和为{this.state.count}</h2> <button onClick={this.add}>点我+1</button> <button onClick={this.force}>强制更新</button> </div> ) } };
可以看出
forceUpdate这个强制更新组件方法不会经过shouldComponentUpdate这个钩子函数
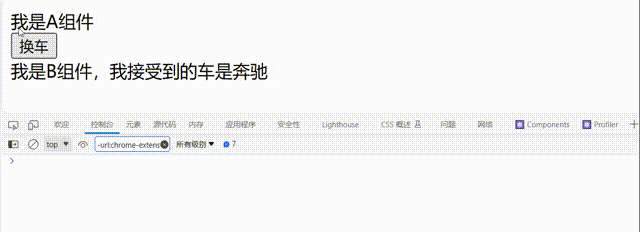
②.由父组件render触发
// 父组件A
class A extends React.Component{
    // 初始化状态
    state={
        carName:'奔驰'
    }
    changeCar=()=>{
        this.setState({carName:'奥拓'})
    }
    render(){
        return(
            <div>
                <div>我是A组件</div>
                <button onClick={this.changeCar}>换车</button>
                <B carName={this.state.carName}/>
            </div>
        )
    }
}
// 子组件B
class B extends React.Component{
    // 控制组件更新的“阀门”
    shouldComponentUpdate(){
        console.log('Count-shouldComponentUpdate');
        return true
    }
    // 组件将要更新的钩子
    componentWillUpdate(){
        console.log('Count-componentWillUpdate');
    }
    // 组件更新完毕的钩子
    componentDidUpdate(){
        console.log('Count-componentDidUpdate');
    }
    render(){
        return(
            <div>我是B组件,我接受到的车是{this.props.carName}</div>
        )
    }
}
//  2.渲染组件到页面
ReactDOM.render(<A />, document.getElementById('test'));
注意点:
-
componentWillReceiveProps生命周期:当组件接收新的props值时触发,且父组件传入的props值会传入到componentWillReceiveProps()函数中// 父组件A class A extends React.Component{ // 初始化状态 state={ carName:'奔驰' } changeCar=()=>{ this.setState({carName:'奥拓'}) } render(){ return( <div> <div>我是A组件</div> <button onClick={this.changeCar}>换车</button> <B carName={this.state.carName}/> </div> ) } } // 子组件B class B extends React.Component{ // 组件将要接收新的props的钩子 componentWillReceiveProps(props){ console.log('B-componentWillReceiveProps',props); } render(){ return( <div>我是B组件,我接受到的车是{this.props.carName}</div> ) } }
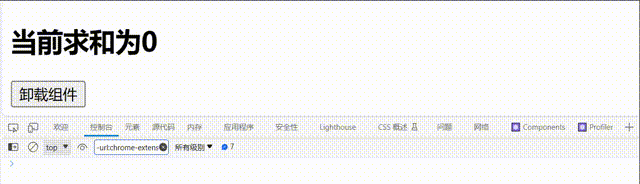
c.卸载组件:
由ReactDOM.unmountComponentAtNode()触发
1.componentwillUnmount()====>常用:般在这个钩子中做一些收尾的事,例如:关闭定时器、取消订阅消息
//  1.创建函数式组件
class Count extends React.Component {
    constructor(props){
        super(props)
        // 初始化状态
        this.state={count:0}
    }
    // 组件将要销毁的钩子
    componentWillUnmount(){
        console.log('Count-componentWillUnmount');
    }
    // 卸载组件的按钮的回调
    death=()=>{
        // 卸载组件
        ReactDOM.unmountComponentAtNode(document.getElementById('test'))
    }
    render() {
        return (
            <div>
                <h2>当前求和为{this.state.count}</h2>
                <button onClick={this.death}>卸载组件</button>
            </div>
        )
    }
};
3.React的新生命周期
1).生命周期流程图(新):
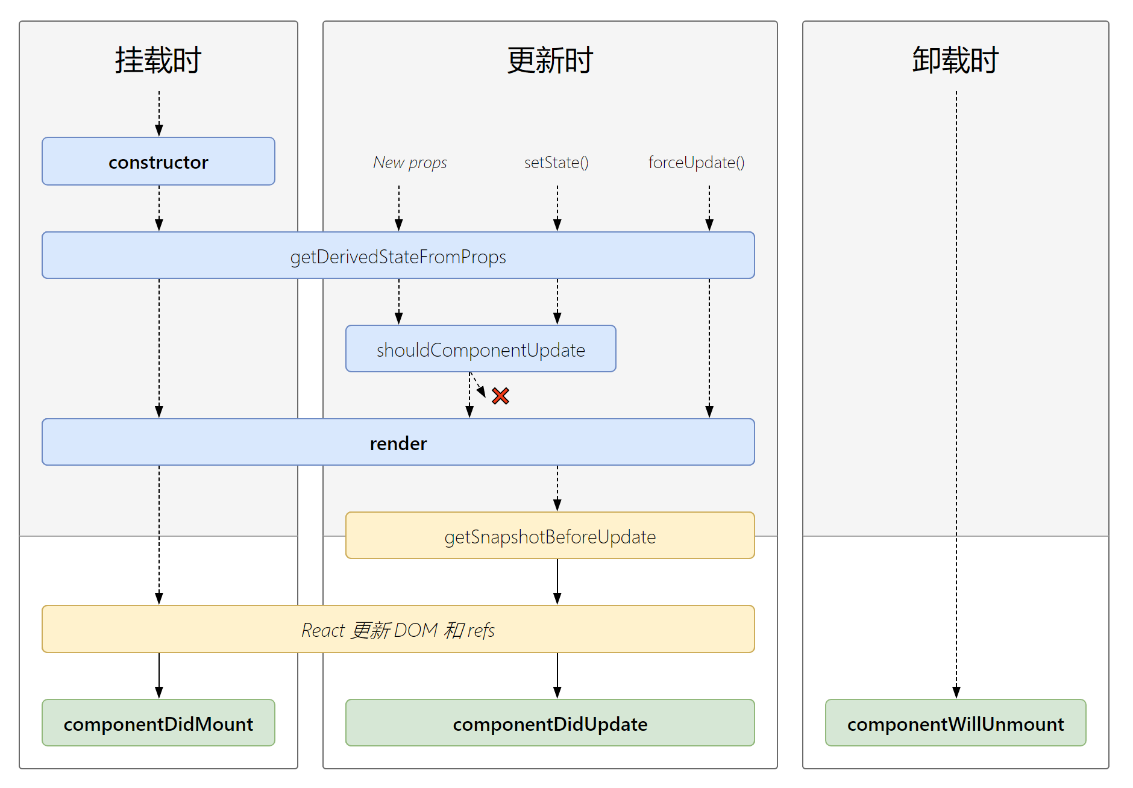
2).生命周期的三个阶段(新):
a.初始化阶段: 由ReactDOM.render()触发——初次渲染
-
constructor() -
getDerivedStateFromProps -
render() -
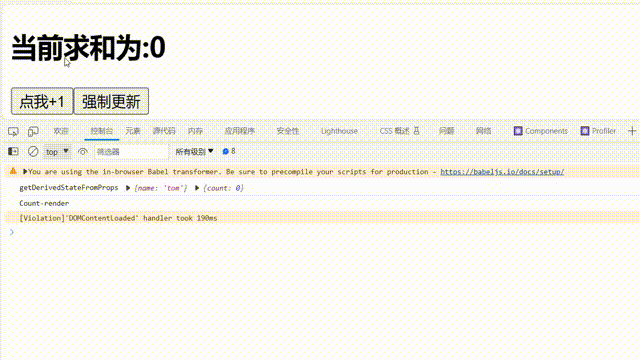
componentDidMount()// 1.创建函数式组件 class Count extends React.Component { constructor(props) { console.log('Count-constructor'); super(props) // 初始化状态 this.state = { count: 0 } } // 组件挂载完毕的钩子 componentDidMount() { console.log('Count-componentDidMount'); } // 组件将要销毁的钩子 componentWillUnmount() { console.log('Count-componentWillUnmount'); } // 控制组件更新的“阀门” shouldComponentUpdate() { console.log('Count-shouldComponentUpdate'); return true } static getDerivedStateFromProps() { console.log('getDerivedStateFromProps') return null } render() { console.log('Count-render'); return( <div> <h2>当前求和为:{this.state.count}</h2> </div > ) } };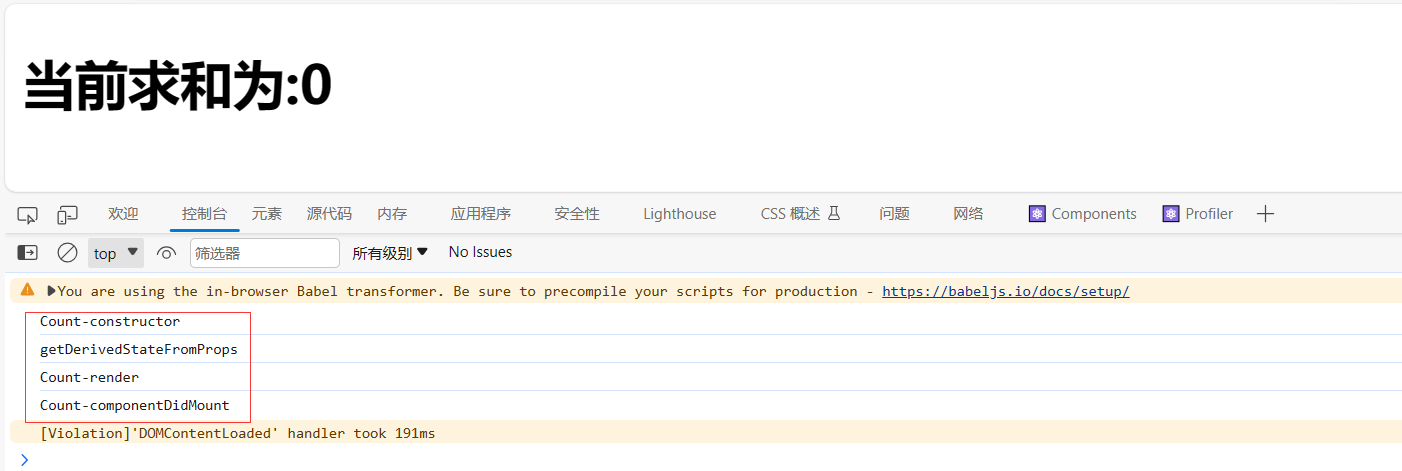
getDerivedStateFromProps钩子函数:若state的值在任何时候都取决于props,那么可以使用getDerivedStateFromProps,函数需要返回值// 1.创建函数式组件 class Count extends React.Component { constructor(props) { super(props) // 初始化状态 this.state = { count: 0 } } // 若state的值在任何时候都取决于props,那么可以使用getDerivedStateFromProps static getDerivedStateFromProps(props,state) { console.log('getDerivedStateFromProps',props,state) return null } render() { return( <div> <h2>当前求和为:{this.state.count}</h2> </div > ) } }; // 2.渲染组件到页面 ReactDOM.render(<Count name='tom'/>, document.getElementById('test'));
b.更新阶段: 由组件内部this.setSate()或父组件重新render触发
getDerivedStateFromPropsshouldComponentUpdate()render()getSnapshotBeforeUpdatecomponentDidUpdate()
①.由组件内部this.setSate()触发
//  1.创建函数式组件
class Count extends React.Component {
    constructor(props) {
        super(props)
        // 初始化状态
        this.state = { count: 0 }
    }
    // 控制组件更新的“阀门”
    shouldComponentUpdate() {
        console.log('Count-shouldComponentUpdate');
        return true
    }
    // 组件更新完毕的钩子
    componentDidUpdate(prevProps,prevState,snapshotValue) {
        console.log('Count-componentDidUpdate',prevProps,prevState,snapshotValue);
    }
    // 在更新之前获取快照
    getSnapshotBeforeUpdate(){
        console.log('Count-getSnapshotBeforeUpdate');
        return 'nihao'
    }
    add = () => {
        const { count } = this.state;
        this.setState({ count: count + 1 })
    }
    // 强制更新的按钮的回调
    force = () => {
        this.forceUpdate()
    }
    render() {
        console.log('Count-render');
        return(
            <div>
                <h2>当前求和为:{this.state.count}</h2>
                <button onClick={this.add}>点我+1</button>
                <button onClick={this.force}>强制更新</button>
            </div >
        )
    }
};
注意点:
-
componentDidUpdate钩子函数:钩子函数会接收到三个参数:
prevProps,prevState,snapshotValue:-
prevProps:更新前的props的值 -
prevState:更新前的state状态 -
snapshotValue:getSnapshotBeforeUpdate函数返回的值// 组件更新完毕的钩子 componentDidUpdate(prevProps,prevState,snapshotValue) { console.log('Count-componentDidUpdate',prevProps,prevState,snapshotValue); } // 在更新之前获取快照 getSnapshotBeforeUpdate(){ console.log('Count-getSnapshotBeforeUpdate'); return 'nihao' }
-
-
getSnapshotBeforeUpdate钩子函数——在更新之前获取快照使用
getSnapshotBeforeUpdate钩子的使用场景:-
先编写一个自动增加的列表
//  1.创建函数式组件
class NewList extends React.Component {
    state={
        newArr:[]
    }
    componentDidMount(){
        setInterval(()=>{
            // 获取原状态
            const {newArr} =this.state
            // 模拟一条新新闻
            const news='新闻'+(newArr.length+1)
            // 更新状态
            this.setState({newArr:[news,...newArr]})
        },1000)
    }
    getSnapshotBeforeUpdate(){
        return true
    }
    render() {
        return(
            <div>
                <div className="list" ref="list">
                    {
                        this.state.newArr.map((n,index)=>{
                            return <div key={index} className="news">{n}</div>
                        })
                    }
                </div>
            </div>
        )
    }
}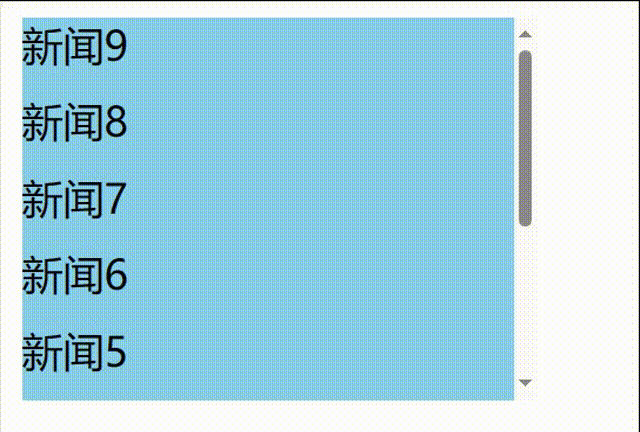
-
发现问题:不能将某条新闻固定在可视化窗口,影响观看效果

-
解决问题:
使用
getSnapshotBeforeUpdate钩子返回当前新闻内容的实际高度,包含超出视图溢出的部分,然后componentDidUpdate钩子函数中将每次更新后的滚动条滚动的距离累加上当前新闻内容的实际高度减去前一条新闻内容的实际高度// 1.创建函数式组件 class NewList extends React.Component { state={ newArr:[] } componentDidMount(){ setInterval(()=>{ // 获取原状态 const {newArr} =this.state // 模拟一条新新闻 const news='新闻'+(newArr.length+1) // 更新状态 this.setState({newArr:[news,...newArr]}) },1000) } getSnapshotBeforeUpdate(){ // return true return this.refs.list.scrollHeight } componentDidUpdate(preProps,preState,height){ this.refs.list.scrollTop+=this.refs.list.scrollHeight-height } render() { return( <div> <div className="list" ref="list"> { this.state.newArr.map((n,index)=>{ return <div key={index} className="news">{n}</div> }) } </div> </div> ) } }
-
②.父组件重新render触发
// 父组件A
class A extends React.Component {
    // 初始化状态
    state = {
        carName: '奔驰'
    }
    changeCar = () => {
        this.setState({ carName: '奥拓' })
    }
    render() {
        return (
            <div>
                <div>我是A组件</div>
                <button onClick={this.changeCar}>换车</button>
                <B carName={this.state.carName} />
            </div>
        )
    }
}
// 子组件B
class B extends React.Component {
    // 控制组件更新的“阀门”
    shouldComponentUpdate() {
        console.log('Count-shouldComponentUpdate');
        return true
    }
    // 组件更新完毕的钩子
    componentDidUpdate(prevProps,prevState) {
        console.log('Count-componentDidUpdate',prevProps,prevState);
    }
    render() {
        return (
            <div>我是B组件,我接受到的车是{this.props.carName}</div>
        )
    }
}
//  2.渲染组件到页面
ReactDOM.render(<A/>, document.getElementById('test'));

c.卸载组件: 由ReactDOM.unmountComponentAtNode()触发
- componentWillUnmount()
//  1.创建函数式组件
class Count extends React.Component {
    constructor(props) {
        super(props)
        // 初始化状态
        this.state = { count: 0 }
    }
    // 组件将要销毁的钩子
    componentWillUnmount() {
        console.log('Count-componentWillUnmount');
    }
    // 卸载组件的按钮的回调
    death = () => {
        // 卸载组件
        ReactDOM.unmountComponentAtNode(document.getElementById('test'))
    }
    render() {
        console.log('Count-render');
        return(
            <div>
                <h2>当前求和为:{this.state.count}</h2>
                <button onClick={this.add}>点我+1</button>
                <button onClick={this.death}>卸载组件</button>
            </div >
        )
    }
};

3).新生命周期总结
①.新更新的钩子函数:
getDerivedStateFromPropsgetSnapshotBeforeUpdate
②.重要的钩子函数:
render:初始化渲染或更新渲染调用componentDidMount:开启监听, 发送ajax请求componentWillUnmount:做一些收尾工作, 如: 清理定时器
③.即将废弃的钩子函数:
componentWillMountcomponentWillReceivePropscomponentWillUpdate
在现今的新版本,需要在这三个钩子函数的名字前加上
UNSAFE_前缀才能使用,以后可能会被彻底废弃,不建议使用。
UNSAFE_componentWillMountUNSAFE_componentWillReceivePropsUNSAFE_componentWillUpdate


 1万+
1万+


 被折叠的 条评论
为什么被折叠?
被折叠的 条评论
为什么被折叠?
 到【灌水乐园】发言


