


目录
2.数据预热,将店铺数据按照 typeId 批量存入Redis。
项目地址:https://github.com/liwook/PublicReview
一、达人探店
1.发布探店笔记
先上传图片,之后发布。
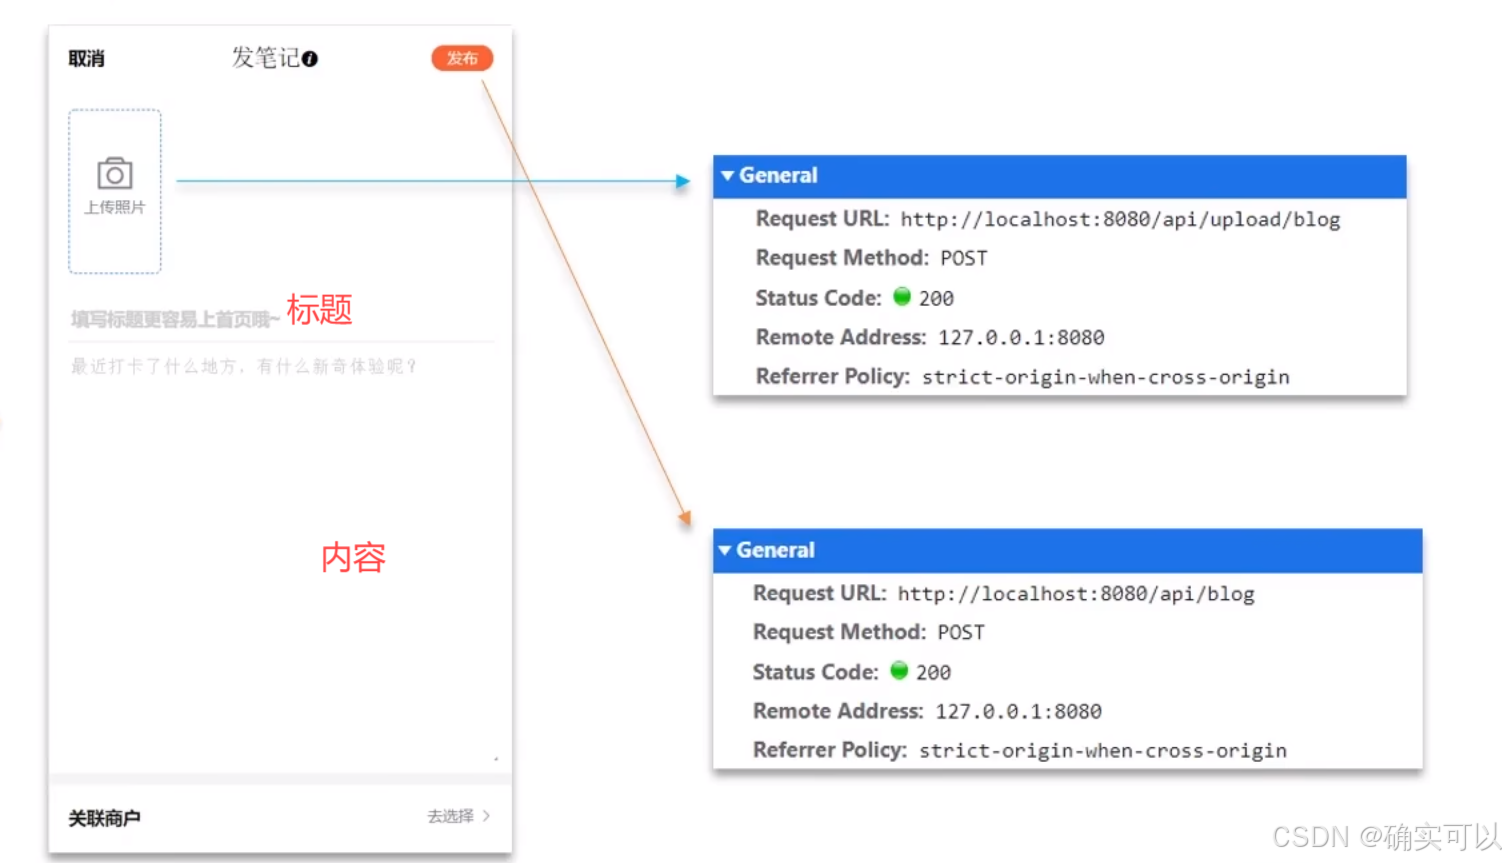
新建 interanl/blog/blog.go文件。添加两个函数。
- 处理图片上传的,成功会返回图片的存储位置 (图片的url)。
- 处理发布的,添加数据到数据库中,成功会返回blogId。
图片文件上传,使用gin中的文件处理。
const savePath = "../images" //这种就是相对位置的,就是运行的位置。

// 上传博客图片
// post /blog/upload-image
func UploadImages(c *gin.Context) {
	file, err := c.FormFile("file")
	if err != nil {
		code.WriteResponse(c, code.ErrDecodingFailed, "file failed")
		return
	}

	name := createNewFileName(file.Filename)

	//按照 日期 来保存图片
	// images/202401/01/xxxx.jpg	就是按照 年月/日/xxx.jpg 来保存图片
	//找到当前年月
	currentTime := time.Now()
	yearMonth := currentTime.Format("2006-01")
	day := currentTime.Format("02")

	dst := filepath.Join(savePath, yearMonth, day, name)
	// 检查,要是没有该目录,就创建目标目录
	dstDir := filepath.Dir(dst)
	if _, err := os.Stat(dstDir); os.IsNotExist(err) {
		if err := os.MkdirAll(dstDir, 0755); err != nil {
			code.WriteResponse(c, code.ErrCreateDirFailed, nil)
			return
		}
	}

	//保存文件
	if err := c.SaveUploadedFile(file, dst); err != nil {
		code.WriteResponse(c, code.ErrFileSaveFailed, nil)
		return
	}
	code.WriteResponse(c, code.ErrSuccess, gin.H{"图片url": dst})
}

func createNewFileName(originalFilename string) string {
	//获取文件后缀名
	ext := filepath.Ext(originalFilename)
	//生成文件名
	uuid := uuid.New().String()

	//拼接新的文件名
	return uuid + ext
}
一般来讲企业会将图片等文件上传到一个专门的文件服务器上。这里为了简便,就只上传到本地。
图片保存后,还需要把笔记的信息存储到数据库中,方便后续通过用户id或者商户id查找博客。
// 发布博客内容,保存到数据库
// post /blog/save
func SaveBlog(c *gin.Context) {
	var blog model.TbBlog
	if err := c.ShouldBindJSON(&blog); err != nil {
		code.WriteResponse(c, code.ErrBind, nil)
		return
	}

	if err := query.TbBlog.Create(&blog); err != nil {
		code.WriteResponse(c, code.ErrDatabase, err)
		return
	}

	code.WriteResponse(c, code.ErrSuccess, gin.H{"blogId": blog.ID})
}
2.查看博客
通过blogId来查看。服务端要返回该博客的用户名和图标,方便查看者可以顺手关注博主。
//在router.go中添加对应的路由
func NewRouter() *gin.Engine {
	r := gin.Default()
    .......
	r.GET("/blog/:id", blog.GetBlogById)
}

//blog.go
func GetBlogById(c *gin.Context) {
	id := c.Param("id")
	idInt, _ := strconv.Atoi(id)

	//通过blog找到该blog的用户id
	queryBlog := query.TbBlog
	blog, err := queryBlog.Where(queryBlog.ID.Eq(uint64(idInt))).First()
	if err == gorm.ErrRecordNotFound {
		response.WriteResponse(c, code.Database, "not find this blog")
		return
	}

	user, err := query.TbUser.Where(query.TbUser.ID.Eq(blog.UserID)).First()
	if err == gorm.ErrRecordNotFound {
		response.WriteResponse(c, code.Database, "not find this user")
		return
	}
	if err != nil {
		response.WriteResponse(c, code.Database, err)
		return
	}

	response.WriteResponse(c, code.Success, gin.H{
		"blog":     blog,
		"username": user.NickName,
		"icon":     user.Icon, //头像
	})
}
3.点赞笔记
关于点赞的分析
保存点赞数,方便查找高赞的博客。也像朋友圈一样,一人只能点赞一次,再次点击则取消点赞。
对于点赞这种高频变化的数据,如果我们使用MySql是不太理智的。可以使用Redis,我们又该选择哪种数据结构才更合适呢?
其中一个重要的点是 不能对同一篇文章重复点赞。不能重复,那会想到使用Set。
Set类型的特点:
- 不重复,符合业务的特点,一个用户只能点赞一次
- 高性能,Set集合内部实现了高效的数据结构(Hash表)
- 灵活性,Set集合可以实现一对多,一个用户可以点赞多个博客,符合实际的业务逻辑
当然也可以选择使用Hash(Hash占用空间比Set更小),如果想要点赞排序也可以选用Sorted Set 。
还有如果当前用户已点赞,则点赞按钮高亮显示(前端实现,通过后端返回的Blog类的isLike字段判断)。
实现步骤
1. 查看博客的时候,是会显示自己是否有点赞。修改之前的查看博客的函数,返回当前登录用户是否已点赞。
func GetBlogById(c *gin.Context) {
    .........
	//添加在header中保存查看该博客的用户id
	userid := c.GetHeader("userId")
	code.WriteResponse(c, code.ErrSuccess, gin.H{
		"blog":     blog,
		"username": user.NickName,
		"icon":     user.Icon,                  //头像
		"isLiked":  isBlogLiked(idInt, userid), //查看该博客的用户是否已经点赞
	})

	// code.WriteResponse(c, code.ErrSuccess, gin.H{
	// 	"blog":     blog,
	// 	"username": user.NickName,
	// 	"icon":     user.Icon, //头像
	// })
}
2. 进行点赞,要是已点赞,就会取消点赞;反之,就需要再数据库和Redis中添加点赞。
- 判断是否点赞。
const BlogLikedKey = "blog:liked:"

// 判断是否有点赞过,通过redis的set
func isBlogLiked(blogId int, userId string) bool {
	key := BlogLikedKey + strconv.Itoa(blogId)
	success, err := global.RedisClient.SIsMember(context.Background(), key, userId).Result()
	if err != nil {
		return false
	}
	return success
}- 进行点赞。
// 点赞博客
// post /blog/like/:id
func LikeBlog(c *gin.Context) {
	//获取blogId,被点赞的博客id
	id := c.Param("id")
	idInt, _ := strconv.Atoi(id)

	//获取当前登录的用户id, 从Header中获取
	userId := c.GetHeader("userId")

	has := isBlogLiked(idInt, userId)

	tbBlog := query.TbBlog
	if has { //已经点赞过了,则取消点赞
		_, err := tbBlog.Where(tbBlog.ID.Eq(uint64(idInt))).UpdateSimple(tbBlog.Liked.Sub(1))
		if err != nil {
			slog.Error("取消点赞失败", "err", err)
			code.WriteResponse(c, code.ErrDatabase, "取消点赞失败")
			return
		}
		db.RedisClient.SRem(context.Background(), BlogLikedKey+id, userId)
		code.WriteResponse(c, code.ErrSuccess, "取消点赞成功")
	} else {
		_, err := tbBlog.Where(tbBlog.ID.Eq(uint64(idInt))).UpdateSimple(tbBlog.Liked.Add(1))
		if err != nil {
			slog.Error("点赞失败", "err", err)
			code.WriteResponse(c, code.ErrDatabase, "点赞失败")
			return
		}
		db.RedisClient.SAdd(context.Background(), BlogLikedKey+id, userId)
		code.WriteResponse(c, code.ErrSuccess, gin.H{"msg": "点赞成功"})
	}
}
4.点赞排行榜
微信、QQ的点赞,会把点赞的人显示出来,其都是默认按照时间顺序对点赞的用户进行排序,后点赞的用户会排在最前面。 那我们也按照时间顺序来排序,比如显示最早点赞的TOP5,形成点赞排行榜

分析使用Redis的哪种数据类型
那当前使用set就不可行了,因为set是不排序的。
现在我们的需求是,一个key存储多个元素,即是集合,元素唯一,可以快速找到元素,可以按照一定规则排序。
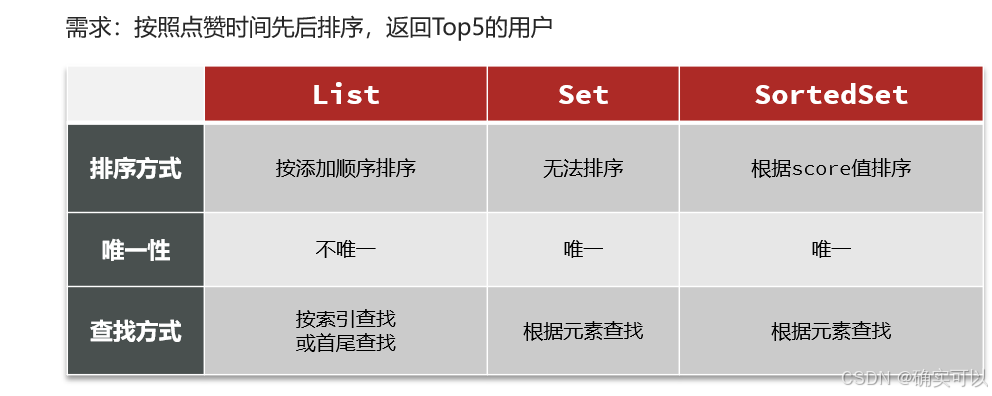
所以使用SortedSet,它完美的满足了我们所有的需求:唯一、有序、查找效率高。
使用sortedSet
其添加命令:
zadd key [NX|XX] [GT|LT] [CH] [INCR] score member [score member ...]那么我们把点赞时间作为score,用户id作为member。
对比之前使用的Set:
- Set是使用isMember判断用户是否存在,而SortedSet,使用ZSCORE方法进行判断。
- Set没有提供范围查询,无法获排行榜前几名的数据;SortedSet可以使用ZRANGE进行范围查询
修改之前的代码
1)修改函数isBlogLiked。通过用户id作为member去查找是否有该score,若是没有,则表明没有点赞。
// 判断是否有点赞过
func isBlogLiked(blogId int, userId string) bool {
	// key := BlogLikedKey + strconv.Itoa(blogId)
	// success, err := db.RedisClient.SIsMember(context.Background(), key, userId).Result()
	// if err != nil {
	// 	return false
	// }
	// return success

	// 通过redis的sortedSet
	//没有该key,或者没有该member的时候,是通过err来返回的,其值是redis.Nil
	key := BlogLikedKey + strconv.Itoa(blogId)
	_, err := db.RedisClient.ZScore(context.Background(), key, userId).Result()
	return err != nil
}
2)修改在redis中点赞的操作LikeBlog。
// post /blog/like/:id
func LikeBlog(c *gin.Context) {
    ................
	tbBlog := query.TbBlog
	if has { //已经点赞过了,则取消点赞
	    ................
		// db.RedisClient.SRem(context.Background(), BlogLikedKey+id, userId)
		db.RedisClient.ZRem(context.Background(), BlogLikedKey+id, userId)
	} else {
        ...........................
		// db.RedisClient.SAdd(context.Background(), BlogLikedKey+id, userId)
		db.RedisClient.ZAdd(context.Background(), BlogLikedKey+id, redis.Z{Score: float64(time.Now().Unix()), Member: userId})
	}
}
3)添加查询所有点赞博客的用户,返回TOP5。
我们的需求是,先点赞的排在前面,后点赞的排在后面。
在MySQL中如果我们使用in进行条件查询,我们的查询默认是数据库顺序查询,数据库中的记录默认都是按照ID自增的,所以查出来的结果默认是按照ID自增排序的。这就涉及到MySQL的一些知识,需要使用order by field(id ,.....)。
// get /blog/getLikes/:id
func GetBlogLikes(c *gin.Context) {
	//获取blogId
	id := c.Param("id")
	//获取点赞的用户id列表
	userIds, err := db.RedisClient.ZRevRangeWithScores(context.Background(), BlogLikedKey+id, 0, 4).Result()
	if err != nil {
		slog.Error("获取点赞用户列表失败", "err", err)
		code.WriteResponse(c, code.ErrDatabase, nil)
		return
	}

	Ids := make([]string, len(userIds))
	for i, userId := range userIds {
		Ids[i] = userId.Member.(string)
	}

	in := strings.Join(Ids, ",")
	fmt.Println(in)
	//在数据库中查找到该些用户的信息和图标
	var users []model.TbUser
	err = db.DBEngine.Raw(fmt.Sprintf("select nick_name,icon from tb_user where id in(%s) order by field(%s);", in, "id,"+in)).Scan(&users).Error
	if err != nil {
		slog.Error("获取点赞用户列表失败", "err", err)
		code.WriteResponse(c, code.ErrDatabase, nil)
		return
	}

	code.WriteResponse(c, code.ErrSuccess, users)
}
二、好友关注
1.关注和取关
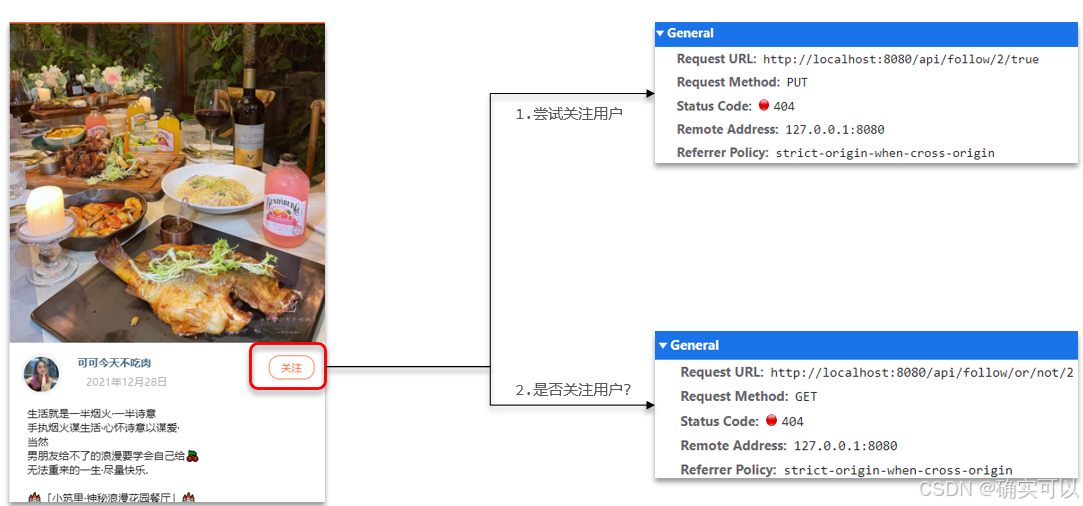
在探店图文的详情页面上,可以关注发布笔记的博主。
关注是用户之间的关系,是博主与粉丝的关系,数据库中有一张表tb_follow来标示。
 CREATE TABLE `tb_follow` (
  `id` bigint NOT NULL AUTO_INCREMENT COMMENT '主键',
  `user_id` bigint unsigned NOT NULL COMMENT '用户id',
  `follow_user_id` bigint unsigned NOT NULL COMMENT '关联的用户id',
  `create_time` timestamp NOT NULL DEFAULT CURRENT_TIMESTAMP COMMENT '创建时间',
  PRIMARY KEY (`id`) USING BTREE
);代码实现:
关注用户功能的实现,根据前端传递的isFollow的值判断,用户是否已关注该博主,若未关注,传过来的是true,则有关注资格,之后保存到数据库表中。
在internal/user目录,创建follow.go文件。
type followUser struct {
UserId int64 `json:"user_id"`
FollowId int64 `json:"follow_id"`
IsAlreadyFollow bool `json:"isAlreadyFollow"`
}
// 判断是否关注
// get /user/isfollow
func IsFolow(c *gin.Context) {
UserId := c.Query("user_id")
followId := c.Query("follow_id")
if UserId == "" || followId == "" {
code.WriteResponse(c, code.ErrMissingParameter, "user_id or follow_id is empty")
return
}
UserIdint, _ := strconv.Atoi(UserId)
followIdInt, _ := strconv.Atoi(followId)
f := query.TbFollow
count, err := f.Where(f.UserID.Eq(uint64(UserIdint)), f.FollowUserID.Eq(uint64(followIdInt))).Count()
if err != nil {
slog.Error("IsFolow bad", "err", err)
code.WriteResponse(c, code.ErrDatabase, nil)
return
}
if count > 0 {
code.WriteResponse(c, code.ErrSuccess, gin.H{"isAlreadyFollow": true})
return
}
code.WriteResponse(c, code.ErrSuccess, gin.H{"isAlreadyFollow": false})
}
// 关注,已关注就进行取关
// post /user/follow
func Follow(c *gin.Context) {
var follow followUser
err := c.BindJSON(&follow)
if err != nil {
code.WriteResponse(c, code.ErrBind, nil)
return
}
f := query.TbFollow
if follow.IsAlreadyFollow { //已关注,就取关
_, err := f.Where(f.UserID.Eq(uint64(follow.UserId)), f.FollowUserID.Eq(uint64(follow.FollowId))).Delete()
if err != nil {
slog.Error("Follow bad", "err", err)
code.WriteResponse(c, code.ErrDatabase, nil)
return
}
code.WriteResponse(c, code.ErrSuccess, "unfollow success")
} else { //关注
err := f.Create(&model.TbFollow{
UserID: uint64(follow.UserId),
FollowUserID: uint64(follow.FollowId),
})
if err != nil {
slog.Error("create bad", "err", err)
code.WriteResponse(c, code.ErrDatabase, "follow failed")
return
}
code.WriteResponse(c, code.ErrSuccess, "follow success")
}
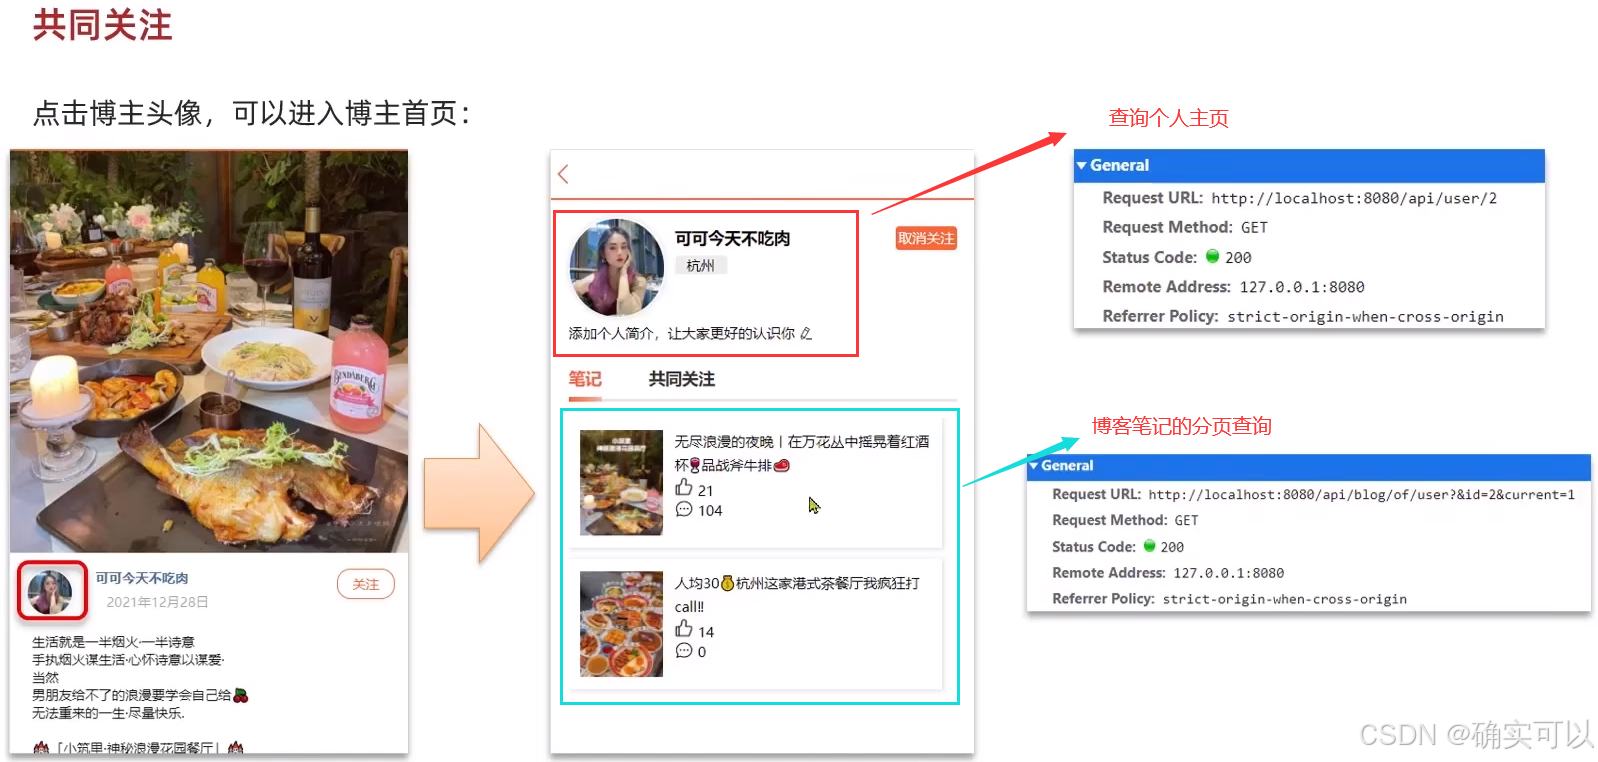
}2.查看他人主页
新建 internal/user/user.go文件。
查看用户主页
// get /user/:id
func QueryUserById(c *gin.Context) {
	id := c.Param("id")
	idInt, err := strconv.Atoi(id)
	if err != nil {
		slog.Error("Decoding failed", "err", err)
		code.WriteResponse(c, code.ErrDecodingFailed, "id must be int")
		return
	}
	u := query.TbUserInfo
	info, err := u.Where(u, u.UserID.Eq(uint64(idInt))).First()
	if err == gorm.ErrRecordNotFound {
		code.WriteResponse(c, code.ErrDatabase, "has not this user")
		return
	}
	if err != nil {
		slog.Error("Database error", "err", err)
		code.WriteResponse(c, code.ErrDatabase, nil)
		return
	}
	code.WriteResponse(c, code.ErrSuccess, info)
}
博客分页查询
在数据密集型的应用中,分页是一项基本功能,它允许用户逐页浏览大量数据。传统的基于offset和limit的分页方法虽然简单直观,但在处理大型数据集时可能会遇到性能瓶颈。
- 性能问题:随着
offset值的增加,查询效率会降低。 - 数据一致性:在分页期间如果有数据增删,可能会导致数据重复或遗漏。
- 内存消耗:大
offset值可能导致数据库加载过多的数据到内存中。
基于指针的分页,又称为游标分页,不依赖于offset。相反,它使用一列(通常是唯一的排序列)的最后一个值来查询下一页的数据。
比如:
SELECT * FROM users WHERE id > last_seen_id ORDER BY id LIMIT 10;其优点
- 性能提升:不需要跳过前面的记录,查询速度更快。
- 减少内存消耗:数据库不需要加载和处理大量的中间结果。
- 数据一致性:通过锚定上一页的最后一条记录,减少了数据变动带来的影响。
//blog.go
const DefalutBlogsPerPage = 8

type blogsRespone struct {
	IsEnd bool            `json:"is_end"`
	Blogs []*model.TbBlog `json:"blogs"`
}

// get /blog/list
func GetBlogListbyUserId(c *gin.Context) {
	userId := c.Query("userId")
	lastId := c.Query("lastId")

	userIdInt, _ := strconv.Atoi(userId)
	lastIdInt, _ := strconv.Atoi(lastId)

	if userId == "" || lastIdInt == -1 {
		code.WriteResponse(c, code.ErrMissingParameter, nil)
		return
	}

	tbBlog := query.TbBlog
	blogs, err := tbBlog.Where(tbBlog.UserID.Eq(uint64(userIdInt)), tbBlog.ID.Gt(uint64(lastIdInt))).Order(tbBlog.ID).Limit(DefalutBlogsPerPage).Find()
	if err != nil {
		slog.Error("find blog failed", "err", err)
		code.WriteResponse(c, code.ErrDatabase, nil)
		return
	}
	if len(blogs) < DefalutBlogsPerPage {	//表明当前获取的数量已经少于一页数量,所以已经到底了
		code.WriteResponse(c, code.ErrSuccess, blogsRespone{IsEnd: true, Blogs: blogs})
		return
	}
	code.WriteResponse(c, code.ErrSuccess, blogsRespone{IsEnd: false, Blogs: blogs})
}
3.共同关注
- 可以只使用数据库中的数据。比如查找用户a和b的共同关注对象。那就先在表tb_follow中找到用户a关注的,之后再找用户b关注的,之后再求交集即可。但是这种可能就性能不太好。
- 用redis处理共同关注。在关注某位用户之后,同时将被关注的用户id存入到Redis中。查看共同关注的时候,只需要求被查看的用户与自己关注列表的交集即可,那即是使用set。
更改关注功能的函数(Follow)
不仅要把数据存入数据库follow表中,还有把userId存入redis的set集合里。key就是userid,集合就是关注的对象。
const FollowUserId = "follow:userId:"

// 关注,已关注就进行取关
// post /user/follow
func Follow(c *gin.Context) {
    .............
	f := query.TbFollow
	if follow.IsAlreadyFollow { //已关注,就取关
	    ...................
		//redis中删除set的集合
		db.RedisClient.SRem(context.Background(), FollowUserId+strconv.Itoa(int(follow.UserId)), follow.FollowId)
		code.WriteResponse(c, code.ErrSuccess, "unfollow success")
	} else { //关注
		.....................
		//在redis中set添加关注的对象
		db.RedisClient.SAdd(context.Background(), FollowUserId+strconv.Itoa(int(follow.UserId)), follow.FollowId).Result()
		code.WriteResponse(c, code.ErrSuccess, "follow success")
	}
}
编写求交集的方法
//follow.go
// get /user/follow/commons
func FollowCommons(c *gin.Context) {
ids := c.QueryArray("id")
if len(ids) != 2 {
code.WriteResponse(c, code.ErrBind, nil)
return
}
res, err := db.RedisClient.SInter(context.Background(), FollowUserId+ids[0], FollowUserId+ids[1]).Result()
if err != nil {
slog.Error("FollowCommons bad", "err", err)
code.WriteResponse(c, code.ErrDatabase, nil)
return
}
code.WriteResponse(c, code.ErrSuccess, gin.H{"followCommoms": res})
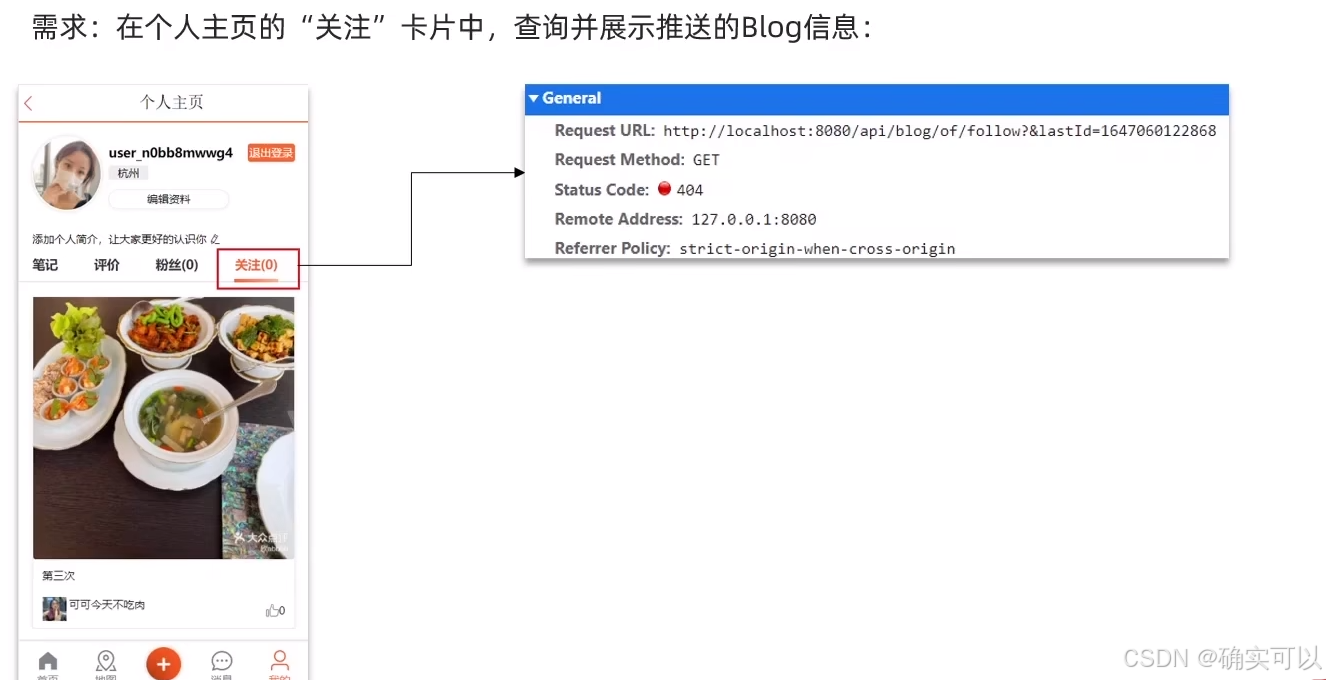
}4.关注推送
关注推送也叫做 Feed 流,直译为投喂。为用户持续的提供 “沉浸式” 的体验,通过无限下拉刷新获取新的信息。
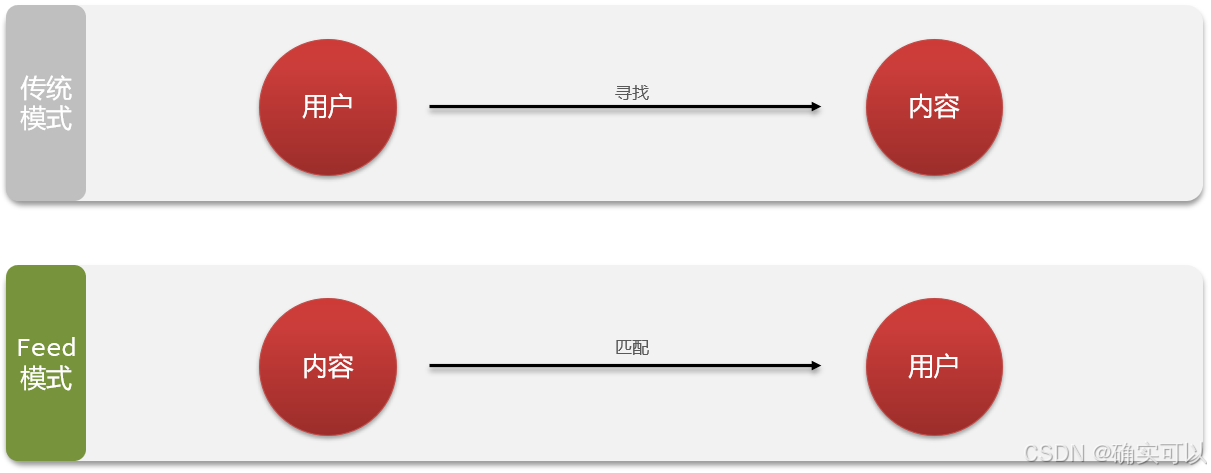
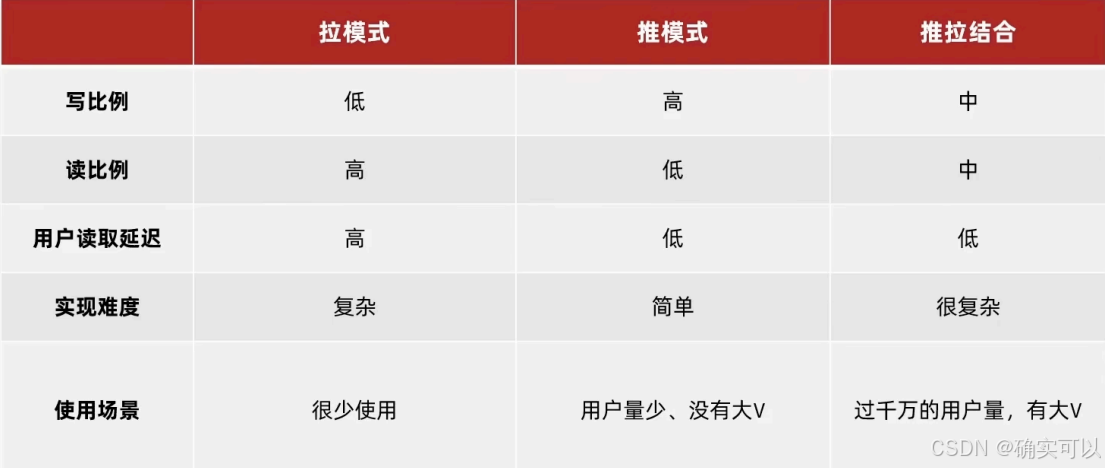
Feed流产品有两种常见模式:
时间排序(Timeline):不做内容筛选,简单的按照内容发布时间排序,常用于好友或关注。例如朋友圈
- 优点:信息全面,不会有缺失。并且实现也相对简单
- 缺点:信息噪音较多,用户不一定感兴趣,内容获取效率低
智能排序:利用智能算法屏蔽掉违规的、用户不感兴趣的内容。推送用户感兴趣信息来吸引用户
- 优点:投喂用户感兴趣信息,用户粘度很高,容易沉迷
- 缺点:如果算法不精准,可能起到反作用
本例中的个人页面,是基于关注的好友来做Feed流,因此采用Timeline的模式。该模式的实现方案有三种:
拉模式:也叫做读扩散。在拉模式中,终端用户或应用程序主动发送请求来获取最新的数据流。它是一种按需获取数据的方式,用户可以在需要时发出请求来获取新数据。在Feed流中,数据提供方将数据发布到实时数据源中,而终端用户或应用程序通过订阅或请求来获取新数据。
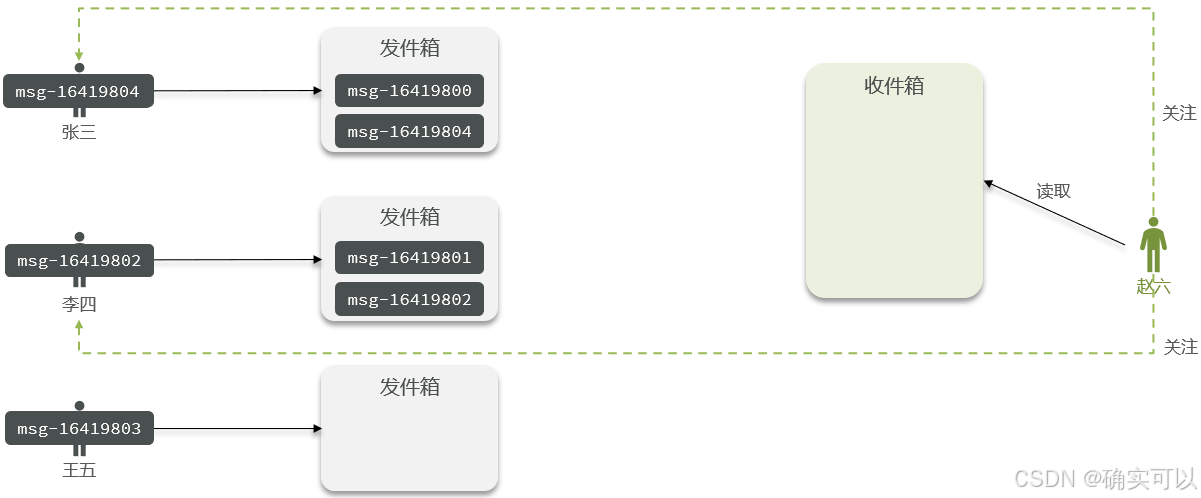
- 优点:节约空间,可以减少不必要的数据传输,只需要获取自己感兴趣的数据,因为赵六在读信息时,并没有重复读取,而且读取完之后可以把他的收件箱进行清除。
- 缺点:延迟较高,当用户读取数据时才去关注的人里边去读取数据,假设用户关注了大量的用户,那么此时就会拉取海量的内容,对服务器压力巨大。
推模式:也叫做写扩散。在推模式中,数据提供方主动将最新的数据推送给终端用户或应用程序。数据提供方会实时地将数据推送到终端用户或应用程序,而无需等待请求。
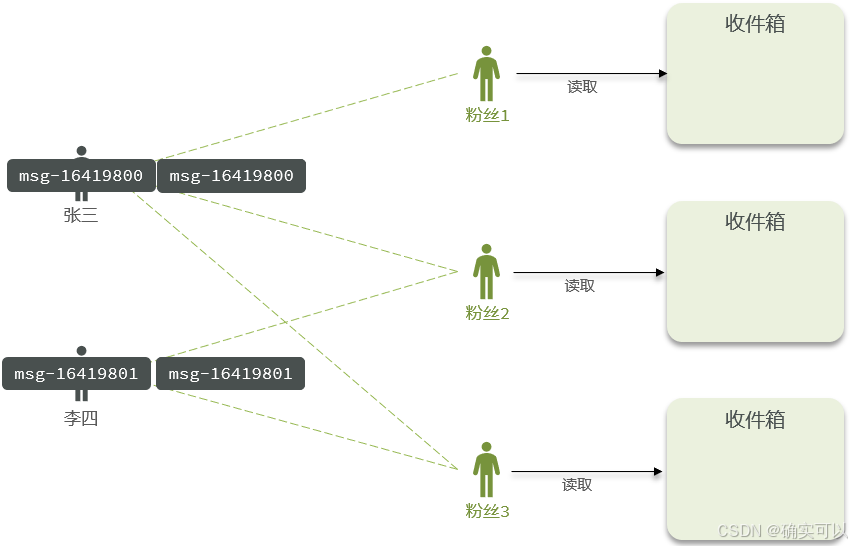
- 优点:数据延迟低,不用临时拉取。
- 缺点:内存耗费大。加速一个dav写信息,很多人关注他,就会写很多份数据到粉丝那边去。
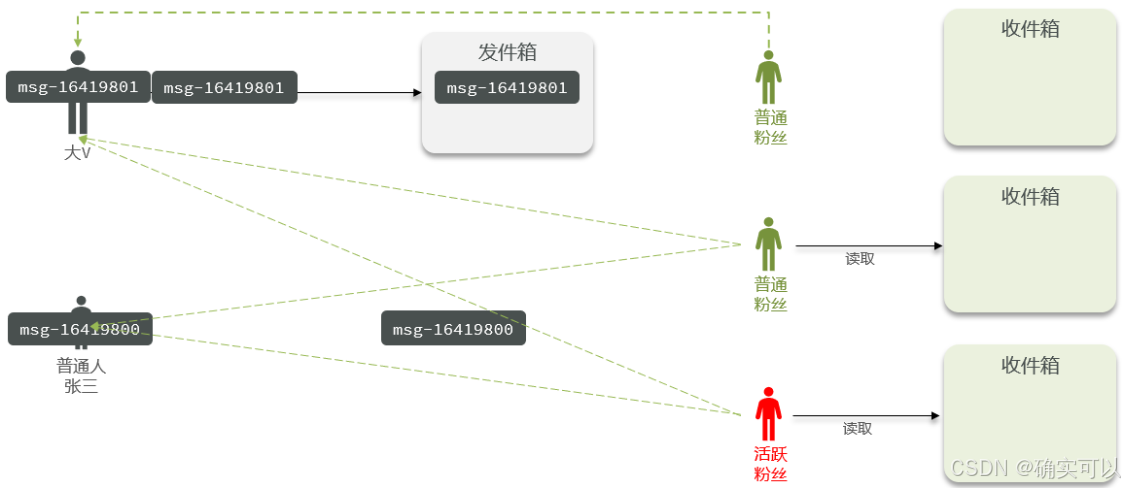
推拉结合:即读写混合模式,兼具推和拉的优点。数据提供方主动推送最新数据,同时也支持用户拉取数据,可实现实时更新且满足按需获取。
- 对于发件人端,普通人采用写扩散方式将数据写入粉丝处,因其粉丝量小无压力;大 V 先将数据写入发件箱,再写入活跃粉丝收件箱。
- 从收件人端看,活跃粉丝接收大 V 和普通人的直接写入,普通粉丝上线不频繁,上线时从发件箱拉取信息。
那么,我们基于推模式实现关注推送功能。这也是因为这样实现比较简单。
推送到粉丝收件箱
需求:
- 修改发布笔记的业务,在保存blog到数据库的同时,推送到粉丝的收件箱
- 收件箱可以根据时间戳排序,用Redis的数据结构zset实现
- 查询收件箱数据时,可以实现分页查询
按照需求1,把博客保存到数据库后,还需要把对应的博客id存入到redis中。使用zset,key是用户id(粉丝),value的score是时间戳,member是博客id。
const FeedKey = "feed:"
// 发布博客内容,保存到数据库
// post /blog/add
func SaveBlog(c *gin.Context) {
    //保存到数据库后................

	//为了可以推送博客给粉丝,就存储到redis中
	follow := query.TbFollow
	//查找到该用户的所有粉丝
	res, err := follow.Where(follow.FollowUserID.Eq(blog.UserID)).Select(follow.UserID).Find()
	if err != nil {
		code.WriteResponse(c, code.ErrDatabase, err)
		return
	}
	for _, v := range res {
		//使用时间戳作为score,blogId作为成员
		db.RedisClient.ZAdd(context.Background(), FeedKey+fmt.Sprint(v.UserID), redis.Z{
			Score:  float64(time.Now().UnixMicro()), //时间戳,毫秒为单位
			Member: blog.ID,
		})
	}

	code.WriteResponse(c, code.ErrSuccess, gin.H{"blogId": blog.ID})
}
实现分页查询收邮箱
当粉丝⽤户需要按分页模式来读取收件箱的信息时,不能采⽤传统的分页模式(按数据的⾓标开始查)。
因为Feed 流中的数据会不断更新,所以数据的⾓标也在不断变化。传统的分页模式,会出现消息重复读的问题。
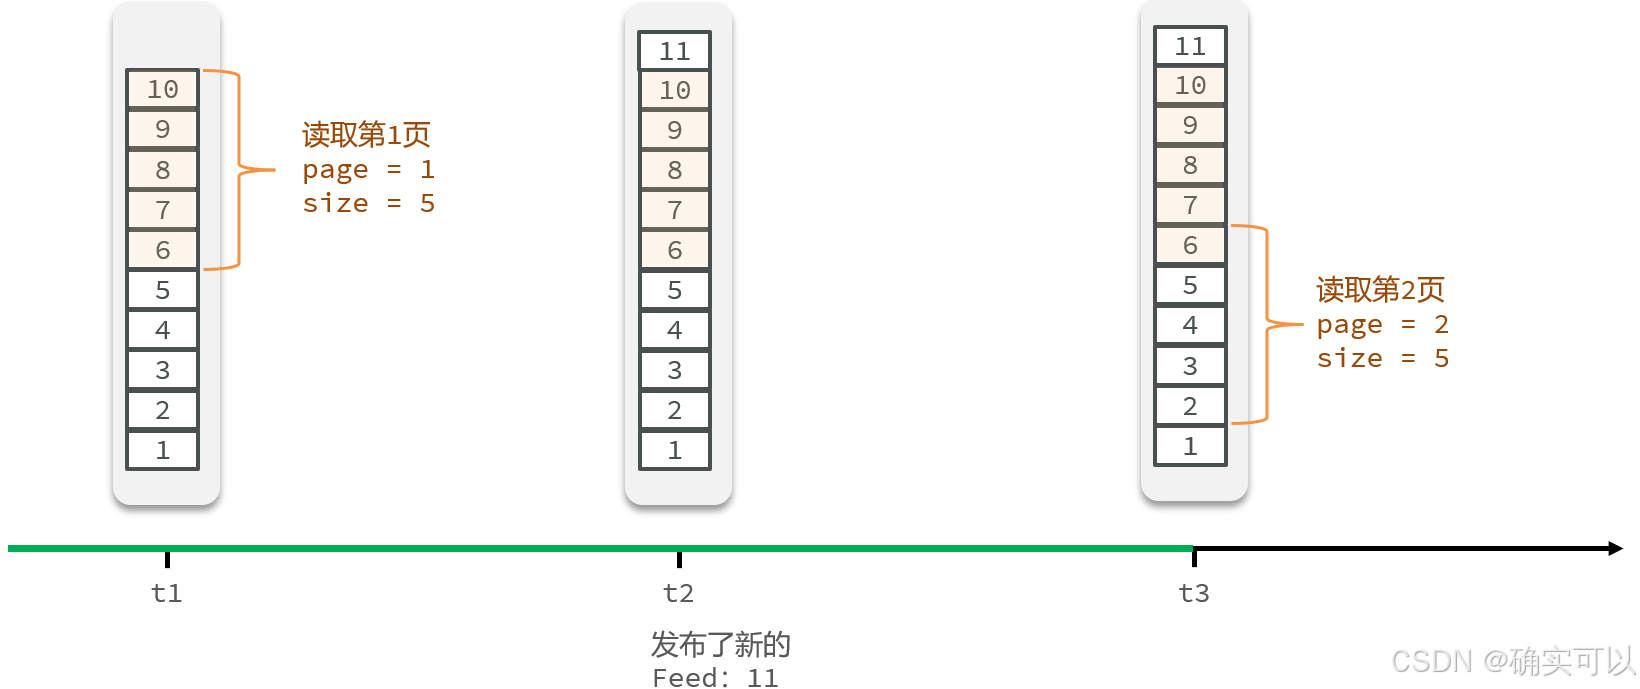
滚动分页(即是游标分页)
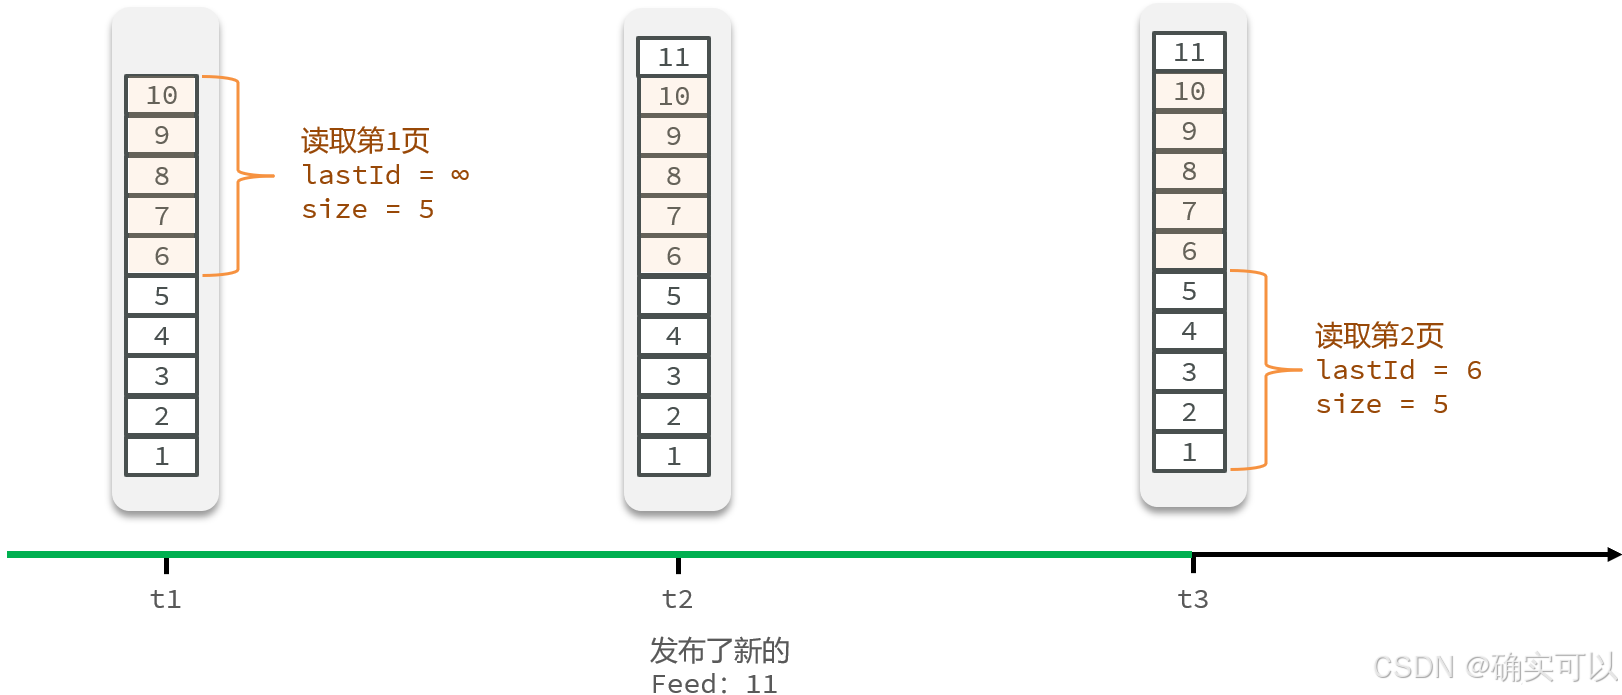
具体操作:
- 每次查询完成后,我们要得到查询数据的最小时间戳,这个值会作为下一次查询的条件。这个是滚动查询:每一次都记住上一次查询分数的最小值,将最小值作为下一次的最大值。
- 我们需要找到与上一次查询相同的查询个数作为偏移量,下次查询时,跳过这些查询过的数据,拿到我们需要的数据
综上,我们的请求参数中就需要携带2个参数:
- 上一次查询的最小时间戳minTime
- 偏移量offset
带有偏移量是为了处理有多条同一时间戳的数据。这两个参数第一次会由前端来指定,以后的查询就根据上一次的后端结果作为当前条件,再次传递到后端。
- 这里的minTime就表示 当前时间戳 或者 上一次查询的最小时间戳。
- offset就是 0(第一次查询) 或者 在上一次结果中与最小值一样的元素的个数。
还有一些具体的细节在代码中有注释。
const (
	BlogsPerPage = 8
)

// get /blog/of-follow
func QueryBlogOfFollow(c *gin.Context) {
	userid := c.Query("userId")
	offset := c.Query("offset")
	maxTime := c.Query("maxTime")

	offsetInt, _ := strconv.Atoi(offset)
	//按照score从大到小排序,即是按照时间戳从大到小排序
	res, err := db.RedisClient.ZRevRangeByScoreWithScores(context.Background(), FeedKey+userid,
		&redis.ZRangeBy{Min: "0", Max: maxTime, Offset: int64(offsetInt), Count: BlogsPerPage}).Result()
	if err != nil {
		slog.Error(err.Error())
		code.WriteResponse(c, code.ErrDatabase, nil)
		return
	}
	if len(res) == 0 {
		code.WriteResponse(c, code.ErrSuccess, "no blogs anymore.")
		return
	}

	//解析数据: blogId,minTime(时间戳), offset
	minTime := 0 //这个minTime是上次查询的最小时间戳,作为当次查询的最大时间戳来开始查
	resOffset := 1
	ids := make([]string, len(res))
	for i, v := range res {
		ids[i] = v.Member.(string)
		//获取分数      判读得到最后一次的时间戳,以及偏移量
		t := int(v.Score)
		if t == minTime { //该时间戳有相同的,则偏移量加1。这样就可以去掉了因为socore相同(即时间戳相同),导致返回数据重复的问题
			resOffset++
		} else {
			minTime = t
			resOffset = 1
		}
	}

	in := strings.Join(ids, ",")
	var blogs []model.TbBlog

	err = db.DBEngine.Raw(fmt.Sprintf("select * from tb_blog where id in (%s) order by field(id,%s)", in, in)).Scan(&blogs).Error
	if err != nil {
		slog.Error(err.Error())
		code.WriteResponse(c, code.ErrDatabase, nil)
		return
	}

	code.WriteResponse(c, code.ErrSuccess, gin.H{
		"blogs":   blogs,
		"offset":  resOffset,
		"minTime": minTime,
	})
}
三、附近商铺搜索
搜索附近的商铺,就需要知道商铺的地理位置(经纬度)。而Redis的数据结构GEO就很适合存储地理位置。
1.GEO数据结构
GEO就是Geolocation的简写形式,代表地理坐标。Redis在3.2版本中加入了对GEO的支持,允许存储地理坐标信息,帮助我们根据经纬度来检索数据。常见的命令有:
1. GEOADD
用于添加地理空间位置数据(经度、纬度和名称)到指定的key中。
- 语法:
GEOADD key longitude latitude member [longitude latitude member ...]
2. GEODIST
用于计算两个地点之间的距离,默认单位为米,也可以指定单位为km、miles或ft。
- 语法:
GEODIST key member1 member2 [unit]3. GEOHASH
GEOHASH命令返回一个或多个位置元素的Geohash字符串。该字符串可以用于近似表示位置的唯一标识。
- 语法:
GEOHASH key member [member ...]4.GEOPOS
返回指定member的坐标
- 语法: GEOPOS key member [member ...]
5. GEORADIUS
指定圆心、半径,找到该圆内包含的所有member,并按照与圆心之间的距离排序后返回。6.2以后已废弃
6. GEOSEARCH
在指定范围内搜索member,并按照与指定点之间的距离排序后返回。范围可以是圆形或矩形。6.2版本的新功能
GEOSEARCH key
[FROMMEMBER member] [FROMLONLAT long lat]
[BYRADIUS radius unit] [BYBOX width height unit]
[WITHCOORD] [WITHDIST] [WITHHASH]
[COUNT count] [ASC|DESC]命令的使用说明:
该API返回使用GEOADD填充的地理空间信息有序集合中位于给定形状所划定的区域边界内的所有成员。
其中搜索中心有两种指定方式:
• FROMMEMBER:从已经存在的key中读取经纬度。
• FROMLONLAT:从用户参数传递经纬度。
搜索条件按照下面两种:
• BYRADIUS:根据给定半径长度按照圆形搜索,命令效果等同于GEORADIUS。
• BYBOX:根据给定的width和height按照矩形搜索,矩形是轴对称矩形。
后面更多的可选参数如下:
• WITHCOORD:返回匹配的经纬度坐标。
• WITHDIST:返回距离,距离单位按照radius或者height/width单位转换。
• WITHHASH:返回GeoHash计算的值。
• COUNT count:只返回count个元素。注意,这里的count是全部搜索完成之后才过滤的,也就是不能减少搜索的CPU消耗,但是返回元素少,可以相应降低网络带宽的利用率。7. GEOSEARCHSTORE
与GEOSEARCH功能一致,不过可以把结果存储到一个指定的key。 6.2后新功能
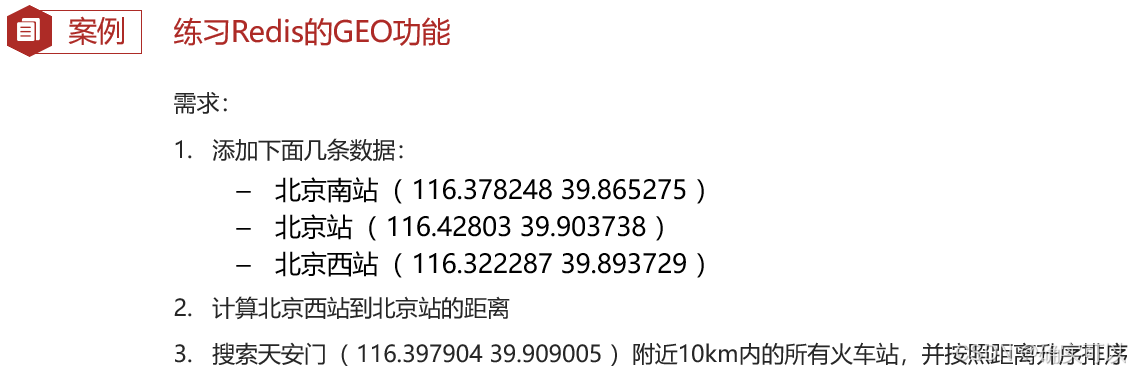
127.0.0.1:5678> geoadd station 116.378248 39.865275 bjnz 116.42803 39.903738 bjz 116.322287 39.893729 bjxz
(integer) 3
127.0.0.1:5678> GEODIST station bjnz bjxz km
"5.7300"
127.0.0.1:5678> GEOSEARCH station FROMLONLAT 116.397904 39.909005 BYRADIUS 10 km WITHDIST
1) 1) "bjz"
   2) "2.6361"
2) 1) "bjnz"
   2) "5.1452"
3) 1) "bjxz"
   2) "6.6723"

//FROMLONLAT表示从用户参数传递经纬度。
//BYRADIUS 根据给定半径长度按照圆形搜索
//WITHDIST 表示返回距离,距离单位按照radius或者height/width单位转换
2.数据预热,将店铺数据按照 typeId 批量存入Redis。
- GEO存储经度(longitude)和维度(latitude)还有值(member),为了节约内存,我们在memboer中值存储店铺id
- geoadd中有key,该key可以传入多个经纬度,即是可以传入多个商户。可以这样,前端传来一个type参数,后端按照商铺类型进行分组,以typeId作为key存入一个GEO集合中。
在internal/shopservice目录添加location.go文件。在main函数中调用LoadShopListToCache。
const GeoKeyPriex = "geo:"

func LoadShopListToCache() {
	tbshop := query.TbShop
	shops, err := tbshop.Select(tbshop.ID, tbshop.X, tbshop.Y, tbshop.TypeID).Find()
	if err != nil {
		slog.Error(err.Error())
		panic(err)
	}
	//将shop按照typeid进行分类
	shopMap := make(map[uint64][]*model.TbShop)
	for _, shop := range shops {
		shopMap[shop.TypeID] = append(shopMap[shop.TypeID], shop)
	}

	//使用管道,一次性输入
	pipeline := db.RedisClient.Pipeline()
	for _, shops := range shopMap {
		for _, shop := range shops {
			pipeline.GeoAdd(context.Background(), GeoKeyPriex+strconv.Itoa(int(shop.TypeID)), &redis.GeoLocation{Longitude: shop.X, Latitude: shop.Y, Name: strconv.Itoa(int(shop.ID))})
		}
	}
	_, err = pipeline.Exec(context.Background())
	if err != nil {
		panic(err)
	}
}
3.查找附近商户
前端就需要传入key(即是typeId)、坐标(x,y)、距离。后端调用GeoSearch。
//tb_shop.gen.go 添加距离字段
// TbShop mapped from table <tb_shop>
type TbShop struct {
    .................
	Distance float64 `json:"distance"`
}
// get /shop/distance-list
func QueryShopDistance(c *gin.Context) {
longitude := c.Query("longitude")
latitude := c.Query("latitude")
distance := c.Query("distance")
typeId := c.Query("typeId")
currentPage := c.Query("currentPage")
id, _ := strconv.Atoi(typeId)
page, _ := strconv.Atoi(currentPage)
//判断是否只需要查询数据库,就是说不通过经纬度和距离查询
if latitude == "" || longitude == "" || distance == "" {
tbShop := query.TbShop
res, err := tbShop.Where(tbShop.TypeID.Eq(uint64(id))).Limit(StoresPerPage).Offset((page - 1) * StoresPerPage).Find()
if err != nil {
slog.Error(err.Error())
code.WriteResponse(c, code.ErrDatabase, nil)
return
}
code.WriteResponse(c, code.ErrSuccess, res)
} else {
distanceFloat, _ := strconv.ParseFloat(distance, 64)
lng, _ := strconv.ParseFloat(longitude, 64)
lat, _ := strconv.ParseFloat(latitude, 64)
queryShopByType(c, id, distanceFloat, lng, lat, page)
}
}
func queryShopByType(c *gin.Context, typeId int, distance float64, longitude float64, latitude float64, currentPage int) {
from := (currentPage - 1) * StoresPerPage
end := currentPage * StoresPerPage
res, err := db.RedisClient.GeoSearchLocation(context.Background(), "station", &redis.GeoSearchLocationQuery{
GeoSearchQuery: redis.GeoSearchQuery{
Longitude: longitude,
Latitude: latitude,
Radius: distance,
RadiusUnit: "km",
Sort: "ASC", //升序,从小排到大
Count: end,
},
WithDist: true, //返回距离,用于显示
// WithCoord: true, //返回经纬度, 数据库中有,所以不需要返回了
}).Result()
if err != nil {
slog.Error("redis geo search bad", "error", err)
code.WriteResponse(c, code.ErrDatabase, nil)
return
}
if len(res) <= from { //表示没有下一页了,直接返回空
code.WriteResponse(c, code.ErrSuccess, "already have no more data")
return
}
if len(res) < end {
end = len(res)
}
tmp := res[from:end] //截取需要的数据
shopIds := make([]string, len(tmp))
for i, v := range tmp {
shopIds[i] = v.Name
}
in := strings.Join(shopIds, ",")
//从数据库中获取shop信息,
var shops []*model.TbShop
err = db.DBEngine.Raw(fmt.Sprintf("select * from tb_shop where type_id = %d and id in (%s) order by field(id,%s)", typeId, in, in)).Scan(&shops).Error
if err != nil {
slog.Error(err.Error())
code.WriteResponse(c, code.ErrDatabase, nil)
return
}
//计算距离
if len(shops) != len(tmp) {
slog.Error("shop and distance length not equal")
code.WriteResponse(c, code.ErrDatabase, nil)
return
}
for i, v := range shops {
v.Distance = tmp[i].Dist
}
code.WriteResponse(c, code.ErrSuccess, shops)
}
//关于上述函数中的变量shops的说明
// 在Go语言中,[]*model.TbShop和[]model.TbShop在内存占用上是有区别的。
// []*model.TbShop:这是一个指向model.TbShop结构体的指针切片。每个元素都是一个指向model.TbShop结构体的指针,因此需要额外的内存空间来存储指针本身。
// []model.TbShop:这是一个model.TbShop结构体的切片。每个元素都是一个model.TbShop结构体的副本,因此需要额外的内存空间来存储整个结构体。
// 因此,如果model.TbShop结构体较大,那么使用[]model.TbShop会比使用[]*model.TbShop占用更多的内存空间。
// 使用[]*model.TbShop有一些优点,例如可以避免在函数调用时复制整个结构体,从而提高性能。此外,如果需要修改结构体的字段,使用指针可以避免修改副本,而是直接修改原始对象。
// 在实际应用中,需要根据具体的需求和场景来选择使用哪种类型。如果需要频繁地修改结构体的字段,或者结构体较大,那么使用[]*model.TbShop可能更合适。如果只需要读取结构体的字段,或者结构体较小,那么使用[]model.TbShop可能更合适。
四、用户签到
每天都可以签到。简单的想,可以存在数据库中。
CREATE TABLE `tb_sign` (
  `id` bigint unsigned NOT NULL AUTO_INCREMENT COMMENT '主键',
  `user_id` bigint unsigned NOT NULL COMMENT '用户id',
  `year` year NOT NULL COMMENT '签到的年',
  `month` tinyint NOT NULL COMMENT '签到的月',
  `date` date NOT NULL COMMENT '签到的日期',
  `is_backup` tinyint unsigned DEFAULT NULL COMMENT '是否补签',
  PRIMARY KEY (`id`) USING BTREE
);
假如用户数量庞大有1000w,平均每人每年签到次数为 10 次,则这张表一年的数据量为 1 亿条
每签到一次需要使用(8 + 8 + 1 + 1 + 3 + 1)共 22 字节的内存,一个月则最多需要 600 多字节。那用户量大的话占用的磁盘空间就会大了。
1.BitMap
我们按月来统计用户签到信息,签到记录为 1,未签到则记录为 0,可以使用redis来存储。
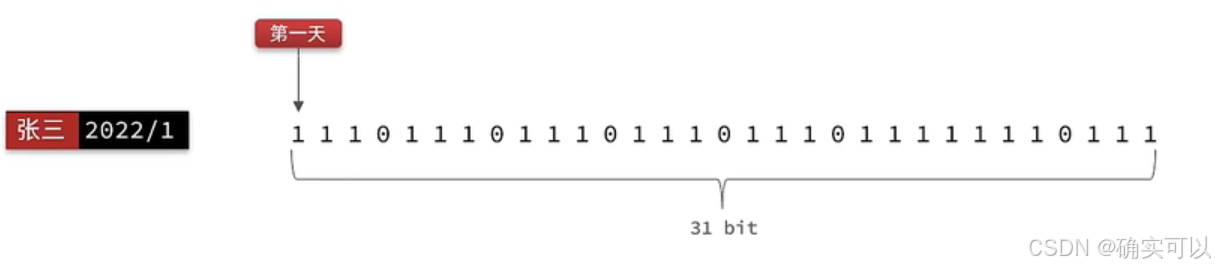 把每一个 bit 位对应当月的每一天,形成了映射关系。用0和1标示业务状态,这样一个月也只消耗31位(4字节)这种思路就称为位图(BitMap)。
Redis 中 是利用 string 类型数据结构实现 BitMap,因此最大上限是 512M,转换为 bit 则是 2^32个 bit 位。其操作命令有:
SETBIT:向指定位置(offset)存入一个 0 或 1
GETBIT :获取指定位置(offset)的 bit 值
BITCOUNT :统计 BitMap 中值为 1 的 bit 位的数量
BITFIELD :操作(查询、修改、自增)BitMap中bit数组中的指定位置(offset)的值
BITFIELD_RO :获取 BitMap 中 bit 数组,并以十进制形式返回
BITOP :将多个 BitMap 的结果做位运算(与 、或、异或)
BITPOS :查找 bit 数组中指定范围内第一个 0 或 1 出现的位置
2.签到功能
//user.go
const SignKeyPre = "sign:"
// post /user/signIn/:id
func SignIn(c *gin.Context) {
userId := c.Param("id")
key := SignKeyPre + userId + ":" + time.Now().Format("200601")
dayOfMonth := time.Now().Day()
_, err := db.RedisClient.SetBit(context.Background(), key, int64(dayOfMonth)-1, 1).Result() // 1为签到,0为未签到
if err != nil {
slog.Error(err.Error())
code.WriteResponse(c, code.ErrDatabase, nil)
return
}
code.WriteResponse(c, code.ErrSuccess, nil)
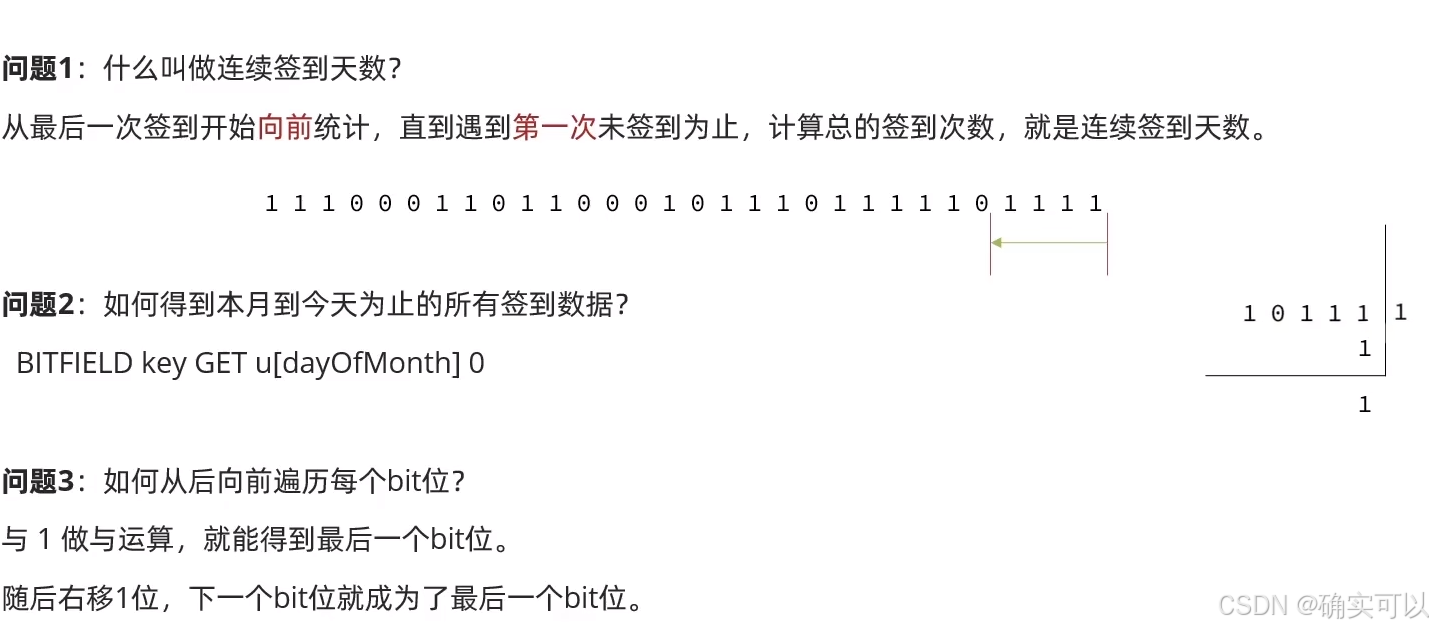
}3.签到统计
统计当前用户截止当前时间在本月的连续签到次数。
// 统计到当前时间的连续签到次数
// get /user/signin-statistics/:id
func ContinuousSigninStatistics(c *gin.Context) {
	userId := c.Param("id")
	key := SignKeyPre + userId + ":" + time.Now().Format("200601")
	dayOfMonth := time.Now().Day()

	// 类型u代表无符号十进制,i代表带符号十进制
	//0表示偏移量。 从偏移量offset=0开始取dayOfMonth-1位,获取无符号整数的值(将前dayOfMonth-1位二进制转为无符号10进制返回)
	res, err := db.RedisClient.BitField(context.Background(), key, "GET", "u"+strconv.Itoa(dayOfMonth-1), 0).Result()
	if err != nil {
		slog.Error(err.Error())
		code.WriteResponse(c, code.ErrDatabase, nil)
		return
	}

	if len(res) == 0 {
		code.WriteResponse(c, code.ErrSuccess, "has not this user signin")
		return
	}
	num := res[0]
	//循环遍历
	count := 0
	for {
		if num&1 == 0 { //让这个数字与1做与运算,得到数字的最后一个bit位   //判读这个bit位是否为0
			break
		} else {
			count++
		}
		num >>= 1 //把数字右移一位,抛弃最后一个bit位,继续下一个bit位
	}
	code.WriteResponse(c, code.ErrSuccess, count)
}
五、UV统计
1.两个概念
- UV:全称Unique Visitor,也叫独立访客量,是指通过互联网访问、浏览这个网页的自然人。1天内同一个用户多次访问该网站,只记录1次。
- PV:全称Page View,也叫页面访问量或点击量。用户每访问网站的一个页面,记录1次PV,用户多次打开页面,则记录多次PV。往往用来衡量网站的流量。
UV统计在服务端做会比较麻烦,因为要判断该用户是否已经统计过了,需要将统计过的用户信息保存。那这时可以想到使用set,set可以去重,还可以计算个数。但如果某文章非常火爆达,一个 Set 集合就保存了百万/千万个用户的 ID,那消耗的内存也太大了。
2.Hyperloglog
Hyperloglog(HLL)是从Loglog算法派生的概率算法,用于确定非常大的集合的基数,而不需要存储其所有值,很适合做海量数据的统计工作。
Redis中的HLL是基于string结构实现的。
- 单个HLL的内存永远小于16kb,内存占用很低,性能好。它所需的内存并不会因为集合的大小而改变,无论集合包含的元素有多少个,其进行计算所需的内存总是固定的,并且是很少的。
- 缺点是有一定的误差。其测量结果是概率性的,有小于0.81%的误差。
HyperLogLog常用指令:
- PFADD key element [element...] :添加指定元素到 HyperLogLog 中
- PFCOUNT key [key ...]:返回给定 HyperLogLog 的基数估算值
- PFMERGE destkey sourcekey [sourcekey ...]:将多个 HyperLogLog 合并为一个 HyperLogLog
在internal/user目录添加uniquevisitor.go文件。
const uvKey = "UV:"

type uvStatistics struct {
	BlogId int `json:"blogId"`
	UserId int `json:"userId"`
}

// post /uv/add
func AddUniqueVisitor(c *gin.Context) {
	var uv uvStatistics
	err := c.ShouldBindJSON(&uv)
	if err != nil {
		slog.Error(err.Error())
		code.WriteResponse(c, code.ErrDecodingFailed, nil)
		return
	}
	now := time.Now().Format("20060102")
	err = db.RedisClient.PFAdd(context.Background(), uvKey+now+":"+strconv.Itoa(uv.BlogId), uv.UserId).Err()
	if err != nil {
		slog.Error(err.Error())

		code.WriteResponse(c, code.ErrDatabase, nil)
		return
	}
	code.WriteResponse(c, code.ErrSuccess, nil)
}

// get /uv/get
func GetUniqueVisitor(c *gin.Context) {
	blogId := c.Query("blogid")
	date := c.Query("date")
	if blogId == "" || date == "" {
		code.WriteResponse(c, code.ErrMissingParameter, nil)
		return
	}
	res, err := db.RedisClient.PFCount(context.Background(), uvKey+date+":"+blogId).Result()
	if err != nil {
		slog.Error(err.Error())
		code.WriteResponse(c, code.ErrDatabase, nil)
		return
	}
	code.WriteResponse(c, code.ErrSuccess, res)
}
进行一个测试,来测试内存占用是否极低。
func TestHyperLogLog() {
	//values := make([]int, 1000)  用整数类型的数组,会出现错误redis: can't marshal []uint32 (implement encoding.BinaryMarshaler)
	values := make([]string, 1000)

	j := 0
	for i := 0; i < 1000000; i++ {
		values[j] = strconv.Itoa(i)
		j++
		if j == 999 {
			j = 0
			global.RedisClient.PFAdd(context.Background(), "testHll", values)
		}
	}

	count, err := global.RedisClient.PFCount(context.Background(), "testHll").Result()
	if err != nil {
		fmt.Println(err)
		return
	}
	fmt.Println("count= ", count)
}效果:存了100w条,结果显示是1009972,误差为(1009972-100w)/100w=0.9972%。是大于官方的0.81%,但也是在误差范围内的。使用info server命令查看,占用的内存大小也是很小的。


 1万+
1万+

 被折叠的 条评论
为什么被折叠?
被折叠的 条评论
为什么被折叠?
 到【灌水乐园】发言


