文章目录
实验操作

实验要求:
1、需求VRRP 正常情况下VLAN10的Master为SW1;VLAN20的Master为SW2
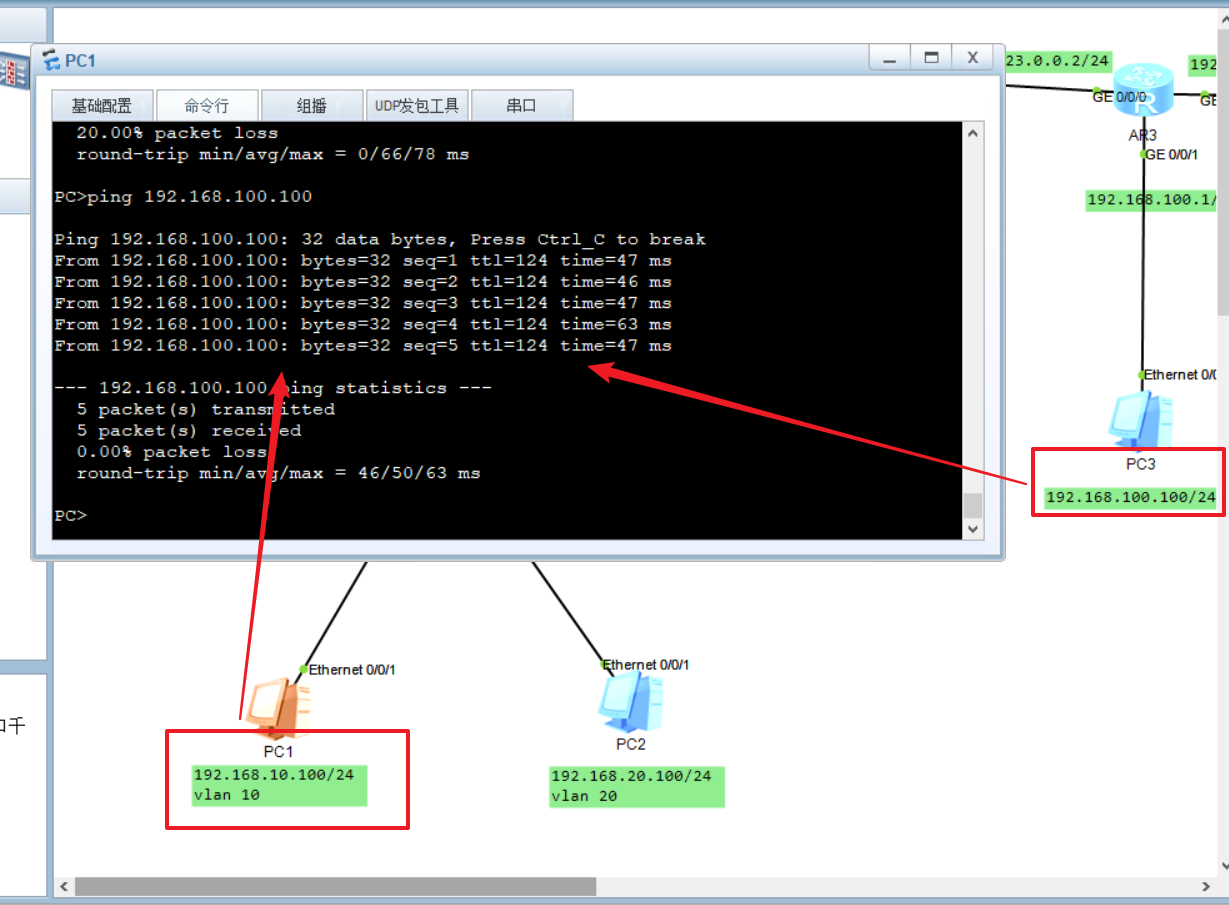
2、PC1ping通PC3
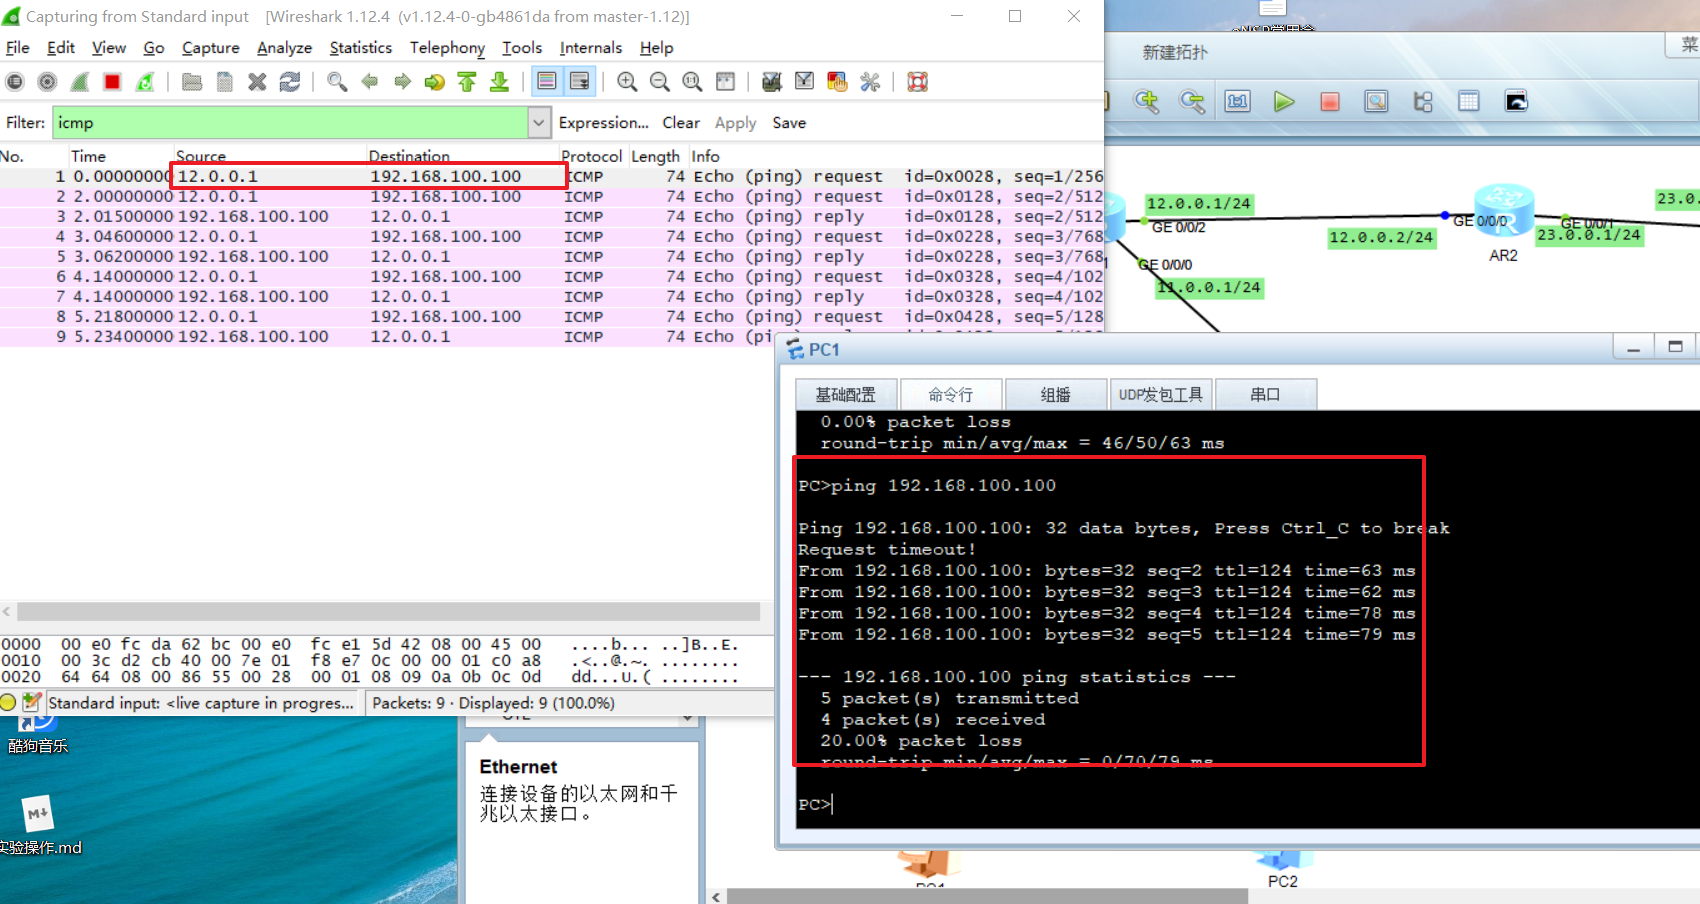
3、使用Easy Ip进行转换使得Client1能够使用R1的g0/0/2的IP访问外网
4、使用NAT-server使得Client1访问server的Web服务,并且能够使用R3的g0/0/0接口进行登陆FTP。
sw1配置(二层交换机)
配置思路:
与计算机连接的接口模式为access模式,与三层交换机相连接的为trunk,客户端和pc1都为vlan 10,pc2位vlan 20.且上行两个接口都至少需要vlan 10和vlan 20允许通过,因为三层交换机互为主备,所以两边都要可以实现通过。
<Huawei>sys    #进入系统模式
Enter system view, return user view with Ctrl+Z.
[Huawei]sysname SW1   # 修改名称
[SW1]undo info-center enable   #取消提示
Info: Information center is disabled.
[SW1]vlan batch 10 20   #创建vlan 10 20
Info: This operation may take a few seconds. Please wait for a moment...done.

[SW1]int e0/0/1    #进入接口e0/0/1
[SW1-Ethernet0/0/1]port link-type access    #设置为access模式
[SW1-Ethernet0/0/1]port default vlan 10     #默认vlan为10
[SW1-Ethernet0/0/1]undo shutdown      #开启端口
Info: Interface Ethernet0/0/1 is not shutdown.

[SW1-Ethernet0/0/1]int e0/0/2     #进入接口e0/0/2
[SW1-Ethernet0/0/2]port link-type access     #设置为access模式
[SW1-Ethernet0/0/2]port default vlan 20     #默认vlan为20
[SW1-Ethernet0/0/2]undo shutdown     #开启端口
Info: Interface Ethernet0/0/2 is not shutdown.

[SW1-Ethernet0/0/2]int e0/0/3    #进入接口e0/0/3
[SW1-Ethernet0/0/3]port link-type access    #设置为access模式
[SW1-Ethernet0/0/3]port default vlan 10     #设置默认vlan
[SW1-Ethernet0/0/3]undo shutdown      #开启端口
Info: Interface Ethernet0/0/3 is not shutdown.

[SW1-Ethernet0/0/3]int g0/0/1     #进入g0/0/1接口
[SW1-GigabitEthernet0/0/1]port link-type trunk     #设置trunk模式
[SW1-GigabitEthernet0/0/1]port trunk allow-pass vlan all     #设置所有vlan允许通过
[SW1-GigabitEthernet0/0/1]undo shutdown    #开启端口
Info: Interface GigabitEthernet0/0/1 is not shutdown.

[SW1-GigabitEthernet0/0/1]int g0/0/2   #进入g0/0/2接口
[SW1-GigabitEthernet0/0/2]port link-type trunk     #设置trunk模式
[SW1-GigabitEthernet0/0/2]port trunk allow-pass vlan all   #设置所有vlan允许通过
[SW1-GigabitEthernet0/0/2]undo shutdown    #开启端口
Info: Interface GigabitEthernet0/0/2 is not shutdown.
[SW1-GigabitEthernet0/0/2]q
SW2配置(三层交换机)
配置思路:
三层交换机具有路由器和交换的功能,但是接口无法直接设置ip,所以需要通过创建Vlan来设置虚拟ip,设置好虚拟ip之后然后再在实际接口中允许所创建的vlan通过。因为sw2是pc1的主链路,所以在设置vrrp时,需要将它的优先级设置高一点,pc2在sw2上的链路是备链路,所以优先级暂不设置,默认100。因为三层交换机与R1不在同一网段,所以需要设置默认路由可以实现与路由器AR1的通信。
<Huawei>sys   #进入系统模式
Enter system view, return user view with Ctrl+Z.
[Huawei]sysname SW2   #修改名称
[SW2]undo info-center enable   #关闭提示
Info: Information center is disabled.
[SW2]vlan batch 10 20 100   #创建vlan
Info: This operation may take a few seconds. Please wait for a moment...done.

[SW2]int vlanif 10    #进入虚拟接口vlanif 10
[SW2-Vlanif10]ip add 192.168.10.10 24   #设置接口ip
[SW2-Vlanif10]vrrp vrid 1 virtual-ip 192.168.10.1    #设置虚拟ip
[SW2-Vlanif10]vrrp vrid 1 priority 120     #设置优先级120
[SW2-Vlanif10]vrrp vrid 1 preempt-mode timer delay 5   #设置抢占时间5s
[SW2-Vlanif10]vrrp vrid 1 track int g0/0/2 reduced 30   #监控上行接口
[SW2-Vlanif10]vrrp vrid 1 track int g0/0/1 reduced 30   #监控下行接口
[SW2-Vlanif10]di th   #查看所有配置
#
interface Vlanif10
 ip address 192.168.10.10 255.255.255.0
 vrrp vrid 1 virtual-ip 192.168.10.1
 vrrp vrid 1 priority 120
 vrrp vrid 1 preempt-mode timer delay 5
 vrrp vrid 1 track interface GigabitEthernet0/0/2 reduced 30
 vrrp vrid 1 track interface GigabitEthernet0/0/1 reduced 30
#
return
[SW2-Vlanif10]q   #返回

[SW2]int vlanif 20    #进入虚拟接口vlanif 20
[SW2-Vlanif20]ip add 192.168.20.20 24   #配置接口ip
[SW2-Vlanif20]vrrp vrid 2 virtual-ip 192.168.20.1   #配置虚拟ip
[SW2-Vlanif20]di th   #查看配置
#
interface Vlanif20
 ip address 192.168.20.20 255.255.255.0
 vrrp vrid 2 virtual-ip 192.168.20.1
#
return
[SW2-Vlanif20]q   #返回

[SW2]int g0/0/1   #进入接口g0/0/1
[SW2-GigabitEthernet0/0/1]port link-type trunk   #配置trunk模式
[SW2-GigabitEthernet0/0/1]port trunk allow-pass vlan all   #设置所有vlan允许通过
[SW2-GigabitEthernet0/0/1]di th   #查看配置
#
interface GigabitEthernet0/0/1
 port link-type trunk
 port trunk allow-pass vlan 2 to 4094
#
return
[SW2-GigabitEthernet0/0/1]undo shutdown   #启动接口
Info: Interface GigabitEthernet0/0/1 is not shutdown.
[SW2-GigabitEthernet0/0/1]q   #返回

[SW2]int vlanif 100   #进入虚拟接口vlanif100
[SW2-Vlanif100]ip add 10.0.0.10 24   #设置接口ip
[SW2-Vlanif100]q   #返回

[SW2]int g0/0/2    #进入g0/0/2接口
[SW2-GigabitEthernet0/0/2]port link-type access   #设置access模式
[SW2-GigabitEthernet0/0/2]port default vlan 100    #设置默认vlan 100
[SW2-GigabitEthernet0/0/2]undo shutdown   #开启接口
Info: Interface GigabitEthernet0/0/2 is not shutdown.
[SW2-GigabitEthernet0/0/2]di th   #查看配置
#
interface GigabitEthernet0/0/2
 port link-type access
 port default vlan 100
#
return
[SW2-GigabitEthernet0/0/2]q   #返回

[SW2]ip route-static 0.0.0.0 0.0.0.0 10.0.0.1   #配置默认路由
SW3配置(三层交换机)
三层交换机具有路由器和交换的功能,但是接口无法直接设置ip,所以需要通过创建Vlan来设置虚拟ip,设置好虚拟ip之后然后再在实际接口中允许所创建的vlan通过。因为sw3是pc2的主链路,所以在设置vrrp时,需要将它的优先级设置高一点,同理,pc1在sw3上的链路是备链路,所有优先级暂不设置,默认100。最后设置一个默认路由器,因为三层交换机与R1不在同一网段,所以设置默认路由可以实现与路由器AR1的通信。
<Huawei>sys   #进入系统模式
Enter system view, return user view with Ctrl+Z.
[Huawei]sysname SW3   #修改名称
[SW3]undo info-center enable    #关闭提示
Info: Information center is disabled.
[SW3]vlan batch 10 20 100    #创建vlan 10 20 100
Info: This operation may take a few seconds. Please wait for a moment...done.

[SW3]int vlanif 10   #进入虚拟接口vlanif 10
[SW3-Vlanif10]ip add 192.168.10.20 24  #设置接口ip
[SW3-Vlanif10]vrrp vrid 1 virtual-ip 192.168.10.1  #设置虚拟ip
[SW3-Vlanif10]di th   #查看接口
#
interface Vlanif10
 ip address 192.168.10.20 255.255.255.0
 vrrp vrid 1 virtual-ip 192.168.10.1
#
return
[SW3-Vlanif10]q   #返回

[SW3]int vlanif 20    #进入虚拟接口vlanif 20
[SW3-Vlanif20]ip add 192.168.20.10 24      #设置接口ip
[SW3-Vlanif20]vrrp vrid 2 virtual-ip 192.168.20.1    #设置虚拟ip
[SW3-Vlanif20]vrrp vrid 2 priority 120   #设置优先级120
[SW3-Vlanif20]vrrp vrid 2 preempt-mode timer delay 5   #设置抢占时间5s
[SW3-Vlanif20]vrrp vrid 2 track int g0/0/2 reduced 30   #监控上行接口
[SW3-Vlanif20]vrrp vrid 2 track int g0/0/1 reduced 30   #监控下行接口
[SW3-Vlanif20]di th   #查看命令
#
interface Vlanif20
 ip address 192.168.20.20 255.255.255.0
 vrrp vrid 2 virtual-ip 192.168.20.1
 vrrp vrid 2 priority 120
 vrrp vrid 2 preempt-mode timer delay 5
 vrrp vrid 2 track interface GigabitEthernet0/0/2 reduced 30
 vrrp vrid 2 track interface GigabitEthernet0/0/1 reduced 30
#
return
[SW3-Vlanif20]q   #返回

[SW3]int vlanif 100   #进入虚拟接口vlanif 100
[SW3-Vlanif100]ip add 11.0.0.20 24    #设置接口ip

[SW3]int g0/0/2   #进入接口g0/0/2
[SW3-GigabitEthernet0/0/2]port link-type access   #设置access模式
[SW3-GigabitEthernet0/0/2]port default vlan 100   #默认vlan100
[SW3-GigabitEthernet0/0/2]undo shutdown   #开启接口
Info: Interface GigabitEthernet0/0/2 is not shutdown.
[SW3-GigabitEthernet0/0/2]di th   #查看配置
#
interface GigabitEthernet0/0/2
 port link-type access
 port default vlan 100
#
return

[SW3-GigabitEthernet0/0/2]int g0/0/1   进入g0/0/1接口
[SW3-GigabitEthernet0/0/1]port link-type trunk    #设置trunk模式
[SW3-GigabitEthernet0/0/1]port trunk allow-pass vlan all  #设置允许所有vlan通过
[SW3-GigabitEthernet0/0/1]undo shutdown   #开启端口
Info: Interface GigabitEthernet0/0/1 is not shutdown.
[SW3-GigabitEthernet0/0/1]di th   #查看端口
#
interface GigabitEthernet0/0/1
 port link-type trunk
 port trunk allow-pass vlan 2 to 4094
#
return
[SW3-GigabitEthernet0/0/1]q   #返回

[SW3]ip route-static 0.0.0.0 0.0.0.0 11.0.0.1   #设置默认路由
AR1设置(路由器)
配置思路:
根据接口ip设置好各个的接口ip地址,然后启动,就开始配置静态路由,首先先配置往下的静态路由,因为根三层交换机不在同一网段,先配置往PC1的主线路sw2的静态路由,在配置往PC2的备线路sw3的浮动路由,然后先配置往PC2的主线路SW2的静态路由器,再配置往PC2备线路SW1的浮动路由,以上配置好后,再配置往右侧的静态路由,一个指向pc3,一个指向server1。然后配置结束。
<Huawei>sys  #进入系统模式
Enter system view, return user view with Ctrl+Z.
[Huawei]sysname R1   #修改名称R1
[R1]undo info-center enable    #关闭提示
Info: Information center is disabled.
[R1]int g0/0/0   #进入接口g0/0/0
[R1-GigabitEthernet0/0/0]ip add 11.0.0.1 24  #设置接口ip
[R1-GigabitEthernet0/0/0]undo shutdown    #开启接口
Info: Interface GigabitEthernet0/0/0 is not shutdown.

[R1-GigabitEthernet0/0/0]int g0/0/1   #进入接口g0/0/1
[R1-GigabitEthernet0/0/1]ip add 10.0.0.1 24  #设置接口ip
[R1-GigabitEthernet0/0/1]undo shutdown     #开启端口
Info: Interface GigabitEthernet0/0/1 is not shutdown.

[R1-GigabitEthernet0/0/1]int g0/0/2     #进入接口g0/0/2
[R1-GigabitEthernet0/0/2]ip add 12.0.0.1 24  #设置接口ip
[R1-GigabitEthernet0/0/2]undo shutdown       #开启端口
Info: Interface GigabitEthernet0/0/2 is not shutdown.

#设置静态路由
[R1]ip route-static 192.168.10.0 255.255.255.0 10.0.0.10
      #目标网段:192.168.10.0     下一跳地址:10.0.0.10
[R1]ip route-static 192.168.10.0 255.255.255.0 11.0.0.20 preference 70
      #目标网段:192.168.10.0     下一跳地址:11.0.0.20(浮动路由器,当PC1主线路端开后启用)
[R1]ip route-static 192.168.20.0 255.255.255.0 11.0.0.20
      #目标网段:192.168.20.0     下一跳地址:11.0.0.20
[R1]ip route-static 192.168.20.0 255.255.255.0 10.0.0.10 preference 70
      #目标网段:192.168.20.0     下一跳地址:10.0.0.10(浮动路由器,当PC2主线路端开后启用)
[R1]ip route-static 192.168.100.0 255.255.255.0 12.0.0.2
      #目标网段:192.168.100.0     下一跳地址:12.0.0.2
[R1]ip route-static 192.168.200.0 255.255.255.0 12.0.0.2
      #目标网段:192.168.200.0     下一跳地址:12.0.0.2
AR2配置(路由器)
配置思路:
首先进入接口配合ip地址,启动接口,然后配置静态路由,首先配置往左侧的两台静态路由,再配置往右侧的两条静态路由。
<Huawei>sys   #进入系统模式
Enter system view, return user view with Ctrl+Z.
[Huawei]sysname R2   #修改名称
[R2]undo info-center enable   #关闭提示
Info: Information center is disabled.

[R2]int g0/0/0   #进入接口g0/0/0
[R2-GigabitEthernet0/0/0]ip add 12.0.0.2 24   #配置ip地址
[R2-GigabitEthernet0/0/0]undo shutdown    #开启接口
Info: Interface GigabitEthernet0/0/0 is not shutdown.

[R2-GigabitEthernet0/0/0]int g0/0/1   #进入接口g0/0/1
[R2-GigabitEthernet0/0/1]ip add 23.0.0.1 24  #配置ip地址
[R2-GigabitEthernet0/0/1]undo shutdown   #开启接口
Info: Interface GigabitEthernet0/0/1 is not shutdown.


#配置静态路由
[R2]ip route-static 192.168.10.0 255.255.255.0 12.0.0.1
      #目的地址 192.168.10.0    下一跳地址:12.0.0.1
[R2]ip route-static 192.168.20.0 255.255.255.0 12.0.0.1
      #目的地址 192.168.20.0    下一跳地址:12.0.0.1
[R2]ip route-static 192.168.100.0 255.255.255.0 23.0.0.2
      #目的地址 192.168.100.0    下一跳地址:23.0.0.2
[R2]ip route-static 192.168.200.0 255.255.255.0 23.0.0.2
      #目的地址 192.168.200.0    下一跳地址:23.0.0.2
AR3配置(路由器)
配置思路:
进入各个接口将接口ip配置然后启动,配置静态路由只需要配置默认路由就行,因为它现在处于末梢网络,只有一个出口,所以完全可以配置默认路由器。
<Huawei>sys   #进入系统模式
Enter system view, return user view with Ctrl+Z.
[Huawei]sysname R3   #修改名称
[R3]undo info-center enable  #关闭提示
Info: Information center is disabled.
[R3]int g0/0/0   #进入接口g0/0/0
[R3-GigabitEthernet0/0/0]ip add 23.0.0.2 24  #配置接口ip
[R3-GigabitEthernet0/0/0]undo shutdown   #启动接口
Info: Interface GigabitEthernet0/0/0 is not shutdown.
[R3-GigabitEthernet0/0/0]q   #返回

[R3]int g0/0/1   #进入接口g0/0/1
[R3-GigabitEthernet0/0/1]ip add 192.168.100.1 24   #配置接口ip
[R3-GigabitEthernet0/0/1]undo shutdown   #开启接口
Info: Interface GigabitEthernet0/0/1 is not shutdown.

[R3-GigabitEthernet0/0/1]int g0/0/2   #进入接口g0/0/2
[R3-GigabitEthernet0/0/2]ip add 192.168.200.1 24   #配置接口ip
[R3-GigabitEthernet0/0/2]undo shutdown    #开启接口

配置静态路由
[R3]ip route-static 0.0.0.0 0.0.0.0 23.0.0.1
   #配置一条默认路由     下一跳23.0.0.1
至目前为止,第一和第二个需求已完成,下面进行验证
第一个需求:
正常情况下线路这样走:
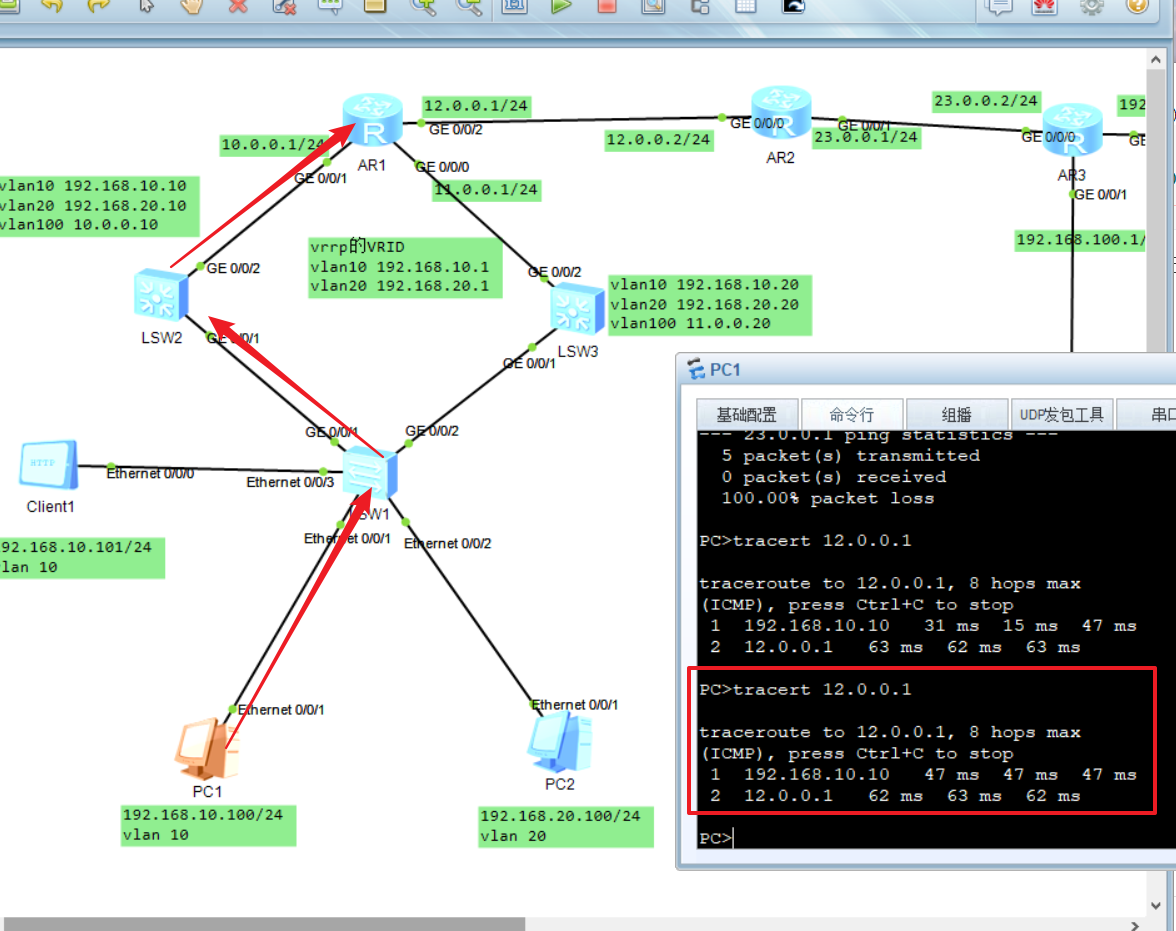
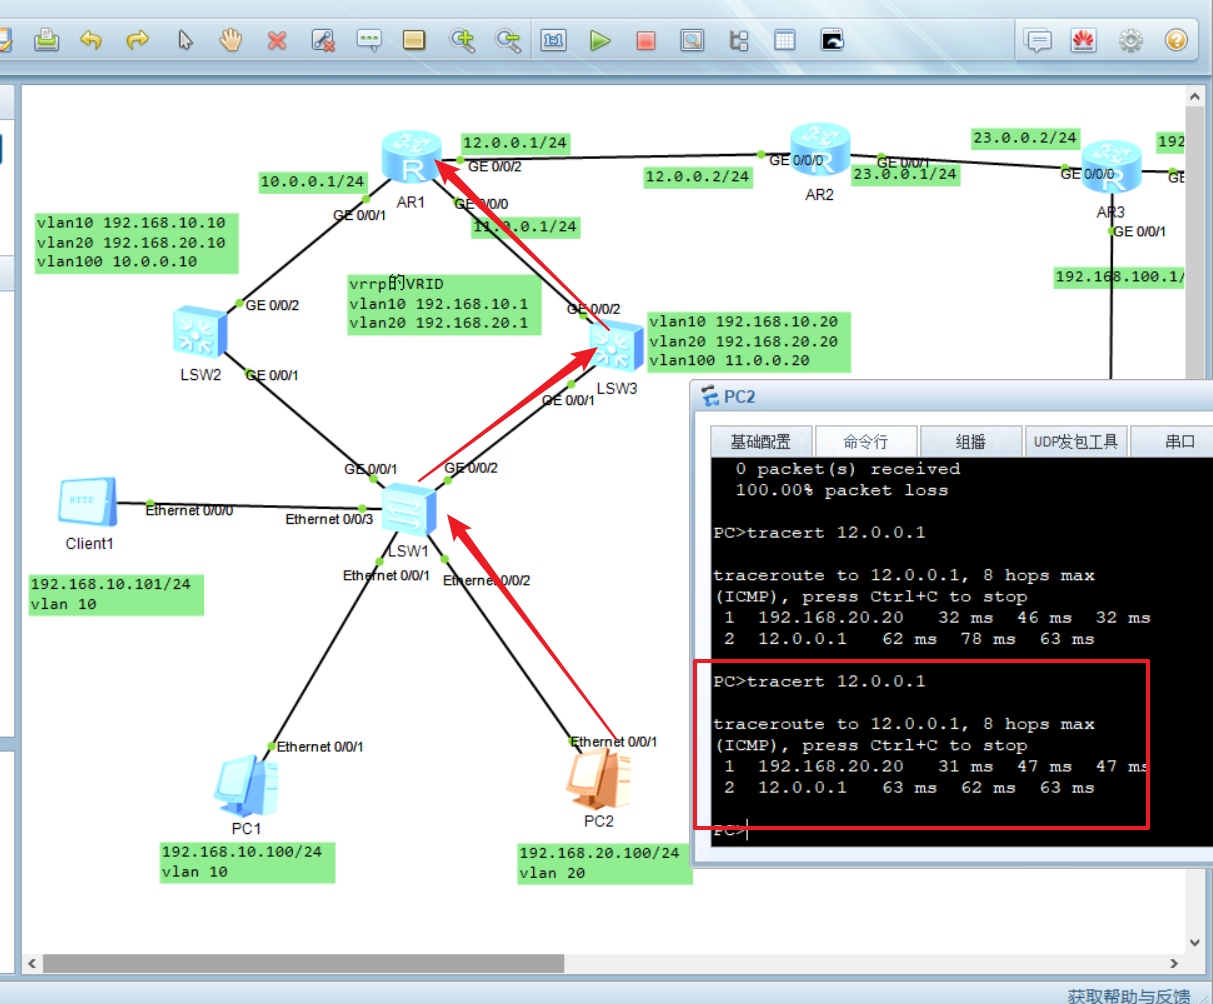
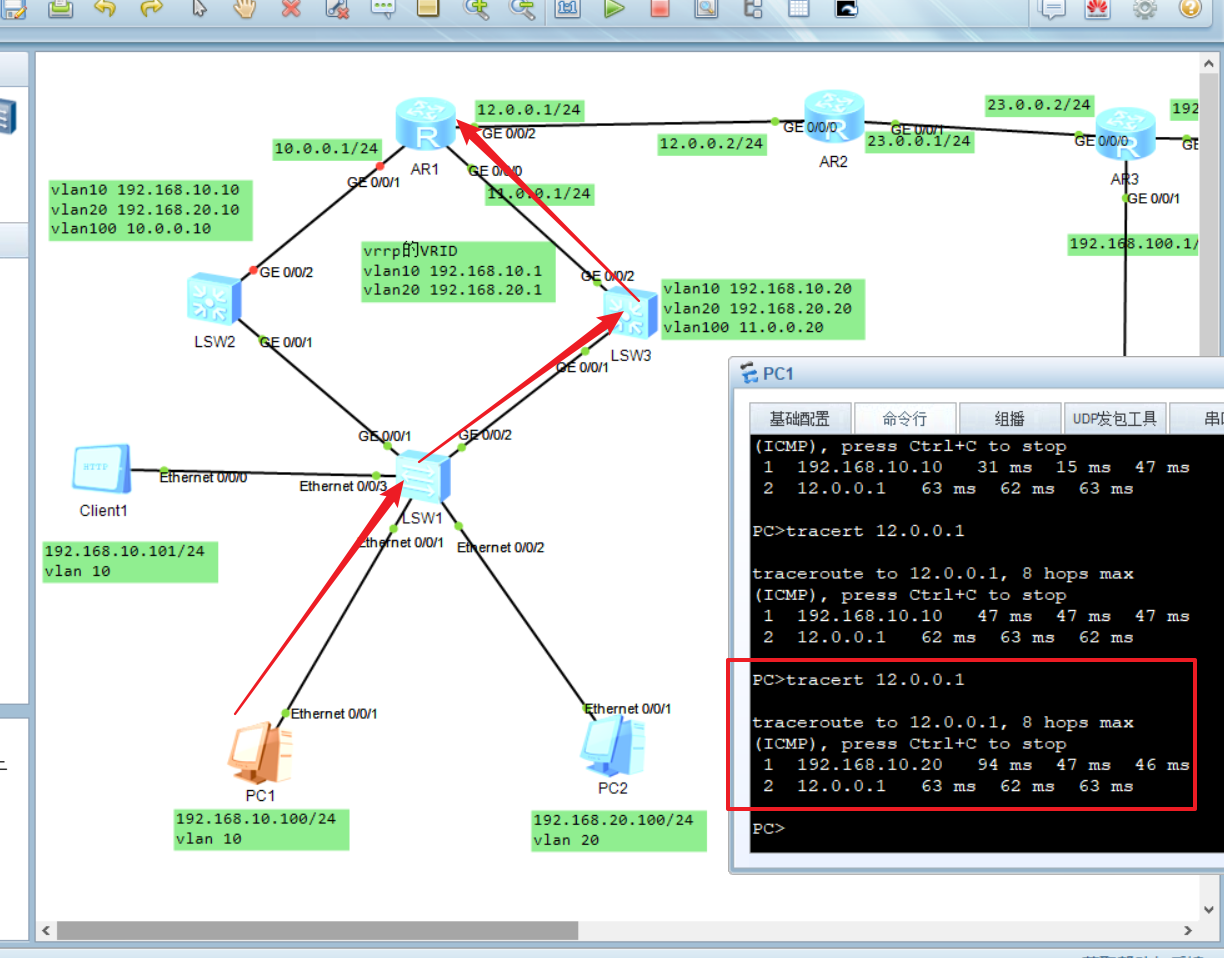
现将SW2线路断开,SW3抢占成功
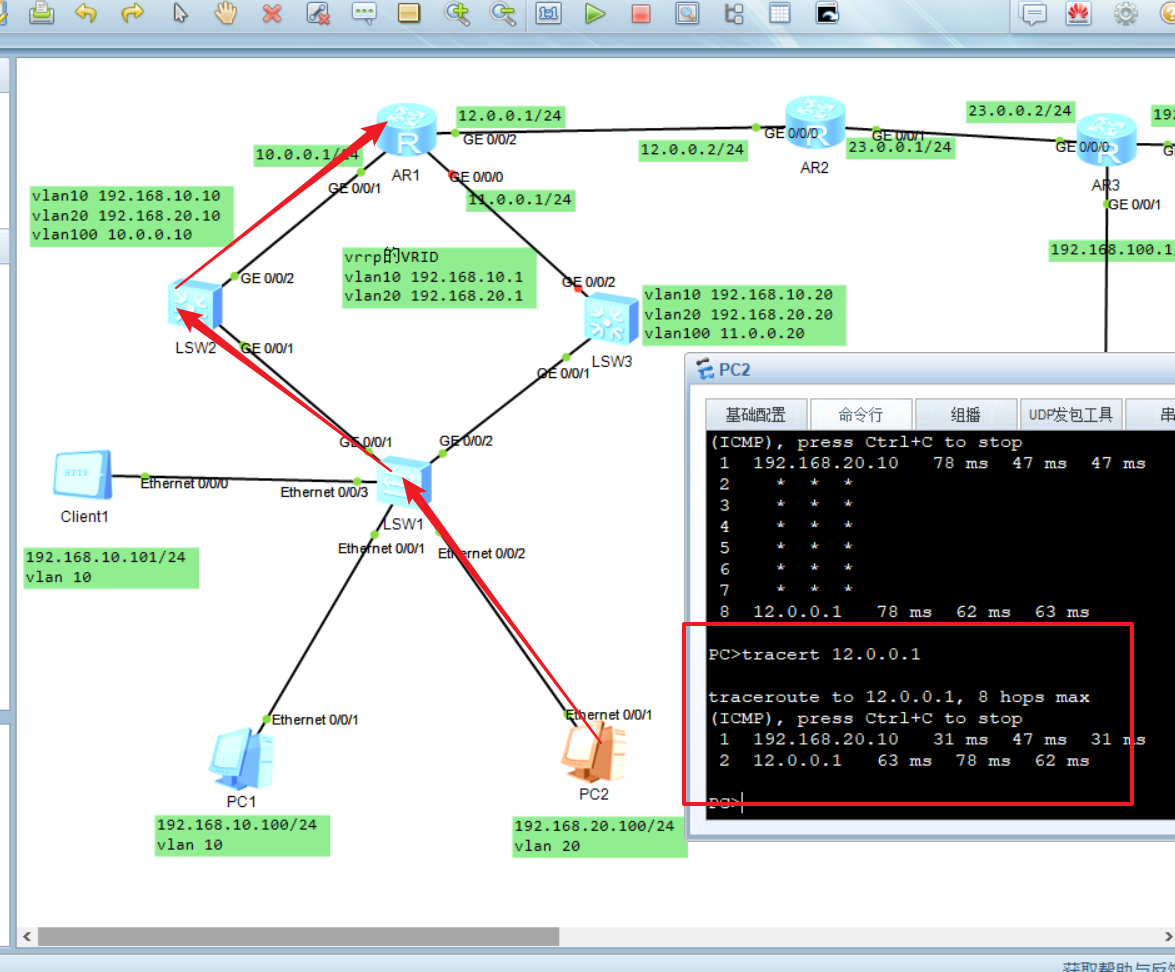
现将SW3线路切断,SW2抢占成功
第二需求:PC1 ping通 PC3
第三个和第四个还需要配置。
第三个配置:
R1配置
配置思路:Easyip配置为 将多个内网转换为一个接口外网地址,首先创建acl来进行设置哪个能否通过,然后再进入接口中映射。
<R1>sys   #进入系统
Enter system view, return user view with Ctrl+Z.
[R1]acl 2000    #创建acl 2000
[R1-acl-basic-2000]rule permit source 192.168.10.0 0.0.0.255   #允许192.168.10.0网段ip地址通过
[R1-acl-basic-2000]int g0/0/2   #进入g0/0/2接口
[R1-GigabitEthernet0/0/2]nat outbound 2000   #将acl配置映射在这个接口上
[R1-GigabitEthernet0/0/2]q   #返回
[R1]dis nat outbound   #查看nat映射表

 NAT Outbound Information:
 --------------------------------------------------------------------------

 Interface                     Acl     Address-group/IP/Interface      Type
 --------------------------------------------------------------------------

 GigabitEthernet0/0/2         2000                       12.0.0.1    easyip
 --------------------------------------------------------------------------

  Total : 1
第三个需求验证:
由图可以看出,源ip地址已转换为接口ip地址。实现了转换。
第四个配置:
R3配置
配置思路:
静态PAT不需要使用ACL,直接在接口上配置私网转公网的地址,且公网地址不要与其它公网地址冲突,自定义。
<R3>sys   #进入系统模式
Enter system view, return user view with Ctrl+Z.
[R3]int g0/0/0   #进入接口g0/0/2
[R3-GigabitEthernet0/0/0]nat server protocol tcp global 23.0.0.5 21 inside 192.1
68.200.200    #在接口上配置私网转公网的ip地址
[R3-GigabitEthernet0/0/0]dis nat server   #查看nat server

  Nat Server Information:
  Interface  : GigabitEthernet0/0/0
    Global IP/Port     : 23.0.0.5/21(ftp)
    Inside IP/Port     : 192.168.200.200/21(ftp)
    Protocol : 6(tcp)
    VPN instance-name  : ----
    Acl number         : ----
    Description : ----

  Total :    1
[R3-GigabitEthernet0/0/0]q   #返回
配置服务器server1

第四个需求验证:
在AR2上使用server1的公网地址,可以完成登录
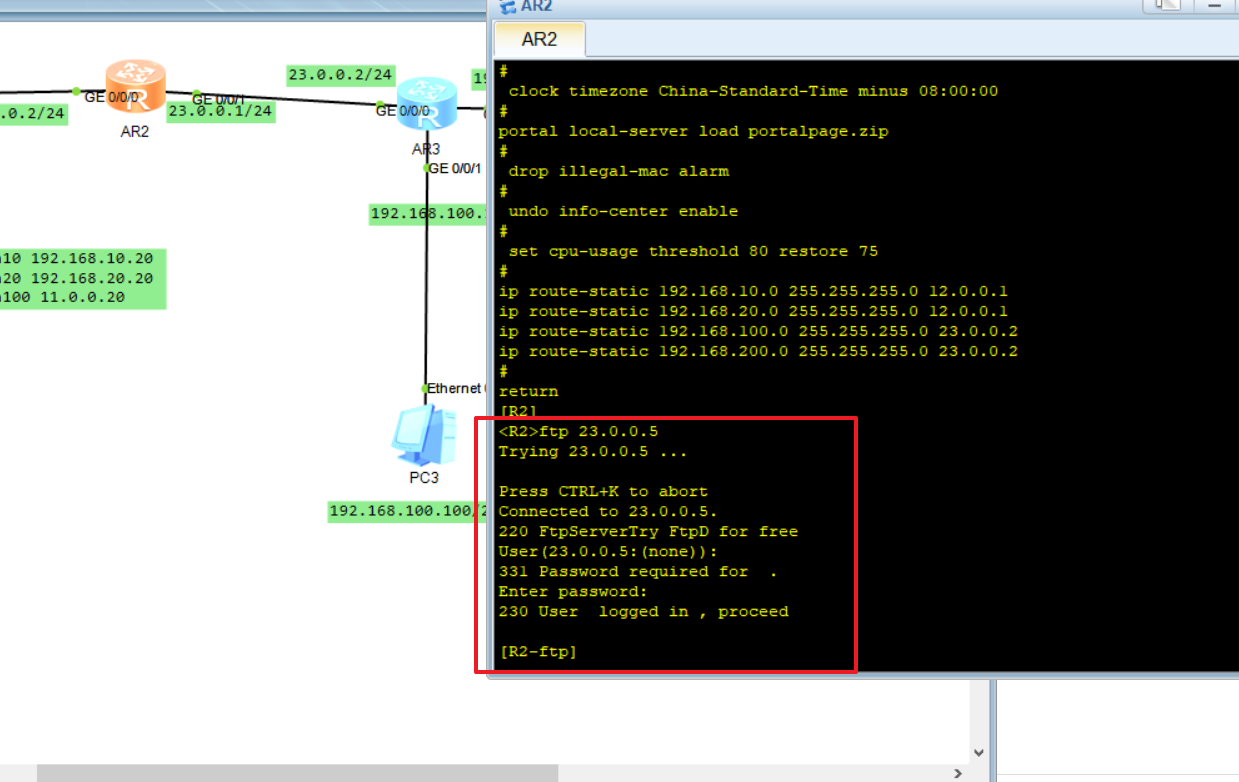
在clent1上可以远程登录FTPserver1的目录。


 562
562

 被折叠的 条评论
为什么被折叠?


