


我们开发的时候经常需要添加定时器去执行程序。那么在springboot项目中添加定时器还是非常方便的,下面我来介绍几种好用的方式。
目录
2. 使用注解(@Scheduled + cron表达式)方式:单线程
3. 使用注解(@Scheduled + @Async + cron表达式)方式,多线程方式
定时任务实现方式:
1. 原生的Timer方式开启定时任务
class javaTask {
    public static void main(String[] args) {
        // 利用java的api Timer实现一个定时任务
        Timer timer = new Timer();
        // 创建一个定时任务
        TimerTask task = new TimerTask() {
            @Override
            public void run() {
                System.out.println("定时任务开始处理业务了。。。");
                System.err.println("执行定时任务时间: " + LocalDateTime.now());
            }
        };
        // 参数1:定时任务, 参数2:项目启动后延时运行时间, 参数3:执行任务的频率
        timer.schedule(task,2 *1000,2 * 1000);
    }
}
2. 使用注解(@Scheduled + cron表达式)方式:单线程
@Component      // 1.用于标记配置类。
@EnableScheduling   // 2.开启定时任务
public class TasksSpringBoot {

    //3.添加定时任务 2秒执行一次
//    @Scheduled(cron = "0/2 * * * * ?")
    // 直接指定时间间隔,例如:2秒
    //@Scheduled(fixedRate=2 * 1000)
    public void configureTasks() {
        System.out.println("线程名称 name = " + Thread.currentThread().getName());
        System.err.println("执行定时任务时间: " + LocalDateTime.now());
    }
}
同一个服务开启多个任务时,任务的执行时机受上一个任务执行时间的影响。适用于只有一个定时任务的项目,多个定时器会影响定时任务的时效问题。测试如下:
@Component      // 1.用于标记配置类。
@EnableScheduling   // 2.开启定时任务
public class TasksSpringBoot {

    //3.添加定时任务 5秒执行一次
    @Scheduled(cron = "0/5 * * * * ?")
    public void configureTasks() throws InterruptedException {
        Thread.sleep(3*1000);
        System.out.println("线程名称 name = " + Thread.currentThread().getName());
        System.err.println("执行定时任务-1时间: " + LocalDateTime.now());
    }

    //3.添加定时任务 5秒执行一次
    @Scheduled(cron = "0/5 * * * * ?")
    public void configureTasks2() throws InterruptedException {
        Thread.sleep(1*1000);
        System.out.println("线程名称 name = " + Thread.currentThread().getName());
        System.err.println("执行定时任务-2时间: " + LocalDateTime.now());
    }
}
控制台打印如下:
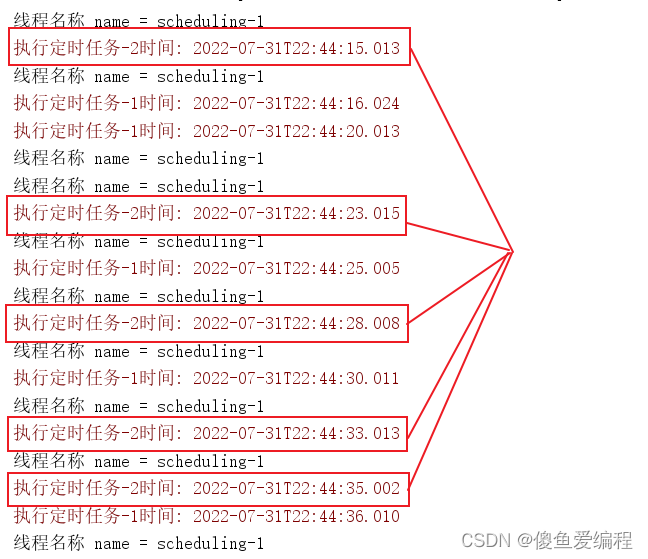
可以看出并不是我们想要的结果,定时任务是同一个线程运行,他们相互影响。我们如何解决呢?请看下一个开启定时任务的方法--多线程开启任务。
3. 使用注解(@Scheduled + @Async + cron表达式)方式,多线程方式
这种方式是多线程开启定时任务,一个项目中可以配备多个定时任务,不会相互影响。
以前我们开发中经常会使用@Async注解,@Async是spring的一个用于调用方法时异步的注解,所以他的返回值是Future类型以及void类型。这个注解可以加到类上或者方法上。添加这个注解之前需要在类上添加@EnableAsync注解(开启异步执行任务)。
代码展示如下:
可以自定义线程池,也可以不使用线程池。默认就会开启多线程。根据自己的项目是否需要线程池来决定。
@Component // 1.用于标记配置类。
@EnableScheduling // 2.开启定时任务
@EnableAsync // 开启异步执行任务(即开启多线程)
public class ThreadTasksSpringBoot {
// 方法异步调用注解(只支持返回值是Future类型以及void类型),指定线程池springThreadPool方式。
// 可以不使用线程池,@Async默认开启多线程SimpleAsyncTaskExecutor
@Async("springThreadPool")
@Scheduled(cron = "0/5 * * * * ?")
public void configureTasks() throws InterruptedException {
System.out.println("线程名称 name = " + Thread.currentThread().getName());
System.err.println("执行定时任务-1 时间: " + LocalDateTime.now());
Thread.sleep(3*1000);
}
@Async("springThreadPool")
@Scheduled(cron = "0/5 * * * * ?")
public void configureTasks2() throws InterruptedException {
System.out.println("线程名称 name = " + Thread.currentThread().getName());
System.err.println("执行定时任务-2 时间: " + LocalDateTime.now());
Thread.sleep(1*1000);
}
@Bean("springThreadPool")
public ThreadPoolTaskExecutor createSpringThreadPool() {
// 创建线程池对象
ThreadPoolTaskExecutor threadPoolTaskExecutor = new ThreadPoolTaskExecutor();
// 设置核心线程数
threadPoolTaskExecutor.setCorePoolSize(8);
// 最大线程数
threadPoolTaskExecutor.setMaxPoolSize(32);
// 线程的闲置时间
threadPoolTaskExecutor.setKeepAliveSeconds(128);
// 最大队列数量
threadPoolTaskExecutor.setQueueCapacity(Integer.MAX_VALUE);
// 线程名称
threadPoolTaskExecutor.setThreadNamePrefix("springThreadPool:");
// 初始化线程
threadPoolTaskExecutor.initialize();
return threadPoolTaskExecutor;
}
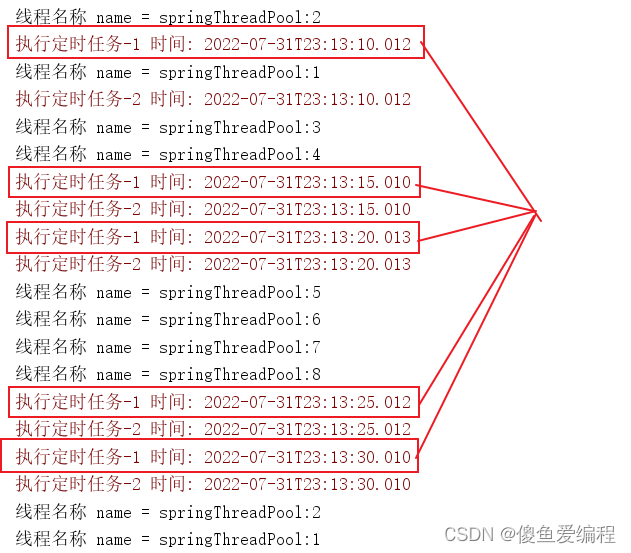
}控制台打印如下:任务之间不会相互影响。
总结:1. 当我们项目需要对个定时任务的时候,第3种方式: 使用注解(@Scheduled + @Async + cron表达式)方式,创建定时任务,因为这样定时任务线程不同,不会相互影响。
2. 当项目只有一个定时任务时可以使用第一或者第二种方式创建定时任务,因为写法简单,方便快捷。


 1万+
1万+


 被折叠的 条评论
为什么被折叠?
被折叠的 条评论
为什么被折叠?
 到【灌水乐园】发言


