


一、软件安装包获取
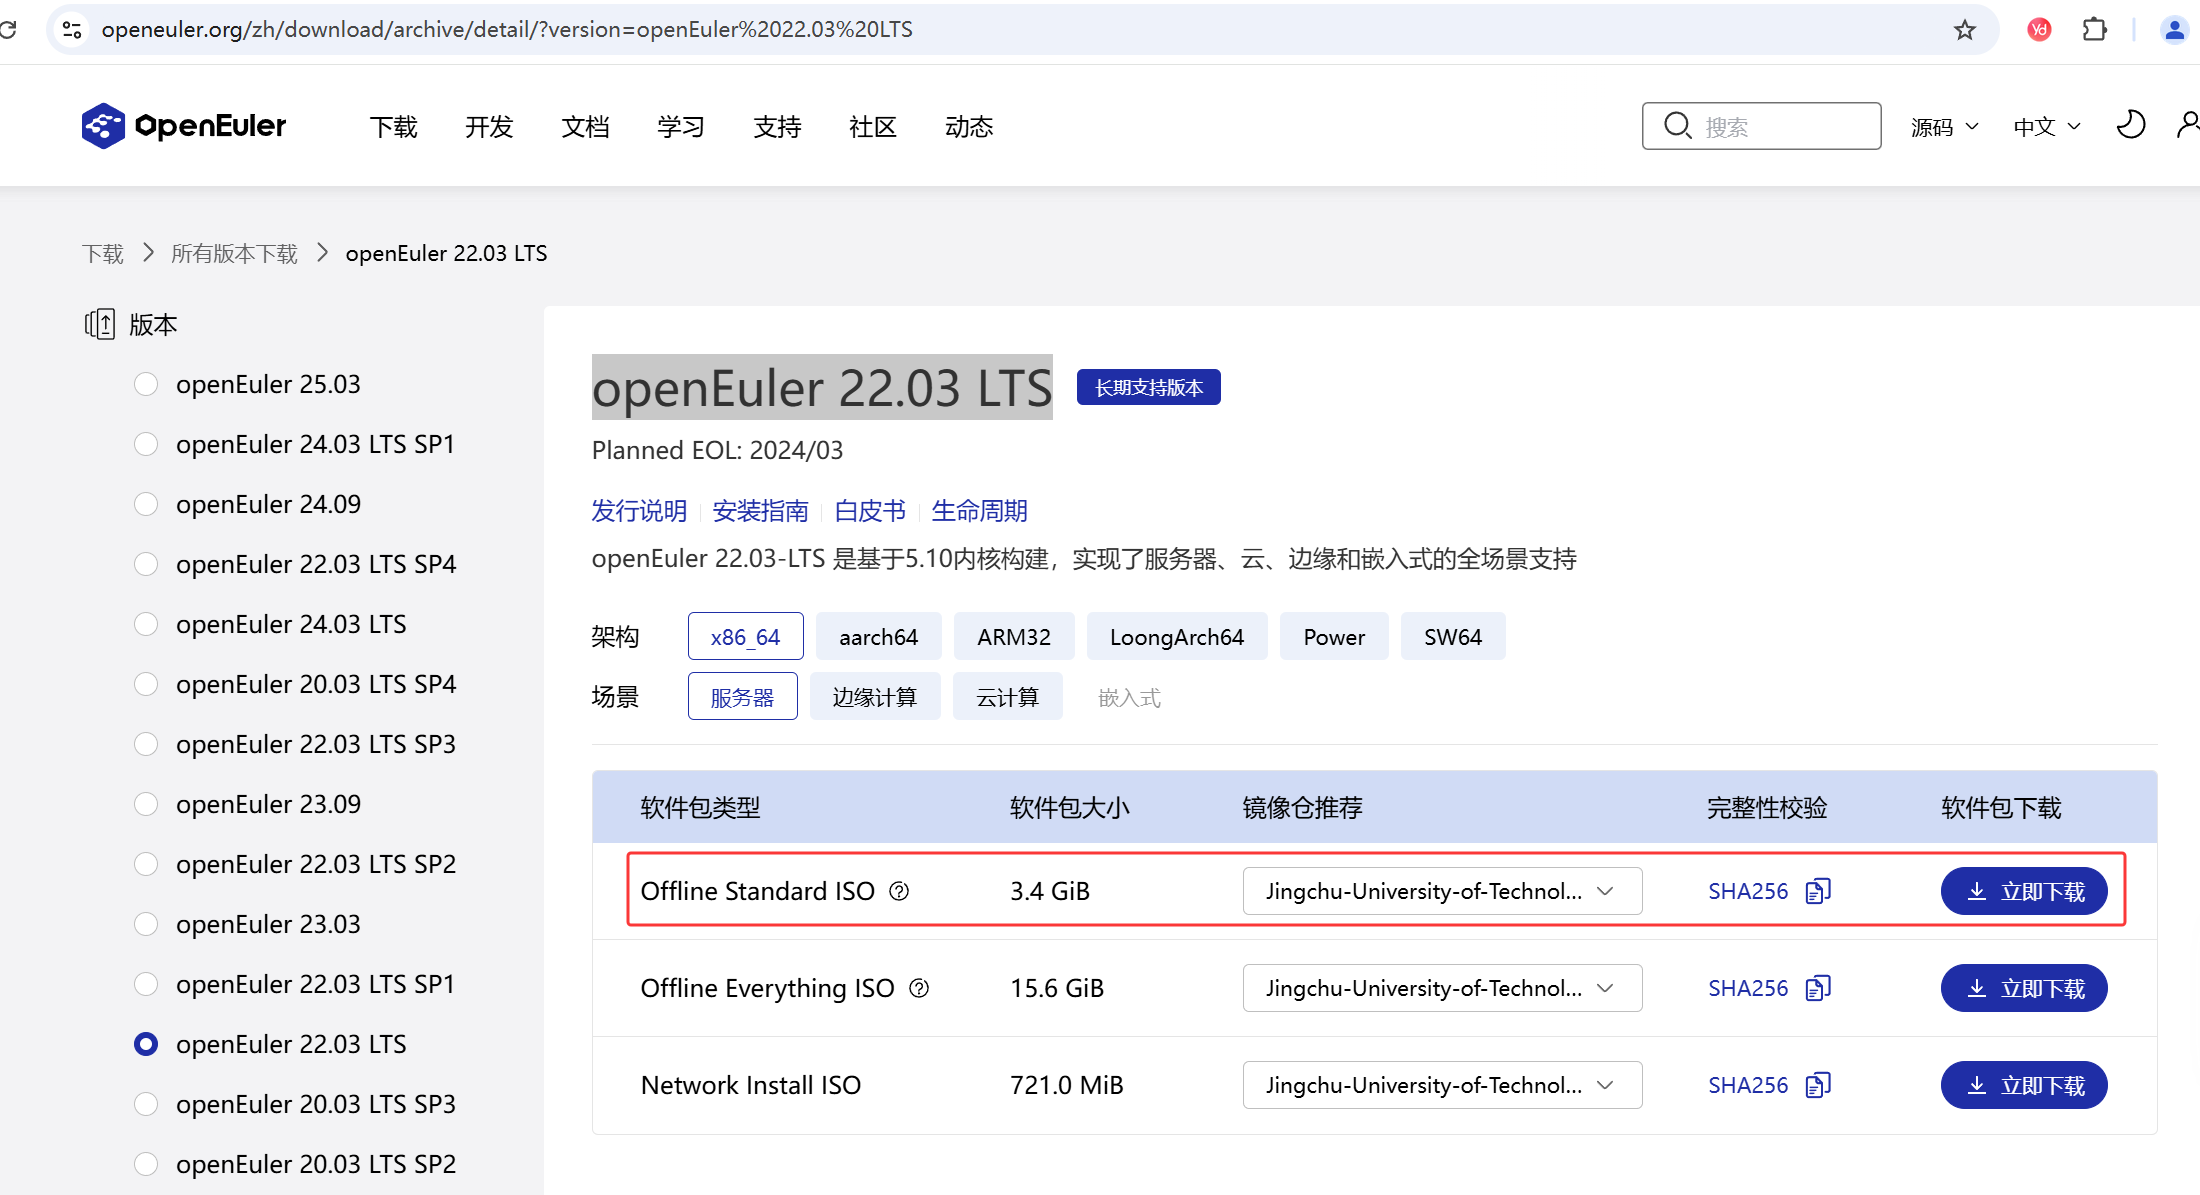
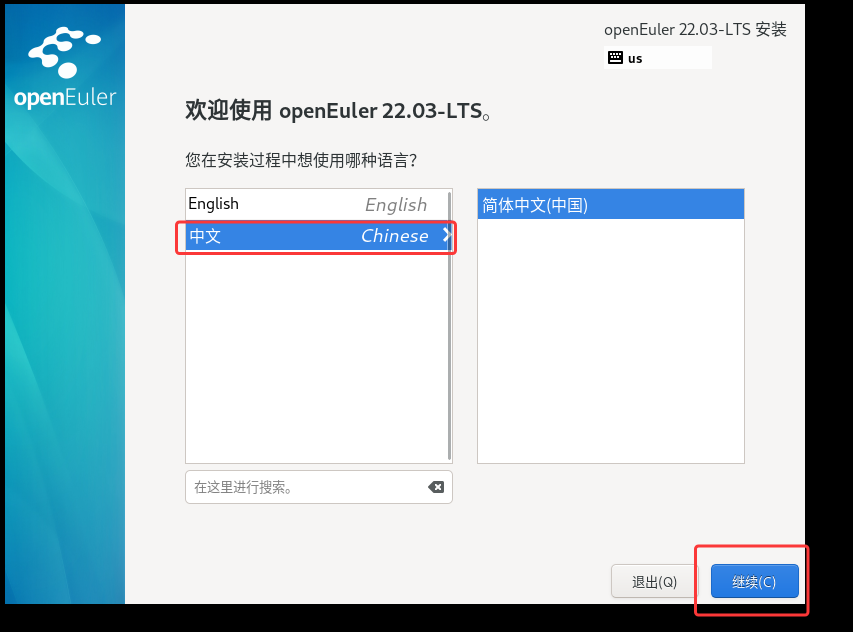
1、openEuler虚拟机镜像获取
下载地址:openEuler 22.03 LTS
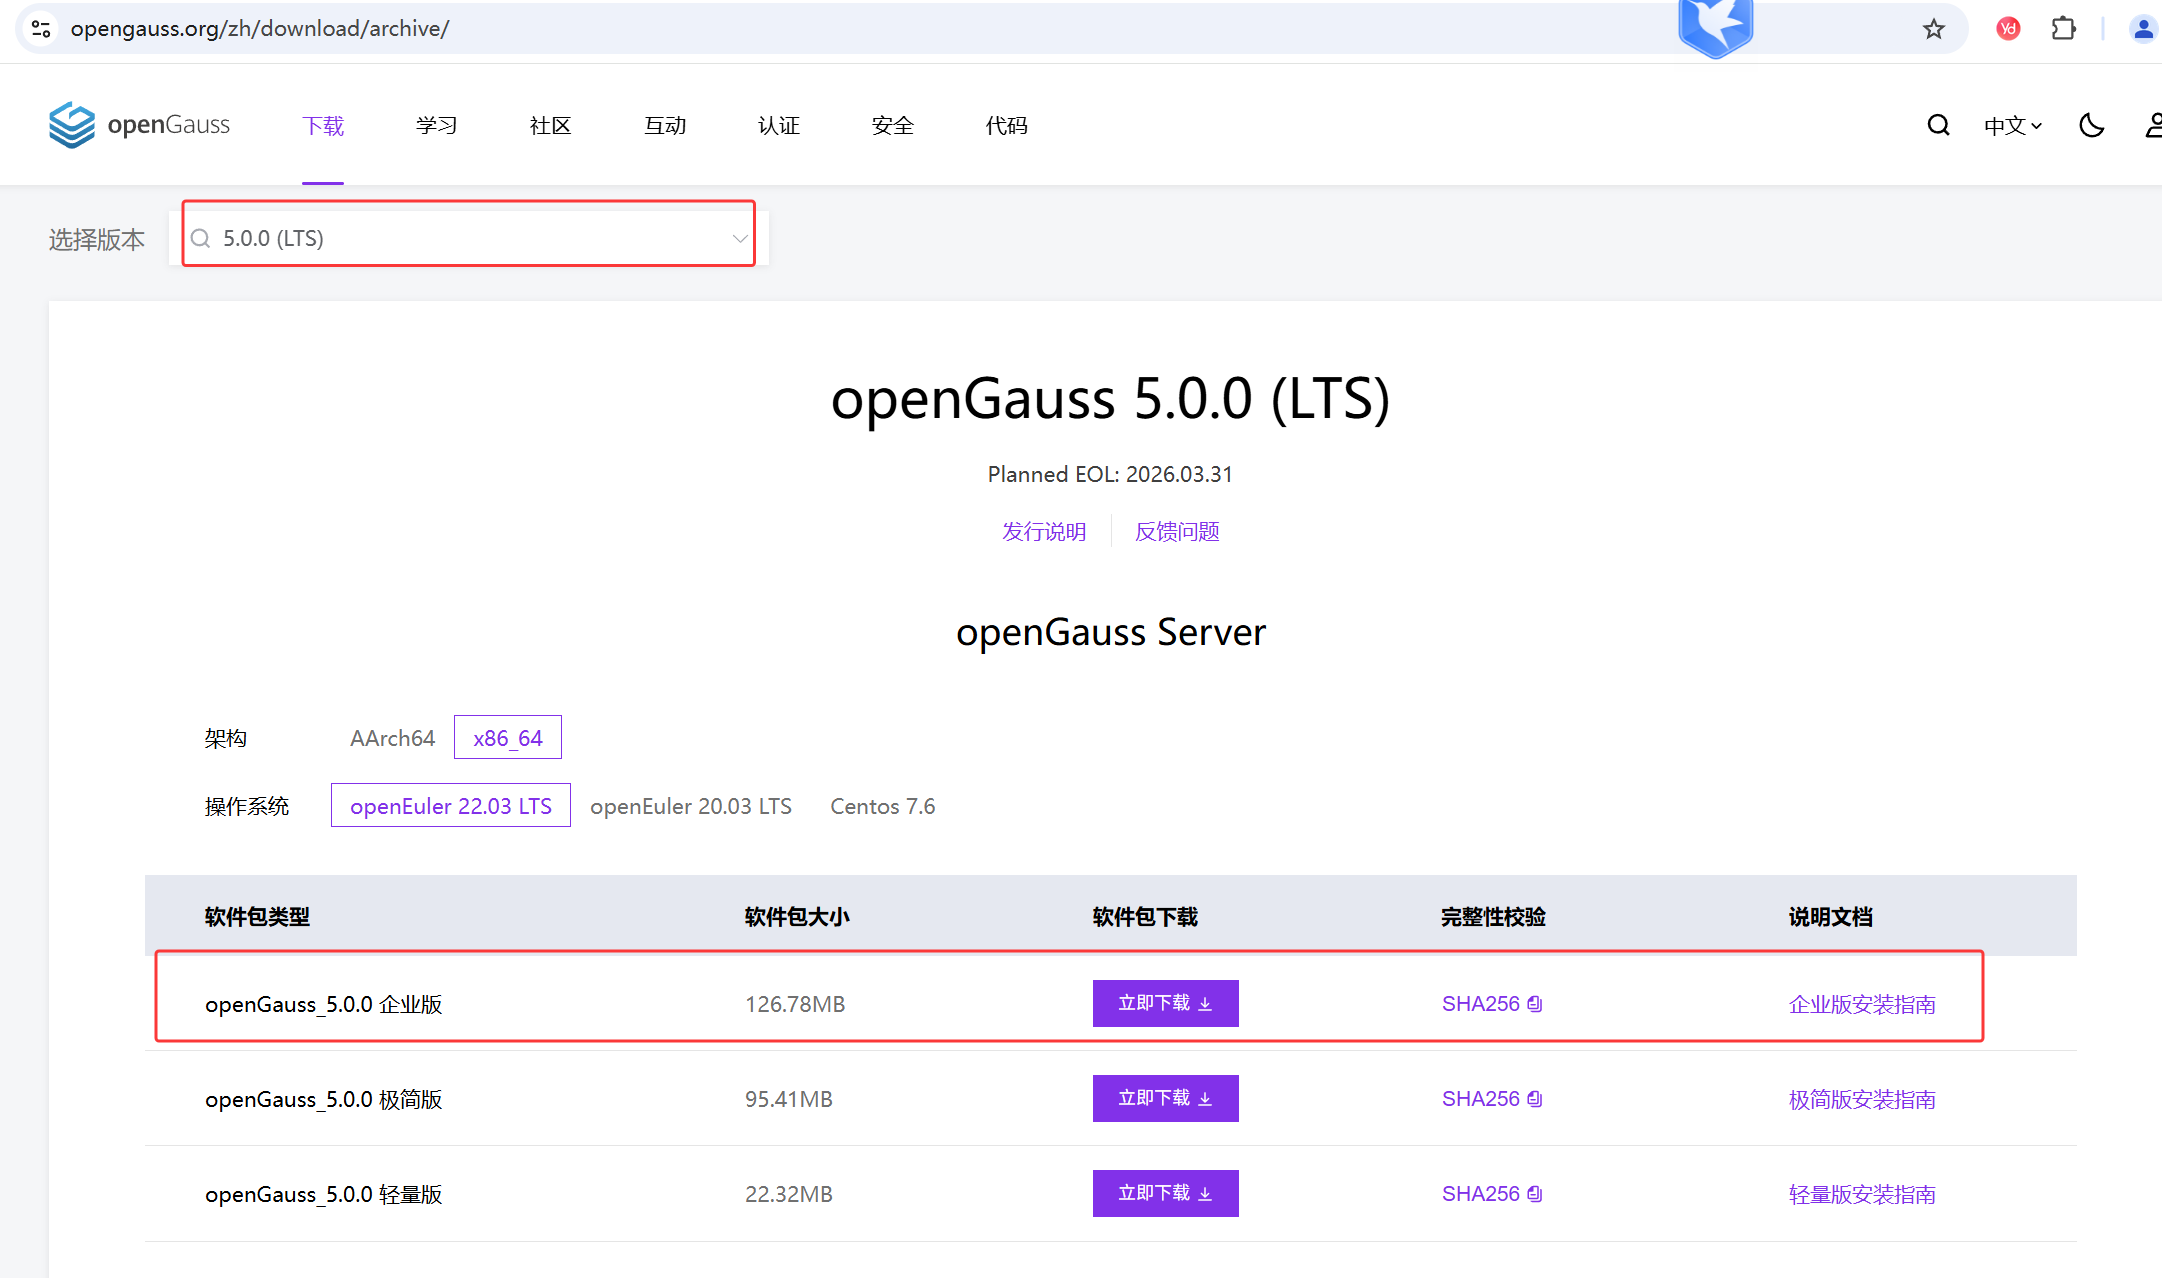
2、openGuass安装包获取
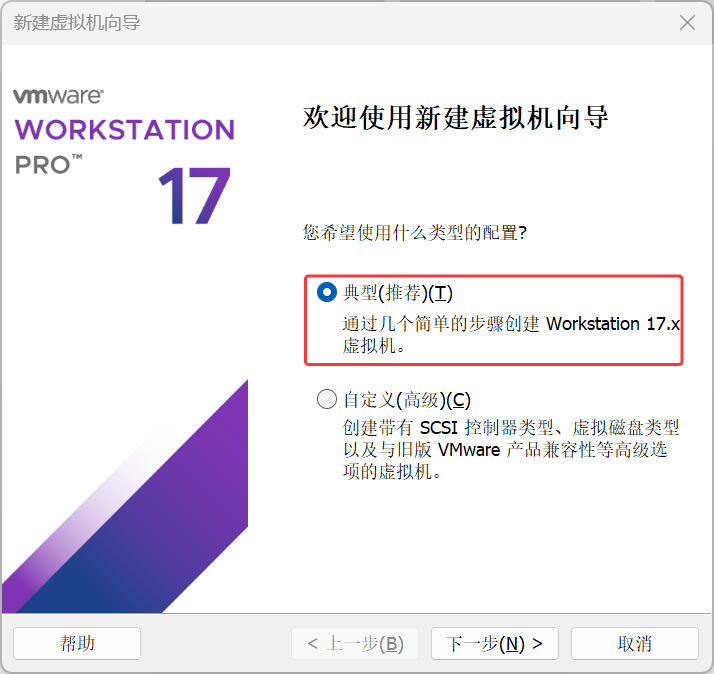
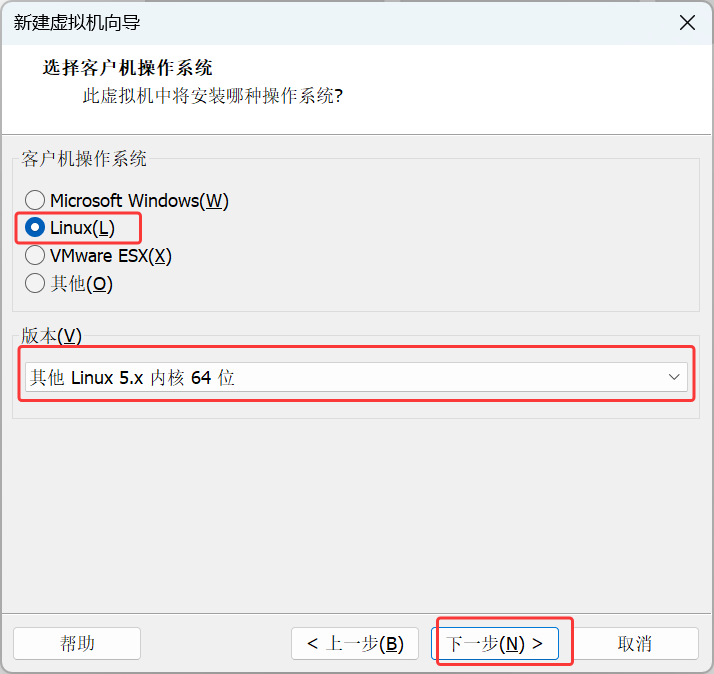
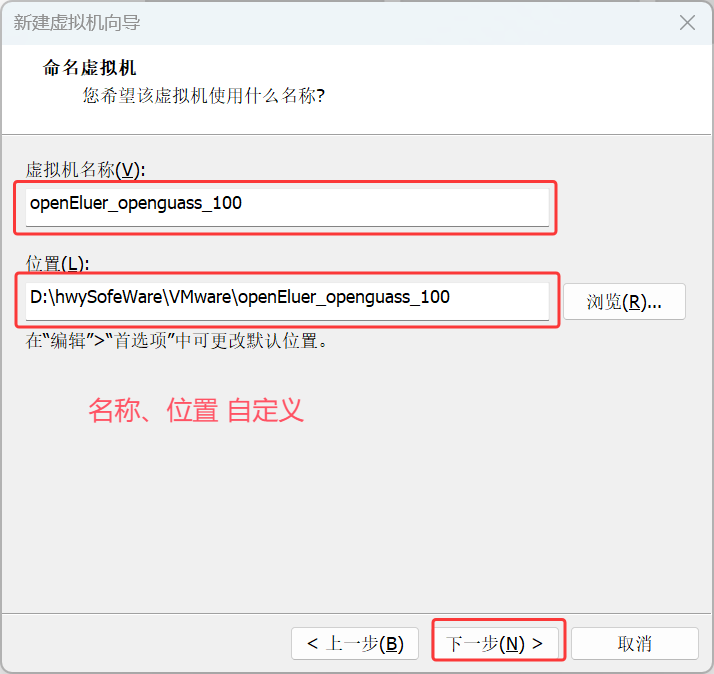
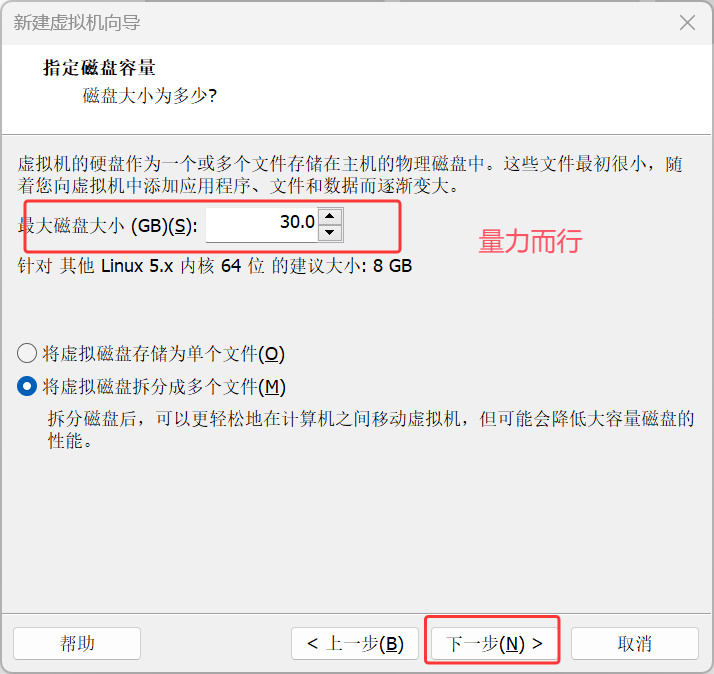
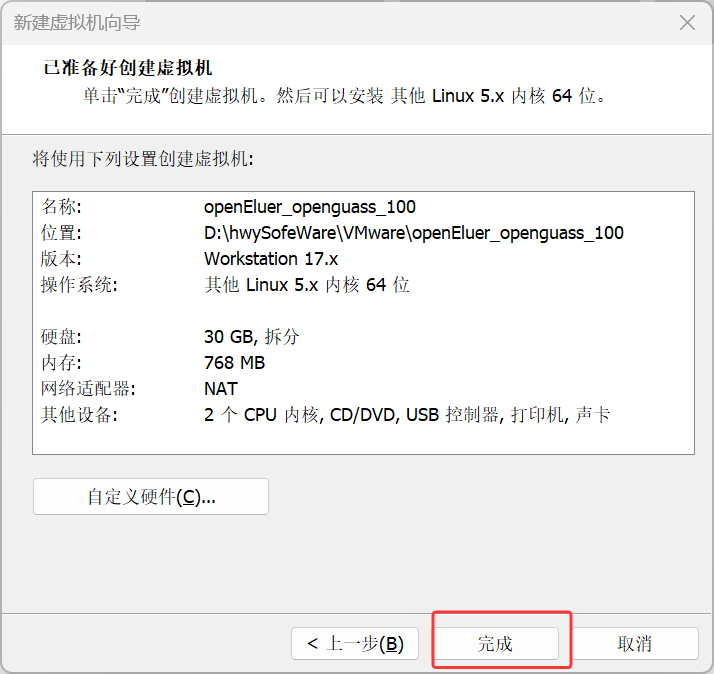
二、新建虚拟机
操作步骤如下:


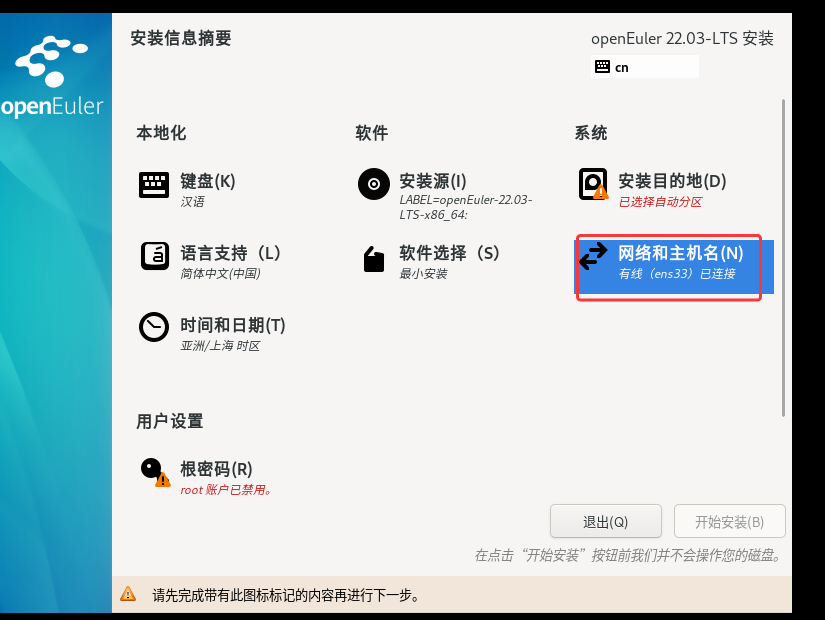
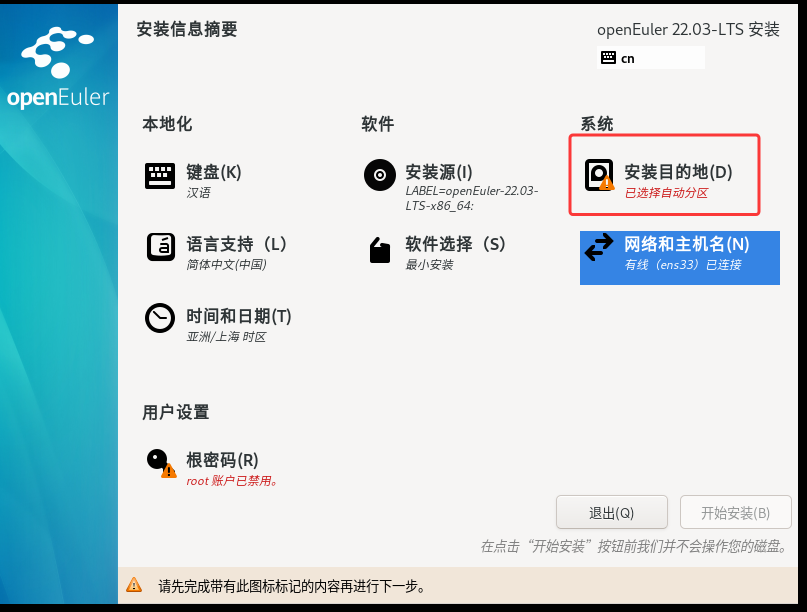
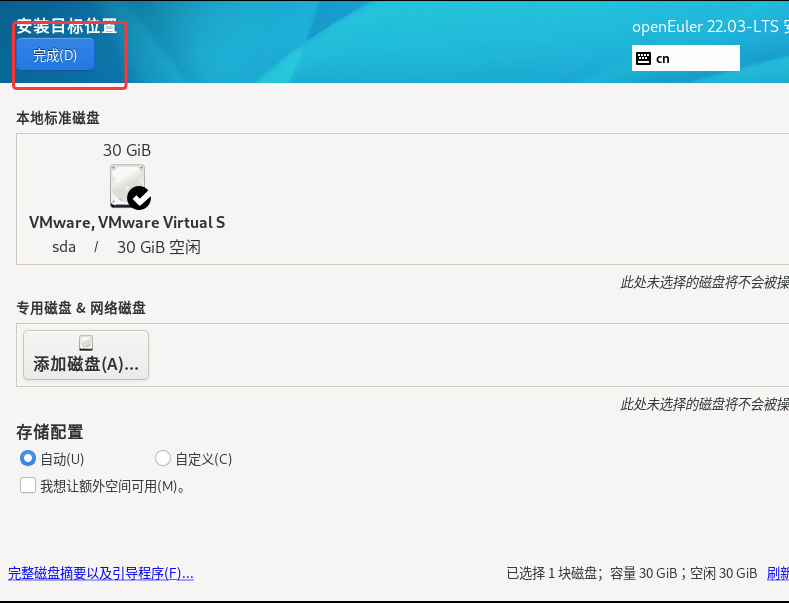
三、操作系统环境配置
1、主机清单
参照第二步再新建两台虚拟机,一共三台虚拟机,网络配置如下:
| 主机名 | IP | 主备 |
| openEuler100 | 192.168.254.100/24 | master |
| openEuler101 | 192.168.254.101/24 | slave |
| openEuler102 | 192.168.254.102/24 | slave |
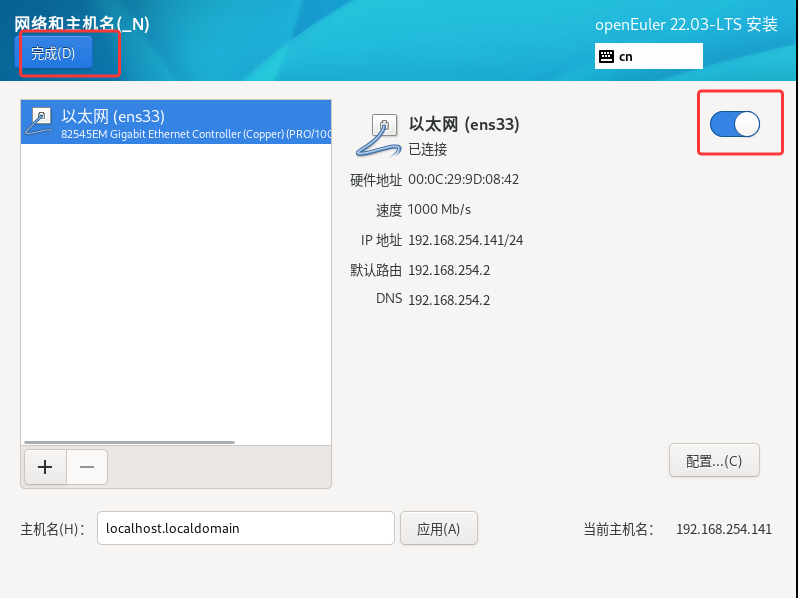
2、网络配置
三台都配置
su - root
vi /etc/sysconfig/network-scripts/ifcfg-ens33

# 更新如下内容,没有的新增,有的变更
# ip地址根据主机清单进行变更
################
BOOTPROTO=static
IPADDR=192.168.254.100
GATEWAY=192.168.254.2
NETMASK=255.255.255.0
DNS=8.8.8.8
################

# 重启网卡或者重启主机,使网络配置生效
systemctl restart NetworkManager

# 检查网络配置是否成功变更
ip a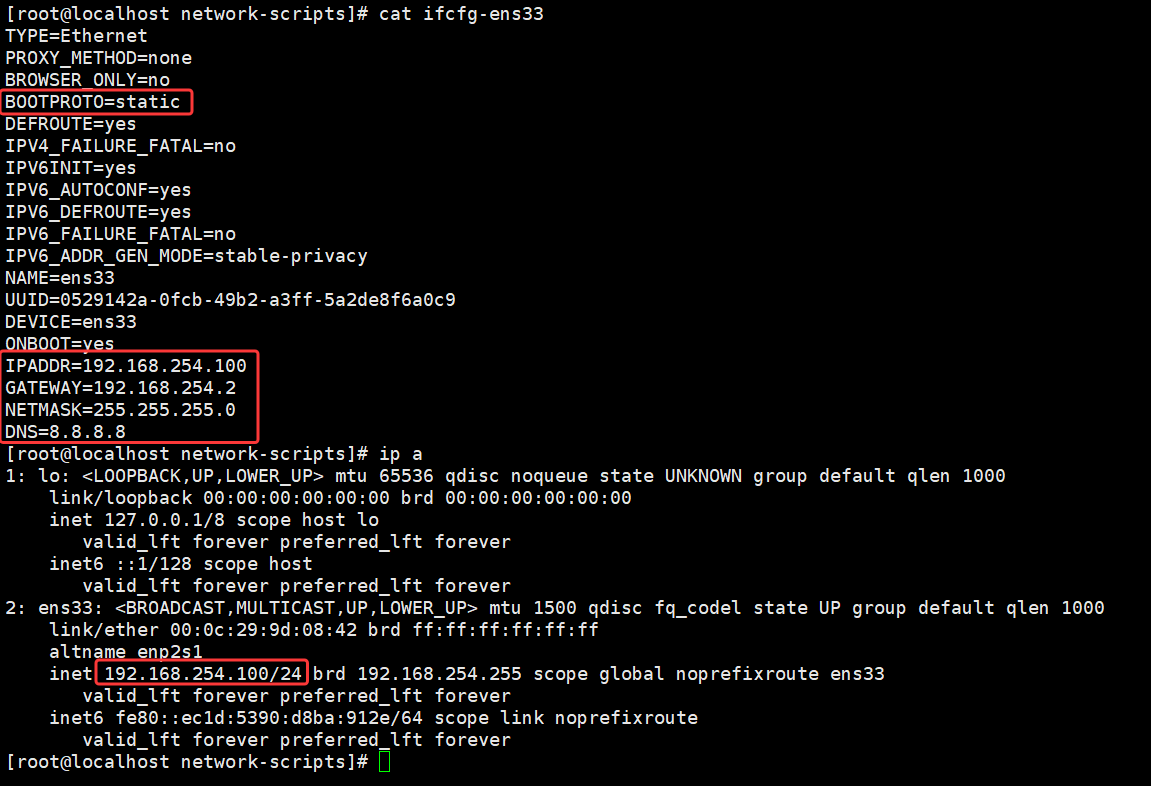
3、关闭防火墙
三台都配置
su - root
systemctl stop firewalld
systemctl disable firewalld

# 查看防火墙是否关闭
systemctl status firewalld
4、关闭selinux
三台都配置
su - root

# 临时关闭 selinux
setenforce 0

# 永久关闭 SELinux(需要重启主机)
vi /etc/selinux/config

# 更改SELINUX
#############
SELINUX=disabled
#############

# 查看 selinux 状态
sestatus
5、修改操作系统参数
三台都配置
su - root

# net.ipv4.tcp_retries1=5  作用: 控制 TCP 报文在触发拥塞控制前的重传次数(默认 3)

# net.ipv4.tcpsynretries=5  作用: SYN 请求的重试次数(默认通常为 6)。

# net.ipv4.tcpsynackretries=5  作用: SYN-ACK 报文的重试次数(默认通常为 5)。

# vm.minfreekbytes=380834  作用: 保留约 380MB 内存供系统紧急使用。测试环境这个就不配了

# net.ipv4.iplocalport_range = 26000 65535  作用: 扩大本地端口范围至约 4 万个(默认 32768-60999)。

# net.ipv4.tcpfintimeout=60  作用: 控制 FIN-WAIT-2 状态超时(默认 60 秒)。


echo '
net.ipv4.tcp_retries1=5
net.ipv4.tcp_syn_retries=5
net.ipv4.tcp_synack_retries=5
net.ipv4.ip_local_port_range = 26000 65535
net.ipv4.tcp_fin_timeout=60
' >>/etc/sysctl.conf
sysctl -p
6、安装依赖
三台都配置
su - root

yum install libaio-devel
yum install flex
yum install bison
yum install ncurses-devel
yum install glibc-devel
yum install patch
yum install readline-devel
yum install libnsl
yum install expect

yum install net-tools
yum install tar
7、配置主机名称和host配置
主机名称配置(三台都配置)
su - root
hostnamectl set-hostname 新主机名
hosts文件配置(三台都配置)
su - root
vi /etc/hosts

# hosts文件末尾加入如下配置
####################
192.168.254.100 openEuler100
192.168.254.101 openEuler101
192.168.254.102 openEuler102
####################
8、检查主机间的网络通信
确保3台主机间能相互 ping 通
ping openEuler100
ping openEuler101
ping openEuler102
9、创建用户和组
三台都操作
su - root
groupadd dbgrp
useradd -g dbgrp omm
passwd omm10、配置sshd_config
在openGauss安装时需要root帐户远程登录访问权限,root用户和omm用户(密码一致可以脚本配置信任。
su - root
vi /etc/ssh/sshd_config

# 修改PermitRootLogin配置,允许用户远程登录
# PermitRootLogin 改为“yes”。
# 修改Banner配置,注释掉“Banner”所在的行。
# 添加端口为22配置:(preinstall要求端口是22)
####################

PermitRootLogin yes
#Banner XXXX
Port 22

####################

# 使配置生效
systemctl restart sshd.service
四、openGuass集群搭建
1、安装包上传到指定目录
su - omm
mkdir -p /home/omm/software/
ls /home/omm/software/
2、解压软件包
su - omm
cd /home/omm/software
tar xvf openGauss-5.0.0-openEuler-64bit-all.tar.gz
tar xvf openGauss-5.0.0-openEuler-64bit-om.tar.gz3、配置集群XML文件
su - omm

# 创建一主两备的配置文件
vi Cluster1.xml
<?xml version="1.0" encoding="UTF-8"?>
<ROOT>
<!-- openGauss整体信息 -->
<CLUSTER>
<PARAM name="clusterName" value="Cluster1" />
<PARAM name="nodeNames" value="openEuler100,openEuler101,openEuler102" />
<PARAM name="gaussdbAppPath" value="/home/omm/huawei/install/app" />
<PARAM name="gaussdbLogPath" value="/home/omm/log/omm" />
<PARAM name="tmpMppdbPath" value="/home/omm/huawei/tmp"/>
<PARAM name="gaussdbToolPath" value="/home/omm/huawei/install/om" />
<PARAM name="corePath" value="/home/omm/huawei/corefile"/>
<PARAM name="backIp1s" value="192.168.254.100,192.168.254.101,192.168.254.102"/>
</CLUSTER>
<!-- 每台服务器上的节点部署信息 -->
<DEVICELIST>
<!-- node1上的节点部署信息 -->
<DEVICE sn="openEuler100">
<PARAM name="name" value="openEuler100"/>
<PARAM name="azName" value="AZ1"/>
<PARAM name="azPriority" value="1"/>
<!-- 如果服务器只有一个网卡可用,将backIP1和sshIP1配置成同一个IP -->
<PARAM name="backIp1" value="192.168.254.100"/>
<PARAM name="sshIp1" value="192.168.254.100"/>
<!-- cm主 -->
<PARAM name="cmsNum" value="1"/>
<PARAM name="cmDir" value="/home/omm/huawei/install/cm"/>
<PARAM name="cmServerPortBase" value="15300"/>
<PARAM name="cmServerListenIp1" value="192.168.254.100,192.168.254.101,192.168.254.102"/>
<PARAM name="cmServerHaIp1" value="192.168.254.100,192.168.254.101,192.168.254.102"/>
<!-- cmServerlevel目前只支持1 -->
<PARAM name="cmServerlevel" value="1"/>
<!-- cms主及所有备的hostname -->
<PARAM name="cmServerRelation" value="openEuler100,openEuler101,openEuler102"/>
<!--dn-->
<PARAM name="dataNum" value="1"/>
<PARAM name="dataPortBase" value="15400"/>
<PARAM name="dataNode1" value="/home/omm/huawei/install/data/dn,openEuler101,/home/omm/huawei/install/data/dn,openEuler102,/home/omm/huawei/install/data/dn"/>
<PARAM name="dataNode1_syncNum" value="0"/>
</DEVICE>
<!-- node2上的节点部署信息 -->
<DEVICE sn="openEuler101">
<PARAM name="name" value="openEuler101"/>
<PARAM name="azName" value="AZ1"/>
<PARAM name="azPriority" value="1"/>
<!-- 如果服务器只有一个网卡可用,将backIP1和sshIP1配置成同一个IP -->
<PARAM name="backIp1" value="192.168.254.101"/>
<PARAM name="sshIp1" value="192.168.254.101"/>
<!-- cm -->
<PARAM name="cmDir" value="/home/omm/huawei/install/cm"/>
<PARAM name="cmServerPortStandby" value="15300"/>
</DEVICE>
<!-- node3上的节点部署信息 -->
<DEVICE sn="openEuler102">
<PARAM name="name" value="openEuler102"/>
<PARAM name="azName" value="AZ1"/>
<PARAM name="azPriority" value="1"/>
<!-- 如果服务器只有一个网卡可用,将backIP1和sshIP1配置成同一个IP -->
<PARAM name="backIp1" value="192.168.254.102"/>
<PARAM name="sshIp1" value="192.168.254.102"/>
<!-- cm -->
<PARAM name="cmDir" value="/home/omm/huawei/install/cm"/>
<PARAM name="cmServerPortStandby" value="15300"/>
</DEVICE>
</DEVICELIST>
</ROOT>4、执行预安装脚本
仅在openEuler100主机(master)执行
su - root
/home/omm/software/script/gs_preinstall -X /home/omm/Cluster1.xml -U omm -G dbgrp

# 预编译执行过程如下:
# yes
# root密码
# yes
# omm密码
###########################

[root@openEuler100 ~]# /home/omm/software/script/gs_preinstall -X /home/omm/Cluster1.xml -U omm -G dbgrp
/home/omm/software/script/domain_utils/sql_handler/../../../lib/ipaddress.py:1106: SyntaxWarning: 'str' object is not callable; perhaps you missed a comma?
  raise TypeError("%s and %s are not of the same version" (a, b))
Parsing the configuration file.
Successfully parsed the configuration file.
Installing the tools on the local node.
Successfully installed the tools on the local node.
Are you sure you want to create trust for root (yes/no)?yes
Please enter password for root
Password:
Successfully created SSH trust for the root permission user.
Setting host ip env
Successfully set host ip env.
Distributing package.
Begin to distribute package to tool path.
Successfully distribute package to tool path.
Begin to distribute package to package path.
Successfully distribute package to package path.
Successfully distributed package.
Are you sure you want to create the user[omm] and create trust for it (yes/no)? yes
Preparing SSH service.
Successfully prepared SSH service.
Installing the tools in the cluster.
Successfully installed the tools in the cluster.
Checking hostname mapping.
Successfully checked hostname mapping.
Creating SSH trust for [omm] user.
Please enter password for current user[omm].
Password:
Checking network information.
All nodes in the network are Normal.
Successfully checked network information.
Creating SSH trust.
Creating the local key file.
Successfully created the local key files.
Appending local ID to authorized_keys.
Successfully appended local ID to authorized_keys.
Updating the known_hosts file.
Successfully updated the known_hosts file.
Appending authorized_key on the remote node.
Successfully appended authorized_key on all remote node.
Checking common authentication file content.
Successfully checked common authentication content.
Distributing SSH trust file to all node.
Distributing trust keys file to all node successfully.
Successfully distributed SSH trust file to all node.
Verifying SSH trust on all hosts.
Successfully verified SSH trust on all hosts.
Successfully created SSH trust.
Successfully created SSH trust for [omm] user.
Checking OS software.
Successfully check os software.
Checking OS version.
Successfully checked OS version.
Creating cluster's path.
Successfully created cluster's path.
Set and check OS parameter.
Setting OS parameters.
Successfully set OS parameters.
Warning: Installation environment contains some warning messages.
Please get more details by "/home/omm/software/script/gs_checkos -i A -h openEuler100,openEuler101,openEuler102 --detail".
Set and check OS parameter completed.
Preparing CRON service.
Successfully prepared CRON service.
Setting user environmental variables.
Successfully set user environmental variables.
Setting the dynamic link library.
Successfully set the dynamic link library.
Setting Core file
Successfully set core path.
Setting pssh path
Successfully set pssh path.
Setting Cgroup.
Successfully set Cgroup.
Set ARM Optimization.
No need to set ARM Optimization.
Fixing server package owner.
Setting finish flag.
Successfully set finish flag.
Preinstallation succeeded.
[root@openEuler100 ~]#


###########################
5、执行安装脚本
三台主机都执行
su - root
# 赋权
chown omm:dbgrp -R /home/omm/software/
chmod 755 -R /home/omm/software/
仅在openEuler100主机(master)执行
su - omm
gs_install -X /home/omm/Cluster1.xml


# 执行过程如下,执行过程中提示设置数据库密码
#############################

[omm@openEuler100 ~]$ gs_install -X /home/omm/Cluster1.xml
Parsing the configuration file.
Check preinstall on every node.
Successfully checked preinstall on every node.
Creating the backup directory.
Successfully created the backup directory.
begin deploy..
Installing the cluster.
begin prepare Install Cluster..
Checking the installation environment on all nodes.
begin install Cluster..
Installing applications on all nodes.
Successfully installed APP.
begin init Instance..
encrypt cipher and rand files for database.
Please enter password for database:
Please repeat for database:
begin to create CA cert files
The sslcert will be generated in /home/omm/huawei/install/app/share/sslcert/om
Create CA files for cm beginning.
Create CA files on directory [/home/omm/huawei/install/app_a07d57c3/share/sslcert/cm]. file list: ['server.key.rand', 'server.crt', 'cacert.pem', 'client.key.rand', 'client.crt', 'server.key', 'client.key', 'client.key.cipher', 'server.key.cipher']
Non-dss_ssl_enable, no need to create CA for DSS
Cluster installation is completed.
Configuring.
Deleting instances from all nodes.
Successfully deleted instances from all nodes.
Checking node configuration on all nodes.
Initializing instances on all nodes.
Updating instance configuration on all nodes.
Check consistence of memCheck and coresCheck on database nodes.
Successful check consistence of memCheck and coresCheck on all nodes.
Configuring pg_hba on all nodes.
Configuration is completed.
Starting cluster.
======================================================================
Successfully started primary instance. Wait for standby instance.
======================================================================
.
Successfully started cluster.
======================================================================
cluster_state      : Normal
redistributing     : No
node_count         : 3
Datanode State
    primary           : 1
    standby           : 2
    secondary         : 0
    cascade_standby   : 0
    building          : 0
    abnormal          : 0
    down              : 0

Successfully installed application.
end deploy..
[omm@openEuler100 ~]$


#############################
6、查看集群状态
仅在openEuler100主机(master)上操作就行
su - omm
gs_om -t status --detail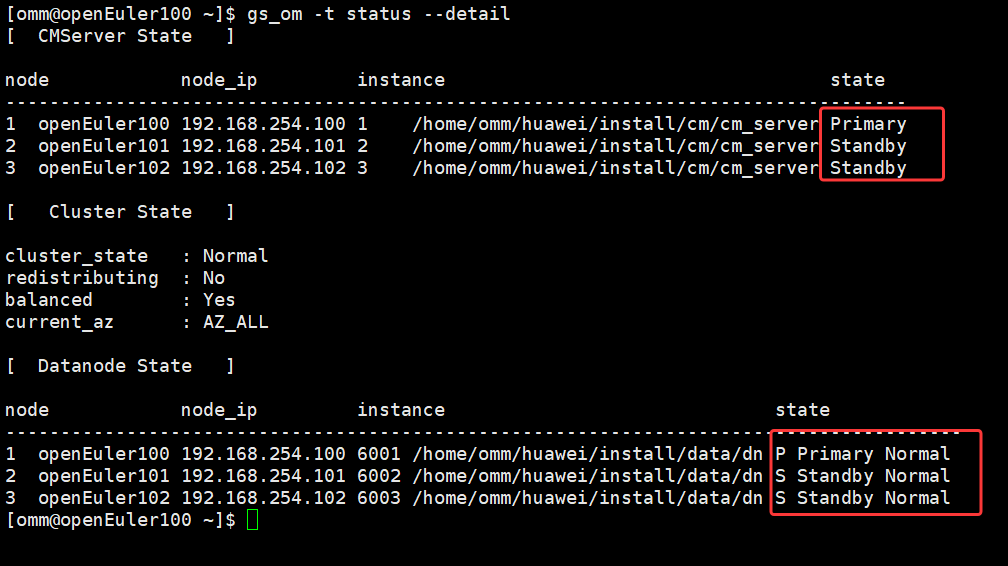
7、关闭和启动集群
仅在openEuler100主机(master)上操作就行
su - omm

# 集群关闭
gs_om -t stop


# 集群启动
gs_om -t start


# 默认登录数据库[-d:指定数据库 -U:指定用户 -W:密码 -h:指定主机 -p:指定端口 -r:自动补全]
gsql -d postgres -p 15400 -r
五、yum命令报错,库版本不兼容的处理
1、错误发现
当我们安装完guass数据库后,切换到root账户去执行yum相关命令会报错,例如:
[root@openEuler100 ~]# yum list
Traceback (most recent call last):
  File "/usr/bin/yum", line 57, in <module>
    from dnf.cli import main
  File "/usr/lib/python3.9/site-packages/dnf/__init__.py", line 30, in <module>
    import dnf.base
  File "/usr/lib/python3.9/site-packages/dnf/base.py", line 29, in <module>
    import libdnf.transaction
  File "/usr/lib64/python3.9/site-packages/libdnf/__init__.py", line 8, in <module>
    from . import error
  File "/usr/lib64/python3.9/site-packages/libdnf/error.py", line 13, in <module>
    from . import _error
ImportError: /home/omm/huawei/install/om/script/gspylib/clib/libstdc++.so.6: version `GLIBCXX_3.4.26' not found (required by /usr/lib64/libdnf.so.2)
[root@openEuler100 ~]#
2、错误分析
openEuler 系统在安装 openGauss 后出现 yum/dnf 报错,根本原因是 openGauss 的安装脚本修改了系统库加载路径,导致 yum/dnf 依赖的关键库 libstdc++.so.6 版本不兼容。
3、临时修复:重置库加载路径
su - root

unset LD_LIBRARY_PATH

# 测试是否修复
yum list
4、环境检查
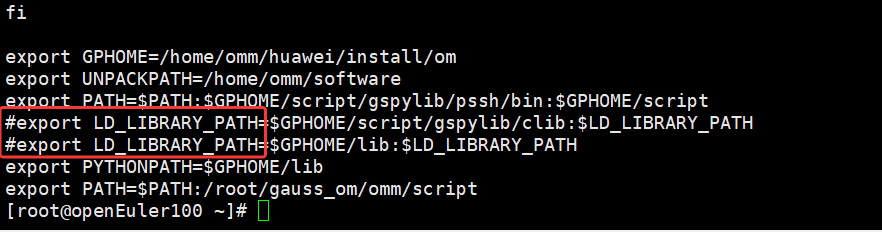
su - root
# 检查下面这些文件有没有 LD_LIBRARY_PATH 相关变量,注释掉
grep LD_LIBRARY_PATH ~/.bashrc

grep LD_LIBRARY_PATH ~/.bash_profile

grep LD_LIBRARY_PATH /etc/profile

grep LD_LIBRARY_PATH /etc/environment

# 注释后,source 文件,使配置立即生效
source ~/.bashrc
source ~/.bash_profile
source /etc/profile
source /etc/environment
例如:
5、验证系统库版本
确认系统标准库是否包含 GLIBCXX_3.4.26
su - root
strings /usr/lib64/libstdc++.so.6 | grep GLIBCXX_3.4.26-
若有输出:系统库正常,问题由环境变量导致,已通过步骤 2 修复。

-
若无输出:需更新系统库:
su - root

# 更新 libstdc++
dnf update libstdc++

# 安装完整开发包(可选)
dnf install gcc-c++
6、测试
su - root

# yum 命令测试
yum list

su - omm
# 仅在openEuler100上执行就行
gs_om -t start


 被折叠的 条评论
为什么被折叠?
被折叠的 条评论
为什么被折叠?
 到【灌水乐园】发言


