


 本文描述了一个小说阅读网站的设计,涵盖了用户注册、登录、找回密码、书架管理和邮件发送等功能。重点讨论了数据安全,如使用MD5和BCrypt进行密码加密,以及生成和验证验证码。此外,还涉及到了数据库设计和数据交换格式,以及如何通过SpringBoot实现邮件发送服务。
目录
设计目标
实现基本功能的小说阅读网站
1、用户登录和注册功能,密码修改功能
2、书籍展示页面的书籍分类,书籍推荐,书籍排行榜等
3、作者的全部书籍展示
4、用户阅读小说和加入书架功能
需求分析
功能需求:实现上述功能的网站
使用浏览器:联想浏览器(版本 8.0.0.10171(正式版本) (32 位))
网站主页
1、主页前端展示

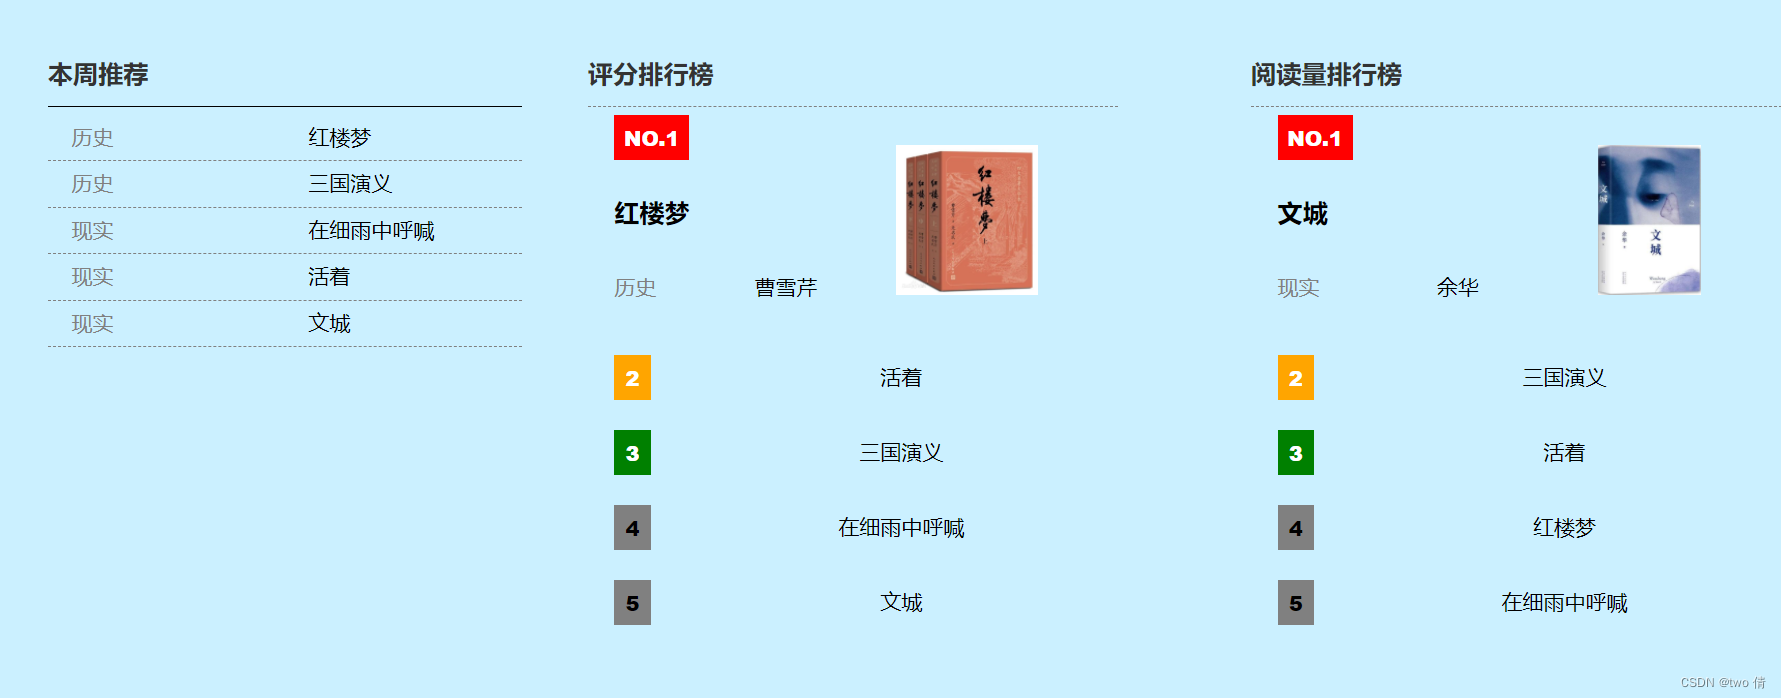

对前端页面进行分析:上半部分是搜索框,登录、注册、书架三个按钮,如果用户已经登录,那么就展示用户姓名(隐藏登录和注册按钮)
中间是分类列表和一个轮播图(使用了BootStrapt框架),点击分类列表的标签,可以跳转到详细的分类页面,点击轮播图图片,可以来到对应书籍的介绍页面
下部分是一个本周推荐列表和两个排行榜,也是点击对应位置可以来到详细的分类、作者、书籍介绍页面
用户注册
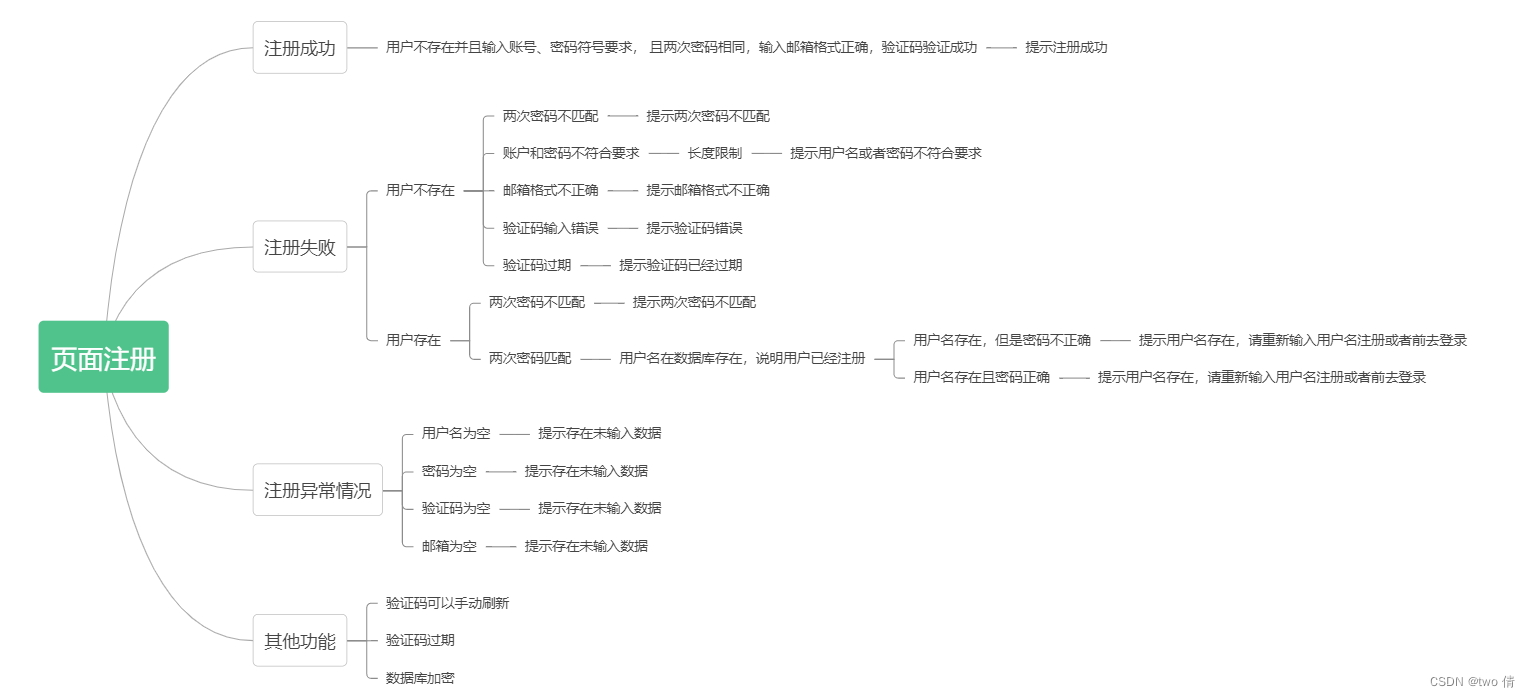
1、需求分析
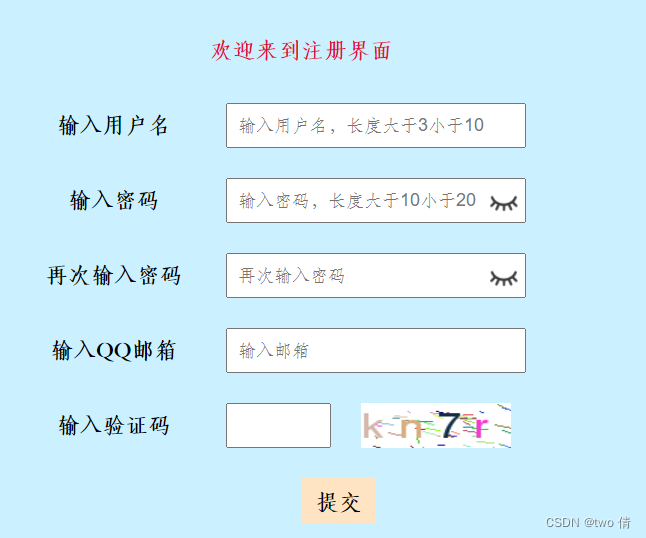
实现用户注册功能
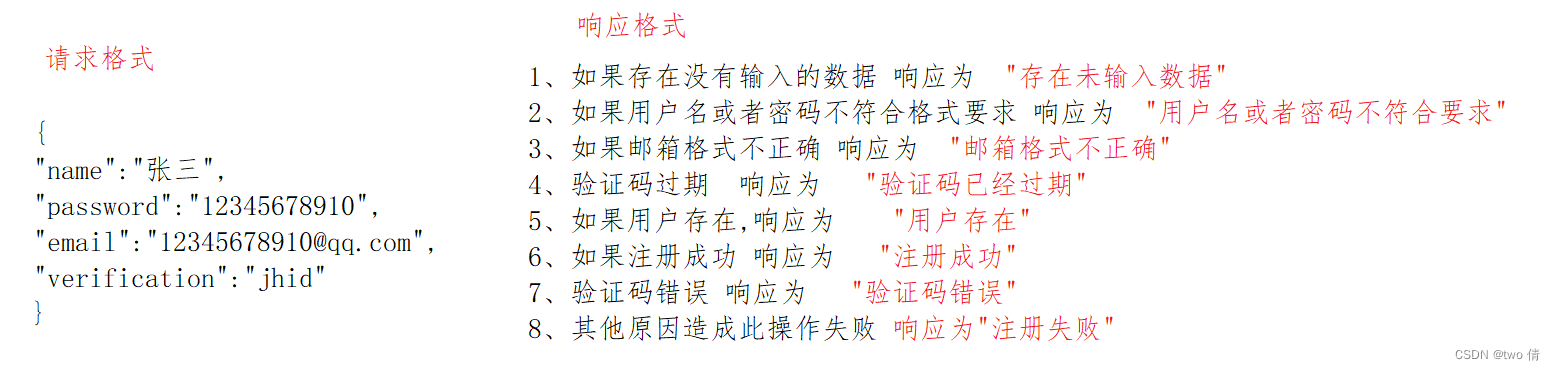
用户注册:输入用户名,输入两次密码,输入QQ邮箱,验证码
这里后端对邮箱格式进行判断时,标准是10位QQ账号的邮箱,所以只支持使用QQ邮箱注册
2、数据库设计
-- 用户表 包括 用户id 和 姓名、 密码、用户邮箱
create table user(
    id int primary key  auto_increment ,
    name varchar(20),
    password varchar(100),
    email varchar(100)
);
不过在前端,一直使用的都是用户姓名,所以方便起见,实际上要求用户名唯一
3、生成验证码
一种方式就是直接使用Java类,使用Graphics和Graphics2D进行绘图,BufferedImage类输出照片
在前端发送数据,得到结果为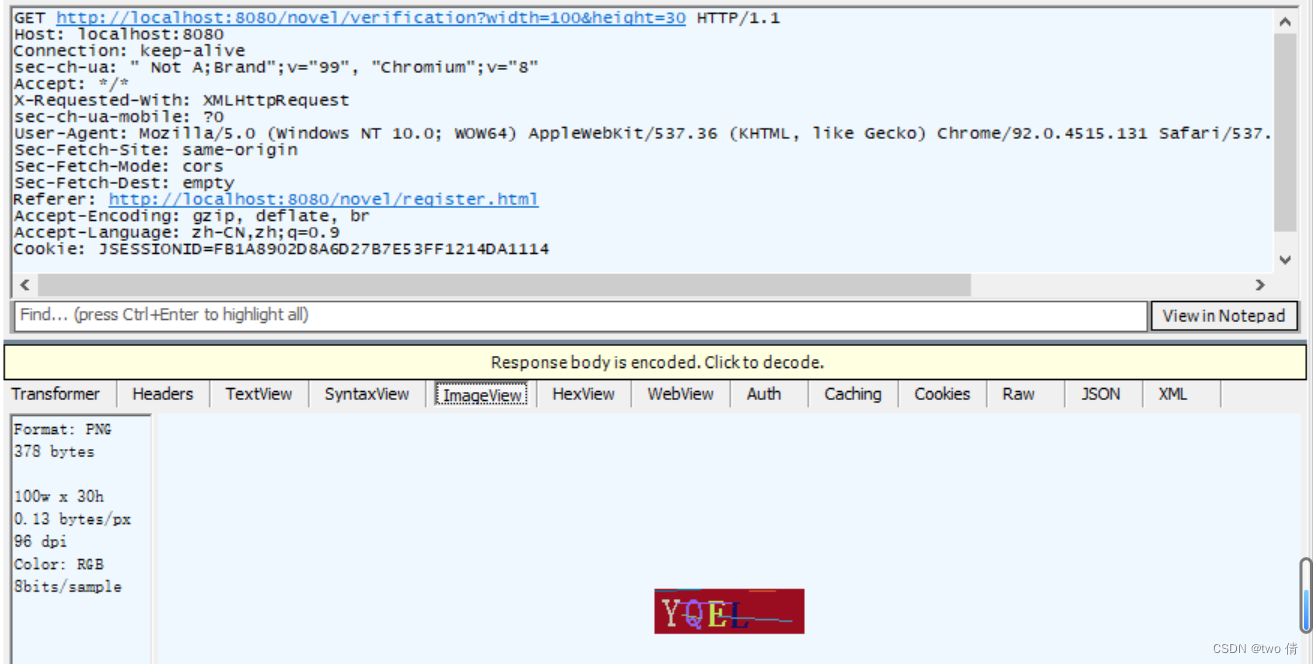
package com.example.demo.Controler;
import lombok.extern.slf4j.Slf4j;
import org.springframework.stereotype.Controller;
import org.springframework.web.bind.annotation.*;

import javax.imageio.ImageIO;
import javax.servlet.http.HttpServletRequest;
import javax.servlet.http.HttpServletResponse;
import javax.servlet.http.HttpSession;
import java.awt.*;
import java.awt.image.BufferedImage;
import java.io.File;
import java.io.FileOutputStream;
import java.io.IOException;
import java.io.UnsupportedEncodingException;
import java.util.Random;

/**
 * 获取验证码
 */
@Controller
@Slf4j
@RequestMapping("/novel")
public class VerificationControl {
    @GetMapping("/verification")
    @ResponseBody
    public void getVerificationControl(HttpServletRequest request, HttpServletResponse response,  int width, int height) throws IOException {
        request.setCharacterEncoding("utf-8");
        response.setCharacterEncoding("utf-8");
        //1、生成数据
        String num = getNumbers();
        //2、生成照片
        BufferedImage bufferedImage = getPhoto(num, width,height);

        //3、将数据以会话的形式存储,只要会话没过期,就说明验证码有效,否则验证码不可以使用
        HttpSession session = request.getSession(true);//会话不存在创建会话

        //只要session对象获取成功,无论验证码是否过期 都要重新创建
        if(session!=null) {
            session.setMaxInactiveInterval(60 * 2);//验证码的最大存活时间
            session.setAttribute("Num", num);

            //4、设置不缓存照片
            response.setHeader("Pragma", "No-cache");
            response.setHeader("Cache-Control", "No-cache");
            response.setDateHeader("Expire", 0);

            //5、设置返回的数据格式
            response.setContentType("image/png");
            //6、图像输出到 输出字符流中 返回给前端
            ImageIO.write(bufferedImage, "png", response.getOutputStream());
        }
    }

    //获得随机字符串
    private String getNumbers() {
        char[] elem = new char[]{'A','B','C','D','E','F','G','H','I','G','K','L','M','N','O','P','Q','S','R','T','U','V','W','X','Y','Z', '0', '1', '2', '3', '4', '5', '6', '7', '8', '9'};
        StringBuilder res = new StringBuilder();
        Random random = new Random();
        for (int i = 0; i < 4; i++) {
            res.append(elem[random.nextInt(elem.length - 1)]);
        }
        return res.toString();
    }

    //获取照片
    private BufferedImage getPhoto(String num,int width,int height) throws IOException {
//,在Java中主要可以使用Graphics和Graphics2D进行绘图,
//    其中Graphics类是所有图形上下文的抽象基类,而Graphics2D就继承了Graphics类
//。而Graphics功能没有Graphics2D强大,Graphics2D是Graphics的扩展。

        //BufferedImage可以将一个图片写入内存
        BufferedImage bufferedImage = new BufferedImage(width, height, BufferedImage.TYPE_INT_BGR);
        //输入图片的宽 高 类型 要和前端匹配

        //获取会话环境(也就是得到画笔)
        Graphics graphics = bufferedImage.createGraphics();

        //绘制矩形 (会在画布上,绘制一个矩形,也就是验证码的边界 可以显示, 这个矩形默认纯白色 )
        graphics.drawRect(0, 0, width, height);

        //设置画布颜色
        graphics.setColor(getRandomColor());

        //使用画布颜色 来填充整个矩形
        graphics.fillRect(0, 0, width, height);

        // 传入Font类型变量   Font(String name, int style, int size)从指定的名称,样式和点大小创建一个新的 Font
        graphics.setFont(new Font("仿宋", Font.BOLD, 25));//字体样式 字体格式 字体大小

        print(graphics,num);//设置字体倾斜

        //图片输出到指定目录
        //  ImageIO.write(bufferedImage, "png", new File("C:\\Users\\30283\\Desktop\\novel\\photo\\photo.png"));
        //这时 生成的验证码 只会有数据和照片 但是没有字体斜体和斜线

        //生成斜线
        Random random = new Random();
        for (int i = 0; i < 5; i++) {
            graphics.setColor(getRandomColor());
            //使用当前颜色绘制线条
            graphics.drawLine(random.nextInt(width), random.nextInt(height), random.nextInt(width), random.nextInt(height));//在两个坐标之间绘制斜线
        }

        return bufferedImage;

    }

    //获取随机颜色
    private Color getRandomColor() {
        Random random = new Random();
        Color color = new Color(random.nextInt(255), random.nextInt(255), random.nextInt(255));
        return color;
    }

    /**
     * ,使用Graphics2D类的setShear()方法,倾斜绘图上下文对象,
     * 然后使用从Graphics类继承的setFont()方法设置字体、字型和字号,
     * 使用drawString()方法绘制文本,从而实现倾斜文字的效果。
     * public abstract void shear(double shx, double shy);
     * <p>
     * shx,shy分别是在正x轴、正y轴方向移动坐标的乘数,可以作为相应y、x坐标的函数(注意是相反的)
     */

//设置字体斜体 最好是直接对数字在画布上显示 时设置
    Random random = new Random();

    private void print(Graphics graphics,String num) {
        int x=5;
        for (int i = 0; i < 4; i++) {
            graphics.setColor(getRandomColor());//设置字体颜色
            Graphics2D graphics2D = (Graphics2D) graphics;//这个类 提供了字符旋转功能
            double degree = random.nextDouble();

            //正向旋转
            if (degree > 0.5)
                ((Graphics2D) graphics).rotate(degree*3.14 / 180);
            else
                //反向旋转
                ((Graphics2D) graphics).rotate(-degree*3.14 / 360);
            graphics.drawString(num.charAt(i) + "", x , 25);//将数字画在画板上
            x+=15;
            //这里的坐标要规划 数字一定要显示在画布中 且不能重叠
        }
    }
}
4、数据加密
1、MD5
MD5是一种算法,可以从任何密码,短语或文本中生成32个字符的十六进制字符串。
比如,如果密码是123,我就可以在任意字符串比如“hello”中选取字符拼接,从而可能创建“1hll3”这样的密码,这时,哪怕数据被盗取,他们也无法获得准确的密码
正常来说,为了用户输入123,系统可以知道它的数据库存储的密码是1hll3,这个生成数据库密码的方法肯定是根据某一个依据来的,通常使用的就是哈希算法。
但是随着彩虹表的出现(彩虹表是一个用于加密散列函数逆运算的预先计算好的表, 为破解密码的散列值(或称哈希值、微缩图、摘要、指纹、哈希密文)而准备。一般主流的彩虹表都在100G以上。 这样的表常常用于恢复由有限集字符组成的固定长度的纯文本密码)也就是说我从123加密到1hll3,黑客极有可能可以根据彩虹表破解密码
这时,可以采用的就是加长密码或者加盐;所谓加盐就是指给密码加上其他字符后存储
Md5的依赖支持:
<!-- md5依赖-->
<dependency>
<groupId>commons-codec</groupId>
<artifactId>commons-codec</artifactId>
</dependency>
<dependency>
<groupId>org.apache.commons</groupId>
<artifactId>commons-lang3</artifactId>
<version>3.6</version>
</dependency>
pom文件导入上述依赖
public class MDUtil {
    //定义一个私有的盐值
    private final static String sal = "hello";

    //DigestUtils是一个加密算法工具类
    public String getMd5(String res) {
        return md5Hex(res);//生成加密数据
    }

    //前端可以增长数据
    public static String addlen(String res) {
        res += sal.charAt(2) + sal.charAt(4);
        return md5Hex(res);
    }
    //后端再次加密 增高密码级别
    public String add(String res) {
        res += sal.charAt(1) + sal.charAt(4)+sal.charAt(3);
        return md5Hex(res);
    }

    public static void main(String[] args) {
        String ret = addlen("123");
        System.out.println("前端加密: " + ret);
        System.out.println("第二次加密: " + addlen(ret));
        System.out.println("第二次加密: " + addlen(ret));
    }
}
2、BCrypt加密
MD5加密是32位的,BCrypt是60位的,在MD5的基础上位数更多更难破解,同时采用随机盐值
(盐不能重复使用。如果所有用户的密码都使用同一个盐进行加密。那么不管盐有多复杂、多大的长度,破解者都可以很容易的使用这个固定盐重新建立彩虹表,破解你的所有用户的密码。所以应当在每一次需要保存新的密码时,都生成一个新的盐,并跟加密后的hash值保存在一起)
安装Hutool依赖,Hutool是一个小而全的Java工具类库
<dependency>

        <groupId>cn.hutool</groupId>

        <artifactId>hutool-all</artifactId>

        <version>5.8.0.M4</version>

</dependency>
HuTool工具的使用_晴城丶的博客-CSDN博客_hutool怎么使用
public class BCryptUtil {
    public static void main(String[] args) {
        String password = "123456";//加密数据
        String ret = BCrypt.hashpw(password, BCrypt.gensalt());//根据随机盐值 生成加密数据
        System.out.println(ret);
        System.out.println(BCrypt.checkpw(password, ret));//判断加密后的数据是否匹配
        ret = BCrypt.hashpw(password,BCrypt.gensalt());
        System.out.println(ret);
        System.out.println(BCrypt.checkpw(password, ret));
    }
}
虽然生成的密文不一样,但是都是可以和密码匹配的
另外:hutool还可以生成图片验证码
利用Java工具类Hutool实现验证码校验功能【java面试】-云海天教程
@Controller
@RequestMapping("/novel")
public class VerificationControlByHutool {
    //LineCaptcha 生成 线段干扰的验证码
    //CaptchaUtil 图片验证工具类
    @ResponseBody
    @GetMapping("/verificationcontrolbyhutool")
    public void getCaptcha(HttpServletRequest request, HttpServletResponse response) throws IOException {
        //生成 带有线条的验证码图片
        LineCaptcha circleCaptcha = CaptchaUtil.createLineCaptcha(100/*宽*/, 40/*高*/, 4/*验证码显示几个数据*/, 50/*有几个线段*/);
        //告诉浏览器输出内容为jpeg类型的图片
        response.setContentType("image/png");
        //禁止浏览器缓存
        response.setHeader("Pragma", "No-cache");
        //输出图形 内的数字
        //    System.out.println(circleCaptcha.getCode());
        //判断图形是否在有效期
        //   System.out.println(circleCaptcha.verify(circleCaptcha.getCode()));

        //将内容写入Session
        HttpSession session = request.getSession(true);
        //不管会话中 Num是不是存在 每次点击 都应该生成新的Session 来存储新的验证码信息
        if (session != null ) {
            session.setAttribute("Num", circleCaptcha.getCode());
            session.setMaxInactiveInterval(60 );
            //图形验证码写出,可以写出到文件,也可以写出到流
            circleCaptcha.write(response.getOutputStream());
        }
    }
}
5、数据交换格式
前端传递用户名和密码和邮箱,使用post提交,格式为json
在后端处理时
control层:进行参数长度或输入为空的判断和邮箱格式的验证(这里限定死了邮箱格式:以QQ.com或者qq.com为后缀的10位QQ账号邮箱)
package com.example.demo.Controler;

import com.example.demo.Model.User;
import com.example.demo.Service.RegisterService;
import lombok.extern.slf4j.Slf4j;
import org.apache.ibatis.annotations.Param;
import org.springframework.beans.factory.annotation.Autowired;
import org.springframework.stereotype.Controller;
import org.springframework.web.bind.annotation.*;

import javax.servlet.http.HttpServletRequest;
import javax.servlet.http.HttpServletResponse;
import java.util.Map;


/**
 *用户注册
 */
@Controller
@Slf4j
@RequestMapping("/novel")
public class RegisterControl {
    @Autowired
    private RegisterService registerService;

    @PostMapping(value = "/register")
    @ResponseBody
    public String registerControl(@RequestBody java.util.Map<String, String> map, HttpServletRequest request, HttpServletResponse response) {
        //RequestBody注解在接收多个参数时,如果是类对象,会将内容匹配到类中
        //如果是多个参数,且有元素不存在在对象中
        // 如果使用(@RequestBody String name, @RequestBody String password, @RequestBody String email, @RequestBody String verification) 直接接收
        //  {
        //  "name":"123",
        //    "password":"123",
        //    "email":"123",
        //    "verification":"tyui"
        //    }
        //因为传入的本来就是json格式的字符串,又不是对象类型,这时name就接受了所有数据,password、email、verification全部为null
        //@RequestBody 也没有设置菲必传参数,这时后面三个参数传入null,就会抛出异常:传入参数为null

        String name = map.get("name");
        String password = map.get("password");
        String email = map.get("email");
        String verification = map.get("verification");
        //这时就只能用map接收
        //1、判断为空
        if (name == null || password == null || name.equals("") || password.equals("") || email == null || email.equals("") || verification == null || verification.equals(""))
            return "存在未输入数据";
        //2、判断用户名 密码 邮箱的格式要求
        if (name.length() > 10 || name.length() < 3 || password.length() > 20 || password.length() < 10) {
            return "用户名或者密码不符合要求";
        }
        //3、判断邮箱的格式
        if (!isTrue(email)) //邮箱格式不正确
            return "邮箱格式不正确";
        return registerService.registerService(name, password, email, verification, request, response);
    }


    //对QQ邮箱格式的判断 10位数字 以QQ.com或者qq.com
    private boolean isTrue(String email) {
        if (email.length() == 17) {
            for (int i = 0; i < 10; i++) {
                if (!(email.charAt(i) >= '0' && email.charAt(i) <= '9')) {
                    return false;
                }
            }
            String value = email.substring(10, 17);
            if (value.equals("@QQ.com") || value.equals("@qq.com"))
                return true;
        }
        return false;
    }

}
Service层:1、判断验证码是否正确或者是否存在(根据验证码创建时的Session判断)2、验证码正确后,判断用户名是否已经存在,不存在执行插入操作,并创建session
package com.example.demo.Service;

import com.example.demo.Mapper.InsertUserMapper;
import com.example.demo.Mapper.RegisterMapper;
import com.example.demo.Model.User;
import lombok.extern.slf4j.Slf4j;
import org.springframework.beans.factory.annotation.Autowired;
import org.springframework.stereotype.Service;

import javax.servlet.http.HttpServletRequest;
import javax.servlet.http.HttpServletResponse;
import javax.servlet.http.HttpSession;


/**
 * 注册的数据校验
 */


@Service
@Slf4j
public class RegisterService {
    @Autowired
    private RegisterMapper registerMapper;
    @Autowired
    private InsertUserMapper insertUserMapper;
    @Autowired
    private BCryptUtil bCryptUtil;

    public String registerService(String name, String password, String email, String verification, HttpServletRequest request, HttpServletResponse response) {
        //1、获取验证码 判断验证码是否正确
        //获取Session
        String num = getSession(request);
        if (num == null)
            return "验证码已经过期";
        //2、判断用户输入的验证码值是否正确
        if (verification.equals(num) || isTrue(num, verification)) {//如果验证码正确
//查询用户名 如果用户名存在 表示用户已经存在
            User user = registerMapper.register(name,null);
            if (user == null) {//用户不存在 去新增数据库

                String src;
                if (email.contains("QQ.com"))
                    src = email.replace("QQ.com", "qq.com");
                else
                    src = email.replace("qq.com", "QQ.com");
                if(registerMapper.register(null,email)!=null||registerMapper.register(null,src)!=null)
                    return "邮箱已经被注册";
                String pass = bCryptUtil.add(password);
                Integer ret = insertUserMapper.insertUser(name, pass, email);
                if (ret != 1)
                    return "注册失败";
                HttpSession session = request.getSession(true);
                user = new User();
                user.setName(name);
                user.setEmail(email);
                session.setAttribute("User", user);
                return "注册成功";
            } else {
                return "用户名已经存在";
            }
        }
        return "验证码错误";
    }

    //验证码查验 忽略大小写
    private boolean isTrue(String num, String verification) {
        for (int i = 0; i < 4; i++) {
            char elem = num.charAt(i);
            char ch = verification.charAt(i);
            if (!(elem == ch || elem == Character.toLowerCase(ch) || elem == Character.toUpperCase(ch)))
                return false;
        }
        return true;
    }

    //获取会话
    private String getSession(HttpServletRequest request) {
        HttpSession session = request.getSession(false);
        if (session != null)
            return (String) session.getAttribute("Num");
        return null;
    }
}
Dao层:进行数据库处理
用户登录
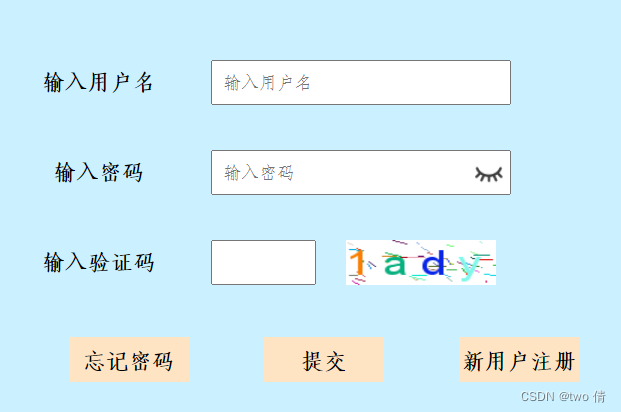
在control层进行数据判空或者长度校验
/**
 * 用户登录
 */
@Controller
@RequestMapping("/novel")
public class LoginControl {
    @Autowired
    private LoginService loginService;

    @PostMapping(value = "/login")
    @ResponseBody
    public String loginControl(@RequestBody java.util.Map<String, String> map, HttpServletRequest request, HttpServletResponse response) {
        String name = map.get("name");
        String password = map.get("password");
        String verification = map.get("verification");
        //这时就只能用map接收
        //1、判断为空
        if (name == null || password == null || name.equals("") || password.equals("") || verification == null || verification.equals(""))
            return "存在未输入数据";
        //2、判断用户名 密码的格式要求
        if (name.length() > 10||name.length()<3 || password.length() > 20 || password.length() < 10) {
            return "用户名或者密码不符合要求";
        }
        //3、数据校验
        return loginService.loginService(name, password, verification, request, response);
    }
}
在service层判断验证码是否正确,验证码正确后,调用dao层接口,检验用户密码是否匹配,登陆成功,创建session
package com.example.demo.Service;
import cn.hutool.crypto.digest.BCrypt;
import com.example.demo.Mapper.RegisterMapper;
import com.example.demo.Model.User;
import org.springframework.beans.factory.annotation.Autowired;
import org.springframework.stereotype.Service;
import javax.servlet.http.HttpServletRequest;
import javax.servlet.http.HttpServletResponse;
import javax.servlet.http.HttpSession;
@Service
public class LoginService {
@Autowired
private RegisterMapper registerMapper;
public String loginService(String name, String password, String verification, HttpServletRequest request, HttpServletResponse response) {
//1、获取验证码 判断验证码是否正确
//获取Session
String num = getSession(request);
if (num == null)
return "验证码已经过期";
if (!(verification.equals(num) || isTrue(num, verification)))
return "验证码错误";
//registerMapper 根据name查找用户 获取到了用户对象
User user = registerMapper.register(name);
if (user == null) {
return "用户不存在";
}
//用户存在 且密码核验成功
if (BCrypt.checkpw(password, user.getPassword())) {
//用户登录成功
user.setPassword("");
HttpSession session = request.getSession(true);
session.setAttribute("User", user);
return user.getName();
}
return "用户名和密码不匹配";
}
//验证码查验 忽略大小写
private boolean isTrue(String num, String verification) {
for (int i = 0; i < 4; i++) {
char elem = num.charAt(i);
char ch = verification.charAt(i);
if (!(elem == ch || elem == Character.toLowerCase(ch) || elem == Character.toUpperCase(ch)))
return false;
}
return true;
}
//获取会话
private String getSession(HttpServletRequest request) {
HttpSession session = request.getSession(false);
if (session != null)
return (String) session.getAttribute("Num");
return null;
}
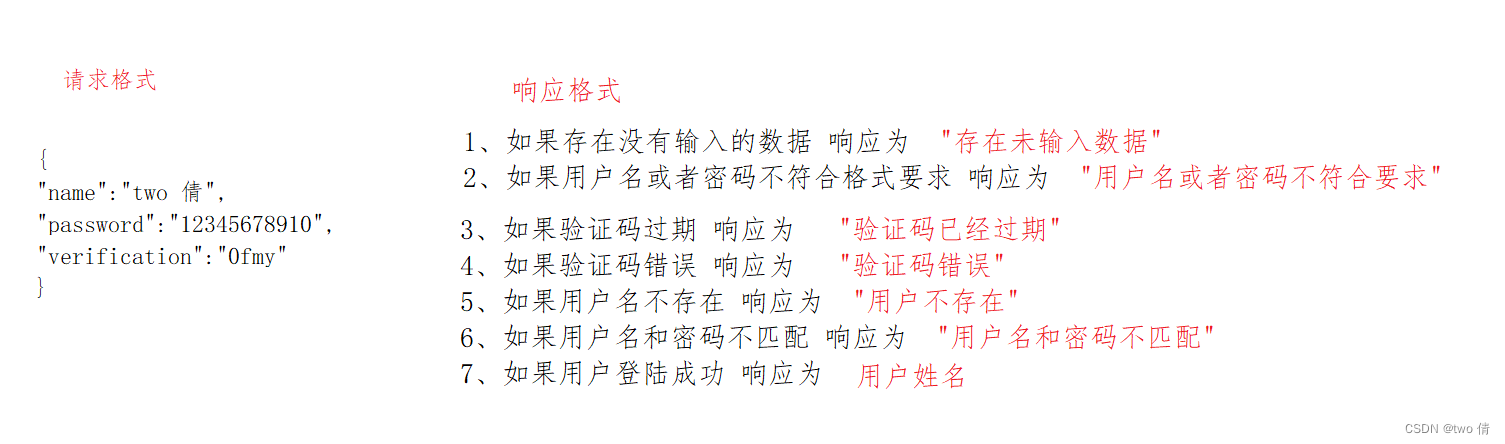
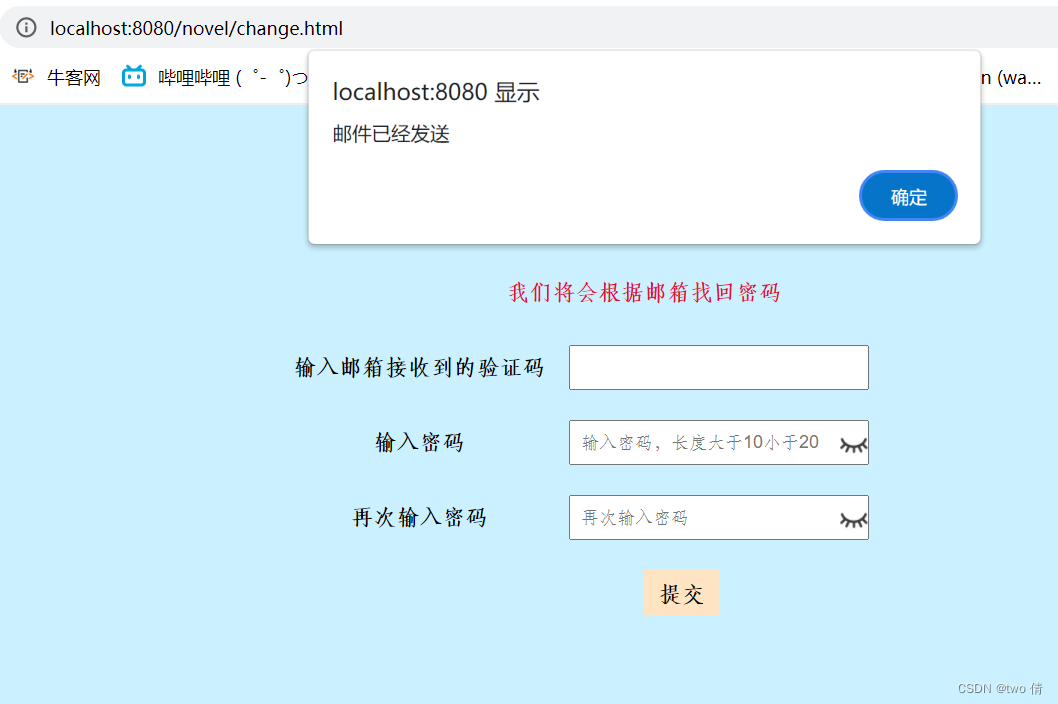
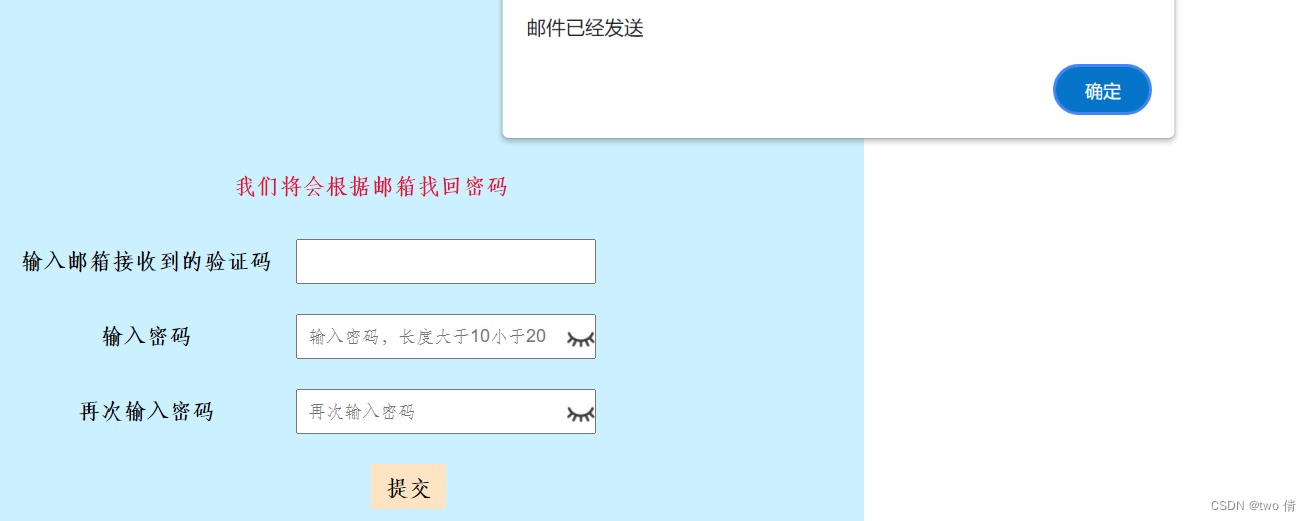
}找回密码
用户输入用户名,邮箱,验证码,后端通过邮箱进行数据核验 核验成功后 用户输入新的密码
数据验证成功之后,发送邮件,根据邮件验证码检验数据,修改密码
新用户注册
页面跳转到注册页面
邮件发送
1、导入依赖
<!--邮箱依赖-->
<dependency>
<groupId>org.springframework.boot</groupId>
<artifactId>spring-boot-starter-mail</artifactId>
</dependency>
<dependency>
<groupId>org.springframework</groupId>
<artifactId>spring-context-support</artifactId>
<version>4.3.7.RELEASE</version>
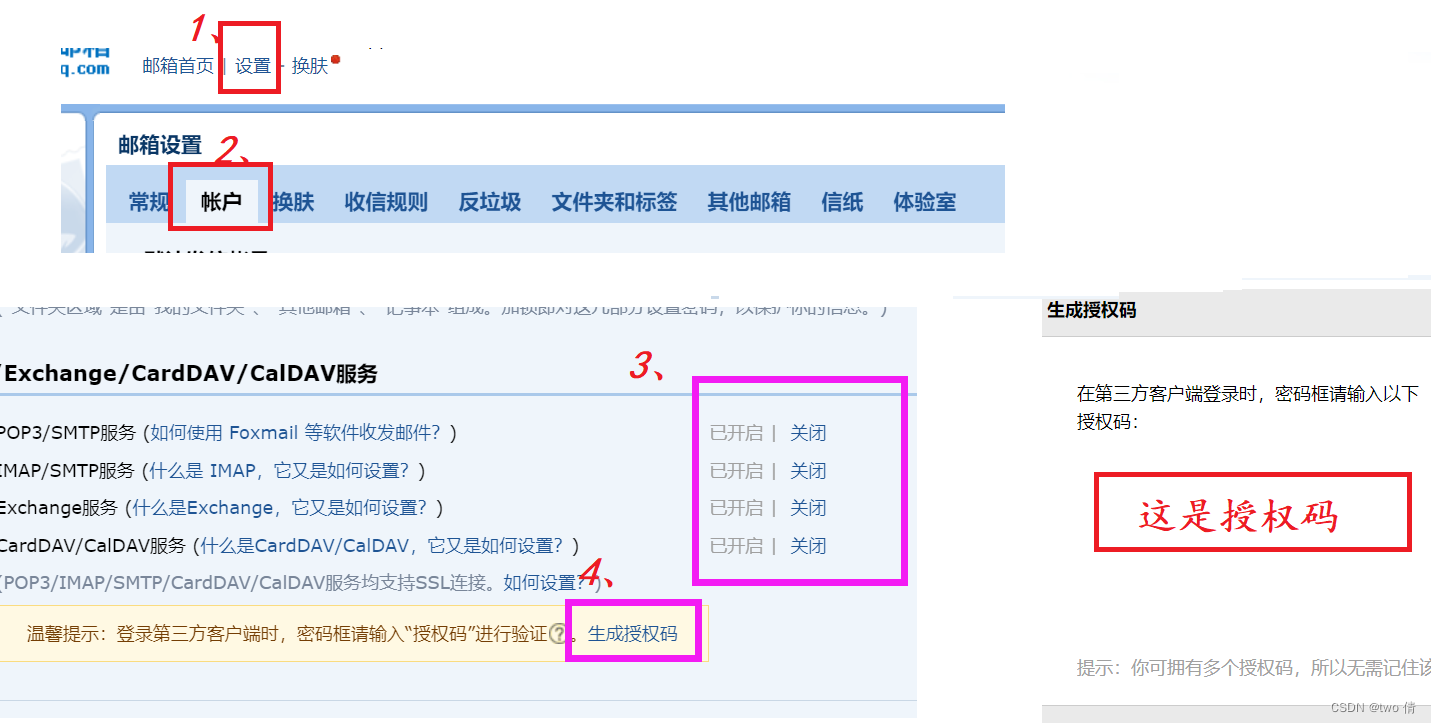
</dependency>2、开启授权码
QQ邮箱:
 3、 配置文件配置 (只配置了QQ邮箱,仅支持QQ邮箱发送)
  spring:
    mail:
      #QQ邮箱
      host: smtp.qq.com
      #发送者邮箱账号
      username: ****@qq.com
      #授权码 书写不要有空格
      password:********
      default-encoding: UTF-8
      port: 465
      properties:
        mail:
          smtp:
            socketFactory:
              class: javax.net.ssl.SSLSocketFactory
          debug: true
4、发送邮件
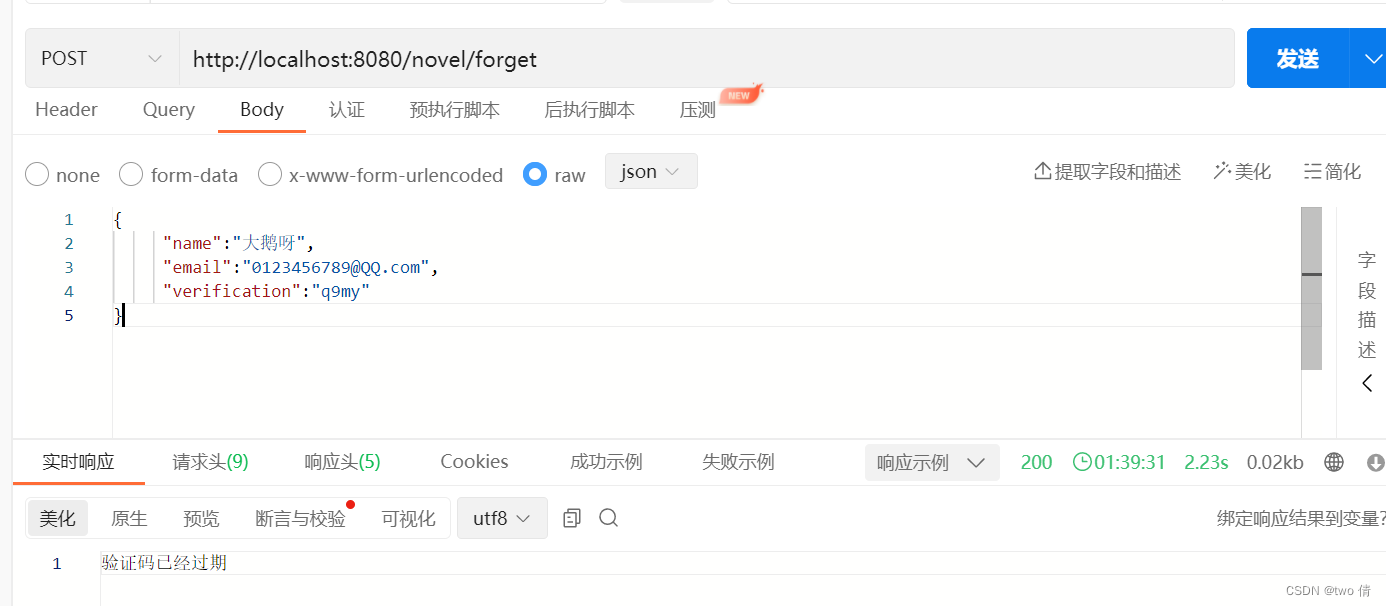
1、在忘记密码页面,传入邮箱,用户名,验证码
请求格式与响应格式
{
 type:"post",
        url:"forget",
        contentType:"application/json"
}
在control层进行数据判断
package com.example.demo.Controler;

import com.example.demo.Service.ForgetService;
import org.springframework.beans.factory.annotation.Autowired;
import org.springframework.stereotype.Controller;
import org.springframework.web.bind.annotation.PostMapping;
import org.springframework.web.bind.annotation.RequestBody;
import org.springframework.web.bind.annotation.RequestMapping;
import org.springframework.web.bind.annotation.ResponseBody;

import javax.servlet.http.HttpServletRequest;
import javax.servlet.http.HttpServletResponse;
import java.util.Map;


/**
 * 忘记密码 传入用户名 邮箱 验证码
 */
@Controller
@RequestMapping("/novel")
public class ForgetControl {
    @Autowired
    ForgetService forgetService;
    @PostMapping("/forget")
    @ResponseBody
    public String forgetControl(@RequestBody Map<String,String> map, HttpServletRequest request, HttpServletResponse response) {
        String name = map.get("name");
        String email = map.get("email");
        String verification = map.get("verification");
        //这时就只能用map接收
        //1、判断为空
        if (name == null || email == null || name.equals("") || email.equals("") || verification == null || verification.equals(""))
            return "存在未输入数据";
        //2、判断用户名 密码 邮箱的格式要求
        if (name.length() > 10||name.length()<3) {
            return "用户名长度不符合要求";
        }
        //3、判断邮箱的格式
        if (!isTrue(email)) //邮箱格式不正确
            return "邮箱格式不正确";
        return forgetService.forgetService(name, email, verification, request, response);
    }

    //对QQ邮箱格式的判断 10位数字 或者qq.com
    private boolean isTrue(String email) {
        if (email.length() != 17)
            return false;
        for (int i = 0; i <10 ; i++) {
            if(!(email.charAt(i)>='0'&&email.charAt(i)<='9')){
                return false;
            }
        }
        String value=email.substring(10,17);
        if(value.equals("@QQ.com")||value.equals("@qq.com"))
            return true;
        return false;
    }


}
2、在service层进行用户名和邮箱是否匹配的校验,校验成功,创建session
package com.example.demo.Service;

import com.example.demo.Mapper.ForgetMapper;
import com.example.demo.Model.User;
import org.springframework.beans.factory.annotation.Autowired;
import org.springframework.stereotype.Service;

import javax.servlet.http.HttpServletRequest;
import javax.servlet.http.HttpServletResponse;
import javax.servlet.http.HttpSession;
import java.io.File;


/**
 * 忘记密码
 */
@Service
public class ForgetService {
    @Autowired
    ForgetMapper forgetMapper;

    public String forgetService(String name, String email, String verification, HttpServletRequest request, HttpServletResponse response) {

        //1、获取验证码 判断验证码是否正确
        //获取Session
        String num = getSession(request);
        if (num == null)
            return "验证码已经过期";
        if (!(verification.equals(num) || isTrue(num, verification)))
            return "验证码错误";
        //2、数据查询
        String src;
        if (email.contains("QQ.com"))
            src = email.replace("QQ.com", "qq.com");
        else
            src = email.replace("qq.com", "QQ.com");
        User user = forgetMapper.forgetMapper(name, email);
        if (user == null) {
            user = forgetMapper.forgetMapper(name, src);
            if (user == null)
                return "用户和邮箱不匹配";
        } else {
            HttpSession session = request.getSession(true);
            if (session != null) {
                user.setPassword("");
                session.setAttribute("forget", user);
                session.setMaxInactiveInterval(60 * 5);
                return "校验成功";
            }
        }
        return "校验失败";
    }

    //验证码查验 忽略大小写
    private boolean isTrue(String num, String verification) {
        for (int i = 0; i < 4; i++) {
            char elem = num.charAt(i);
            char ch = verification.charAt(i);
            if (!(elem == ch || elem == Character.toLowerCase(ch) || elem == Character.toUpperCase(ch)))
                return false;
        }
        return true;
    }

    //获取会话
    private String getSession(HttpServletRequest request) {
        HttpSession session = request.getSession(false);
        if (session == null)
            return null;
            return (String) session.getAttribute("Num");
    }
}
3、校验成功之后,来到密码修改页面
在control层,进行判断
package com.example.demo.Controler;

import com.example.demo.Model.User;
import com.example.demo.Service.SendEmailService;
import org.springframework.beans.factory.annotation.Autowired;
import org.springframework.stereotype.Controller;
import org.springframework.web.bind.annotation.GetMapping;
import org.springframework.web.bind.annotation.RequestMapping;
import org.springframework.web.bind.annotation.ResponseBody;

import javax.servlet.http.HttpServletRequest;
import javax.servlet.http.HttpServletResponse;
import javax.servlet.http.HttpSession;


/**
 * 发送邮件
 */
@Controller
@RequestMapping("/novel")
public class SendEmailControl {
    @Autowired
 private   SendEmailService sendEmailService;

    @GetMapping("/sendemail")
    @ResponseBody
    public String sendEmail(HttpServletRequest request, HttpServletResponse response) {
        HttpSession session = request.getSession(false);
        //说明存在想要请求找回密码的用户
        if (session != null && session.getAttribute("forget") != null) {
            User user = (User) session.getAttribute("forget");
            if (sendEmailService.sendEmail(user.getEmail(), request, response))
                return "邮件已经发送";
        }
        return "邮件未发送";
    }
}
在service层,发送邮件,将邮件内的验证码存储到session中
/**
 * 发送数据
 */
@Service
public class SendEmailService {
    @Autowired
    private JavaMailSender javaMailSender; //自动注入的Bean

    public boolean sendEmail(String email, HttpServletRequest request, HttpServletResponse response) {
        String ret = getNum();
        SimpleMailMessage simpleMailMessage = new SimpleMailMessage();
        //邮件发送方
        simpleMailMessage.setFrom("****@qq.com");
        //邮件接收方
        simpleMailMessage.setTo(email);
        //邮件标题
        simpleMailMessage.setSubject("这是找回密码的验证码");
        //设置邮件标题
        simpleMailMessage.setText("您正在找回密码,请勿告知他人,防止密码被修改,如是本人操作,请输入验证码,验证码将在5分钟后过期" + ret);
        HttpSession session = request.getSession(true);
        if (session != null) {
            session.setAttribute("Email", ret);//存入验证码
            session.setMaxInactiveInterval(5 * 60);
            javaMailSender.send(simpleMailMessage);
            return true;
        }
        return false;

    }

    //生成随机六位数字
    private String getNum() {
        Random random = new Random();
        String ret = "";
        for (int i = 0; i < 6; i++) {
            ret += random.nextInt(10);
        }
        return ret;
    }
}
4、用户点击提交,和后端交互来修改密码
请求和响应
 type:"post",
 url:"change",
contentType:"application/json",
在control层,进行数据长度和输入为空的判断
package com.example.demo.Controler;

import com.example.demo.Service.ChangeService;
import org.springframework.beans.factory.annotation.Autowired;
import org.springframework.stereotype.Controller;
import org.springframework.web.bind.annotation.PostMapping;
import org.springframework.web.bind.annotation.RequestBody;
import org.springframework.web.bind.annotation.RequestMapping;
import org.springframework.web.bind.annotation.ResponseBody;

import javax.servlet.http.HttpServletRequest;
import javax.servlet.http.HttpServletResponse;
import java.util.Map;


/**
 * 密码修改功能 输入验证码和新密码
 */
@Controller
@RequestMapping("/novel")
public class ChangeControl {
    @Autowired
    ChangeService changeService;
    @ResponseBody
    @PostMapping("/change")
    public String changeControl(@RequestBody Map<String, String> map, HttpServletRequest request, HttpServletResponse response) {
        String verification = map.get("email");//邮箱验证码
        String password = map.get("password");
        //1、判断为空
        if (verification == null || password == null || verification.equals("") || password.equals(""))
            return "存在未输入数据";
        if(password.length()<10||password.length()>20)
            return "密码长度不符合要求";
        return changeService.changeService(verification, password, request, response);
    }
}
在service层,检验邮箱验证码的正确性,然后调用dao层接口,修改密码
package com.example.demo.Service;

import cn.hutool.core.annotation.AnnotationUtil;
import cn.hutool.crypto.digest.BCrypt;
import com.example.demo.Mapper.ChangePasswordMapper;
import com.example.demo.Model.User;
import org.apache.ibatis.annotations.Mapper;
import org.springframework.beans.factory.annotation.Autowired;
import org.springframework.stereotype.Service;

import javax.servlet.http.HttpServletRequest;
import javax.servlet.http.HttpServletResponse;
import javax.servlet.http.HttpSession;


/**
 * 密码修改
 */
@Service
public class ChangeService {

    @Autowired
    ChangePasswordMapper changePasswordMapper;

    public String changeService(String verification, String password, HttpServletRequest request, HttpServletResponse response) {
        HttpSession session = request.getSession(false);
        if(session==null)
            return "验证码过期";
        User user = (User) session.getAttribute("forget");
        String num = (String) session.getAttribute("Email");
        if(num==null||user==null)
            return "验证码过期";
        if (num.equals(verification)) {//验证成功 修改密码
            String pass = BCrypt.hashpw(password, BCrypt.gensalt());
            if (changePasswordMapper.change(user.getId(), pass) == 1)
                return "修改成功";
            return "修改失败";
        }
        return "验证码错误";
    }
}
以上实现了用户的登录,修改密码,注册功能
书架功能
create table bookshelf (
    user_name varchar(20),
    book_id int
);
查看书架功能,在用户登录之后,才可以查看书架
查看书架
url:
响应:
[
	{
		"book_id": 1,
		"writer_name": "曹雪芹",
		"photo": "1.png",
		"book_name": "红楼梦",
		"classify_name": "历史",
		"book_brief": "《红楼梦》初名《石头记》,成书于清代乾隆年间,是一部章回体古典长篇小说,位列中国古典文学四大名著之首,是中国古典文学创作的巅峰之作。据传,《红楼梦》刊行后不久,京师竹枝词里便有“开口不谈《红楼梦》,此公缺典定糊涂”的说法。\r\n清代小说家曹雪芹便是《红楼梦》的作者。曹雪芹(约1715—约1763),名霑,字梦阮,号雪芹、芹圃、芹溪,祖籍辽阳。曹家和《红楼梦》中的贾家一样,是个“钟鸣鼎食”之家。从曹雪芹的曾祖父曹玺开始,曹家三代任江宁织造,是江南显赫一时的名门望族。因此,生于南京的曹雪芹曾经有过一段“饫甘餍肥”的富贵生活,受过良好的文化艺术教养。雍正六年,曹家被抄,一家迁往北京,家道日渐衰落,正值年少的曹雪芹开始过着“茅椽蓬牖”的贫苦生活。曹雪芹晚年居于北京西郊,因爱子夭折而极度悲伤,最终贫病而死。\r\n曹雪芹性情豪放不羁,嗜酒健谈,工诗善画。他以十年时间创作《红楼梦》,“披阅十载,增删五次”,可谓“字字看来尽是血,十年辛苦不寻常”。据说这部凝聚着曹雪芹全部心血的巨著仅存八十回,他写至第八十回便“泪尽而逝”了。乾隆五十六年至乾隆五十七年,程伟元和高鹗先后对现存的后四十回进行反复修改,首次刊行一百二十回本,并取“红楼梦”为书名。其后四十回所据底本旧说是高鹗所续,然而红学专家们认为,《红楼梦》后四十回,曹雪芹基本上已经完成,只是不知为何未能传抄行世,未能流传下来,造成不可弥补的损失。据近年来的研究,高续说尚有可疑,续作的作者究竟为谁,仍尚待探究。\r\n《红楼梦》以错综复杂的清代上层贵族社会为背景,以贾宝玉和林黛玉的爱情悲剧为主线,通过对贾、史、王、薛四大家族荣衰的描写,展示了18世纪上半叶中国封建社会末期的方方面面,囊括了多姿多彩的世俗人情,可谓一部百科全书式的长篇小说。鲁迅先生在《中国小说史略》中评《红楼梦》:“全书所写,虽不外悲喜之情,聚散之迹,而人物事故,则摆脱旧套,与在先之人情小说甚不同……盖叙述皆存本真,闻见悉所亲历,正因写实,转成新鲜……单是命意,就因读者的眼光而有种种:经学家看见《易》,道学家看见淫,才子看见缠绵,革命家看见排满,流言家看见宫闱秘事……”\r\n",
		"score": 9.8,
		"sex": "全部",
		"state": "完结",
		"count": 1000
	}
]
control层:直接调用dao层接口进行查找
<select id="get" resultMap="bookMap">
        <!--        这个id,表示实现StudentMapper接口的哪一个方法-->
        <!--        resultType 表示方法的返回类型-->
        select book.* from book,bookshelf where book.book_id= bookshelf.book_id and
        bookshelf.user_name=#{user_name}
        <!--        这里写具体的执行语句-->

    </select>
添加书籍进入书架
用户已经登录才可以执行相应功能

加入书架的逻辑:1、查找书籍是否已经在书架了 2、加入书架
/**
* 给书架新增记录
*/
@Controller
@RequestMapping("/novel")
@ResponseBody
public class InsertBookShelfRecordControl {
@Autowired
SelectBookFromBookshelfMapper selectBookFromBookshelfMapper;
@Autowired
InsertBookShelfRecordMapper insertBookShelfRecordMapper;
@RequestMapping("/add")
public String add(@RequestParam("user_name") String user_name, @RequestParam("book_id") int book_id) {
if ((selectBookFromBookshelfMapper.select(user_name, book_id))!=null)
return "书籍已经加入书架了";
if (user_name == "" || book_id <= 0)
return "加入书架失败";
if (insertBookShelfRecordMapper.add(user_name, book_id) == 1)
return "加入书架成功";
return "加入书架失败";
}
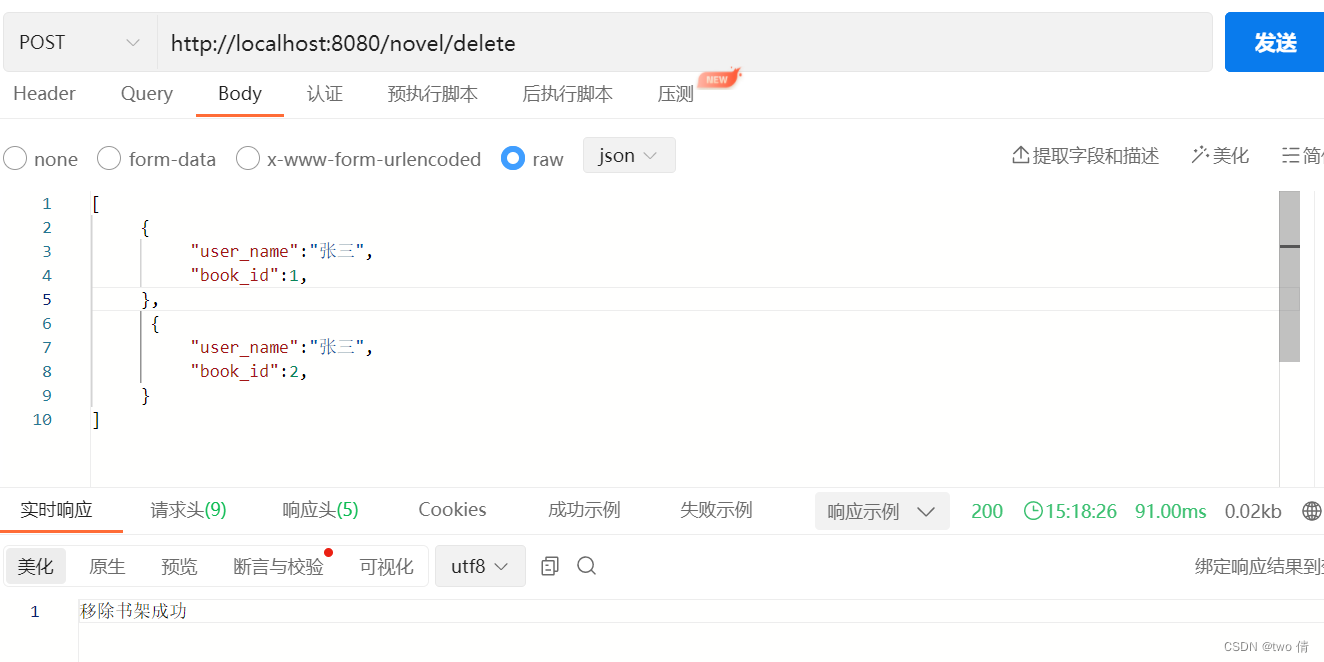
}删除书架上的书籍
用户登录之后,在书架管理页面,可以选中书籍将其从书架中移除

用户可以同时选中多个书籍进行删除,所以前端发送的是数组
请求格式:
  type:"post",
        url:"delete",
        contentType:"application/json",
响应:"移除书架成功"或者"移除书架失败"
获取全部小说分类
create table classify(
    classify_id int primary key  auto_increment,
    classify_name  varchar(20)
);
请求与响应
type:"get",
url:"getallclassify"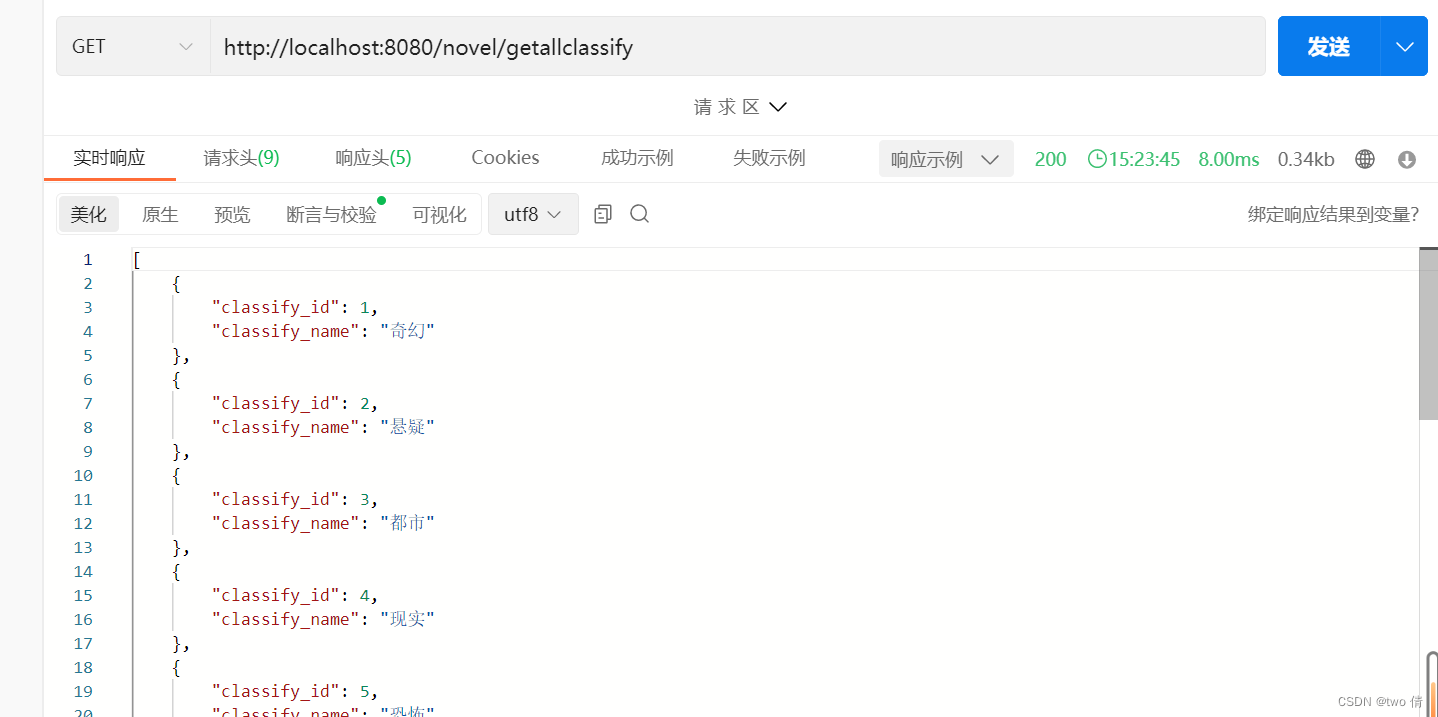
点击某一个分类,可以跳转到具体的分类
这里因为后序还涉及到了根据连载/完结的状态查询,根据女生/男生的性别查询,根据评分/阅读量的榜单排序查询,这些查找都是返回Book类,而且只是查找条件的不同,所以将这些功能在一个接口实现了
package com.example.demo.Controler;


import com.example.demo.Mapper.GetShowBookMapper;
import com.example.demo.Model.Book;
import com.example.demo.Service.GetShowBookService;
import org.apache.ibatis.io.Resources;
import org.apache.ibatis.session.SqlSession;
import org.apache.ibatis.session.SqlSessionFactory;
import org.apache.ibatis.session.SqlSessionFactoryBuilder;
import org.springframework.beans.factory.annotation.Autowired;
import org.springframework.stereotype.Controller;
import org.springframework.web.bind.annotation.GetMapping;
import org.springframework.web.bind.annotation.RequestMapping;
import org.springframework.web.bind.annotation.RequestParam;
import org.springframework.web.bind.annotation.ResponseBody;

import java.io.IOException;
import java.io.InputStream;
import java.util.List;
import java.util.Objects;

import static org.apache.tomcat.util.http.parser.HttpParser.isNumeric;

/**
 * 获取count本展示书籍
 * type标识根据什么条件筛选
 * 1、classify_name表示获取书籍的类型  并且type==classify
 * 2、阅读量 排行榜 (可以是某一分类) type=count
 * 3、评分排行榜 (可以是某一分类) type=score
 * 4、type=sex 标识根据性别查询书籍 sex参数标识男女
 * 5、type=state 标识根据书籍状态获取书籍  state参数标识书籍状态:完本,连载
 * 6、type=total 标识获取所有类型的书籍
 */
@Controller
@RequestMapping("/novel")
public class GetShowBookControl {
    @Autowired
    GetShowBookService getShowBookService;
    @ResponseBody
    @GetMapping("/getshowbooks")
    public List<Book> getbooks( @RequestParam("count")Integer count, String type, String classify_name,String sex,String state) throws IOException {
        System.out.println(count);
        System.out.println(type);
        System.out.println(classify_name);
        System.out.println(sex);
        System.out.println(state);
        if(count==null||type==null)
            return null;
        if(type.equals("classify")&&classify_name==null||type.equals("classify")&&classify_name.equals("null"))
            return null;
        else if(type.equals("sex")&&sex==null||type.equals("sex")&&sex.equals("null"))
            return null;
       else if(type.equals("state")&&state==null||type.equals("state")&&state.equals("null"))
            return null;
        if (count<=0&&!isNumeric(count))
            return null;
        if (Objects.equals(count, "null"))
            return null;
        if (Objects.equals(type, "null"))
            return null;
        if (Objects.equals(classify_name, "null"))
            classify_name=null;
        if (Objects.equals(sex, "null"))
            sex=null;
        if (Objects.equals(state, "null"))
            state=null;
        if(!(type.equals("total")||type.equals("sex")||type.equals("state")||type.equals("score")||type.equals("count")||type.equals("classify")))
            return null;
        return getShowBookService.getbooks(count,type,classify_name,sex,state);
    }
}
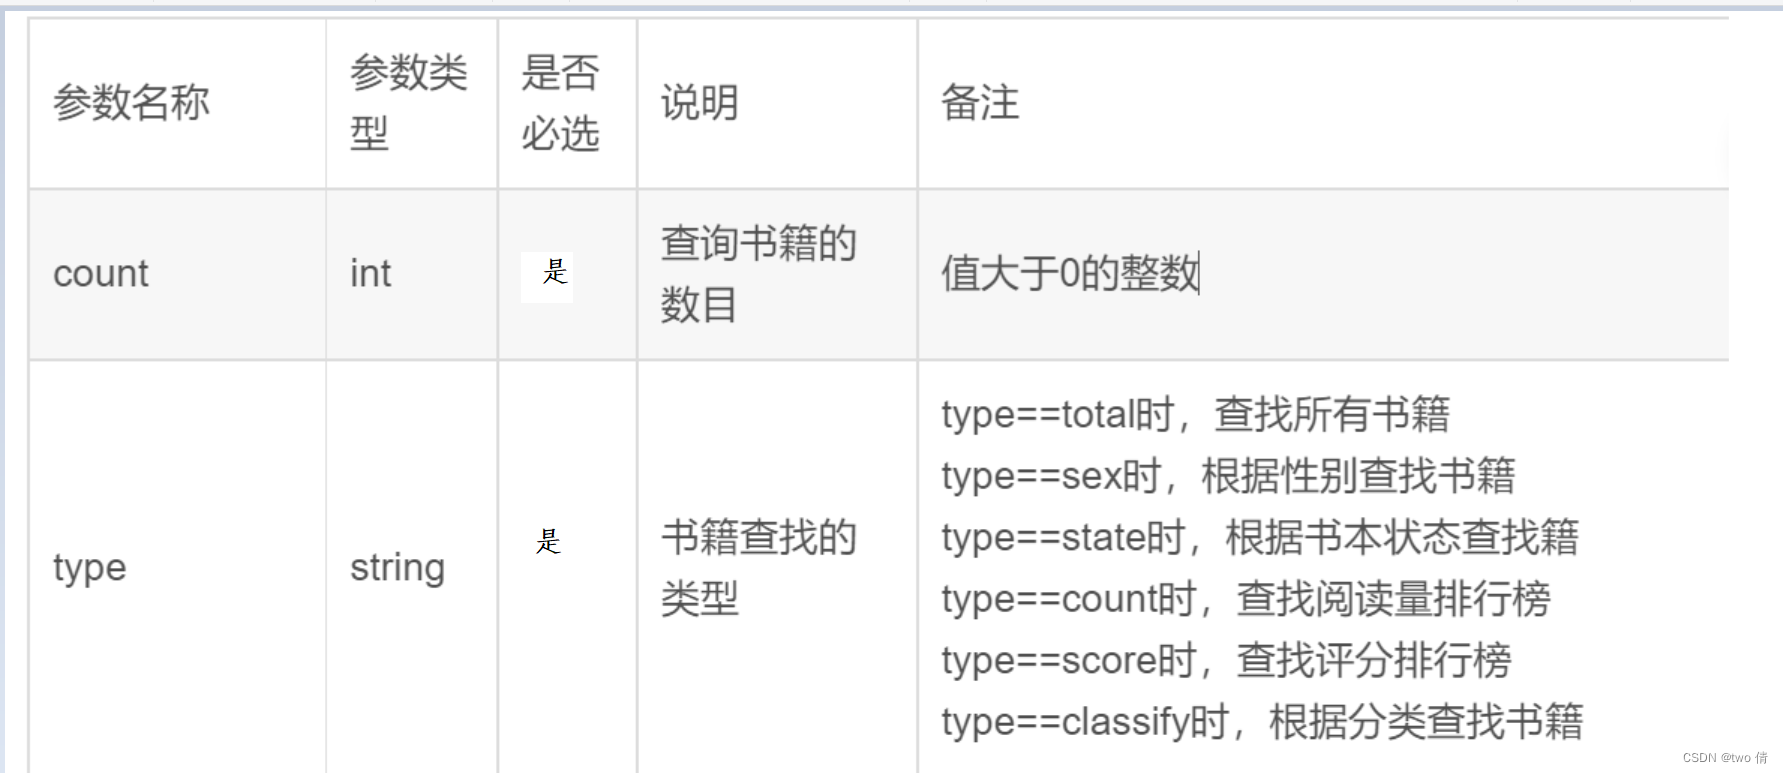
这里的参数count,表示数据库分页查找时的数量
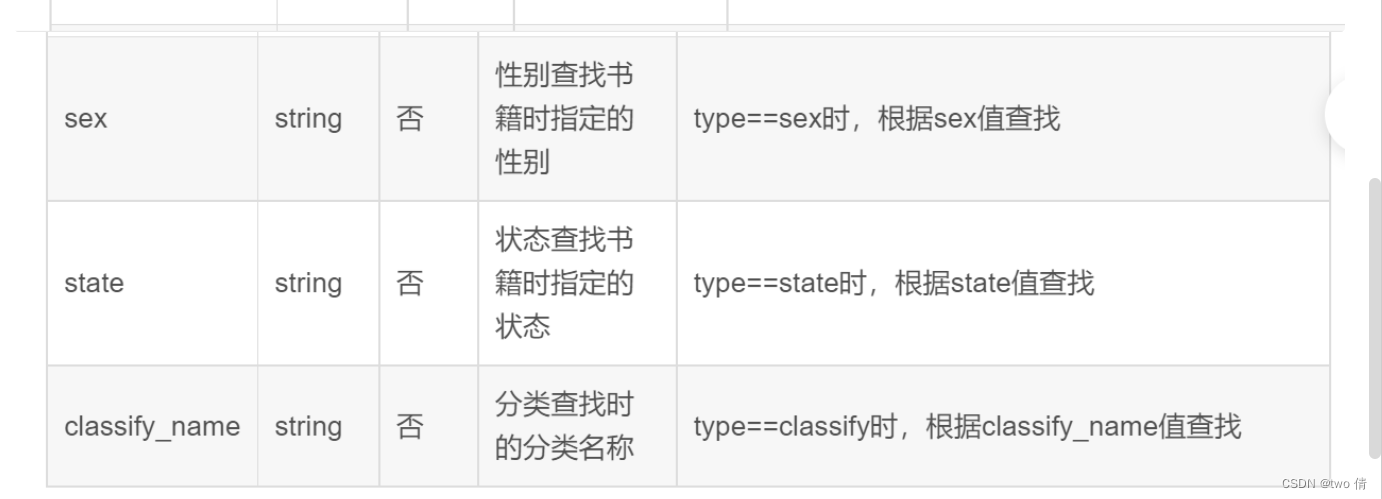
type:表示根据某一类型进行查找,其包括几种情况:total:表示想要查找所有数据,sex:表示根据性别查询,state:表示根据书籍状态查询,count:表示根据阅读量排序查询,score表示根据评分排序查询classify:表示根据分类查询
而classify_name,sex,state则表示查询哪一个类别,哪个性别,哪个状态
<?xml version="1.0" encoding="UTF-8"?>
<!DOCTYPE mapper PUBLIC "-//mybatis.org//DTD Mapper 3.0//EN" "http://mybatis.org/dtd/mybatis-3-mapper.dtd">
<mapper namespace="com.example.demo.Mapper.GetShowBookMapper">
<select id="getbooks" resultType="com.example.demo.Model.Book">
select * from book
<choose>
<!-- 获取所有书籍-->
<when test="type=='total' and count!=null" >
limit #{count}
</when>
<!-- 根据类型查询-->
<when test="type=='classify' and classify_name!=null">
where classify_name=#{classify_name} limit #{count}
</when>
<!-- 根据性别查询-->
<when test="type=='sex' and sex!=null">
where sex=#{sex} limit #{count}
</when>
<!-- 根据状态查询-->
<when test="type=='state' and state!=null">
where state=#{state} limit #{count}
</when>
<!-- 阅读量榜单 -->
<!-- 查询时候带有类型-->
<!-- where classify_name='玄幻' order by count desc limit 2-->
<!-- 只根据排序书籍 -->
<when test="type=='count' and classify_name==null and sex==null and state==null">
order by count desc limit #{count}
</when>
<!-- 查询某一类书籍的阅读量前几名-->
<when test="type=='count' and classify_name!=null and sex==null and state==null">
where classify_name=#{classify_name} order by count desc limit #{count}
</when>
<!-- 查询某一个性别下的最高阅读量书籍-->
<when test="type=='count' and sex!=null and classify_name==null and state==null">
where sex=#{sex} order by count desc limit #{count}
</when>
<!-- 查询某一个状态下的最高阅读量书籍-->
<when test="type=='count' and state!=null and classify_name==null and sex==null">
where state=#{state} order by count desc limit #{count}
</when>
<!-- 评分挡榜单 -->
<!-- 查询时候带有类型-->
<when test="type=='score' and classify_name!=null and sex==null and state==null">
where classify_name=#{classify_name} order by score desc limit #{count}
</when>
<!-- 查询时候不带有类型-->
<when test="type=='score' and classify_name==null and state==null and sex==null" >
order by score desc limit #{count}
</when>
<when test="count!=null">
limit #{count}
</when>
</choose>
</select>
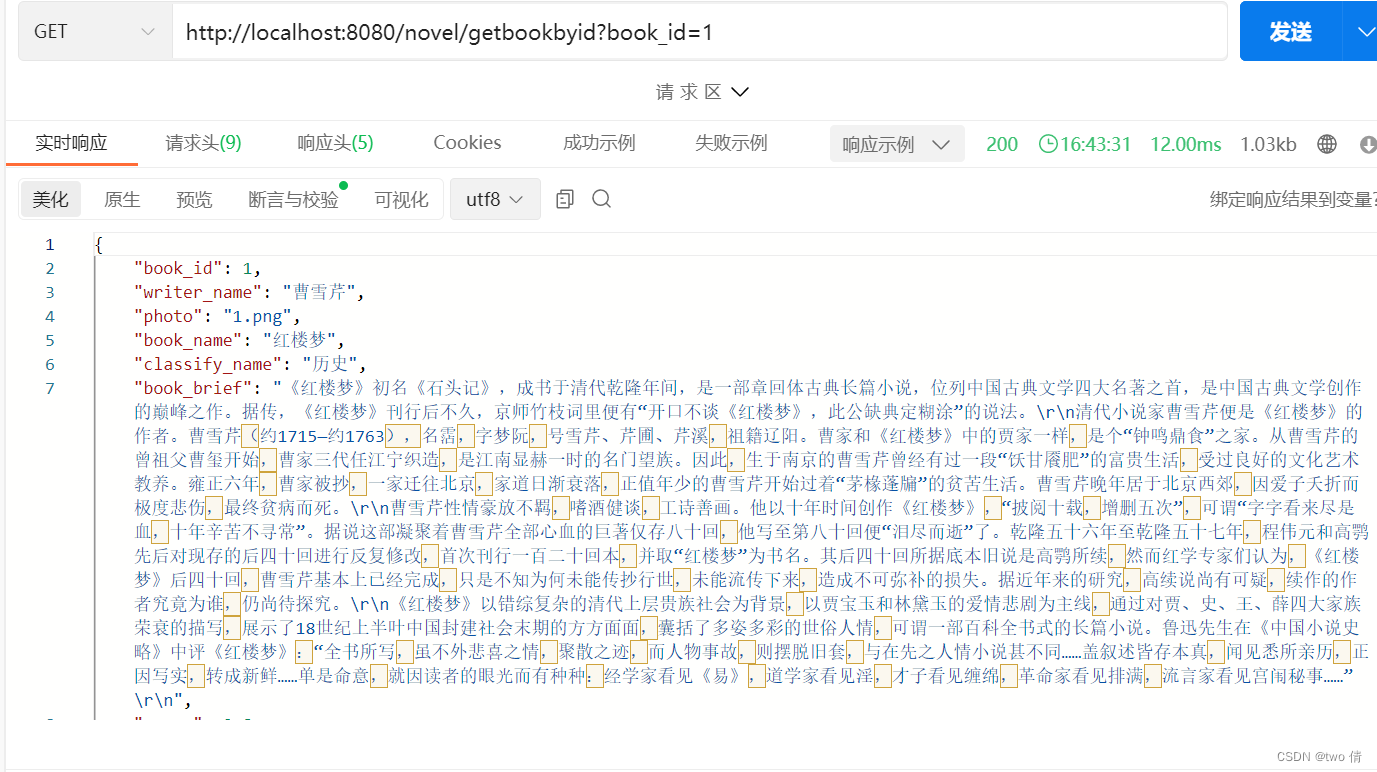
</mapper>获取书籍信息
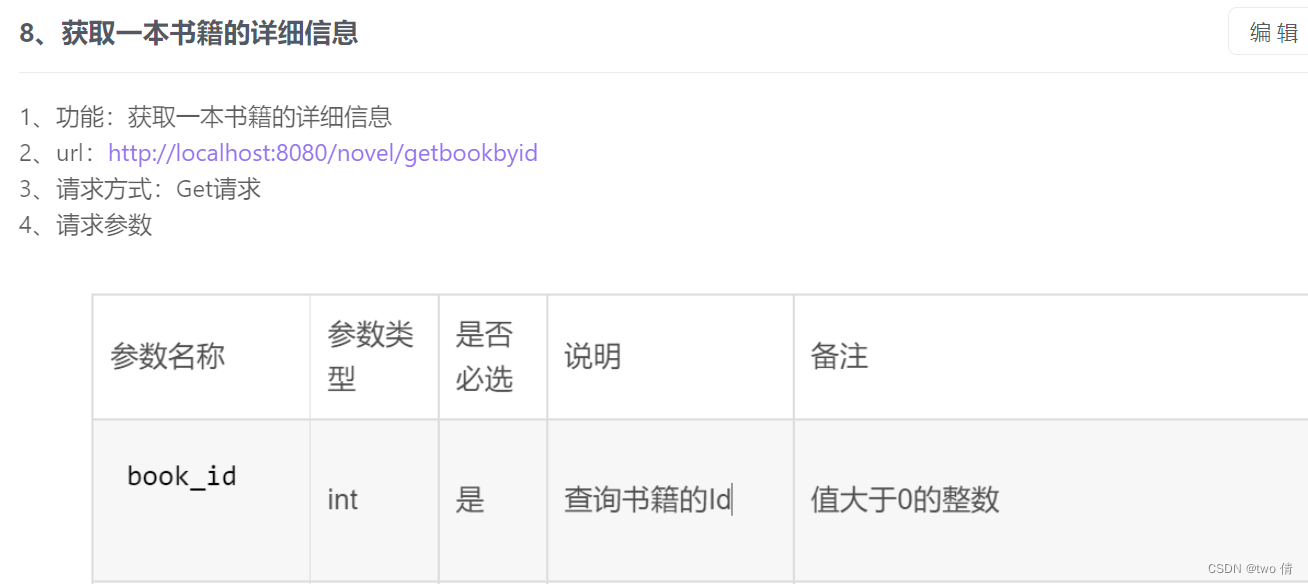
请求和响应:
{
type:"get",
url:"getbookbyid"
}
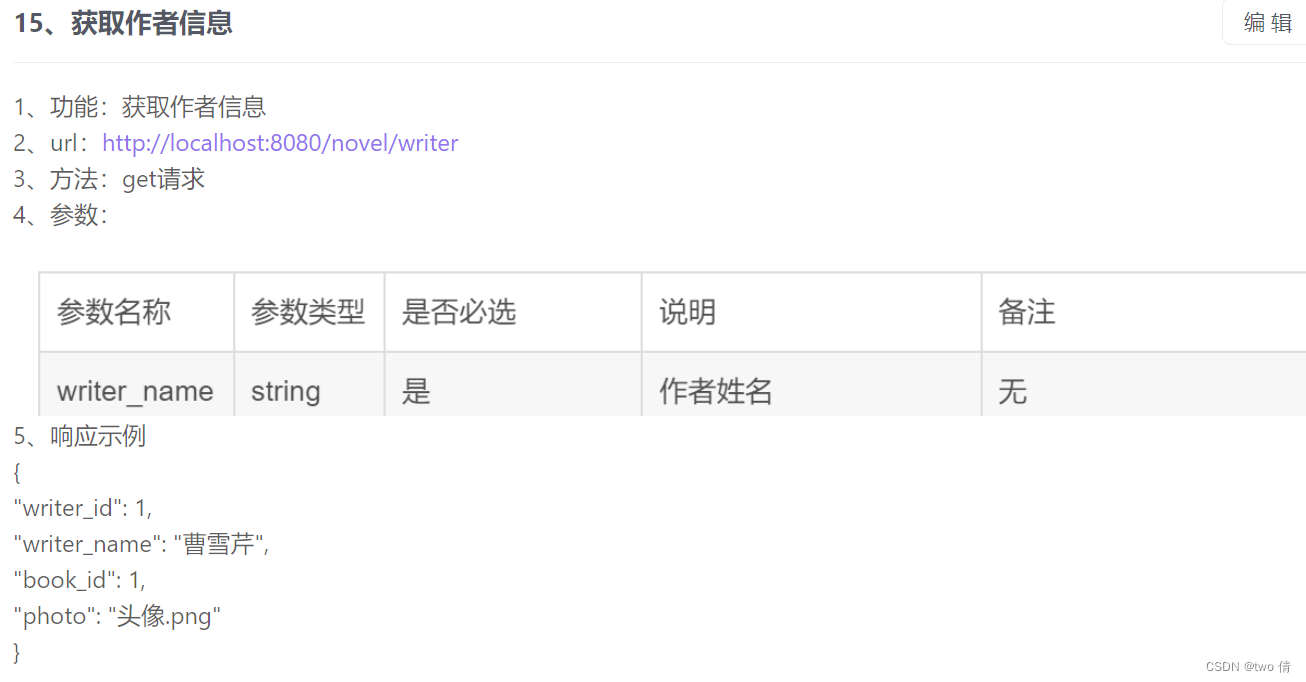
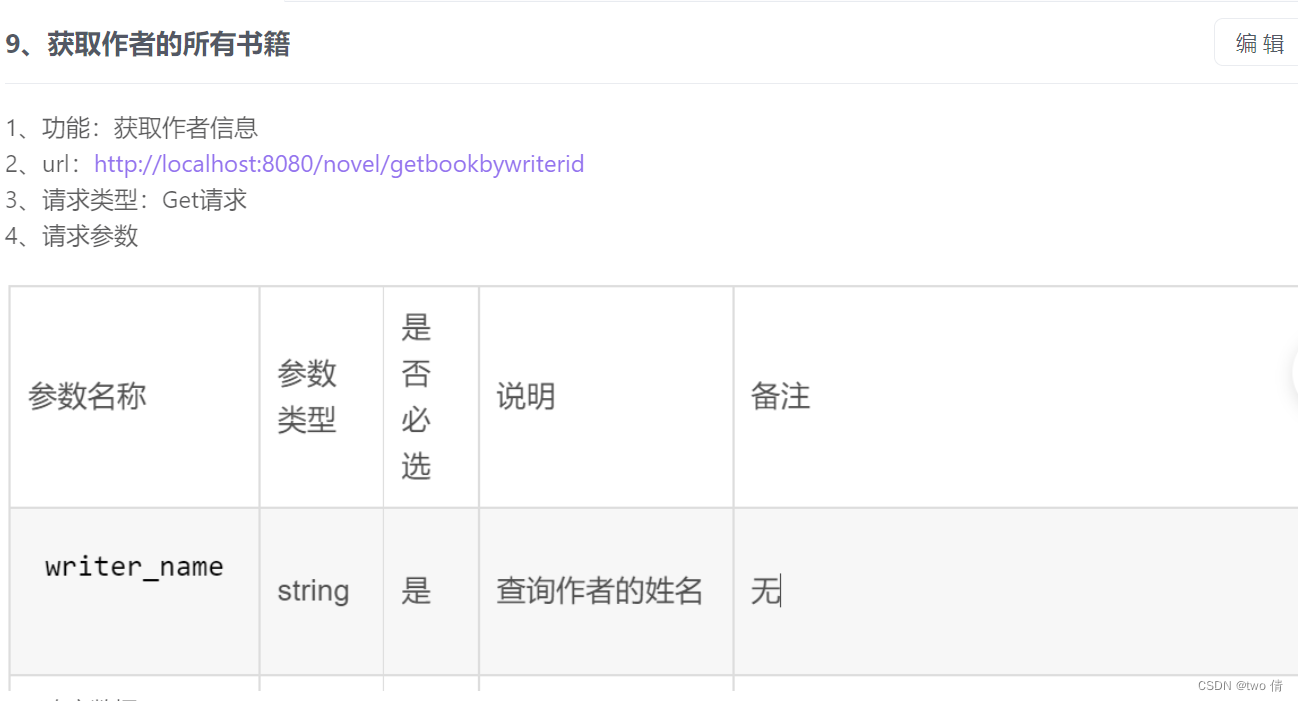
获取作者信息
点击作者姓名,来到作者信息介绍页面
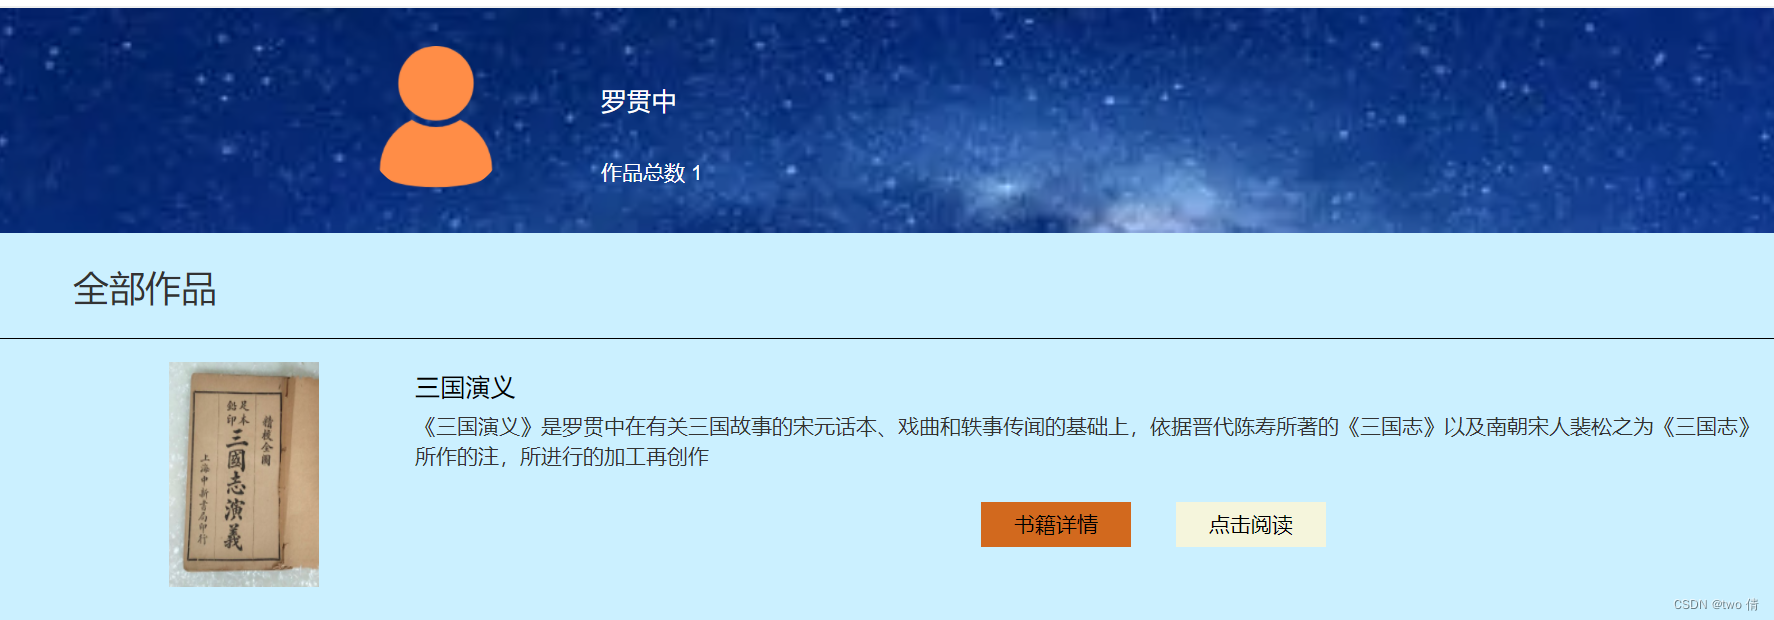
查找作者信息
根据作者姓名查找这个作者的信息
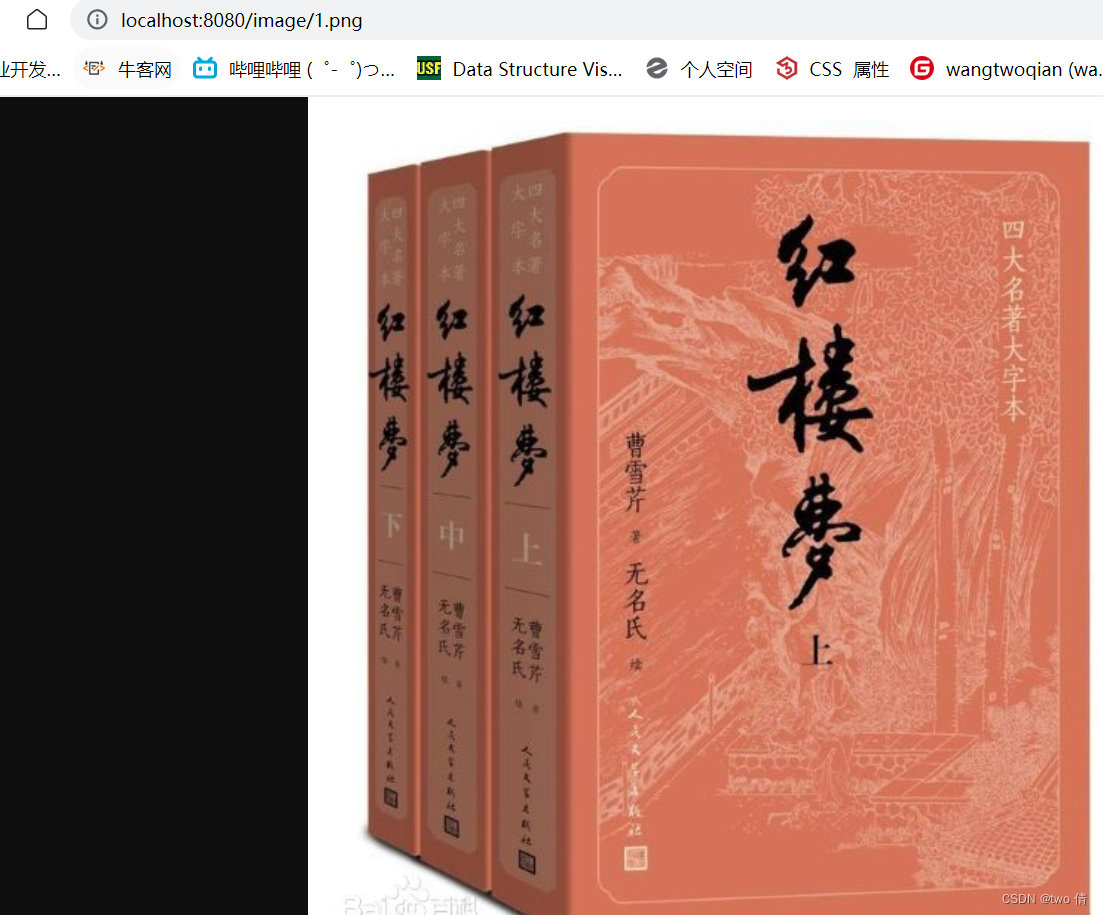
这里涉及到了照片的展示,如果在前端html中设置的是照片的路径,由于安全考虑,web工程里是无法访问本地文件的,所以要设置虚拟路径
/**
 * 配置文件
 * 配置虚拟路径映射本地路径
 * 根据虚拟地址就可访问本地图片
 */
@Configuration
public class MyConfig implements WebMvcConfigurer {
    /*
     *addResourceHandler:访问映射路径
     *addResourceLocations:资源绝对路径
     */
    @Override
    public void addResourceHandlers(ResourceHandlerRegistry registry) {
        registry.addResourceHandler("/image/**").addResourceLocations("file:C:\\Users\\30283\\Desktop\\novel\\photo\\");
    }
}
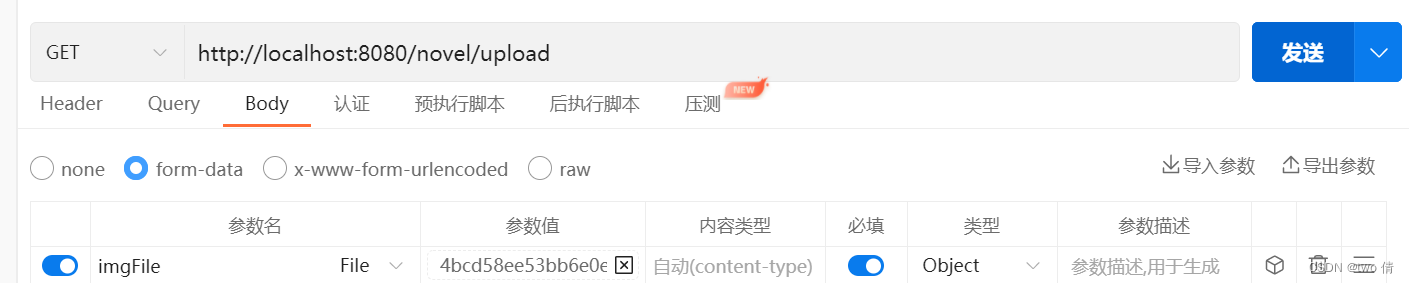
@Controller
@RequestMapping("/novel")
public class UploadPicture {
    @RequestMapping("/upload")
    public void upload(@RequestParam("imgFile") MultipartFile imgFile) throws IOException {
        String fileName = imgFile.getOriginalFilename();//获取上传的文件名
        String filePath = "C:\\Users\\30283\\Desktop\\novel\\photo\\";
        assert fileName != null;
        File targetFile = new File(filePath, fileName);   //在filePath目录下 创建filename的文件
        imgFile.transferTo(targetFile);  //使用transferTo(dest)方法将上传文件写到服务器上指定的文件;
    }
}
调用接口,上传图片,图片会复制到本地路径"C:\\Users\\30283\\Desktop\\novel\\photo\\"里,同时,使用虚拟路径可以访问到图片
文件上传到了指定路径

使用虚拟路径,也可以访问图片
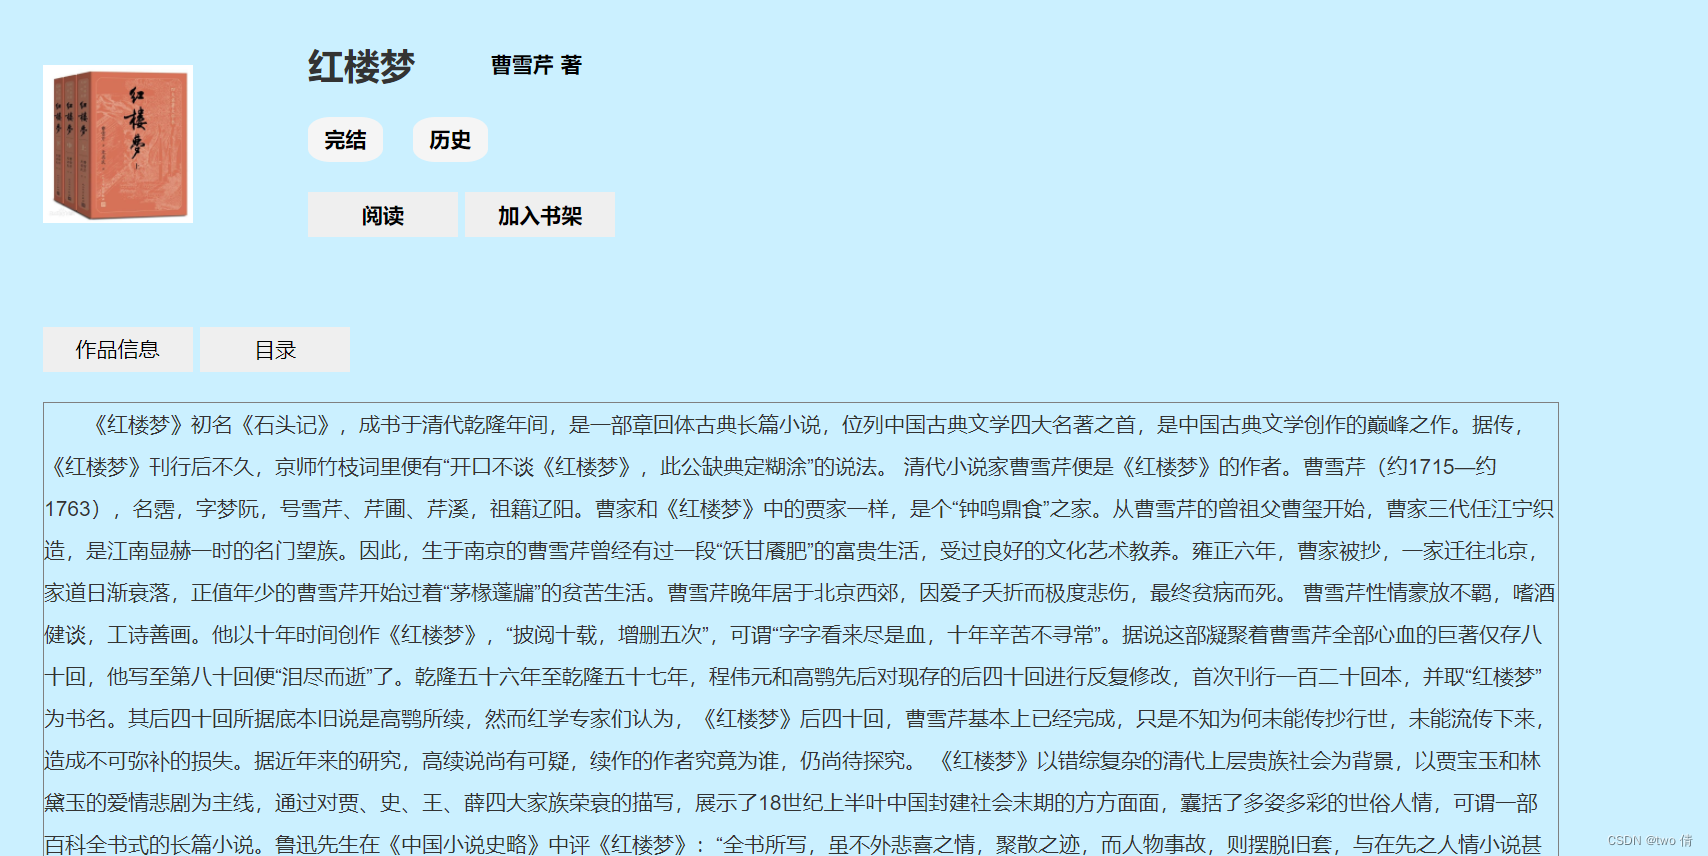
查找作者的所有书籍
响应:
[
{
"book_id": 1,
"writer_name": "曹雪芹",
"photo": "1.png",
"book_name": "红楼梦",
"classify_name": "历史",
"book_brief": "《红楼梦》初名《石头记》,成书于清代乾隆年间,是一部章回体古典长篇小说,位列中国古典文学四大名著之首,是中国古典文学创作的巅峰之作。据传,《红楼梦》刊行后不久,京师竹枝词里便有“开口不谈《红楼梦》,此公缺典定糊涂”的说法。\r\n清代小说家曹雪芹便是《红楼梦》的作者。曹雪芹(约1715—约1763),名霑,字梦阮,号雪芹、芹圃、芹溪,祖籍辽阳。曹家和《红楼梦》中的贾家一样,是个“钟鸣鼎食”之家。从曹雪芹的曾祖父曹玺开始,曹家三代任江宁织造,是江南显赫一时的名门望族。因此,生于南京的曹雪芹曾经有过一段“饫甘餍肥”的富贵生活,受过良好的文化艺术教养。雍正六年,曹家被抄,一家迁往北京,家道日渐衰落,正值年少的曹雪芹开始过着“茅椽蓬牖”的贫苦生活。曹雪芹晚年居于北京西郊,因爱子夭折而极度悲伤,最终贫病而死。\r\n曹雪芹性情豪放不羁,嗜酒健谈,工诗善画。他以十年时间创作《红楼梦》,“披阅十载,增删五次”,可谓“字字看来尽是血,十年辛苦不寻常”。据说这部凝聚着曹雪芹全部心血的巨著仅存八十回,他写至第八十回便“泪尽而逝”了。乾隆五十六年至乾隆五十七年,程伟元和高鹗先后对现存的后四十回进行反复修改,首次刊行一百二十回本,并取“红楼梦”为书名。其后四十回所据底本旧说是高鹗所续,然而红学专家们认为,《红楼梦》后四十回,曹雪芹基本上已经完成,只是不知为何未能传抄行世,未能流传下来,造成不可弥补的损失。据近年来的研究,高续说尚有可疑,续作的作者究竟为谁,仍尚待探究。\r\n《红楼梦》以错综复杂的清代上层贵族社会为背景,以贾宝玉和林黛玉的爱情悲剧为主线,通过对贾、史、王、薛四大家族荣衰的描写,展示了18世纪上半叶中国封建社会末期的方方面面,囊括了多姿多彩的世俗人情,可谓一部百科全书式的长篇小说。鲁迅先生在《中国小说史略》中评《红楼梦》:“全书所写,虽不外悲喜之情,聚散之迹,而人物事故,则摆脱旧套,与在先之人情小说甚不同……盖叙述皆存本真,闻见悉所亲历,正因写实,转成新鲜……单是命意,就因读者的眼光而有种种:经学家看见《易》,道学家看见淫,才子看见缠绵,革命家看见排满,流言家看见宫闱秘事……”\r\n",
"score": 9.8,
"sex": "全部",
"state": "完结",
"count": 1000
}
]
到此,就完成了homepage页面的功能实现,接下来就是小说阅读界面
小说展示功能
根据book_id获取某一本书籍信息:通过getbookbyid接口实现
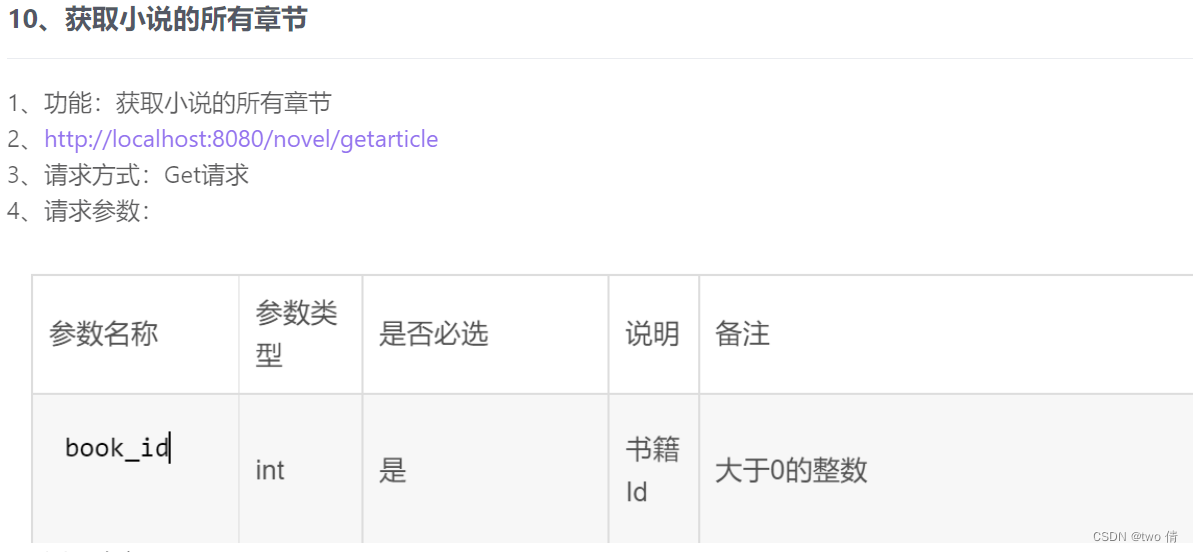
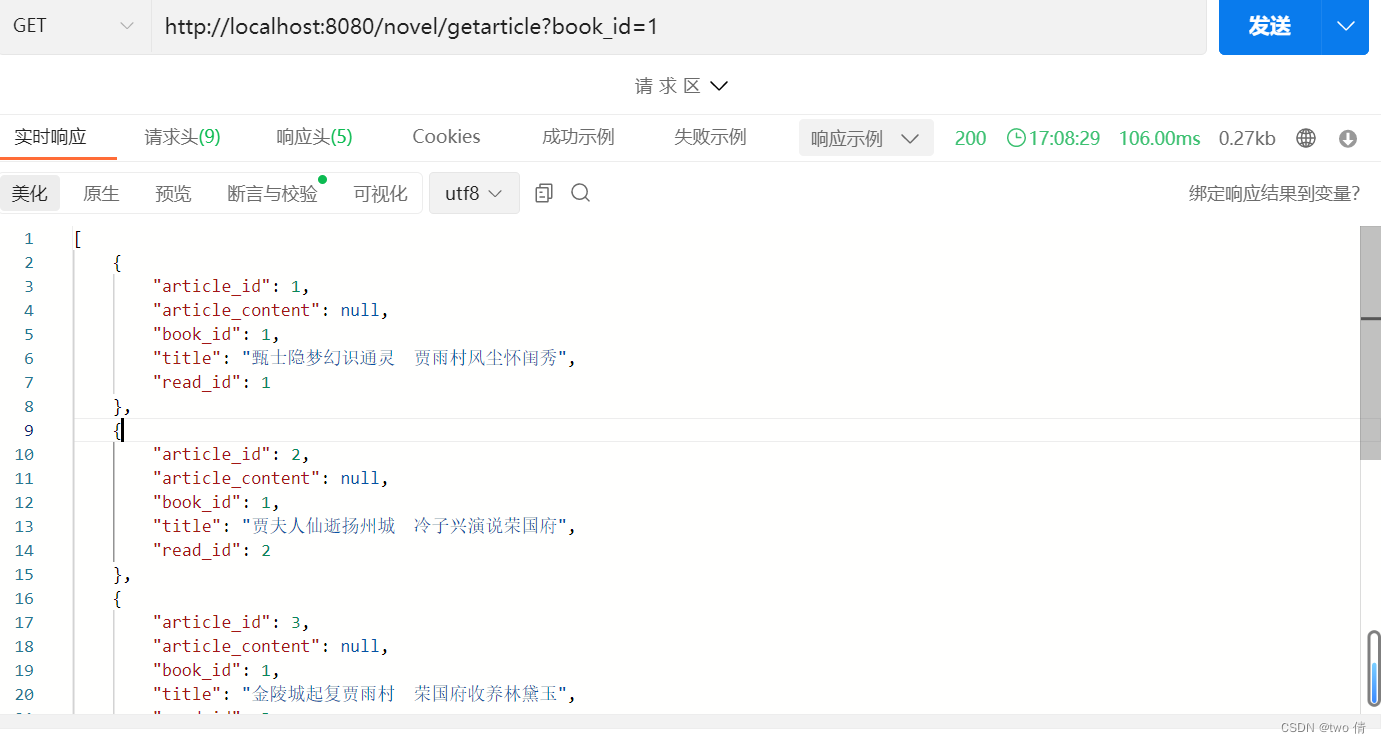
获取目录:
create table article
(
    article_id   int primary key auto_increment,
    article_content varchar(10000),
    book_id         int,
    title           varchar(100),
    read_id         int
);
获取一本书籍的所有目录
小说阅读功能
小说阅读的方式:1、点击阅读按钮阅读 2、点击目录阅读 3、在阅读界面点击上/下一页阅读
在前端处理时,第一种:传入参数是book_id,第二种是article_id,第三种是book_id和read_id
package com.example.demo.Controler;

import com.example.demo.Model.Article;
import com.example.demo.Service.GetContentService;
import org.springframework.beans.factory.annotation.Autowired;
import org.springframework.stereotype.Controller;
import org.springframework.web.bind.annotation.GetMapping;
import org.springframework.web.bind.annotation.RequestMapping;
import org.springframework.web.bind.annotation.RequestParam;
import org.springframework.web.bind.annotation.ResponseBody;

import javax.servlet.http.HttpServletRequest;


/**
 * 阅读小说的某一个章节
 *
 *  1、如果是article_id 说明是点击目录阅读 直接查询即可
 *  2、如果是book_id存在  read_id不存在 就是直接阅读按钮
 *  3、如果是book_id存在  read_id存在 直接查询即可
 */
@Controller
@RequestMapping("/novel")
public class GetContentControl {
    @Autowired
    GetContentService service;

    @ResponseBody
    @GetMapping("/getcontent")
    public Article get( @RequestParam(value = "article_id", required = false) Integer article_id, @RequestParam(value = "book_id", required = false) Integer book_id, @RequestParam(value = "read_id", required = false) Integer read_id, HttpServletRequest request) {
        if (article_id == null && book_id != null && book_id > 0) {
            //根据书籍阅读
            if (read_id != null && read_id > 0)
                return service.get(article_id, book_id, read_id, request);
            if (read_id == null)
                return service.get(article_id, book_id, 1, request);
        }
        if (article_id != null && article_id > 0 && book_id == null && read_id == null)//点击目录阅读
            return service.get(article_id, null, null, request);
        return null;
    }
}
package com.example.demo.Service;

import com.example.demo.Mapper.*;
import com.example.demo.Model.Article;
import com.example.demo.Model.Record;
import com.example.demo.Model.User;
import org.springframework.beans.factory.annotation.Autowired;
import org.springframework.stereotype.Service;

import javax.servlet.http.HttpServletRequest;
import javax.servlet.http.HttpSession;


/*
获取目录
//获取书籍内容的方式

//如果用户没有登录:
   //1、如果传入参数是article_id 说明是点击目录阅读 直接根据article_id查询即可
   //2、如果是直接点击阅读按钮 那么就是只有book_id,这时直接从第一章阅读
   //3、如果是book_id存在  read_id存在 那就是根据上一页/下一页按钮阅读

//如果用户登录 阅读哪一个章节都需要更新阅读记录
//1、如果传入参数是article_id 说明是点击目录阅读 直接根据article_id查询即可
   //2、如果是直接点击阅读按钮 那么就是只有book_id,这时根据阅读记录查询的read——id 查找书籍内容
   //3、如果是book_id存在  read_id存在 那就是根据上一页/下一页按钮阅读
 */
@Service
public class GetContentService {
    @Autowired
    GetContentMapper getContentMapper;
    @Autowired
    GetRecordMapper getRecordMapper;//查询用户记录
    @Autowired
    InsertRecordMapper insertRecordMapper;//增加用户记录
    @Autowired
    UpdateRecordMapper updateRecordMapper;//更新用户记录
    @Autowired
    GetBookIdByArticleIdMapper getBookIdByArticleId;//根据文章id获取read_id
    @Autowired
    UpdateBookCountMapper updateBookCountMapper;

    public Article get(Integer article_id, Integer book_id, Integer read_id, HttpServletRequest request) {
        HttpSession session = request.getSession(false);
        User user = null;
        if (session != null)
            user = (User) session.getAttribute("User");
        if (session == null || user == null) {
            //没有登录
            //1、优先根据目录查询
            if (article_id != null) {
                return getContentMapper.get(article_id, null, null);
            }
            //2、根据书籍Id和章节Id读取
            else if (book_id != null && read_id != null) {//如果带有read_id,说明是根据 一本书的某一章节阅读
                return getContentMapper.get(null, book_id, read_id);
            } else if (book_id != null) {
                //只携带 默认从第一篇阅读
                return getContentMapper.get(null, book_id, 1);
            }
            return null;
        } else {//用户登录了
            //1、优先根据目录查询
            if (article_id != null) {
                Article article = getBookIdByArticleId.get(article_id);//获取read_id
                if (article != null) {
                    Record record = getRecordMapper.get(user.getName(), article.getBook_id());//读取用户记录
                    if (record == null) {//不存在此记录
                        insertRecordMapper.insert(user.getName(), article.getBook_id(), article.getRead_id());//新增阅读记录
                        updateBookCountMapper.set(article.getBook_id());//修改这本书的阅读次数
                    } else//修改记录
                        updateRecordMapper.upload(user.getName(), article.getBook_id(), article.getRead_id());
                    return getContentMapper.get(article_id, null, null);
                }
            }else if (book_id != null & read_id != null) {
                    //2、根据书籍Id和章节Id读取
                    // 如果带有read_id,说明是根据 一本书的某一章节阅读
                    Record record = getRecordMapper.get(user.getName(), book_id);//读取用户记录
                    if (record == null) {//不存在此记录
                        insertRecordMapper.insert(user.getName(), book_id, read_id);//新增阅读记录
                        updateBookCountMapper.set(book_id);//修改这本书的阅读次数
                    } else//修改记录
                        updateRecordMapper.upload(user.getName(), book_id, read_id);
                    return getContentMapper.get(null, book_id, read_id);
                } else if (book_id != null) {
                    //直接点击阅读 查询阅读记录
                    Record record = getRecordMapper.get(user.getName(), book_id);//读取用户记录
                    if (record == null) {//不存在此记录
                        insertRecordMapper.insert(user.getName(), book_id, 1);//新增阅读记录
                        updateBookCountMapper.set(book_id);//修改这本书的阅读次数
                    } else //不需要修改
                        return getContentMapper.get(null, book_id, record.getRead_id());
                }
            }
        return null;
    }
}
<select id="get" resultType="com.example.demo.Model.Article">
select * from article
<if test="article_id!=null">
where article_id=#{article_id}
</if>
<if test="read_id!=null and book_id!=null">
where book_id=#{book_id} and read_id=#{read_id}
</if>
</select>
发布章节
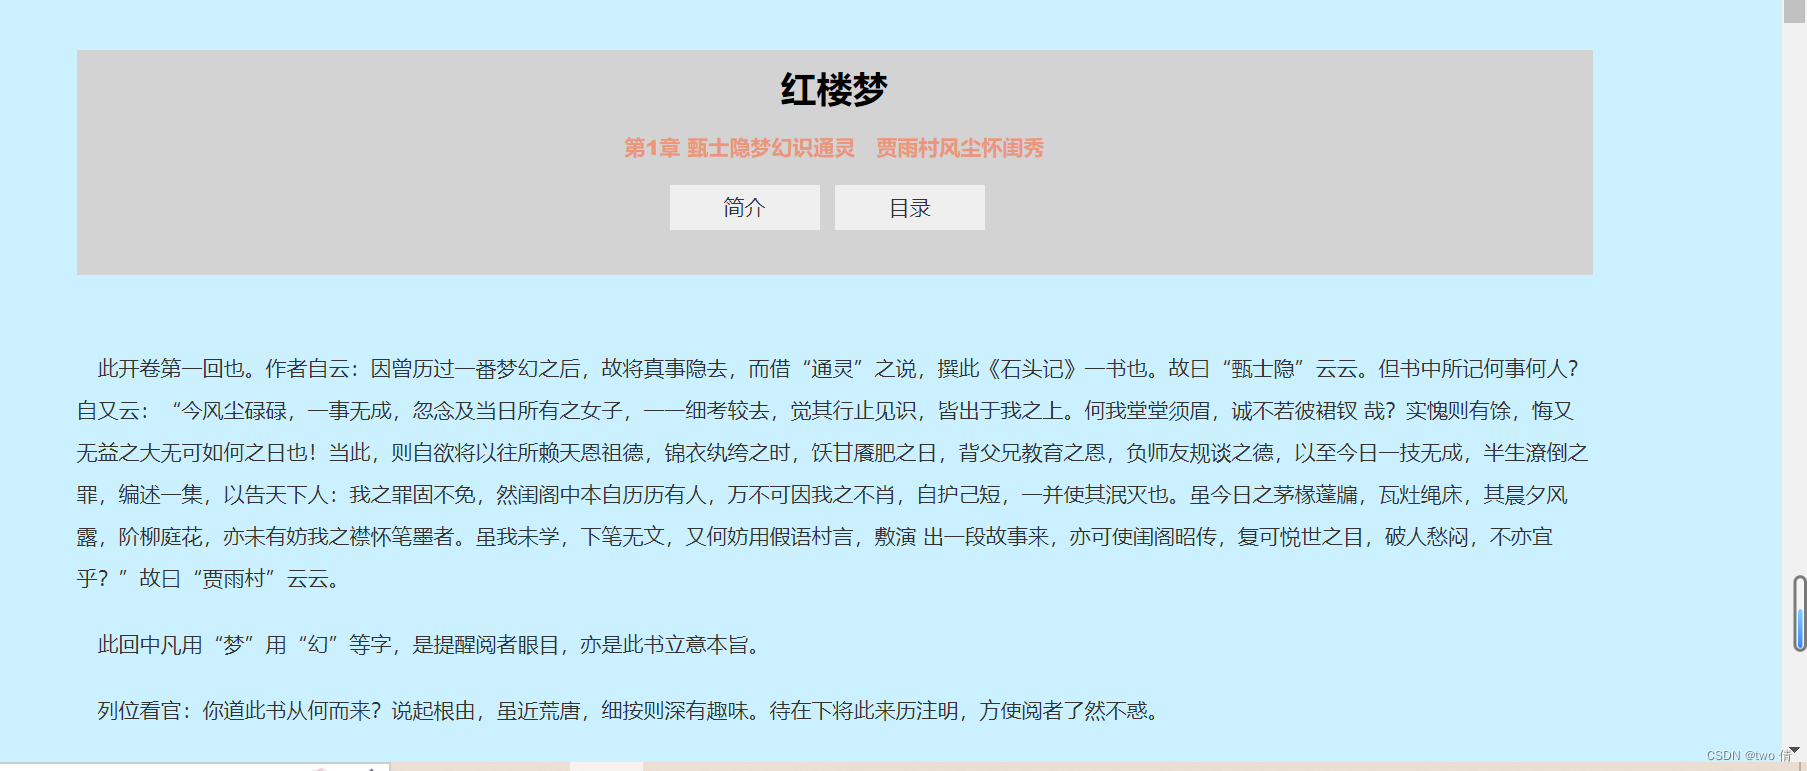
为了让小说阅读界面排版美观,使用了Markdown编辑器发布小说内容和展示
请求和响应
        type:"post",
        url:"send",
        contentType:"application/json",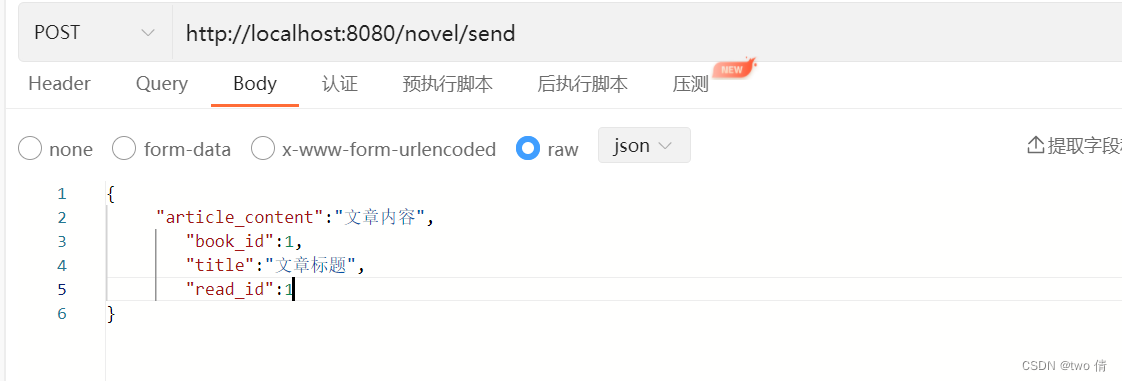
添加统一的异常处理
@ControllerAdvice
public class ErrorAdvice {
    @ExceptionHandler(Exception.class)
    //异常处理器
    //Exception.class 表示接受所有的异常
    @ResponseBody
    public Object errorAdvice(Exception e, HttpServletResponse response) {
        System.out.println(e.getMessage());
        response.setStatus(200);
        return null;
    }
}
@Component
@Aspect
public class NovelAspect {
//定义一个切点
@Pointcut("execution(* com.example.demo..*.*(..))")
public void pointcut(){
}
}


 730
730

 被折叠的 条评论
为什么被折叠?
被折叠的 条评论
为什么被折叠?
 到【灌水乐园】发言


