


1.获取的聚合数据
getMapData(label){
  agriculturalParkMap().then((res) => {
    if (res.code === 200){
      if(label=='种植大户'){
        this.plantMarkerList = res.data.parkMap2
      }else {
        this.plantMarkerList = res.data.parkMap1
      }
      this.setCluster(this.plantMarkerList,label)
    }
  })
},
2.实现聚合
setCluster(points,label){
  var count = points.length;
  var features = new Array(count);
  for (var i = 0; i < count; i++) {
    var coordinate = points[i].lnglat;

    if(label=='种植大户'){
      var attr = {
        lnglat: points[i].lnglat,
        town_name: points[i].town_name,
        region: points[i].region,
        contacts: points[i].contacts,
        phone: points[i].phone,
        plant_area: points[i].plant_area,
        average_yield: points[i].average_yield,
        main_food_crops: points[i].main_food_crops
      }
    }else {
      var attr = {
        lnglat: points[i].lnglat,
        park_name: points[i].park_name,
        region: points[i].region,
        park_position: points[i].park_position,
        concats: points[i].concats,
        phone: points[i].phone,
        prime_mover_industry: points[i].prime_mover_industry,
        existing_facilities: points[i].existing_facilities,
        trafficWay: points[i].trafficWay,
      }
    }

    features[i] = new ol.Feature({
      geometry: new ol.geom.Point(coordinate),
      attribute: attr,
    });
  }

  // 创建几个聚合效果所在的点
  var source = new ol.source.Vector({
    features: features
  })

  // Cluster聚合类
  var clusterSource = new ol.source.Cluster({
    distance: 90,  // 聚合点与点之间的距离
    source: source,
  })

  this.vectorLayer = new ol.layer.Vector({
    source: clusterSource,
    // 聚合样式
    style: function (feature) {
      var img,img1,scale,anchor
      if(label=='种植大户'){
        img=require("../../img/livestockManagement/111.png")
        img1=require('@/img/planting/main5/zz.png')
        scale=0.74
        anchor=[0.5, 25]
      }else {
        img=require("../../img/machineryManagement/main2/yuan.png")
        img1=require('@/img/planting/main5/ny.png')
        scale=0.45
        anchor=[0.5, 40]
      }
      // 点的个数
      var size = feature.get('features').length
      if(size > 1){
        return new ol.style.Style({
          image: new ol.style.Icon({
            anchor: anchor,
            scale:scale,  //大小
            offset: [0, 0], //偏移量设置
            anchorXUnits: 'fraction',
            anchorYUnits: 'pixels',
            src: img
          }),

          text: new ol.style.Text({ // 文字样式
            font: '12px sans-serif',
            text: size.toString(),
            fill: new ol.style.Fill({
              color: '#fff'
            })
          })
        })
      }else {
        return new ol.style.Style({
          image: new ol.style.Icon({
            // anchor: [0.5, 46],
            scale: 1.7,  //大小
            offset: [0, 0], //偏移量设置
            anchorXUnits: 'fraction',
            anchorYUnits: 'pixels',
            src: img1
          }),

        })
      }
    }
  })
  this.map.addLayer(this.vectorLayer);
},
3.弹窗
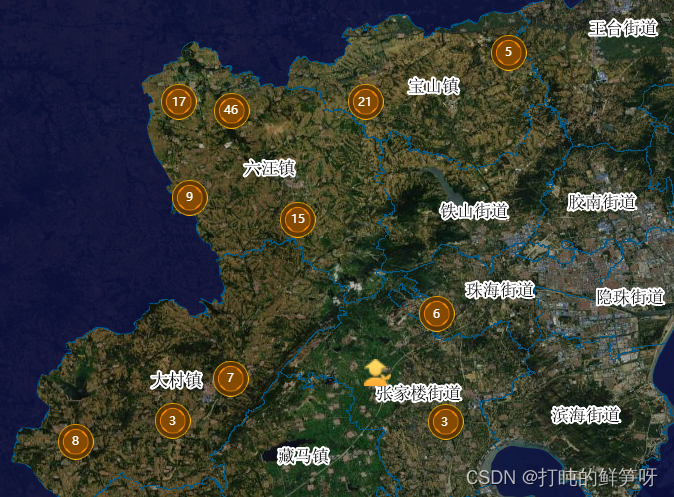
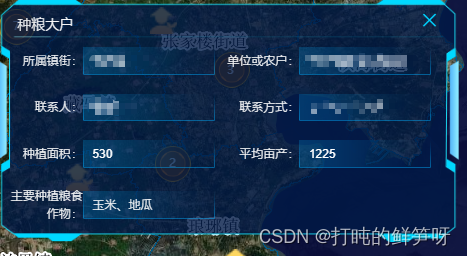
<div ref="plantDialog" class="plantDialog">
      <div class="my-container">
        <div class="title">
          <span class="text">种粮大户</span>
          <i class="el-icon-close icon1" style="top:4%;right:4%" @click="closeDialog"></i>
        </div>
        <div class="center">
          <div class="content">
            <div class="label">所属镇街:</div>
            <div class="value">{{ singleData.town_name}}</div>
          </div>
          <div class="content">
            <div class="label">单位或农户:</div>
            <div class="value">{{ singleData.region}}</div>
          </div>
          <div class="content">
            <div class="label">联系人:</div>
            <div class="value">{{ singleData.contacts}}</div>
          </div>
        <div>
</div>
初始化地图的时候,绑定弹窗
 this.overlay = new ol.Overlay({
          element: this.$refs.plantDialog,
          autoPan: true,
          offset: [-240, -250],
          autoPanAnimation: {
            duration: 250
          }
        });


  this.map = new ol.Map({
          target: 'plantMap3',
          controls: ol.control.defaults({
            attributionOptions: {
              collapsed: true
            },
            zoom: false,
            rotate: false,
            attribution: false,
            scaleLine: true
          }),
          view: new ol.View({
            center: [119.873281, 35.859051],
            zoom: 11,
            projection: 'EPSG:4326'
          }),
          overlays: [this.overlay],
          this.map.on('singleclick', this.addClickEvent);
        });
4.点击弹窗
addClickEvent(e) {
        var isClickMarker = false
        this.singleData={}
        this.singleDataFarm={}
        var pixel = this.map.getEventPixel(e.originalEvent);
        this.map.forEachFeatureAtPixel(pixel, (feature) => {
          var attr = feature.getProperties();
          if(attr.features){
            isClickMarker = true
            if(attr.features.length == 1){
              if(this.legend=='种植大户'){
                this.singleData={}
                this.singleData = attr.features[0].A.attribute
                this.overlay.setPosition(attr.geometry.flatCoordinates)
              }else {
                this.singleDataFarm={}
                this.singleDataFarm = attr.features[0].A.attribute
                this.$nextTick(() => {
                  this.initChart()
                });
                this.overlay1.setPosition(attr.geometry.flatCoordinates)
              }

            }
          }
        })
}
5.关闭弹窗
closeDialog() {
  this.overlay.setPosition(undefined)
}


 756
756


 被折叠的 条评论
为什么被折叠?
被折叠的 条评论
为什么被折叠?
 到【灌水乐园】发言


