


目标
追踪下面一段代码的流程:
AnnotationConfigApplicationContextDemo
/**
 * @description
 * @date 2021-06-30 11:21
 **/
public class AnnotationConfigApplicationContextDemo {

	public static void main(String[] args) {
		final AnnotationConfigApplicationContext applicationContext = new AnnotationConfigApplicationContext(SimpleConfig.class);
		User user = applicationContext.getBean(User.class);
		System.out.println("user:" + user);
	}
}
@Configuration
public class SimpleConfig {
@Bean
public User user(){
return new User("xgimi", 10);
}
}public class User {
private String name;
private Integer age;
...流程
核心逻辑都在AnnotationConfigApplicationContext的带参构造器中:
	public AnnotationConfigApplicationContext(Class<?>... componentClasses) {
		this();
		register(componentClasses);
		refresh();
	}
空构造器做了什么
先说答案: 两个事情,一是创建了BedefinitionReader、BeanDefinitionScanner,提供了扫描BeanDefinition的能力; 二是通过父类GenericApplicationContext的构造器创建了DefaultListableBeanFactory,提供底层的IOC能力。
初始化AnnotatedBeanDefinitionReader
	public AnnotatedBeanDefinitionReader(BeanDefinitionRegistry registry) {
		//注入registry,并且初始化Environment对象
		this(registry, getOrCreateEnvironment(registry));
	}
提供注册beanDefinition的能力
	public AnnotationConfigApplicationContext() {
		StartupStep createAnnotatedBeanDefReader = this.getApplicationStartup().start("spring.context.annotated-bean-reader.create");
		this.reader = new AnnotatedBeanDefinitionReader(this);
		createAnnotatedBeanDefReader.end();
		this.scanner = new ClassPathBeanDefinitionScanner(this);
	}
我们会在后面探究BeanDefinitionRegistry注册BeanDefinition的本质
获取环境对象 getOrCreateEnvironment这个方法进行环境的创建并获取:
	private static Environment getOrCreateEnvironment(BeanDefinitionRegistry registry) {
		Assert.notNull(registry, "BeanDefinitionRegistry must not be null");
		if (registry instanceof EnvironmentCapable) {
			return ((EnvironmentCapable) registry).getEnvironment();
		}
		return new StandardEnvironment();
	}
环境对象中包含了系统环境变量,自定义属性等内容。
通过构造器可以看到,AnnotatedBeanDefinitionReader底层维护了一个BeanDefinitionRegistry。实际上,他就是通过BeanDefinitionRegistry提供的注册能力,而AnnotationConfigApplicationContext本身就是一个BeanDefinitionRegistry;所以在调用AnnotatedBeanDefinitionReader构造器时,我们传入的就是AnnotationConfigApplicationContext:
初始化AnnotatedBeanDefinitionReader
初始化DefaultListableBeanFactory
首先探究以下AnnotationConfigApplicationContext和DefaultListableBeanFactory之间的关系:
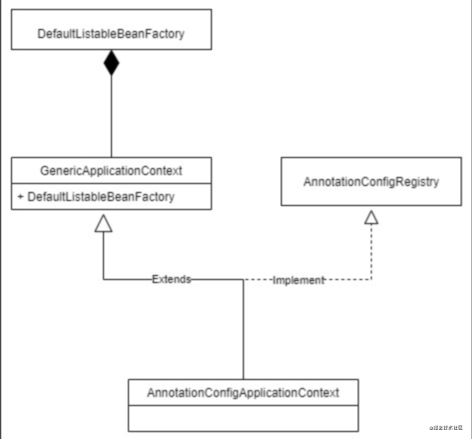
实际上是组合关系,AnnotationConfigApplicationContext中大部分的能力,包括注册beanDefinition,依赖查找,依赖注入,都是通过DefaultListableBeanFactory通过的底层能力支持。
如何将配置类注册为BeanDefinition
在AnnotationConfigApplicationContext中:
	@Override
	public void register(Class<?>... componentClasses) {
		Assert.notEmpty(componentClasses, "At least one component class must be specified");
		StartupStep registerComponentClass = this.getApplicationStartup().start("spring.context.component-classes.register")
				.tag("classes", () -> Arrays.toString(componentClasses));
		//注册配置类
		this.reader.register(componentClasses);
		registerComponentClass.end();
	}
从上面代码可以看出,主要是调用了reader的register方法完成的注册,来看下这个方法的实现逻辑
	public void register(Class<?>... componentClasses) {
		for (Class<?> componentClass : componentClasses) {
			registerBean(componentClass);
		}
	}
public void registerBean(Class<?> beanClass) {
doRegisterBean(beanClass, null, null, null, null);
} private <T> void doRegisterBean(Class<T> beanClass, @Nullable String name,
@Nullable Class<? extends Annotation>[] qualifiers, @Nullable Supplier<T> supplier,
@Nullable BeanDefinitionCustomizer[] customizers) {
//进来就先把class对象转为一个BeanDefinition,此时这个BeanDefinition中只有class信息和注解类上注解信息
AnnotatedGenericBeanDefinition abd = new AnnotatedGenericBeanDefinition(beanClass);
//处理@Conditional注解
if (this.conditionEvaluator.shouldSkip(abd.getMetadata())) {
return;
}
//supplier会优先于所有的构造器和工厂方法进行类的实例化,但是不会影响属性设置
abd.setInstanceSupplier(supplier);
//处理scope,没有设置,默认返回singleton;@Scope("scopeName")会在这个方法中进行处理,获得scopeName
ScopeMetadata scopeMetadata = this.scopeMetadataResolver.resolveScopeMetadata(abd);
abd.setScope(scopeMetadata.getScopeName());
//创建beanName AnnotationBeanNameGenerator提供能力,但以接口入参为优先
String beanName = (name != null ? name : this.beanNameGenerator.generateBeanName(abd, this.registry));
//将以下几个注解标注的值设置到abd中
//1.@Lazy 2.@Primary 3.@Role 4.@DependesOn 5.@Description
AnnotationConfigUtils.processCommonDefinitionAnnotations(abd);
if (qualifiers != null) {
for (Class<? extends Annotation> qualifier : qualifiers) {
if (Primary.class == qualifier) {
abd.setPrimary(true);
}
else if (Lazy.class == qualifier) {
abd.setLazyInit(true);
}
else {
abd.addQualifier(new AutowireCandidateQualifier(qualifier));
}
}
}
if (customizers != null) {
for (BeanDefinitionCustomizer customizer : customizers) {
customizer.customize(abd);
}
}
//definitionHolder 保存的是beanDefinition和beanName(还可以有别名)
BeanDefinitionHolder definitionHolder = new BeanDefinitionHolder(abd, beanName);
//如果@Scope设置了代理,这里将会返回一个代理对象
definitionHolder = AnnotationConfigUtils.applyScopedProxyMode(scopeMetadata, definitionHolder, this.registry);
//将definitionHolder中的beanDefinition注册到registry对象中
//DefaultListableBeanFactory.registerBeanDefinition(String beanName, BeanDefinition beanDefinition)
//最后的结果:DefaultListableBeanFactory中的beanDefinitionMap中存入一个beanDefinition,beanDefinitionNames中存入beanName
BeanDefinitionReaderUtils.registerBeanDefinition(definitionHolder, this.registry);
}综合上述代码,整理以下doRegisterBean的大致逻辑:
- 创建一个配置类对象的AnnotationBeanDefinition
- 通过AnnotationBeanDefinition解析类上面是否存在@Conditional注解,并判断是否满足注册的条件,如果不满足,则不进行注册
- 向abd中注册方法入参传入的 Supplier,后续可通过该接口实现bean的实例化
- 解析@Scope属性并注册到abd中
- 创建beanName
- 解析下面几个注解,并将对应属性注册到abd中
- @Lazy
- @Primary
- @Role
- @DependesOn
- @Description
- 创建一个beanDefinitionHolder保存abd和beanName,alias之间的对应关系
- 处理非单例Scope,返回一个代理,详见@Scope的处理过程
- BeanDefinitionReaderUtils.registerBeanDefinition(definitionHolder, this.registry);
我们来看下第9步,究竟是如何注册的:
BeanDefinitionReaderUtils.registerBeanDefinition(definitionHolder, this.registry); public static void registerBeanDefinition(
BeanDefinitionHolder definitionHolder, BeanDefinitionRegistry registry)
throws BeanDefinitionStoreException {
// Register bean definition under primary name.
String beanName = definitionHolder.getBeanName();
registry.registerBeanDefinition(beanName, definitionHolder.getBeanDefinition());
// Register aliases for bean name, if any.
String[] aliases = definitionHolder.getAliases();
if (aliases != null) {
for (String alias : aliases) {
//TODO
registry.registerAlias(beanName, alias);
}
}
}可以看到,实际进行了两部分注册:
- 注册beanName
- 注册别名
其中registry都是AnnotationConfigApplicationContext 先看一下registerBeanDefinition方法的实现:

如下所示,我们调用的应该是GenericApplicationContext中的实现方法,进去看看:

结果发现还是使用的DefaultListableBeanFactory进行注册的,这也论证了我们上面关于DefaultListableBeanFactory和AnnotationConfigApplicationContext之间关系的结论。来看看DefaultListableBeanFactory中究竟是怎么实现的吧:
@Override
	public void registerBeanDefinition(String beanName, BeanDefinition beanDefinition)
			throws BeanDefinitionStoreException {

		Assert.hasText(beanName, "Bean name must not be empty");
		Assert.notNull(beanDefinition, "BeanDefinition must not be null");

		if (beanDefinition instanceof AbstractBeanDefinition) {
			try {
				((AbstractBeanDefinition) beanDefinition).validate();
			}
			catch (BeanDefinitionValidationException ex) {
				throw new BeanDefinitionStoreException(beanDefinition.getResourceDescription(), beanName,
						"Validation of bean definition failed", ex);
			}
		}

		BeanDefinition existingDefinition = this.beanDefinitionMap.get(beanName);
		if (existingDefinition != null) {
			if (!isAllowBeanDefinitionOverriding()) {
				throw new BeanDefinitionOverrideException(beanName, beanDefinition, existingDefinition);
			}
			else if (existingDefinition.getRole() < beanDefinition.getRole()) {
				// e.g. was ROLE_APPLICATION, now overriding with ROLE_SUPPORT or ROLE_INFRASTRUCTURE
				if (logger.isInfoEnabled()) {
					logger.info("Overriding user-defined bean definition for bean '" + beanName +
							"' with a framework-generated bean definition: replacing [" +
							existingDefinition + "] with [" + beanDefinition + "]");
				}
			}
			else if (!beanDefinition.equals(existingDefinition)) {
				if (logger.isDebugEnabled()) {
					logger.debug("Overriding bean definition for bean '" + beanName +
							"' with a different definition: replacing [" + existingDefinition +
							"] with [" + beanDefinition + "]");
				}
			}
			else {
				if (logger.isTraceEnabled()) {
					logger.trace("Overriding bean definition for bean '" + beanName +
							"' with an equivalent definition: replacing [" + existingDefinition +
							"] with [" + beanDefinition + "]");
				}
			}
			this.beanDefinitionMap.put(beanName, beanDefinition);
		}
		else {
			if (hasBeanCreationStarted()) {
				// Cannot modify startup-time collection elements anymore (for stable iteration)
				synchronized (this.beanDefinitionMap) {
					this.beanDefinitionMap.put(beanName, beanDefinition);
					List<String> updatedDefinitions = new ArrayList<>(this.beanDefinitionNames.size() + 1);
					updatedDefinitions.addAll(this.beanDefinitionNames);
					updatedDefinitions.add(beanName);
					this.beanDefinitionNames = updatedDefinitions;
					removeManualSingletonName(beanName);
				}
			}
			else {
				// Still in startup registration phase
                // 主要看这里
				this.beanDefinitionMap.put(beanName, beanDefinition);
				this.beanDefinitionNames.add(beanName);
				removeManualSingletonName(beanName);
			}
			this.frozenBeanDefinitionNames = null;
		}

		if (existingDefinition != null || containsSingleton(beanName)) {
			resetBeanDefinition(beanName);
		}
		else if (isConfigurationFrozen()) {
			clearByTypeCache();
		}
	}
上述的代码,先检查了容器中是否已经注册过了该bd,再检查了是否正在注册该db;而我们是第一次注册,所以走的核心分支就是第59行开始的else分支。做了下面几件事情:
- 向beanDefinitionMap中放入了beanName为key的beanDefinition
- 向beanDefinitionNames中放入了beanName
- 如果manualSingletonNames中存在beanName,将其移除
为什么要单独维护一个beanDefinitionNames?主要是因为beanDefinitionMap是无序的,而beanDefinitionNames是一个ArrayList,是有序的,可以保存bd的注册顺序
refresh方法都做了什么
1.prepareRefresh
	protected void prepareRefresh() {
		// Switch to active.
		this.startupDate = System.currentTimeMillis();
		this.closed.set(false);
		this.active.set(true);

		if (logger.isDebugEnabled()) {
			if (logger.isTraceEnabled()) {
				logger.trace("Refreshing " + this);
			}
			else {
				logger.debug("Refreshing " + getDisplayName());
			}
		}

		// Initialize any placeholder property sources in the context environment.
		//非web环境下默认是空的实现
		initPropertySources();

		// Validate that all properties marked as required are resolvable:
		// see ConfigurablePropertyResolver#setRequiredProperties
		getEnvironment().validateRequiredProperties();

		// Store pre-refresh ApplicationListeners...
		if (this.earlyApplicationListeners == null) {
			this.earlyApplicationListeners = new LinkedHashSet<>(this.applicationListeners);
		}
		else {
			// Reset local application listeners to pre-refresh state.
			this.applicationListeners.clear();
			this.applicationListeners.addAll(this.earlyApplicationListeners);
		}

		// Allow for the collection of early ApplicationEvents,
		// to be published once the multicaster is available...
		this.earlyApplicationEvents = new LinkedHashSet<>();
	}
预刷新阶段主要做了一下几件事情:
- 提供initPropertySources()扩展方法供容器进行外部资源加载,在AnnotationContextApplicationContext中默认是空实现
- getEnvironment().validateRequiredProperties();进行必填属性的校验,是AbstractPropertyResolver这个接口提供的能力,Environment对象是这个接口的实现。
	@Override
	public void validateRequiredProperties() {
		MissingRequiredPropertiesException ex = new MissingRequiredPropertiesException();
		for (String key : this.requiredProperties) {
			if (this.getProperty(key) == null) {
				ex.addMissingRequiredProperty(key);
			}
		}
		if (!ex.getMissingRequiredProperties().isEmpty()) {
			throw ex;
		}
	}
默认容器中是没有必须存在的属性的,如果需要添加该校验,则通过beanFactory获取到Environment,然后再进行设置:
		AnnotationConfigApplicationContext applicationContext = new AnnotationConfigApplicationContext();
		applicationContext.register(SimpleConfig.class);
		applicationContext.getEnvironment().setRequiredProperties("system");
		applicationContext.refresh();
实际上是调用的AbstractPropertyResolver类的下面方法
	//设置必须存在的属性
	@Override
	public void setRequiredProperties(String... requiredProperties) {
		Collections.addAll(this.requiredProperties, requiredProperties);
	}
requiredProperties是一个LinkedHashSet
private final Set<String> requiredProperties = new LinkedHashSet<>();- 在容器中创建earlyApplicationListeners、earlyApplicationEvents
2.obtainFreshBeanFactory
通过该方法的返回值可以判断他就是获取了容器中内置的ConfigurableListableBeanFactory,我们来看他具体是怎么获取的:
	protected ConfigurableListableBeanFactory obtainFreshBeanFactory() {
		refreshBeanFactory();
		return getBeanFactory();
	}
其中:getBeanFactory()方法是很好理解的,他就是把GenericApplicationContext中保存的DefaultListableBeanFactory返回,这个DefaultListableBeanFactor是在GenericApplicationContext的空构造器中实例化的。 我们看下refreshBeanFactory()中做了什么:
	@Override
	protected final void refreshBeanFactory() throws IllegalStateException {
		//内部容器只允许refresh一次
		if (!this.refreshed.compareAndSet(false, true)) {
			throw new IllegalStateException(
					"GenericApplicationContext does not support multiple refresh attempts: just call 'refresh' once");
		}
		this.beanFactory.setSerializationId(getId());
	}
主要是对refreshed进行了cas修改,以保证容器只会被刷新一次
3.prepareBeanFactory(beanFactory)
容器的准备阶段
protected void prepareBeanFactory(ConfigurableListableBeanFactory beanFactory) {
		// Tell the internal bean factory to use the context's class loader etc.
		beanFactory.setBeanClassLoader(getClassLoader());
		if (!shouldIgnoreSpel) {
			//设置el表达式解析器(#{...})
			beanFactory.setBeanExpressionResolver(new StandardBeanExpressionResolver(beanFactory.getBeanClassLoader()));
		}
		//设置属性解析器PropertyEditorRegistrar
		beanFactory.addPropertyEditorRegistrar(new ResourceEditorRegistrar(this, getEnvironment()));

		// Configure the bean factory with context callbacks.
		//为容器中添加一个ApplicationContextAwareProcessor,这是容器中添加的第一个BeanPostProcessor
		//ApplicationContextAwareProcessor的作用:
		//判断bean是否实现了下面的Aware接口,如果实现了,这把相应的内建bean或单例对象赋给该bean
		//1.EnvironmentAware  -> applicationContext.getEnvironment()
		//2.EmbeddedValueResolverAware -> embeddedValueResolver
		//3.ResourceLoaderAware -> applicationContext
		//4.ApplicationEventPublisherAware -> applicationContext
		//5.MessageSourceAware -> applicationContext
		//6.ApplicationContextAware -> applicationContext
		//7.ApplicationStartupAware -> applicationContext.getApplicationStartup()
		beanFactory.addBeanPostProcessor(new ApplicationContextAwareProcessor(this));
		beanFactory.ignoreDependencyInterface(EnvironmentAware.class);
		beanFactory.ignoreDependencyInterface(EmbeddedValueResolverAware.class);
		beanFactory.ignoreDependencyInterface(ResourceLoaderAware.class);
		beanFactory.ignoreDependencyInterface(ApplicationEventPublisherAware.class);
		beanFactory.ignoreDependencyInterface(MessageSourceAware.class);
		beanFactory.ignoreDependencyInterface(ApplicationContextAware.class);
		beanFactory.ignoreDependencyInterface(ApplicationStartupAware.class);

		//添加容器内建依赖
		// BeanFactory interface not registered as resolvable type in a plain factory.
		// MessageSource registered (and found for autowiring) as a bean.
		beanFactory.registerResolvableDependency(BeanFactory.class, beanFactory);
		beanFactory.registerResolvableDependency(ResourceLoader.class, this);
		beanFactory.registerResolvableDependency(ApplicationEventPublisher.class, this);
		beanFactory.registerResolvableDependency(ApplicationContext.class, this);

		// Register early post-processor for detecting inner beans as ApplicationListeners.
		// 处理实现了ApplicationListener接口的bean
		beanFactory.addBeanPostProcessor(new ApplicationListenerDetector(this));

		// Detect a LoadTimeWeaver and prepare for weaving, if found.
		if (!NativeDetector.inNativeImage() && beanFactory.containsBean(LOAD_TIME_WEAVER_BEAN_NAME)) {
			beanFactory.addBeanPostProcessor(new LoadTimeWeaverAwareProcessor(beanFactory));
			// Set a temporary ClassLoader for type matching.
			beanFactory.setTempClassLoader(new ContextTypeMatchClassLoader(beanFactory.getBeanClassLoader()));
		}

		// Register default environment beans.
		// 在beanFactory中注入下面的单例对象
		if (!beanFactory.containsLocalBean(ENVIRONMENT_BEAN_NAME)) {
			beanFactory.registerSingleton(ENVIRONMENT_BEAN_NAME, getEnvironment());
		}
		if (!beanFactory.containsLocalBean(SYSTEM_PROPERTIES_BEAN_NAME)) {
			beanFactory.registerSingleton(SYSTEM_PROPERTIES_BEAN_NAME, getEnvironment().getSystemProperties());
		}
		if (!beanFactory.containsLocalBean(SYSTEM_ENVIRONMENT_BEAN_NAME)) {
			beanFactory.registerSingleton(SYSTEM_ENVIRONMENT_BEAN_NAME, getEnvironment().getSystemEnvironment());
		}
		if (!beanFactory.containsLocalBean(APPLICATION_STARTUP_BEAN_NAME)) {
			beanFactory.registerSingleton(APPLICATION_STARTUP_BEAN_NAME, getApplicationStartup());
		}
}- 设置ClassLoader
- 设置el表达式解析器
- 设置PropertyEditorRegistrar
- 添加一个ApplicationContextAwareProcessor判断bean是否实现了下面的Aware接口,如果实现了,这把相应的内建bean或单例对象赋给该bean 1.EnvironmentAware -> applicationContext.getEnvironment() 2.EmbeddedValueResolverAware -> embeddedValueResolver 3.ResourceLoaderAware -> applicationContext 4.ApplicationEventPublisherAware -> applicationContext 5.MessageSourceAware -> applicationContext 6.ApplicationContextAware -> applicationContext 7.ApplicationStartupAware -> applicationContext.getApplicationStartup()
- ignoreDependencyInterface:在自动装配时忽略下面这些接口,实现了下述接口,可以通过set方法接受aware回调传入的值进行装配
		beanFactory.ignoreDependencyInterface(EnvironmentAware.class);
		beanFactory.ignoreDependencyInterface(EmbeddedValueResolverAware.class);
		beanFactory.ignoreDependencyInterface(ResourceLoaderAware.class);
		beanFactory.ignoreDependencyInterface(ApplicationEventPublisherAware.class);
		beanFactory.ignoreDependencyInterface(MessageSourceAware.class);
		beanFactory.ignoreDependencyInterface(ApplicationContextAware.class);
beanFactory.ignoreDependencyInterface(ApplicationStartupAware.class);- 添加容器内建依赖。容器的内建依赖会保存在resolvableDependencies,支持通过类型进行依赖注入,主要解决的问题是同一种类型存在多个依赖对象,spring在自动装配的时候会报错,但是如果在resolvableDependencies中指定了具体类型的装配对象,则直接可以使用指定对象。spring容器中存在多个BeanFactory等类型的对歌对象,所以这里将其依赖对象指定,避免报错。我们也可以通过自定义BeanFactoryPostProcessor获取Beanfactory,然后指定自己的类型-依赖对象关系。
		beanFactory.registerResolvableDependency(BeanFactory.class, beanFactory);
		beanFactory.registerResolvableDependency(ResourceLoader.class, this);
		beanFactory.registerResolvableDependency(ApplicationEventPublisher.class, this);
beanFactory.registerResolvableDependency(ApplicationContext.class, this);- 添加ApplicationListenerDetector,DestructionAwareBeanPostProcessor:bean曝光前回调,在对外提供bean实例之前,可以返回代理对象替换beanMergedBeanDefinitionPostProcessor
class ApplicationListenerDetector implements DestructionAwareBeanPostProcessor, MergedBeanDefinitionPostProcessor {- 直接注册四个单例对象
		// Register default environment beans.
		// 在beanFactory中注入下面的单例对象
		if (!beanFactory.containsLocalBean(ENVIRONMENT_BEAN_NAME)) {
			beanFactory.registerSingleton(ENVIRONMENT_BEAN_NAME, getEnvironment());
		}
		if (!beanFactory.containsLocalBean(SYSTEM_PROPERTIES_BEAN_NAME)) {
			beanFactory.registerSingleton(SYSTEM_PROPERTIES_BEAN_NAME, getEnvironment().getSystemProperties());
		}
		if (!beanFactory.containsLocalBean(SYSTEM_ENVIRONMENT_BEAN_NAME)) {
			beanFactory.registerSingleton(SYSTEM_ENVIRONMENT_BEAN_NAME, getEnvironment().getSystemEnvironment());
		}
		if (!beanFactory.containsLocalBean(APPLICATION_STARTUP_BEAN_NAME)) {
			beanFactory.registerSingleton(APPLICATION_STARTUP_BEAN_NAME, getApplicationStartup());
		}
4.postProcessBeanFactory
预留的扩展方法,默认没有实现
5.invokeBeanFactoryPostProcessors(beanFactory)
关于BeanFactoryPostProcesso,我们先了解下面两点:
- 注册BeanFactoryPostProcessor:ConfigurableApplicationContext#addBeanFactoryPostProcessor
- BeanFactoryPostProcessor的作用:
@FunctionalInterface
public interface BeanFactoryPostProcessor {

	/**
	 * 在所有beanDefinition已经加载,且没有Bean实例化之前,修改application的内置beanFactory
	 * 该方法可以支持修改beanDefinition的属性配置,甚至可以提前初始化bean
	 * Modify the application context's internal bean factory after its standard
	 * initialization. All bean definitions will have been loaded, but no beans
	 * will have been instantiated yet. This allows for overriding or adding
	 * properties even to eager-initializing beans.
	 * @param beanFactory the bean factory used by the application context
	 * @throws org.springframework.beans.BeansException in case of errors
	 */
	void postProcessBeanFactory(ConfigurableListableBeanFactory beanFactory) throws BeansException;

}
简而言之,就是在第3步将内置beanfactory准备完毕之后。给用户一次机会再获取到beanFactory 接下来我们研究invokeBeanFactoryPostProcessors的流程,这里默认容器中是不会注册BeanFactoryPostProcessor的,但是这个方法还有其他的作用
	protected void invokeBeanFactoryPostProcessors(ConfigurableListableBeanFactory beanFactory) {
		PostProcessorRegistrationDelegate.invokeBeanFactoryPostProcessors(beanFactory, getBeanFactoryPostProcessors());

		// Detect a LoadTimeWeaver and prepare for weaving, if found in the meantime
		// (e.g. through an @Bean method registered by ConfigurationClassPostProcessor)
		if (!NativeDetector.inNativeImage() && beanFactory.getTempClassLoader() == null && beanFactory.containsBean(LOAD_TIME_WEAVER_BEAN_NAME)) {
			beanFactory.addBeanPostProcessor(new LoadTimeWeaverAwareProcessor(beanFactory));
			beanFactory.setTempClassLoader(new ContextTypeMatchClassLoader(beanFactory.getBeanClassLoader()));
		}
	}
getBeanFactoryPostProcessors()
	public List<BeanFactoryPostProcessor> getBeanFactoryPostProcessors() {
		return this.beanFactoryPostProcessors;
	}
PostProcessorRegistrationDelegate
public static void invokeBeanFactoryPostProcessors(
			ConfigurableListableBeanFactory beanFactory, List<BeanFactoryPostProcessor> beanFactoryPostProcessors) {

		// WARNING: Although it may appear that the body of this method can be easily
		// refactored to avoid the use of multiple loops and multiple lists, the use
		// of multiple lists and multiple passes over the names of processors is
		// intentional. We must ensure that we honor the contracts for PriorityOrdered
		// and Ordered processors. Specifically, we must NOT cause processors to be
		// instantiated (via getBean() invocations) or registered in the ApplicationContext
		// in the wrong order.
		//
		// Before submitting a pull request (PR) to change this method, please review the
		// list of all declined PRs involving changes to PostProcessorRegistrationDelegate
		// to ensure that your proposal does not result in a breaking change:
		// https://github.com/spring-projects/spring-framework/issues?q=PostProcessorRegistrationDelegate+is%3Aclosed+label%3A%22status%3A+declined%22

		// Invoke BeanDefinitionRegistryPostProcessors first, if any.
		Set<String> processedBeans = new HashSet<>();

		if (beanFactory instanceof BeanDefinitionRegistry) {
			BeanDefinitionRegistry registry = (BeanDefinitionRegistry) beanFactory;
			List<BeanFactoryPostProcessor> regularPostProcessors = new ArrayList<>();
			List<BeanDefinitionRegistryPostProcessor> registryProcessors = new ArrayList<>();

			for (BeanFactoryPostProcessor postProcessor : beanFactoryPostProcessors) {
				if (postProcessor instanceof BeanDefinitionRegistryPostProcessor) {
					BeanDefinitionRegistryPostProcessor registryProcessor =
							(BeanDefinitionRegistryPostProcessor) postProcessor;
					registryProcessor.postProcessBeanDefinitionRegistry(registry);
					registryProcessors.add(registryProcessor);
				}
				else {
					regularPostProcessors.add(postProcessor);
				}
			}

			// Do not initialize FactoryBeans here: We need to leave all regular beans
			// uninitialized to let the bean factory post-processors apply to them!
			// Separate between BeanDefinitionRegistryPostProcessors that implement
			// PriorityOrdered, Ordered, and the rest.
			List<BeanDefinitionRegistryPostProcessor> currentRegistryProcessors = new ArrayList<>();

			// First, invoke the BeanDefinitionRegistryPostProcessors that implement PriorityOrdered.
			String[] postProcessorNames =
					beanFactory.getBeanNamesForType(BeanDefinitionRegistryPostProcessor.class, true, false);
			for (String ppName : postProcessorNames) {
				if (beanFactory.isTypeMatch(ppName, PriorityOrdered.class)) {
					currentRegistryProcessors.add(beanFactory.getBean(ppName, BeanDefinitionRegistryPostProcessor.class));
					processedBeans.add(ppName);
				}
			}
			sortPostProcessors(currentRegistryProcessors, beanFactory);
			registryProcessors.addAll(currentRegistryProcessors);
			invokeBeanDefinitionRegistryPostProcessors(currentRegistryProcessors, registry, beanFactory.getApplicationStartup());
			currentRegistryProcessors.clear();

			// Next, invoke the BeanDefinitionRegistryPostProcessors that implement Ordered.
			postProcessorNames = beanFactory.getBeanNamesForType(BeanDefinitionRegistryPostProcessor.class, true, false);
			for (String ppName : postProcessorNames) {
				if (!processedBeans.contains(ppName) && beanFactory.isTypeMatch(ppName, Ordered.class)) {
					currentRegistryProcessors.add(beanFactory.getBean(ppName, BeanDefinitionRegistryPostProcessor.class));
					processedBeans.add(ppName);
				}
			}
			sortPostProcessors(currentRegistryProcessors, beanFactory);
			registryProcessors.addAll(currentRegistryProcessors);
			invokeBeanDefinitionRegistryPostProcessors(currentRegistryProcessors, registry, beanFactory.getApplicationStartup());
			currentRegistryProcessors.clear();

			// Finally, invoke all other BeanDefinitionRegistryPostProcessors until no further ones appear.
			boolean reiterate = true;
			while (reiterate) {
				reiterate = false;
				postProcessorNames = beanFactory.getBeanNamesForType(BeanDefinitionRegistryPostProcessor.class, true, false);
				for (String ppName : postProcessorNames) {
					if (!processedBeans.contains(ppName)) {
						currentRegistryProcessors.add(beanFactory.getBean(ppName, BeanDefinitionRegistryPostProcessor.class));
						processedBeans.add(ppName);
						reiterate = true;
					}
				}
				sortPostProcessors(currentRegistryProcessors, beanFactory);
				registryProcessors.addAll(currentRegistryProcessors);
				invokeBeanDefinitionRegistryPostProcessors(currentRegistryProcessors, registry, beanFactory.getApplicationStartup());
				currentRegistryProcessors.clear();
			}

			// Now, invoke the postProcessBeanFactory callback of all processors handled so far.
			invokeBeanFactoryPostProcessors(registryProcessors, beanFactory);
			invokeBeanFactoryPostProcessors(regularPostProcessors, beanFactory);
		}

		else {
			// Invoke factory processors registered with the context instance.
			invokeBeanFactoryPostProcessors(beanFactoryPostProcessors, beanFactory);
		}

		// Do not initialize FactoryBeans here: We need to leave all regular beans
		// uninitialized to let the bean factory post-processors apply to them!
		String[] postProcessorNames =
				beanFactory.getBeanNamesForType(BeanFactoryPostProcessor.class, true, false);

		// Separate between BeanFactoryPostProcessors that implement PriorityOrdered,
		// Ordered, and the rest.
		List<BeanFactoryPostProcessor> priorityOrderedPostProcessors = new ArrayList<>();
		List<String> orderedPostProcessorNames = new ArrayList<>();
		List<String> nonOrderedPostProcessorNames = new ArrayList<>();
		for (String ppName : postProcessorNames) {
			if (processedBeans.contains(ppName)) {
				// skip - already processed in first phase above
			}
			else if (beanFactory.isTypeMatch(ppName, PriorityOrdered.class)) {
				priorityOrderedPostProcessors.add(beanFactory.getBean(ppName, BeanFactoryPostProcessor.class));
			}
			else if (beanFactory.isTypeMatch(ppName, Ordered.class)) {
				orderedPostProcessorNames.add(ppName);
			}
			else {
				nonOrderedPostProcessorNames.add(ppName);
			}
		}

		// First, invoke the BeanFactoryPostProcessors that implement PriorityOrdered.
		sortPostProcessors(priorityOrderedPostProcessors, beanFactory);
		invokeBeanFactoryPostProcessors(priorityOrderedPostProcessors, beanFactory);

		// Next, invoke the BeanFactoryPostProcessors that implement Ordered.
		List<BeanFactoryPostProcessor> orderedPostProcessors = new ArrayList<>(orderedPostProcessorNames.size());
		for (String postProcessorName : orderedPostProcessorNames) {
			orderedPostProcessors.add(beanFactory.getBean(postProcessorName, BeanFactoryPostProcessor.class));
		}
		sortPostProcessors(orderedPostProcessors, beanFactory);
		invokeBeanFactoryPostProcessors(orderedPostProcessors, beanFactory);

		// Finally, invoke all other BeanFactoryPostProcessors.
		List<BeanFactoryPostProcessor> nonOrderedPostProcessors = new ArrayList<>(nonOrderedPostProcessorNames.size());
		for (String postProcessorName : nonOrderedPostProcessorNames) {
			nonOrderedPostProcessors.add(beanFactory.getBean(postProcessorName, BeanFactoryPostProcessor.class));
		}
		invokeBeanFactoryPostProcessors(nonOrderedPostProcessors, beanFactory);

		// Clear cached merged bean definitions since the post-processors might have
		// modified the original metadata, e.g. replacing placeholders in values...
		beanFactory.clearMetadataCache();
	}
主要流程:
- 创建两个list分别保存BeanFactoryPostProcessor和BeanDefinitionRegistryPostProcessor
- 将自定义注册的BeanFactoryPostProcessor按照类型分别存入regularPostProcessors或者registryProcessors,并且:如果是BeanDefinitionRegistryPostProcessor,则直接调用其postProcessBeanDefinitionRegistry方法
- 创建一个新的列表来保存容器内置的BeanDefinitionRegistryPostProcessor
- 通过BeanDefinitionRegistryPostProcessor类型以及PriorityOrdered获取容器中对对应的bean,放入currentRegistryProcessors,并将名字放入processedBeans,表示已经执行。这里会得到一个:org.springframework.context.annotation.internalConfigurationAnnotationProcessor
- 将currentRegistryProcessors排序,并且放入registryProcessors
- 遍历执行currentRegistryProcessors中的BeanDefinitionRegistryPostProcessor的postProcessBeanDefinitionRegistry方法
- 这里会执行internalConfigurationAnnotationProcessor的回调方法,这个类后续会专项研究,其结果就是把配置类中@Bean方法对应的类加载到容器中注册为bd
- 清空currentRegistryProcessors
- 重复4-8,调用的是实现了Ordered接口的BeanDefinitionRegistryPostProcessor
- 重复4-8,调用没有实现排序接口的BeanDefinitionRegistryPostProcessor
- 通过上面的操作,所有的BeanDefinitionRegistryPostProcessor都加入了registryProcessors,所有的自定义BeanFactoryPostProcessor都加入了regularPostProcessors。执行他们的postProcessBeanFactory方法
- 现在还有容器内置的BeanFactoryPostProcessor没有处理,也按照PriorityOrdered,Ordered,nonOrdered的顺序依次加载并调用他们的postProcessBeanFactory方法
6.initMessageSource
MessageSource列为专题讨论
7.initApplicationEventMulticaster()
事件广播机制列为专题讨论
8.onRefresh
截止到这里,整个beanfactory已经准备就绪了。剩下的就是容器中的bean的处理了,再此之前,可以通过onFresh方法执行回调。例如在SpringBoot中,就是通过这个方法进行的嵌入式web容器启动
9.registerListeners()
- 注册容器内置的listener
- 注册实现了ApplicationListener接口的类
10.inishBeanFactoryInitialization(beanFactory)
实例化所有非懒加载的单例bean 这个流程又是非常复杂的逻辑,我们放在第二章进行讨论
总结
经过上述的步骤,spring容器已经初始化完成,beanFactory准备就绪。ApplicatiionContext提供的扩展特性:事件机制,资源,AOP等能力也已经初始化完成
最后
我想,可能还有很多人在今年刚过去的金三银四春招中保持着观望的形势,害怕自己的能力不够,或者是安于现状,觉得目前拿着几千的月薪觉得能够接受,那么你就要注意了,这是非常危险的!
我们身为技术人员,最怕的就是安于现状,一直在原地踏步,那么你可能在30岁就会迎来自己的职业危机,因为你工作这么久提升的只有自己的年龄,技术还是万年不变!
如果你想在未来能够自我突破,圆梦大厂,那或许以上这些Java面试题资料,你需要阅读阅读,希望能够对你的职业发展有所帮助。
进【Java进阶之路群】,找管理员获取哦!


 303
303


 被折叠的 条评论
为什么被折叠?
被折叠的 条评论
为什么被折叠?
 到【灌水乐园】发言


