


1 Spring整合Mybatis
大体需要做两件事,
第一件事是:Spring要管理MyBatis中的SqlSessionFactory
第二件事是:Spring要管理Mapper接口的扫描
具体该如何实现,具体的步骤为:
环境搭建
建表
CREATE TABLE account(
    id INT PRIMARY KEY AUTO_INCREMENT,
    NAME VARCHAR(35),
    money DOUBLE
);

INSERT INTO
account VALUE
(NULL,'张三',1000),
(NULL,'李四',2000),
(NULL,'王五',3000),
(NULL,'赵六',4000);
根据表创建模型类
package com.mySpring.pojo;

import java.io.Serializable;

/**
 * @author hyl
 * @version 1.0
 * @date 2023/1/7-20:44
 */

public class Account implements Serializable {

    private Integer id;
    private String name;
    private Double money;

    public Integer getId() {
        return id;
    }

    public void setId(Integer id) {
        this.id = id;
    }

    public String getName() {
        return name;
    }

    public void setName(String name) {
        this.name = name;
    }

    public Double getMoney() {
        return money;
    }

    public void setMoney(Double money) {
        this.money = money;
    }

    @Override
    public String toString() {
        return "Account{" +
                "id=" + id +
                ", name='" + name + '\'' +
                ", money=" + money +
                '}';
    }
}
创建Dao(Mapper)接口
package com.mySpring.dao;

import com.mySpring.pojo.Account;
import org.apache.ibatis.annotations.Delete;
import org.apache.ibatis.annotations.Insert;
import org.apache.ibatis.annotations.Select;
import org.apache.ibatis.annotations.Update;

import java.util.List;

/**
 * @author hyl
 * @version 1.0
 * @date 2023/1/7-20:45
 * 使用注解开发,不需要写对应的Mapper.xml
 */

public interface AccountDao {

    @Insert("insert into account(name,money)values(#{name},#{money})")
    void save(Account account);

    @Delete("delete from account where id = #{id} ")
    void delete(Integer id);

    @Update("update account set name = #{name} , money = #{money} where id = #{id} ")
    void update(Account account);

    @Select("select * from account")
    List<Account> findAll();

    @Select("select * from account where id = #{id} ")
    Account findById(Integer id);
}
创建Service接口
package com.mySpring.service;

import com.mySpring.pojo.Account;

import java.util.List;

/**
 * @author hyl
 * @version 1.0
 * @date 2023/1/7-20:46
 */

public interface AccountService {

    void save(Account account);

    void delete(Integer id);

    void update(Account account);

    List<Account> findAll();

    Account findById(Integer id);

}
创建Service接口实现类
package com.mySpring.service.impl;

import com.mySpring.dao.AccountDao;
import com.mySpring.pojo.Account;
import com.mySpring.service.AccountService;
import org.springframework.beans.factory.annotation.Autowired;
import org.springframework.stereotype.Service;

import java.util.List;

/**
 * @author hyl
 * @version 1.0
 * @date 2023/1/7-20:47
 */

@Service
public class AccountServiceImpl implements AccountService {

    @Autowired
    private AccountDao accountDao;

    public void save(Account account) {
        accountDao.save(account);
    }

    public void update(Account account){
        accountDao.update(account);
    }

    public void delete(Integer id) {
        accountDao.delete(id);
    }

    public Account findById(Integer id) {
        return accountDao.findById(id);
    }

    public List<Account> findAll() {
        return accountDao.findAll();
    }
}
添加db.properties文件
driver=com.mysql.jdbc.Driver
url=jdbc:mysql://localhost:3306/table_04
username=root
password=123456
整合步骤
步骤1:项目中导入整合需要的jar包
<dependencies>
    <dependency>
        <groupId>org.springframework</groupId>
        <artifactId>spring-context</artifactId>
        <version>5.2.10.RELEASE</version>
    </dependency>
    <!--德鲁伊数据库连接池-->
    <dependency>
        <groupId>com.alibaba</groupId>
        <artifactId>druid</artifactId>
        <version>1.1.16</version>
    </dependency>
    <!--导入Mybatis-->
    <dependency>
        <groupId>org.mybatis</groupId>
        <artifactId>mybatis</artifactId>
        <version>3.5.6</version>
    </dependency>
    <!--连接数据库-->
    <dependency>
        <groupId>mysql</groupId>
        <artifactId>mysql-connector-java</artifactId>
        <version>5.1.47</version>
    </dependency>
</dependencies>


<!--整合需要导入的-->
<dependency>
    <!--Spring操作数据库需要该jar包-->
    <groupId>org.springframework</groupId>
    <artifactId>spring-jdbc</artifactId>
    <version>5.2.10.RELEASE</version>
</dependency>
<dependency>
    <!--
		Spring与Mybatis整合的jar包
		这个jar包mybatis在前面,是Mybatis提供的
	-->
    <groupId>org.mybatis</groupId>
    <artifactId>mybatis-spring</artifactId>
    <version>1.3.0</version>
</dependency>
步骤2:创建Spring的主配置类
替代applicationContext.xml文件
package com.mySpring.config;

import org.springframework.context.annotation.ComponentScan;
import org.springframework.context.annotation.Configuration;
import org.springframework.context.annotation.Import;
import org.springframework.context.annotation.PropertySource;


/**
 * @author hyl
 * @version 1.0
 * @date 2023/1/7-20:54
 */
//配置类注解
@Configuration
//包扫描,主要扫描的是项目中的AccountServiceImpl类
@ComponentScan({"com.mySpring"})
public class SpringConfig {

}
步骤3:创建数据源的配置类
在配置类中完成数据源的创建
package com.mySpring.config;

import com.alibaba.druid.pool.DruidDataSource;
import org.springframework.beans.factory.annotation.Value;
import org.springframework.context.annotation.Bean;

import javax.sql.DataSource;

/**
 * @author hyl
 * @version 1.0
 * @date 2023/1/7-20:59
 * 数据源配置文件
 */

public class JdbcConfig {
//    从db.properties文件中获取值

    @Value("${driver}")
    private String driver;
    @Value("${url}")
    private String url;
    @Value("${username}")
    private String userName;
    @Value("${password}")
    private String password;
    @Bean
    public DataSource dataSource(){
        DruidDataSource ds = new DruidDataSource();
        ds.setDriverClassName(driver);
        ds.setUrl(url);
        ds.setUsername(userName);
        ds.setPassword(password);
        return ds;
    }
}
步骤4:主配置类中读properties并引入数据源配置类
@Configuration
@ComponentScan({"com.mySpring"})
//从类路径中读取properties文件
@PropertySource({"classpath:db.properties"})
//同时导入JdbcConfig配置类
@Import({JdbcConfig.class})
public class SpringConfig {
}
步骤5:创建Mybatis配置类并配置SqlSessionFactory
package com.mySpring.config;

import org.mybatis.spring.SqlSessionFactoryBean;
import org.mybatis.spring.mapper.MapperScannerConfigurer;
import org.springframework.context.annotation.Bean;

import javax.sql.DataSource;

/**
 * @author hyl
 * @version 1.0
 * @date 2023/1/7-21:07
 * Mybatis配置文件(等同于mybatis-config.xml配置文件)
 */

public class MybatisConfig {
    /**
     * 定义bean,SqlSessionFactoryBean,用于产生SqlSessionFactory对象
     * =====================================================
     * dataSource从JdbcConfig中获取,替代配置文件中的
     *<dataSource type="POOLED">
     *      <property name="driver" value="${driver}"/>
     *      <property name="url" value="${url}"/>
     *      <property name="username" value="${username}"/>
     *      <property name="password" value="${password}"/>
     *</dataSource>
     *
     *======================================================
     *
     * setTypeAliasesPackage("com.mySpring.pojo")替代起别名
     *<typeAliases>
     *   <package name="com.mySpring.pojo"/>
     *</typeAliases>
     *
     * =====================================================
     * @param dataSource 获取的DataSource在ioc容器中已经注入,会自动装填
     * @return 返回一个sqlSession对象
     */
    @Bean
    public SqlSessionFactoryBean sqlSessionFactory(DataSource dataSource){
        SqlSessionFactoryBean ssfb = new SqlSessionFactoryBean();
        //设置模型类的别名扫描
        ssfb.setTypeAliasesPackage("com.mySpring.pojo");
        //设置数据源
        ssfb.setDataSource(dataSource);
        return ssfb;
    }

    /**
     * 定义bean,返回MapperScannerConfigurer对象,替代
     * <mappers>
     *      <package name="com.mySpring.dao"/>
     *<mappers/>
     * @return
     */
    @Bean
    public MapperScannerConfigurer mapperScannerConfigurer(){
        MapperScannerConfigurer msc = new MapperScannerConfigurer();
        msc.setBasePackage("com.mySpring.dao");
        return msc;
    }
}
说明:
- 使用SqlSessionFactoryBean封装SqlSessionFactory需要的环境信息
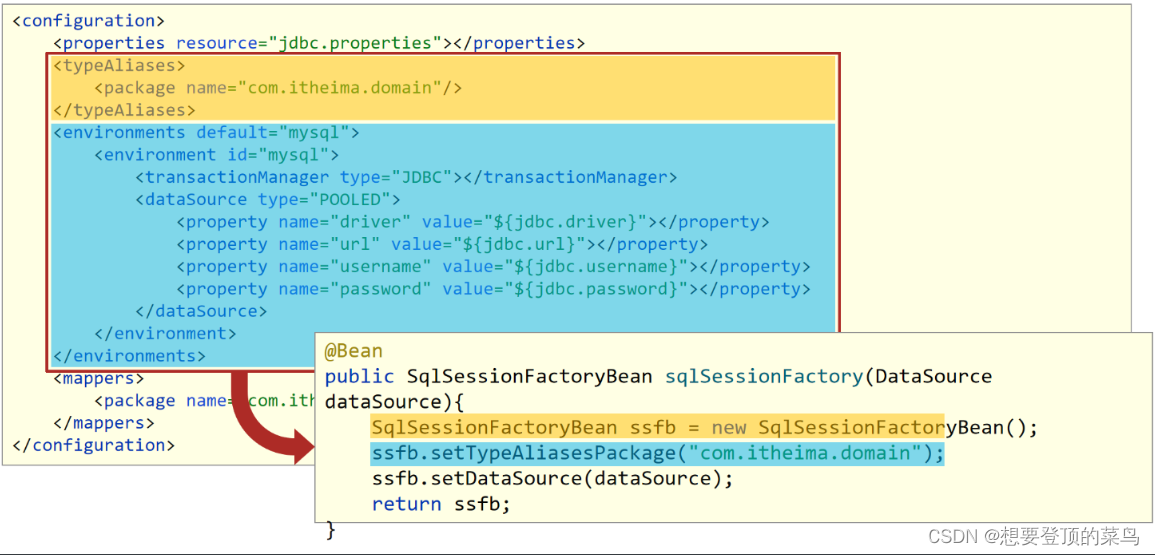
- SqlSessionFactoryBean是前面我们讲解FactoryBean的一个子类,在该类中将SqlSessionFactory的创建进行了封装,简化对象的创建,我们只需要将其需要的内容设置即可。
- 方法中有一个参数为dataSource,当前Spring容器中已经创建了Druid数据源,类型刚好是DataSource类型,此时在初始化SqlSessionFactoryBean这个对象的时候,发现需要使用DataSource对象,而容器中刚好有这么一个对象,就自动加载了DruidDataSource对象。
- 使用MapperScannerConfigurer加载Dao接口,创建代理对象保存到IOC容器中
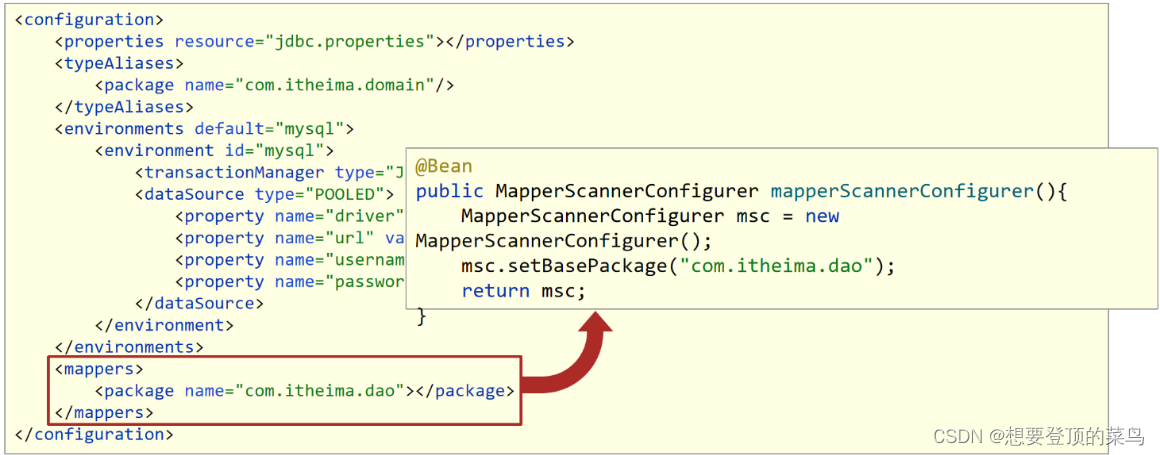
- 这个MapperScannerConfigurer对象也是MyBatis提供的专用于整合的jar包中的类,用来处理原始配置文件中的mappers相关配置,加载数据层的Mapper接口类
- MapperScannerConfigurer有一个核心属性basePackage,就是用来设置所扫描的包路径
步骤6:主配置类中引入Mybatis配置类
@Configuration
@ComponentScan({"com.mySpring"})
@PropertySource("classpath:db.properties")
导入MybatisConfig配置类
@Import({JdbcConfig.class,MybatisConfig.class})
public class SpringConfig {
}
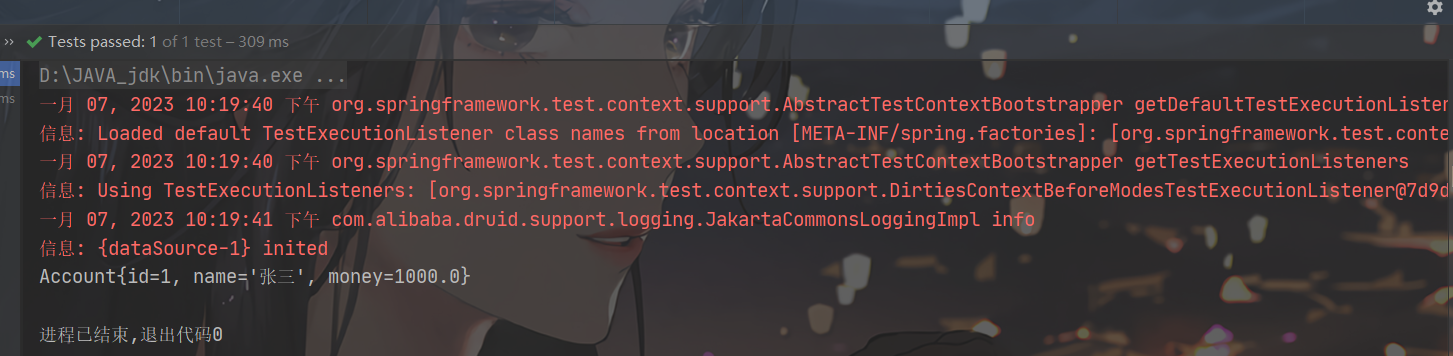
步骤7:编写运行类
package com.mySpring.test;

import com.mySpring.config.SpringConfig;
import com.mySpring.pojo.Account;
import com.mySpring.service.AccountService;
import org.springframework.context.ApplicationContext;
import org.springframework.context.annotation.AnnotationConfigApplicationContext;

/**
 * @author hyl
 * @version 1.0
 * @date 2023/1/7-21:24
 */

public class App2 {
    public static void main(String[] args) {
        ApplicationContext ctx = new AnnotationConfigApplicationContext(SpringConfig.class);

        AccountService accountService = ctx.getBean(AccountService.class);

        Account ac = accountService.findById(2);
        System.out.println(ac);
    }
}

使用的注解详解
@Component注解,衍生出了其他三个注解@Controller、@Service、@Repository
这三个注解和@Component注解的作用是一样的,为什么要衍生出这三个呢?
方便我们后期在编写类的时候能很好的区分出这个类是属于表现层、业务层还是数据层的类。
| 名称 | @Component/@Controller/@Service/@Repository |
|---|---|
| 类型 | 类注解 |
| 位置 | 类定义上方 |
| 作用 | 设置该类为spring管理的bean |
| 属性 | value(默认):定义bean的id |
| 名称 | @Configuration |
|---|---|
| 类型 | 类注解 |
| 位置 | 类定义上方 |
| 作用 | 设置该类为spring配置类 |
| 属性 | value(默认):定义bean的id |
| 名称 | @ComponentScan |
|---|---|
| 类型 | 类注解 |
| 位置 | 类定义上方 |
| 作用 | 设置spring配置类扫描路径,用于加载使用注解格式定义的bean |
| 属性 | value(默认):扫描路径,此路径可以逐层向下扫描 |
| 名称 | @Value |
|---|---|
| 类型 | 属性注解 或 方法注解(了解) |
| 位置 | 属性定义上方 或 标准set方法上方 或 类set方法上方 |
| 作用 | 为 基本数据类型 或 字符串类型 属性设置值 |
| 属性 | value(默认):要注入的属性值 |
| 名称 | @PropertySource |
|---|---|
| 类型 | 类注解 |
| 位置 | 类定义上方 |
| 作用 | 加载properties文件中的属性值 |
| 属性 | value(默认):设置加载的properties文件对应的文件名或文件名组成的数组 |
| 名称 | @Autowired |
|---|---|
| 类型 | 属性注解 或 方法注解(了解) 或 方法形参注解(了解) |
| 位置 | 属性定义上方 或 标准set方法上方 或 类set方法上方 或 方法形参前面 |
| 作用 | 为引用类型属性设置值 |
| 属性 | required:true/false,定义该属性是否允许为null |
| 名称 | @Qualifier |
|---|---|
| 类型 | 属性注解 或 方法注解(了解) |
| 位置 | 属性定义上方 或 标准set方法上方 或 类set方法上方 |
| 作用 | 为引用类型属性指定注入的beanId |
| 属性 | value(默认):设置注入的beanId |
| 名称 | @Bean |
|---|---|
| 类型 | 方法注解 |
| 位置 | 方法定义上方 |
| 作用 | 设置该方法的返回值作为spring管理的bean |
| 属性 | value(默认):定义bean的id |
| 名称 | @Import |
|---|---|
| 类型 | 类注解 |
| 位置 | 类定义上方 |
| 作用 | 导入配置类 |
| 属性 | value(默认):定义导入的配置类类名, 当配置类有多个时使用数组格式一次性导入多个配置类 |
2 Spring整合Junit
整合Junit与整合Druid和MyBatis差异比较大,为什么呢?Junit是一个搞单元测试用的工具,它不是我们程序的主体,也不会参加最终程序的运行,从作用上来说就和之前的东西不一样,它不是做功能的,看做是一个辅助工具就可以了。
整合Junit步骤
步骤1:引入依赖
在原有的pom.xml的基础上(借助mybatis去测试)
<dependency>
    <groupId>junit</groupId>
    <artifactId>junit</artifactId>
    <version>4.12</version>
    <scope>test</scope>
</dependency>

<dependency>
    <groupId>org.springframework</groupId>
    <artifactId>spring-test</artifactId>
    <version>5.2.10.RELEASE</version>
</dependency>
步骤2:编写测试类
import com.mySpring.config.SpringConfig;
import com.mySpring.service.AccountService;
import org.junit.Test;
import org.junit.runner.RunWith;
import org.springframework.beans.factory.annotation.Autowired;
import org.springframework.test.context.ContextConfiguration;
import org.springframework.test.context.junit4.SpringJUnit4ClassRunner;

/**
 * @author hyl
 * @version 1.0
 * @date 2023/1/7-22:18
 */

//设置类运行器
@RunWith(SpringJUnit4ClassRunner.class)
//设置Spring环境对应的配置类
@ContextConfiguration(classes = {SpringConfig.class}) //加载配置类
//@ContextConfiguration(locations={"classpath:applicationContext.xml"})//加载配置文件
public class AccountServiceTest {
    //支持自动装配注入bean
    @Autowired
    private AccountService accountService;
    @Test
    public void testFindById(){
        System.out.println(accountService.findById(1));

    }
    @Test
    public void testFindAll(){
        System.out.println(accountService.findAll());
    }
}
注意:
- 单元测试,如果测试的是注解配置类,则使用
@ContextConfiguration(classes = 配置类.class) - 单元测试,如果测试的是配置文件,则使用
@ContextConfiguration(locations={配置文件名,...}) - Junit运行后是基于Spring环境运行的,所以Spring提供了一个专用的类运行器,这个务必要设置,这个类运行器就在Spring的测试专用包中提供的,导入的坐标就是这个东西
SpringJUnit4ClassRunner - 上面两个配置都是固定格式,当需要测试哪个bean时,使用自动装配加载对应的对象,下面的工作就和以前做Junit单元测试完全一样了
使用的注解详解
| 名称 | @RunWith |
|---|---|
| 类型 | 测试类注解 |
| 位置 | 测试类定义上方 |
| 作用 | 设置JUnit运行器 |
| 属性 | value(默认):运行所使用的运行期 |
| 名称 | @ContextConfiguration |
|---|---|
| 类型 | 测试类注解 |
| 位置 | 测试类定义上方 |
| 作用 | 设置JUnit加载的Spring核心配置 |
| 属性 | classes:核心配置类,可以使用数组的格式设定加载多个配置类 locations:配置文件,可以使用数组的格式设定加载多个配置文件名称 |


 249
249


 被折叠的 条评论
为什么被折叠?
被折叠的 条评论
为什么被折叠?
 到【灌水乐园】发言


