


整体流程图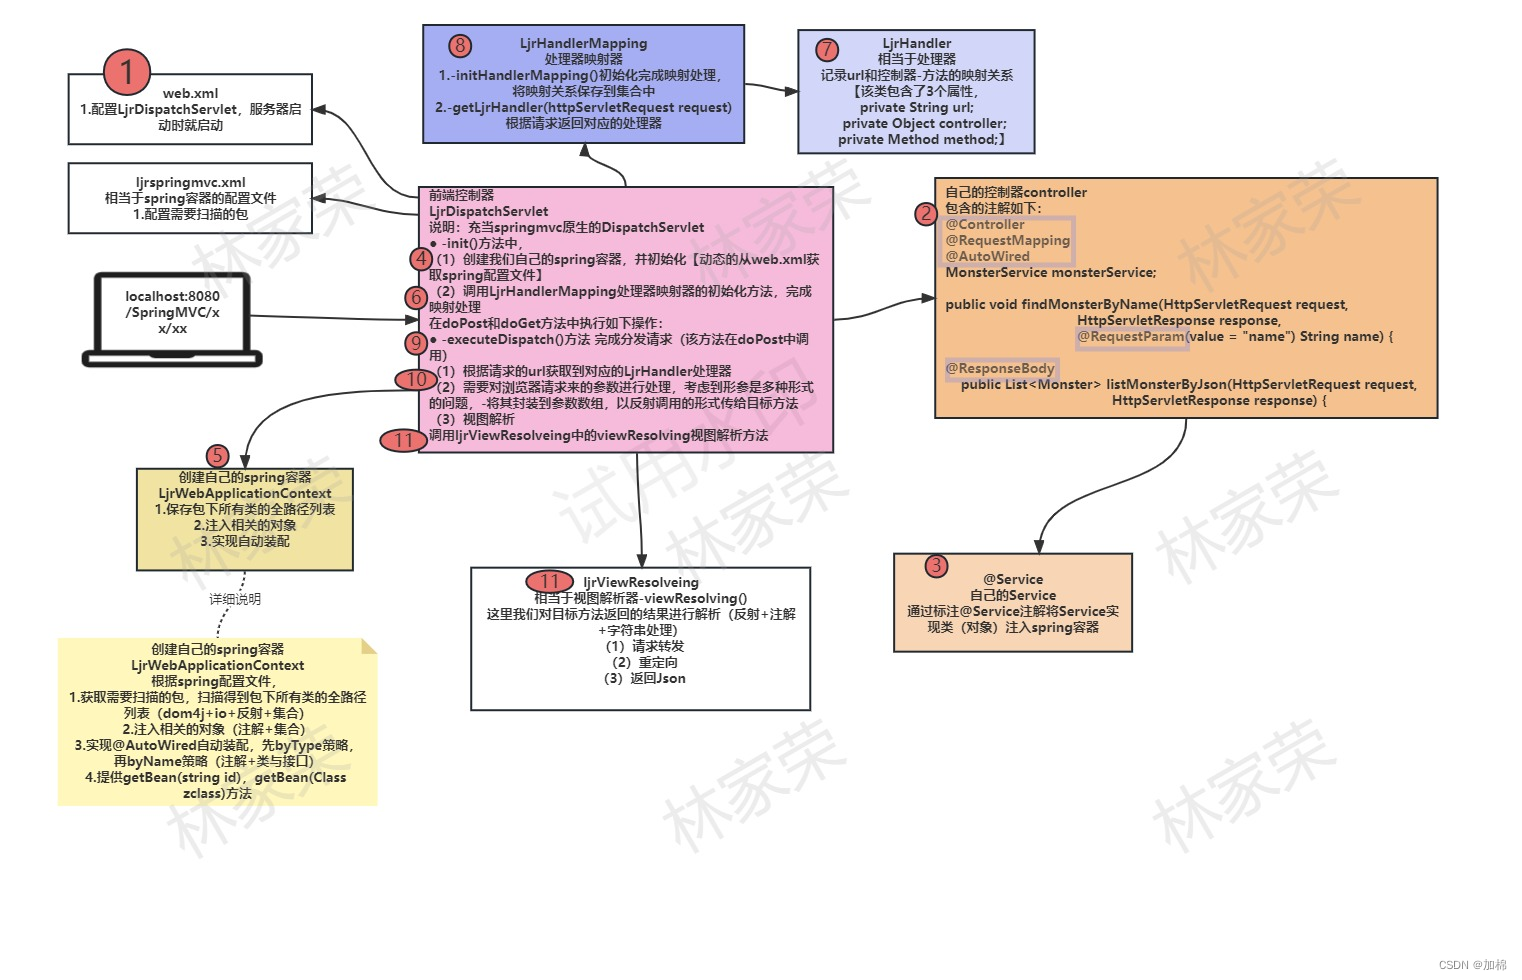
1.自定义视图(63~66)
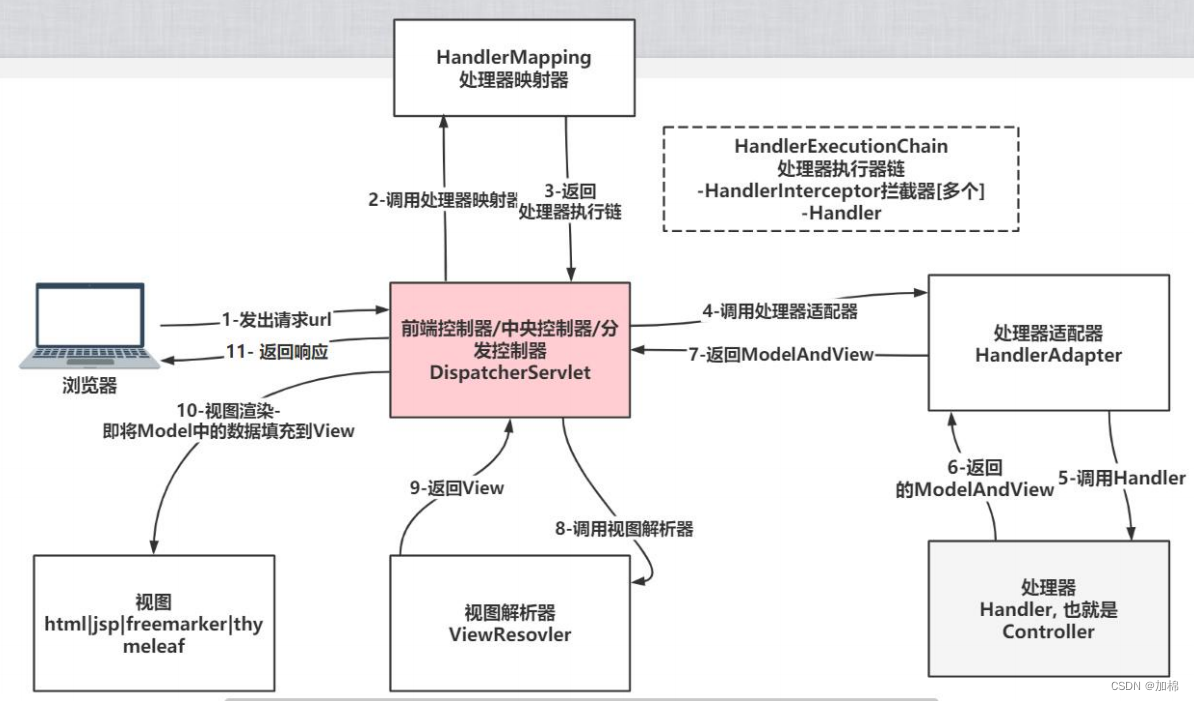
视图解析过程
1.先到DispatcherServlet中央控制器, 根据视图解析的 优先级 执行对应的 视图解析器
@Nullable
protected View resolveViewName(String viewName, @Nullable Map<String, Object> model,
      Locale locale, HttpServletRequest request) throws Exception {

   if (this.viewResolvers != null) {
      for (ViewResolver viewResolver : this.viewResolvers) {//viewResolvers存放了两个视图解析器(1)InternalResourceViewResolver默认视图解析器   (2)BeanNameViewResolver自定义视图解析器
         View view = viewResolver.resolveViewName(viewName, locale);
         if (view != null) {//如果返回的视图为空,那么会继续遍历所有的视图解析器;
             //注意:如果 默认视图解析器 优先级在前,那么不管怎样,它都不会再执行 自定义视图解析器
             //原因:默认视图解析器 一定会返回视图,因为它是通过传入的视图名build一个视图
            return view;
         }
      }
   }
   return null;
}
2.若默认视图解析器在前,那么用 视图解析器 解析
@Override
protected AbstractUrlBasedView buildView(String viewName) throws Exception {
   InternalResourceView view = (InternalResourceView) super.buildView(viewName);//根据viewName创建视图
   if (this.alwaysInclude != null) {
      view.setAlwaysInclude(this.alwaysInclude);
   }
   view.setPreventDispatchLoop(true);
   return view;
}
注意:如果 默认视图解析器 优先级在前,那么不管怎样,它都不会再执行 自定义视图解析器 (因为:默认视图解析器 一定会返回视图,因为它是通过传入的视图名build一个视图)
3.若自定义视图解析器在前
public View resolveViewName(String viewName, Locale locale) throws BeansException {
   ApplicationContext context = obtainApplicationContext();//context实质上就类似于ioc容器
   if (!context.containsBean(viewName)) {//判断context(ioc)中是否有id为viewName的bean
      // Allow for ViewResolver chaining...
      return null;
   }
   if (!context.isTypeMatch(viewName, View.class)) {//判断context(ioc)中是否有id为viewName并实现View接口的bean
      if (logger.isDebugEnabled()) {
         logger.debug("Found bean named '" + viewName + "' but it does not implement View");
      }
      // Since we're looking into the general ApplicationContext here,
      // let's accept this as a non-match and allow for chaining as well...
      return null;
   }
   return context.getBean(viewName, View.class);
}
1.拿到context对象,实质上类似于ioc容器
2.//判断context(ioc)中是否有id为viewName的bean, 没有就返回null; 有就接着往下走
3.//判断context(ioc)中是否有id为viewName并实现View接口的bean 有就返回该视图 ,如果不存在传入的viewName对应的自定义视图,那么就返回null,接着走其他视图解析器
视图渲染和响应
- 拿到view对象后, SpringMVC 调用自定义视图的 renderMergedOutputModel 方法渲染视图
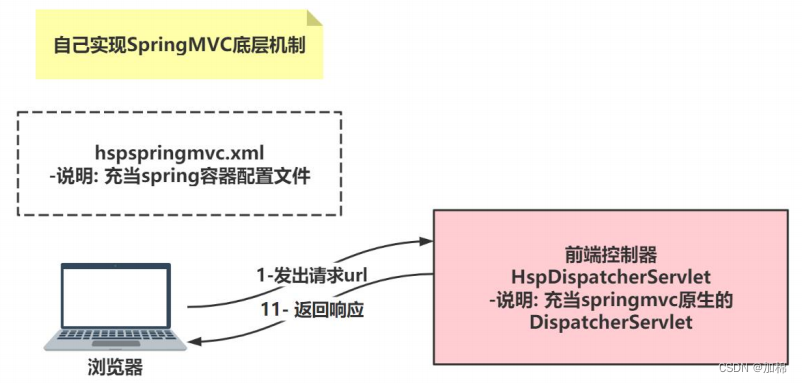
手动实现SpringMVC
自己实现 SpringMVC 底层机制 【核心分发控制器+ Controller 和 Service 注入容器 + 对象自动装配 + 控制器方法获取参数 + 视图解析 + 返回 JSON 格式数据 】
原生SpringMVC**一图胜千言
1 实现任务阶段 1- 开发 HspDispatcherServlet
1.1 说明**😗* 编写 HspDispatcherServlet 充当原生的 DispatcherServlet(即核心控制器)
1.2 分析**+**代码实现
2 实现任务阶段 2- 完成客户端**/**浏览器可以请求控制层

2.1 创建 自己的 Controller 和自定义注解
MonsterController控制器类
/**
 * Created by IntelliJ IDEA.
 * User: 加棉
 * Date: 2023/9/9
 * Time: 14:22
 */
package com.ljr.controller;

import com.ljr.ljrspringmvc.annotation.Controller;
import com.ljr.ljrspringmvc.annotation.RequestMapping;

import javax.servlet.http.HttpServletRequest;
import javax.servlet.http.HttpServletResponse;
import java.io.IOException;
import java.io.PrintWriter;

@Controller
public class MonsterController {

    @RequestMapping("/listMonster")
    public void listMonster(HttpServletRequest request, HttpServletResponse response) {
        //设置编码和返回类型
        response.setContentType("text/html;charset=utf-8");
        StringBuilder stringBuilder = new StringBuilder("<h1>所有的monster<h1>");
        try {
            PrintWriter writer = response.getWriter();
            writer.write(stringBuilder.toString());
        } catch (IOException e) {
            e.printStackTrace();
        }
    }
}
@Controller 注解
package com.ljr.ljrspringmvc.annotation;

import java.lang.annotation.*;

@Target(ElementType.TYPE)
@Retention(RetentionPolicy.RUNTIME)
@Documented
public @interface Controller {
    String value() default "";
}
@RequestMapping 注解
package com.ljr.ljrspringmvc.annotation;

import java.lang.annotation.*;

@Target(value = ElementType.METHOD)
@Retention(RetentionPolicy.RUNTIME)
@Documented
public @interface RequestMapping {
    String value() default "";
}
2.2 配置 ljrspringmvc.xml
<?xml version="1.0" encoding="utf-8" ?>
<beans>
    <!--指定要扫描的基础包及子包的路径-->
    <component-scan base-package="com.ljr.controller"/>
</beans>
2.3 编写 XMLParser 工具类,可以解析 ljrspringmvc.xml
0.完成功能说明
编写 XMLParser 工具类,可以解析hspringmvc.xml, 得到要扫描的包
/**
 * Created by IntelliJ IDEA.
 * User: 加棉
 * Date: 2023/9/9
 * Time: 14:48
 */
package com.ljr.ljrspringmvc.xml;

import org.dom4j.Document;
import org.dom4j.DocumentException;
import org.dom4j.Element;
import org.dom4j.io.SAXReader;

import java.net.URL;
import java.util.ArrayList;
import java.util.Iterator;

public class XMLParser {
    public static ArrayList<String> getBasePackage(String xmlFile){
        //定义一个集合,用于存放 指定扫描包的路径
        ArrayList<String> packageList = new ArrayList<>();

        SAXReader saxReader = new SAXReader();
        ClassLoader classLoader = XMLParser.class.getClassLoader();
        URL url = classLoader.getResource(xmlFile);
        try {
            Document read = saxReader.read(url);
            Element rootElement = read.getRootElement();
            //遍历所有的component-scan结点,将指定的包路径 放入packageList
            Iterator iterator = rootElement.elementIterator("component-scan");
            while (iterator.hasNext()) {
                Element nextComponentScanElement = (Element)iterator.next();
                String basePackage = nextComponentScanElement.attributeValue("base-package");
                packageList.add(basePackage);
            }
            return packageList;
        } catch (DocumentException e) {
            e.printStackTrace();
        }
        return packageList;
    }
}
2.4 开发 HspWebApplicationContext,充当 Spring 容器得到扫描类的全路径列表(扫描包)
简单说明:将要扫描的包下所有的文件的路径添加到一个集合中,方便下一阶段 实例化单例池
/**
 * Created by IntelliJ IDEA.
 * User: 加棉
 * Date: 2023/9/9
 * Time: 16:16
 */
package com.ljr.ljrspringmvc.context;

import com.ljr.ljrspringmvc.xml.XMLParser;

import java.io.File;
import java.net.URL;
import java.util.ArrayList;
import java.util.List;

public class LjrWebApplicationContext {
    //定义属性classFullPathList, 保存扫描包/子包的类的全路径
    public static List<String> classFullPathList = new ArrayList<>();


    public void init() {
        //获取要扫描包的路径(可能在ljrspringmvc.xml配置了多个<component-scan>,就会有多个)
        ArrayList<String> packageList = XMLParser.getBasePackage("ljrspringmvc.xml");
        if (packageList.size() > 0) {
            for (String basePackage : packageList) {
                //扫描包
                scanPackage(basePackage);
            }
        }
        System.out.println("classFullPathList = " + classFullPathList);
    }

    public void scanPackage(String basePackage) {
        ClassLoader classLoader = this.getClass().getClassLoader();
        URL url = classLoader.getResource("/" + basePackage.replaceAll("\\.", "/"));
        System.out.println("url = " + url);
        File file = new File(url.getFile());
        System.out.println("file = " + file);
        File[] files = file.listFiles();
        for (File file1 : files) {
            if (file1.isDirectory()) {//如果是一个目录
                //递归
                scanPackage(basePackage + "." + file1.getName());
            } else {//是文件
                classFullPathList.add(basePackage + "." + file1.getName().replaceAll("\\.class", ""));
            }
        }
    }
}
初始化HspWebApplicationContext, 因为LjrDispatcherServlet是tomcat一启动就创建的,所以可以在其init()初始化方法中调用,HspWebApplicationContext的初始化方法
package com.ljr.ljrspringmvc.servlet;

import com.ljr.ljrspringmvc.context.LjrWebApplicationContext;
import com.ljr.ljrspringmvc.xml.XMLParser;

import javax.servlet.ServletConfig;
import javax.servlet.ServletException;
import javax.servlet.http.HttpServlet;
import javax.servlet.http.HttpServletRequest;
import javax.servlet.http.HttpServletResponse;
import java.io.IOException;

public class LjrDispatcherServlet extends HttpServlet {
    @Override
    public void init(ServletConfig config) throws ServletException {
        super.init(config);
         LjrWebApplicationContext ljrWebApplicationContext = new LjrWebApplicationContext();
        ljrWebApplicationContext.init();
    }

    protected void doPost(HttpServletRequest request, HttpServletResponse response) throws ServletException, IOException {
        System.out.println("LjrDispatcherServlet doPost被调用...");
    }

    protected void doGet(HttpServletRequest request, HttpServletResponse response) throws ServletException, IOException {
        System.out.println("LjrDispatcherServlet doGet被调用...");
    }
}
2.5 完善 HspWebApplicationContext,充当 Spring 容器-实例化对象到容器中(实例化单例池)
0 完成功能说明
- 将扫描到的类**,** 在满足条件的情况下(即有相应的注解@Controller @Service…), 反射注入到 ioc 容器
实现:在LjrWebApplicationContex类中添加executeInstance()方法, 再在init方法中调用
//根据classFullPathList(需要扫描的包/子包的类的全路径),
//如果是.class文件并且被@Controller注解标识,就实例化到单例池
public void executeInstance() {
    if (classFullPathList.size() == 0) {
        return;
    }
    try {
        for (String classFullPath : classFullPathList) {
            ClassLoader classLoader = this.getClass().getClassLoader();
            System.out.println("classFullPath = " + classFullPath);
            Class<?> aClass = classLoader.loadClass(classFullPath);
            //判断aClass是否被@controller直接标识
            if (aClass.isAnnotationPresent(Controller.class)) {//被标识
                //实例化对象
                Object o = aClass.newInstance();
                String id;
                //判断是否设置了value
                String value = aClass.getDeclaredAnnotation(Controller.class).value();
                if (!(value == null || "".equals(value))) {
                    id = value;
                } else {//没有设置value,将类名首字母小写作为id
                    String simpleName = aClass.getSimpleName();
                    //将首字母小写
                    id = StringUtils.uncapitalize(simpleName);
                }
                //将实例对象放入ioc容器中
                ioc.put(id, o);
            }
        }
    } catch (Exception e) {
        e.printStackTrace();
    }
}
2.6 完成请求 URL 和控制器方法的映射关系
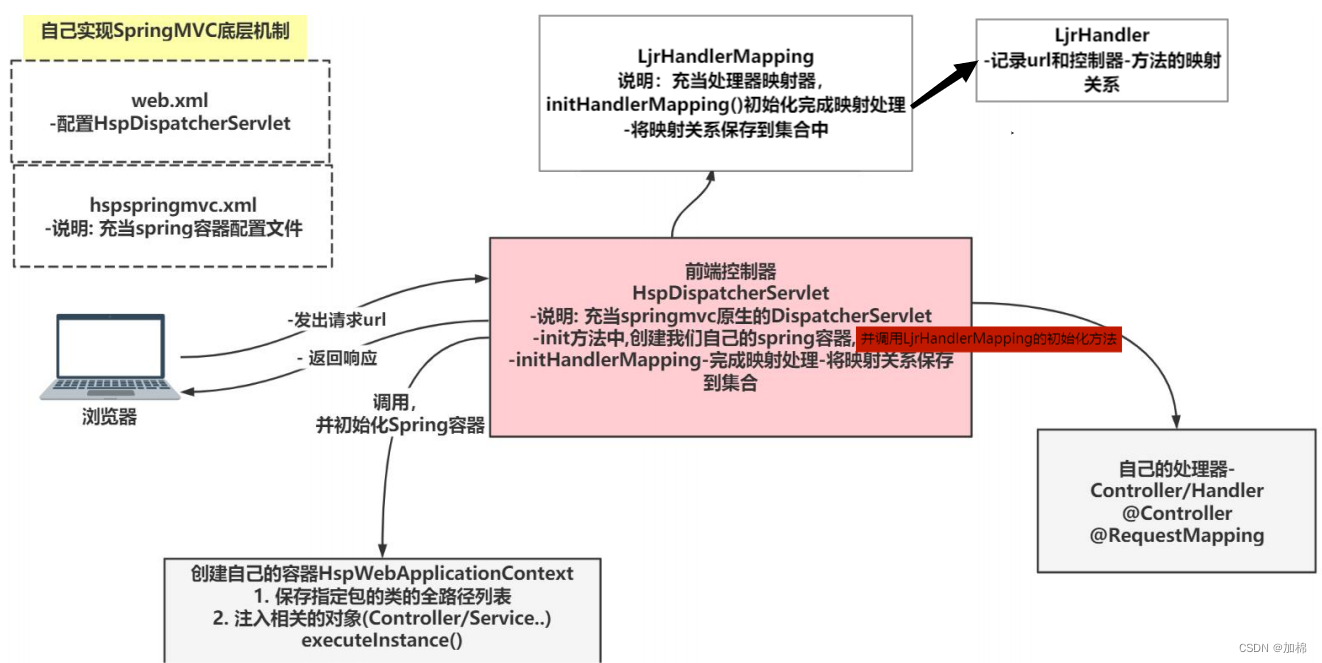
实现思路:
处理器映射器的作用:
1.根据ioc容器(即已经初始化的单例池singtonObject),遍历所有的controller的所有被LjrRequestMapping标识的方法
2.取出url,与controller实例和Method方法组成一个LjrHandler对象
3.将步骤2创建的LjrHandler对象放入一个List集合中
处理器映射器的代码实现:
/**
 * Created by IntelliJ IDEA.
 * User: 加棉
 * Date: 2023/9/10
 * Time: 15:53
 */
package com.ljr.ljrspringmvc.handle;

import com.ljr.ljrspringmvc.annotation.Controller;
import com.ljr.ljrspringmvc.annotation.RequestMapping;

import java.lang.reflect.Method;
import java.util.*;
import java.util.concurrent.ConcurrentHashMap;

/**
 * LjrHandlerMapping 充当处理器映射器,初始化controller中定义的方法的映射
 */
public class LjrHandlerMapping {
    //定义属性handlerList, 保存LjrHandler
    public List<LjrHandler> handlerList = new ArrayList<>();

    private ConcurrentHashMap<String, Object> ioc;

    public LjrHandlerMapping(ConcurrentHashMap<String, Object> ioc) {
        this.ioc = ioc;
    }

    //初始化 URL与控制器方法的映射关系
    public void initHandlerMapping() {
        if (ioc.isEmpty()) {
            return;
        }
        Set<Map.Entry<String, Object>> entrySet = ioc.entrySet();
        for (Map.Entry<String, Object> entry : entrySet) {
            Class<?> aClass = entry.getValue().getClass();
            System.out.println("aClass = "+aClass);
            //定义一个属性,保存@RequestMapping标识在类上的value值
            String classURL = "";
            if(aClass.isAnnotationPresent(Controller.class)){
                if (aClass.isAnnotationPresent(RequestMapping.class)) {
                    //获取@RequestMapping标识在类上的value值
                    RequestMapping requestMappingAnnotation = aClass.getDeclaredAnnotation(RequestMapping.class);
                    classURL = requestMappingAnnotation.value();
                }
                //遍历所有的Method,看是否有被@RequestMapping标识
                //Method[] methods = aClass.getMethods();
                Method[] methods = aClass.getDeclaredMethods();
                for (Method method : methods) {
                    if (method.isAnnotationPresent(RequestMapping.class)) {//说明该Method上标识了@RequestMapping注解
                        //拿出value值
                        RequestMapping requestMappingMethodAnnotation = method.getDeclaredAnnotation(RequestMapping.class);
                        String methodURL = requestMappingMethodAnnotation.value();

                        //映射url = 类url + 方法url
                        String url = classURL + methodURL;
                        LjrHandler ljrHandler = new LjrHandler(url, entry.getValue(), method);
                        //将创建的 LjrHandler 对象放入handlerList集合中
                        handlerList.add(ljrHandler);
                    }
                }
            }
        }
    }
}
2.7 完成 HspDispatcherServlet 分发请求到对应控制器方法
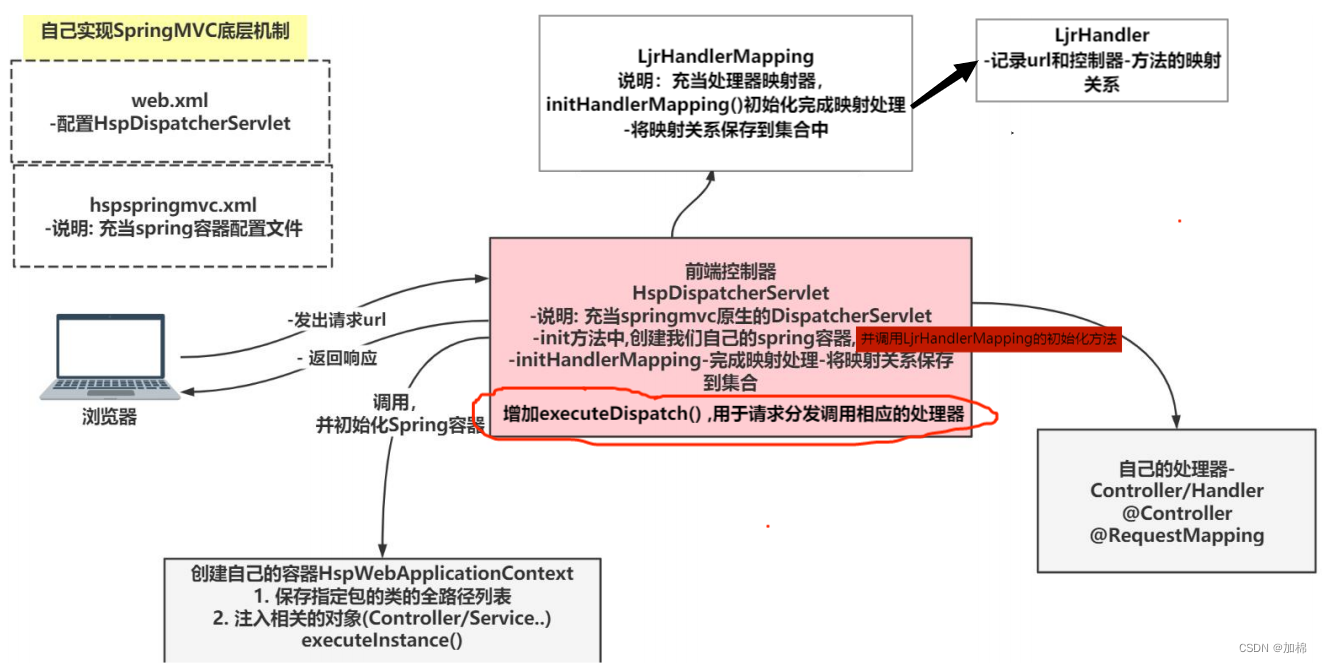
实现思路:
增加executeDispatch()方法,用于请求分发,调用相应的处理器
1.根据request(使用request.getRequestURI()拿到用户请求的uri)返回对应的LjrHandler --在LjrMapping中添加 getLjrHandler()方法
2.有就调用执行相应的处理器,没有就报404错误
代码实现:
LjrHandlerMapping中的 getHandler()方法
//根据request返回对应的LjrHandler
public LjrHandler getLjrHandler(HttpServletRequest request) {
    //1.先获取的用户请求的uri 比如http://localhost:8080/springmvc/monster/list
    //  uri = /springmvc/monster/list
    String uri = request.getRequestURI();
    for (LjrHandler ljrHandler : handlerList) {
        if (uri.equals(ljrHandler.getUrl())) {//存在该url
            return ljrHandler;
        }
    }
    //不存在该url
    return null;
}
LjrDispatcherServlet中的 executeDispatch()方法
public void executeDispatch(HttpServletRequest request, HttpServletResponse response){
    LjrHandler ljrHandler = ljrHandlerMapping.getLjrHandler(request);
    if (ljrHandler!=null) {//找到匹配的LjrHandler
        //使用反射执行LjrHandler对应的方法
        Method method = ljrHandler.getMethod();
        try {
            method.invoke(ljrHandler.getController(),request,response);
        } catch (Exception e) {
            e.printStackTrace();
        }
    }else {//匹配不到LjrHandler,报404
        System.out.println("匹配不到LjrHandler");
        try {
            response.getWriter().write("<h1>404 NOT FOUNT</h1>");
        } catch (IOException e) {
            e.printStackTrace();
        }
    }
}
3 实现任务阶段 3- 从 web.xml 动态获取 hspspringmvc.xml
说明:前面我们加载 hspspringmvc.xml 是硬编码**,** 现在做活**,** 从 web.xml 动态获取
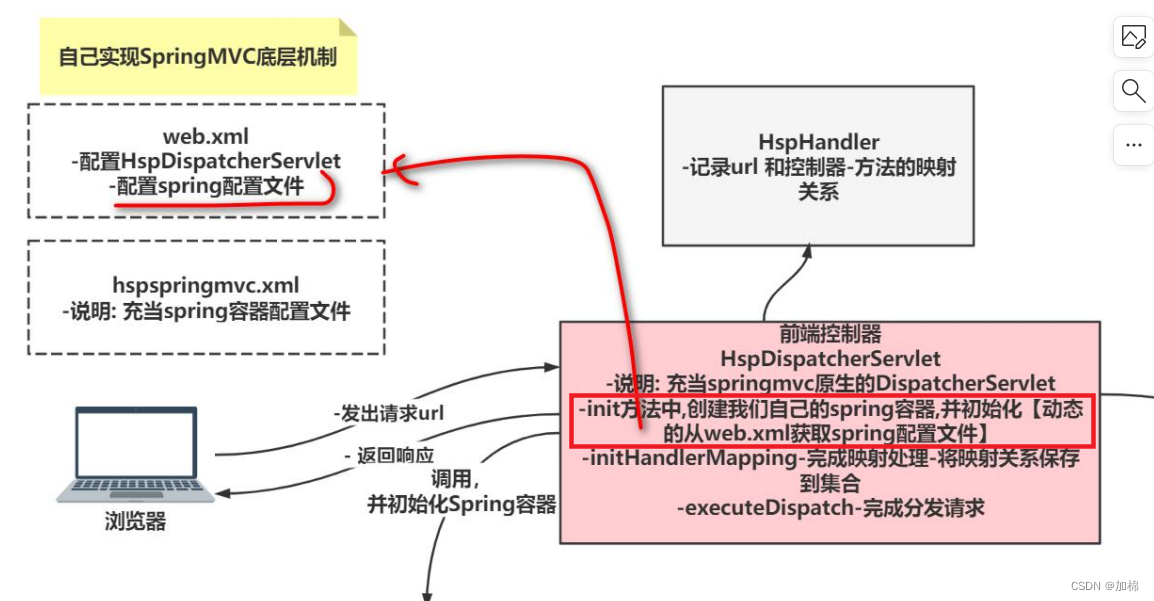
代码实现:
LjrDispatcherServlet类中的 init()方法:
(获取web.xml配置的初始化参数"contextConfigLocation",构建我们自己的spring容器LjrWebApplicationContext时,传入配置文件路径,动态创建)
public void init(ServletConfig config) throws ServletException {
    super.init(config);
    String contextConfigLocation = config.getInitParameter("contextConfigLocation");
    String ljrspringmvcPath = contextConfigLocation.substring(contextConfigLocation.indexOf(":") + 1);
    LjrWebApplicationContext ljrWebApplicationContext = new LjrWebApplicationContext(ljrspringmvcPath);
    //初始化映射关系
    ljrHandlerMapping = new LjrHandlerMapping(ljrWebApplicationContext.ioc);
    ljrHandlerMapping.initHandlerMapping(config);
    System.out.println("handlerList = "+ljrHandlerMapping.handlerList);
}
LjrWebApplicationContext类中的构造方法:
public LjrWebApplicationContext(String ljrspringmvcPath) {
    this.ljrspringmvcPath = ljrspringmvcPath;
    //初始化单例池
    init(ljrspringmvcPath);
}
4 实现任务阶段 4- 完成自定义**@Service** 注解功能
4.1 功能说明:如果给某个类加上@Service, 则可以将其注入到我们的 Spring 容器
-
给 Service 类标注**@Service,** 可以将对象注入到 Spring 容器中
-
并可以通过 id 来获取到 ServiceBean
-
并可以通过接口名支持多级, 类名来获取到 ServiceBean
getBean(String id)方法:
//通过id获取bean
public Object getBean(String id) {
    Object o = ioc.get(id);
    if (o == null) {
        throw new RuntimeException("getBean时没有该bean");
    }
    return o;
}
getBean(Class aClass)方法:
//通过类名/接口名获取bean
    public Object getBean(Class aClass) {
        Object result = null;
        int count = 0;//统计有多少个对象符合要求

        //遍历ioc中所有的value,判断是否有aClass类型的对象
        Set<Map.Entry<String, Object>> entrySet = ioc.entrySet();
        for (Map.Entry<String, Object> entry : entrySet) {
            Object o = entry.getValue();
            //1.判断某个对象是否是aClass类型的实例
            if (!(aClass.isInterface())
                    && (aClass.isInstance(o))) {//aClass不是接口,并且对象o是aClass的实例
                result = o;
                count++;
            }
            //2.判断某个对象对应的类是否实现了aClass
            if (aClass.isInterface()) {
                Class<?>[] interfaces = o.getClass().getInterfaces();
                for (Class<?> anInterface : interfaces) {
                    if (aClass.equals(interfaces)) {
                        result = o;
                        count++;
                    }
                }
            }
        }
        if (result != null && count == 1) {//有且只有一个
            return result;
        }
        if (count==0){
            throw new RuntimeException("使用byType策略getBean时没有该类型的bean");
        }else{
            throw new RuntimeException("使用byType策略getBean时该类型的bean含有多个");
        }
    }
5- 完成 Spring 容器对象的自动装配 -@Autowried
说明: 完成 Spring 容器中对象的注入/自动装配
1.添加一个方法executeAutoWired(), 在executeInstance()后调用,
2.该方法遍历ioc,取出里面的object,遍历所有的字段
3.判断字段是否被 @AutoWired 标识,若是 ,进行下面4,5
4.获取待装配对象, 先根据byType策略,再根据byName策略(如果装配失败,给出相应的报错信息)
5.使用反射设置属性值(需爆破)
executeAutoWired()方法:
//完成spring容器中对象的自动装配
    private void executeAutoWired(){
        //遍历ioc
        for(ConcurrentHashMap.Entry<String,Object> entry : ioc.entrySet()){
            Object o = entry.getValue();
            Class<?> aClass = o.getClass();
            //遍历所有的字段,查看是否需要自动装配
            Field[] fields = aClass.getDeclaredFields();
            for (Field field : fields) {
                if (field.isAnnotationPresent(AutoWired.class)) {
                    //根据字段类型,返回对象
                    Object bean = null;
                    try {
                        Class<?> fieldType = field.getType();
                        //通过属性类型获取bean
                        bean = getBean(fieldType);
                    } catch (Exception e) {
                        new PrinterException("AutoWired自动装配时, "+o+" 对象无法通过byType策略注入,将进行byName策略").printStackTrace();
                    }
                    if (bean==null){
                        //不是只有唯一一个该类型的对象, 需要根据id装配
                        String id = "";
                        //判断是否设置了value
                        AutoWired autoWiredAnnotation = field.getDeclaredAnnotation(AutoWired.class);
                        String value = autoWiredAnnotation.value();
                        if (value!=null&&value!=""){//设置了value
                            id = value;
                        }else{//未设置value
                            //根据属性名匹配
                            id = field.getName();
                        }
                        try {//如果通过byName策略还无法匹配注入bean,那就等着报错吧
                            bean = getBean(id);
                        } catch (Exception e) {
                            throw new RuntimeException("自动装配【"+field.getName()+"】属性失败");
                        }
                    }
                    //爆破
                    field.setAccessible(true);
                    try {
                        field.set(o,bean);
                    } catch (IllegalAccessException e) {
                        e.printStackTrace();
                    }
                }
            }
        }
    }
6 实现任务阶段 6- 完成控制器方法获取参数**-@RequestParam**
功能说明:自定义**@RequestParam** 和 方法参数名获取参数
6.1 功能说明:自定义**@RequestParam** 和 方法参数名获取参数
6.2* 完成**😗* 将 方法的 HttpServletRequest 和 HttpServletResponse 参数封装到参数数组,进行反射调用
6.3 完成**😗* 在方法参数 指定 @RequestParam 的参数封装到参数数组,进行反射调用
6.4 完成**😗* 在方法参数 没有指定 @RequestParam ,按照默认参数名获取值**,** 进行反射调用
代码:(修改了LjrDispatcherServlet类的executeDispatch()方法)
public void executeDispatch(HttpServletRequest request, HttpServletResponse response){
    LjrHandler ljrHandler = ljrHandlerMapping.getLjrHandler(request);
    if (ljrHandler!=null) {//找到匹配的LjrHandler
        //使用反射执行LjrHandler对应的方法

        //目标将: HttpServletRequest 和 HttpServletResponse封装到参数数组
        //1. 得到目标方法的所有形参参数信息[对应的数组]
        Class<?>[] parameterTypes = ljrHandler.getMethod().getParameterTypes();
        //2. 创建一个参数数组[对应实参数组], 在后面反射调用目标方法时,会使用到
        Object[] objects = new Object[parameterTypes.length];

        //3遍历parameterTypes形参数组,根据形参数组信息,将实参填充到实参数组
        for (int i=0;i<parameterTypes.length;i++){
            //取出每一个形参类型
            //如果这个形参的类型是HttpServletRequest, 将request填充到params
            if ((HttpServletRequest.class).equals(parameterTypes[i])){
                objects[i]=request;
            }else if ((HttpServletResponse.class).equals(parameterTypes[i])){
                objects[i]=response;
            }
        }

        //将http请求参数封装到params数组中, 老韩提示,要注意填充实参的时候,顺序问题

        //1. 获取http请求的参数集合
        //解读
        //http://localhost:8080/monster/find?name=牛魔王&hobby=打篮球&hobby=喝酒
        //2. 返回的Map<String,String[]> String:表示http请求的参数名
        //   String[]:表示http请求的参数值,为什么是数组
        //
        Map<String, String[]> parameterMap = request.getParameterMap();
        for (Map.Entry<String, String[]> entry : parameterMap.entrySet()) {
            String name = entry.getKey();//请求实参参数名
            String value = entry.getValue()[0];//请求实参参数值

            //根据name返回该参数的位置
            int indexRequestParameterIndex = getIndexRequestParameterIndex(ljrHandler.getMethod(), name);
            if (indexRequestParameterIndex!=-1){
                objects[indexRequestParameterIndex]=value;
            }
        }
        /*至此,请求的参数 已经按 方法参数的顺序 放入objects数组*/

        Method method = ljrHandler.getMethod();
        try {
            method.invoke(ljrHandler.getController(),objects);
        } catch (Exception e) {
            e.printStackTrace();
        }
    }else {//匹配不到LjrHandler,报404
        try {
            response.getWriter().write("<h1>404 NOT FOUNT</h1>");
        } catch (IOException e) {
            e.printStackTrace();
        }
    }
}

//根据参数名和目标方法返回该参数的位置
private int getIndexRequestParameterIndex(Method method,String name){
    Class<?>[] parameterTypes = method.getParameterTypes();
    for (int i=0;i<parameterTypes.length;i++){
        //判断该参数字段是否被@RequestParam标识
        boolean annotationPresent = parameterTypes[i].isAnnotationPresent(RequestParam.class);
        if (annotationPresent){
            RequestParam declaredAnnotation = parameterTypes[i].getDeclaredAnnotation(RequestParam.class);
            String value = declaredAnnotation.value();
            if (name.equals(value)){
                return i;
            }
        }

    }
    //普通字段,方法参数名 和 请求参数名一致
    Parameter[] parameters = method.getParameters();
    for (int i=0;i<parameters.length;i++) {
        if (name.equals(parameters[i].getName())){
            return i;
        }
    }
    return -1;
}
7 实现任务阶段 7- 完成简单视图解析
7.1 功能说明:通过方法返回的 String, 转发或者重定向到指定页面
7.2分析和代码实现
定义一个视图解析器LjrViewResolveing类, 解析 handler处理器返回的结果
/**
 * Created by IntelliJ IDEA.
 * User: 加棉
 * Date: 2023/9/14
 * Time: 19:54
 */
package com.ljr.ljrspringmvc.viewResolving;

import javax.servlet.ServletException;
import javax.servlet.http.HttpServletRequest;
import javax.servlet.http.HttpServletResponse;
import java.io.IOException;

public class LjrViewResolveing {
    //编写一个方法,解析LjrHandler处理器的返回结果
    public void viewResolving(HttpServletRequest request, HttpServletResponse response,
                              Object object) throws ServletException, IOException {
        System.out.println("开始视图解析,解析内容:" + object);
        if (object instanceof String) {
            String viewName = (String) object;
            if (viewName.contains(":")) {//说明你返回的String 结果forward:/login_ok.jsp 或者 redirect:/xxx/xx/xx.xx
                String viewType = viewName.split(":")[0];//forward | redirect
                String viewPage = viewName.split(":")[1];//是你要跳转的页面名
                if ("forward".equals(viewType)) {
                    //请求转发
                    request.getRequestDispatcher(viewPage).forward(request, response);
                } else if ("redirect".equals(viewType)) {
                    //重定向
                    //这里的"/"是被服务器解析的
                    viewPage = request.getContextPath() + viewPage;
                    response.sendRedirect(viewPage);
                }
            } else {//默认是请求转发
                request.getRequestDispatcher(viewName).forward(request, response);
            }
        }
    }
}
8 实现任务阶段 8- 完成返回 JSON 格式数据**-@ResponseBody**
8.1 功能说明:通自定义**@ResponseBody** 返回 JSON 格式数据
8.2 分析**+**代码实现
1.定义注解@ResponseBody,用在方法上,说明该方法要放回 json 格式的数据
2.handler处理器的方法返回ArrayList集合
3.在视图解析器中,判断handler目标方法是否被@ResponseBody标识,如果时,将方法返回的数据转化成 json 格式,再相应给客户端.
@ResponseBody:
@Target(ElementType.METHOD)
@Retention(RetentionPolicy.RUNTIME)
@Documented
public @interface ResponseBody {
}
整体流程图

项目源码
额外功能:(尚未实现的)
1.验证以及国际化
用法:
方法上标识 @Valid 注解
public String save(@Valid Monster monster, Errors errors, Map<String, Object> map) {
javabean上标识 标准的校验注解
public class Monster {
    private Integer id;

    //email是string,使用@NotEmpty
    @NotEmpty
    private String email;

    //@Range(min = 1,max = 100)
    //表示接收的age值,在 1-100之间

    @NotNull(message = "age不能为空")
    @Range(min = 1,max = 100)
    private Integer age;
底层实现思路:
/* 校验发生的时机: 在springmvc底层,反射调用目标方法时,会接收到http请求的数据,然后根据注解来进行验证,
 * 在验证过程中,如果出现了错误,就把错误信息填充errors 和 map
2.数据转换机制(比如使用@RequestBody,将客户端发送的json数据转换成javabean)
底层实现思路:
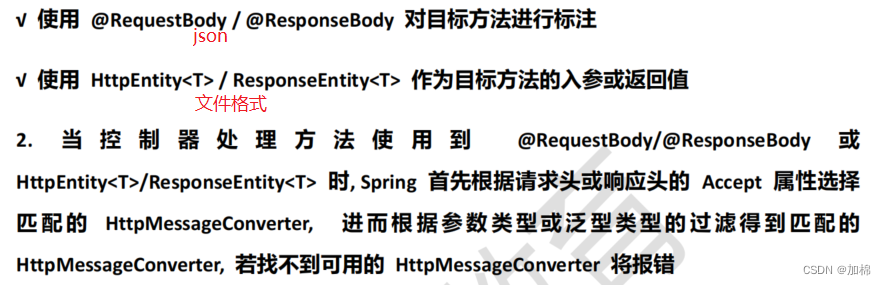
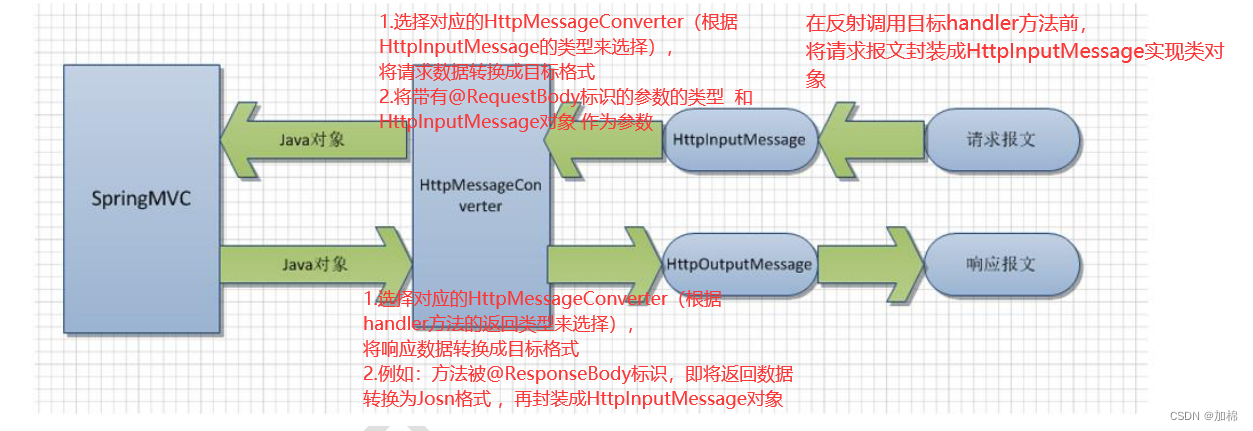
当控制器处理方法使用到@RequestBody/@ResponseBody或HttpEntity/ResponseEntity时, Spring首先根据请求头或响应头的 Accept属性选择匹配 的HttpMessageConverter, 进而 根据 参数类型 或泛型 类型的 过滤得 到匹配 的HttpMessageConverter, 若找不到可用的 HttpMessageConverter将报错


 1119
1119


 被折叠的 条评论
为什么被折叠?
被折叠的 条评论
为什么被折叠?
 到【灌水乐园】发言


