


linux系统下的驱动编写演示,这里是利用别人的代码模板来实现的驱动程序编写以及调用
在进行驱动程序的编写前建议先对驱动linux系统驱动的原理进行深入了解一下再进行驱动编写可能会更快上手。
对于很多新手来说,驱动开发这块可能概念比较模糊,原理什么的我在这里不讲,因为太多了。。。。如果你刚进行驱动程序的开发学习建议先补充关于linux的一些基础知识,再来看本文章。
本驱动运行的环境是:Ubuntu16.04
其他的一些环境运行的依赖文件或者库请自行安装。
接下来的三个文件放在一个文件夹里面,可以放在linux下面的你喜欢的任何位置,并且不用更改源码,都是可以完美演示的。
1、接下来我直接贴出来驱动代码源码:
/*头文件的添加可以根据系统源码驱动用到的头文件,也可以直接将系统源码的某个驱动所引用的头文件直接复制过来
如果你想搞清楚这些头文件里面的内容可以挨个去查看*/
#include <linux/fs.h>
#include <linux/init.h>
#include <linux/mm.h>
#include <linux/module.h>
#include <linux/miscdevice.h>
#include <linux/delay.h>
#include <linux/bcd.h>
#include <linux/mutex.h>
#include <linux/uaccess.h>
#include <linux/io.h>


/*1确定主设备号										*/
static int major = 0;
static char kernel_buf[1024];//内核的缓存区
static struct class *hello_class;//定义节点的类


#define MIN(a,b) (a<b? a:b)//定义了一个取两者值中的较小者
/*2实现对应的open/read/write/close等函数,填入file_operations结构体			*/
static int hello_open(struct inode *node,struct file *file)
{ //open函数的实现
	printk("%s %s line %d\n",__FILE__,__FUNCTION__,__LINE__);//内核的打印用的是printk实现的
	return 0;
}
static int hello_close(struct inode *node,struct file *file)
{//close函数的实现
	printk("%s %s line %d\n",__FILE__,__FUNCTION__,__LINE__);
	return 0;
}
static ssize_t hello_read(struct file *file, char __user *buf, size_t size, loff_t *offset)
{//read函数的实现
	int err;//这个err定义只是为了避免编译告警,没有使用
	printk("%s %s line %d\n",__FILE__,__FUNCTION__,__LINE__);
	err=copy_to_user(buf,kernel_buf,MIN(1024,size));//**copy_to_user这个接口是实现内核层和用户层数据传输的重要接口**
	err=1;
	return MIN(1024,size);
}
static ssize_t hello_write(struct file *file, const char __user *buf, size_t size, loff_t *offset)
{//write函数的实现
	int err;//这个err定义只是为了避免编译告警,没有使用
	printk("%s %s line %d\n",__FILE__,__FUNCTION__,__LINE__);
	err=copy_from_user(kernel_buf,buf,MIN(1024,size));//**copy_from_user这个接口是实现内核层和用户层数据传输的重要接口**
	err=1;
	return MIN(1024,size);

}
/*3定义自己的file_operations结构体,并将结构体进行赋值实现							*/
static struct file_operations hello_drv = {
	.owner	=THIS_MODULE,
	.open	=hello_open,
	.write	=hello_write,
	.read	=hello_read,
	.release=hello_close,
};

/*4把file_operations结构体告诉内核:注册驱动程序						*/
/*5谁注册驱动程序,得有一个入口函数:安装驱动程序时就会去调用这个入口函数			*/

static int __init hello_init(void)
{
	int err;
printk("%s %s line %d\n",__FILE__,__FUNCTION__,__LINE__);
	major=register_chrdev(0,"hello",&hello_drv);//注册结构体到内核
	hello_class =class_create(THIS_MODULE,"hello_class");//创建节点类
	err=PTR_ERR(hello_class);
	if(IS_ERR(hello_class)){
	unregister_chrdev(major,"hello");
	return -1;
	}
	device_create(hello_class,NULL,MKDEV(major,0),NULL,"hello");

	return 0;


}

/*6有入口函数就应该有出口函数:卸载驱动程序时,就会去调用这个出口函数			*/
static void __exit hello_exit(void)
{
printk("%s %s line %d\n",__FILE__,__FUNCTION__,__LINE__);
	device_destroy(hello_class,MKDEV(major,0));//注销设备注册信息
	class_destroy(hello_class);//注销节点类
	unregister_chrdev(major,"hello");//注销设备

}

/*7其他完善:提供设备信息,自动创建设备节点						*/

module_init(hello_init);//规范化驱动入口函数
module_exit(hello_exit);//规范化驱动出口函数
MODULE_LICENSE("GPL");//规范代码协议符合GPL
以上代码的实现就是一个简单驱动的实现模板,几乎没有什么废程序,如果以后进行其他的驱动程序的编写可以进行参考本模板。
2、接下来将main程序的实现源码贴出来:
#include <unistd.h>
#include <stdio.h>
#include <string.h>
#include <fcntl.h>

/*
 *./main -w abc
 *./main -r
*/
int main(int argc,char **argv)
{
int fd;
char buf[1024];
int len;

/*1************/
if(argc <2)
  {
  printf("usage:	%s -w <string>\n",argv[0]);
  printf("	%s -r\n",argv[0]);
  return -1;
  }
fd=open("/dev/hello",O_RDWR);
/*2************/
if(fd==-1)
  {
  printf("can not open file /dev/hello\n");
  return -1;
  }
/*3************/
if((0==strcmp(argv[1],"-w"))&&(argc==3))
  {
  len=strlen(argv[2])+1;
  len=len <1024?len:1024;
  write(fd , argv[2],len);
  }

else{
  len=read(fd,buf ,1024);
  buf[1023]='\0';
  printf("app read :%s\n",buf);
  }
 close(fd);

}
3、接下来贴出Makefile文件的内容:
obj-m :=hello.o

#//目标文件
#module-objs := file1.o file.o //当模块有多个文件组成时,添加本句
KDIR :=/usr/src/linux-headers-4.10.0-28-generic
#内核路径,根据实际情况换成自己的内核路径,嵌入式的换成嵌入式,PC机的指定PC机路径
PWD := $(shell pwd) #模块源文件路径
all:
	$(MAKE) -C $(KDIR) SUBDIRS=$(PWD) modules
	gcc -o main main.c #编译main.c的,不喜欢可以删除独立编译main.c
	@rm -rf *.mod.*
	@rm -rf .*.cmd
	@rm -rf *.o
	@rm -rf Module.*
clean:
	rm -rf *.ko
4、然后就是运行Makefile进行编译驱动和main程序:

5、会生成下面多出来的三个文件:

6、在该文件夹下面将**.ko文件用insmod命令挂载到驱动树上面,利用lsmod查看如下图:

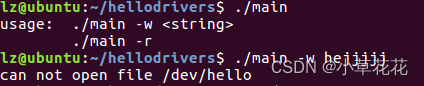
7、用./main** 运行main程序:

8、输入一些字符串进去:你可能会看到下面一句话说不能打开驱动…
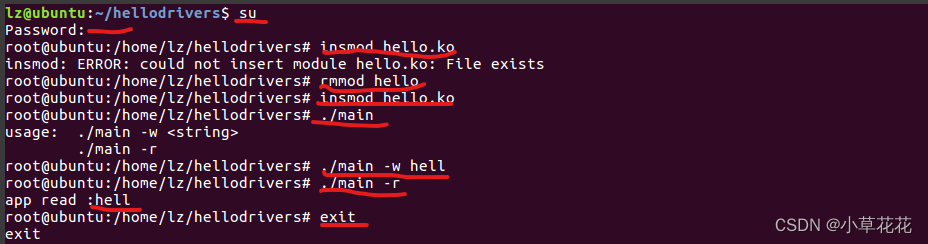
9、不要慌,这也是这个驱动程序编写中最有可能坑到你的地方,刚开始学习的时候老师傅肯定都会告诉你不要用上帝模式,尽量用普通用户模式。但在这里不一样,这里需要用上帝模式才能打开,流程如下:


 5024
5024


 被折叠的 条评论
为什么被折叠?
被折叠的 条评论
为什么被折叠?
 到【灌水乐园】发言


