


一、设计目标
1.1 设计要求
完成类微信的门户页面框架设计,APP最少必须包含4个tab页面。框架设计需要使用 fragment,activity,不得使用UNIAPP技术进行开发(H5或者小程序);
1.2 设计功能介绍
(1)顶部显“微信“”
(2)底部有四个按钮,分别为聊天、好友、通讯录、设置。
(3)点击按钮,按钮图标变化且点击不同按钮,中间显示界面显示对应的内容。
二、界面设计详解
2.1 UI布局设计
2.1.1 准备图片
由于底端按钮在点击之前和点击之后会呈现不同的效果,所以需要提前准备8张png格式的图片,存放到drawable文件夹中。
文件夹打开方式:app--->res--->右击drawable--->Open In--->explorer

2.1.2 顶端top.xml
step1:在layout中新建top.xml
step2: 在Palette中找到textView控件,将其拖入LinearLayout,然后完善code
<?xml version="1.0" encoding="utf-8"?>
<LinearLayout xmlns:android="http://schemas.android.com/apk/res/android"
    android:layout_width="match_parent"
    android:layout_height="match_parent">

    <TextView
        android:id="@+id/textView"
        android:textSize="40sp"
        android:layout_width="wrap_content"
        android:layout_height="wrap_content"
        android:background="#FFFFFF"
        android:layout_weight="1"
        android:gravity="center"
        android:textColor="#4682B4"
        android:text="微信" />
</LinearLayout>
2.1.3 底端button.xml
step1:在layout中新建button.xml
app--->res--->右击layout--->New--->XML--->Layout XML File
step2: 在Palette中找到LinearLayout(vertical)添加到LinearLayout(horizontal)中
step3: 在Palette中找到textView和ImageView控件,将其拖入LinearLayout下面
step4: 完善code
<?xml version="1.0" encoding="utf-8"?>
<LinearLayout xmlns:android="http://schemas.android.com/apk/res/android"
    xmlns:app="http://schemas.android.com/apk/res-auto"
    android:layout_width="match_parent"
    android:layout_height="70dp"
    android:background="#FFF8DC"
    android:orientation="horizontal"
    android:baselineAligned="false">

    <LinearLayout
        android:id="@+id/linear_char"
        android:layout_width="match_parent"
        android:layout_height="wrap_content"
        android:layout_weight="1"
        android:orientation="vertical"
        android:onClick="onClick">

        <TextView
            android:id="@+id/textView6"
            android:layout_width="match_parent"
            android:layout_height="wrap_content"
            android:gravity="center"
            android:text="聊天"
            android:textColor="#4682B4"
            android:textSize="20dp" />

        <ImageButton
            android:id="@+id/聊天"
            android:layout_width="match_parent"
            android:layout_height="wrap_content"
            android:background="#FFFFFF"
            android:contentDescription="微信"
            android:clickable="false"
            app:srcCompat="@drawable/img_chat"
            android:scaleType="centerInside"/>

    </LinearLayout>

    <LinearLayout
        android:id="@+id/linear_friend"
        android:layout_width="match_parent"
        android:layout_height="match_parent"
        android:layout_weight="1"
        android:onClick="onClick"
        android:orientation="vertical">

        <TextView
            android:id="@+id/textView3"
            android:layout_width="match_parent"
            android:layout_height="wrap_content"
            android:gravity="center"
            android:text="好友"
            android:textColor="#4682B4"
            android:textSize="20dp" />

        <ImageButton
            android:id="@+id/朋友"
            android:layout_width="match_parent"
            android:layout_height="wrap_content"
            android:background="#FFFFFF"
            android:contentDescription="微信"
            android:clickable="false"
            app:srcCompat="@drawable/img_friend"
            android:scaleType="centerInside"/>

    </LinearLayout>

    <LinearLayout
        android:id="@+id/linear_contact"
        android:layout_width="match_parent"
        android:layout_height="match_parent"
        android:layout_weight="1"
        android:orientation="vertical"
        android:onClick="onClick">

        <TextView
            android:id="@+id/textView4"
            android:layout_width="match_parent"
            android:layout_height="wrap_content"
            android:gravity="center"
            android:text="通讯录"
            android:textColor="#4682B4"
            android:textSize="20dp" />

        <ImageButton
            android:id="@+id/通讯录"
            android:layout_width="match_parent"
            android:layout_height="wrap_content"
            android:background="#FFFFFF"
            android:clickable="false"
            android:contentDescription="微信"
            app:srcCompat="@drawable/img_contect"
            android:scaleType="centerInside"/>

    </LinearLayout>

    <LinearLayout
        android:id="@+id/linear_setting"
        android:layout_width="match_parent"
        android:layout_height="match_parent"
        android:layout_weight="1"
        android:orientation="vertical"
        android:onClick="onClick">

        <TextView
            android:id="@+id/textView5"
            android:layout_width="match_parent"
            android:layout_height="wrap_content"
            android:gravity="center"
            android:text="设置"
            android:textColor="#4682B4"
            android:textSize="20dp" />

        <ImageButton
            android:id="@+id/设置"
            android:layout_width="match_parent"
            android:layout_height="wrap_content"
            android:background="#FFFFFF"
            android:clickable="false"
            android:contentDescription="微信"
            app:srcCompat="@drawable/img_setting"
            android:scaleType="centerInside"/>

    </LinearLayout>
</LinearLayout>
2.1.4 Layout_Main.xml
layout中新建Layout_Main.xml,在Palette中找到include和FrameLayout控件添加到LinearLayout中,第一个include引入top.xml,第二个include引入bottom.xml
完善code
<?xml version="1.0" encoding="utf-8"?>
<LinearLayout xmlns:android="http://schemas.android.com/apk/res/android"
    xmlns:app="http://schemas.android.com/apk/res-auto"
    xmlns:tools="http://schemas.android.com/tools"
    android:layout_width="match_parent"
    android:layout_height="match_parent"
    android:orientation="vertical"
    tools:context=".MainActivity">
        <include
            layout="@layout/top"
            android:layout_width="match_parent"
            android:layout_height="55dp"
            android:layout_weight="0" />

        <FrameLayout
            android:id="@+id/content"
            android:layout_width="match_parent"
            android:layout_height="553dp"
            android:layout_weight="1">

        </FrameLayout>

        <include
            layout="@layout/bottom"
            android:layout_width="match_parent"
            android:layout_height="119dp"
            android:layout_weight="0" />


</LinearLayout>
2.2 MainActivity代码配置
2.2.1新建四个fragment:将fragment与对应的layout文件相关联
step1:新建java文件,一般xml文件也会在Layout中同步新建
app--->右击java--->New--->Fragment--->Fragment(Blank)
完善fragment_message.java代码
public class Fragment_message extends Fragment {

    @Nullable
    @Override
    public View onCreateView(LayoutInflater inflater, ViewGroup container,
                             Bundle savedInstanceState) {
        // Inflate the layout for this fragment
        View view = inflater.inflate(R.layout.fragment_message, container, false);

        return view;
        //return inflater.inflate(R.layout.fragment_message, container, false);
    }
}
2.2.2完善相应的四个fragment.xml
首先找到textView控件,然后拖入FrameLayout下面,最后配置code
<?xml version="1.0" encoding="utf-8"?>
<FrameLayout xmlns:android="http://schemas.android.com/apk/res/android"
    xmlns:tools="http://schemas.android.com/tools"
    android:layout_width="match_parent"
    android:layout_height="match_parent"
    tools:context=".Fragment_message">

    <!-- TODO: Update blank fragment layout -->
    <TextView
        android:id="@+id/txt_message"
        android:layout_width="match_parent"
        android:layout_height="match_parent"
        android:text="这是信息界面"
        android:textSize="35sp"
        android:gravity="center"/>

</FrameLayout>
2.2.3编写MainActivity文件的Java代码
(1)加载fragment:首先获取四个fragment对象,然后定义initFragment()方法,将这四个fragment加载到activity_main文件的FrameLayout中去。
public class MainActivity extends AppCompatActivity implements View.OnClickListener {
    private final Fragment fragment_message=new Fragment_message();
    private final Fragment fragment_friend=new Fragment_friend();
    private final Fragment fragment_connect=new Fragment_connect();
    private final Fragment fragment_setting=new Fragment_setting();
//Fragment初始化函数
    private void initFragment(){
        fm=getSupportFragmentManager();
        //增加方法
        transaction=fm.beginTransaction()
                .add(R.id.content,fragment_message)
                .add(R.id.content,fragment_friend)
                .add(R.id.content,fragment_connect)
                .add(R.id.content,fragment_setting);
        //开启事务
        transaction.commit();
}(2)找到响应区:我们需要对底部四个控件进行点击事件的监听,因此定义initView()方法找到响应区。为了增强用户体验感,用户点击时只需要点击LinearLayout包含的区域即可触发tab切换另外点击图片时图片资源会发生改变,因此也需获取图片对象。
    //记住申明全局变量
    private LinearLayout tabChat;
    private LinearLayout tabFriend;
    private LinearLayout tabContect;
    private LinearLayout tabSetting;
    private ImageButton imgChat;
    private ImageButton imgFriend;
    private ImageButton imgContact;
    private ImageButton imgSetting;
// 找到所有的控件并响应
  private void initView() {
        tabChat = findViewById(R.id.linear_char);
        tabFriend = findViewById(R.id.linear_friend);
        tabContect = findViewById(R.id.linear_contact);
        tabSetting = findViewById(R.id.linear_setting);

        imgChat = findViewById(R.id.聊天);
        imgFriend = findViewById(R.id.朋友);
        imgContact = findViewById(R.id.通讯录);
        imgSetting = findViewById(R.id.设置);
}(3)定义事件启动函数:MainActivity实现接口View.OnClickListener,默认会对界面进行全屏监听,这里我们只需要对四个控件进行监听
//局部监听
        tabChat.setOnClickListener(this);
        tabFriend.setOnClickListener(this);
        tabContect.setOnClickListener(this);
tabSetting.setOnClickListener(this);(4)控制tab变换:自定义setSelect(int i)函数来显示不同界面内容。一共有四个tab,我们给每个tab设置一个index作为标记,第一个tab为0,第二个tab为1,以此类推,默认index为0。当点击到第i个tab时,需要显示该界面内容,并且将图片变为绿色。要实现此功能,需要先将所有界面都隐藏,再通过switch来匹配,将标记i对应的界面展示出来,并修改图片。函数hideFragment()实现隐藏所有界面功能。代码如下:
//控制图片变换
//实现点击效果
    private void setSelect(int i){
        FragmentTransaction transaction=fm.beginTransaction();
        hidefragment(transaction);
        switch (i){
            case  1:
                transaction.show(fragment_message);
                imgChat.setImageResource(R.drawable.img_chat_click);
                break;
            case  2:
                transaction.show(fragment_friend);
                imgFriend.setImageResource(R.drawable.img_friend_click);
                break;
            case  3:
                transaction.show(fragment_connect);
                imgContact.setImageResource(R.drawable.img_contect_click);
                break;
            case  4:
                transaction.show(fragment_setting);
                imgSetting.setImageResource(R.drawable.img_setting_click);
                break;
            default:
                break;
        }
    }
//隐藏所有tab
private void hidefragment(@NonNull FragmentTransaction transaction){
transaction.hide(fragment_message);
transaction.hide(fragment_friend);
transaction.hide(fragment_connect);
transaction.hide(fragment_setting);
transaction.commit();
}(5)重写onClick方法:用户点击哪个tab,就调用setSelect方法设置对应的i值。注意这里还需要对图片进行统一变灰处理。resetImgs方法实现该功能。
 //重写onClick方法
    //用户点击哪个tab,就设置i值
    public void onClick(@NonNull View v) {
        resetimg();
        switch (v.getId()){
            case R.id.linear_char:
                setSelect(1);
                break;
            case R.id.linear_friend:
                setSelect(2);
                break;
            case R.id.linear_contact:
                setSelect(3);
                break;
            case R.id.linear_setting:
                setSelect(4);
                break;
            default:
                break;
        }
    }
//将未点击的图片按钮还原成原来的颜色
private void resetimg(){
imgChat.setImageResource(R.drawable.img_chat);
imgFriend.setImageResource(R.drawable.img_friend);
imgContact.setImageResource(R.drawable.img_contect);
imgSetting.setImageResource(R.drawable.img_setting);
}(6)调用所需函数
@Override
    protected void onCreate(Bundle savedInstanceState) {
        super.onCreate(savedInstanceState);
        requestWindowFeature(Window.FEATURE_NO_TITLE);
        setContentView(R.layout.layout_main);
        //去掉它自带的标题框
        if (getSupportActionBar() != null)
        {
            getSupportActionBar().hide();
        }

        initView();//关联对象
        initFragment();//添加界面
        transaction=fm.beginTransaction();
        hidefragment(transaction);
        //局部监听
        tabChat.setOnClickListener(this);
        tabFriend.setOnClickListener(this);
        tabContect.setOnClickListener(this);
        tabSetting.setOnClickListener(this);
    }
三、运行界面展示
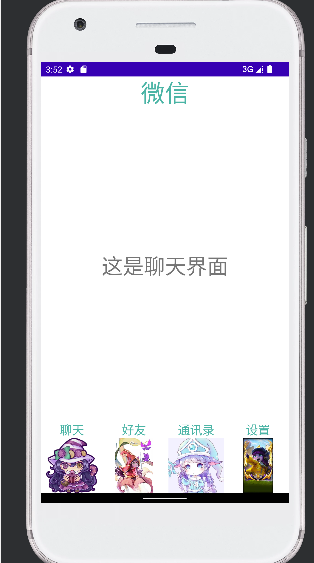
3.1 点击聊天按钮 ,图像变化且显示相应文本内容
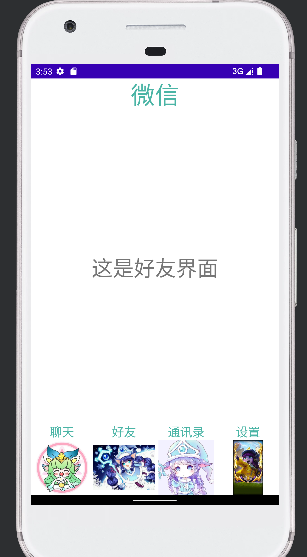
3.2 点击好友按钮 ,图像变化且显示相应文本内容
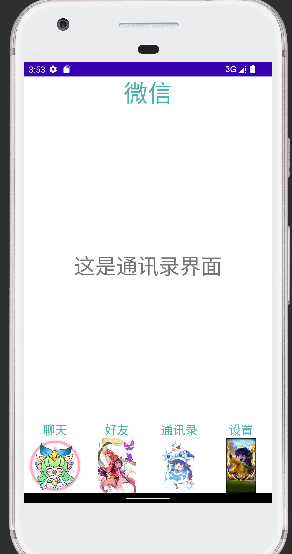
3.3 点击通讯录按钮 ,图像变化且显示相应文本内容
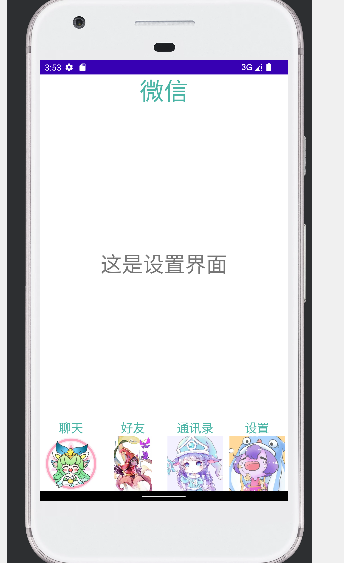
3.4 点击设置按钮 ,图像变化且显示相应文本内容
实验心得
本次实验完成了类微信界面的开发,在实现简单布局的同时完成了点击图标变换的功能,在了解as开发的同时复习了java的语法和相关的知识,在实验中遇到的问题通过查询博客得到了解决,在今后的学习中要多加练习,继续努力!


 132
132

 被折叠的 条评论
为什么被折叠?
被折叠的 条评论
为什么被折叠?
 到【灌水乐园】发言


