


所谓的IOC称之为控制反转,简单来说就是将对象的创建的权利及对象的生命周期的管理过程交由Spring框架来处理,从此在开发过程中不再需要关注对象的创建和生命周期的管理,而是在需要时由Spring框架提供,这个由spring框架管理对象创建和生命周期的机制称之为控制反转。如果spring容器通过IOC控制大量的bean对象,也可以将对象之间的关系管理起来--DI注入依赖完成的.
依赖:在一个类A中,这个类A的属性包含其他类B的数据,称为A的使用依赖B
通常的javabean属性都会私有化,而对外暴露setXxx()getXxx()方法,此时spring可以通过这样的setXxx()方法将属性的值注入对象。
| 1 2 3 4 5 6 7 8 9 10 11 12 13 14 15 16 17 18 19 20 21 22 23 24 25 26 27 28 29 30 31 32 33 34 35 36 37 38 39 40 41 42 43 44 45 | package cn.tedu.beans; import java.util.List; import java.util.Map; import java.util.Properties; import java.util.Set; public class Hero { private int id; private String name; private List<String> jobs; private Set<String> set; private Map<String,String> map; private Properties prop;
public void setId(int id) { this.id = id; } public void setName(String name) { this.name = name; } public void setJobs(List<String> jobs) { this.jobs = jobs; } public void setSet(Set<String> set) { this.set = set; } public void setMap(Map<String, String> map) { this.map = map; } public void setProp(Properties prop) { this.prop = prop; } @Override public String toString() { return "Hero [id=" + id + ", name=" + name + ", jobs=" + jobs + ", set=" + set + ", map=" + map + ", prop=" + prop + "]"; } } |
| 1 2 3 4 5 6 7 8 9 10 11 12 13 14 15 16 17 18 19 20 21 22 23 24 25 26 27 28 29 30 31 32 33 34 35 36 37 38 39 40 41 42 43 44 45 | <?xml version="1.0" encoding="UTF-8"?> <beans xmlns="http://www.springframework.org/schema/beans" xmlns:xsi="http://www.w3.org/2001/XMLSchema-instance" xsi:schemaLocation="http://www.springframework.org/schema/beans http://www.springframework.org/schema/beans/spring-beans-3.2.xsd" >
<bean id="hero" class="cn.tedu.beans.Hero"> <property name="id" value="123"></property> <property name="name" value="亚瑟 "></property> <property name="jobs"> <list> <value>上单</value> <value>打野</value> <value>辅助</value> <value>中单</value> </list> </property> <property name="set"> <set> <value>aaa</value> <value>bbb</value> <value>ccc</value> <value>aaa</value> </set> </property> <property name="map"> <map> <entry key="addr" value="王者荣耀"></entry> <entry key="addr" value="英雄联盟"></entry> <entry key="skill" value="风火轮"></entry> <entry key="age" value="19"></entry> </map> </property> <property name="prop"> <props> <prop key="k1">v1</prop> <prop key="k2">v2</prop> <prop key="k3">v3</prop> <prop key="k4">v4</prop> </props> </property> </bean> </beans> |
| 1 2 3 4 5 6 7 8 9 | @Test /** * SpringDI set方式属性注入 - Spring内置的可直接注入类型的注入 */ public void test1(){ ApplicationContext context = new ClassPathXmlApplicationContext("applicationContext.xml"); Hero hero = (Hero) context.getBean("hero"); System.out.println(hero); } |
| 1 2 3 4 5 6 7 8 9 10 11 12 13 14 15 16 17 18 19 20 21 22 23 24 25 26 27 28 29 30 31 32 33 34 35 36 37 38 39 40 41 42 43 44 45 46 47 48 49 50 51 52 53 54 55 56 57 58 | package cn.tedu.beans; import java.util.List; import java.util.Map; import java.util.Properties; import java.util.Set; public class Hero { private int id; private String name; private List<String> jobs; private Set<String> set; private Map<String,String> map; private Properties prop; private Dog dog; private Cat cat;
public void setId(int id) { this.id = id; } public void setName(String name) { this.name = name; } public void setJobs(List<String> jobs) { this.jobs = jobs; } public void setSet(Set<String> set) { this.set = set; } public void setMap(Map<String, String> map) { this.map = map; } public void setProp(Properties prop) { this.prop = prop; } public void setDog(Dog dog) { this.dog = dog; } public void setCat(Cat cat) { this.cat = cat; } @Override public String toString() { return "Hero [id=" + id + ", name=" + name + ", jobs=" + jobs + ", set=" + set + ", map=" + map + ", prop=" + prop + ", dog=" + dog + ", cat=" + cat + "]"; } } |
| 1 2 3 4 5 6 7 8 9 10 11 12 13 14 15 16 17 18 19 20 21 22 23 24 25 26 27 28 29 30 31 32 33 34 35 36 37 38 39 40 41 42 43 44 45 46 47 48 49 50 | <?xml version="1.0" encoding="UTF-8"?> <beans xmlns="http://www.springframework.org/schema/beans" xmlns:xsi="http://www.w3.org/2001/XMLSchema-instance" xsi:schemaLocation="http://www.springframework.org/schema/beans http://www.springframework.org/schema/beans/spring-beans-3.2.xsd" >
<bean id="hero" class="cn.tedu.beans.Hero"> <property name="id" value="123"></property> <property name="name" value="亚瑟 "></property> <property name="jobs"> <list> <value>上单</value> <value>打野</value> <value>辅助</value> <value>中单</value> </list> </property> <property name="set"> <set> <value>aaa</value> <value>bbb</value> <value>ccc</value> <value>aaa</value> </set> </property> <property name="map"> <map> <entry key="addr" value="王者荣耀"></entry> <entry key="addr" value="英雄联盟"></entry> <entry key="skill" value="风火轮"></entry> <entry key="age" value="19"></entry> </map> </property> <property name="prop"> <props> <prop key="k1">v1</prop> <prop key="k2">v2</prop> <prop key="k3">v3</prop> <prop key="k4">v4</prop> </props> </property> <property name="dog" ref="dog"></property> <property name="cat" ref="cat"></property> </bean> <bean id="dog" class="cn.tedu.beans.Dog"></bean> <bean id="cat" class="cn.tedu.beans.Cat"></bean>
</beans> |
|
|
| 1 2 3 4 5 6 7 8 9 | @Test /** * SpringDI set方式属性注入 - 非Spring内置的可以直接注入类型的注入 */ public void test2(){ ApplicationContext context = new ClassPathXmlApplicationContext("applicationContext.xml"); Hero hero = (Hero) context.getBean("hero"); System.out.println(hero); } |
在Spring的set方式实现的注入过程中,支持自动装配机制,所谓自动装配机制,会根据要设置的javabean属性的名字 或 类型 到spring中自动寻找对应id 或 类型的<bean>进行注入设置,从而 省去依次配置的过程,简化了配置。
为 指定<bean>开启自动装配:
| 1 2 3 4 5 6 7 8 9 10 11 12 13 14 15 16 17 18 | <?xml version="1.0" encoding="UTF-8"?> <beans xmlns="http://www.springframework.org/schema/beans" xmlns:xsi="http://www.w3.org/2001/XMLSchema-instance" xsi:schemaLocation="http://www.springframework.org/schema/beans http://www.springframework.org/schema/beans/spring-beans-3.2.xsd" >
<!-- autowire设定自动装配: byName:根据javabean中需要注入的属性的名字 ,在spring容器中找对应id的<bean>将该<bean>的对象复制给 当前的属性 byType:根据javabean中需要注入的属性的类型,在spring容器中找对应class类型的<bean>将该<bean>的对象复制给 当前的属性 **byType方式 根据类型进行匹配,可能匹配到多个<bean>,此时会抛出异常。而byName是通过id来寻找<bean>,id没有重复,不会有这方面的问题,所以推荐使用byName方式 --> <bean id="teacher" class="cn.tedu.beans.Teacher" autowire="byType"></bean> <bean id="dog" class="cn.tedu.beans.Dog"></bean> <bean id="cat" class="cn.tedu.beans.Cat"></bean>
</beans> |
为 全局配置自动装配:
| 1 2 3 4 5 6 7 8 9 10 11 12 13 14 15 16 17 18 19 | <?xml version="1.0" encoding="UTF-8"?> <beans xmlns="http://www.springframework.org/schema/beans" xmlns:xsi="http://www.w3.org/2001/XMLSchema-instance" xsi:schemaLocation="http://www.springframework.org/schema/beans http://www.springframework.org/schema/beans/spring-beans-3.2.xsd" default-autowire="byName" >
<!-- autowire设定自动装配: byName:根据javabean中需要注入的属性的名字 ,在spring容器中找对应id的<bean>将该<bean>的对象复制给 当前的属性 byType:根据javabean中需要注入的属性的类型,在spring容器中找对应class类型的<bean>将该<bean>的对象复制给 当前的属性 **byType方式 根据类型进行匹配,可能匹配到多个<bean>,此时会抛出异常。而byName是通过id来寻找<bean>,id没有重复,不会有这方面的问题,所以推荐使用byName方式 --> <bean id="teacher" class="cn.tedu.beans.Teacher"></bean> <bean id="dog" class="cn.tedu.beans.Dog"></bean> <bean id="cat" class="cn.tedu.beans.Cat"></bean>
</beans> |
| 1 2 3 4 5 6 7 8 9 10 11 12 13 14 15 16 17 | package cn.tedu.beans; public class Teacher { private Dog dog; private Cat cat; public void setDog(Dog dog) { this.dog = dog; } public void setCat(Cat cat) { this.cat = cat; }
@Override public String toString() { return "Teacher [dog=" + dog + ", cat=" + cat + "]"; } } |
| 1 2 3 4 5 6 7 8 9 | @Test /** * SpringDI 自动装配 */ public void test4(){ ApplicationContext context = new ClassPathXmlApplicationContext("applicationContext.xml"); Teacher teacher = (Teacher) context.getBean("teacher"); System.out.println(teacher); } |
对象属性设置的另一种方式是在对象创建的过程中通过构造方法传入并设置对象的属性。
spring也可以通过这样的构造方法实现属性的注入。
| 1 2 3 4 5 6 7 8 9 10 11 12 13 14 15 16 17 18 | package cn.tedu.beans; public class Student { private int id; private String name; private Dog dog;
public Student(int id, String name, Dog dog) { this.id = id; this.name = name; this.dog = dog; } @Override public String toString() { return "Student [id=" + id + ", name=" + name + ", dog=" + dog + "]"; } } |
| 1 2 3 4 5 6 7 8 9 10 11 12 13 14 15 16 17 18 19 20 21 22 23 | <?xml version="1.0" encoding="UTF-8"?> <beans xmlns="http://www.springframework.org/schema/beans" xmlns:xsi="http://www.w3.org/2001/XMLSchema-instance" xsi:schemaLocation="http://www.springframework.org/schema/beans http://www.springframework.org/schema/beans/spring-beans-3.2.xsd" >
<bean id="student" class="cn.tedu.beans.Student"> <!-- index:为构造方法的第几个参数 进行配置 name:为构造方法的哪个名字的参数进行配置 **index 和 name 可以配置任何一个或同时配置 但要求一旦配置必须正确 **推荐优先使用index方式配置 防止没有源码造成name无法匹配到对应参数 type:该构造方法参数的类型 value:该构造方法参数的值 ,用来指定基本值 ref:该构造方法参数的值,用来指定引用其他bean的值 --> <constructor-arg index="0" name="id" value="999"/> <constructor-arg index="1" type="java.lang.String" value="张无忌"/> <constructor-arg name="dog" ref="dog"/> </bean>
<bean id="dog" class="cn.tedu.beans.Dog"></bean>
</beans> |
|
|
| 1 2 3 4 5 6 7 8 9 | @Test /** * SpringDI 构造方法方式属性注入 */ public void test3(){ ApplicationContext context = new ClassPathXmlApplicationContext("applicationContext.xml"); Student student = (Student) context.getBean("student"); System.out.println(student); } |
- **基于构造方法的注入
 自动装配
自动装配- 自定义bean的注入:
- Spring普通属性注入:
- 基于set方法注入
- IOC(DI) - 控制反转(依赖注入)
|
|

| 1 2 3 4 5 6 7 8 9 10 | <?xml version="1.0" encoding="UTF-8"?> <beans xmlns="http://www.springframework.org/schema/beans" xmlns:context="http://www.springframework.org/schema/context" xmlns:xsi="http://www.w3.org/2001/XMLSchema-instance" xsi:schemaLocation="http://www.springframework.org/schema/beans http://www.springframework.org/schema/beans/spring-beans-3.2.xsd http://www.springframework.org/schema/context http://www.springframework.org/schema/context/spring-context-3.2.xsd "> </beans> |
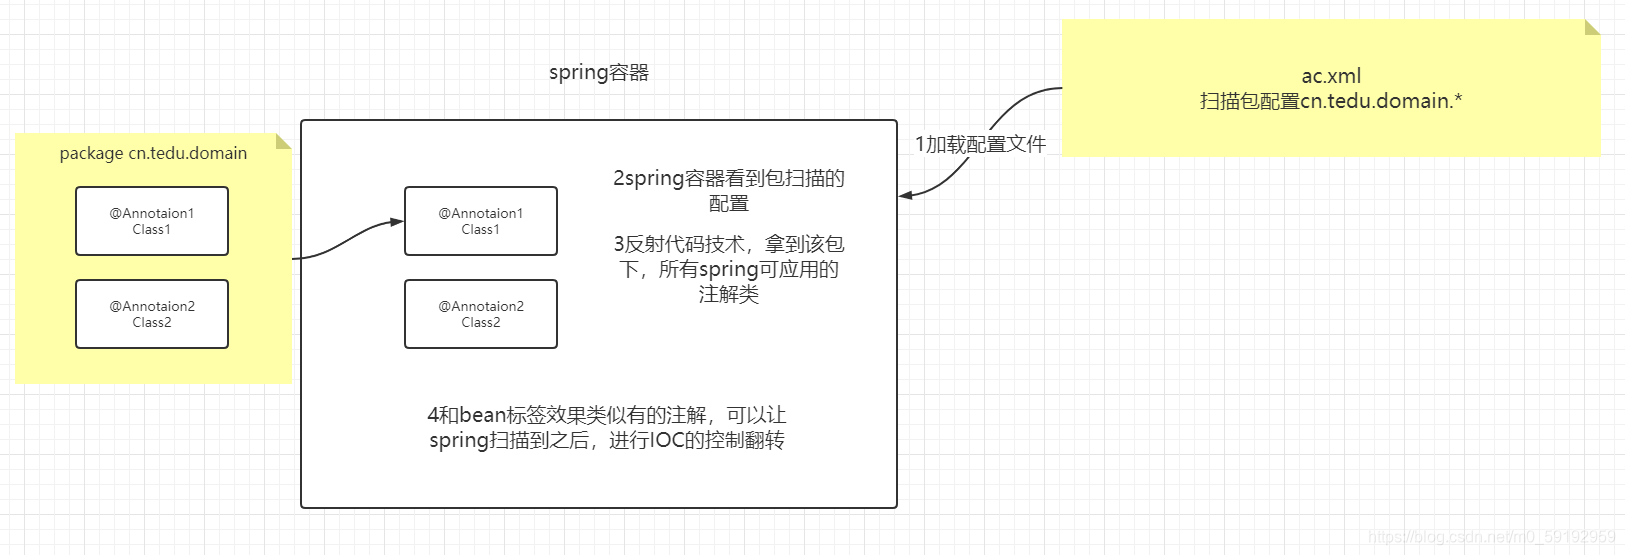
在配置文件中,开启包扫描,指定spring自动扫描哪些个包下的类。只有在指定的扫描包下的类上的IOC注解才会生效。
| 1 2 3 4 5 6 7 8 9 10 11 12 13 14 15 16 17 | <?xml version="1.0" encoding="UTF-8"?> <beans xmlns="http://www.springframework.org/schema/beans" xmlns:context="http://www.springframework.org/schema/context" xmlns:xsi="http://www.w3.org/2001/XMLSchema-instance" xmlns:aop="http://www.springframework.org/schema/aop" xmlns:mvc="http://www.springframework.org/schema/mvc" xsi:schemaLocation="http://www.springframework.org/schema/beans http://www.springframework.org/schema/beans/spring-beans.xsd http://www.springframework.org/schema/context http://www.springframework.org/schema/context/spring-context.xsd http://www.springframework.org/schema/aop http://www.springframework.org/schema/aop/spring-aop.xsd http://www.springframework.org/schema/mvc https://www.springframework.org/schema/mvc/spring-mvc.xsd"> <!--目标对象Student--> <context:component-scan base-package="cn.tedu.domain"/> <!--<bean id="p1" class="cn.tedu.domain.Person"/>--> </beans> |
在配置的包中的类上使用@Component注解,则这个类会自动被注册为bean,使用当前类的class为<bean>的class,通常情况下使用类名首字母小写为<bean>id。
案例:
| 1 2 3 4 5 6 | package cn.tedu.domain; import org.springframework.stereotype.Component; @Component public class Person { public Person(){ System.out.println("person被加载了"); } } |
通常情况下注解注册bean使用类名首字母小写为bean的id,但是如果类名的第二个字母为大写则首字母保留原样.
| 1 2 3 | cn.tedu.beans.Person --> <bean id="person" class="cn.tedu.beans.Person"/> cn.tedu.beans.PErson --> <bean id="PErson" class="cn.tedu.beans.Person"/> cn.tedu.beans.NBA --> <bean id="NBA" class="cn.tedu.beans.NBA"/> |
也可以通过在@Component中配置value属性,明确的指定bean的id
课堂练习:
尝试使用第一个注解@Component形式创建spring容器bean对象。
尝试默认id生成规则,
尝试自定义id值。
总结:
在类上使用@Componet注解创建容器bean的方式,原理就是调用无参构造器
Spring默认通过反射创建bean,如果某些bean没有无参构造器或创建过程非常复杂,则无法通过简单的反射创建bean,此时可以通过指定创建bean的工厂,令SpringIOC通过工厂来创建bean,从而进行注册。
可以通过配置文件方式配置bean工厂,同样也可以通过注解配置bean工厂。
工厂类必须放在包扫描目录下,且被@Component注解修饰。所以spring注解形式,工厂创建对象的底层原理是实例工厂。否则工厂不能加@Component,工厂本身也是spring容器bean对象
工厂中生产bean的方法要被@Bean修饰
则此方法会被SpringIOC调用,并将返回的对象注册为Spring的bean,默认自动推断id,也可以通过value属性手工指定id。
| @Component public class Pesron5Factory { @Bean("per5") public Person5 getInstance(){ return new Person5("xx"); } } |
默认方法名称是返回bean的id值,如果多个实例工厂中存在同名的init,不会产生像bean标签一个的错误冲突,异常等,但是只加载其中的一个方法,创建一个bean,另外一个同名的方法的构建过程完全不加载。
@Bean注解属性,自定义当前方法返回bean的id值。
测试代码
Person
package cn.tedu.beans;
import org.springframework.stereotype.Component;
//@Component不能使用
public class Person {
private String name;
//没有无参构造器
public Person(String name) {
this.name = name;
}
public String getName() {
return name;
}
public void setName(String name) {
this.name = name;
}
}
Student
package cn.tedu.beans;
public class Student {
}
PersonFactory
package cn.tedu.factory;
import cn.tedu.beans.Person;
import cn.tedu.beans.Student;
import org.springframework.context.annotation.Bean;
import org.springframework.stereotype.Component;
/**
* 注解形式,也支持工厂加工bean对象
* 工厂本身要有@Component注解
*/
/*
<bean factory>
<bean person factory-bean=factory factory-method=init
*/
@Component
public class PersonFactory {
//工厂有构建对象的方法 方法名称 返回值就是目标类
@Bean
public Student init(){
System.out.println("pf工厂");
/* System.out.println("pf工厂");
Person p=new Person("wangcuihua");*/
return new Student();
}
}
PersonFactory1
package cn.tedu.factory;
import cn.tedu.beans.Person;
import org.springframework.context.annotation.Bean;
import org.springframework.stereotype.Component;
/**
* 注解形式,也支持工厂加工bean对象
* 工厂本身要有@Component注解
*/
/*
<bean factory>
<bean person factory-bean=factory factory-method=init
*/
@Component
public class PersonFactory1 {
//工厂有构建对象的方法 方法名称 返回值就是目标类
@Bean("haha")
public Person init(){
System.out.println("pf1工厂");
Person p=new Person("wangcuihua");
return p;
}
}
|
|
| 1 2 3 4 5 6 7 8 9 10 | <?xml version="1.0" encoding="UTF-8"?> <beans xmlns="http://www.springframework.org/schema/beans" xmlns:context="http://www.springframework.org/schema/context" xmlns:xsi="http://www.w3.org/2001/XMLSchema-instance" xsi:schemaLocation="http://www.springframework.org/schema/beans http://www.springframework.org/schema/beans/spring-beans-3.2.xsd http://www.springframework.org/schema/context http://www.springframework.org/schema/context/spring-context-3.2.xsd "> </beans> |
3.2.23版本,IOC和DI的开启方式就整合了,component-scan标签包含了annotation-config的功能
| 1 2 3 4 5 6 7 8 9 10 11 12 13 14 15 16 17 | <?xml version="1.0" encoding="UTF-8"?> <beans xmlns="http://www.springframework.org/schema/beans" xmlns:context="http://www.springframework.org/schema/context" xmlns:util="http://www.springframework.org/schema/util" xmlns:xsi="http://www.w3.org/2001/XMLSchema-instance" xsi:schemaLocation="http://www.springframework.org/schema/beans http://www.springframework.org/schema/beans/spring-beans-3.2.xsd http://www.springframework.org/schema/context http://www.springframework.org/schema/context/spring-context-3.2.xsd http://www.springframework.org/schema/util http://www.springframework.org/schema/util/spring-util-3.2.xsd "> <!-- 开启IOC包扫描 --> <context:component-scan base-package="cn.tedu.domain"/> <!-- 开启注解配置DI --> <context:annotation-config></context:annotation-config> </beans> |
spring中可以通过@Value注解来实现spring内置支持的类型的属性的注入。
| 1 2 3 4 5 6 7 8 9 10 11 12 13 14 15 16 17 18 | package cn.tedu.domain; import org.springframework.beans.factory.annotation.Value; import org.springframework.stereotype.Component; @Component public class Student { @Value("zs") private String name;
@Value("19") private int age;
@Override public String toString() { return "Student [name=" + name + ", age=" + age + "]"; } } |
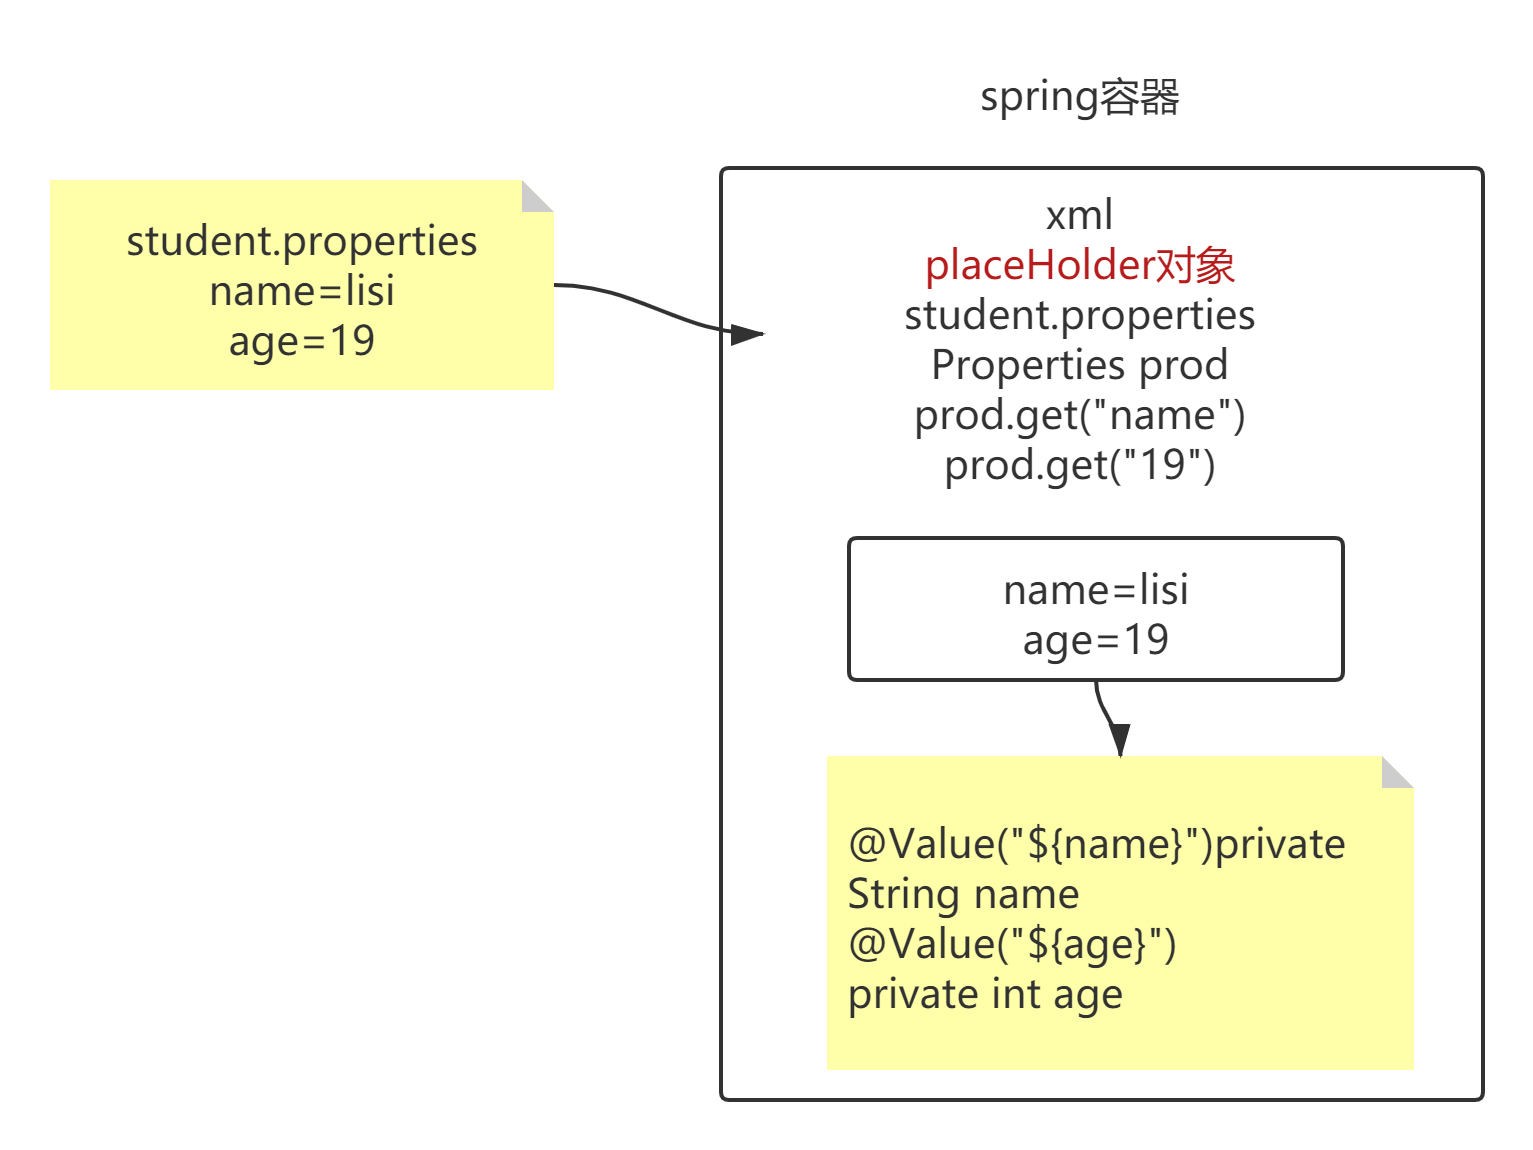
这种方式可以实现spring内置支持类型的注入,但是这种方式将注入的值写死在了代码中,后续如果希望改变注入的值,必须来修改源代码,此时可以将这些值配置到一个properties配置文件中,再在spring中进行引入。
| student.properties配置文件准备工作 |
| name=lisi |
| age=18 |
|
|

引入util名称空间,通过适当的util标签注册数据
| 1 2 3 4 5 6 7 8 9 10 11 12 13 14 15 16 17 18 19 20 21 22 23 24 25 26 27 28 29 30 31 32 33 34 35 36 37 38 39 40 41 | <?xml version="1.0" encoding="UTF-8"?> <beans xmlns="http://www.springframework.org/schema/beans" xmlns:context="http://www.springframework.org/schema/context" xmlns:util="http://www.springframework.org/schema/util" xmlns:xsi="http://www.w3.org/2001/XMLSchema-instance" xsi:schemaLocation="http://www.springframework.org/schema/beans http://www.springframework.org/schema/beans/spring-beans-3.2.xsd http://www.springframework.org/schema/context http://www.springframework.org/schema/context/spring-context-3.2.xsd http://www.springframework.org/schema/util http://www.springframework.org/schema/util/spring-util-3.2.xsd "> <!-- 开启IOC包扫描 --> <context:component-scan base-package="cn.tedu.domain"/> <!-- 开启注解配置DI --> <context:annotation-config></context:annotation-config> <!-- 引入Properties文件 --> <context:property-placeholder location="classpath:/stu.properties"/>
<!-- 配置集合数据 --> <util:list id="l1"> <value>aaa</value> <value>bbb</value> <value>ccc</value> </util:list> <util:set id="s1"> <value>111</value> <value>222</value> <value>333</value> </util:set> <util:map id="m1"> <entry key="k1" value="v1"></entry> <entry key="k2" value="v2"></entry> <entry key="k3" value="v3"></entry> </util:map> <util:properties id="p1"> <prop key="p1">v1</prop> <prop key="p2">v2</prop> <prop key="p3">v3</prop> </util:properties> </beans> |
再在类的属性中通过@Value注入赋值
| 1 2 3 4 5 6 7 8 9 10 11 12 13 14 15 16 17 18 19 20 21 22 23 24 25 26 27 28 29 30 31 32 33 34 35 36 37 | package cn.tedu.domain; import java.util.List; import java.util.Map; import java.util.Properties; import java.util.Set; import org.springframework.beans.factory.annotation.Value; import org.springframework.stereotype.Component; @Component public class Student { @Value("${name}") private String name;
@Value("${age}") private int age;
@Value("#{@l1}") private List<String> list;
@Value("#{@s1}") private Set<String> set;
@Value("#{@m1}") private Map<String,String> map;
@Value("#{@p1}") private Properties prop;
@Override public String toString() { return "Student [name=" + name + ", age=" + age + ", list=" + list + ", set=" + set + ", map=" + map + ", prop=" + prop + "]"; }
} |
在bean中的属性上通过@Autowired实现自定义bean类型的属性注入
代码:
| 1 2 3 4 5 6 7 8 9 10 11 12 13 14 15 16 17 18 19 20 21 22 23 24 25 | package cn.tedu.domain; import java.util.List; import java.util.Map; import java.util.Properties; import java.util.Set; import org.springframework.beans.factory.annotation.Autowired; import org.springframework.beans.factory.annotation.Value; import org.springframework.stereotype.Component; @Component public class Student { @Autowired private Dog dog;
@Autowired private Cat cat;
@Override public String toString() { return "Student [dog="+ dog + ", cat=" + cat + "]"; }
} |
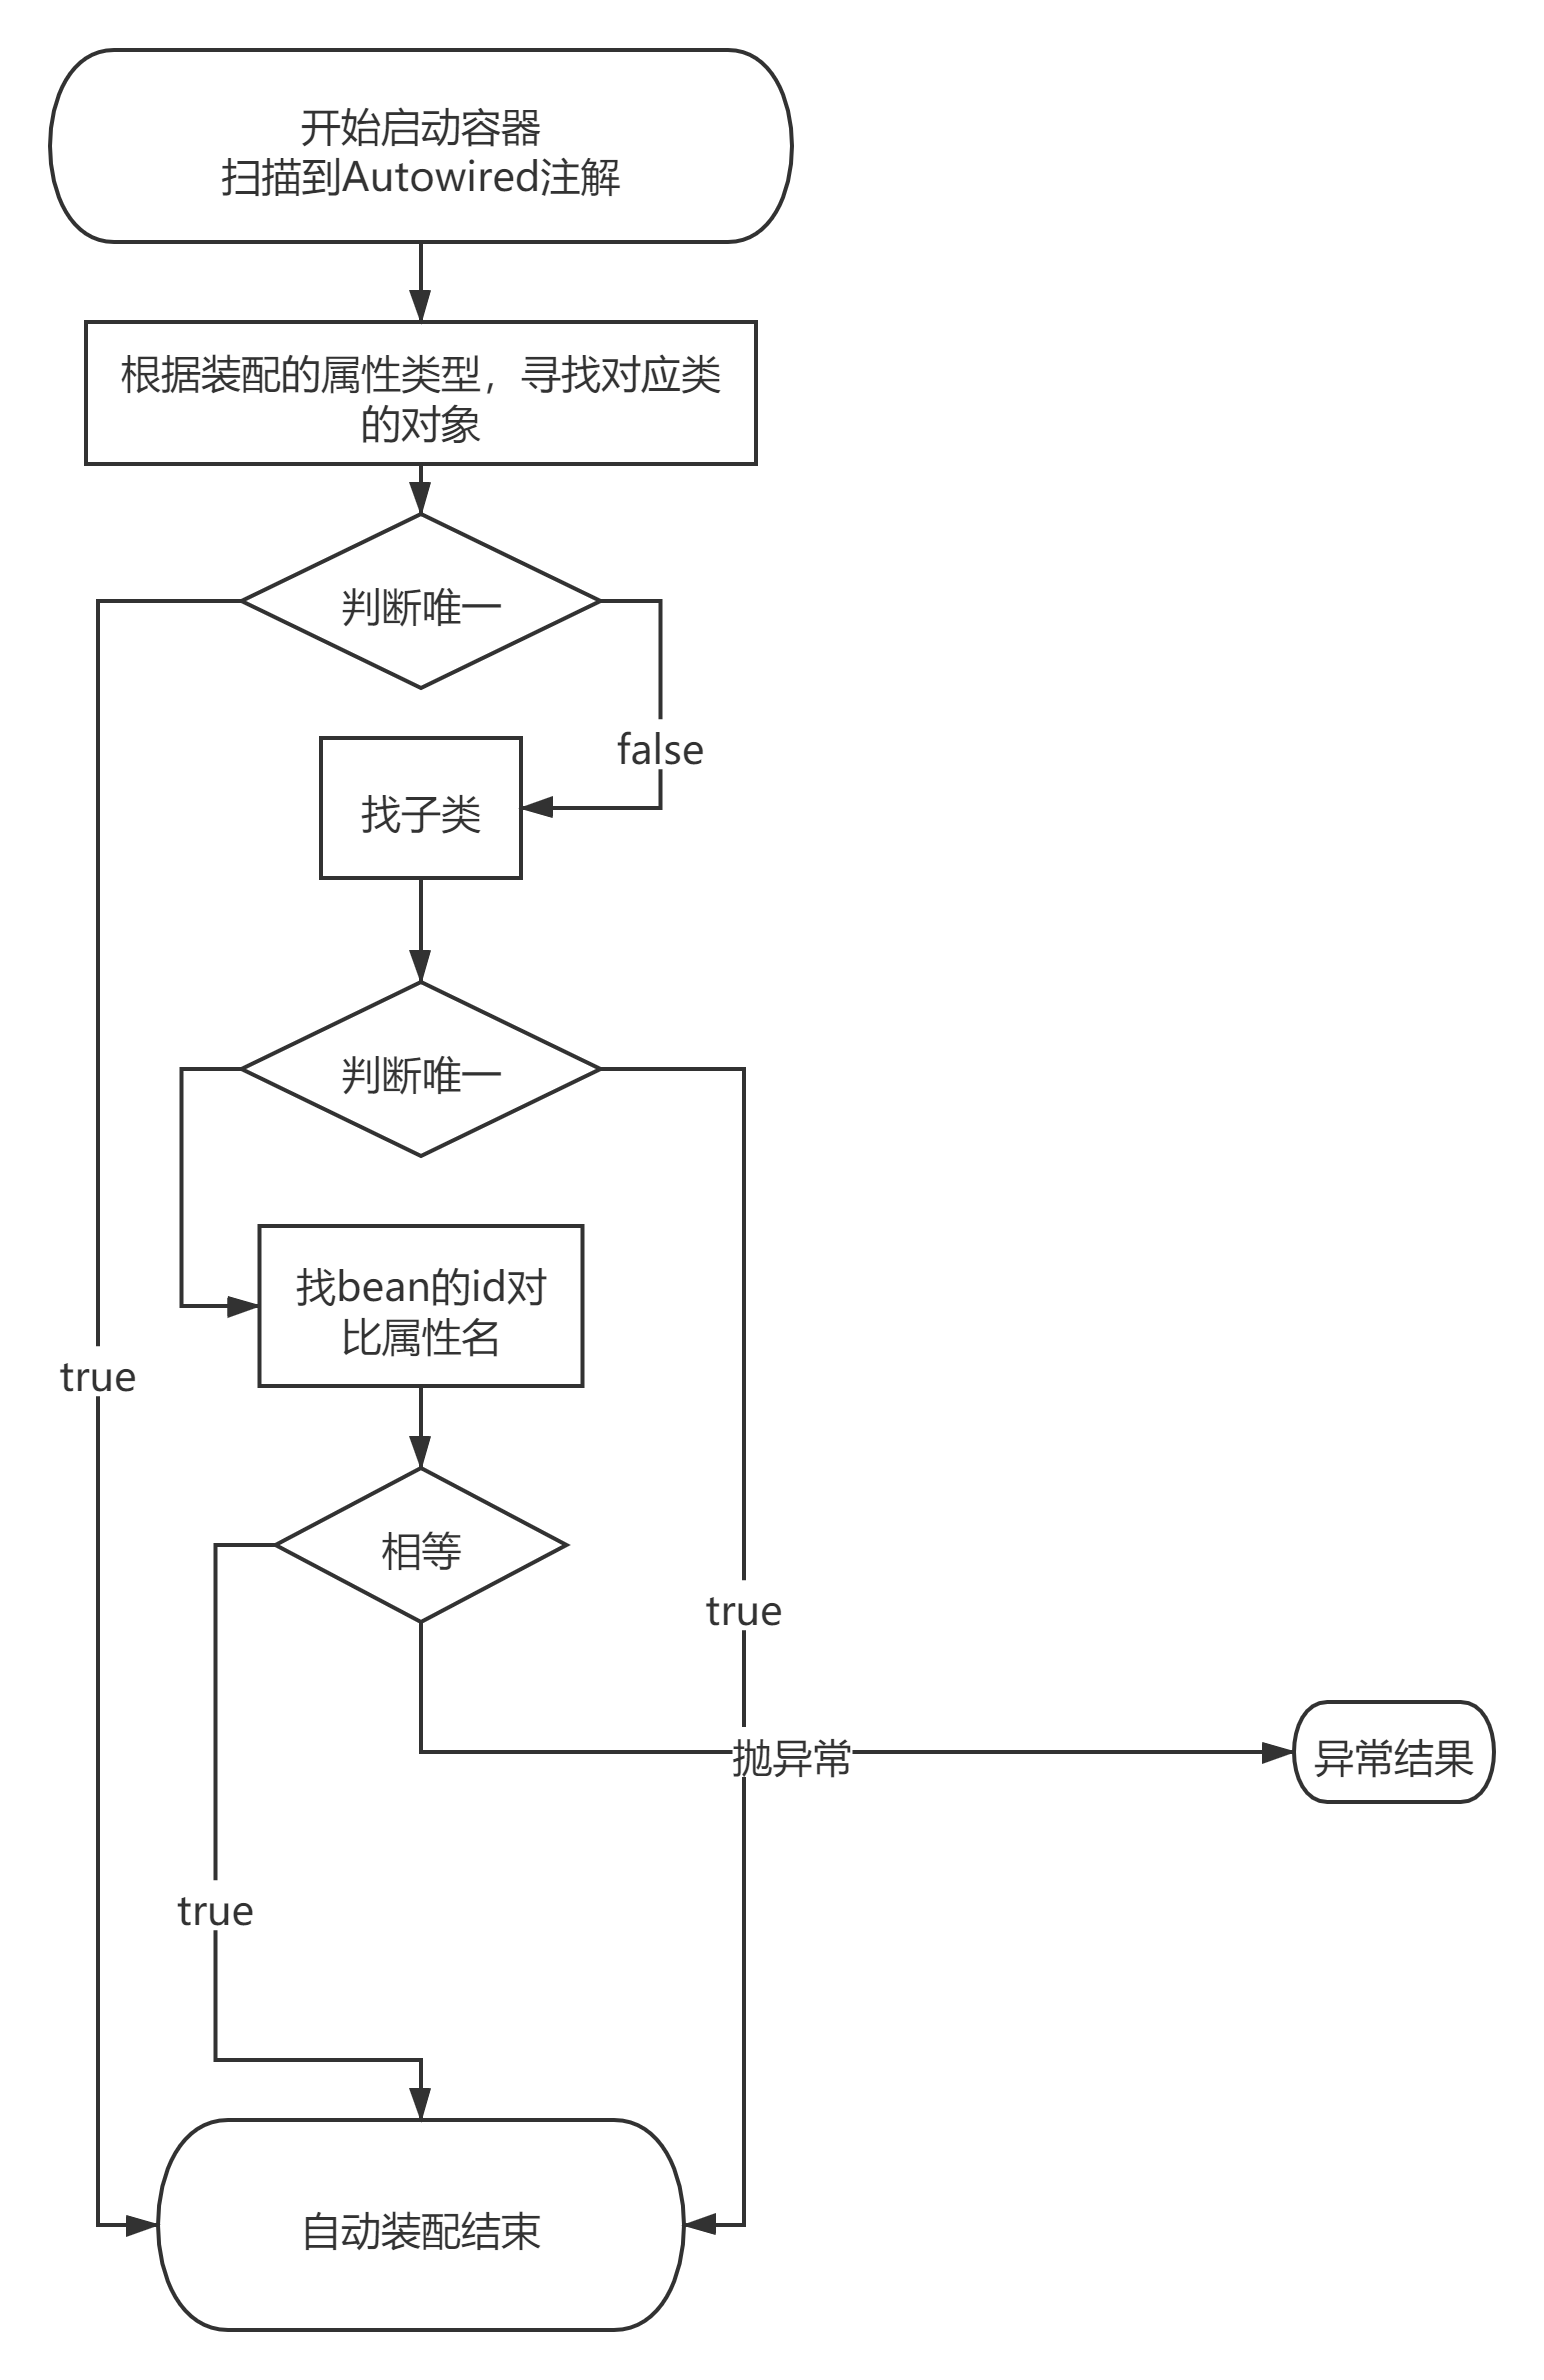
当Spring容器解析到@Component注解时,创建当前类的bean在spring容器中进行管理,在创建bean的过程中发现了@Autowired注解,会根据当前bean类型,寻找在spring中是否存在该类型的bean,找到直接注入,如果找不到还会检查是否有子孙类、实现类存在,如果存在唯一的则自动注入,如果还是没有找到或找到多个无法注入,则还会按照属性名对应id去查找对应的bean,如果存在则注入,如果还是没有找到则抛出异常。
也可以额外配置@Qualifier(value="dog1")注解强制要求按照id寻找bean,则此时会直接使用给定的id寻找bean,而不会进行基于类型的匹配。
使用spring框架模拟user用户登录和注册的功能。
4.1需求:
搭建一个项目,可以调用userService功能进行用户注册,和登录,userService接口,userServiceImpl 实现类,数据库的读写,userDao接口 userDaoImpl
判断:spring容器管理的对象,依赖
4.2操作内容步骤
肝起来
配置修饰的类的bean是单例还是多例,如果不配置默认为单例
案例:
| 1 2 3 4 5 6 7 8 9 | package cn.tedu.domain; import org.springframework.context.annotation.Scope; import org.springframework.stereotype.Component; @Component @Scope("prototype") public class Teacher { } |
配置修饰的类的bean采用懒加载机制
单例模式下,bean对象可以设置懒加载为false 多里模式只能使用懒加载,对象会杯容器创建,直到调用getBean或者注入一个使用的对象中
案例:
| 1 2 3 4 5 6 7 8 9 10 11 12 | package cn.tedu.domain; import org.springframework.context.annotation.Lazy; import org.springframework.stereotype.Component; @Component @Lazy public class Teacher { public Teacher() { System.out.println("teacher construct.."); } } |
在bean对应的类中 修饰某个方法 将该方法声明为初始化方法,对象创建之后立即执行。
在bean对应的类中 修饰某个方法 将该方法声明为销毁的方法,对象销毁之前调用的方法。
案例:
| 1 2 3 4 5 6 7 8 9 10 11 12 13 14 15 16 17 18 19 20 21 | package cn.tedu.beans; import javax.annotation.PostConstruct; import javax.annotation.PreDestroy; import org.springframework.stereotype.Component; @Component public class Dog { public Dog() { System.out.println("Dog...被创建出来了..."); }
@PostConstruct public void init(){ System.out.println("Dog的初始化方法。。。"); }
@PreDestroy public void destory(){ System.out.println("Dog的销毁方法。。。"); } } |
这四个注解的功能是完全相同的,都是用来修饰类,将类声明为Spring管理的bean的。
其中@Component一般认为是通用的注解
而@Controller用在软件分层中的控制层,一般用在web层
而@Service用在软件分层中的业务访问层,一般用在service层
而@Repository用在软件分层中的数据访问层,一般用在dao层


 5万+
5万+


 被折叠的 条评论
为什么被折叠?
被折叠的 条评论
为什么被折叠?
 到【灌水乐园】发言


