


实际开发中我们经常需要给 view 设置圆角,如果是给四个角设置相同大小的圆角,使用系统 api 即可。
但有时需要给四个角设置不同大小的圆角,此时系统 api 就不能满足了。为了提高开发效率,我结合 CAShapeLayer 和 UIBezierPath 封装了一个 CornerView。
- 可以通过代码直接设置某个角的圆角:
// 设置左上角圆角
self.cornerView.topLeftCornerRadious = 40;
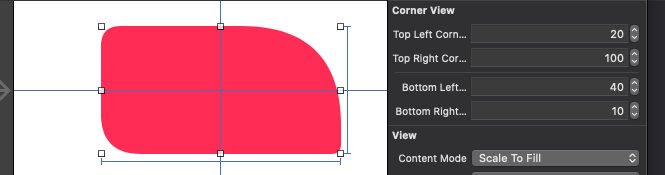
- 也支持在 xib 上设置:
Swift 和 Objective-C 的源码如下:
- Swift:
import UIKit

@IBDesignable

class CornerView: UIView {

    /// 左上角圆角
    @IBInspectable var topLeftCornerRadious: CGFloat = 0 {
        didSet {
            refreshCorner()
        }
    }
    /// 右上角圆角
    @IBInspectable var topRightCornerRadious: CGFloat = 0 {
        didSet {
            refreshCorner()
        }
    }
    /// 左下角圆角
    @IBInspectable var bottomLeftCornerRadious: CGFloat = 0 {
        didSet {
            refreshCorner()
        }
    }
    /// 右下角圆角
    @IBInspectable var bottomRightCornerRadious: CGFloat = 0 {
        didSet {
            refreshCorner()
        }
    }

    private func refreshCorner() {
        let maskLayer = CAShapeLayer()
        maskLayer.frame = bounds
        self.layer.mask = maskLayer

        let borderPath = UIBezierPath()
        // 起点
        borderPath.move(to: .init(x: 0, y: topLeftCornerRadious))
        // 左上角
        borderPath.addQuadCurve(to: .init(x: topLeftCornerRadious, y: 0), controlPoint: .zero)
        // 直线,到右上角
        borderPath.addLine(to: .init(x: bounds.width-topRightCornerRadious, y: 0))
        // 右上角圆角
        borderPath.addQuadCurve(to: .init(x: bounds.width, y: topRightCornerRadious), controlPoint: .init(x: bounds.width, y: 0))
        // 直线,到右下角
        borderPath.addLine(to: .init(x: bounds.width, y: bounds.height-bottomRightCornerRadious))
        // 右下角圆角
        borderPath.addQuadCurve(to: .init(x: bounds.width-bottomRightCornerRadious, y: bounds.height), controlPoint: .init(x: bounds.width, y: bounds.height))
        // 直线,到左下角
        borderPath.addLine(to: .init(x: bottomLeftCornerRadious, y: bounds.height))
        // 左下角圆角
        borderPath.addQuadCurve(to: .init(x: 0, y: bounds.height-bottomLeftCornerRadious), controlPoint: .init(x: 0, y: bounds.height))
        // 回到起点
        borderPath.addLine(to: .init(x: 0, y: topLeftCornerRadious))

        maskLayer.path = borderPath.cgPath
    }

    override func layoutSubviews() {
        super.layoutSubviews()
        refreshCorner()
    }

}
- Objective-C:
#import <UIKit/UIKit.h>

NS_ASSUME_NONNULL_BEGIN

@interface CQCornerView : UIView

/// 左上角圆角
@property (nonatomic, assign) IBInspectable CGFloat topLeftCornerRadious;
/// 右上角圆角
@property (nonatomic, assign) IBInspectable CGFloat topRightCornerRadious;
/// 左下角圆角
@property (nonatomic, assign) IBInspectable CGFloat bottomLeftCornerRadious;
/// 右下角圆角
@property (nonatomic, assign) IBInspectable CGFloat bottomRightCornerRadious;

@end

NS_ASSUME_NONNULL_END


#import "CQCornerView.h"

IB_DESIGNABLE

@implementation CQCornerView

- (void)setTopLeftCornerRadious:(CGFloat)topLeftCornerRadious {
    _topLeftCornerRadious = topLeftCornerRadious;
    [self refreshCorner];
}

- (void)setTopRightCornerRadious:(CGFloat)topRightCornerRadious {
    _topRightCornerRadious = topRightCornerRadious;
    [self refreshCorner];
}

- (void)setBottomLeftCornerRadious:(CGFloat)bottomLeftCornerRadious {
    _bottomLeftCornerRadious = bottomLeftCornerRadious;
    [self refreshCorner];
}

- (void)setBottomRightCornerRadious:(CGFloat)bottomRightCornerRadious {
    _bottomRightCornerRadious = bottomRightCornerRadious;
    [self refreshCorner];
}

- (void)refreshCorner {
    CAShapeLayer *maskLayer = [CAShapeLayer new];
    maskLayer.frame = self.bounds;
    self.layer.mask = maskLayer;

    UIBezierPath *borderPath = [UIBezierPath new];

    CGFloat width = self.bounds.size.width;
    CGFloat height = self.bounds.size.height;

    // 起点
    [borderPath moveToPoint:CGPointMake(0, _topLeftCornerRadious)];
    // 弧线,到左上角上方
    [borderPath addQuadCurveToPoint:CGPointMake(_topLeftCornerRadious, 0) controlPoint:CGPointZero];
    // 直线,到右上角
    [borderPath addLineToPoint:CGPointMake(width - _topRightCornerRadious, 0)];
    // 右上角圆角
    [borderPath addQuadCurveToPoint:CGPointMake(width, _topRightCornerRadious) controlPoint:CGPointMake(width, 0)];
    // 直线,到右下角
    [borderPath addLineToPoint:CGPointMake(width, height - _bottomRightCornerRadious)];
    // 右下角圆角
    [borderPath addQuadCurveToPoint:CGPointMake(width - _bottomRightCornerRadious, height) controlPoint:CGPointMake(width, height)];
    // 直线,到左下角
    [borderPath addLineToPoint:CGPointMake(_bottomLeftCornerRadious, height)];
    // 左下角圆角
    [borderPath addQuadCurveToPoint:CGPointMake(0, height - _bottomLeftCornerRadious) controlPoint:CGPointMake(0, height)];
    // 回到起点
    [borderPath addLineToPoint:CGPointMake(0, _topLeftCornerRadious)];

    maskLayer.path = borderPath.CGPath;
}

- (void)layoutSubviews {
    [super layoutSubviews];
    [self refreshCorner];
}

@end


 936
936


 被折叠的 条评论
为什么被折叠?
被折叠的 条评论
为什么被折叠?
 到【灌水乐园】发言


