


要论期末考试必须考的存储方式,我SQLite大哥只能排第二,而SharedPreferences必须排第一,用最少的代码量做到最基础最必要的功能----自动登录或记住密码。
SharedPreferences(以下简称SP)只需要记住两段代码,读取数据与保存数据
SP存储的方式是在手机内部,以XML格式文件保存的键值对数据
先看一下我们如何看到这个XML文件,考试时可以随时验证是否成功
还是原来的:点击打开模拟器资源管理
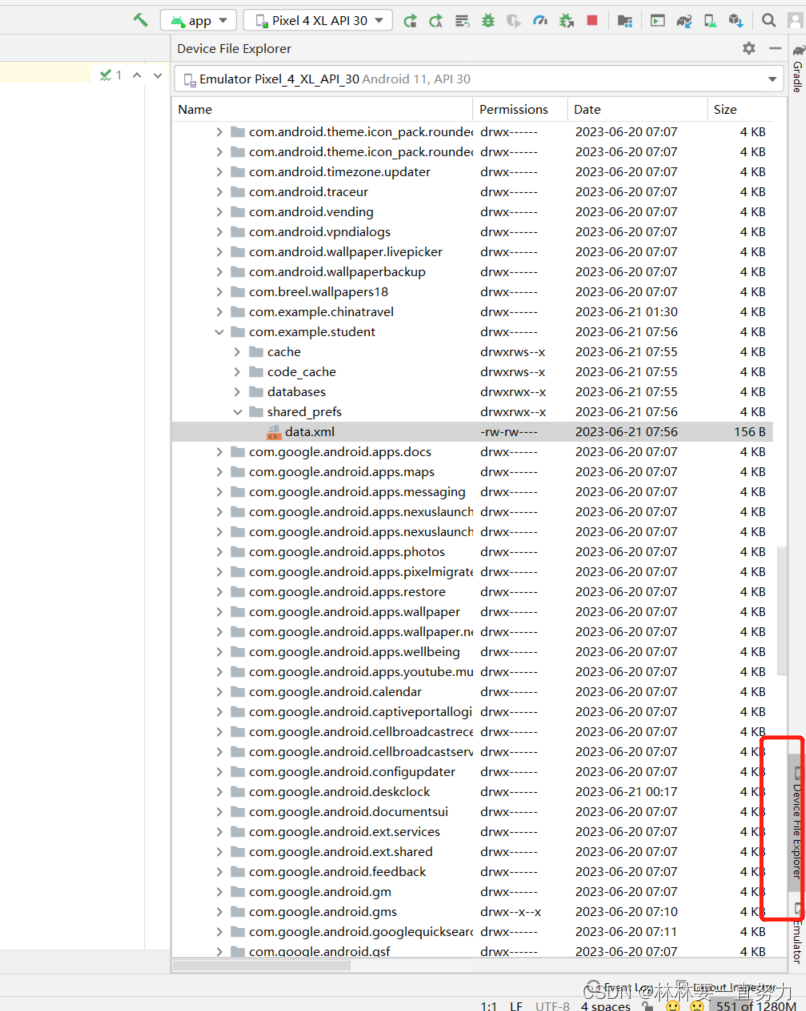
打开data/data/包名的文件夹

那么在shared_prefs这个文件夹下的文件就是SP的存储文件
打开看看吧:可以看到键值对存储的形式

接下来可以看一个简单的实例,界面使用的是之前实验的界面
XML代码如下:
<?xml version="1.0" encoding="utf-8"?>
<LinearLayout xmlns:android="http://schemas.android.com/apk/res/android"
    xmlns:app="http://schemas.android.com/apk/res-auto"
    android:layout_width="match_parent"
    android:layout_height="match_parent"
    android:background="#E6E6E6"
    android:orientation="vertical"
    android:padding="10dp">

    <ImageView
        android:layout_marginTop="100dp"
        android:id="@+id/imageView1"
        android:layout_width="140dp"
        android:layout_height="140dp"
        android:layout_centerHorizontal="true"
        android:layout_gravity="center_horizontal"
        android:scaleType="fitCenter"
        android:src="@drawable/a111"
        />
    <LinearLayout
        android:layout_width="match_parent"
        android:layout_height="wrap_content"
        android:layout_marginTop="15dp"
        android:background="@android:color/white"
        android:orientation="horizontal">
        <TextView
            android:layout_width="wrap_content"
            android:layout_height="wrap_content"
            android:padding="10dp"
            android:text="账号:"
            android:textColor="#000"
            android:textSize="20sp" />
        <EditText

            android:id="@+id/et_account"
            android:layout_width="match_parent"
            android:layout_height="wrap_content"
            android:layout_marginLeft="5dp"
            android:background="@null"
            android:padding="10dp" />
    </LinearLayout>
    <LinearLayout
        android:layout_width="match_parent"
        android:layout_height="wrap_content"
        android:layout_marginTop="10dp"
        android:background="@android:color/white"
        android:orientation="horizontal">
        <TextView
            android:id="@+id/tv_password"
            android:layout_width="wrap_content"
            android:layout_height="wrap_content"
            android:padding="10dp"
            android:text="密码:"
            android:textColor="#000"
            android:textSize="20sp" />
        <EditText
            android:id="@+id/et_password"
            android:layout_width="match_parent"
            android:layout_height="wrap_content"
            android:layout_marginLeft="5dp"
            android:background="@null"
            android:inputType="textPassword"
            android:padding="10dp" />
    </LinearLayout>

    <TextView
        android:layout_width="wrap_content"
        android:layout_height="wrap_content"
        android:text="选择功能"/>
    <LinearLayout
        android:layout_width="match_parent"
        android:layout_height="wrap_content"
        android:orientation="horizontal">

        <CheckBox

            android:layout_marginLeft="30dp"
            android:layout_width="wrap_content"
            android:layout_height="wrap_content"
            android:text="记住密码"
            android:id="@+id/cb1"/>
        <CheckBox
            android:layout_marginLeft="150dp"
            android:layout_width="wrap_content"
            android:layout_height="wrap_content"
            android:text="自动登录"
            android:id="@+id/cb2"/>
    </LinearLayout>

    <Button
        android:id="@+id/btn_login"
        android:layout_width="match_parent"
        android:layout_height="wrap_content"
        android:layout_marginTop="25dp"
        android:background="#3C8DC4"
        android:text="登录"
        android:textColor="@android:color/white"
        android:textSize="20sp" />

</LinearLayout>
逻辑代码如下:
import androidx.appcompat.app.AppCompatActivity;

import android.content.SharedPreferences;
import android.os.Bundle;
import android.view.View;
import android.widget.CheckBox;
import android.widget.EditText;
import android.widget.Toast;

public class MainActivity71 extends AppCompatActivity {
    CheckBox cb1;
    EditText account,password;
    SharedPreferences share;
    @Override
    protected void onCreate(Bundle savedInstanceState) {
        super.onCreate(savedInstanceState);
        setContentView(R.layout.activity_main71);
        //绑定控件
        cb1=findViewById(R.id.cb1);
        account=findViewById(R.id.et_account);
        password=findViewById(R.id.et_password);
        //在进入界面执行的时候,去调取名为data的SharedPreferences文件下的数据
        share = getSharedPreferences("data",MODE_PRIVATE);
        //给account password设置上次记住登录的值,share.getString方法是获取存储的String类型的值
        //两个参数,第一个参数是键值对的键,第二个参数是若没有数据则获取的默认数据
        account.setText(share.getString("account",""));
        password.setText(share.getString("password",""));

        //给登录按钮生成点击事件
        findViewById(R.id.btn_login).setOnClickListener(new View.OnClickListener() {
            @Override
            public void onClick(View v) {
                //如果记住密码多选框被选中则记住密码
                 if (cb1.isChecked()){
                    SharedPreferences.Editor edt = share.edit();
                    //保存一个键值对  键为account 值为输入的账号
                    edt.putString("account",account.getText().toString());
                    //保存一个键值对  键为password  值为输入的密码
                    edt.putString("password",password.getText().toString());
                    //提交修改  必须提交!否则不会保存
                    edt.commit();
                    Toast.makeText(MainActivity71.this,"登陆成功",Toast.LENGTH_SHORT).show();
                }

            }
        });
    }
}
显而易见在登录代码中,使用的就是SP的保存数据代码,需要用到Editor这个东东,而进入界面读取数据的则是使用的SP读取数据代码,不需要这个东东。
所以你必须甚至是记住这两个代码,所以说如果是开卷,这则是送分:
SP保存数据:
SharedPreferences share = getSharedPreferences("data",MODE_PRIVATE);
SharedPreferences.Editor edt = share.edit();
//保存一个键值对  键为account 值为输入的账号
edt.putString("account",account.getText().toString());
//保存一个键值对  键为password  值为输入的密码
edt.putString("password",password.getText().toString());
//提交修改  必须提交!否则不会保存
edt.commit();
SP读取数据:
SharedPreferences share = getSharedPreferences("data",MODE_PRIVATE);
SharedPreferences.Editor edt = share.edit();
//保存一个键值对  键为account 值为输入的账号
edt.putString("account",account.getText().toString());
//保存一个键值对  键为password  值为输入的密码
edt.putString("password",password.getText().toString());
//提交修改  必须提交!否则不会保存
edt.commit();
PS:如果没有勾选记住密码,使用保存数据的代码设置account、password为空“”即可(但不止这一个方法,应付期末用这个即可了)


 2437
2437


 被折叠的 条评论
为什么被折叠?
被折叠的 条评论
为什么被折叠?
 到【灌水乐园】发言


