


信用卡卡号识别项目实战
本项目通过模板匹配的方式 来对一张信用卡的卡号进行识别读取并在
原图中相应位置 展示出来
原理分析
1 对模板进行分割排序和标签标定
2 信用卡进行一系列处理后 得到相应位置的数字
3 将数字和模板进行 模板匹配 取最大值作为结果返还
4 将数字在相对位置画出
代码详解
import cv2 as cv


# 该函数将数字圈出并输出相应的数字
def draw_num(img, num, x, y, w, h):
	cv.rectangle(img, (x, y), (x + w, y + h), (0, 255, 0), 1, 8)
	cv.putText(img, str(num), (x, y), cv.FONT_HERSHEY_SIMPLEX, 0.65, (0, 255 ,0), 2)

	return img


# 模板的轮廓是无序的 该函数来对模板进行排序 x最小的为1  并返回排序后的轮廓的x,y,w,h
def sort_num(contours):
	rect_num = [(cv.boundingRect(i), i) for i in contours]

	sort_temp = sorted(rect_num, key=lambda x: x[0][0])

	sort_num = [i[0] for i in sort_temp]

	return sort_num


if __name__ == '__main__':
	img_temp = cv.imread(r'.\use_img\img_3.png')
	pre_img = cv.imread(r".\use_img\img.png")

	# 模板图像灰度化
	img_gray = cv.cvtColor(img_temp, cv.COLOR_BGR2GRAY)
	cv.imshow('img_gray', img_gray)
	# 模板图像二值化
	_, img_bin = cv.threshold(img_gray, 10, 255, cv.THRESH_BINARY_INV)
	cv.imshow('img_temp', img_bin)
	# 拿到模板的各个数字的轮廓
	contours, hierarchy = cv.findContours(img_bin, 0, 2)
	# 画出来看一下
	# cv.drawContours(img_temp, contours, -1, (0, 0, 255), 2, 8)
	# cv.imshow('img_contours', img_temp)

	# print(contours)
	对轮廓进行排序 并返回排序好的轮廓
	contours_sort = sort_num(contours)
	# print(contours_sort)
	对轮廓用字典进行标定其代表的数字 并且重置大小
	num_dict = {contours_sort.index(i) + 1: cv.resize(img_bin[i[1]:i[1] + i[3], i[0]:i[0] + i[2]], (50, 100)) for i in
				contours_sort}
	zero_coord = contours_sort[-1]
	num_dict[0] = cv.resize(
		img_bin[zero_coord[1]:zero_coord[1] + zero_coord[3], zero_coord[0]:zero_coord[0] + zero_coord[2]], (50, 100))


	# 图像处理  创建卷积核并且转换为灰度后高斯滤波
	rect_kernel = cv.getStructuringElement(cv.MORPH_RECT, (5, 12))
	pre_gray = cv.cvtColor(pre_img, cv.COLOR_BGR2GRAY)
	pre_gray = cv.GaussianBlur(pre_gray, (5, 5), 20)
	cv.imshow('gray', pre_gray)
	# 顶帽操作 突出更明亮的区域
	pre_tophat = cv.morphologyEx(pre_gray, cv.MORPH_TOPHAT, rect_kernel)
	cv.imshow('pre_tophat', pre_tophat)

	# 边缘检测 拿到图像

	pre_canny = cv.Canny(pre_tophat, 15, 200, apertureSize=3)
	pre_canny = cv.convertScaleAbs(pre_canny)
	cv.imshow('tes1', pre_canny)

	# print(pre_canny)
	# 闭运算
	close_kernel = cv.getStructuringElement(cv.MORPH_RECT, (55, 15))
	pre_close = cv.morphologyEx(pre_canny, cv.MORPH_CLOSE, close_kernel)
	cv.imshow('tes2', pre_close)

	# 找轮廓
	contours2, hierarchy2 = cv.findContours(pre_close, 0, 2)

	cv.imshow('cont_in_pre_img',cv.drawContours(pre_img.copy(), contours2, -1, (255, 0, 0), 5, 8))

	conts = []

	res_coor = []

	# 将符合待检测的轮廓添加到列表
	for i in contours2:
		x, y, w, h = cv.boundingRect(i)

		if 350 < y < 400:
			conts.append((x, y, w, h))

	# 拿到大块轮廓
	for i in conts:
		x, y, w, h = i
		test_img = pre_gray[y - 5:y + h + 5, x - 5:x + w + 5]

		# 大块轮廓二值化
		_, test_img_bin = cv.threshold(test_img, 200, 255, cv.THRESH_BINARY)
		conts_num, hierarchy3 = cv.findContours(test_img_bin, 0, 2)

		# 拿到大轮廓里的小轮廓 一个个数字
		for j in conts_num:
			# 这个是在大轮廓的坐标 不是在pre_img的坐标
			x1, y1, w1, h1 = cv.boundingRect(j)

			be_test = cv.resize(test_img_bin[y1:y1 + h1, x1:x1 + w1], (50, 100))

			score_temp = 0

			# 匹配并存储结果
			res = None
			for z in num_dict:
				score = cv.matchTemplate(be_test, num_dict[z], cv.TM_CCOEFF)
				if score > score_temp:
					res = z
					score_temp = score

			res_coor.append((res, (x + x1, y, w1, h1)))

	# 将结果和位置画在pre_img
	img = pre_img.copy()
	for i in res_coor:
		img = draw_num(img, i[0], *i[1])

	cv.imshow('res', img)
cv.waitKey(0)
cv.destroyAllWindows()
结果展示
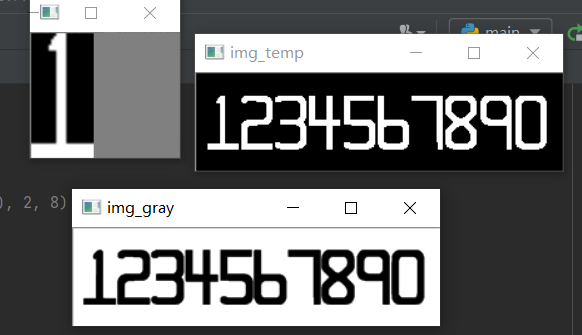
展示二值化后的模板和排序后的数字1的模板

灰度运算
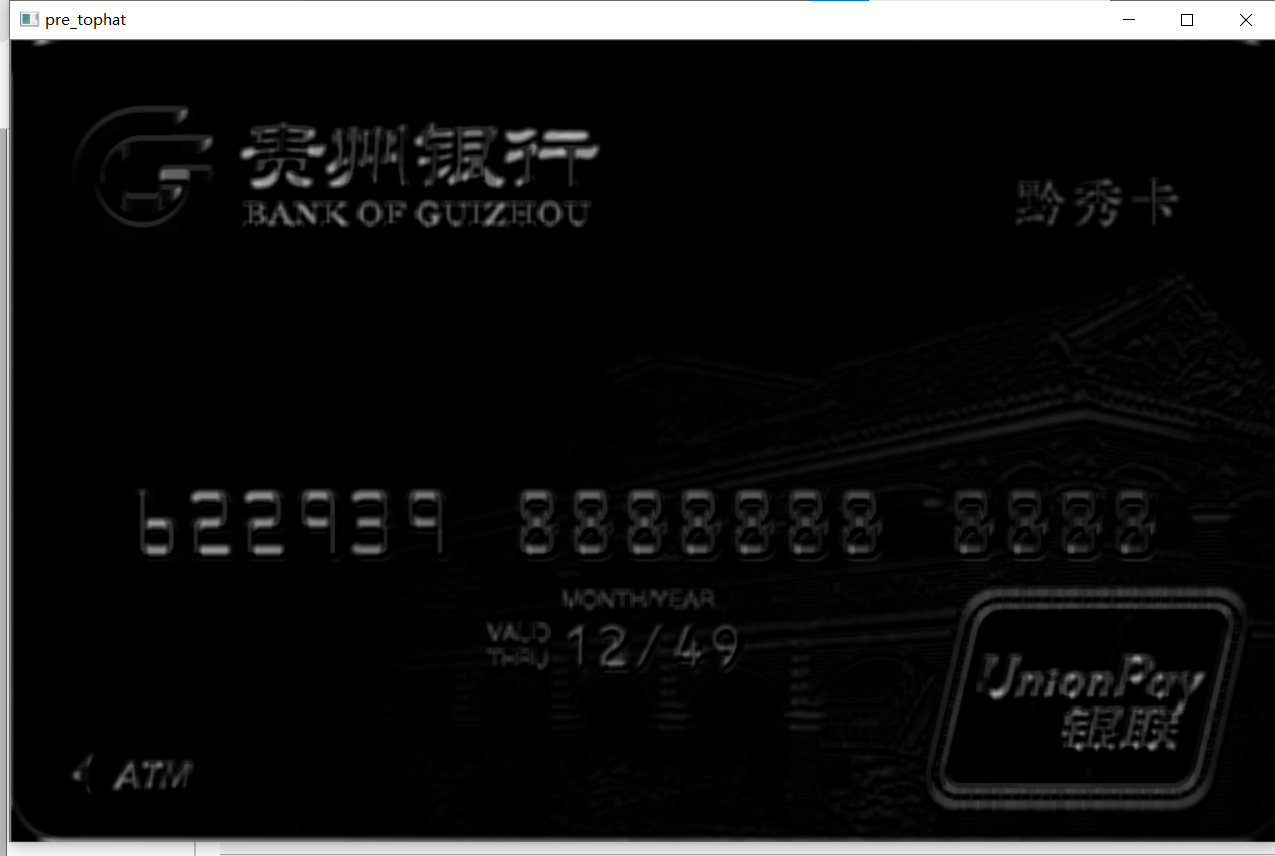
顶帽运算
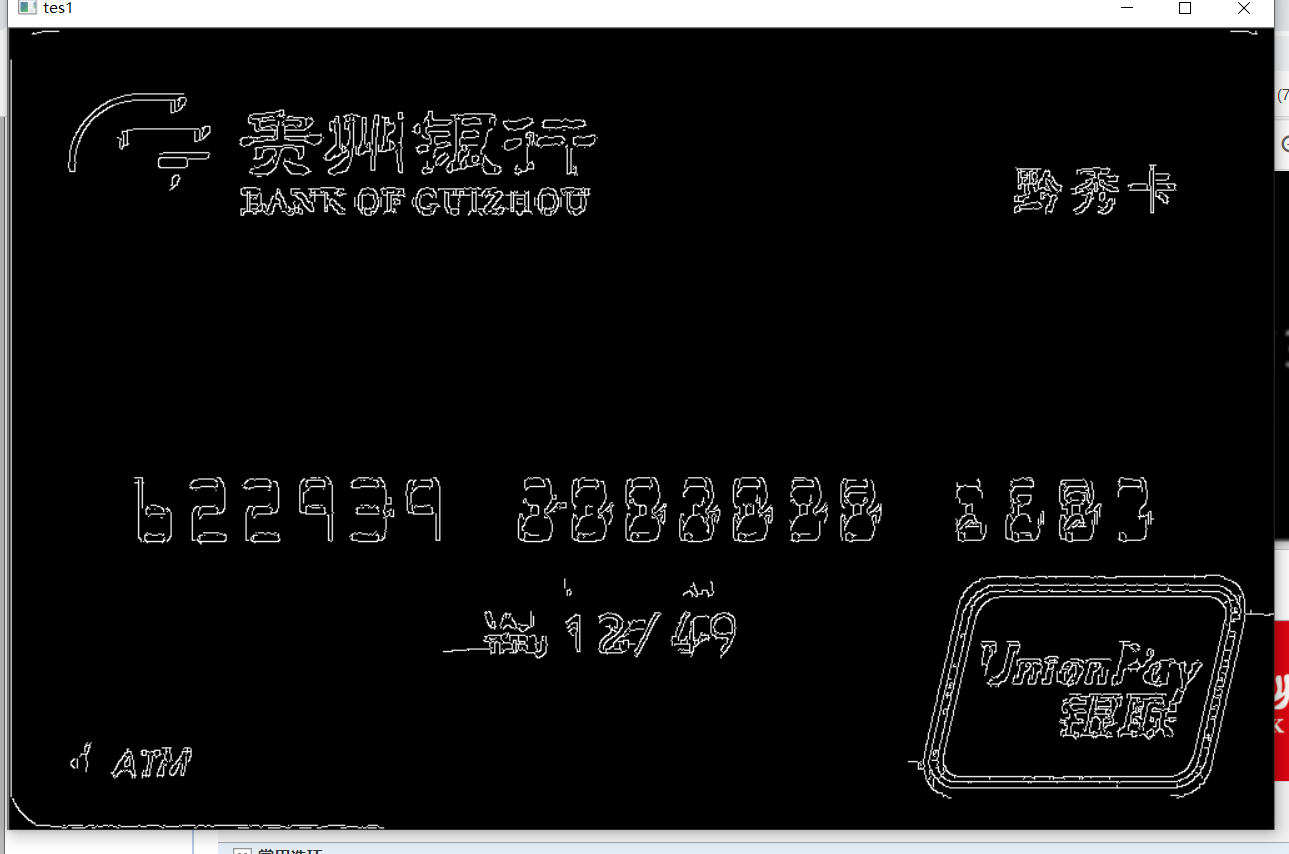
边缘检测

闭运算

轮廓

最终结果


 被折叠的 条评论
为什么被折叠?
被折叠的 条评论
为什么被折叠?
 到【灌水乐园】发言


