


第一步:
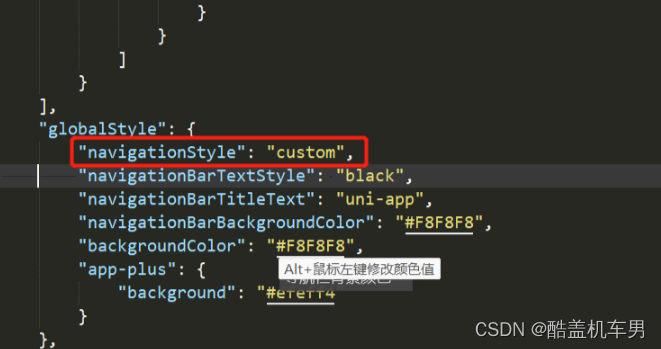
先在pages.json文件夹中设置:“navigationStyle”: “custom” (取消默认的原生导航栏)
下面是可以根据业务需求设置单页面自定义导航栏
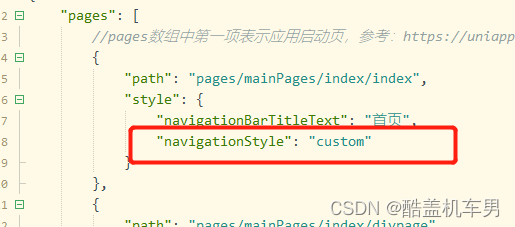
下面需求设置全体页面面自定义导航栏
第二步:将顶部状态栏自定义设置封装成组件提高组件复用性
这是一个组件,将顶部状态栏自定义设置封装成组件提高组件复用性(直接用就可以)
<template>
<view class="_navbar" :style="{ height:`${trStyle.height + trStyle.top + bottomEx}px`}">
<view class="_navbar_container" :style="{ height:`${trStyle.height}px`,top:`${trStyle.top}px` }">
<!-- @click="uni.navigateBack() 返回事件" -->
<view class="_navbar_back">
<i class="iconfont icon-arrow-left-bold" style="font-size:40rpx"></i>
<!-- 左边 -->
<view class="zuo">
<image src="../../static/ylogo.png" mode="" class="img"></image>
</view>
<!-- <view class="" style="width: 50rpx;height: 50rpx;">
<image src="" style="width: 100%;height: 100%;" mode=""></image>
</view> -->
</view>
<!-- 标题 -->
<view :style="{ height:`${trStyle.height }px`,lineHeight:`${trStyle.height }px` }" class="_navbar_title"> {{ title }}</view>
</view>
</view>
</template>
<script>
export default{
name:"Navbar",
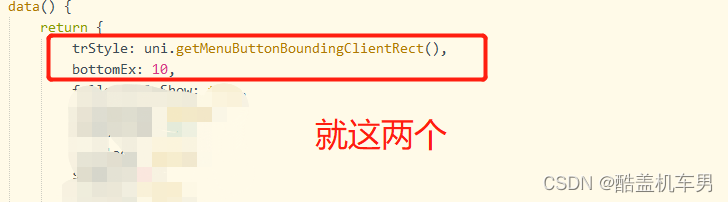
data(){
return {
trStyle:uni.getMenuButtonBoundingClientRect(),
background :'transparent',
bottomEx:10,
}
},
mounted(){
uni.$on('pageScroll',top => {
let parentRoute = this.$parent.$scope.route
let pages = getCurrentPages()
let page = pages[pages.length - 1]
let currentRoute = page.route
if(parentRoute === currentRoute){
this.$nextTick(()=>{
if(top === 0) this.background = 'transparent'
else if(top > this.trStyle.height + this.trStyle.top + this.bottomEx) this.background = '#2D248B'
else this.background = `rgba(#2D248B, ${ top/this.trStyle.height + this.trStyle.top + this.bottomEx })`
})
}
})
},
beforeUnmount(){
uni.$off('pageScroll')
},
props:{
back:{
type:Boolean,
default:true,
},
title:{
type:String,
default:'这是个名字'
}
},
}
</script>
<style lang="scss">
._navbar{
width:750rpx;
position:fixed;
z-index:10000;
transition:all 0.2s linear;
background: #fff;
border-bottom: 1rpx solid rgba(226,226,226,1);
margin-bottom: 35rpx;
._navbar_container{
width:750rpx;
position:absolute;
padding: 0 30rpx;
box-sizing: border-box;
left:0;
bottom:0;
._navbar_back{
width: 100rpx;
.img{
width: 52rpx;
height: 52rpx;
}
color:#000;
height:100%;
font-size:40rpx;
//margin-left:20rpx;
cursor:pointer;
}
._navbar_title{
position:absolute;
left:50%;
top:0rpx;
height:100%;
transform:translateX(-50%);
font-size:30rpx;
font-family: 'my-font';
font-weight: 600;
color:#000;
}
}
}
</style>
第三部 将组件引入页面中
把组件引入保持在最上方 必须放第一行 (两个图都是一个页面,哪里用就在哪里写)

注:只是为了后续自己方便用,方便自己也方便他人


 8128
8128


 被折叠的 条评论
为什么被折叠?
被折叠的 条评论
为什么被折叠?
 到【灌水乐园】发言


