


在微信小程序中,自定义组件是一种将页面的一部分功能封装起来,以便在多个页面中复用的机制。以下详细介绍自定义组件的构建和使用方法,并提供一个简单案例。
1. 构建自定义组件
- 创建组件目录:在项目的
components目录下(也可以是其他目录,但是建议放在components目录下以便管理),创建一个新的文件夹,例如my - component,用于存放组件的相关文件。 - 创建组件文件:在
my - component文件夹中,创建四个文件:my - component.wxml(组件的结构文件)、my - component.wxss(组件的样式文件)、my - component.js(组件的逻辑文件)和my - component.json(组件的配置文件)。
项目结构如下:
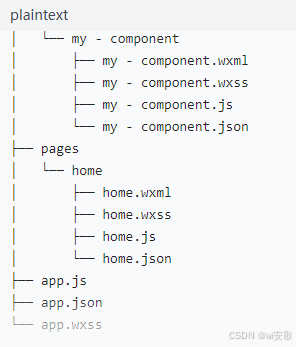
my - component.json
在 my - component.json 文件中,将 component 字段设置为 true,以表明这是一个自定义组件。
{
  "component": true
}
my - component.wxml
编写组件的结构,例如一个简单的包含文本和按钮的组件:
<view class="component-container">
  <text>{{message}}</text>
  <button bindtap="handleClick">点击我</button>
</view>
my - component.wxss
编写组件的样式:
.component-container {
  padding: 20px;
  background-color: #f0f0f0;
  text-align: center;
}
my - component.js
编写组件的逻辑,定义数据和方法:
Component({
  // 组件的属性列表
  properties: {
    message: {
      type: String,
      value: '默认消息'
    }
  },
  // 组件的初始数据
  data: {

  },
  // 组件的方法列表
  methods: {
    handleClick() {
      this.triggerEvent('customEvent', { data: '点击事件的数据' });
    }
  }
});
2. 使用自定义组件
(1)在页面中引入组件:在需要使用组件的页面的 json 文件中,引入自定义组件。例如在 pages/home/home.json 中:
{
  "usingComponents": {
    "my - component": "/components/my - component/my - component"
  }
}
这里的路径是自定义组件的相对路径。
(2)在页面的 wxml 文件中使用组件:在 pages/home/home.wxml 文件中使用组件,并可以传递属性:
<view class="page-container">
  <my - component message="来自页面的消息" bindcustomEvent="handleComponentEvent"></my - component>
</view>
(3)在页面的 js 文件中处理组件事件:在 pages/home/home.js 文件中定义处理组件事件的方法:
Page({
  handleComponentEvent(e) {
    console.log('接收到组件的事件数据:', e.detail.data);
  }
});
通过以上步骤,你可以在微信小程序中构建和使用自定义组件,实现代码的复用和更好的组件化开发。
3、data数据应该如何定义和修改
在微信小程序的自定义组件中,data 用于存储组件的内部数据,这些数据的变化会引起组件视图的更新。
定义 data
在组件的 js 文件中,通过 Component 构造器的 data 属性来定义组件的初始数据。例如,在 my - component.js 文件中:
Component({
  // 组件的属性列表
  properties: {
    // 这里定义属性
  },
  // 组件的初始数据
  data: {
    count: 0,
    message: '这是一条初始消息',
    isLoading: false
  },
  // 组件的方法列表
  methods: {
    // 这里定义方法
  }
});在上述代码中,data 对象中定义了三个初始数据:count(数字类型)、message(字符串类型)和 isLoading(布尔类型)。
修改 data
1. 在组件内部方法中修改
可以在组件的自定义方法中通过 this.setData 方法来修改 data 中的数据。setData 方法会将新的数据与原有的数据进行合并,然后触发视图更新。例如,在 my - component.js 中添加一个方法来修改 count 和 message:
Component({
  properties: {
  },
  data: {
    count: 0,
    message: '这是一条初始消息',
    isLoading: false
  },
  methods: {
    updateData() {
      this.setData({
        count: this.data.count + 1,
        message: '消息已更新'
      });
    }
  }
});在上述代码中,updateData 方法通过 this.setData 方法将 count 加 1,并更新了 message 的值。当调用这个方法时,组件的视图会根据新的数据进行更新。
2. 根据属性变化修改
当组件的属性发生变化时,可以在 observers 中监听属性的变化,并相应地修改 data。例如,假设组件有一个 newMessage 属性,当这个属性变化时,更新 message:
Component({
  properties: {
    newMessage: {
      type: String,
      value: ''
    }
  },
  data: {
    count: 0,
    message: '这是一条初始消息',
    isLoading: false
  },
  observers: {
    'newMessage': function(newValue) {
      this.setData({
        message: newValue
      });
    }
  },
  methods: {
    updateData() {
      this.setData({
        count: this.data.count + 1
      });
    }
  }
});在上述代码中,observers 监听了 newMessage 属性的变化,当 newMessage 变化时,会自动更新 data 中的 message。
3. 响应事件修改
在组件的事件处理函数中,也可以根据用户的操作来修改 data。例如,在 my - component.wxml 中有一个按钮,点击按钮时修改 isLoading:
<view class="component-container">
  <button bindtap="startLoading">开始加载</button>
  <text wx:if="{{isLoading}}">加载中...</text>
</view>
在 my - component.js 中定义 startLoading 方法:
Component({
  properties: {
  },
  data: {
    count: 0,
    message: '这是一条初始消息',
    isLoading: false
  },
  methods: {
    startLoading() {
      this.setData({
        isLoading: true
      });
    }
  }
});当用户点击按钮时,startLoading 方法会被调用,从而将 isLoading 设置为 true,视图中会显示 “加载中...”。
总结来说,在微信小程序自定义组件中,定义 data 是在 Component 构造器的 data 属性中进行,而修改 data 则主要通过 this.setData 方法,并且可以在不同的场景下(如内部方法、属性变化、事件响应)进行灵活修改。


 4211
4211

 被折叠的 条评论
为什么被折叠?
被折叠的 条评论
为什么被折叠?
 到【灌水乐园】发言


