


python-windows本地快速体验ChatGLM2-6B-int预训练模型(和修改python安装包路径)
先说结论
20分钟出来一句话,期间,内存使用50%左右,cpu使用率85%
电脑配置
电脑环境:4cpu16g
配置PYTHON环境
修改python安装包路径:https://blog.csdn.net/qq_27466827/article/details/131163026
pip3 install torch torchvision torchaudio -i https://mirrors.aliyun.com/pypi/simple/
pip install transformers sentencepiece
pip install rouge_chinese cpm_kernels
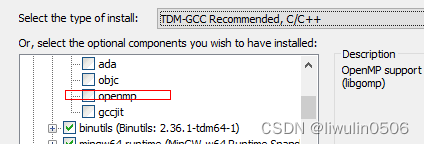
配置GCC环境
TDM-GCC 10.3.0 下载https://jmeubank.github.io/tdm-gcc/download/
这里注意,安装时候,要选择openmp
下载模型文件
清华云盘下载
云盘下载:https://cloud.tsinghua.edu.cn/d/674208019e314311ab5c/?p=%2Fchatglm2-6b-int4&mode=list
代码下载
#执行不成功,多执行几次就可以了
from huggingface_hub import snapshot_download
import sys

repo_id = "THUDM/chatglm2-6b"
local_dir = "/opt/models/chatglm2-6b/"
local_dir_use_symlinks = False
revision = "main"
snapshot_download(repo_id=repo_id,
                local_dir=local_dir,
                local_dir_use_symlinks=local_dir_use_symlinks,
                revision=revision)
报脸下载
https://hf-mirror.com/THUDM/chatglm2-6b-int4
直接命令行体验
打卡cmd窗口依次输入如下命令,快速体验

python
from transformers import AutoTokenizer, AutoModel
tokenizer = AutoTokenizer.from_pretrained("G://glm2-int4", trust_remote_code=True)
model = AutoModel.from_pretrained("G://glm2-int4",trust_remote_code=True).float()
model = model.eval()
response, history = model.chat(tokenizer, "晚上睡不着应该怎么办", history=[])
print(response)
>>> tokenizer = AutoTokenizer.from_pretrained("D:\\jpdir\\localKnow\\models\\chatglm2-6b-int4\\chatglm2-6b-int4", trust_remote_code=True,revision="v1.1.0")
>>> model = AutoModel.from_pretrained("D:\\jpdir\\localKnow\\models\\chatglm2-6b-int4\\chatglm2-6b-int4", trust_remote_code=True,revision="v1.1.0").float()
>>> model = model.eval()
>>> response, history = model.chat(tokenizer, "你好", history=[])
>>> print(response)
你好👋!我是人工智能助手 ChatGLM2-6B,很高兴见到你,欢迎问我任何问题。
>>> response, history = model.chat(tokenizer, "晚上睡不着应该怎么办", history=history)
运行webui体验
修改代码
	tokenizer = AutoTokenizer.from_pretrained("D:\\jpdir\\localKnow\\models\\chatglm2-6b-int4\\chatglm2-6b-int4", trust_remote_code=True,revision="v1.1.0")
	model = AutoModel.from_pretrained("D:\\jpdir\\localKnow\\models\\chatglm2-6b-int4\\chatglm2-6b-int4", trust_remote_code=True,revision="v1.1.0").float()
	model = model.eval()
下载好代码后,有如下两个ui:
web_demo.py
web_demo2.py
我运行第一个报错了
运行第二个没有问题了,运行命令是streamlit run web_demo2.py

遇到的问题
- Windows下CPU部署chatglm-6b-int4报错“Could not find module ‘nvcuda.dll’”等
Explicitly passing a
revisionis encouraged when loading a model with custom code to ensure no malicious code has been contributed in a newer revision.
Explicitly passing arevisionis encouraged when loading a configuration with custom code to ensure no malicious code has been contributed in a newer revision.
Explicitly passing arevisionis encouraged when loading a model with custom code to ensure no malicious code has been contributed in a newer revision.
Failed to load cpm_kernels:Could not find module ‘nvcuda.dll’. Try using the full path with constructor syntax.
Load parallel cpu kernel failed C:\Users\xxx.cache\huggingface\modules\transformers_modules\chatglm2-6b-int4\quantization_kernels_parallel.so: Traceback (most recent call last):
File “C:\Users\l84196432/.cache\huggingface\modules\transformers_modules\chatglm2-6b-int4\quantization.py”, line 148, in init
kernels = ctypes.cdll.LoadLibrary(kernel_file)
File “D:\ProgramData\miniconda3\envs\glm\lib\ctypes_init_.py”, line 447, in LoadLibrary
return self.dlltype(name)
File "D:\ProgramData\miniconda3\envs\glm\lib\ctypes_init.py", line 369, in init
self._handle = _dlopen(self._name, mode)
FileNotFoundError: Could not find module ‘C:\Users\xxx.cache\huggingface\modules\transformers_modules\chatglm2-6b-int4\quantization_kernels_parallel.so’. Try using the full path with constructor syntax.
解决参考:https://github.com/THUDM/ChatGLM-6B/issues/166。
需要注意的是,解决方案中的quantization.py文件是下载模型后的目录中,因此需要到模型目录去修改,没有在代码目录。
另外,在cpu运行时,这个报错不会影响对话。
参考链接
项目地址:https://github.com/THUDM/ChatGLM2-6B
微调教程:heywhale.com/mw/project/64984a7b72ebe240516ae79c
参考文章:https://zhuanlan.zhihu.com/p/633445989?utm_id=0


 被折叠的 条评论
为什么被折叠?
被折叠的 条评论
为什么被折叠?
 到【灌水乐园】发言


