


 本文详细介绍了Spring容器在创建Bean时如何处理循环依赖的问题,通过`doCreateBean`方法解析Bean的创建过程,强调了`resolveValueIfNecessary`在解决依赖中的关键作用,特别是对`RuntimeBeanReference`的处理,确保了Bean的正确初始化。
                    singletonObject = singletonFactory.getObject();
                    this.earlySingletonObjects.put(beanName, singletonObject);
                    this.singletonFactories.remove(beanName);
                }
            }
        }
    }

    return singletonObject;
}
从三面的源码发现,如果a第一次获取,那么第9行的if语句为false,将直接放回为null,这时回到创建对象**doCreateBean()**方法,该方法使用反射的方式生成a对象,并且**该对象在三级缓存**中,对象生成后就需要对a对象进行属性填充:
1 protected Object doCreateBean(String beanName, RootBeanDefinition mbd, @Nullable Object[] args) throws BeanCreationException {
2 // 省略多行代码,大致就是调用各种方法,通过反射创建对象
3 try {
4 // a对象创建完成,调用属性填充方法,对a进行属性填充
5 this.populateBean(beanName, mbd, instanceWrapper);
6 exposedObject = this.initializeBean(beanName, exposedObject, mbd);
7 } catch (Throwable var18) {
8 if (var18 instanceof BeanCreationException && beanName.equals(((BeanCreationException)var18).getBeanName())) {
9 throw (BeanCreationException)var18;
10 }
11
12 throw new BeanCreationException(mbd.getResourceDescription(), beanName, “Initialization of bean failed”, var18);
13 }
14
15 if (earlySingletonExposure) {
16 Object earlySingletonReference = this.getSingleton(beanName, false);
17 if (earlySingletonReference != null) {
18 // 省略多行代码
19 }
20 }
22 // 省略多行代码
23 }
在上面代码**doCreateBean()**方法中先创建a对象,创建完成后会调用**this.populateBean(beanName, mbd, instanceWrapper)**方法对a进行属性填出,这个时候会获取配置文件中所有<bean id="a">里面的所有属性,发现会存在一个b属性,下面贴出部分源码
protected void populateBean(String beanName, RootBeanDefinition mbd, @Nullable BeanWrapper bw) {
if (bw == null) {
if (mbd.hasPropertyValues()) {
throw new BeanCreationException(mbd.getResourceDescription(), beanName, “Cannot apply property values to null instance”);
}
} else {
boolean continueWithPropertyPopulation = true;
if (!mbd.isSynthetic() && this.hasInstantiationAwareBeanPostProcessors()) {
// 删除大量代码
}
        if (continueWithPropertyPopulation) {
            // 删除大量源代码,applyPropertyValues方法中beanName为a,pvs为状态各种属性的PropertyValues对象,pvs就装有b这个属性
            if (pvs != null) {
                this.applyPropertyValues(beanName, mbd, bw, (PropertyValues)pvs);
            }

        }
    }
}
继续跟进applyPropertyValues方法的源码
protected void applyPropertyValues(String beanName, BeanDefinition mbd, BeanWrapper bw, PropertyValues pvs) {
if (!pvs.isEmpty()) {
if (System.getSecurityManager() != null && bw instanceof BeanWrapperImpl) {
((BeanWrapperImpl)bw).setSecurityContext(this.getAccessControlContext());
}
MutablePropertyValues mpvs = null;
List original;
if (pvs instanceof MutablePropertyValues) {
// 省略大量代码
} else {
original = Arrays.asList(pvs.getPropertyValues());
}
// 省略大量代码 大致过程是将属性对象pvs 转化成original List对象,然后在使用迭代器在下面进行迭代
Iterator var11 = original.iterator();
while(true) {
while(var11.hasNext()) {
PropertyValue pv = (PropertyValue)var11.next();
if (pv.isConverted()) {
deepCopy.add(pv);
} else {
String propertyName = pv.getName();
Object originalValue = pv.getValue();
// 通过下面方法解决依赖的b,整个方法在迭代器中,外层在while(true)中,可能有多个属性,循环直到所有属性都解决了就return;或者抛出异常
Object resolvedValue = valueResolver.resolveValueIfNecessary(pv, originalValue);
// 省略大量代码
}
}
            if (mpvs != null && !resolveNecessary) {
                mpvs.setConverted();
            }

            try {
                bw.setPropertyValues(new MutablePropertyValues(deepCopy));
                return;
            } catch (BeansException var19) {
                throw new BeanCreationException(mbd.getResourceDescription(), beanName, "Error setting property values", var19);
            }
        }
    }
}
继续跟进上面红色方法
public Object resolveValueIfNecessary(Object argName, @Nullable Object value) {
if (value instanceof RuntimeBeanReference) {
RuntimeBeanReference ref = (RuntimeBeanReference)value;
return this.resolveReference(argName, ref);
} else if (value instanceof RuntimeBeanNameReference) {
// 省略多行代码
}
// 省略多行代码
}
继续跟进红色部分的代码
private Object resolveReference(Object argName, RuntimeBeanReference ref) {
try {
String refName = ref.getBeanName();
refName = String.valueOf(this.doEvaluate(refName));
Object bean;
if (ref.isToParent()) {
// 省略多行代码
} else {
// 通过refName的值b又去工厂找b对象
bean = this.beanFactory.getBean(refName);
this.beanFactory.registerDependentBean(refName, this.beanName);
}
        // 省略多行代码
        return bean;
    } catch (BeansException var5) {
        throw new BeanCreationException(this.beanDefinition.getResourceDescription(), this.beanName, "Cannot resolve reference to bean '" + ref.getBeanName() + "' while setting " + argName, var5);
    }
}
1 public Object getBean(String name) throws BeansException {
2 return this.doGetBean(name, (Class)null, (Object[])null, false);
3 }
protected <T> T doGetBean(String name, @Nullable Class<T> requiredType, @Nullable Object[] args, boolean typeCheckOnly) throws BeansException {
    String beanName = this.transformedBeanName(name);
    // 跟了这么就,最终表明在实例化a对象后,在装载a的属性b时,会经过各种校验最终到getSingleton(),及先获取b对象,如果b对象不存在则会对b完成创建的过程
    Object sharedInstance = this.getSingleton(beanName);
    // 省略多行代码
}
## 言尽于此,完结
无论是一个初级的 coder,高级的程序员,还是顶级的系统架构师,应该都有深刻的领会到设计模式的重要性。
* 第一,设计模式能让专业人之间交流方便,如下:
程序员A:这里我用了XXX设计模式
程序员B:那我大致了解你程序的设计思路了
* 第二,易维护
项目经理:今天客户有这样一个需求…
程序员:明白了,这里我使用了XXX设计模式,所以改起来很快
* 第三,设计模式是编程经验的总结
程序员A:B,你怎么想到要这样去构建你的代码
程序员B:在我学习了XXX设计模式之后,好像自然而然就感觉这样写能避免一些问题
* 第四,学习设计模式并不是必须的
程序员A:B,你这段代码使用的是XXX设计模式对吗?
程序员B:不好意思,我没有学习过设计模式,但是我的经验告诉我是这样写的
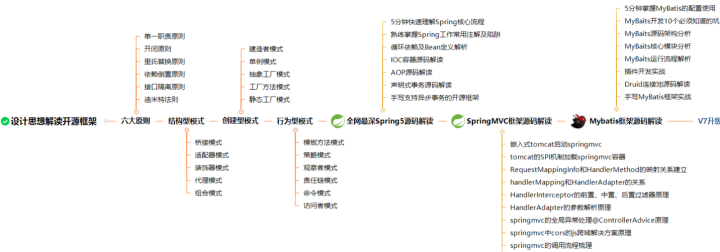
从设计思想解读开源框架,一步一步到Spring、Spring5、SpringMVC、MyBatis等源码解读,我都已收集整理全套,篇幅有限,这块只是详细的解说了23种设计模式,整理的文件如下图一览无余!
[**资料领取方式:点击这里下载**](https://gitee.com/vip204888/java-p7)

pring、Spring5、SpringMVC、MyBatis等源码解读,我都已收集整理全套,篇幅有限,这块只是详细的解说了23种设计模式,整理的文件如下图一览无余!
[**资料领取方式:点击这里下载**](https://gitee.com/vip204888/java-p7)
[外链图片转存中...(img-pGXaOeJ0-1628283832473)]
搜集费时费力,能看到此处的都是真爱!


 3084
3084

 被折叠的 条评论
为什么被折叠?
被折叠的 条评论
为什么被折叠?
 到【灌水乐园】发言


