


先自我介绍一下,小编浙江大学毕业,去过华为、字节跳动等大厂,目前在阿里
深知大多数程序员,想要提升技能,往往是自己摸索成长,但自己不成体系的自学效果低效又漫长,而且极易碰到天花板技术停滞不前!
因此收集整理了一份《2024年最新Linux运维全套学习资料》,初衷也很简单,就是希望能够帮助到想自学提升又不知道该从何学起的朋友。
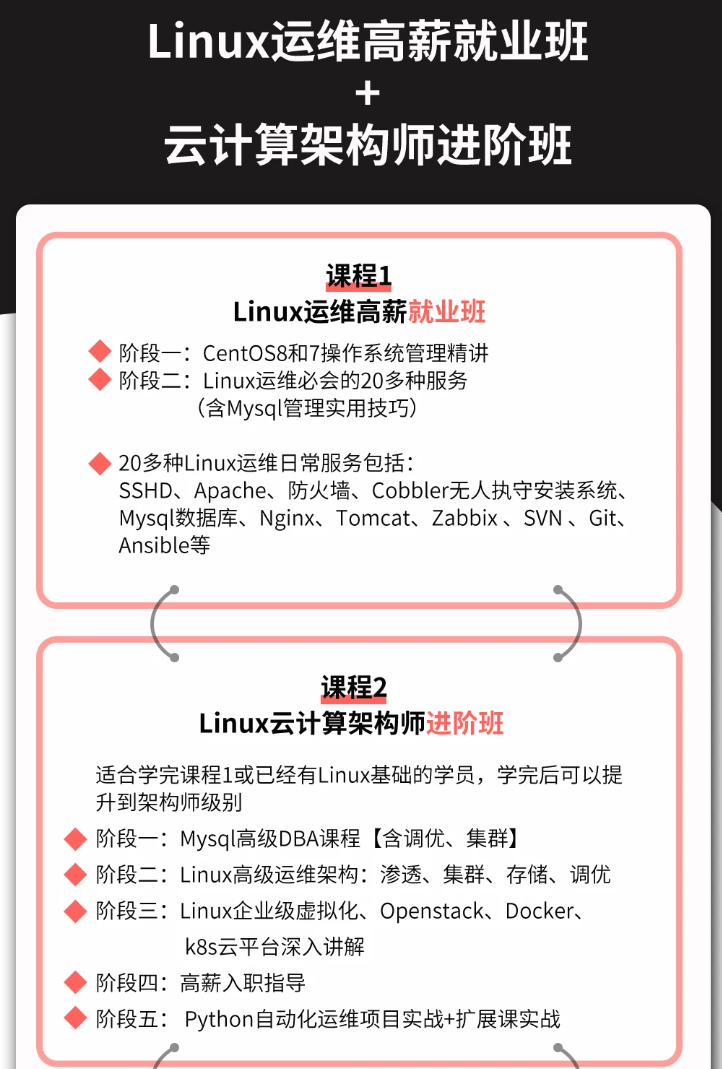


既有适合小白学习的零基础资料,也有适合3年以上经验的小伙伴深入学习提升的进阶课程,涵盖了95%以上运维知识点,真正体系化!
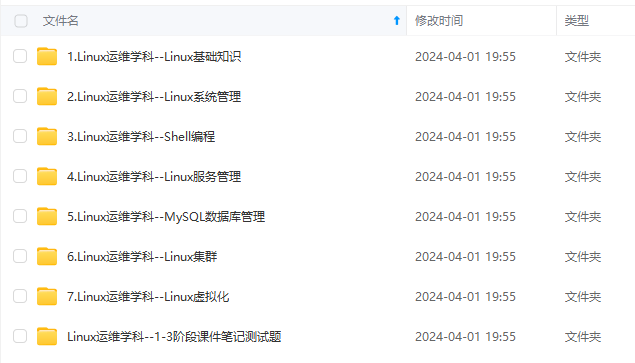
由于文件比较多,这里只是将部分目录截图出来,全套包含大厂面经、学习笔记、源码讲义、实战项目、大纲路线、讲解视频,并且后续会持续更新
1.通过YUM安装Ansible
[root@localhost ~]# rm -f /etc/yum.repos.d/*        #删除yum本地库
[root@localhost ~]# vi /etc/yum.repos.d/local.repo
[root@localhost ~]# cat /etc/yum.repos.d/local.repo    #创建yum本地仓库
[local]
name=local
baseurl=file:///mnt
gpgcheck=0
[root@localhost ~]# yum -y install ansible        #安装ansible
2.验证安装结果
[root@localhost ~]# ansible --version
ansible 2.3.1.0
  config file = /etc/ansible/ansible.cfg
  configured module search path = Default w/o overrides
  python version = 2.7.5 (default, Nov  6 2016, 00:28:07) [GCC 4.8.5 20150623 (Red Hat 4.8.5-11)]
3.创建SSH免交互登录
[root@localhost ~]# ssh-keygen -t rsa            #生成密钥对
Generating public/private rsa key pair.
Enter file in which to save the key (/root/.ssh/id_rsa):    #密钥对存放路径
Created directory '/root/.ssh'.
#输入私钥保护密码,直接Enter键表示无密码
Enter passphrase (empty for no passphrase):
Enter same passphrase again:                                    #再次输入
Your identification has been saved in /root/.ssh/id_rsa.
Your public key has been saved in /root/.ssh/id_rsa.pub.
The key fingerprint is:
bb:9a:1a:a0:f4:46:e8:cd:57:94:61:27:1a:79:19:7d root@localhost.localdomain
The key's randomart image is:
+--[ RSA 2048]----+
|     ..=+.       |
|     .+o=. E     |
|     ..o  .      |
|  .   .          |
| o..   .S        |
|o.=.  .  .       |
|.. =..  .        |
|  . .. . .       |
|    ..o..        |
+-----------------+
4.将密钥对复制到你要免密的服务器上
[root@localhost ~]# ssh-copy-id root@192.168.2.2            #将密钥对复制到192.168.2.2服务器
The authenticity of host '192.168.2.2 (192.168.2.2)' can't be established.
ECDSA key fingerprint is 78:fe:b4:ad:7d:20:29:d4:e4:33:f8:f8:9e:a1:37:c7.
Are you sure you want to continue connecting (yes/no)? yes
/usr/bin/ssh-copy-id: INFO: attempting to log in with the new key(s), to filter out any that are already installed
/usr/bin/ssh-copy-id: INFO: 1 key(s) remain to be installed -- if you are prompted now it is to install the new keys
root@192.168.2.2's password:

Number of key(s) added: 1

Now try logging into the machine, with:   "ssh 'root@192.168.2.2'"
and check to make sure that only the key(s) you wanted were added.

[root@localhost ~]# ssh-copy-id root@192.168.2.3        #将密钥对复制到192.168.2.3服务器马上
The authenticity of host '192.168.2.3 (192.168.2.3)' can't be established.
ECDSA key fingerprint is 92:38:19:c6:28:50:1b:f5:60:5f:04:54:8d:2c:27:81.
Are you sure you want to continue connecting (yes/no)? yes
/usr/bin/ssh-copy-id: INFO: attempting to log in with the new key(s), to filter out any that are already installed
/usr/bin/ssh-copy-id: INFO: 1 key(s) remain to be installed -- if you are prompted now it is to install the new keys
root@192.168.2.3's password:

Number of key(s) added: 1

Now try logging into the machine, with:   "ssh 'root@192.168.2.3'"
and check to make sure that only the key(s) you wanted were added.

[root@localhost ~]# ssh 192.168.2.2        #实现免密码登录192.168.2.2
Last login: Fri Sep  9 13:36:18 2022 from 192.168.2.88
[root@localhost ~]# exit                    #退出192.168.2.2服务器
登出
Connection to 192.168.2.2 closed.
[root@localhost ~]# ssh 192.168.2.3        #实现免密码登录192.168.2.3
Last login: Fri Sep  9 13:36:43 2022 from 192.168.2.88
[root@localhost ~]# exit                    #退出192.168.2.3服务器
登出
Connection to 192.168.2.3 closed.
三,Ansible配置
Ansible通过将设备列表以分组的方式添加到/etc/ansible/hosts文件来实现对设备的管理,所有在正式管理之前,首先要编写hosts文件。另外,hosts文件还支持通配符。
[root@localhost ~]# vi /etc/ansible/hosts
[web]
192.168.2.2
192.168.2.3
1.只对web组中192.168.2.2主机操作。通过–limit参数限定主机的变更。
[root@localhost ~]# ansible web -m command -a "systemctl status firewalld" --limit "192.168.2.2"
192.168.2.2 | SUCCESS | rc=0 >>
● firewalld.service - firewalld - dynamic firewall daemon
   Loaded: loaded (/usr/lib/systemd/system/firewalld.service; disabled; vendor preset: enabled)
   Active: active (running) since 五 2022-09-09 16:02:44 GMT; 3s ago
     Docs: man:firewalld(1)
 Main PID: 9675 (firewalld)
   CGroup: /system.slice/firewalld.service
           └─9675 /usr/bin/python -Es /usr/sbin/firewalld --nofork --nopid

9月 09 16:02:44 localhost.localdomain systemd[1]: Starting firewalld - dynamic firewall daemon...
9月 09 16:02:44 localhost.localdomain systemd[1]: Started firewalld - dynamic firewall daemon.
2.只对192.168.2.3主机操作,通过ip限定主机的变更。
[root@localhost ~]# ansible 192.168.2.3 -m command -a "systemctl status httpd"
192.168.2.3 | FAILED | rc=4 >>
Unit httpd.service could not be found.
3.只对192.168.2.0网段主机操作。通过通配符限定主机的变更。
[root@localhost ~]# ansible 192.168.2.* -m command -a "systemctl status firewalld"
192.168.2.3 | FAILED | rc=3 >>
● firewalld.service - firewalld - dynamic firewall daemon
   Loaded: loaded (/usr/lib/systemd/system/firewalld.service; disabled; vendor preset: enabled)
   Active: inactive (dead)
     Docs: man:firewalld(1)

192.168.2.2 | SUCCESS | rc=0 >>
● firewalld.service - firewalld - dynamic firewall daemon
   Loaded: loaded (/usr/lib/systemd/system/firewalld.service; disabled; vendor preset: enabled)
   Active: active (running) since 五 2022-09-09 16:02:44 GMT; 7min ago
     Docs: man:firewalld(1)
 Main PID: 9675 (firewalld)
   CGroup: /system.slice/firewalld.service
           └─9675 /usr/bin/python -Es /usr/sbin/firewalld --nofork --nopid

9月 09 16:02:44 localhost.localdomain systemd[1]: Starting firewalld - dynamic firewall daemon...
9月 09 16:02:44 localhost.localdomain systemd[1]: Started firewalld - dynamic firewall daemon.
四,Ansible命令
Ansible的维护命令大多以ansable开头,在终端输入ansable后连续按两次Tab键,会补全所有以ansible字母开头的命令,下面介绍Ansible的一些常见命令
[root@localhost ~]# ansible
ansible               ansible-console       ansible-doc-2         ansible-galaxy-2.7    ansible-pull          ansible-vault-2
ansible-2             ansible-console-2     ansible-doc-2.7       ansible-playbook      ansible-pull-2        ansible-vault-2.7
ansible-2.7           ansible-console-2.7   ansible-galaxy        ansible-playbook-2    ansible-pull-2.7
ansible-connection    ansible-doc           ansible-galaxy-2      ansible-playbook-2.7  ansible-vault
1.ansible命令
应用场景:非固化需求,临时一次性操作,二次开发接口调用
语法如下:ansible [options]
可用选项:
-v:输出详细的执行过程信息,可以得到执行过程所有信息
-i PATH:指定inventory信息,默认为/etc/ansible/hosts
-f NUM:并发线程数,默认为5个线程
–private-key=PRIVATE_KEY_FILE:指定文件
- m NAME,–module-node=NAME:指定执行使用模块
-M DIRECTORY(–module-path=DIRECTORY):指定模块存放路径,默认为/usr/share/ansible,也可以通过ANSIBLE_LIBRARY设定默认路径
-a ARGUMENTS (–args=ARGUMENTS):指定模块参数
-u USERNAME :指定远程主机以USERNAME运行命令
–list-hosts:列出符合条件的主机列表,不执行任何命令
1.检查所有主机是否存活,all代表所有/etc/ansible/hosts中的所有主机
[root@localhost ~]# ansible  all -f 5 -m ping
192.168.2.2 | SUCCESS => {
    "changed": false,
    "ping": "pong"
}
192.168.2.3 | SUCCESS => {
    "changed": false,
    "ping": "pong"
}
- 列出web组所有主机列表
[root@localhost ~]# ansible web --list
  hosts (2):
    192.168.2.2
    192.168.2.3
3.批量显示web组中的磁盘使用情况
[root@localhost ~]# ansible web -m command -a "df -hT"
192.168.2.2 | SUCCESS | rc=0 >>
文件系统       类型      容量  已用  可用 已用% 挂载点
/dev/sda3      xfs        14G 1013M   14G    8% /
devtmpfs       devtmpfs  479M     0  479M    0% /dev
tmpfs          tmpfs     489M     0  489M    0% /dev/shm
tmpfs          tmpfs     489M  6.8M  482M    2% /run
tmpfs          tmpfs     489M     0  489M    0% /sys/fs/cgroup
/dev/sda1      xfs       4.0G  131M  3.9G    4% /boot
tmpfs          tmpfs      98M     0   98M    0% /run/user/0

192.168.2.3 | SUCCESS | rc=0 >>
文件系统       类型      容量  已用  可用 已用% 挂载点
/dev/sda3      xfs        14G 1013M   14G    8% /
devtmpfs       devtmpfs  479M     0  479M    0% /dev
tmpfs          tmpfs     489M     0  489M    0% /dev/shm
tmpfs          tmpfs     489M  6.8M  482M    2% /run
tmpfs          tmpfs     489M     0  489M    0% /sys/fs/cgroup
/dev/sda1      xfs       4.0G  131M  3.9G    4% /boot
tmpfs          tmpfs      98M     0   98M    0% /run/user/0
2.Ansible-doc
Ansible-doc用来查询ansible模块文档的说明,类似于man命令,针对每个模块都有详细的用法说明及应用案例介绍。
语法:ansible-doc [options] [module…]
列出支持的模块:
[root@localhost ~]# ansible-doc -l
3.Ansible-playbook
Ansible-playbook是日常应用中使用频率最高的命令,类似于Linux中的sh或source命令,用来执行系列任务。其工作机制是:通过读取预先编写好的playbook文件实现集中处理任务。Ansible-playbook命令后跟yml格式的playbook文件,playbook文件存放了要执行的任务代码。
命令使用方式如下:
[root@localhost ~]# ansible-playbook playbook.yml
4.Ansible-console
Ansible-console是Ansible为用户提供的一款交互式工具,类似于windows的cmd以及Linux中的shell。用户可以在ansible-console虚拟出来的终端上shell一样使用Ansible内置的各种命令
[root@localhost ~]# ansible-console
Welcome to the ansible console.
Type help or ? to list commands.

root@all (2)[f:5]$ list
192.168.2.2
192.168.2.3
root@all (2)[f:5]$ cd web        #通过cd命令切换主机或分组
root@web (2)[f:5]$ list          #列出当前的设备
192.168.2.2
192.168.2.3
root@web (2)[f:5]$
五.Ansible模块
command模块在远程主机执行命令,不支持管道,重定向等shell的特性,常用参数如下
chdir:在远程主机上运行命令前要提前进入的目录
creates:在命令运行时创建一个文件,如果文件已存在。则不会执行创建任务
removes:在命令运行时移除一个文件,如果文件不存在,则不会执行移除任务
executeble:指明运行命令的shell程序
1.chdir进入目录
在所有主机上运行‘ls ./’命令,运行前切换到/home目录。
[root@localhost ~]# ansible all -m command -a "chdir=/home ls ./"
192.168.2.3 | SUCCESS | rc=0 >>


192.168.2.2 | SUCCESS | rc=0 >>
2.shell模块
shell模块在远程主机执行命令,相当于调用远程主机的shell进程,然后再该shell下打开一个子Shell运行命令。和command模块的区别是它支持shell特性,如管道,重定向等。
[root@localhost ~]# ansible web -m shell -a 'echo "hello" > /tmp/html.txt'
192.168.2.2 | SUCCESS | rc=0 >>


192.168.2.3 | SUCCESS | rc=0 >>


[root@localhost ~]# ansible all -m command -a "chdir=/tmp cat html.txt"
192.168.2.2 | SUCCESS | rc=0 >>
hello

192.168.2.3 | SUCCESS | rc=0 >>
hello
3.copy模块
copy模块用于复制指定主机文件到远程主机的指定位置,常见参数:
dest:指定复制文件的目标目录位置,使用绝对路径。如果源是目录,则目录也要是目录,如果目标文件已存在,会覆盖原有内容
src:指出源文件的路径。可以使用相对路径和绝对路径,支持直接指定目录。如果源是目录,则目标也要是目录。
mode:指出复制时,目标文件的权限,可选
owner:指出复制时,目标文件的属主,可选
group:指出复制时,目标文件的属组,可选
content:指出复制到目标主机上的内容,不能与src一起使用,相当于复制content指明的数据到目标文件中
[root@localhost ~]# ansible web -m copy -a "src=/etc/hosts dest=/tmp/ mode=777 owner=nobody group=root"
192.168.2.3 | SUCCESS => {
    "changed": true,
    "checksum": "7335999eb54c15c67566186bdfc46f64e0d5a1aa",
    "dest": "/tmp/hosts",
    "gid": 0,
    "group": "root",
    "md5sum": "54fb6627dbaa37721048e4549db3224d",
    "mode": "0777",
    "owner": "nobody",
    "size": 158,
    "src": "/root/.ansible/tmp/ansible-tmp-1662754726.22-152110997146547/source",
    "state": "file",
    "uid": 99
}
192.168.2.2 | SUCCESS => {
    "changed": true,
    "checksum": "7335999eb54c15c67566186bdfc46f64e0d5a1aa",
    "dest": "/tmp/hosts",
    "gid": 0,
    "group": "root",
    "md5sum": "54fb6627dbaa37721048e4549db3224d",
    "mode": "0777",
    "owner": "nobody",
    "size": 158,
    "src": "/root/.ansible/tmp/ansible-tmp-1662754726.22-199528573055710/source",
    "state": "file",
    "uid": 99
}

[root@localhost ~]# ansible all -m command -a "chdir=/tmp ls ./"
192.168.2.2 | SUCCESS | rc=0 >>
hosts

192.168.2.3 | SUCCESS | rc=0 >>
hosts
4.hostname模块
hostname模块用于管理远程主机上的主机名;
name:指明主机名
[root@localhost ~]# ansible 192.168.2.2 -m hostname -a "name=demo"
192.168.2.2 | SUCCESS => {
    "ansible_facts": {
        "ansible_domain": "",
        "ansible_fqdn": "demo",
        "ansible_hostname": "demo",
        "ansible_nodename": "demo"
    },
    "changed": true,
    "name": "demo"
}
[root@localhost ~]# ssh 192.168.2.2 hostname
demo
5.yum模块
yum模块基于yum机制,对远程主机管理程序包,常用参数如下
name:程序包的名称,可以带上版本号,若不指明版本,则默认为最新版本
state=present | latest | absent:指明对程序包执行的操作,present表示安装程序包,latest表示安装最新版本的程序包,absent表示卸载程序包
disablerepo:在用yum安装时,临时禁用某个仓库的ID
enablerepo:在用yum安装时,临时启用某个仓库的ID
conf_file:yum运行时的配置文件,而不是使用默认的配置文件
diable_gpg_check=yes|no:是否启用完整性校验功能
[root@localhost ~]# ansible web -m yum -a "name=httpd state=present"
192.168.2.3 | FAILED! => {        #192.168.2.3没有配置yum仓库,所有安装失败
    "changed": false,
    "failed": true,
    "msg": "Failure talking to yum: 'ascii' codec can't encode characters in position 173-177: ordinal not in range(128)"
}
192.168.2.2 | SUCCESS => {        #192.168.2.2配置了yum仓库,安装成功
    "changed": true,
    "msg": "",
    "rc": 0,
    "results": [
        "Loaded plugins: fastestmirror\nLoading mirror speeds from cached hostfile\nResolving Dependencies\n--> Running transaction check\n---> Package httpd.x86_64 0:2.4.6-45.el7.centos will be installed\n--> Processing Dependency: httpd-tools = 2.4.6-45.el7.centos for package: httpd-2.4.6-45.el7.centos.x86_64\n--> Processing Dependency: /etc/mime.types for package: httpd-2.4.6-45.el7.centos.x86_64\n--> Processing Dependency: libaprutil-1.so.0()(64bit) for package: httpd-2.4.6-45.el7.centos.x86_64\n--> Processing Dependency: libapr-1.so.0()(64bit) for package: httpd-2.4.6-45.el7.centos.x86_64\n--> Running transaction check\n---> Package apr.x86_64 0:1.4.8-3.el7 will be installed\n---> Package apr-util.x86_64 0:1.5.2-6.el7 will be installed\n---> Package httpd-tools.x86_64 0:2.4.6-45.el7.centos will be installed\n---> Package mailcap.noarch 0:2.1.41-2.el7 will be installed\n--> Finished Dependency Resolution\n\nDependencies Resolved\n\n================================================================================\n Package            Arch          Version                    Repository    Size\n================================================================================\nInstalling:\n httpd              x86_64        2.4.6-45.el7.centos        local        2.7 M\nInstalling for dependencies:\n apr                x86_64        1.4.8-3.el7                local        103 k\n apr-util           x86_64        1.5.2-6.el7                local         92 k\n httpd-tools        x86_64        2.4.6-45.el7.centos        local         84 k\n mailcap            noarch        2.1.41-2.el7               local         31 k\n\nTransaction Summary\n================================================================================\nInstall  1 Package (+4 Dependent packages)\n\nTotal download size: 3.0 M\nInstalled size: 10 M\nDownloading packages:\n--------------------------------------------------------------------------------\nTotal                                               24 MB/s | 3.0 MB  00:00     \nRunning transaction check\nRunning transaction test\nTransaction test succeeded\nRunning transaction\n  Installing : apr-1.4.8-3.el7.x86_64                                       1/5 \n  Installing : apr-util-1.5.2-6.el7.x86_64                                  2/5 \n  Installing : httpd-tools-2.4.6-45.el7.centos.x86_64                       3/5 \n  Installing : mailcap-2.1.41-2.el7.noarch                                  4/5 \n  Installing : httpd-2.4.6-45.el7.centos.x86_64                             5/5 \n  Verifying  : httpd-tools-2.4.6-45.el7.centos.x86_64                       1/5 \n  Verifying  : mailcap-2.1.41-2.el7.noarch                                  2/5 \n  Verifying  : apr-1.4.8-3.el7.x86_64                                       3/5 \n  Verifying  : httpd-2.4.6-45.el7.centos.x86_64                             4/5 \n  Verifying  : apr-util-1.5.2-6.el7.x86_64                                  5/5 \n\nInstalled:\n  httpd.x86_64 0:2.4.6-45.el7.centos                                            \n\nDependency Installed:\n  apr.x86_64 0:1.4.8-3.el7                     apr-util.x86_64 0:1.5.2-6.el7    \n  httpd-tools.x86_64 0:2.4.6-45.el7.centos     mailcap.noarch 0:2.1.41-2.el7    \n\nComplete!\n"
    ]
}
[root@localhost ~]# ssh 192.168.2.2 rpm -qa | grep httpd
httpd-tools-2.4.6-45.el7.centos.x86_64
httpd-2.4.6-45.el7.centos.x86_64
注:管理端只要发送yum指令被管理端,被管理端要存在可用的yum仓库才可用成功安装。
6.service模块
service模块为用来管理远程主机上的服务的模块,常见参数如下:
name:被管理的服务名称state=started|stopped|restarted:动作含启动,关闭或重启
enabled=yes|no:表示是否设置该服务开机自启动
runlevel:如果设定了enabled开机自启动,则要定义在哪些运行目标下自动启动
启动http服务,并设置为开机自启
[root@localhost ~]# ansible web -m service -a "name=httpd state=started enabled=yes"
192.168.2.3 | FAILED! => {        #没有httpd服务
    "changed": false,
    "failed": true,
    "msg": "Could not find the requested service httpd: host"
}
192.168.2.2 | SUCCESS => {            #正常开启httpd服务
    "changed": true,
    "enabled": true,
    "name": "httpd",
.....
}
7.user模块
user模块用于管理远程主机上的用户账号,常见参数如下:
name:必须参数,账号名称
网上学习资料一大堆,但如果学到的知识不成体系,遇到问题时只是浅尝辄止,不再深入研究,那么很难做到真正的技术提升。
一个人可以走的很快,但一群人才能走的更远!不论你是正从事IT行业的老鸟或是对IT行业感兴趣的新人,都欢迎加入我们的的圈子(技术交流、学习资源、职场吐槽、大厂内推、面试辅导),让我们一起学习成长!
yes"
192.168.2.3 | FAILED! => { #没有httpd服务
“changed”: false,
“failed”: true,
“msg”: “Could not find the requested service httpd: host”
}
192.168.2.2 | SUCCESS => { #正常开启httpd服务
“changed”: true,
“enabled”: true,
“name”: “httpd”,
…
}
7.user模块
user模块用于管理远程主机上的用户账号,常见参数如下:
name:必须参数,账号名称
网上学习资料一大堆,但如果学到的知识不成体系,遇到问题时只是浅尝辄止,不再深入研究,那么很难做到真正的技术提升。
一个人可以走的很快,但一群人才能走的更远!不论你是正从事IT行业的老鸟或是对IT行业感兴趣的新人,都欢迎加入我们的的圈子(技术交流、学习资源、职场吐槽、大厂内推、面试辅导),让我们一起学习成长!


 651
651

 被折叠的 条评论
为什么被折叠?
被折叠的 条评论
为什么被折叠?
 到【灌水乐园】发言


