


一、 介绍
溪村小镇是一款展示溪流背坡村园区风貌的应用,包括园区内的导航功能,小火车行车状态查看,以及各区域的风景展览介绍,主要用于展示HarmonyOS的ArkUI能力和动画效果。具体包括如下功能:
1. 打开应用时进入启动页,启动页轮播展示溪村小镇风景图,之后进入应用首页。
2. 在首页的“地图浏览”标签页,可以拖动和缩放查看地图,并查找相应地标建筑。
3. 在首页的“区域导览”标签页,可以上下滑动查看溪村小镇不同区域的卡片,点击卡片可以进入对应的区域详情页并查看区域的详细介绍和高清建筑风景图。
4. 在首页的“小火车”标签页,可以查看溪村小火车的运行路线图。

相关概念
● Tabs组件:通过页签进行内容视图切换的容器组件,每个页签对应一个内容视图。
● List组件:列表包含一系列相同宽度的列表项,包含子组件ListItem。
● 点击手势:支持单击、双击和多次点击事件的识别。
● 拖动手势:用于触发拖动手势事件,滑动的最小距离为5vp时拖动手势识别成功。
● 捏合手势:用于触发捏合手势事件,触发捏合手势的最少手指为2指,最大为5指,最小识别距离为3vp。
● 属性动画:组件的某些通用属性变化时,可以通过属性动画实现渐变过渡效果,提升用户体验。
● 自定义弹窗:通过CustomDialogController类显示自定义弹窗。使用弹窗组件时,可优先考虑自定义弹窗,便于自定义弹窗的样式与内容。
● Canvas画布:用于自定义绘制图形。
完整示例
二、 环境搭建
我们首先需要完成HarmonyOS开发环境搭建,可参照如下步骤进行。
软件要求
● DevEco Studio版本:DevEco Studio 3.1 Release。
● HarmonyOS SDK版本:API version 9。
硬件要求
● 设备类型:华为手机或运行在DevEco Studio上的华为手机设备模拟器。
● HarmonyOS系统:3.1.0 Developer Release。
环境搭建
1. 安装DevEco Studio,详情请参考下载和安装软件。
2. 设置DevEco Studio开发环境,DevEco Studio开发环境需要依赖于网络环境,需要连接上网络才能确保工具的正常使用,可以根据如下两种情况来配置开发环境:如果可以直接访问Internet,只需进行下载HarmonyOS SDK操作。
a. 如果网络不能直接访问Internet,需要通过代理服务器才可以访问,请参考配置开发环境。
3. 开发者可以参考以下链接,完成设备调试的相关配置:使用真机进行调试
a. 使用模拟器进行调试
三、 代码结构解读
本篇Codelab只对核心代码进行讲解,对于完整代码,我们会在gitee中提供。
scss
复制代码
├──entry/src/main/ets // 代码区 │ ├──common │ │ ├──bean │ │ │ ├──AddressItem.ets // 地图地标类 │ │ │ ├──BottomTabsItem.ets // 底部标签类 │ │ │ ├──PositionItem.ets // 搜索面板地标类 │ │ │ ├──TrainMap.ets // 小火车数据类 │ │ │ └──ZonesItem.ets // 区域介绍类 │ │ ├──constants │ │ │ ├──CommonConstants.ets // 公共常量类 │ │ │ └──ZonesConstants.ets // 区域常量类 │ │ ├──images │ │ └──utils │ │ ├──Animation.ets // 区域详情动效类 │ │ ├──DeviceScreen.ets // 获取设备信息类 │ │ ├──Geography.ets // 地理坐标转换工具类 │ │ ├──Logger.ets // 日志打印类 │ │ └──WindowBar.ets // 沉浸式导航栏 │ ├──control │ │ └──MapController.ets // 地图控制类 │ ├──entryability │ │ └──EntryAbility.ets // 程序入口类 │ ├──pages │ │ ├──IntroductionPage.ets // 区域详情页 │ │ ├──MainPage.ets // 应用首页 │ │ └──Splash.ets // 启动页 │ ├──view │ │ ├──BottomTabsComponent.ets // 底部标签栏 │ │ ├──BuildListItem.ets // 区域详情建筑、地理位置ListItem组件 │ │ ├──ImageAnimate.ets // 区域详情小图滑动组件 │ │ ├──ImageViewComponent.ets // 查看大图弹窗 │ │ ├──MapComponent.ets // 地图组件 │ │ ├──StyleListItem.ets // 区域详情风格信息ListItem组件 │ │ ├──SubTitleItem.ets // 区域详情子标题ListItem组件 │ │ ├──SwiperListItem.ets // 区域详情首图轮播组件 │ │ ├──TrainsComponent.ets // 小火车轨迹更新 │ │ ├──TrainsTrack.ets // 小火车组件 │ │ └──ZonesComponent.ets // 区域导览组件 │ └──viewmodel │ ├──ButtonTabsModel.ets // 底部标签数据 │ ├──MapModel.ets // 地图数据及方法 │ ├──SplashModel.ets // 启动页数据 │ ├──TrainsMapModel.ets // 小火车数据及方法 │ └──ZonesViewModel.ets // 区域介绍信息 └──entry/src/main/resources // 资源文件目录
四、 应用主页面与沉浸式设计
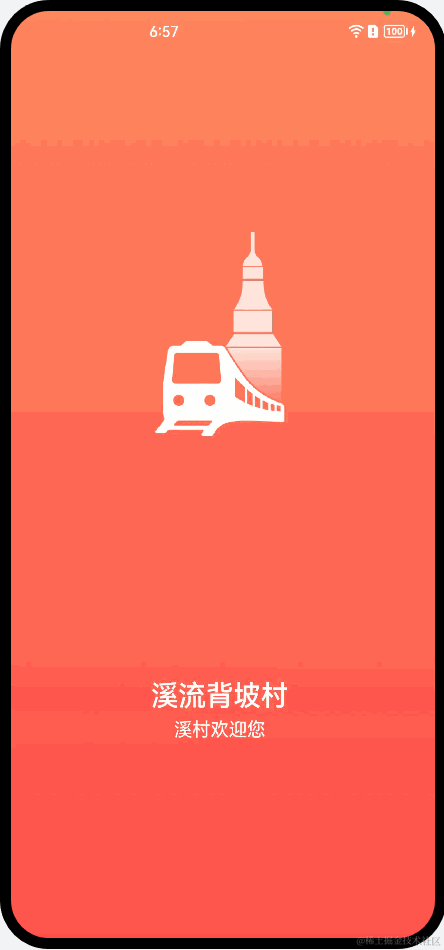
4.1 启动页
应用首次打开会进入启动页。在启动页内分三个时间段(白天、傍晚、晚上),会根据当前时间段轮播展示溪村小镇的优美风景。
在onWindowStageCreate生命周期中配置启动页入口。
javascript
复制代码
// EntryAbility.ets onWindowStageCreate(windowStage: window.WindowStage) { // Main window is created, set main page for this ability hilog.info(0x0000, 'testTag', '%{public}s', 'Ability onWindowStageCreate'); windowStage.loadContent('pages/Splash', (err, data) => { if (err.code) { hilog.error(0x0000, 'testTag', 'Failed to load the content. Cause: %{public}s', JSON.stringify(err) ?? ''); return; } hilog.info(0x0000, 'testTag', 'Succeeded in loading the content. Data: %{public}s', JSON.stringify(data) ?? ''); }); }
启动页会在aboutToAppear生命周期内初始化轮播图片资源及定时任务,会展示5秒溪村的优美风景,用户可以点击右上角的跳过直接进入应用主页,也可以等5秒结束自动进入应用主页;5秒倒计时结束、用户主动点击跳过或启动页面销毁时都会取消定时器任务。
scss
复制代码
// Splash.ets @Entry @Component struct Splash { @State countdown: number = Const.COUNTDOWN; @State showSwiper: boolean = false; private swiperController: SwiperController = new SwiperController(); private data: Resource[] = []; private timer = null; // 在此生命周期内根据当前时间段分配轮播展示的溪村小镇风景图 aboutToAppear(): void { let hours = new Date().getHours(); if (hours >= Const.MORNING_TIME && hours < Const.EVENING_TIME) { this.data = splashImages.day; } else { ... } // 启动画面展示3秒后 轮播展示溪村小镇风景 setTimeout(() => { this.showSwiper = true; this.startTiming(); }, Const.SPLASH_DURATION); } // 轮播展示溪村小镇风景倒计时5秒 startTiming() { this.timer = setInterval(() => { this.countdown--; if (this.countdown === 0) { this.clearTiming(); // 5秒钟后自动跳转到应用首页 this.jumpToMainPage(); } }, Const.DURATION); } // 清理定时器 clearTiming() { if (this.timer !== null) { clearInterval(this.timer); this.timer = null; } } // 跳转到应用首页 jumpToMainPage() { this.clearTiming(); router.replaceUrl({ url: 'pages/MainPage' }); } // 页面销毁时清理定时器 aboutToDisappear() { this.clearTiming(); } build() { Column() { Stack() { // 轮播展示溪村小镇风景 if (this.showSwiper) { Swiper(this.swiperController) { ForEach(this.data, (item: Resource) => { Image(item) ... }) } .loop(true) ... // 轮播倒计时,点击可进入应用主页 Text() { Span($r('app.string.skip')) Span(`${this.countdown}`) } .onClick(() => this.jumpToMainPage()) ... }) } else { // 应用启动画面 Image($r('app.media.splash_bg')) ... Image($r('app.media.ic_splash')) ... Column() { Text(Const.SPLASH_DES) ... Text(Const.SPLASH_WELCOME) ... } } } } ... } }
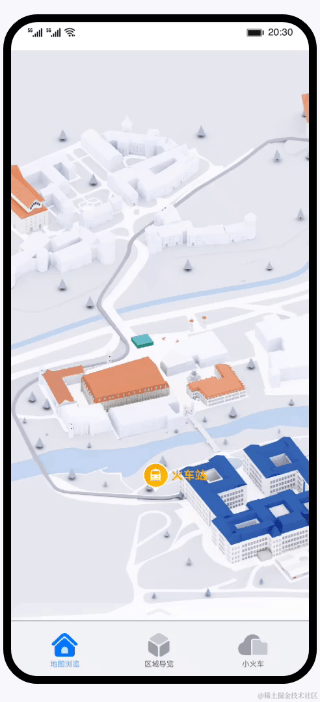
4.2 应用首页
应用首页包括三个标签页,分别是“地图浏览”页、“区域导览”页和“小火车”页,效果如图所示:
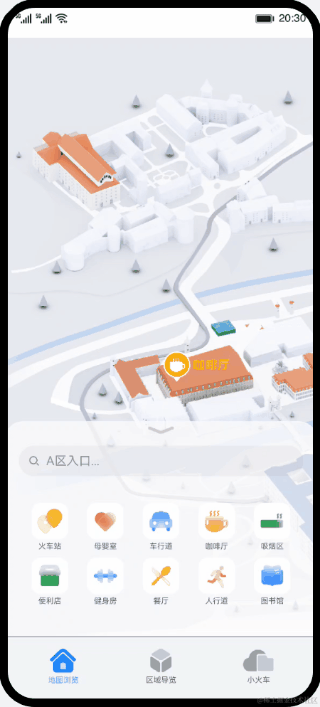
该页面使用Tabs组件实现,使用一个自定义的底部标签栏组件来控制选中对应的标签页时的视觉效果。
scss
复制代码
// MainPage.ets @Entry @Component struct MainPage { // 当底部标签栏index改变时调用onIndexChange()方法,改变Tabs组件的index @State @Watch('onIndexChange') bottomTabIndex: number = 1; private controller: TabsController = new TabsController(); onIndexChange() { this.controller.changeIndex(this.bottomTabIndex); } build() { Flex({ direction: FlexDirection.Column, alignItems: ItemAlign.End, justifyContent: FlexAlign.End }) { Tabs({ barPosition: BarPosition.End, index: 1, controller: this.controller }) { TabContent() { // “地图浏览”页 Map() } TabContent() { // “区域导览”页 Zones() } TabContent() { // “小火车”页 Trains() } } ... .onChange((index: number) => { // 当标签页切换时改变底部标签栏组件的index this.bottomTabIndex = index; }) // 底部标签栏组件 BottomTabs({ bottomTabIndex: $bottomTabIndex }) } .width(Const.FULL_PERCENT) } }
五、 地图浏览
地图浏览模块提供了“溪村小镇”的全景地图,方便用户了解“溪村小镇”内部的地理概况。包含以下功能:
1. 搜索指定类型地标,并在地图上展示。
2. 通过手势对地图进行操作,包括放大、缩小和拖拽。
5.1 初始化地图
地图使用Stack组件实现,地图初始化的宽高是由图片的宽高和地图父组件的宽高计算得出,地图位置由地图宽度和地图父组件计算得出。
scss
复制代码
// MapComponent.ets build() { Stack({ alignContent: Alignment.BottomEnd }) { Column() { // 地图组件 Stack({ alignContent: Alignment.TopStart }) { ... } // 地图图片 .backgroundImage($r('app.media.ic_nav_map')) .backgroundImageSize(ImageSize.Cover) // 地图宽度 .width(this.mapWidth) // 地图高度 .height(this.mapHeight) // 地图左上角位置 .offset({ x: this.mapX, y: this.mapY }) } .... .onAreaChange((oldVal: Area, newVal: Area) => { if (this.screenMapWidth === 0 || this.screenMapHeight === 0) { // 获取地图父组件宽高 this.screenMapWidth = Number(newVal.width); this.screenMapHeight = Number(newVal.height); // 初始化地图组件 MapController.initMap(this); } }) ... } } ...
地图高度默认为地图父组件高度,地图宽度根据地图原始宽高比得出。
kotlin
复制代码
// MapController.ets initMap(mapContext): void { this.mapContext = mapContext; this.mapContext.mapHeight = this.mapContext.screenMapHeight; // 计算地图宽度 this.mapContext.mapWidth = Const.MAP_WIDTH * this.mapContext.mapHeight / Const.MAP_HEIGHT; // 设备屏幕默认显示地图中心位置 this.mapContext.mapX = (this.mapContext.screenMapWidth - this.mapContext.mapWidth) / Const.DOUBLE_OR_HALF; // 计算地图左上角最大移动距离 this.leftTop = [(this.mapContext.screenMapWidth - this.mapContext.mapWidth), 0]; }
5.2 搜索并展示指定类型地标
“地图浏览”完成地图初始化后,界面会默认展示查询搜索面板。用户通过搜索框输入指定类型进行搜索,也可以直接点击面板中已展示的类型进行搜索。

搜索面板为自定义组件CustomPanel,主要由展开/收起图标(Image组件)、搜索栏(Search组件)、地标网格(Grid组件)构成。用户点击地标网格中的网格、通过搜索框搜索指定类型或点击展开/收起图标,都会改变操作面板的显示状态(展示或隐藏)。通过属性动画(animation)可以实现操作面板的渐变过渡效果。
kotlin
复制代码
// MapComponent.ets @Component struct CustomPanel { @State positionList: Array<PositionItem> = PositionList; ... build() { Column() { Column() { Image(this.isDownImage ? $r('app.media.ic_panel_down') : $r('app.media.ic_panel_up')) .enabled(this.imageEnable) ... } .opacity(this.iconOpacity) ... Column() { ... Grid() { ForEach(this.positionList, (item: PositionItem) => { GridItem() { PositionGridView({ positionItem: item }) .enabled(this.imageEnable) ... } }, item => JSON.stringify(item)) } ... } .opacity(this.panelOpacity) .height(this.panelHeight) .animation({ duration: Const.ANIMATION_DURATION, curve: Curve.EaseOut, iterations: 1, playMode: PlayMode.Normal }) ... } ... } upAndDown() { // 配合属性动画实现渐变过渡效果 this.imageEnable = false; if (this.isDownImage) { this.panelOpacity = 0; this.panelHeight = 0; this.iconOpacity = Const.PANEL_LOW_OPACITY; } else { this.panelHeight = Const.PANEL_FULL_HEIGHT; this.panelOpacity = Const.PANEL_HIGH_OPACITY; this.iconOpacity = Const.PANEL_HIGH_OPACITY; } this.isDownImage = !this.isDownImage; this.imageEnable = true; } }
通过搜索框或点击网格中的图标对地标进行搜索,并在地图上展示。每种类型的地标均有预置的经纬度数据,根据地标经纬度数据和地图组件宽高计算地标初始位置。
typescript
复制代码
// MapModel.ets // 根据坐标经纬度和地标信息初始化地标对象 calCoordinateByLonAndLat(geoCoordinates: Array<GeoCoordinates>, type: number, mapContext: any): AddressItem { this.mapContext = mapContext; this.data = undefined; if (!this.addressArray[type - 1]) { // 初始化地标对象 this.addressArray[type - 1] = new AddressItem( mapLandmarksName[type - 1], mapLandmarksIcon[type - 1], // 根据经纬度计算地标在地图中的坐标 this.initLocationData(geoCoordinates), mapLandmarksTextColor[type - 1] ); } this.data = this.addressArray[type - 1]; return this.data; } // MapModel.ets // 根据地标经纬度和地图宽高获取地标在地图中的初始坐标值 initLocationData(geoCoordinates: Array<GeoCoordinates>): Array<Location> { let locations: Array<Location> = []; geoCoordinates.forEach((item: GeoCoordinates) => { // 根据经纬度和地图默认宽高计算地标在地图中的初始坐标值 let pixelCoordinates = Geography.toPixelCoordinates(item.latitude, item.longitude); // 根据地图放大倍数计算地标在地图中的水平方向坐标值 let positionX = pixelCoordinates.coordinateX * this.mapContext.mapWidth / MapController.mapMultiples() / Const.MAP_WIDTH; // 根据地图放大倍数计算地标在地图中的水平方向坐标值 let positionY = pixelCoordinates.coordinateY / Const.MAP_HEIGHT * this.mapContext.mapHeight / MapController.mapMultiples(); locations.push(new Location(positionX, positionY)); }) return locations; }
根据获取地标的初始坐标值和地图放大倍数计算地标的的实际坐标值。
kotlin
复制代码
// MapModel.ets calLandmarksPosition(): void { this.mapContext.data.locations = this.mapContext.data.locations.map((item: Location) => { item.positionX = item.oriPositionX * this.mapMultiples() - Const.MAP_LANDMARKS_SIZE * Const.MAP_ZOOM_RATIO / Const.DOUBLE_OR_HALF; item.positionY = item.oriPositionY * this.mapMultiples() - Const.MAP_LANDMARKS_SIZE * Const.MAP_ZOOM_RATIO; return item; }) }
地标初始化完成之后,默认将第一个地标展示在设备屏幕范围内(水平方向居中)。
kotlin
复制代码
// MapController.ets setFirstLandmarksCenter(): void { let locations = this.mapContext.data.locations; if (locations.length > 0) { // 计算地图左上角水平方向坐标 this.mapContext.mapX = this.mapContext.screenMapWidth / Const.DOUBLE_OR_HALF - locations[0].positionX; // 判断地图左上角是否超出边界 if (this.mapContext.mapX > 0) { this.mapContext.mapX = 0; } if (this.mapContext.mapX < (this.mapContext.screenMapWidth - this.mapContext.mapWidth)) { this.mapContext.mapX = this.mapContext.screenMapWidth - this.mapContext.mapWidth; } // 判断地图右下角是否超出边界 this.mapContext.mapY = this.mapContext.screenMapHeight / Const.DOUBLE_OR_HALF - locations[0].positionY; if (this.mapContext.mapY > 0) { this.mapContext.mapY = 0; } if (this.mapContext.mapY < (this.mapContext.screenMapHeight - this.mapContext.mapHeight)) { this.mapContext.mapY = this.mapContext.screenMapHeight - this.mapContext.mapHeight; } } }
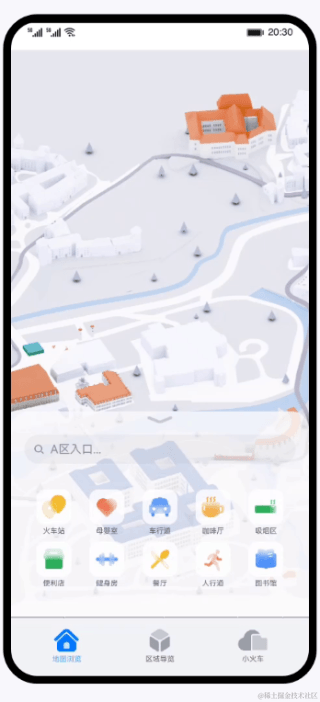
5.3 使用手势操作地图
操作地图的手势由捏合手势(PinchGesture)、点击手势(TapGesture)、平移手势(PanGesture)组合而成,可放大、缩小和移动地图。
less
复制代码
// MapComponent.ets build() { Stack({ alignContent: Alignment.BottomEnd }) { Column() { ... } ... // 地图父组件绑定手势事件 .gesture( GestureGroup(GestureMode.Exclusive, // 捏合手势,放大缩小地图 PinchGesture({ fingers: Const.MAP_FINGER_COUNT }) .onActionUpdate((event: GestureEvent) => { MapController.pinchUpdate(event); }) .onActionEnd(() => { MapController.pinchEnd(); }), // 点击手势,放大地图 TapGesture({ count: Const.MAP_FINGER_COUNT }) .onAction(() => { MapController.tapAction(); }), // 平移手势,拖动地图 PanGesture(this.panOption) .onActionUpdate((event: GestureEvent) => { MapController.panUpdate(event); }) .onActionEnd(() => { MapController.panEnd(); }) ) ) ... } }
捏合手势是通过双指向外拨动放大地图、向内捏合缩小地图,每次将地图放大或缩小1.1倍,最多放大4次。当地图缩放到初始化时的大小后不再进行缩小,地图进行缩放时总是以地图所在屏幕中心位置进行缩放,效果如图所示:
kotlin
复制代码
// MapController.ets pinchUpdate(event: GestureEvent): void { // 获取当前捏合手势的数值 let scale = parseFloat(event.scale.toFixed(Const.MAP_SCALE_ACCURACY)); let ratio = 1; // 防止手指一直按压屏幕操作 if (this.previousScale !== scale) { // 向内捏合手势 if (event.scale < 1) { ratio = 1 / Const.MAP_ZOOM_RATIO; this.pinchCount--; } else { // 向外拨动手势 ratio = Const.MAP_ZOOM_RATIO; this.pinchCount++; } // 只允许放大4次 if (this.pinchCount > Const.ZOOM_MAX_TIMES) { this.pinchCount = Const.ZOOM_MAX_TIMES; return; } // 防止无限缩小 if (this.pinchCount < 0) { this.pinchCount = 0; return; } // 根据缩放倍数,实时计算地图宽高 this.mapContext.mapWidth *= ratio; this.mapContext.mapHeight *= ratio; // 以当前设备中心对地图进行缩放 let offsetX = (1 - ratio) * (this.mapContext.screenMapWidth / Const.DOUBLE_OR_HALF - this.mapContext.mapX); let offsetY = (1 - ratio) * (this.mapContext.mapHeight / Const.MAP_ZOOM_RATIO / Const.DOUBLE_OR_HALF - this.mapContext.mapY); this.mapContext.mapX += offsetX; this.mapContext.mapY += offsetY; // 重新计算地标的坐标值 this.calLandmarksPosition(); // 判断地图是否超出边界 this.zoomOutCheck(); } this.previousScale = scale; }
地图缩放过程中根据当前地图宽高对地标进行位置偏移。
kotlin
复制代码
// MapController.ets calLandmarksPosition(): void { this.mapContext.data.locations = this.mapContext.data.locations.map((item: Location) => { item.positionX = item.oriPositionX * this.mapMultiples() - Const.MAP_LANDMARKS_SIZE * Const.MAP_ZOOM_RATIO / Const.DOUBLE_OR_HALF; item.positionY = item.oriPositionY * this.mapMultiples() - Const.MAP_LANDMARKS_SIZE * Const.MAP_ZOOM_RATIO; return item; }) }
地图移动过程中根据左上角坐标判断是否超出临界点,若地图缩小超出临界点,就以临界点位置进行地图缩小。
kotlin
复制代码
// MapController.ets zoomOutCheck(): void { if (this.mapContext.mapX > 0) { this.mapContext.mapX = 0; } if (this.mapContext.mapY > 0) { this.mapContext.mapY = 0; } if ((this.mapContext.mapX + this.mapContext.mapWidth) < this.mapContext.screenMapWidth) { this.mapContext.mapX = this.mapContext.screenMapWidth - this.mapContext.mapWidth; } if ((this.mapContext.mapY + this.mapContext.mapHeight) < (this.mapContext.mapHeight / this.mapMultiples())) { this.mapContext.mapY = this.mapContext.mapHeight / this.mapMultiples() - this.mapContext.mapHeight; } }
点击手势通过双击地图组件放大地图(缩小地图只能通过捏合手势),每次将地图放大1.1倍,最多放大4次,地图进行放大时总是以地图所在屏幕中心位置进行放大,效果如图所示:
kotlin
复制代码
// MapController.ets tapAction(): void { if (++this.pinchCount > Const.ZOOM_MAX_TIMES) { this.pinchCount = Const.ZOOM_MAX_TIMES; return; } this.mapContext.mapWidth *= Const.MAP_ZOOM_RATIO; this.mapContext.mapHeight *= Const.MAP_ZOOM_RATIO; let offsetX = (1 - Const.MAP_ZOOM_RATIO) * (this.mapContext.screenMapWidth / Const.DOUBLE_OR_HALF - this.mapContext.mapX); let offsetY = (1 - Const.MAP_ZOOM_RATIO) * (this.mapContext.mapHeight / Const.MAP_ZOOM_RATIO / Const.DOUBLE_OR_HALF - this.mapContext.mapY); this.mapContext.mapX += offsetX; this.mapContext.mapY += offsetY; // 重新计算地标的坐标 this.calLandmarksPosition(); // 计算地图左上角可移动范围 let minX = (this.mapContext.screenMapWidth - this.mapContext.mapWidth); let minY = this.mapContext.mapHeight / this.mapMultiples() - this.mapContext.mapHeight; this.leftTop = [minX, minY]; }

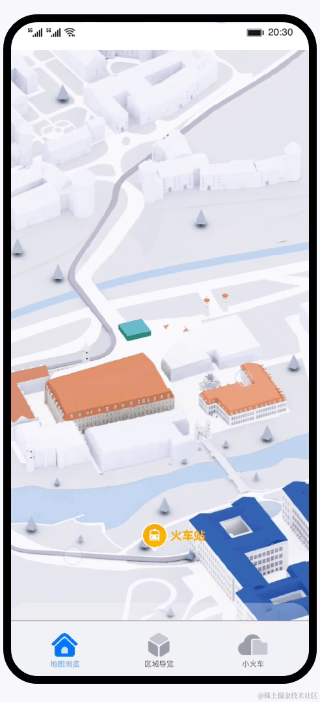
平移手势通过单指拖动地图组件移动地图,当地图位于边界时,禁止拖动。效果如图所示:
kotlin
复制代码
// MapController.ets // 根据手指滑动距离设置地图滑动距离 panUpdate(event: GestureEvent): void { let panX = parseInt(event.offsetX.toFixed(0)); let panY = parseInt(event.offsetY.toFixed(0)); if ((this.panX !== panX) || (this.panY !== panY)) { this.panCheck(panX, panY); } this.panX = panX; this.panY = panY; } // 计算地图滑动距离并判断临界点 panCheck(panX, panY): void { let mapPanX = panX - this.panX; let mapPanY = panY - this.panY; this.mapContext.mapX += mapPanX; this.mapContext.mapY += mapPanY; if (this.mapContext.mapX < this.leftTop[0]) { this.mapContext.mapX = this.leftTop[0]; } if (this.mapContext.mapX > 0) { this.mapContext.mapX = 0; } if (this.mapContext.mapY < this.leftTop[1]) { this.mapContext.mapY = this.leftTop[1]; } if (this.mapContext.mapY > 0) { this.mapContext.mapY = 0; } }
六、 区域导览
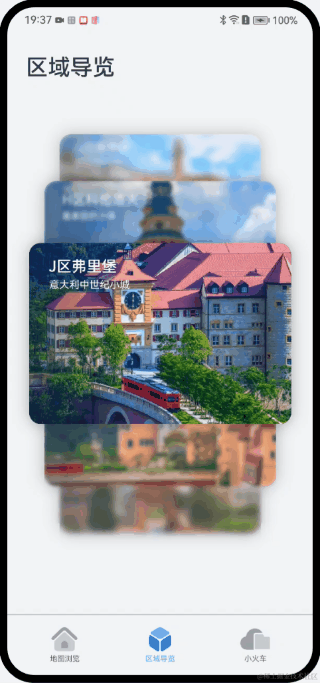
6.1 区域导览卡片
区域导览页展示了一个由各个区域导览卡片组成的可上下滑动的轮播图,效果如图所示:

轮播效果是Stack组件结合拖动手势来实现的,根据手势拖动的距离来判断是否需要切换图片,同时根据手势拖动的方向来决定是切换到上一张还是下一张图片。在图片切换的过程中,会根据图片和最上层图片的下标的差值,来计算它的模糊度、透明度、纵向偏移量、宽度等属性值。
kotlin
复制代码
// ZonesComponent.ets Stack() { ForEach(this.zonesList, (item: ZonesItem, index: number) => { Row() { Image(item.thumbnail) ... .shadow({ radius: Const.SHADOW_RADIUS, color: `rgba(0,0,0,0.3)`, offsetY: Const.SHADOW_RADIUS / Const.DOUBLE_NUM }) // 图片透明度 .opacity(1 - Math.min(ZoneConst.HALF_COUNT, Math.abs(this.getImgCoefficients(index))) * ZoneConst.OPACITY_COEFFICIENTS) } // 图片宽度 .width(index != this.aheadIndex && this.getImgCoefficients(index) === 0 ? Const.SWIPER_DEFAULT_WIDTH : `${ZoneConst.ITEM_WIDTH - ZoneConst.OFFSET_COEFFICIENTS * Math.abs(this.getImgCoefficients(index))}%`) .offset({ x: 0, y: this.getOffSetY(index) }) .zIndex(index != this.aheadIndex && this.getImgCoefficients(index) === 0 ? 0 : ZoneConst.HALF_COUNT - Math.abs(this.getImgCoefficients(index))) // 毛玻璃效果 .blur(ZoneConst.OFFSET_COEFFICIENTS * Math.abs(this.getImgCoefficients(index))) }, (item: ZonesItem) => JSON.stringify(item)) } .gesture( // 添加手势,通过手势实现图片的动态效果 PanGesture({ direction: PanDirection.Vertical }) .onActionStart((event: GestureEvent) => { this.changedIndex = false; this.handlePanGesture(event.offsetY); }) .onActionUpdate((event: GestureEvent) => { this.handlePanGesture(event.offsetY); }) .onActionEnd(() => { animateTo({ duration: Const.SWIPER_DURATION, }, () => { this.marginBottom = 0; }); }) ... ) // 计算图片和最上方图片的下标相对差值 getImgCoefficients(index: number): number { let coefficient = this.aheadIndex - index; let tempCoefficient = Math.abs(coefficient); if (tempCoefficient <= ZoneConst.HALF_COUNT) { return coefficient; } let dataLength = this.zonesList.length; let tempOffset = dataLength - tempCoefficient; if (tempOffset <= ZoneConst.HALF_COUNT) { if (coefficient > 0) { return -tempOffset; } return tempOffset; } return 0; } // 计算图片y轴方法的偏移量 getOffSetY(index: number): number { let offsetIndex = this.getImgCoefficients(index); let tempOffset = Math.abs(offsetIndex); let offsetY = this.marginBottom / (tempOffset + 1); if (tempOffset === 1) { offsetY += -offsetIndex * ZoneConst.MAX_OFFSET_Y; } else if (tempOffset === ZoneConst.HALF_COUNT) { offsetY += -offsetIndex * (ZoneConst.MAX_OFFSET_Y - ZoneConst.OFFSET_COEFFICIENTS); } return offsetY; } // 动态滚动切换最上方图片 startAnimation(isUp: boolean): void { animateTo({ duration: Const.SWIPER_DURATION, }, () => { let dataLength = this.zonesList.length; let tempIndex = isUp ? this.aheadIndex + 1 : dataLength + this.aheadIndex - 1; this.aheadIndex = tempIndex % dataLength; this.marginBottom = 0; }); } // 判断是否需要切换最上方图片 handlePanGesture(offsetY: number): void { if (Math.abs(offsetY) < ZoneConst.MAX_MOVE_OFFSET) { this.marginBottom = offsetY; } else { if (this.changedIndex) { return; } this.changedIndex = true; this.startAnimation(offsetY < 0); } }
在区域导览页点击跳转到区域详情页时,使用pageTransition函数实现了界面跳转过程中的动画效果,效果如图所示:
为实现图中效果,需要在区域导览所在的@Entry界面和详情页所在的@Entry界面里使用pageTransition函数来改变他们入场和出场时的方向、缩放大小和透明度等。
less
复制代码
// MainPage.ets @Entry @Component struct MainPage { pageTransition() { PageTransitionEnter({ duration: Const.SHARED_DURATION }) .slide(SlideEffect.Top); PageTransitionExit({ delay: Const.EXIT_DELAY }) .opacity(0); } } // IntroductionPage.ets @Entry @Component struct IntroductionPage { pageTransition() { PageTransitionEnter({ duration: Const.SHARED_DURATION }) .slide(SlideEffect.Bottom) .scale({ x: 0, y: 0, z: 0, centerX: Const.HALF_PERCENT, centerY: Const.HALF_PERCENT }); PageTransitionExit({ delay: Const.SWIPER_DURATION }) .slide(SlideEffect.Bottom) .scale({ x: 0, y: 0, z: 0, centerX: Const.HALF_PERCENT, centerY: Const.HALF_PERCENT }); } }
6.2 区域详情页
区域详情页包括首图轮播、滑动缩放、标题吸顶以及图片查看等功能,效果如图所示:
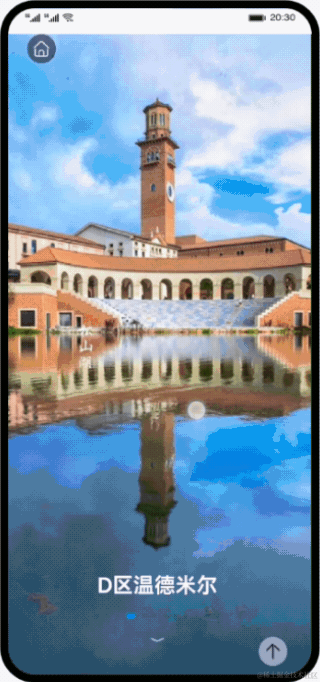
首先通过imageHeight属性设置轮播的启用与禁用,imageHeight为全屏时轮播启用,左右滑动可以查看不同区域的介绍信息,当imageHeight小于全屏时轮播禁用。
typescript
复制代码
// SwiperListItem.ets @Component export default struct SwiperListItem { @Prop imageHeight: number; ... build() { Stack({ alignContent: Alignment.Bottom }) { Swiper(this.swiperController) { ... } ... .indicator(this.imageHeight < CommonConstants.FULL_PERCENT_NUMBER ? false : new DotIndicator()) .disableSwipe(this.imageHeight < CommonConstants.FULL_PERCENT_NUMBER ? true : false) } } }
接着根据List触屏滑动的偏移量,计算滑动缩放的比例。onScrollFrameBegin方法接收offset参数,返回List的实际偏移量。其中offset大于0为向上滑动,图片缩小;小于0为向下滑动,图片放大。
scss
复制代码
// IntroductionPage.ets import { Animation } from '../common/utils/Animation'; ... @Entry @Component struct IntroductionPage { @State listPosition: number = Const.LIST_POSITION_BEGIN; @State imageHeight: number = Const.FULL_PERCENT_NUMBER; @State arrowIconOpacity: number = Const.OPACITY_MAX; ... build() { Column() { Stack({ alignContent: Alignment.Bottom }) { Column() { List({ scroller: this.scrollerForList }) { ... } .onScrollFrameBegin((offset: number, state: ScrollState) => { let realOffset = Animation.controlImageScale.call(this, offset, state); return { offsetRemain: realOffset }; }) ... } } } } }
在滑动缩放过程中,为避免首图滑出屏幕顶端,需要设置List实际偏移量为0。并且基于offset值实时更新imageHeight与arrowIconOpacity实现缩放。
kotlin
复制代码
// Animation.ets import { Const} from '../constants/CommonConstants'; export class Animation { public static controlImageScale(this, offset: number, state: ScrollState): number { if ((offset > 0) && (this.imageHeight > CommonConstants.MIN_IMAGE_HEIGHT)) { // 图片缩小逻辑 let offsetHeight = (Math.abs(offset) * CommonConstants.FULL_PERCENT_NUMBER) / Number(this.screenHeight); let heightOffset = this.imageHeight - CommonConstants.MIN_IMAGE_HEIGHT > offsetHeight ? offsetHeight : this.imageHeight - CommonConstants.MIN_IMAGE_HEIGHT; this.imageHeight = this.imageHeight - heightOffset; this.arrowIconOpacity = this.arrowIconOpacity - heightOffset / (CommonConstants.FULL_PERCENT_NUMBER - CommonConstants.MIN_IMAGE_HEIGHT); // 返回实际偏移量0 return 0; } if ((this.listPosition === CommonConstants.LIST_POSITION_BEGIN) && (offset < 0) && (this.imageHeight < CommonConstants.FULL_PERCENT_NUMBER)) { // 图片放大逻辑 let offsetHeight = (Math.abs(offset) * CommonConstants.FULL_PERCENT_NUMBER) / Number(this.screenHeight); let heightOffset = CommonConstants.FULL_PERCENT_NUMBER - this.imageHeight > offsetHeight ? offsetHeight : CommonConstants.FULL_PERCENT_NUMBER - this.imageHeight; this.imageHeight = this.imageHeight + heightOffset; this.arrowIconOpacity = this.arrowIconOpacity + heightOffset / (CommonConstants.FULL_PERCENT_NUMBER - CommonConstants.MIN_IMAGE_HEIGHT); // 返回实际偏移量0 return 0; } ... // 返回传参offset,此时缩放过程完毕 return offset; } }
介绍信息包括风格、建筑以及地理位置三部分,其中标题部分吸顶,并且需要根据滑动偏移量更新图标。通过scaleIcon数组设置不同标题图标的缩放比,在changeTitleIcon方法中基于偏移量改变scaleIcon数组的值。
scss
复制代码
// IntroductionPage.ets import { Animation } from '../common/utils/Animation'; ... @Entry @Component struct IntroductionPage { @State scaleIcon: Array<number> = [Const.OPACITY_MAX, Const.OPACITY_MIN, Const.OPACITY_MIN]; ... @Builder StickyHeader() { Column() { ... } } @Builder StickyFooter() { Column() .height($r('app.float.introduction_page_padding_bottom')) } } build() { Column() { Stack({ alignContent: Alignment.Bottom }) { Column() { List({ scroller: this.scrollerForList }) { ... } .onScroll(() => { this.startAnimation(); }) } } } } // 标题图标动画部分 startAnimation() { Animation.changeTitleIcon.apply(this); } ... }
计算offsetSum整体偏移量,当滑动到相应介绍模块时改变iconTitle与scaleIcon。
kotlin
复制代码
// Animation.ets import { CommonConstants as Const} from '../constants/CommonConstants'; export class Animation { public static changeTitleIcon(this) { this.offsetSum = this.scrollerForList.currentOffset().yOffset; ... // 滑动设置listPosition标注当前所在listitem的索引 if (this.offsetSum > Const.OFFSET_SUM_THRESHOLD) { this.listPosition = Const.LIST_POSITION_MIDDLE; } if (this.offsetSum > firstStarLine + Const.FIXED_ITEM_HEIGHT / 2) { this.geographicPicType = Const.GEOGRAPHY_LIGHT; } if (this.offsetSum <= firstStarLine + Const.FIXED_ITEM_HEIGHT / 2) { this.geographicPicType = Const.GEOGRAPHY_DARK; } // 基于总偏移量更新scaleIcon与iconTitle属性 if ((this.currentListIndex === 2) && (this.offsetSum <= firstStarLine)) { this.iconTitle = Const.ICON_SUBTITLE_ARRAY[0]; this.scaleIcon = [Const.OPACITY_MAX, Const.OPACITY_MIN, Const.OPACITY_MIN]; } if ((this.currentListIndex === 2) && (this.offsetSum > firstStarLine) && (this.offsetSum < secondStarLine)) { this.iconTitle = Const.ICON_SUBTITLE_ARRAY[1]; this.scaleIcon = [Const.OPACITY_MIN, Const.OPACITY_MAX, Const.OPACITY_MIN]; } if ((this.currentListIndex === 2) && (this.offsetSum >= secondStarLine) && (this.offsetSum < thirdStarLine)) { this.iconTitle = Const.ICON_SUBTITLE_ARRAY[2]; this.scaleIcon = [Const.OPACITY_MIN, Const.OPACITY_MIN, CommonConstants.OPACITY_MAX]; } } ... }
6.3 查看大图
在区域详情页的“设计风格”部分,提供了一个可以左右滑动查看的图库,展示了该区域的建筑风貌。点击当前展示的图片,将打开可以查看大图的弹窗,可以左右滑动查看对应图片的高清大图,支持双指缩放和拖动。

ImageAnimate自定义组件提供了左右滑动查看的图库功能,为了实现查看大图的弹窗,在此组件内添加自定义弹窗控制器,并通过点击事件打开弹窗。
typescript
复制代码
// ImageAnimate.ets // 导入自定义弹窗组件 import { ImageView } from '../view/ImageViewComponent'; @Component export default struct ImageAnimation { // 添加自定义弹窗控制器 dialogController: CustomDialogController = new CustomDialogController({ builder: ImageView({ currentImageId: this.currentIndex }), customStyle: true, alignment: DialogAlignment.Bottom, }); build(){ Stack() { ForEach(this.introductionData.imageList, (item: ResourceStr, index: number) => { Row() { ... } .onClick(() => { // 打开弹窗 this.dialogController.open(); }) }, item => JSON.stringify(item)) } } }
在自定义弹窗中,使用Swiper组件实现滑动查看大图的功能,使用Image组件通过控制组件大小实现缩放功能。两者作为Stack的子组件,通过手势识别判断当前是滑动查看不同大图的操作还是图片缩放和拖动的操作,控制对应组件的显隐,来实现对应功能。
kotlin
复制代码
// ImageViewComponent.ets @CustomDialog export struct ImageView { build() { Stack(){ Swiper() { ForEach(this.introductionData.imageList, (item: Resource) => { Column() { Blank() .onClick(() => { // 使用Blank组件填充空白处,点击可以关闭弹窗 this.controller.close(); }) Image(item) .gesture( // 触发捏合手势 PinchGesture() .onActionStart(() => { // 识别到手势操作,将isGesture设为true this.isGesture = true; }) .onActionUpdate((event: GestureEvent) => { // 随着捏合操作的过程,逐渐调整图片缩放倍数 this.imgScale = this.curScale * event.scale; }) .onActionEnd(() => { // 为了避免图片无限缩放,在捏合操作结束时控制缩放倍数的值 this.limitScale(false); }) ) // 根据isGesture的值来控制显隐 .visibility(this.isGesture ? Visibility.Hidden : Visibility.Visible) Blank() .onClick(() => { this.controller.close(); }) } ... }, item => JSON.stringfy(item)) } ... .onChange((index: number) => { // swiper滑动时记录切换的index this.curIndex = index; }) Row() { // 根据切换的index显示对应的图片 Image(this.introductionData.imageList[this.curIndex]) .objectFit(ImageFit.Contain) // 控制图片缩放倍数 .scale({ x: this.imgScale, y: this.imgScale }) // 控制图片偏移值 .translate({ x: this.imgOffsetX, y: this.imgOffsetY }) .onComplete((event) => { this.imgWidth = event.width; this.imgHeight = event.height; // 根据图片宽高计算图片不缩放时的实际高度 this.displayHeight = this.deviceWidth * this.imgHeight / this.imgWidth; }) } .gesture( // 触发捏合手势 PinchGesture() .onActionUpdate((event: GestureEvent) => { // 随着捏合操作的过程,逐渐调整图片缩放倍数 this.imgScale = this.curScale * event.scale; }) .onActionEnd(() => { // 为了避免图片偏移超出屏幕边界,检测到偏移值到达最大时停止继续偏移 this.detectBoundary(); // 为了避免图片无限缩放,在捏合操作结束时控制缩放倍数的值,并重置偏移值 this.limitScale(true); }) ) .gesture( // 触发拖动手势 PanGesture() .onActionStart(() => { // 记录先前的偏移值 this.preOffsetX = this.imgOffsetX; this.preOffsetY = this.imgOffsetY; }) .onActionUpdate((event: GestureEvent) => { // 随着拖动操作的过程,不断改变图片偏移值 this.imgOffsetX = this.preOffsetX + event.offsetX; this.imgOffsetY = this.preOffsetY + event.offsetY; }) .onActionEnd(() => { // 为了避免图片偏移超出屏幕边界,检测到偏移值到达最大时停止继续偏移 this.detectBoundary(); }) ) // 根据isGesture的值来控制显隐 .visibility(this.isGesture ? Visibility.Visible : Visibility.Hidden) } ... } }
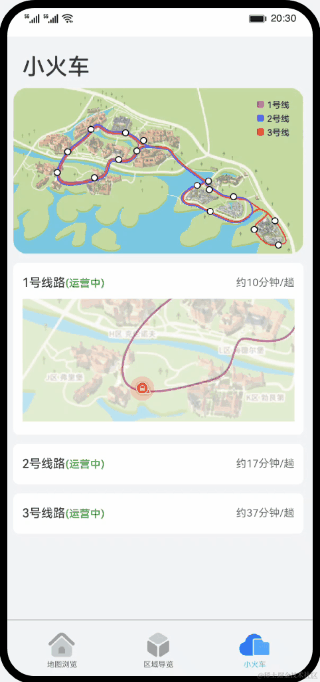
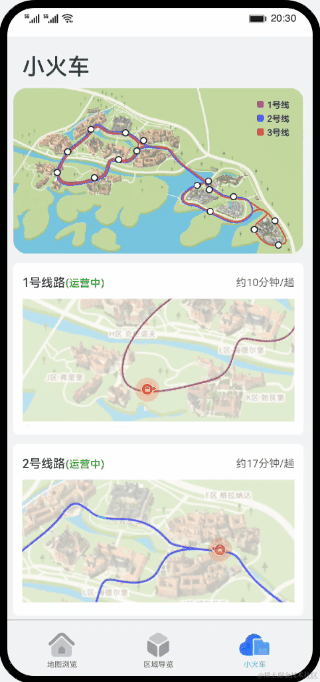
七、 小火车
小火车模块提供了溪村小镇小火车的相关信息,主要功能如下:
1. 查看溪村小火车三条路线的概览图。
2. 点击对应路线展示当前时间每条路线上小火车运营状态、时刻表、所在的位置、运动方向、及实时运动轨迹。效果如图所示:
注意:非运营时间内,不展示路线图。

7.1 页面布局
主页面以Navigation组件作为根组件,可直接设置标题,上方Image组件展示小火车的路线概览图,下方List组件循环展示三条路线的信息及火车轨迹动图。
scss
复制代码
// TrainsComponent.ets build() { Navigation() { Column({ space: Const.TRAIN_SPACE }) { Image($r('app.media.ic_train_map')) .aspectRatio(Const.TRAIN_ASPECT_RATIO) .objectFit(ImageFit.Cover) .borderRadius(Const.TRAIN_BORDER_RADIUS) List({ space: Const.TRAIN_SPACE }) { ForEach(this.trainsMapData, (item: TrainsMap, index: number) => { ListItem() { Column({ space: Const.TRAIN_SPACE }) { ... if (this.fetchShowMap(index)) { // 小火车运行轨迹组件 TrainsTrack({ trainsInfo: this.trainsMapData[index], trainLine: index }) } } ... } }, item => JSON.stringify(item)) } .layoutWeight(1) .edgeEffect(EdgeEffect.None) } .padding({ left: Const.TRAIN_PADDING_LEFT, right: Const.TRAIN_PADDING_RIGHT }) .height(Const.FULL_SIZE) .backgroundColor($r("app.color.train_background")) } .title(Const.TRAIN_TITLE) .titleMode(NavigationTitleMode.Full) .hideToolBar(true) .hideBackButton(true) .backgroundColor($r("app.color.train_background")) }
火车轨迹更新页面封装在子组件TrainsTrack.ets中,以Stack组件为根组件,地图背景使用Canvas组件绘制,小火车的箭头使用Image组件定位绘制,小火车图标的其他地方均使用第二个Canvas组件绘制。
scss
复制代码
// TrainsTrack.ets build() { Stack() { // 小火车运行背景轨迹 Canvas(this.context) .width(Const.FULL_SIZE) .aspectRatio(Const.CANVAS_ASPECT_RADIO) .borderRadius(Const.CANVAS_BORDER_RADIUS) .onReady(() => { ... }) Image(Const.ARROW_URL) .width(Const.ARROW_WIDTH) .height(Const.ARROW_HEIGHT) .position({ x: this.trainX + this.bgX - Const.ARROW_OFFSET_X, y: this.trainY + this.bgY - Const.ARROW_OFFSET_Y }) .rotate({ x: 0, y: 0, z: 1, angle: this.rotateAngle }) // 小火车导航图 Canvas(this.contextTrainLine) .width(Const.FULL_SIZE) .aspectRatio(Const.CANVAS_ASPECT_RADIO) .borderRadius(Const.CANVAS_BORDER_RADIUS) .onReady(() => { ... }) } }
7.2 初始化小火车信息
点击对应路线的小火车,会显示或隐藏小火车的运动轨迹,当首次显示小火车的运动轨迹时,需要初始化一些信息,包括小火车当前时间运动的位置、背景区域的位置、小火车的轨迹更新时间等。
在子组件的aboutToAppear中,调用自定义的初始化方法calcDistance,方法接收一个参数即小火车的运动坐标点数组,根据路线参数不同可以获取不同路线小火车运动一周的总路程。
ini
复制代码
// TrainsTrack.ets aboutToAppear() { this.sumDistance = TrainsMapModel.calcDistance(this.trainsInfo.lineData); ... } // TrainsMapModel.ets calcDistance(data: Position[]): number { let sumDistance: number = 0; const length = data.length; data.forEach((item: Position, index: number) => { const startX = item.x; const startY = item.y; const endX = index === length - 1 ? data[0].x : data[index + 1].x; const endY = index === length - 1 ? data[0].y : data[index + 1].y; if (Math.abs(startX - endX) >= Math.abs(startY - endY)) { sumDistance += Math.abs(startX - endX); } else { sumDistance += Math.abs(startY - endY); } }) return sumDistance; }
获取总路程后,通过获取当前的时间、小火车的出发时间、以及始发站坐标,计算小火车在当前时间从始发站开始走过的距离。
ini
复制代码
// TrainsMapModel.ets travelDistance(distance: number, startTime: string, line: number): number { let ret: number = 0; const date = new Date(); const dateStr = `${date.getFullYear()}-${date.getMonth() + 1}-${date.getDate()} `; const startDate = new Date(dateStr + startTime).getTime(); const currentDate = date.getTime(); const diff = currentDate - startDate; switch (line) { case TrainsLine.LINE_ONE: ret = distance * (diff % (Const.LINE_ONE_TIME)) / (Const.LINE_ONE_TIME); break; case TrainsLine.LINE_TWO: ret = distance * (diff % (Const.LINE_TWO_TIME)) / (Const.LINE_TWO_TIME); break; case TrainsLine.LINE_THREE: ret = distance * (diff % (Const.LINE_THREE_TIME)) / (Const.LINE_THREE_TIME); break; default: ret = 0; } return Number(ret.toFixed(2)); }
在上一个方法中获取到小火车从始发站走过的距离,再通过路线坐标点可以得到当前小火车在路线图上的最近坐标位置。
ini
复制代码
// TrainsTrack.ets calcFirstDistance(data: Position[], travelDistance: number) { let sumDistance: number = 0; const length = data.length; for (let index = 0;index < length; index++) { if (sumDistance > travelDistance) { this.currentIndex = index - 1; this.trainX = data[index - 1].x; this.trainY = data[index - 1].y; this.calcPosition(this.trainX, this.trainY, this.canvasWidth, this.canvasHeight); break; } else { const startX = data[index].x, startY = data[index].y; const endX = index === length - 1 ? data[0].x : data[index+1].x, endY = index === length - 1 ? data[0].y : data[index+1].y; if (Math.abs(startX - endX) >= Math.abs(startY - endY)) { sumDistance += Math.abs(startX - endX); } else { sumDistance += Math.abs(startY - endY); } } } }
小火车的路线与运行一圈的时间均不相同,但是每次更新位置的距离都是1vp,所以需要计算每条路线小火车更新轨迹的时间间隔,这里计算时间间隔通过总距离/运行一圈时间获得。
ini
复制代码
// TrainsMapModel.ets calcDelay(distance: number, line: number): number { let ret: number = 0; switch (line) { case TrainsLine.LINE_ONE: ret = Const.LINE_ONE_TIME / distance; break; case TrainsLine.LINE_TWO: ret = Const.LINE_TWO_TIME / distance; break; case TrainsLine.LINE_THREE: ret = Const.LINE_THREE_TIME / distance; break; default: ret = 0; } return ret; }
7.3 更新小火车轨迹
根据初始化计算的更新时间及下次小火车即将到达的地点,更新小火车的位置,同时计算更新底层地图的显示位置。

通过setInterval函数,每隔一段时间重新清除画布上的小火车,并重新绘制小火车,包括位置、方向等。
kotlin
复制代码
// TrainsTrack.ets drawTrainPosition() { if (Math.abs(this.trainX - this.positionEnd.x) <= Const.AVERAGE_ERROR && Math.abs(this.trainY - this.positionEnd.y) <= Const.AVERAGE_ERROR) { this.trainX = this.positionEnd.x; this.trainY = this.positionEnd.y; if (this.currentIndex === this.trainsInfo.lineData.length - 2) { this.currentIndex = 0; } else { this.currentIndex += 1; } } this.positionStart = this.trainsInfo.lineData[this.currentIndex]; this.positionEnd = this.trainsInfo.lineData[this.currentIndex + 1]; this.rotateAngle = Const.BASIC_ROTATE_ANGLE + TrainsMapModel.fetchDirection(this.positionStart.x, this.positionStart.y, this.positionEnd.x, this.positionEnd.y); this.contextTrainLine.clearRect(0, 0, this.canvasWidth, this.canvasHeight); this.trainX += TrainsMapModel.fetchRatioX(this.positionStart, this.positionEnd); this.trainY += TrainsMapModel.fetchRatioY(this.positionStart, this.positionEnd); this.calcPosition(this.trainX, this.trainY, this.canvasWidth, this.canvasHeight); this.context.clearRect(0, 0, this.canvasWidth, this.canvasHeight); this.context.drawImage(this.trainsInfo.imgBg, this.bgX, this.bgY, Const.CANVAS_WIDTH, Const.CANVAS_HEIGHT); this.contextTrainLine.drawImage( this.imgTrain, this.trainX + this.bgX - Const.TRAIN_OFFSET_X, this.trainY + this.bgY - Const.TRAIN_OFFSET_Y, Const.TRAIN_WIDTH, Const.TRAIN_HEIGHT ); this.contextTrainLine.drawImage( this.imgCircle, this.trainX + this.bgX - Const.CIRCLE_OFFSET_X, this.trainY + this.bgY - Const.CIRCLE_OFFSET_Y, Const.CIRCLE_WIDTH, Const.CIRCLE_HEIGHT ); } build() { Stack() { ... Canvas(this.contextTrainLine) .width(Const.FULL_SIZE) .aspectRatio(Const.CANVAS_ASPECT_RADIO) .borderRadius(Const.CANVAS_BORDER_RADIUS) .onReady(() => { ... setInterval(() => { this.drawTrainPosition(); }, this.delay) }) } }
每次需要计算小火车横向和竖向运动的距离,这里我们以每次运动1vp为单位,如果当前坐标相对于下次坐标,横向运动距离更长,为了保持匀速,那么竖向运动距离需要计算一个运动比例,反之一样。
typescript
复制代码
// TrainsMapModel.ets fetchRatioX(start: Position, end: Position): number { let diffX = start.x - end.x; let diffY = start.y - end.y; if (Math.abs(diffX) >= Math.abs(diffY)) { return -diffX / Math.abs(diffX); } else { return -Number((diffX / Math.abs(diffY)).toFixed(2)); } } fetchRatioY(start: Position, end: Position): number { let diffX = start.x - end.x; let diffY = start.y - end.y; if (Math.abs(diffY) >= Math.abs(diffX)) { return -diffY / Math.abs(diffY); } else { return -Number((diffY / Math.abs(diffX)).toFixed(2)); } }
小火车图标包含方向箭头,默认是指向上方,当小火车每次运动的时候,需要更新小火车的箭头方向,通过计算开始坐标与结束坐标的比例,计算旋转角度。
ini
复制代码
// TrainsMapModel.ets fetchDirection(startX: number, startY: number, endX: number, endY: number): number { let ret; if (startX === endX) { return startY > endY ? 0 : Const.DIRECTION * 2; } if (startY === endY) { return startX > endX ? -Const.DIRECTION : Const.DIRECTION; } let angle = this.calcAngle(startX, startY, endX, endY); if (startX > endX && startY > endY) { ret = -(Const.DIRECTION - angle); } if (startX > endX && startY < endY) { ret = -Const.DIRECTION - angle; } if (startX < endX && startY > endY) { ret = Const.DIRECTION - angle; } if (startX < endX && startY < endY) { ret = Const.DIRECTION + angle; } return ret; } calcAngle(startX: number, startY: number, endX: number, endY: number): number { const x = Math.abs(startX - endX); const y = Math.abs(startY - endY); const radianA = Math.atan(y / x); const angleA = Math.round(Const.PI_ANGLE / Math.PI * radianA); return angleA; }
因为小火车是实时运动的,下方的轨迹地图比展示区域要大很多,所以当小火车即将运动出显示范围的时候,需要实时更新下方地图的位置,保证小火车一直在展示区域的轨迹上运动。
kotlin
复制代码
// TrainsTrack.ets calcPosition(x, y, w, h) { if (x + this.bgX > w - Const.HORIZONTAL_THRESHOLD) { this.bgX = Math.abs(this.bgX - w / 2) > Const.CANVAS_WIDTH - w ? -Const.CANVAS_WIDTH + w : this.bgX - w / 2; } if (x + this.bgX < Const.HORIZONTAL_THRESHOLD) { this.bgX = Math.abs(this.bgX + w / 2) < 0 ? 0 : this.bgX + w / 2; } if (y + this.bgY > h - Const.VERTICAL_THRESHOLD) { this.bgY = Math.abs(this.bgY - h / 2) > Const.CANVAS_HEIGHT - h ? -Const.CANVAS_HEIGHT + h : this.bgY - h / 2; } if (y + this.bgY < Const.VERTICAL_THRESHOLD) { this.bgY = Math.abs(this.bgY + h / 2) < 0 ? 0 : this.bgY + h / 2; } }
八、 总结
您已经完成了本次Codelab的学习,并了解到以下知识点:
1. 实现页面跳转和自定义弹窗。
2. 识别用户操作手势并触发相应事件。
3. 添加页面动画效果。
4. 使用画布组件自定义绘制图形。


 1448
1448


 被折叠的 条评论
为什么被折叠?
被折叠的 条评论
为什么被折叠?
 到【灌水乐园】发言


