


6、启动kibana:elastic-cluster1/kibana-8.1.0/bin/kibana --allow-root
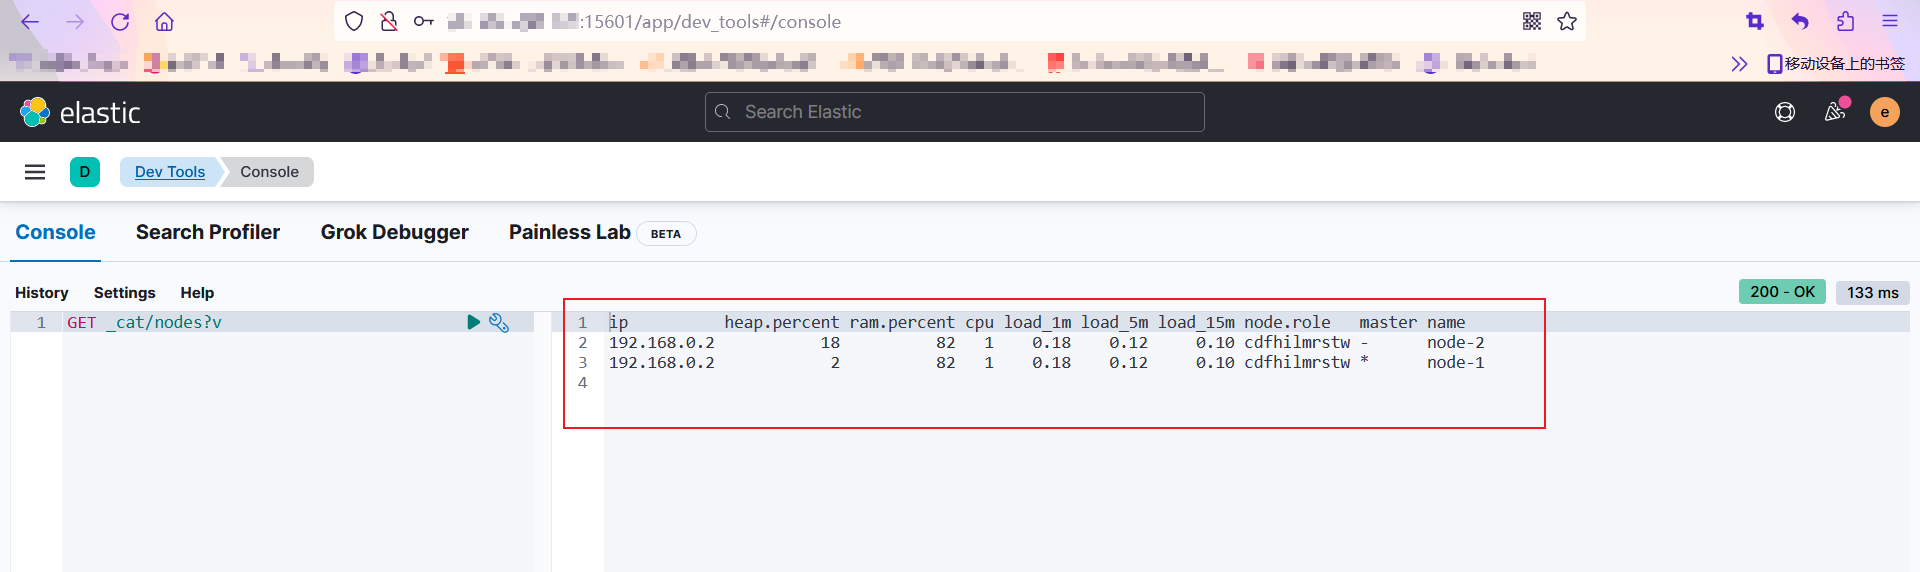
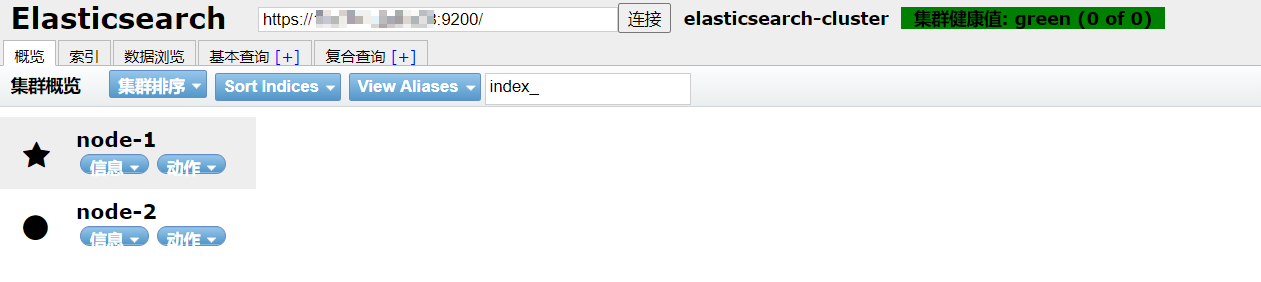
查询结果如下
5、多服务器部署节点加入同一集群
因为生产环境的es是启动着安全设置的,使用TLS加密节点间进行通信,可以参考官网文档:https://www.elastic.co/guide/en/elasticsearch/reference/8.1/security-basic-setup.html#encrypt-internode-communication
5.1、方法论
注意事项:集群中的节点数量应该是奇数个,最少为3个,这样可以避免脑裂问题
就不放截图了,直接口述,跟上面配置没有太大出入,包括注意事项一样,当时这个问题卡了我几天后来把data目录下的数据删除后在启动就可以了
1、如果你是新集群,es内没有任何数据可以使用此方法,把es里面配置的的data和logs目录下的所有内容都删除
2、主机这两个内网主机是否能通信,首先保证通信正常,能ping就行
3、是否设置了node.roles:,如果默认不用管,如果设置了你要确保你设置的是否正确
4、确保你的ca证书,及tls设置是否正确,可以参考下面配置的生成证书然后分配到对应节点上在加入集群,或者用取巧的方法,直接把集群拷贝过去,然后修改一下启动即可
5、不用生成新的token node,新节点也不用指定token
- 我的操作步骤,复制已有集群到另外一台机器上,然后配置/etc/hosts文件把IP和主机名加入进去,然后,新节点下的data和logs目录内的文件全部删除,配置文件配置好集群信息,启动集群加入新节点即可
- 3个节点的配置文件:
主节点配置如下:
cluster.name: node-xiao
node.name: master
network.host: 0.0.0.0
http.port: 9200
transport.port: 9300
discovery.seed_hosts: [“192.168.0.160:9300”, “192.168.0.160:9302”, “192.168.0.183:9301”]
cluster.initial_master_nodes: [“master”]
xpack.security.enabled: true
xpack.security.enrollment.enabled: true
xpack.security.http.ssl:
enabled: true
keystore.path: certs/http.p12
xpack.security.transport.ssl:
enabled: true
verification_mode: certificate
keystore.path: certs/transport.p12
truststore.path: certs/transport.p12
node1节点配置如下:
cluster.name: node-xiao
node.name: node1
network.host: 0.0.0.0
http.port: 9202
transport.port: 9302
discovery.seed_hosts: [“192.168.0.160:9300”, “192.168.0.160:9302”, “192.168.0.183:9301”]
cluster.initial_master_nodes: [“master”]
xpack.security.enabled: true
xpack.security.enrollment.enabled: true
xpack.security.http.ssl:
enabled: true
keystore.path: certs/http.p12
xpack.security.transport.ssl:
enabled: true
verification_mode: certificate
keystore.path: certs/transport.p12
truststore.path: certs/transport.p12
node2节点配置如下:
cluster.name: node-xiao
node.name: node2
network.host: 0.0.0.0
http.port: 9201
transport.port: 9301
discovery.seed_hosts: [“192.168.0.183:9301”, “192.168.0.160:9302”, “192.168.0.160:9300”]
cluster.initial_master_nodes: [“master”]
xpack.security.enabled: true
xpack.security.enrollment.enabled: true
xpack.security.http.ssl:
enabled: true
keystore.path: certs/http.p12
xpack.security.transport.ssl:
enabled: true
verification_mode: certificate
keystore.path: certs/transport.p12
truststore.path: certs/transport.p12

- 我试了两种方法,第一种是集群全部是初始化新的状态,方法二是加入节点,没有太大的差异
跟方法1没有什么出入

 最低0.47元/天 解锁文章


 9861
9861


 被折叠的 条评论
为什么被折叠?
被折叠的 条评论
为什么被折叠?
 到【灌水乐园】发言


